Difference between pages "Object 906" and "Bf 109 G-10"
Colok76286 (talk | contribs) (Moved subsection References to correct place) |
CobraKingII (talk | contribs) (→Flight performance) |
||
| Line 1: | Line 1: | ||
| − | {{Specs-Card|code= | + | {{Specs-Card|code=bf-109g-10}} |
| + | {{About | ||
| + | | about = German fighter '''{{PAGENAME}}''' | ||
| + | | usage = other uses | ||
| + | | link = Bf 109 (Family) | ||
| + | }} | ||
== Description == | == Description == | ||
| − | <!--''In the description, the first part | + | <!-- ''In the description, the first part should be about the history of and the creation and combat usage of the aircraft, as well as its key features. In the second part, tell the reader about the aircraft in the game. Insert a screenshot of the vehicle, so that if the novice player does not remember the vehicle by name, he will immediately understand what kind of vehicle the article is talking about.'' --> |
| − | [[File: | + | [[File:GarageImage_Bf109G10.jpg|420px|thumb|left]] |
| − | {{ | + | {{Break}} |
| − | The '''{{Specs|name}}''' is a rank {{Specs|rank}} | + | The '''{{Specs|name}}''' is a rank {{Specs|rank}} German fighter {{Battle-rating}}. It has been in the game since the start of the Open Beta Test prior to Update 1.27. |
| + | |||
| + | Not very different from the Bf 109 F's and other Bf 109 G's, the G-10 can only be identified by paint scheme. Unfortunately the other camouflage (I./JG 27) can be mistaken for a Bf 109 G-6, but can be differed from a Bf-109 K-4. The G-10 does not have a retractable landing gear in the rear while the K-4 does (the Bf 109 K-4 is the only model to have retractable rear landing gear). | ||
== General info == | == General info == | ||
| − | === | + | === Flight performance === |
| − | <!--''Describe | + | <!-- ''Describe how the aircraft behaves in the air. Speed, manoeuvrability, acceleration and allowable loads - these are the most important characteristics of the vehicle.'' --> |
| − | |||
| − | |||
| − | |||
| − | + | {| class="wikitable" style="text-align:center" width="70%" | |
| − | + | ! rowspan="2" | Characteristics | |
| − | + | ! colspan="2" | Max Speed<br>(km/h at 7,000 m) | |
| − | + | ! rowspan="2" | Max altitude<br>(metres) | |
| − | + | ! colspan="2" | Turn time<br>(seconds) | |
| + | ! colspan="2" | Rate of climb<br>(metres/second) | ||
| + | ! rowspan="2" | Take-off run<br>(metres) | ||
|- | |- | ||
| − | ! | + | ! AB !! RB !! AB !! RB !! AB !! RB |
|- | |- | ||
| − | | | + | ! Stock |
| + | | 662 || 645 || rowspan="2" | {{Specs|ceiling}} || 20.1 || 20.9 || 17.0 || 17.0 || rowspan="2" | 325 | ||
|- | |- | ||
| − | | | + | ! Upgraded |
| + | | 729 || 692 || 18.2 || 19.0 || 32.6 || 21.8 | ||
|- | |- | ||
|} | |} | ||
| − | |||
| − | |||
| − | |||
| − | |||
| − | |||
| − | |||
| − | |||
| − | |||
| − | |||
| − | |||
| − | |||
| − | |||
| − | |||
| − | |||
| − | {| class="wikitable" style="text-align:center" | + | ==== Details ==== |
| + | {| class="wikitable" style="text-align:center" width="50%" | ||
|- | |- | ||
| − | ! colspan=" | + | ! colspan="5" | Features |
|- | |- | ||
| − | ! | + | ! Combat flaps !! Take-off flaps !! Landing flaps !! Air brakes !! Arrestor gear |
| − | ! | ||
| − | ! | ||
| − | ! | ||
|- | |- | ||
| − | | | + | | ✓ || ✓ || ✓ || X || X <!-- ✓ --> |
| − | | | ||
| − | ! | ||
| − | |||
| − | |||
| − | |||
| − | |||
| − | |||
| − | |||
| − | |||
| − | |||
| − | |||
| − | |||
| − | |||
| − | |||
| − | |||
| − | |||
| − | |||
| − | |||
| − | |||
| − | |||
| − | |||
| − | |||
|- | |- | ||
|} | |} | ||
| − | + | {| class="wikitable" style="text-align:center" width="50%" | |
| − | {| class="wikitable | ||
| − | |||
|- | |- | ||
| − | + | ! colspan="7" | Limits | |
| − | |||
| − | ! colspan=" | ||
|- | |- | ||
| − | ! | + | ! rowspan="2" | Wings (km/h) |
| − | ! | + | ! rowspan="2" | Gear (km/h) |
| − | ! | + | ! colspan="3" | Flaps (km/h) |
| − | ! | + | ! colspan="2" | Max Static G |
| − | |||
| − | |||
|- | |- | ||
| − | + | ! Combat !! Take-off !! Landing !! + !! - | |
|- | |- | ||
| − | | | + | | {{Specs|destruction|body}} || {{Specs|destruction|gear}} || 460 || 460 || 260 || ~12 || ~6 |
| − | | | ||
| − | | | ||
|- | |- | ||
|} | |} | ||
| − | {| class="wikitable | + | |
| − | + | {| class="wikitable" style="text-align:center" | |
|- | |- | ||
| − | ! | + | ! colspan="4" | Optimal velocities (km/h) |
| − | |||
| − | |||
| − | |||
| − | |||
| − | |||
| − | |||
| − | |||
| − | |||
| − | |||
| − | |||
| − | |||
| − | |||
| − | |||
| − | |||
| − | |||
| − | |||
| − | |||
| − | |||
| − | |||
| − | |||
| − | |||
| − | |||
| − | |||
| − | |||
| − | |||
| − | |||
|- | |- | ||
| − | ! | + | ! Ailerons !! Rudder !! Elevators !! Radiator |
| − | ! | ||
| − | ! | ||
| − | ! | ||
| − | ! | ||
| − | ! | ||
| − | ! | ||
| − | |||
|- | |- | ||
| − | || | + | | < 450 || < 390 || < 450 || > 715 |
|- | |- | ||
|} | |} | ||
| − | |||
| − | |||
| − | |||
| − | |||
| − | |||
| − | |||
{| class="wikitable" style="text-align:center" | {| class="wikitable" style="text-align:center" | ||
|- | |- | ||
| − | ! colspan=" | + | ! colspan="3" | Compressor (RB/SB) |
|- | |- | ||
| − | ! colspan=" | + | ! colspan="3" | Setting 1 |
|- | |- | ||
| − | ! | + | ! Optimal altitude |
| − | ! | + | ! 100% Engine power |
| − | ! | + | ! WEP Engine power |
| − | |||
|- | |- | ||
| − | | | + | | 6,800 m || 1,265 hp || 1,569 hp |
|- | |- | ||
|} | |} | ||
| − | == | + | === Survivability and armour === |
| − | <!--'' | + | <!-- ''Examine the survivability of the aircraft. Note how vulnerable the structure is and how secure the pilot is, whether the fuel tanks are armoured, etc. Describe the armour, if there is any, and also mention the vulnerability of other critical aircraft systems.'' --> |
| − | |||
| − | + | * 60 mm Bulletproof glass in front and rear of the cockpit | |
| + | * 4-8 mm Steel plates on the pilot seat | ||
| + | * 10 mm Steel plates around pilot's head | ||
| + | * 21 mm Steel plate on the rear of the fuel tank, with 4 mm plates surrounding it on other sides | ||
| − | === | + | == Armaments == |
| − | + | === Offensive armament === | |
| − | + | <!-- ''Describe the offensive armament of the aircraft, if any. Describe how effective the cannons and machine guns are in a battle, and also what belts or drums are better to use. If there is no offensive weaponry, delete this subsection.'' --> | |
| + | {{main|MK 108 (30 mm)|MG 151 (20 mm)|MG 131 (13 mm)}} | ||
| − | + | The '''''{{PAGENAME}}''''' is armed with: | |
| − | + | * A choice between two presets: | |
| + | ** 1 x 20 mm MG 151 cannon, nose-mounted (200 rpg) | ||
| + | ** 1 x 30 mm MK 108 cannon, nose-mounted (65 rpg) | ||
| + | * 2 x 13 mm MG 131 machine guns, nose-mounted (300 rpg = 600 total) | ||
| − | + | The two machine guns are in the upper part of the fuselage just in front of the cockpit. The 20 or 30 mm cannon is mounted to fire through the propeller shaft and out the propeller hub. | |
| − | |||
| − | '' | + | === Suspended armament === |
| − | + | <!-- ''Describe the aircraft's suspended armament: additional cannons under the wings, bombs, rockets and torpedoes. This section is especially important for bombers and attackers. If there is no suspended weaponry remove this subsection.'' --> | |
| + | {{main|SC250JA (250 kg)|MK 108 (30 mm)|MG 151 (20 mm)}} | ||
| − | + | The '''''{{PAGENAME}}''''' can be outfitted with the following ordnance: | |
| − | The | ||
| − | + | * Without load | |
| + | * 1 x 250 kg SC250JA bomb (250 kg total) | ||
| + | * 2 x 30 mm MK 108 cannons, wing-mounted (35 rpg = 70 total) | ||
| + | * 2 x 20 mm MG 151 cannons, wing-mounted (135 rpg = 270 total) | ||
| − | === | + | == Usage in battles == |
| − | + | <!-- ''Describe the tactics of playing in the aircraft, the features of using aircraft in a team and advice on tactics. Refrain from creating a "guide" - do not impose a single point of view, but instead, give the reader food for thought. Examine the most dangerous enemies and give recommendations on fighting them. If necessary, note the specifics of the game in different modes (AB, RB, SB).'' --> | |
| + | [[File:Cockpit_Bf109g10.jpg|thumbnail|right|The Bf 109 G-10's instrument panel.]] | ||
| + | The Bf 109 G-10 is a 109 that does not change very much. It fits in between the: Bf 109 G-14 and K-4. One of the best tactics is to use your decent climb rate to get above most of the enemy team. This could be American fighters, however, Spitfires will most likely outclimb you. The best tactic to attack enemies below is to Boom and Zoom, if they turn, pull up immediately as you could risk getting shot. Another good tactic would be to fly over an enemy and bait them to climb up. When they do this fly away to gain some distance and do a large circle around them. It is crucial you keep your distance as you will die if you're too close. After a couple of seconds, the enemy aircraft will stall, take this opportunity to kill him. It is important to avoid using this manoeuvre with Spitfires as they will climb right up to you and obliterate you before they stall. If a Spitfire is above you and tries to Boom and Zoom you, do a '''split S''' to avoid him, if he follows pull back the throttle and wait for his zoom climb to stab him in the back, but it will most likely rip the wings or enter a G-force induced loss of consciousness (G-LOC). | ||
| − | + | === Manual Engine Control === | |
| − | + | {| class="wikitable" style="text-align:center" | |
| − | + | |- | |
| − | + | ! colspan="7" | MEC elements | |
| − | + | |- | |
| − | + | ! rowspan="2" | Mixer | |
| − | + | ! rowspan="2" | Pitch | |
| + | ! colspan="3" | Radiator | ||
| + | ! rowspan="2" | Supercharger | ||
| + | ! rowspan="2" | Turbocharger | ||
| + | |- | ||
| + | ! Oil !! Water !! Type | ||
| + | |- | ||
| + | | Not controllable || Controllable<br>Auto control available || Controllable<br>Auto control available || Controllable<br>Auto control available || Separate || Not controllable<br>1 gear || Not controllable | ||
| + | |- | ||
| + | |} | ||
=== Modules === | === Modules === | ||
{| class="wikitable" | {| class="wikitable" | ||
| − | !Tier | + | ! Tier |
| − | ! colspan="2" | | + | ! colspan="2" | Flight performance |
| − | ! | + | ! Survivability |
| − | ! colspan="3" | | + | ! colspan="3" | Weaponry |
|- | |- | ||
| − | |I | + | | I |
| − | | | + | | Fuselage repair |
| + | | Radiator | ||
| + | | | ||
| + | | Offensive 13 mm | ||
| + | | ETC 500/IXb I | ||
| | | | ||
| − | | | + | |- |
| − | | | + | | II |
| | | | ||
| + | | Compressor | ||
| + | | Airframe | ||
| + | | New 13 mm MGs | ||
| + | | MK 108 cannon | ||
| | | | ||
|- | |- | ||
| − | | | + | | III |
| − | | | + | | Wings repair |
| − | | | + | | Engine |
| − | |||
| − | |||
| − | |||
| | | | ||
| + | | Offensive 20 mm | ||
| + | | Offensive 30 mm | ||
| + | | R6 modification | ||
|- | |- | ||
| − | | | + | | IV |
| − | |||
| − | |||
| − | |||
| − | |||
| − | |||
| | | | ||
| + | | Engine injection | ||
| + | | Cover | ||
| + | | New 20 mm cannons | ||
| + | | New 30 mm cannons | ||
| + | | R5 modification | ||
|- | |- | ||
| − | |||
| − | |||
| − | |||
| − | |||
| − | |||
| − | |||
| − | |||
|} | |} | ||
| + | |||
| + | * It is recommended to go for the performance upgrades as they will benefit you more than if you chose the weaponry options, gunpods should not be put on the Bf 109 G-10 as they hinder the performance during energy fighting. | ||
=== Pros and cons === | === Pros and cons === | ||
| − | <!--'' | + | <!-- ''Summarise and briefly evaluate the vehicle in terms of its characteristics and combat effectiveness. Mark its pros and cons in the bulleted list. Try not to use more than 6 points for each of the characteristics. Avoid using categorical definitions such as "bad", "good" and the like - use substitutions with softer forms such as "inadequate" and "effective".'' --> |
| + | |||
'''Pros:''' | '''Pros:''' | ||
| − | * | + | * Excellent acceleration |
| − | * | + | * Excellent climb rate, even stock |
| − | * | + | * Improved high-altitude performance over earlier Bf 109s, improved supercharger can maintain maximum boost with WEP to ~7,000m |
| − | * | + | * Variable-speed supercharger eliminates "weak altitudes" between gear changes seen in allied fighters. Engine power is consistent |
| − | + | * Variable-speed supercharger allows for Bf 109s to maintain maximum engine power at enemy fighter supercharger gear switch altitudes; at these heights an enemy plane will be either gain no benefit from WEP or be forced to prematurely switch to the next gear, which draws more power from the engine to drive the compressor. Supercharger gear switch varies from plane to plane (as well as with airspeed and temperature), but typically is between 3500m-4500m for Spitfires, P-51s, and F4U-4Bs. | |
| − | + | * Can WEP for 5 minutes non-stop until it reaches ~100°C (212°F)\ | |
| − | + | * 20 minutes of MW-50 available for WEP | |
| − | + | * WEP fuel load is close to the engine fuel load | |
| − | + | * Engine cools down very quickly at 0% throttle | |
| − | * | + | * Good dive characteristics |
| − | * | + | * Great dive acceleration, better than most opponents it faces |
| − | * | + | * Can pull High-G manoeuvres |
| − | * | + | * Armament is interchangeable between a heavy 30 mm Mk 108 and a lighter 20 mm Mg 151 with more ammunition |
| − | * | + | * 2nd fastest Bf 109, only the K-4 is faster |
| − | * | + | * Fastest Bf 109 at extreme altitudes |
| − | * | ||
| − | * | ||
'''Cons:''' | '''Cons:''' | ||
| − | * | + | * Poor sustained turn radius. |
| − | * | + | * Tends to be out-climbed/outrun by post-war aircraft, many late/post-war allied props wholly outperform it at low altitudes |
| − | * | + | * Low rip speed — combined with the excellent dive acceleration, this plane can quickly reach unsafe speeds in dive |
| − | * | + | * Ammunition can run out really quickly for the Mk 108's. |
| − | * | + | * Flight performance drastically decreases with under-wing gondola pods. |
| − | * | + | * Requires skill to play efficiently. |
| − | + | * Can face F8F Bearcats and Griffon Spitfires, which can be superior in certain situations. | |
| − | |||
| − | |||
== History == | == History == | ||
| − | <!--''Describe the history of the creation and combat usage of the | + | <!-- ''Describe the history of the creation and combat usage of the aircraft in more detail than in the introduction. If the historical reference turns out to be too long, take it to a separate article, taking a link to the article about the vehicle and adding a block "/History" (example: <nowiki>https://wiki.warthunder.com/(Vehicle-name)/History</nowiki>) and add a link to it here using the <code>main</code> template. Be sure to reference text and sources by using <code><nowiki><ref></ref></nowiki></code>, as well as adding them at the end of the article with <code><nowiki><references /></nowiki></code>. This section may also include the vehicle's dev blog entry (if applicable) and the in-game encyclopedia description (under <code><nowiki>=== In-game description ===</nowiki></code>, also if applicable).'' --> |
| − | The | + | The Bf 109 G-10 was a variant of the already successful Bf 109 series. The G-10 was the combination of a Bf 109 G airframe with a DB605 D-2 Engine, the aircraft was built in the factories of Erla, WNF, and Messerschmit Regensburg. Even though being called a G-10, the aircraft was in production after the G-14, the sole purpose was to produce a fighter better than the G-14 until the K-4 could take its place. |
| − | The | + | '''Variants''' |
| + | |||
| + | *G-10 (Light fighter with DB605DM or DB/DC engine) | ||
| + | *G-10/R2 (Reconnaissance fighter) | ||
| + | *G-10/R6 (Bad-weather fighter with PKS 12 autopilot) | ||
| + | *G-10/U4 (As G-10 but with 30 mm/1.18 in MK 108 Motorkanone engine cannon) | ||
| + | |||
| + | === In-game description === | ||
| + | The Messerschmitt Bf 109 was a single-seat monoplane fighter used by the Luftwaffe before and during WWII. It was used as a fighter, interceptor, high-altitude interceptor, fighter-bomber and reconnaissance aircraft. | ||
| + | |||
| + | By early Spring 1944, the Bf 109 G-10 variant had replaced the Bf 109 G-6 in mass-production, being powered by the DB 605D engine with an improved supercharger. Without external pylons, and powered by the DB 605DC, the G-10 was the fastest Bf-109G variant, with a weight of 3,100 kg and top speeds of 550 km/h at sea level and 680 km/h at 7,400 m. It could reach 6,000 m in 5.8 minutes. | ||
| + | |||
| + | Unfortunately, the Bf 109 G-10 would usually reach the front line with factory-installed Ruestsatz armament kits. For example, the Bf 109 G-10/R1 had an ETC fuselage bomb rack for one 250-kg or 4 x 50-kg bombs, a bomb selector switch and a 5mm armor plating under the oil tank. The Bf 109 G-10/R2 with DB 605DB was a reconnaissance variant with the 13mm guns removed and with one Rb 50/30 or 75/30 camera. With a takeoff weight of 3,300 kg (including a 300-litre drop tank) the recon variant could reach 645 km/h at 9,000 m; it had a range of 840 km at a speed of 620 km/h and at an altitude of 8,300 m. The Bf 109 G-10/R14 with DB 605D had a pair of 30mm MK 108 cannon in underwing gondolas. The Bf 109 G-10/R6 was similar to the R14, but with the gondolas housing 20mm MG 151s. | ||
== Media == | == Media == | ||
| − | + | ''Excellent additions to the article would be video guides, screenshots from the game, and photos.'' | |
| + | |||
| + | == See also == | ||
| + | <!-- ''Links to the articles on the War Thunder Wiki that you think will be useful for the reader, for example:'' | ||
| + | * ''reference to the series of the aircraft;'' | ||
| + | * ''links to approximate analogues of other nations and research trees.'' --> | ||
| − | ; | + | ;Aircraft of comparable role, configuration and era |
| − | |||
| − | + | * Mitsubishi [[A6M (Family)|A6M]] | |
| − | + | * Bell [[P-39 (Family)|P-39]] Airacobra | |
| − | * | + | * Curtiss [[P-36 (Family)|P-36]] |
| − | * | + | * Curtiss [[P-40 (Family)|P-40]] |
| − | + | * Dewoitine [[D.520]] | |
| − | [ | + | * Fiat [[G.55 serie 1|G.55]] |
| + | * Focke-Wulf [[Fw 190 (Family)|Fw 190]] | ||
| + | * Grumman [[F4F (Family)|F4F]] Wildcat | ||
| + | * Grumman [[F6F (Family)|F6F]] Hellcat | ||
| + | * Hawker [[Hurricane (Family)|Hurricane]] | ||
| + | * Heinkel [[He 112 (Family)|He 112]] | ||
| + | * [[IAR-81C|IAR-81]] | ||
| + | * Kawasaki [[Ki-61 (Family)|Ki-61]] | ||
| + | * Lavochkin [[LaGG-3 (Family)|LaGG-3]] | ||
| + | * Macchi [[C.202]] | ||
| + | * Macchi [[C.205 serie 1|C.205]] | ||
| + | * Mikoyan-Gurevich [[MiG-3 (Family)|MiG-3]] | ||
| + | * Morane-Saulnier [[M.S.406C1|MS.406]] | ||
| + | * Nakajima [[Ki-43 (Family)|Ki-43]] | ||
| + | * North American [[P-51 (Family)|P-51]] Mustang | ||
| + | * Polikarpov [[I-16 (Family)|I-16]] | ||
| + | * Supermarine [[Spitfire (Family)|Spitfire]] | ||
| + | * Yakovlev [[Yak-1]] | ||
| + | * Yakovlev [[Yak-9]] | ||
== External links == | == External links == | ||
| − | + | ''Paste links to sources and external resources, such as:'' | |
* ''topic on the official game forum;'' | * ''topic on the official game forum;'' | ||
| − | * ''encyclopedia page on the | + | * ''encyclopedia page on the aircraft;'' |
| − | * ''other literature.'' | + | * ''other literature.'' |
| − | |||
| − | |||
| − | |||
| − | |||
| − | |||
| − | |||
| − | {{ | + | {{AirManufacturer BFW}} |
| + | {{Germany fighters}} | ||
Revision as of 23:19, 15 August 2020
Contents
| This page is about the German fighter Bf 109 G-10. For other uses, see Bf 109 (Family). |
Description

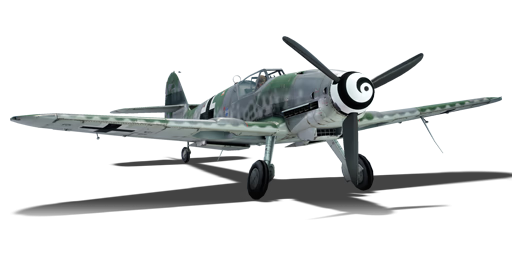
The Bf 109 G-10 is a rank IV German fighter
with a battle rating of 5.7 (AB/RB) and 5.3 (SB). It has been in the game since the start of the Open Beta Test prior to Update 1.27.
Not very different from the Bf 109 F's and other Bf 109 G's, the G-10 can only be identified by paint scheme. Unfortunately the other camouflage (I./JG 27) can be mistaken for a Bf 109 G-6, but can be differed from a Bf-109 K-4. The G-10 does not have a retractable landing gear in the rear while the K-4 does (the Bf 109 K-4 is the only model to have retractable rear landing gear).
General info
Flight performance
| Characteristics | Max Speed (km/h at 7,000 m) |
Max altitude (metres) |
Turn time (seconds) |
Rate of climb (metres/second) |
Take-off run (metres) | |||
|---|---|---|---|---|---|---|---|---|
| AB | RB | AB | RB | AB | RB | |||
| Stock | 662 | 645 | 12500 | 20.1 | 20.9 | 17.0 | 17.0 | 325 |
| Upgraded | 729 | 692 | 18.2 | 19.0 | 32.6 | 21.8 | ||
Details
| Features | ||||
|---|---|---|---|---|
| Combat flaps | Take-off flaps | Landing flaps | Air brakes | Arrestor gear |
| ✓ | ✓ | ✓ | X | X |
| Limits | ||||||
|---|---|---|---|---|---|---|
| Wings (km/h) | Gear (km/h) | Flaps (km/h) | Max Static G | |||
| Combat | Take-off | Landing | + | - | ||
| 790 | 360 | 460 | 460 | 260 | ~12 | ~6 |
| Optimal velocities (km/h) | |||
|---|---|---|---|
| Ailerons | Rudder | Elevators | Radiator |
| < 450 | < 390 | < 450 | > 715 |
| Compressor (RB/SB) | ||
|---|---|---|
| Setting 1 | ||
| Optimal altitude | 100% Engine power | WEP Engine power |
| 6,800 m | 1,265 hp | 1,569 hp |
Survivability and armour
- 60 mm Bulletproof glass in front and rear of the cockpit
- 4-8 mm Steel plates on the pilot seat
- 10 mm Steel plates around pilot's head
- 21 mm Steel plate on the rear of the fuel tank, with 4 mm plates surrounding it on other sides
Armaments
Offensive armament
The Bf 109 G-10 is armed with:
- A choice between two presets:
- 1 x 20 mm MG 151 cannon, nose-mounted (200 rpg)
- 1 x 30 mm MK 108 cannon, nose-mounted (65 rpg)
- 2 x 13 mm MG 131 machine guns, nose-mounted (300 rpg = 600 total)
The two machine guns are in the upper part of the fuselage just in front of the cockpit. The 20 or 30 mm cannon is mounted to fire through the propeller shaft and out the propeller hub.
Suspended armament
The Bf 109 G-10 can be outfitted with the following ordnance:
- Without load
- 1 x 250 kg SC250JA bomb (250 kg total)
- 2 x 30 mm MK 108 cannons, wing-mounted (35 rpg = 70 total)
- 2 x 20 mm MG 151 cannons, wing-mounted (135 rpg = 270 total)
Usage in battles

The Bf 109 G-10 is a 109 that does not change very much. It fits in between the: Bf 109 G-14 and K-4. One of the best tactics is to use your decent climb rate to get above most of the enemy team. This could be American fighters, however, Spitfires will most likely outclimb you. The best tactic to attack enemies below is to Boom and Zoom, if they turn, pull up immediately as you could risk getting shot. Another good tactic would be to fly over an enemy and bait them to climb up. When they do this fly away to gain some distance and do a large circle around them. It is crucial you keep your distance as you will die if you're too close. After a couple of seconds, the enemy aircraft will stall, take this opportunity to kill him. It is important to avoid using this manoeuvre with Spitfires as they will climb right up to you and obliterate you before they stall. If a Spitfire is above you and tries to Boom and Zoom you, do a split S to avoid him, if he follows pull back the throttle and wait for his zoom climb to stab him in the back, but it will most likely rip the wings or enter a G-force induced loss of consciousness (G-LOC).
Manual Engine Control
| MEC elements | ||||||
|---|---|---|---|---|---|---|
| Mixer | Pitch | Radiator | Supercharger | Turbocharger | ||
| Oil | Water | Type | ||||
| Not controllable | Controllable Auto control available |
Controllable Auto control available |
Controllable Auto control available |
Separate | Not controllable 1 gear |
Not controllable |
Modules
| Tier | Flight performance | Survivability | Weaponry | |||
|---|---|---|---|---|---|---|
| I | Fuselage repair | Radiator | Offensive 13 mm | ETC 500/IXb I | ||
| II | Compressor | Airframe | New 13 mm MGs | MK 108 cannon | ||
| III | Wings repair | Engine | Offensive 20 mm | Offensive 30 mm | R6 modification | |
| IV | Engine injection | Cover | New 20 mm cannons | New 30 mm cannons | R5 modification | |
- It is recommended to go for the performance upgrades as they will benefit you more than if you chose the weaponry options, gunpods should not be put on the Bf 109 G-10 as they hinder the performance during energy fighting.
Pros and cons
Pros:
- Excellent acceleration
- Excellent climb rate, even stock
- Improved high-altitude performance over earlier Bf 109s, improved supercharger can maintain maximum boost with WEP to ~7,000m
- Variable-speed supercharger eliminates "weak altitudes" between gear changes seen in allied fighters. Engine power is consistent
- Variable-speed supercharger allows for Bf 109s to maintain maximum engine power at enemy fighter supercharger gear switch altitudes; at these heights an enemy plane will be either gain no benefit from WEP or be forced to prematurely switch to the next gear, which draws more power from the engine to drive the compressor. Supercharger gear switch varies from plane to plane (as well as with airspeed and temperature), but typically is between 3500m-4500m for Spitfires, P-51s, and F4U-4Bs.
- Can WEP for 5 minutes non-stop until it reaches ~100°C (212°F)\
- 20 minutes of MW-50 available for WEP
- WEP fuel load is close to the engine fuel load
- Engine cools down very quickly at 0% throttle
- Good dive characteristics
- Great dive acceleration, better than most opponents it faces
- Can pull High-G manoeuvres
- Armament is interchangeable between a heavy 30 mm Mk 108 and a lighter 20 mm Mg 151 with more ammunition
- 2nd fastest Bf 109, only the K-4 is faster
- Fastest Bf 109 at extreme altitudes
Cons:
- Poor sustained turn radius.
- Tends to be out-climbed/outrun by post-war aircraft, many late/post-war allied props wholly outperform it at low altitudes
- Low rip speed — combined with the excellent dive acceleration, this plane can quickly reach unsafe speeds in dive
- Ammunition can run out really quickly for the Mk 108's.
- Flight performance drastically decreases with under-wing gondola pods.
- Requires skill to play efficiently.
- Can face F8F Bearcats and Griffon Spitfires, which can be superior in certain situations.
History
The Bf 109 G-10 was a variant of the already successful Bf 109 series. The G-10 was the combination of a Bf 109 G airframe with a DB605 D-2 Engine, the aircraft was built in the factories of Erla, WNF, and Messerschmit Regensburg. Even though being called a G-10, the aircraft was in production after the G-14, the sole purpose was to produce a fighter better than the G-14 until the K-4 could take its place.
Variants
- G-10 (Light fighter with DB605DM or DB/DC engine)
- G-10/R2 (Reconnaissance fighter)
- G-10/R6 (Bad-weather fighter with PKS 12 autopilot)
- G-10/U4 (As G-10 but with 30 mm/1.18 in MK 108 Motorkanone engine cannon)
In-game description
The Messerschmitt Bf 109 was a single-seat monoplane fighter used by the Luftwaffe before and during WWII. It was used as a fighter, interceptor, high-altitude interceptor, fighter-bomber and reconnaissance aircraft.
By early Spring 1944, the Bf 109 G-10 variant had replaced the Bf 109 G-6 in mass-production, being powered by the DB 605D engine with an improved supercharger. Without external pylons, and powered by the DB 605DC, the G-10 was the fastest Bf-109G variant, with a weight of 3,100 kg and top speeds of 550 km/h at sea level and 680 km/h at 7,400 m. It could reach 6,000 m in 5.8 minutes.
Unfortunately, the Bf 109 G-10 would usually reach the front line with factory-installed Ruestsatz armament kits. For example, the Bf 109 G-10/R1 had an ETC fuselage bomb rack for one 250-kg or 4 x 50-kg bombs, a bomb selector switch and a 5mm armor plating under the oil tank. The Bf 109 G-10/R2 with DB 605DB was a reconnaissance variant with the 13mm guns removed and with one Rb 50/30 or 75/30 camera. With a takeoff weight of 3,300 kg (including a 300-litre drop tank) the recon variant could reach 645 km/h at 9,000 m; it had a range of 840 km at a speed of 620 km/h and at an altitude of 8,300 m. The Bf 109 G-10/R14 with DB 605D had a pair of 30mm MK 108 cannon in underwing gondolas. The Bf 109 G-10/R6 was similar to the R14, but with the gondolas housing 20mm MG 151s.
Media
Excellent additions to the article would be video guides, screenshots from the game, and photos.
See also
- Aircraft of comparable role, configuration and era
- Mitsubishi A6M
- Bell P-39 Airacobra
- Curtiss P-36
- Curtiss P-40
- Dewoitine D.520
- Fiat G.55
- Focke-Wulf Fw 190
- Grumman F4F Wildcat
- Grumman F6F Hellcat
- Hawker Hurricane
- Heinkel He 112
- IAR-81
- Kawasaki Ki-61
- Lavochkin LaGG-3
- Macchi C.202
- Macchi C.205
- Mikoyan-Gurevich MiG-3
- Morane-Saulnier MS.406
- Nakajima Ki-43
- North American P-51 Mustang
- Polikarpov I-16
- Supermarine Spitfire
- Yakovlev Yak-1
- Yakovlev Yak-9
External links
Paste links to sources and external resources, such as:
- topic on the official game forum;
- encyclopedia page on the aircraft;
- other literature.
| Germany fighters | |
|---|---|
| Heinkel | |
| He 51 | He 51 A-1 · He 51 B-1 · He 51 B-2/H · He 51 C-1 · He 51 C-1/L |
| He 100 | He 100 D-1 |
| He 112 | He 112 A-0 · He 112 B-0 · He 112 B-1/U2 · He 112 B-2/U2 · He 112 V-5 |
| Messerschmitt | |
| Bf 109 (Jumo) | Flegel's Bf 109 A · Bf 109 B-1 · Bf 109 C-1 |
| Bf 109 (DB-601) | Bf 109 E-1 · Bf 109 E-3 · Bf 109 E-4 · Bf 109 E-7/U2 · Bf 109 F-1 · Bf 109 F-2 · Bf 109 F-4 · Bf 109 F-4/trop |
| Bf 109 (DB-605) | Bf 109 G-2/trop · Bf 109 G-2 · Bf 109 G-6 · Bf 109 G-10 · Bf 109 G-14 · Bf 109 K-4 |
| Focke-Wulf | |
| Fw 190 (early) | Fw 190 A-1 · Fw 190 A-4 · Fw 190 A-5 · Fw 190 A-5 · Fw 190 A-5/U2 · Fw 190 A-5/U14 · Fw 190 A-8 · Fw 190 C |
| Fw 190 (late) | Fw 190 D-9 · Fw 190 D-12 · Fw 190 D-13 |
| Ta 152 | Ta 152 C-3 · Ta 152 H-1 |
| Blohm & Voss | |
| BV 155 | BV 155 B-1 |
| Foreign: | |
| USA | ▀P-47D-16-RE · ▀P-47D |
| USSR | ▀La-5FN · ▀Yak-1B |
| Britain | ▀Tempest Mk V |
| Italy | ▀CR.42 · ▀Marcolin's C.R.42 CN · ▀G.50 serie 2 · ▀G.50 AS serie 7 · ▀C. 200 serie 3 · ▀C. 200 serie 7 · ▀C. 202 |
| Finland | ▀Hawk H-75A-2 |
