Type 60 ATM


Contents
Description
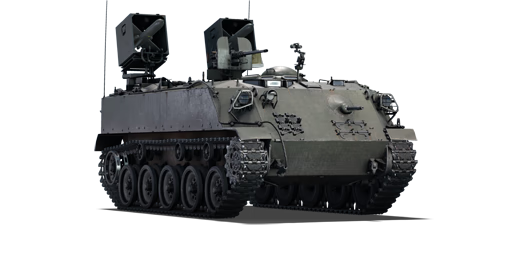
The Type 60 ATM is a rank IV Japanese tank destroyers with a battle rating of 6.7 (AB/RB/SB). It was introduced in Update 1.67 "Assault".
Alongside its tank-destroying role, the Type 60 ATM can also function as a "light tank" being able to scout enemies and assist in repairing teammates, just like Type 60 SPRG (C).
General info
Survivability and armour
While the armour of the Type 60 ATM's hull is immune small-calibre MG fire, heavy machine gun fire will penetrate from up close (under 500 m).Its roof armour is nonexistent: with only 10 mm thickness, every fighter in the game will succeed to strafe the Type 60 ATM.
The armour of the Type 60 is too weak to sustain the blast damage from tanks exploding next to it. It is advisable to avoid close proximity to other tanks when possible to limit exposure from explosion shockwaves.
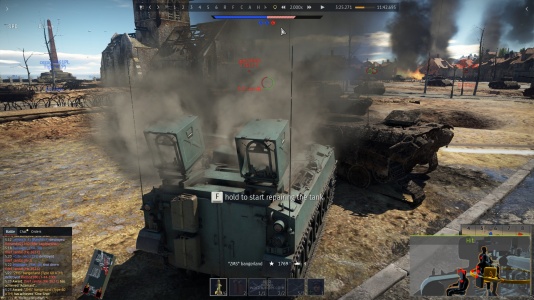
The hull is just exactly low enough to use every other hull-down position, that any normal tank would fail to use. As an example, one can use solid concrete roadblocks, building leftovers, solid construction details, random sized rocks, destroyed gas cisterns, destroyed tank hulls and so on as a protective cover. Here, only the launchers will be exposed. In some spots, the 12.7 mm machine gun will also be exposed.
Launchers themselves can be "broken" by machine guns, but they will still reload. Loaded ATGMs are also resistant to attempts of setting them off and will merely briefly malfunction. Manual repair time for the launcher is about 5 seconds with untrained crew, which is faster than a field repair, so most of the times it is not a concern for the tank. Damage to the launchers only really matters if type 60 ATM is also set on fire, then it can be done to prevent counterattack.
It is worth noting that Soviets can still load HE shells and just explode an entire tank by hitting the launcher, but not every one of them carries these shells. Some high calibre HESH shells are also able to send spall down from the launcher into the Type 60 or cause overpressure damage on a good hit.
Being hit to the hull or the MG shield is strictly forbidden, as the compartment is not made with damage control in mind. Enemy attack planes diving down and blasting away with their autocannons and rockets can also penetrate the Type 60 frontally, so be wary of enemy aerial support. In AB, the Type 60 can sustain a hit to the upper part of the hull, but once it is penetrated, it goes down very easily regardless.
If hull must be exposed due to poor cover, only expose the left side, as it has less critical crew members and increases likelihood of back crew surviving and replacing the tank commander afterwards. Sometimes the Type 60 ATM can survive up to 4 snap shots per battle, just because enemy doesn't take it seriously or panic.
Armour type:
- Rolled homogeneous armour
- Cast homogeneous armour (Machine gun port, Cupola)
| Armour | Front (Slope angle) | Sides | Rear | Roof |
|---|---|---|---|---|
| Hull | 20 mm (35-43°) Front glacis 20 mm (30°) Lower glacis 20 mm (spherical) MG port 10 mm (1°) Driver viewport |
12.7 mm | 20 mm (1°) | 10 mm 20 mm Driver hatch |
| Missile platform | N/A | 10 mm | N/A | 10 mm |
| Cupola | 20 mm (conical) Base 10 mm (spherical) Dome |
20 mm Outer ring 10 mm (spherical) Centre | ||
Notes:
- Suspension wheels and tracks are both 15 mm thick, while torsion bar chassis is 12 mm thick.
- Belly armour is 10 mm thick.
Mobility
| Game Mode | Max Speed (km/h) | Weight (tons) | Engine power (horsepower) | Power-to-weight ratio (hp/ton) | |||
|---|---|---|---|---|---|---|---|
| Forward | Reverse | Stock | Upgraded | Stock | Upgraded | ||
| Arcade | 50 | 10 | 12 | 312 | 420 | 26 | 35 |
| Realistic | 46 | 10 | 195 | 220 | 16.25 | 18.33 | |
The Type 60 ATM can only move about as fast as an average medium tank. Acceleration is above average, especially when mobility upgrades are researched, but racing against enemy tanks is only recommended if any other option means certain doom.
The issue is the turning ability, as it is slow. It will be problematic to turn around in the middle of a warzone, so a decent hull-down or hiding position is almost always required for comfortable sniping, due to a very limited optics vision arc. It is still possible to turn around even when hiding behind medium tank hull remains, but there will be a high risk of getting sniped, if not extra careful.
The Type 60 ATM has poor resistance to ramming attempts - it may stand its ground against light tanks, but any medium tank should be able to move it, and heavier tanks can literally drive over it if Type 60 ATM is stuck against something.
Getting stuck on rocks is very bad for this tank, similar to Type 60 SPRG (C), so if trying to take over mountain position, make sure there is nothing below you, in case if tank will slide off it.
Modifications and economy
| Mobility | Protection | Firepower | ||||||||||||||||
|---|---|---|---|---|---|---|---|---|---|---|---|---|---|---|---|---|---|---|
|
|
|
Armaments
Main armament
| 120 mm Type 64 MAT ATGM (x2) | Reloading rate (seconds) | ||||||
|---|---|---|---|---|---|---|---|
| Capacity | Vertical | Horizontal | Stabilizer | Stock | Full | Expert | Aced |
| 6 | N/A | N/A | N/A | 13.00 | 11.50 | 10.60 | 10.00 |
As the slowest ATGM in the game mounted on an APC chassis, Type 64 MAT gives the Type 60 APC a bad taste to War Thunder players and so it is revered as the worst possible vehicle in-game. Though in weakness there's strength, because the Type 60 is considered very weak and most opponents will not fire upon the "harmless" APC once there are other targets in sight. The slow velocity of the missile helps to readjust it easier and allows user to hover it just above the ground to clearly see its current position and have it peak up or drop down just before the target if there's a small incline in between the target and the launcher system. Use these weaknesses to your advantage.
In arcade mode, the missile has a tendency to "flutter" whenever it gets too close to the LOS control threshold. This results in missile starting to literally fly sideways without turning, which can be good or bad, depending on situation.
Ammunition
| Penetration statistics | |||||||
|---|---|---|---|---|---|---|---|
| Ammunition | Type of warhead |
Penetration @ 0° Angle of Attack (mm) | |||||
| 10 m | 100 m | 500 m | 1,000 m | 1,500 m | 2,000 m | ||
| Type 64 | ATGM | 500 | 500 | 500 | 500 | 500 | 500 |
| Shell details | ||||||||||
|---|---|---|---|---|---|---|---|---|---|---|
| Ammunition | Type of warhead |
Velocity (m/s) |
Range (m) |
Projectile Mass (kg) |
Fuse delay (m) |
Fuse sensitivity (mm) |
Explosive Mass (TNT equivalent) (g) |
Ricochet | ||
| 0% | 50% | 100% | ||||||||
| Type 64 | ATGM | 85 | 1,800 | 15.7 | 0 | 0.1 | 4,550 | 80° | 82° | 90° |
Notes:
- Flight characteristics heavily depend on the mode you play in. For example, in RB starting ATGM speed is 40 km/h, in AB it's 85.
- While stat card states the max range is 1,800 m, in reality, it is less due to the missile losing fuel making course corrections. The resulting effective range is closer to 1,600 m.
- In AB, rearming takes about 40 seconds once the launcher is empty and no partial rearming can be done on the capture point. Rearm only happens for one launcher at once, which means fully restocking will take you 80 seconds. Launcher still reloads during rearming, so you can fire away immediately after it's done.
Ammo racks

| Full ammo |
Visual discrepancy |
|---|---|
| 6 | No |
Notes:
- It is not possible to select how many missiles to bring into battle.
Machine guns
The Type 60 ATM comes equipped with a 12.7 mm M2HB Browning machine gun and a smaller 7.62 mm Browning machine gun.
The 7.62 mm, while useless against conventional tanks, can sometimes come in handy for clearing some debris and can convince some unarmored SPGs like M56 to leave you alone. The 12.7 mm machine gun serves a similar purpose, but it also can destroy some light tanks, though something like AMX-13 will resist its fire from the front.
Both types of MGs are only able to fire at planes that try to strafe the vehicle directly, which is not very likely, so in case if an attacker is present on the field, the vehicle should just hide behind some hills or trees and hope the pilot isn't after it.
| 12.7 mm M2HB | ||||
|---|---|---|---|---|
| Mount | Capacity (Belt) | Fire rate | Vertical | Horizontal |
| Pintle | 800 (200) | 577 | -5°/+25° | ±45° |
| 7.62 mm M1919A4 | ||||
|---|---|---|---|---|
| Mount | Capacity (Belt) | Fire rate | Vertical | Horizontal |
| Coaxial | 1,500 (250) | 500 | ±22° | ±22° |
Usage in battles
- Firing procedure
The vehicle has two Type 64 ATGMs loaded at once, with four others being stored in the hull. These ATGMs can be launched from about a 30-degree arc in front of the hull. Only one missile can be controlled at a time.
You have the main camera leading indicator, which directs initial launch and guides missiles in arcade battles. Sniper optics are only directed forward, so if you want to look at something in the distance while you guide the missile in RB, you have to first turn the entire hull towards them.
Type 64 missiles are on the same trigger, the vehicle always attempts to fire the right missile first. The only way to fire left missile first is in Close Quarters Combat (CQC) by turning your main aiming reticle to the left just enough for right launcher to go offline, but not in the dead zone of left launcher yet. The left-to-right shot, however convenient, is impossible to make if the right launcher is loaded. This makes CQC firing training extremely complex and unforgiving.
Missiles have about 500 mm of penetration at flat angle, which is enough to penetrate anything at its battle rating. While it's penetration numbers are nothing to be amazed of, it has 4.5 kilograms of explosive mass, which compensates for its low projectile "health" and allows it to do fatal damage even with 30 mm penetration left and causes extremely high overpressure damage if it is triggered. It's technically possible to even destroy T-64B with a good hit, because it can obliterate its fuel tanks and thus make the entire tank explode or hit it from an angle it is not built to deflect.
The missiles act differently in either game mode, and so the vehicle cannot be treated same in AB as in RB, which further increases training difficulty.
Due to extremely limited firing arc, if one wants to forcefully launch missile behind enemy cover it is recommended to stand with hull towards the enemy behind cover and use left launcher to fire right (L-R) or right launcher to fire left (R-L), but since L-R shot is by default overridden by R-R shot, it is also recommended to practice it a lot, or to not attack enemy from the left, if possible. As for vertical attacks, it depends on game mode a lot.
It is also possible to sidestep the missile, which most of BR ~8.0 light tanks will try do, unless they do not notice ATGM somehow, or are too busy fighting something else.
In realistic battle, the missile has about 40 km/h initial speed and missile won't respond to your commands until it flies at least 50-80 meters away, and should be treated as a rocket until that point. Missile prefers to keep its initial course, so it's better to launch it properly to avoid further inconveniences. To steer it around, the user must press buttons assigned for tank movements (the vertical controls are inverted with W being "down" and S being "up"). It's vertical mobility is higher than horizontal and it is easier to control from sniper seat in RB.
Ironically, lower speed allows it to be launched onto tanks which are almost ramming Type 60, with the dead zone being just 6 meters, if operator aims at the ground below the vehicle. Basically, this means it can one-shot T64 or tanks with an even lower profile, like IT-1, while being at a gunpoint. On flat ground, to hit targets at ~40 meters one should aim about 1/3 the range between tanks. To hit targets at ~80 meters one should aim 1/2 the range between tanks, as ATGM accelerates by that point.
Examples of aiming at close range in RB: (do note, that targeting applications for each launcher are no longer present in current version of the game)
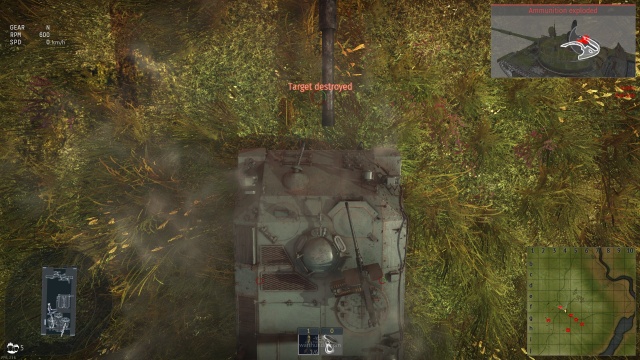
Dead zone shot for RB. Note how low all of targeting reticles are aimed. Remember, some tanks will explode so hard, they might destroy yours as well, so try to deal with them before this kind of attack becomes necessary.
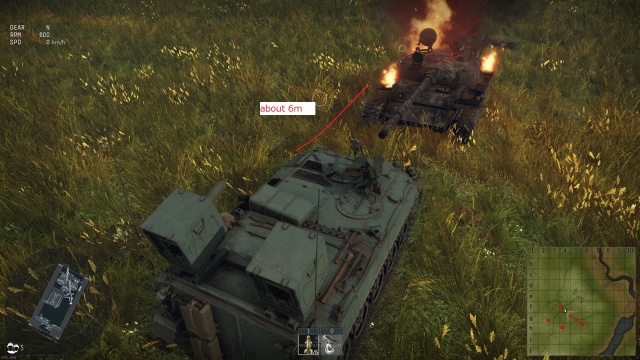
The exact minimal range for ATGM when fighting low-profile tanks.
This is the closest range shot you can pull off without using camera manipulation. The range is about 30 m.
50 m straight shot. Check how both main and launcher's targeting reticle is aimed.
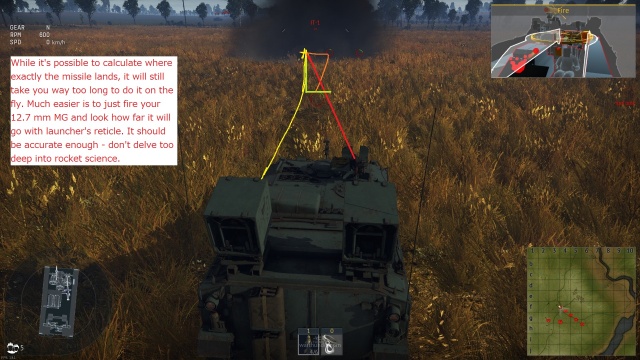
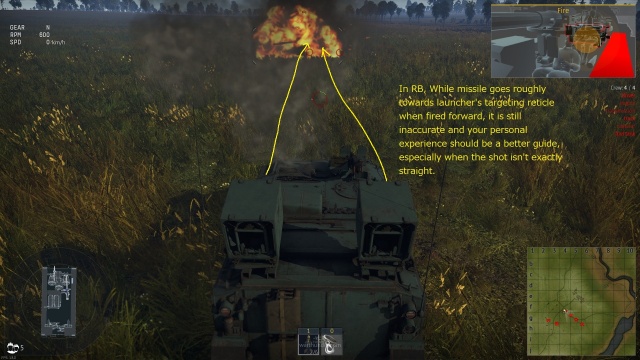
While it's possible to calculate exact missile deviation on side shots, it's easier to just use your 12 mm MG to guess angle and launcher's reticle to guess range.


To hit targets in cover far away, the operator must be very good at judging distances or guide missile close to the ground and use light emanations off it as a guide, then turn missile into enemy cover as it approaches them. As for tanks which stand in the open or with minimal cover, this brings no problems, as you just have to make it follow them. Try to keep some lead on the missile by moving it to the side a bit in case enemy tries to dodge the missile, as suddenly turning it horizontally might be difficult from your perspective. It also helps if hostiles fire machine guns at it, as it is easier for them to hit missiles that fly directly towards them, rather than missile that approaches them at an angle.
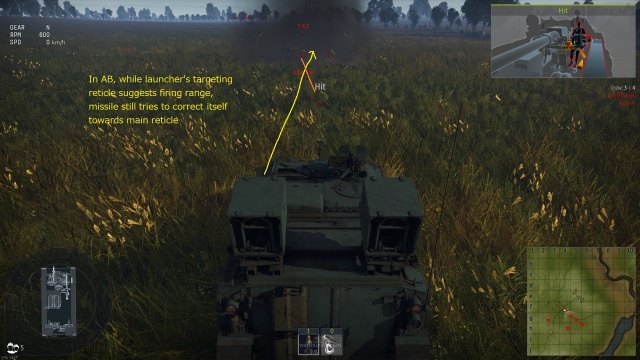
In arcade battle, Missile has full 89 km/h initial speed (also max speed) and responds to SACLOS manual input (mouse movements, not the targeting reticle itself) almost immediately (with real dead zone being unclear), so it can be somewhat curved around even during launch sequence, which allows the operator to push it even further behind houses. But due to its speed, the launch dead zone is extended to 11 m, so one cannot let enemy too close to themselves.
| Be aware, that while arcade mode allows Type 60 ATM to guide missiles with the mouse, it also restricts control of missiles if its optics can't look towards it or towards target and makes them vulnerable to IRCM jamming. When sight towards target is lost (target pointer is located behind missile), the missile obeys mouse movements directly, allowing manual aim. When sight towards missile is also lost, it will stop responding and fly forward until it hit something. While manual aim is very powerful, it can be hard to pull off at times. If you do not want to deal with manual controls, to snipe above cover pull tank optics out of cover, so it does not block the space in between camera and target (sniper sight itself is irrelevant for this particular tank and in AB its "camera" can see and aim in full sphere around it). |
At 30-120 m range, past initial launch dead zone, the operator should always aim about 1\2 toward the enemy tank and correct the course of missile manually by moving the mouse. Past that range, it's possible to use SACLOS system reliably, as long as the enemy tank isn't moving towards ATGM carrier, so you can just aim straight at the enemy.
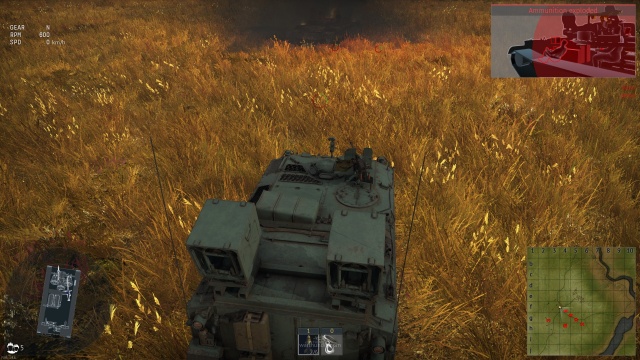
Examples of aiming at close range in AB:

Dead zone range for type 60 ATM in AB. Remember that you have to aim exactly at the bottom of your tank to make it work.
You should remember that in AB guidance system activates earlier, and aim accordingly. Though, it's less of an issue, since missile obeys your commands almost immediately in AB.

30 m indirect shot at T-64. Missiles in AB are obeying manual input from the get-go, but you still have to launch them carefully to not make them hit a wall, so even hull placement is important. It's also best to use the further launcher, if possible.
Since in AB missile obeys manual input immediately, type 60 ATM operator drags missile to the right to avoid hitting T-64s fuel tank, and the result is tank annihilation. It is worth noting, that such shots require an immense amount of practice to reliably hit, though they are still less risky than going out of cover and trying to duke it out with other tanks directly.


Long range sniping isn't much different from RB, you just have to aim at the enemy with your mouse instead of manually curving missile. You also can move while guiding it, though it is still hard to do on a move, so you might want to rely on other ways of aiming.
To attack an enemy on move you have to use aim assist, a sniper scope is locked to launcher's firing arc and vehicle lacks stabilizer, so your missile may go anywhere it wants to otherwise. Due to missile overall low speed (currently the lowest one in the game) and "aim assist" option (right mouse button) as long as the enemy is in tank's sights, one can treat the missile as a sort of dumb third-generation missile. The point is, missile is so slow, that tank is almost unable to hit the ground or a wall with it on accident, which means that you can even launch it forward and follow it, and if anyone dares to drive in the open near to you, you can just hold right mouse button to make missile destroy them on its own, while you focus on driving and dodging enemy shots. It's still best to not drive around recklessly and rely on a missile that much, as it is still very slow and it still requires you to see enemy tank (which means, they also can see you) and it will not avoid any obstacles on away, so you still have to correct it sometimes.
Overall, if one uses aim assist, you should keep in mind how it works - it always aims for the centre of the tank, and it lags behind the moving vehicle. To avoid hitting fuel tanks or missing moving tank, you can adjust it without breaking the tracking. After holding down the aim assist button, move your mouse a bit up, to let missile hit enemy just below the gun barrel, but high enough to not hit their tracks, and, if target moves to the left or right, move the mouse to the left or right to make missile track them properly. After that, wait for about 10 to 13 seconds for it to hit enemy, unless they realize what's coming for them and sidestep the missile, or to hit a random obstacle on a way towards them. Having maxed out "keen vision" and "improved optics" allows you to do this at any range indefinitely, as it's impossible to avoid being detected by you at missile's effective range.
- Combat tactics
The Type 60 ATM struggles in close quarters and is unsuited for direct urban combat. When playing the Type 60 ATGM consider all your flanking routes and hull-down positions as your high damage potential can be most effectively harnessed in these environments. Avoid all major sight-lines, and pick your targets carefully. The cover is your best friend, finding positions, where you can scout enemy vehicles for your team, can often be more beneficial than attempting to destroy enemy tanks yourself.
To get most out of the tank, one should find a hull-down position with a sight onto capture point, to scout everyone, who is open for allied snipers, and then pick off pinned down opponents, forcing them to choose between being destroyed by ATGM or your allies.
As one example, on Alaska map Type 60 ATM can use concrete blocks and rubbish to the east of B point to become resistant to enemy fire while being able to fire clean shots at both A and B points with little fear of being directly attacked back.
The Type 60 ATM often plays out as a support vehicle instead of a tank destroyer, simply scouting enemy tanks and repairing damaged allies. Keep in mind, that enemy often likes to call artillery upon huge tank groups, and your tank can be destroyed on accident. It is safer to assist heavy hull-down tanks, as it's generally pointless to use artillery on them, and many may not even notice the Type 60 next to them. After you repaired the allied tank, immediately move away from them, as if they get destroyed, the shockwave will annihilate the Type 60 hull.
In AB it can also do some moral damage, as its presence alone forces the enemy to change plans, as soon as they realize it can destroy them without even showing up on a field or doing elaborate artillery tricks, unlike Type 60 SPRG (C). You shouldn't let this to get to your head, though, as you are most likely unable to stop massive coordinated push alone. Still, the fear alone may stall enemy long enough for a vehicle to rearm, and damage done to the launcher is completely irrelevant in arcade mode.
As example, experienced type 60 ATM user can entrench it on river of Berlin map, making people who see ATGM for the first time to lose any will to attack B point at all, and seriously stalling the rest, although this requires meticulous training in close range launch techniques, as combat range there can quickly reach 20 meters, and ground isn't exactly even, often resulting in misses.
Examples of urban combat in arcade mode (In realistic mode, only try this at your own discretion):
Type 60 can hull down in some open spot, where friendly snipers can assist it, and antagonize enemy assault group. Make sure, that the hulldown spot is at least 150-200m away from the enemy entry point, and enemy still can see the launchers. On contact, demonstrate them your firepower by one-shotting one of them, then stall them by fact that you have two launchers. Destroy ones, who actually saw through your ruse and rush towards you.
If enemy got too close and snipers failed to stop them, or launchers are out of ammo and are rearming, call in a bomber to spend rearm time and to finish the enemy off. Sometimes, you might need to even bomb yourself, but with the perfect mind game, your opponents will be too afraid to leave the cover, being unsure of your missile count. With enough luck, you will take out all of them.
On maps with destructible environment you can destroy a part of a house to create a firing position for yourself. Your launcher fires upwards, allowing you to attack enemy with no fear of retaliation - only very few 8.0 tanks have APFSDS which can shoot through such cover. Remember - only house remains count as a good enough cover, the house itself does not.


In one-on-one situations, it is often better to fire only one launcher at the enemy, unless they try to push you, just to keep enemy guessing if it's even worth attacking you, instead of firing both missiles at once or doing nothing and letting them know, that you are harmless now. In arcade mode, while your launcher rearms, you can also join allied bombers as secondary attacker or bomber as a scout, to spend points earned by scouting and to cut off enemy reinforcement.
The Type 60 ATM's biggest threats in battle are many. Avoid directly fighting all vehicles at all costs to prevent being destroyed - almost every shell at your battle rating will destroy Type 60 with ease. The vehicle will often face enemy frontally when you fire missiles, and that's where the three out of five of your crew are crammed together, two of which are the gunner and driver.
As soon as the enemy tries to drop artillery on you, it's best to leave the position and move to a safer place. As such, always keep plan B in your head.
Try to use scouting to know the very moment your opponent drives out to attack your tank and try to blast them away with ATGM. If the direct confrontation with a light tank is inevitable - fire 12.7 MG at its sides as well and hope it penetrates them.
- Counter-tactics
The biggest threat from this tank comes in form of its abilities to hide behind almost anything, retaliate despite heavy ammo rack damage and to fire over cover. In realistic battles, and even in arcade battles, if a player pays no attention, their tank can be suddenly hit by a gigantic HEAT bomb with the Type 60 as its sender. Being aware of its presence is the key to avoiding this.
For example, the Type 60's ATGM is very loud, so unless it was fired from 1.5 km away (almost maximum range for this tank), the sound of the missile launch will likely be audible. Do not ignore them, check if there is a missile coming for you, and if not - remember where the noise came from.
The only comfortable way to destroy hull-down Type 60 ATM relies on using 105 mm HE and HESH. HEAT is not effective against it, so carry at least 2 of those in the battle. Whenever a Type 60 ATM is spotted standing behind low cover, try to not focus on its launchers and instead try to spot machine gun shield on its right (left for an opposing player) and fire explosives at the shield itself. It is very likely that HE shock-wave will hit poor roof armour and either annihilate tank crew or break the hull entirely. In the case of HESH, hitting the machine gun shield and part of the roof will transform into shrapnel and tear the tank apart - this generally doesn't happen if the launchers are hit. If the attack only took out the crew in the front, repeat the attack after the back crew moved forward to replace driver and commander (gunner). If only the launchers are visible, generally only HE can destroy the opponent easily.
Do note, that Type 60 ATM has two missiles at once and is rarely truly alone due to "scouting" ability. Scouting also allows it to track tanks, even behind smoke screens and walls, for better missile accuracy.
Type 60 ATM has a rather long reload sequence and only 3 missiles for each rack. The ammo pool is not shared between them and it is clearly visible which rack is currently loaded, so a quick blitz during reload or rearm can put an end to it. To avoid being suddenly crushed by fatal "roof shot", do not ram the tank frontally, or at least push it around without stopping. Do note that while the exposed MG is a weakness of Type 60 ATM, it is still of 12.7 mm calibre and it can shred some light tanks and SPG at close range before they can even get a direct shot. If the rushing tanks have less than 29 mm of effective armour, they shouldn't approach Type 60 ATM directly.
If missiles were already launched, there are a few ways to protect the tank:
- A) Attack active missiles with machine guns. Attacking dormant missile in the rack with machine gun is less effective (In Arcade Mode it does nothing at all). If laying down suppressive fire - the Type 60's right missile rack (left if facing the Type 60) almost always fires first.
- As soon as missile fires off, try to fire in front of the missile path, as bullets do not teleport and may overshoot it. If missile is hit a few times it explodes.
- Missile interception is often hard to do, if missile is guided at an angle and doesn't just fly straight towards the tank. It is generally useful for heavy tanks, which can't outrun it anyway, and medium tanks with high fire rate machine guns.
- B) Run away from it, as it is very slow. To quickly change direction, the player's tank have to be mobile or at least to have great acceleration, thus this option is more suitable for light tanks and light tank destroyers. It is recommended to also fire machine guns at it as you go, since ATGM will now have to go after you in a straight line, increasing your chances of hitting it. Do note that if the Type 60 ATM operator is set on destroying a tank, they will try very hard to steer the missile into a moving target, so only stop after the missile passed the vehicle's position entirely. This tactic is more feasible in RB, as it is harder to control the missile there and it might miss.
- C) Sacrifice cannon barrel or pull the engine forward to block missile. This will greatly reduce overall damage taken by tank and likely prevent the loss of entire crew in single hit. If lightly armoured tank takes ATGM hit into heavily armoured part, there is a chance it wont take overpressure damage. Avoid pulling fuel tanks forward, as type 64 MAT can cause entire tank to explode by destroying all of them in one hit.
Pros and cons
Pros:
- Type 60 APC Hull:
- Has scouting and can repair any allied tank as a support vehicle
- Spaded version can reach maximum speed almost instantly in some cases, can compete with average medium tanks in terms of forward speed and hill climbing
- With its very weak side armour, it fails to detonate APHE shells
- Type 64 MAT Missile:
- Good missile manoeuvrability - closely resembles superior BAe Swingfire
- Provides exceptional firepower compared to HEAT, due to increased payload and heavily reduced angle of impact
- Upwards facing launchers can allow the vehicle to fire at enemy behind cover, although the setup is often required
- In arcade mode, can hull down and be combat effective almost anywhere. By extent, it has some of the safest hull down setups compared to almost any tank in the game
- There are 2 launchers mounted on the Type 60 APC, allowing for a follow-up shot being made as the previous missile hits
Cons:
- Type 60 APC Hull:
- Highly visible, very distinct profile, with the sore default blue camouflage and obvious launchers
- Little to no armour, most shells immediately destroy this vehicle, although its engine can allow for some unexpected survival and retaliation, not taking this tank seriously can sometimes backfire
- Even though its side armour is too thin to detonate APHE shells, the compact APC will almost always lose critical components such as:
- Front: gunner, commander, driver
- Middle: engine
- Back: two loaders and/or ammo rack
- Front and back armour are thick enough to detonate APHE rounds even though it will only withhold machine gun fire
- Even though its side armour is too thin to detonate APHE shells, the compact APC will almost always lose critical components such as:
- Larger opponents may attempt to use their weight to crush this tank against a wall and drive over it, resulting in destruction
- Limited turning ability, which sometimes forces it to expose itself to sniper fire
- Type 64 MAT Missile:
- Slow missile speed, to a point they can be easily shot mid-air or sidestepped by many tanks
- Need a certain range for effective hit (maximum 1,600 m for long range, at least 10 m at close range, at least 100 m for a guidance system to start in RB)
- Need a visual target for an accurate hit, otherwise it heavily relies on operator skill to hit anything at all
- Very limited main ammunition (6 missiles)
- Reload per launcher is 13s which can mean a long downtime if both missiles are spent after quick succession
- AB related:
- Cannot be partially rearmed on capture point, forcing it to completely empty the ammunition, making it incapable of sustaining massive sieges on its own, even though forcing it out of cover is a challenge
- Missile can start "fluttering" when control signal is reaching its limits, which is hard to predict without experience
- RB related:
- Can't move while the missile flies to the target because of manual input
- It can be difficult to hit tanks if they move in circles around type 60 ATM
History
The Type 60 ATM was a Japanese Type 60 APC personnel carrier equipped with guided anti-tank Type 64 MAT missiles. The Type APC itself was developed by the Mitsubishi company in 1959 and officially put into service in 1960, becoming the first APC developed by Japan after the war. The Type 64 MAT (Anti-tank Missile) first-generation missiles, also known as KAM-3, were developed by the Kawasaki company and put into service in 1964.
The Type 64 MAT was an ordinary guided, wired HEAT missile, very reminiscent in its design of the German anti-tank Cobra and the Soviet 9M14 Malyutka, put into service several years before. The firing crew consisted of three people, and the vehicle aimed by sending a signal from the control unit along a wire connected to the rear of the missile. The wired aiming system limited the maximum cruising speed and flight range of the missile, but was extremely reliable and cheap to produce.
Containers of these missiles were used as portable weapons, and were also installed on jeeps and APCs. In total, roughly 430 standard models of the Type 60 APC were produced, and around 220 Type 64 MAT missile systems, but the precise number of APCs equipped with the missiles is unknown.
- From Devblog
Media
- Skins
- Images
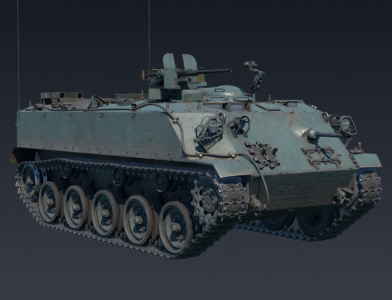
Type 60 ATM without launcher. (Almost Type 60 APC)

- Videos
See also
- Other vehicles of similar configuration and role
External links
| Japan tank destroyers | |
|---|---|
| Ro-Go Derivatives | Ro-Go Exp. |
| Chi-Ha Derivatives | Ho-Ni I · Ho-Ni III · Ho-Ro · Chi-Ha LG |
| Ho-Ri | Ho-Ri Prototype · Ho-Ri Production |
| Other | Na-To |
| JGSDF | |
| SPRG | Type 60 (C) |
| SPH | Type 75 · Type 99 |
| ATGM | Type 60 ATM |
| Rocket | Type 75 MLRS |
| USA | ▅M36 |
