|
|
| (45 intermediate revisions by 13 users not shown) |
| Line 1: |
Line 1: |
| − | {{About
| + | {{Specs-Card|code=germ_pzkpfw_VI_ausf_h1_tiger_animal_version}} |
| − | | about = German heavy tank '''{{PAGENAME}}'''
| |
| − | | usage = other versions
| |
| − | | link = Tiger I (Family)
| |
| − | }}
| |
| − | {{Specs-Card | |
| − | |code=germ_pzkpfw_VI_ausf_h1_tiger_animal_version | |
| − | |images={{Specs-Card-Image|GarageImage_{{PAGENAME}}.jpg|ArtImage_{{PAGENAME}}.png}}
| |
| − | |market=␠Tiger
| |
| − | }} | |
| | | | |
| | == Description == | | == Description == |
| − | <!-- ''In the description, the first part should be about the history of the creation and combat usage of the vehicle, as well as its key features. In the second part, tell the reader about the ground vehicle in the game. Insert a screenshot of the vehicle, so that if the novice player does not remember the vehicle by name, he will immediately understand what kind of vehicle the article is talking about.'' -->
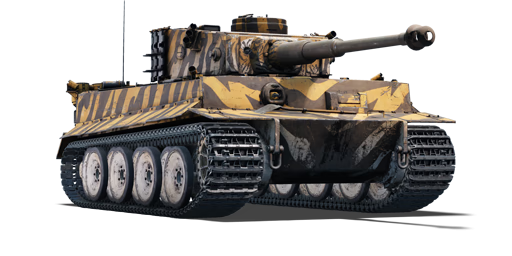
| + | ''The tiger is a famous heavy tank made by the Germans during WW2. It first saw combat in North Africa during 1942, against American and British tanks like the m3 lee. The tiger is most commonly known for its blocky structure and 88 millimeter cannon. Used until the end of the war, it was fantastic in its front armor but has a little weakness in its sides and back. |
| − | The '''{{Specs|name}}''' ([[Abbreviations#.28DE.29_Sd.Kfz._Index|Sd.Kfz. Index:]] '''Sd.Kfz. 181''') is a premium gift rank {{Specs|rank}} German heavy tank {{Battle-rating}}. It was introduced in [[Update 1.77 "Advancing Storm"]] as a reward vehicle for the [[wt:en/news/5424-event-flying-serpent-crouching-tiger-en|2018 "Flying Serpent, Crouching Tiger"]] crafting event. | |
| − | | |
| − | The Tiger is a famous heavy tank made by the Germans during WWII. It first saw combat in North Africa during 1942 against both American and British tanks like the M3 Lee. The Tiger is most commonly known for its blocky structure and 88-millimetre cannon. Used until the end of the war, it was fantastic in regards to its front armour, but had weaker armour on its sides and back.
| |
| − | | |
| − | This Tiger, often referred to as the "furry Tiger," is a Tiger H1 with a special orange, white and black Tiger stripe camouflage. It is considered a premium tank and as such comes with higher boosters, 30 free repairs and modifications unlocked.
| |
| | | | |
| | == General info == | | == General info == |
| | === Survivability and armour === | | === Survivability and armour === |
| − | {{Specs-Tank-Armour}}
| + | ''Describe armour protection. Note the most well protected and key weak areas. Appreciate the layout of modules as well as the number and location of crew members. Is the level of armour protection sufficient, is the placement of modules helpfull for survival in combat?'' |
| − | <!-- ''Describe armour protection. Note the most well protected and key weak areas. Appreciate the layout of modules as well as the number and location of crew members. Is the level of armour protection sufficient, is the placement of modules helpful for survival in combat? If necessary use a visual template to indicate the most secure and weak zones of the armour.'' -->
| |
| − | [[File:TigerIHTank Armour Angling.png|right|thumbnail|The ideal angling of hull armour on Tiger I for maximum effective armour all-around|300px]]
| |
| − | '''Armour type:''' | |
| − | | |
| − | *Rolled homogeneous armour
| |
| − | *Cast homogeneous armour (Gun mantlet, Cupola)
| |
| | | | |
| − | {| class="wikitable"
| + | ''If necessary use a visual template to indicate the most secure and weak zones of the armour.'' |
| − | |-
| |
| − | ! Armour !! Front (Slope angle) !! Sides !! Rear (Slope angle) !! Roof
| |
| − | |-
| |
| − | | Hull || 102 mm (9°) ''Front plate'' <br> 62 mm (80°) ''Front glacis'' <br> 102 mm (25°) ''Lower glacis''|| 82 mm ''Top'' <br /> 62 mm ''Bottom''|| 82 mm (9°)|| 26 mm
| |
| − | |-
| |
| − | | Turret || 100 mm ''Turret front'' <br> 90 - 200 mm ''Gun mantlet'' || 82 mm || 82 mm || 26 mm
| |
| − | |-
| |
| − | ! Armour !! Sides !! Roof
| |
| − | |-
| |
| − | | Cupola || 80 mm || 26 mm
| |
| − | |}
| |
| − | '''Notes:'''
| |
| − | | |
| − | * Turret front covered by gun mantlet has variable thickness depending on exact place, ranging from 90 to 200 mm of armour.
| |
| − | * Turret side (about 1/3) is covered by attached tracks, adding additional 30 mm of armour.
| |
| − | * While the hull side of the tank is 82 mm, the side where the suspension is located is only 62 mm thick so be aware of this weak point.
| |
| − | * On paper, the best angle is roughly 38.8° with armour all-round being from the front 130 mm.
| |
| − | | |
| − | One may feel the need to charge head-on into battle, blaring that 88 mm gun as shells bounce off the front armour while the ''Schachtellaufwerk'' suspension system runs over the ground; this is a short-lived strategy.
| |
| − | | |
| − | The Tiger I should be played more like a bulky medium tank rather than a heavy tank despite its status, supporting allies from the sideline or from a distance rather than leading directly from the front. This is due to the poor armour arrangement with its "boxy" features, providing no sloping benefits alone. One must remain a distance, exploit the 88 mm long-distance power, and maintain a diamond-shape compound angling to maximize armour thickness against the trailing enemy shells that will inevitably come towards the Tiger's way.
| |
| | | | |
| | === Mobility === | | === Mobility === |
| − | {{Specs-Tank-Mobility}}
| + | ''Write about the mobility of the ground vehicle. Estimate the specific power and maneuverability as well as the maximum speed forward and backward.'' |
| − | <!-- ''Write about the mobility of the ground vehicle. Estimate the specific power and manoeuvrability, as well as the maximum speed forwards and backwards.'' -->
| |
| − | | |
| − | {{tankMobility|abMinHp=839|rbMinHp=575}}
| |
| − | | |
| − | === Modifications and economy ===
| |
| − | {{Specs-Economy}}
| |
| | | | |
| | == Armaments == | | == Armaments == |
| − | {{Specs-Tank-Armaments}}
| |
| | === Main armament === | | === Main armament === |
| − | {{Specs-Tank-Weapon|1}}
| + | ''Give the reader information about the characteristics of the main gun. Assess its effectiveness in a battle based on the reloading speed, ballistics and the power of shells. Do not forget about the flexibilty of the fire, that is how quickly the cannon can be aimed at the target, open fire on it and aim at another enemy. Add a link to the main article on the gun: <code><nowiki>{{main|Name of the weapon}}</nowiki></code>. Describe in general terms the ammunition available for the main gun. Give advice on how to use them and how to fill the ammunition storage.'' |
| − | <!-- ''Give the reader information about the characteristics of the main gun. Assess its effectiveness in a battle based on the reloading speed, ballistics and the power of shells. Do not forget about the flexibility of the fire, that is how quickly the cannon can be aimed at the target, open fire on it and aim at another enemy. Add a link to the main article on the gun: <code><nowiki>{{main|Name of the weapon}}</nowiki></code>. Describe in general terms the ammunition available for the main gun. Give advice on how to use them and how to fill the ammunition storage.'' -->
| |
| − | {{main|KwK36 (88 mm)}}
| |
| − | | |
| − | {| class="wikitable" style="text-align:center" width="100%"
| |
| − | |-
| |
| − | ! colspan="5" | [[KwK36 (88 mm)|88 mm KwK36]] || colspan="5" | Turret rotation speed (°/s) || colspan="4" | Reloading rate (seconds)
| |
| − | |-
| |
| − | ! Mode !! Capacity !! Vertical !! Horizontal !! Stabilizer
| |
| − | ! Stock !! Upgraded !! Full !! Expert !! Aced
| |
| − | ! Stock !! Full !! Expert !! Aced
| |
| − | |-
| |
| − | ! ''Arcade''
| |
| − | | rowspan="2" | 92 || rowspan="2" | -8°/+16° || rowspan="2" | ±180° || rowspan="2" | N/A || 9.7 || 13.4 || 16.3 || 18.0 || 19.2 || rowspan="2" | 9.62 || rowspan="2" | 8.51 || rowspan="2" | 7.84 || rowspan="2" | 7.40
| |
| − | |-
| |
| − | ! ''Realistic''
| |
| − | | 7.1 || 8.4 || 10.2 || 11.3 || 12.0
| |
| − | |-
| |
| − | |}
| |
| − | | |
| − | ==== Ammunition ====
| |
| − | * '''PzGr 39''' - The go-to shell for all Tiger H1 drivers as this is arguably the best. It will do incredible damage to any tank shot by it, except SPAA, or any extremely thin armoured vehicles. Heavier tanks like the IS-1, IS-2, or American heavy tanks are able to resist the round at longer ranges, but well-placed shots from close range or sides will do the job. All other medium and light tanks will be history as soon as this shell make contact with them. This shell, however, will almost always over-penetrate all but the most armoured SPAA vehicles, so it is best to use HE or machine gun fire on thin-skinned vehicles.
| |
| − | * '''Pzgr.''' - This shell is also very useful. It has very similar characteristics as PzGr 39, but sacrifices some penetration for about 50% more Explosive Filler, meaning even more damage than already powerful PzGr 39. It is recommended to carry some of these shells and use them regularly, as the penetration is still enough to deal with most targets (at least when being down-tiered), and switch to PzGr 39 when shooting targets far away, or those that are heavily armoured.
| |
| − | * '''Hl.Gr 39''' - On paper the HEAT rounds don't bring anything new to the table, however they can be used as a substitute for the HE shells due to the greater explosive mass and still gives a fighting chance if caught with pants down.
| |
| − | * '''Sprgr. L/4.5''' - The HE shell is completely ineffective against all but SPAA or the AI artillery on the Kursk and Ash River maps, and the machine gun mounted on the Tiger has proven quite capable of dealing with these. Keep a small supply of this shell on hand if planning to flank the enemy and take out their SPAA or artillery, but avoid them for everything else.
| |
| | | | |
| − | {{:KwK36 (88 mm)/Ammunition|PzGr 39, Pzgr., Hl.Gr 39, Sprgr. L/4.5}}
| + | === Additional armament === |
| − | | + | ''Some tanks are armed with several guns in one or more turrets. Evaluate the additional weaponry and give advice on its use. Describe the ammunition available for additional weaponry. Give advice on how to use them and how to fill the ammunition storage. If there is no additional weaponry remove this subsection.'' |
| − | ==== [[Ammo racks]] ====
| |
| − | <!-- '''Last updated: 2.33.0.25''' -->
| |
| − | {| class="wikitable" style="text-align:center"
| |
| − | |-
| |
| − | ! Full<br>ammo
| |
| − | ! 1st<br>rack empty
| |
| − | ! 2nd<br>rack empty
| |
| − | ! 3rd<br>rack empty
| |
| − | ! 4th<br>rack empty
| |
| − | ! 5th<br>rack empty
| |
| − | ! 6th<br>rack empty
| |
| − | ! 7th<br>rack empty
| |
| − | ! 8th<br>rack empty
| |
| − | ! 9th<br>rack empty
| |
| − | ! 10th<br>rack empty
| |
| − | ! Visual<br>discrepancy
| |
| − | |-
| |
| − | | '''92''' || 76 ''(+16)'' || 60 ''(+32)'' || 44 ''(+48)'' || 28 ''(+64)'' || 24 ''(+68)'' || 20 ''(+72)'' || 16 ''(+76)'' || 12 ''(+80)'' || 6 ''(+86)'' || 0 ''(+92)'' || No
| |
| − | |-
| |
| − | |}
| |
| − | [[File:Ammoracks_Tiger_H1.png|right|thumb|x250px|[[Ammo racks]] of the Tiger H1.]]
| |
| − | '''Note''': | |
| − | | |
| − | * Large sides empty: 28 ''(+64)'' shells.
| |
| | | | |
| | === Machine guns === | | === Machine guns === |
| − | {{Specs-Tank-Weapon|2}}
| + | ''Offensive and anti-aircraft machine guns not only allow you to fight some aircraft, but also are effective against lightly armoured vehicles. Evaluate machine guns and give recommendations on its use.'' |
| − | <!-- ''Offensive and anti-aircraft machine guns not only allow you to fight some aircraft but also are effective against lightly armoured vehicles. Evaluate machine guns and give recommendations on its use.'' -->
| |
| − | {{main|MG34 (7.92 mm)}}
| |
| − | | |
| − | {| class="wikitable" style="text-align:center" width="50%"
| |
| − | |-
| |
| − | ! colspan="5" | [[MG34 (7.92 mm)|7.92 mm MG34]]
| |
| − | |-
| |
| − | ! Mount !! Capacity (Belt) !! Fire rate !! Vertical !! Horizontal
| |
| − | |-
| |
| − | | Coaxial || 4,350 (150) || 900 || - || -
| |
| − | |-
| |
| − | |}
| |
| − | | |
| − | == Usage in battles ==
| |
| − | <!-- ''Describe the tactics of playing in the vehicle, the features of using vehicles in the team and advice on tactics. Refrain from creating a "guide" - do not impose a single point of view but instead give the reader food for thought. Describe the most dangerous enemies and give recommendations on fighting them. If necessary, note the specifics of the game in different modes (AB, RB, SB).'' -->
| |
| − | The main role of the ''Tiger'' tank was to eliminate enemy tanks at a far range, similar to behaving like a sniping tank, or a Tank Destroyer. Nonetheless, the Tiger can excel at brawling with other tanks at medium, even possibly against two [[Panther D|Panther]] tanks to close range and escape undamaged. It's recommended to not stay in one place for too long or risk getting outflanked, spotted, or bombed.
| |
| − | | |
| − | While guns like the Soviet [[D-5T (85 mm)|85 mm]] cannon can easily penetrate the Tiger at close range, the Tiger can stay nearly invulnerable at long range. The 88 can take out any tank on Rank 3 at any combat range but may have problems with the [[IS-1]]'s 120 mm front armour at some ranges. When having to close in a bit, it is generally advisable to angle the hull to the sides by about 30°, improving the armour rating enough that it can keep away 85 mm shells very well, even at closer ranges. The Tiger is still vulnerable to the [[SU-152|SU-152s]] howitzer and its HE shell at any range. So whenever encountering these heavy-calibre vehicles, it should be prioritized and eliminated first.
| |
| − | | |
| − | '''Mobility'''-wise the Tiger is pretty good for a heavy tank. It is much faster than a [[KV-1 (ZiS-5)|KV-1]] and about as equally fast as the [[IS-1]], although medium tanks like the [[T-34-85]] can easily outmanoeuvre all three at close range. Try to use the Tiger's mobility to keep a distance rather than for closing in on a target. Don't be afraid to use the speed to fall back if necessary as the Tiger cannot survive close range engagements on open terrain vs. mediums, due to the slow turret and the vulnerability to the 85 mm guns on Soviet medium tanks.
| |
| − | | |
| − | The Tiger has a very bad '''turret traverse''', it is recommended to get the ''Turret Drive'' traverse modification as fast as possible. Even then, the Tiger will have to turn the tank in the direction of the traverse to make the most of the time to quickly engage a target. This, together with very exposed ammo racks on both sides (though one side can be emptied by reducing the ammo stowage) means that facing multiple enemies at once is almost a certain end to the Tiger tank. The best option is to take cover from one tank and fire on the other.
| |
| − | | |
| − | As far as ammo is concerned, the default ''PzGr 39'' will be the standard AP rounds many players will use. The second AP round available, the ''Pzgr.'', is also a good round to use against the enemy as the shell contains more explosive filler than the default, but suffers from a lower penetration value compared to the ''PzGr 39''. The HEAT rounds offer consistent penetration at all ranges including more than 2,000 m. However, they provide less damage upon penetration. HEAT rounds usually are usually not used as the primary ammunition type for this sole reason. Upgrading the tank should mainly be dedicated to turret traverse, hull traverse (as this is needed even with the turret traverse upgrade) and engine upgrades. The Tiger's 88 has massive destructive power. Unlike the other German tank of its rank, all armed with 75 mm guns, the Tiger can easily one-shot all the mediums like the T-34s, M4 Shermans, and still be a threat against heavy tanks like the IS-1s. If it doesn't destroy a tank in one hit, most of the enemy crew will be wounded or incapacitated. The best place to aim with the 88 is either at the gunner's side of the enemy turret to incapacitate an enemy's firepower, or between the driver and the gunner which would usually wound or knock out most of the enemy crew at once. Attacking from the side also presents a good shot opportunity, as the best shot placement is right below the turret on the hull where most of the tank ammunition are stored, giving a big chance for an ammo-rack explosion.
| |
| − | | |
| − | When driving the Tiger, plan ahead on where it will drive. Even with engine and track modifications, the Tiger is still a heavy tank and a 90 degree or more turn will almost always mean an immediate standstill as the tank try to make the change in movement. Even small adjustments can knock the speed down a bit. Thus, knowing the terrain and destination is of the utmost importance to preserve its mobility to its fullest extent.
| |
| − | | |
| − | The Tiger is also best used on the flanks of the current maps, as these are usually more open and allow good use of its armour and excellent gun. The centre of the map would seem more logical as there are a lot of enemies, but as has already been established a Tiger taking fire from multiple directions won't last long. Going in a flank and taking down light and medium tanks is an easy task for this beast, and thus a flank can be easily secured if the Tiger is driven carefully. Then, work the Tiger into the enemy sides and rear of the main force in the centre, doing much more damage than if the Tiger faced the force head-on because a shot to the side and rear will set most enemies alight if not outright exploding the ammunition. Able to destroy vehicles in one hit, the Tiger can quickly jump from target to target and eliminate a good number of enemies in its lifespan.
| |
| − | | |
| − | There will be many hard eggs to crack such as the IS Series, T-34 Series, American Jumbos, and several other tanks that will give the Tiger I trouble.
| |
| | | | |
| − | * The Soviets have many tanks at the BR able to handle the Tiger H1 easily. The main tank at this BR is the T-34-85. While it may have very thin armour and is easy to penetrate it is easy to angle and the T-34 is a flanking machine, it will drive circles around the Tiger so it needs to be destroyed quickly. The IS Heavy tanks are the second worst nightmare situation. Thick armour and a huge gun. If the IS tank is not destroyed first, it will definitely destroy the Tiger.
| + | == Usage in the battles == |
| − | * The American Jumbos are similar to the T-34. The 75 mm variant would have trouble to penetrate the Tiger's armour at long ranges, but caution needs to be exercised when they are armed with a 76 mm gun.
| + | ''Describe the tactics of playing in the vehicle, the features of using vehicles in the team and advice on tactics. Refrain from creating a "guide" - do not impose a single point of view but give the reader food for thought. Describe the most dangerous enemies and give recommendations on fighting them. If necessary, note the specifics of the game in different modes (AB, RB, SB).'' |
| − | * The Japanese tanks all have very thin armour that the 88 mm gun can easily penetrate through with no problem, but their guns at this BR all have enough penetration to deal with the Tiger if it gets a hit on.
| |
| | | | |
| | === Pros and cons === | | === Pros and cons === |
| − | <!-- ''Summarise and briefly evaluate the vehicle in terms of its characteristics and combat effectiveness. Mark its pros and cons in a bulleted list. Try not to use more than 6 points for each of the characteristics. Avoid using categorical definitions such as "bad", "good" and the like - use substitutions with softer forms such as "inadequate" and "effective".'' -->
| + | ''Summarize and briefly evaluate the vehicle in terms of its characteristics and combat effectiveness. Mark its pros and cons in a bulleted list. Do not use more than 6 points for each of the characteristics. Avoid using categorical definitions such as "bad", "good" and the like - they have a substitution in the form of softer "inadequate", "effective".'' |
| | | | |
| | '''Pros:''' | | '''Pros:''' |
| − | | + | * |
| − | * Turret armour is particularly hard to penetrate, especially around the mantlet | |
| − | * One of the fastest heavy tanks with its top speed of 45 km/h
| |
| − | * Good reverse speed
| |
| − | * It's box-like shape gives the ability to some angling tactics
| |
| − | * The rear is surprisingly hard to penetrate, partially due to the slightly-angled armour and partly due to the large exhaust pipes which seem to deflect shells
| |
| | | | |
| | '''Cons:''' | | '''Cons:''' |
| − | | + | * |
| − | * Has trouble dealing with other heavy tanks | |
| − | * Only performs well against soft targets
| |
| − | * Lower glacis is easy to penetrate, therefore watch for one going over hills
| |
| − | * Transmission catches fire easily if struck
| |
| − | * Ammo racks offer great targets
| |
| − | * Slow acceleration and turning speed
| |
| − | * Turret traverse is second slowest on heavy tank line for Germany
| |
| − | * Low manoeuvrability, susceptible to being outflanked by more quicker adversaries
| |
| − | * Unsloped armour on all sides
| |
| − | * Armour is worthless unless angled
| |
| − | * Can meet against some tough opponents
| |
| − | * S-Mine dischargers on the hull limits gun depression in certain areas
| |
| | | | |
| | == History == | | == History == |
| − | <!-- ''Describe the history of the creation and combat usage of the vehicle in more detail than in the introduction. If the historical reference turns out to be too long, take it to a separate article, taking a link to the article about the vehicle and adding a block "/History" (example: <nowiki>https://wiki.warthunder.com/(Vehicle-name)/History</nowiki>) and add a link to it here using the <code>main</code> template. Be sure to reference text and sources by using <code><nowiki><ref></ref></nowiki></code>, as well as adding them at the end of the article with <code><nowiki><references /></nowiki></code>. This section may also include the vehicle's dev blog entry (if applicable) and the in-game encyclopedia description (under <code><nowiki>=== In-game description ===</nowiki></code>, also if applicable).'' -->
| + | ''Describe the history of the creation and combat usage of the ground vehicle in more detail than in the introduction. If the historical reference turns out to be too big, take it to a separate article, taking a link to an article about the vehicle and adding a block "/historical reference" (example: https://wiki.warthunder.com/Name-vehicles/historical reference) and add a link to it here using the <code>main</code> template. Be sure to include links to sources at the end of the article.'' |
| − | | |
| − | This tank is the same tank as the [[Tiger H1]], but has a very special camouflage, - a tiger camouflage.
| |
| − | This tank could only be made during the Flying Serpent, Crouching Tiger event which spanned from 31 March to 3 April 2018.
| |
| | | | |
| | == Media == | | == Media == |
| − | <!-- ''Excellent additions to the article would be video guides, screenshots from the game, and photos.'' -->
| + | ''An excellent addition to the article will be video guides, as well as screenshots from the game and photos.'' |
| | | | |
| − | ;Skins
| + | == Read also == |
| − | * [https://live.warthunder.com/feed/camouflages/?vehicle=germ_pzkpfw_VI_ausf_h1_tiger_animal_version Skins and camouflages for the {{PAGENAME}} from live.warthunder.com.]
| + | [https://warthunder.com/en/news/5424-event-flying-serpent-crouching-tiger-en Flying Serpent, Crouching Tiger] |
| | | | |
| − | ;Videos
| + | == Sources == |
| − | {{Youtube-gallery|NHpWKPletxA|'''April Fools 2018 - The Furry Tiger''' - ''TheEuropeanCanadian'' (Review starts at 4:45)|TjfQbjrtw5U|'''"Crouching Tiger" Rare Vehicle''' - ''BaconGaming''}}
| + | ''Paste links to sources and external resources, such as:'' |
| − | | |
| − | == See also ==
| |
| − | ''Links to the articles on the War Thunder Wiki that you think will be useful for the reader, for example:''
| |
| − | * ''reference to the series of the vehicles;''
| |
| − | * ''links to approximate analogues of other nations and research trees.''
| |
| − | | |
| − | == External links == | |
| − | <!-- ''Paste links to sources and external resources, such as:''
| |
| | * ''topic on the official game forum;'' | | * ''topic on the official game forum;'' |
| − | * ''other literature.'' --> | + | * ''other literature.'' |
| − | | |
| − | * [[wt:en/news/5424-event-flying-serpent-crouching-tiger-en|[Event] Flying Serpent, Crouching Tiger]]
| |
| − | | |
| − | {{Germany heavy tanks}}
| |
| − | {{Germany premium ground vehicles}}
| |
Description
The tiger is a famous heavy tank made by the Germans during WW2. It first saw combat in North Africa during 1942, against American and British tanks like the m3 lee. The tiger is most commonly known for its blocky structure and 88 millimeter cannon. Used until the end of the war, it was fantastic in its front armor but has a little weakness in its sides and back.
General info
Survivability and armour
Describe armour protection. Note the most well protected and key weak areas. Appreciate the layout of modules as well as the number and location of crew members. Is the level of armour protection sufficient, is the placement of modules helpfull for survival in combat?
If necessary use a visual template to indicate the most secure and weak zones of the armour.
Mobility
Write about the mobility of the ground vehicle. Estimate the specific power and maneuverability as well as the maximum speed forward and backward.
Armaments
Main armament
Give the reader information about the characteristics of the main gun. Assess its effectiveness in a battle based on the reloading speed, ballistics and the power of shells. Do not forget about the flexibilty of the fire, that is how quickly the cannon can be aimed at the target, open fire on it and aim at another enemy. Add a link to the main article on the gun: {{main|Name of the weapon}}. Describe in general terms the ammunition available for the main gun. Give advice on how to use them and how to fill the ammunition storage.
Additional armament
Some tanks are armed with several guns in one or more turrets. Evaluate the additional weaponry and give advice on its use. Describe the ammunition available for additional weaponry. Give advice on how to use them and how to fill the ammunition storage. If there is no additional weaponry remove this subsection.
Machine guns
Offensive and anti-aircraft machine guns not only allow you to fight some aircraft, but also are effective against lightly armoured vehicles. Evaluate machine guns and give recommendations on its use.
Usage in the battles
Describe the tactics of playing in the vehicle, the features of using vehicles in the team and advice on tactics. Refrain from creating a "guide" - do not impose a single point of view but give the reader food for thought. Describe the most dangerous enemies and give recommendations on fighting them. If necessary, note the specifics of the game in different modes (AB, RB, SB).
Pros and cons
Summarize and briefly evaluate the vehicle in terms of its characteristics and combat effectiveness. Mark its pros and cons in a bulleted list. Do not use more than 6 points for each of the characteristics. Avoid using categorical definitions such as "bad", "good" and the like - they have a substitution in the form of softer "inadequate", "effective".
Pros:
Cons:
History
Describe the history of the creation and combat usage of the ground vehicle in more detail than in the introduction. If the historical reference turns out to be too big, take it to a separate article, taking a link to an article about the vehicle and adding a block "/historical reference" (example: https://wiki.warthunder.com/Name-vehicles/historical reference) and add a link to it here using the main template. Be sure to include links to sources at the end of the article.
Media
An excellent addition to the article will be video guides, as well as screenshots from the game and photos.
Read also
Flying Serpent, Crouching Tiger
Sources
Paste links to sources and external resources, such as:
- topic on the official game forum;
- other literature.