Difference between revisions of "Tetrarch I"
Inceptor57 (talk | contribs) |
|||
| Line 2: | Line 2: | ||
== Description == | == Description == | ||
| − | ''In the description, the first part needs to be about the history of the creation and combat usage of the vehicle, as well as its key features. In the second part, tell the reader about the ground vehicle in the game. Insert the screenshot of the vehicle. If the novice player does not remember the vehicle by name, they will immediately understand what kind of vehicle it is talking about.'' | + | <!--''In the description, the first part needs to be about the history of the creation and combat usage of the vehicle, as well as its key features. In the second part, tell the reader about the ground vehicle in the game. Insert the screenshot of the vehicle. If the novice player does not remember the vehicle by name, they will immediately understand what kind of vehicle it is talking about.''--> |
| + | [[File:GarageImage_TetrarchMkI.jpg|420px|thumb|left]] | ||
| + | {{break}} | ||
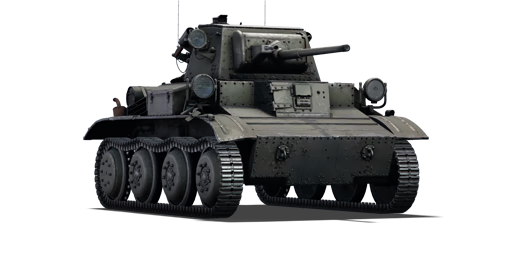
| + | The '''Mark VII A17 Tetrarch Mk.I''' (or just '''Tetrarch''') is a reserve Rank I British light tank with a battle rating of 1.0. It was introduced along with the initial British tank tree line in [[Update 1.55 "Royal Armour"]]. A light tank with a [[Ordnance QF 2-pounder|2-pounder]], it fits the British light line of a fast tank with a powerful gun. but with weak armour. | ||
| + | |||
| + | The Tetrarch plays along like any other Rank I vehicle in the game. Zip around with high speed to the destination and get a first shot off on the enemy tank (preferably the gunner). The 2-pounder can penetrate most enemy tanks at close range and the 40 mm shells can cause a decent amount of shrapnel that can damage most of the internals at the area of the penetration. The mobility is great with the adequate horsepower to propel the 7 ton tank around. The armour is barely adequate for Rank I, with its flat surfaces encouraging penetration with the cramped interiors making one-hit destruction a worrying situation for the Tetrarch. | ||
== General info == | == General info == | ||
=== Survivability and armour === | === Survivability and armour === | ||
| − | ''Describe armour protection. Note the most well protected and key weak areas. Appreciate the layout of modules as well as the number and location of crew members. Is the level of armour protection sufficient, is the placement of modules helpfull for survival in combat?'' | + | <!--''Describe armour protection. Note the most well protected and key weak areas. Appreciate the layout of modules as well as the number and location of crew members. Is the level of armour protection sufficient, is the placement of modules helpfull for survival in combat?'' |
| − | ''If necessary use a visual template to indicate the most secure and weak zones of the armour.'' | + | ''If necessary use a visual template to indicate the most secure and weak zones of the armour.''--> |
| + | '''Armour type:''' | ||
| + | * Rolled homogeneous armour | ||
| + | * Cast homogeneous armour (Gun mantlet) | ||
| + | {| class="wikitable" | ||
| + | |- | ||
| + | ! Armour !! Front !! Sides !! Rear !! Roof | ||
| + | |- | ||
| + | | Hull || 16 mm (15°) ''Driver's port'' <br> 16 mm (2°) ''Front plate'' <br> 10 mm (72°) ''Front glacis'' <br> 16 mm (19-43°) ''Lower glacis'' || 14 mm (0-1°) || 10 mm (22-51°) || 7 mm (79-88°) | ||
| + | |- | ||
| + | | Turret || 14 mm (18°) ''Turret front'' <br> 16 mm (10-80°) ''Gun mantlet'' || 14 mm (13-15°) || 10 mm (2°) || 4 mm | ||
| + | |} | ||
| + | '''Notes:''' | ||
| + | *Suspension wheels and tracks are 15 mm thick. | ||
| + | *A little glimpse of the 4mm roof can be see from the front. A well placed HE round will penetrate and result in a knock-out. | ||
=== Mobility === | === Mobility === | ||
| − | ''Write about the mobility of the ground vehicle. Estimate the specific power and maneuverability as well as the maximum speed forward and backward.'' | + | <!--''Write about the mobility of the ground vehicle. Estimate the specific power and maneuverability as well as the maximum speed forward and backward.''--> |
| + | {| class="wikitable" style="text-align:center" | ||
| + | |- | ||
| + | !colspan="3" | Mobility characteristic | ||
| + | |- | ||
| + | ! Weight (tons) | ||
| + | !colspan="1" | Add-on Armor<br>weight (tons) | ||
| + | !colspan="1" | Max speed (km/h) | ||
| + | |- | ||
| + | |rowspan="2" | 7.6 || colspan="1" rowspan="2" | N/A || colspan="1" | 74 (AB) | ||
| + | |- | ||
| + | |67 (RB/SB) | ||
| + | |- | ||
| + | !colspan="3" | Engine power (horsepower) | ||
| + | |- | ||
| + | !colspan="1" | Mode | ||
| + | !Stock | ||
| + | !Upgraded | ||
| + | |- | ||
| + | |''Arcade'' | ||
| + | |256 | ||
| + | |315 | ||
| + | |- | ||
| + | |''Realistic/Simulator'' | ||
| + | |146 | ||
| + | |165 | ||
| + | |- | ||
| + | !colspan="3" | Power-to-weight ratio (hp/ton) | ||
| + | |- | ||
| + | !colspan="1" | Mode | ||
| + | !Stock | ||
| + | !Upgraded | ||
| + | |- | ||
| + | |''Arcade'' | ||
| + | |33.68 | ||
| + | |41.45 | ||
| + | |- | ||
| + | |''Realistic/Simulator'' | ||
| + | |19.21 | ||
| + | |21.71 | ||
| + | |- | ||
| + | |} | ||
== Armaments == | == Armaments == | ||
=== Main armament === | === Main armament === | ||
| − | ''Give the reader information about the characteristics of the main gun. Assess its effectiveness in a battle based on the reloading speed, ballistics and the power of shells. Do not forget about the flexibilty of the fire, that is how quickly the cannon can be aimed at the target, open fire on it and aim at another enemy. Add a link to the main article on the gun: <code><nowiki>{{main|Name of the weapon}}</nowiki></code>. Describe in general terms the ammunition available for the main gun. Give advice on how to use them and how to fill the ammunition storage.'' | + | <!--''Give the reader information about the characteristics of the main gun. Assess its effectiveness in a battle based on the reloading speed, ballistics and the power of shells. Do not forget about the flexibilty of the fire, that is how quickly the cannon can be aimed at the target, open fire on it and aim at another enemy. Add a link to the main article on the gun: <code><nowiki>{{main|Name of the weapon}}</nowiki></code>. Describe in general terms the ammunition available for the main gun. Give advice on how to use them and how to fill the ammunition storage.''--> |
| + | {{main|Ordnance QF 2-pounder (40 mm)}} | ||
| + | |||
| + | {| class="wikitable" style="text-align:center" | ||
| + | |- | ||
| + | ! colspan="6" | [[Ordnance QF 2-pounder (40 mm)|40 mm OQF 2-pounder]] | ||
| + | |- | ||
| + | ! colspan="3" rowspan="1" style="width:5em" |Capacity | ||
| + | ! rowspan="1" | Vertical <br> guidance | ||
| + | ! rowspan="1" | Horizontal <br> guidance | ||
| + | ! rowspan="1" | Stabilizer | ||
| + | |- | ||
| + | | colspan="3" | 50 || -15°/+25° || ±180° || Vertical | ||
| + | |- | ||
| + | ! colspan="6" | Turret rotation speed (°/s) | ||
| + | |- | ||
| + | ! style="width:4em" |Mode | ||
| + | ! style="width:4em" |Stock | ||
| + | ! style="width:4em" |Upgraded | ||
| + | ! style="width:4em" |Prior + Full crew | ||
| + | ! style="width:4em" |Prior + Expert qualif. | ||
| + | ! style="width:4em" |Prior + Ace qualif. | ||
| + | |- | ||
| + | | ''Arcade'' || 4.20 || 5.80 || _.__ || _.__ || _.__ | ||
| + | |- | ||
| + | | ''Realistic'' || 4.20 || 4.90 || _.__ || _.__ || _.__ | ||
| + | |- | ||
| + | ! colspan="4" | Reloading rate (seconds) | ||
| + | |- | ||
| + | ! colspan="1" style="width:4em" |Stock | ||
| + | ! colspan="1" style="width:4em" |Prior + Full crew | ||
| + | ! colspan="1" style="width:4em" |Prior + Expert qualif. | ||
| + | ! colspan="1" style="width:4em" |Prior + Ace qualif. | ||
| + | |- | ||
| + | | 3.64 || _.__ || _.__ || _.__ | ||
| + | |- | ||
| + | |} | ||
| + | |||
| + | ===== Ammunition ===== | ||
| + | {| class="wikitable sortable" style="text-align:center" width="100%" | ||
| + | ! colspan="8" | Penetration statistics | ||
| + | |- | ||
| + | ! rowspan="2" data-sort-type="text" | Ammunition | ||
| + | ! rowspan="2" class="unsortable" | Type of <br /> warhead | ||
| + | ! colspan="6" | '''Penetration''' '''''in mm''''' '''@ 90°''' | ||
| + | |- | ||
| + | ! 10m | ||
| + | ! 100m | ||
| + | ! 500m | ||
| + | ! 1000m | ||
| + | ! 1500m | ||
| + | ! 2000m | ||
| + | |- | ||
| + | | Shot Mk.1 AP/T || AP || 80 || 79 || 61 || 46 || 32 || 21 | ||
| + | |- | ||
| + | | Shot Mk.1 APCBC/T || APCBC || 74 || 72 || 64 || 58 || 48 || 43 | ||
| + | |- | ||
| + | |} | ||
| + | {| class="wikitable sortable" style="text-align:center" width="100%" | ||
| + | ! colspan="11" | Shell details | ||
| + | |- | ||
| + | ! rowspan="2" data-sort-type="text" | Ammunition | ||
| + | ! rowspan="2" class="unsortable" | Type of <br /> warhead | ||
| + | ! rowspan="2" |Velocity <br /> in m/s | ||
| + | ! rowspan="2" |Projectile<br />Mass in kg | ||
| + | ! rowspan="2" | ''Fuse delay'' | ||
| + | ''in m:'' | ||
| + | ! rowspan="2" | ''Fuse sensitivity'' | ||
| + | ''in mm:'' | ||
| + | ! rowspan="2" | ''Explosive Mass in g<br /> (TNT equivalent):'' | ||
| + | ! rowspan="2" | ''Normalization At 30° <br> from horizontal:'' | ||
| + | ! colspan="3" | ''Ricochet:'' | ||
| + | |- | ||
| + | ! 0% | ||
| + | ! 50% | ||
| + | ! 100% | ||
| + | |- | ||
| + | | Shot Mk.1 AP/T || AP || 853 || 1.1 || N/A || N/A || N/A || -1° || 47° || 60° || 65° | ||
| + | |- | ||
| + | | Shot Mk.1 APCBC/T || APCBC || 853 || 1.2 || N/A || N/A || N/A || +4° || 48° || 63° || 71° | ||
| + | |- | ||
| + | |} | ||
| − | === | + | ===== [[Ammo racks|Ammo racks]] ===== |
| − | '' | + | '''Last updated: 1.77.2.128''' |
| + | [[File:Ammoracks_TetrarchMkI.png|right|thumbnail|x250px|[[Ammo racks|Ammo racks]] of the Tetrarch]] | ||
| + | {| class="wikitable sortable" style="text-align:center" | ||
| + | |- | ||
| + | ! class="wikitable unsortable" |Full<br /> ammo | ||
| + | ! class="wikitable unsortable" |1st<br /> rack empty | ||
| + | ! class="wikitable unsortable" |2nd<br /> rack empty | ||
| + | ! class="wikitable unsortable" |3rd<br /> rack empty | ||
| + | ! class="wikitable unsortable" |4th<br /> rack empty | ||
| + | ! class="wikitable unsortable" |Visual<br /> discrepancy | ||
| + | |- | ||
| + | || '''50''' || 38 ''(+12)'' || 25 ''(+25)'' || 13 ''(+27)'' || 1 ''(+49)'' || style="text-align:left" | Yes | ||
| + | |- | ||
| + | |} | ||
=== Machine guns === | === Machine guns === | ||
| − | ''Offensive and anti-aircraft machine guns not only allow you to fight some aircraft, but also are effective against lightly armoured vehicles. Evaluate machine guns and give recommendations on its use.'' | + | <!--''Offensive and anti-aircraft machine guns not only allow you to fight some aircraft, but also are effective against lightly armoured vehicles. Evaluate machine guns and give recommendations on its use.''--> |
| + | {{main|BESA (7.92 mm)}} | ||
| + | |||
| + | {| class="wikitable" style="text-align:center" | ||
| + | |- | ||
| + | ! colspan="7" | [[BESA (7.92 mm)|7.92 mm BESA]] | ||
| + | |- | ||
| + | ! colspan="7" | ''Coaxial mount'' | ||
| + | |- | ||
| + | ! colspan="4" rowspan="1" style="width:5em" |Capacity (Belt capacity) | ||
| + | ! rowspan="1" | Fire rate <br> (shots/minute) | ||
| + | ! rowspan="1" | Vertical <br> guidance | ||
| + | ! rowspan="1" | Horizontal <br> guidance | ||
| + | |- | ||
| + | | colspan="4" | 2,025 (225) || 600 || N/A || N/A | ||
| + | |- | ||
| + | |} | ||
== Usage in the battles == | == Usage in the battles == | ||
| − | ''Describe the tactics of playing in the vehicle, the features of using vehicles in the team and advice on tactics. Refrain from creating a "guide" - do not impose a single point of view but give the reader food for thought. Describe the most dangerous enemies and give recommendations on fighting them. If necessary, note the specifics of the game in different modes (AB, RB, SB).'' | + | <!--''Describe the tactics of playing in the vehicle, the features of using vehicles in the team and advice on tactics. Refrain from creating a "guide" - do not impose a single point of view but give the reader food for thought. Describe the most dangerous enemies and give recommendations on fighting them. If necessary, note the specifics of the game in different modes (AB, RB, SB).''--> |
| + | This tank is all about mobility: it can nearly go anywhere fast, surprising the enemy. Being one of the smallest vehicles in game, the Tetrarch will be able to roll through the thinnest passages at high speed. Its short hull enables it to cross hilly woods and rocky ground without ditching. On gear 1, it can climb any hill, as long as it sticks to the ground, thus reaching advantageous spots from where it can snipe using its good gun depression, showing only its tiny turret. Although, it is recommended to change position often since anyone knowing where the Tetrarch is can pin it down easily (remember that the Tetrarch only have 3 crew members and thin armour). Consider flanking with this vehicle since it has such a good speed but beware the Tetrarch's slow turret slewing rate, so pre-aim the cannon in the expected direction of the enemy. | ||
| + | |||
| + | Target isolated enemies since the 2-pounder gun does not have significant post-penetration damage. Shoot the gunner first to disable it from returning fire, then, stop it from moving by shooting the driver, engine or transmission. Et voilà ! then, disable every crewmen one by one. Make sure to shoot at the gunner's and driver's position every 3-4 shots since it takes roughly 15 seconds to replace them. | ||
| + | |||
| + | Use the Tetrarch's awesome off-road mobility and climbing to get into an unusual position behind enemy lines, fire a few shot and disappear in the shadows. If the Tetrarch gets spotted before finishing an enemy, flee: staying alive is more important than destroying someone, finish the enemy off later, when they have forgotten about the Tetrarch's presence. | ||
| + | |||
| + | Otherwise, anyone playing the Tetrach should get back behind friendly lines if two or more enemies are approaching since it's canon can only take down enemies one by one, patiently shooting down each crewmens. | ||
| + | |||
| + | As with any tank equipped with the [[Ordnance QF 2-pounder|QF 2-pounder]], little post-penetration damage makes large and crowded tanks a nightmare, thus, [[Light Tank LVT(A)(1)|LVT(A)(1)]], [[T-28]] and the less common [[T-35]] should be avoided or fleed. | ||
=== Pros and cons === | === Pros and cons === | ||
| − | ''Summarize and briefly evaluate the vehicle in terms of its characteristics and combat effectiveness. Mark its pros and cons in a bulleted list. Do not use more than 6 points for each of the characteristics. Avoid using categorical definitions such as "bad", "good" and the like - they have a substitution in the form of softer "inadequate", "effective".'' | + | <!--''Summarize and briefly evaluate the vehicle in terms of its characteristics and combat effectiveness. Mark its pros and cons in a bulleted list. Do not use more than 6 points for each of the characteristics. Avoid using categorical definitions such as "bad", "good" and the like - they have a substitution in the form of softer "inadequate", "effective".''--> |
| − | |||
'''Pros:''' | '''Pros:''' | ||
| − | * | + | *Powerful gun. |
| − | + | *High top speed. | |
| + | *Vertical [[Gun Stabilizer|stabilizer]] available for the 2-pounder. | ||
| + | *Small profile. | ||
| + | *Awesome acceleration (kicks when it starts). | ||
| + | *Good climbing ability. | ||
| + | *Short hull:Hard to cross ditches. | ||
| + | *Fast reloads. | ||
| + | *Coaxial MG. | ||
'''Cons:''' | '''Cons:''' | ||
| − | * | + | *Rather slow turret traverse. |
| + | *High speed often makes the vehicle hard to control. | ||
| + | *Incredibly thin armour. | ||
| + | *Low crew count of 3. | ||
| + | *Very light and thus ramming can deal major internal damage and knockout crew. | ||
| + | *Vulnerable to artillery. | ||
| + | *Only reaches max speed when going down a slope. | ||
== History == | == History == | ||
| − | ''Describe the history of the creation and combat usage of the ground vehicle in more detail than in the introduction. If the historical reference turns out to be too big, take it to a separate article, taking a link to an article about the vehicle and adding a block "/historical reference" (example: https://wiki.warthunder.com/Name-vehicles/historical reference) and add a link to it here using the <code>main</code> template. Be sure to include links to sources at the end of the article.'' | + | <!--''Describe the history of the creation and combat usage of the ground vehicle in more detail than in the introduction. If the historical reference turns out to be too big, take it to a separate article, taking a link to an article about the vehicle and adding a block "/historical reference" (example: https://wiki.warthunder.com/Name-vehicles/historical reference) and add a link to it here using the <code>main</code> template. Be sure to include links to sources at the end of the article.''--> |
| + | ===Development=== | ||
| + | Development for this tank started in 1937 by Vickers-Armstrongs privately as the '''Light Tank Mk VII''' and nicknamed the ''Purdah''.<ref name="ImagesOfWarBritishWW2Tanks">Pat Ware. ''Images Of War: British Tank: The Second World War'' Great Britain: Pen & Sword Military, 2011</ref>. The intention was for the tank to be sold to either the British Army or foreign countries as the latest light tank of the company. It's predecessor, the ''Mk VIB Light Tank'', was considered insufficient in firepower, armed with only machine guns. The new design would use the new 2-pounder gun along with a coaxial machine gun. The Mk VII design was finished around 1938, and the British War Office (government administrating the British Army) took up the design for trials in May 1938 that lasted until June. The trials tested the Mk VII's ability to act as a "light cruiser", but this failed as the [[Mark IV A13 Mk.I|A13 cruiser]] was much better at the task. Thus, it was suggested that the Mk VII be tested as a light tank instead and production to be started for the trials. During the trials, the War Office gave the Mk VII the specification number '''A17''' for identification and was put into limited production in November 1938 with a few design changes. It was initially known as the "Purdah" from its standardization date, but in September 22, 1941, the Mk VII Light Tank also received the name ''''Tetrarch'''' as part of an order to distinguish tanks by chosen names. | ||
| + | |||
| + | Demand for the tank fluctuated depending on the War Office demand for the tank. In July 1938, the first order came for 70 tanks, then 100, then 120 in November, then back to 70 in July 1940. This order then jumped back to 100, then finally settled on 220 after Metropolitan Cammell Carriage and Wagon, a part of Vickers-Armstrong, had enough armour plating to create that many tanks. Production was suppose to start in July 1940, but was delayed due to many factors, especially with World War II now on full swing against Germany. Light tank also soon fell out of War Office use after the poor performance they showed in the Battle of France, so military production was focused on the infantry and cruiser tanks rather than light tanks. Bombing raids by the Luftwaffe in the Blitz also disrupted the production of the tanks when the factories intended for their production were targeted. These delays due to waning military interest, the pressure of war, and enemy attacks caused only a small number of Tetrarch light tanks to be produced, with 177 units produced from 1938 to 1942.<ref name="ImagesOfWarBritishWW2Tanks"/> | ||
| + | |||
| + | ===Design=== | ||
| + | The Tetrarch featured armour only about 16 mm thick and the whole design weighed about 7.6 tonnes. The vehicle moved on a eight road wheel (four on each side) suspension system and there were no other driver or idler wheel present. The engine powering the vehicle was a 165 hp Meadows Type 30 engine that can propel the vehicle up to a speed of 64 km/h. The vehicle functions on a steering mechanism and mechanical system taken from earlier Vickers tanks, the unique steering mechanism allowed for turning by bending the tracks on each side of the tank rather than by braking a set of track, but the latter was still involved when making sharper turns and low speed turns.<ref name="ImagesOfWarBritishWW2Tanks"/> | ||
| + | |||
| + | However, the Tetrarch presented many faults in its design during its time with the British military. The small size of the tank only allowed a crew of three for the tank to operate, making it a very cramped and the crew overworked. Also, the Tetrarch's cooling system was faulty, enough so that the Tetrarch was an unsuitable tank for the North Africa campaign due to the hot climate at the area. | ||
| + | |||
| + | ===Combat usage=== | ||
| + | The Tetrarch was first issued in November 1940 to the 1st and 6th Armoured Division, the 1st had lost most of their equipment in the Battle of France and the 6th was a newly formed unit. While these units were sent to North Africa, the defects in the engine cooling system forced the Tetrarchs to stay behind, until they were taken out of armoured divisions due to the "light tank" concept becoming obsolete, though they were still used as training vehicles. | ||
| + | |||
| + | The Tetrarchs still saw use overseas as part of the Lend-Lease program, and 20 were supplied to the Soviet Union in 1942 to fight back the invading German Army. In the cold Russian weather, it was noted that the cooling problem was still present and the cold also caused damages to the tank's suspension and tracks. The vehicle was well-liked for its handling, maneuverability, and speed, plus was compatible with low-octane fuel the Soviets used in their diesel-powered tanks. The Soviets compared the Tetrarch's capabilities to their [[T-70]] light tank and employed the Tetrarch in the same roles. Some were used for training, other as propaganda purposes, and combat, with a notable event where two were assigned to the 132nd Separated Tank Battalion in September 1943. Both Tetrarchs were destroyed in combat. | ||
| + | |||
| + | Back to the British, in mid-1941, the Tetrarch was still integrated in the Royal Armoured Corps as part of tank squadrons that would be sent to overseas operations. The three Special Service Squadrons exist as "A", "B", and "C"; "A" and "B" were armed with the older Mk VI light tank and the [[Valentine Mk.I|Valentine]] tank, but the "C" squadron was equipped with 12 Tetrarchs in its ranks. These squadrons were first used in Freetown, West Africa in order to ensure Spain does not enter the conflict on Germany's side, then the squadrons were withdrawn to Operation Ironclad, the invasion of Madagascar. Six Tetrarchs were deployed alongside Valentines in "B" Special Service Squadron, which took elements of "B" and "C" squadron. The invasion commenced on May 5, 1942 and "B" Squadron encountered difficulty after a Tetrarch became stuck in the beach after coming loose from a landing craft. The Tetrarch and Valentine were still able to assist the infantry after that delay, but the rocky terrain in the region made tank maneuvering difficult. After two days of combat, the forces on the island formally surrendered, the losses experienced by the squadron were 8 tanks knocked out, with only four tanks (1 Valentine and 3 Tetrarchs) left functional. | ||
| + | |||
| + | After Operation Ironclad, the Tetrarchs were shifted in their roles to become part of the airborne forces after War Office and the Army decided that the light tanks of the day were not capable of competing against other tanks. It was in mid-1941 when the Airborne forces decided to use gliders as part of their landing equipment and the ''General Aircraft Hamilcar'' glider can carry one Tetrarch tank and its crew in the storage compartment. By 1942, the War Office had redesignated the Tetrarch as an "airborne" tank and the essential unit with the Tetrarch on hand was the "C" Squadron, converted into an independent tank unit and brought to the airborne forces in June 1942. Though intentionally in 1st Airborne Division and primed for the invasion of Sicily, not enough gliders for the Tetrarchs were available so they were left behind, the "C" squadron was transferred to 6th Airborne Division in April 1943. The squadron was expanded into a regiment by bringing in more light tanks and other reconnaissance vehicles, the regiment has at least 21 Tetrarchs on hand in its three squadrons in May 1944, some modified with a 76.2 mm howitzer for close support (CS) and others retaining the 2-pounder that has littlejohn adaptors that increased its penetration capabilities. A consistent problem for the airborne forces was the low number of tanks available to them; with only 50 available Tetrarchs reported in December 1942, the demand could not be met, thus a new airborne tank design must be made to fill this demand, which the specifications was sent to the United States for manufacturing. | ||
| + | |||
| + | The next British operation using the Tetrarch was Operation Tonga, which was an airborne operation that took place alongside D-Day with the objective to capture two bridges over the Caen Canal and Orne River. This began in June 5, 1944 with only parachute brigades landing first to clear anti-glider obstacles on the landing zones, which then allowed the gliders to land on the next day, carrying the tanks with them. As they landed, the tank force of about twenty tanks became depleted by four tanks from glider incidents, the remaining Tetrarchs still operational were ordered to link-up with 8th Parachute Battalion to preform reconnaissance. The general notion with the Tetrarch was for it to avoid any contact with German armour as even the most typical German unit like the [[Pz.Kpfw. III Ausf. M|Panzer III]] can destroy the Tetrarch, so the tank was relegated to infantry support. By August 1944, the majority of the Tetrarchs in the squadron were replaced with [[Mark VIII A27M Cromwell V|Cromwells]] and only three Tetrarchs remained with the Headquarters troop of the Regiment. | ||
| + | |||
| + | Operation Tonga was the last World War II conflict involving the Tetrarch, and it was replaced by the [[Light Tank M22 Locust|M22 Locust]] in October 1944. Though declared obsolete in January 1946, the Tetrarchs stayed with a few units like the 3rd Hassar until 1949.<ref name="ImagesOfWarBritishWW2Tanks"/> The Tetrarch in every military branch, even in training exercises, were formally removed from service by 1950. | ||
== Media == | == Media == | ||
''An excellent addition to the article will be video guides, as well as screenshots from the game and photos.'' | ''An excellent addition to the article will be video guides, as well as screenshots from the game and photos.'' | ||
| + | |||
| + | ==References== | ||
| + | <references /> | ||
== Read also == | == Read also == | ||
| − | ''Links to the articles on the War Thunder Wiki that you think will be useful for the reader, for example,'' | + | <!--''Links to the articles on the War Thunder Wiki that you think will be useful for the reader, for example,'' |
* ''reference to the series of the vehicles;'' | * ''reference to the series of the vehicles;'' | ||
* ''links to approximate analogues of other nations and research trees.'' | * ''links to approximate analogues of other nations and research trees.'' | ||
| − | ''ETC.'' | + | ''ETC.''--> |
| + | [https://warthunder.com/en/devblog/current/847/ [Devblog<nowiki>]</nowiki> Tetrarch Mk I]<br/> | ||
== Sources == | == Sources == | ||
| Line 51: | Line 268: | ||
* ''topic on the official game forum;'' | * ''topic on the official game forum;'' | ||
* ''other literature.'' | * ''other literature.'' | ||
| + | |||
| + | {{Britain light tanks}} | ||
Revision as of 22:45, 2 November 2018
Contents
Description

The Mark VII A17 Tetrarch Mk.I (or just Tetrarch) is a reserve Rank I British light tank with a battle rating of 1.0. It was introduced along with the initial British tank tree line in Update 1.55 "Royal Armour". A light tank with a 2-pounder, it fits the British light line of a fast tank with a powerful gun. but with weak armour.
The Tetrarch plays along like any other Rank I vehicle in the game. Zip around with high speed to the destination and get a first shot off on the enemy tank (preferably the gunner). The 2-pounder can penetrate most enemy tanks at close range and the 40 mm shells can cause a decent amount of shrapnel that can damage most of the internals at the area of the penetration. The mobility is great with the adequate horsepower to propel the 7 ton tank around. The armour is barely adequate for Rank I, with its flat surfaces encouraging penetration with the cramped interiors making one-hit destruction a worrying situation for the Tetrarch.
General info
Survivability and armour
Armour type:
- Rolled homogeneous armour
- Cast homogeneous armour (Gun mantlet)
| Armour | Front | Sides | Rear | Roof |
|---|---|---|---|---|
| Hull | 16 mm (15°) Driver's port 16 mm (2°) Front plate 10 mm (72°) Front glacis 16 mm (19-43°) Lower glacis |
14 mm (0-1°) | 10 mm (22-51°) | 7 mm (79-88°) |
| Turret | 14 mm (18°) Turret front 16 mm (10-80°) Gun mantlet |
14 mm (13-15°) | 10 mm (2°) | 4 mm |
Notes:
- Suspension wheels and tracks are 15 mm thick.
- A little glimpse of the 4mm roof can be see from the front. A well placed HE round will penetrate and result in a knock-out.
Mobility
| Mobility characteristic | ||
|---|---|---|
| Weight (tons) | Add-on Armor weight (tons) |
Max speed (km/h) |
| 7.6 | N/A | 74 (AB) |
| 67 (RB/SB) | ||
| Engine power (horsepower) | ||
| Mode | Stock | Upgraded |
| Arcade | 256 | 315 |
| Realistic/Simulator | 146 | 165 |
| Power-to-weight ratio (hp/ton) | ||
| Mode | Stock | Upgraded |
| Arcade | 33.68 | 41.45 |
| Realistic/Simulator | 19.21 | 21.71 |
Armaments
Main armament
| 40 mm OQF 2-pounder | |||||
|---|---|---|---|---|---|
| Capacity | Vertical guidance |
Horizontal guidance |
Stabilizer | ||
| 50 | -15°/+25° | ±180° | Vertical | ||
| Turret rotation speed (°/s) | |||||
| Mode | Stock | Upgraded | Prior + Full crew | Prior + Expert qualif. | Prior + Ace qualif. |
| Arcade | 4.20 | 5.80 | _.__ | _.__ | _.__ |
| Realistic | 4.20 | 4.90 | _.__ | _.__ | _.__ |
| Reloading rate (seconds) | |||||
| Stock | Prior + Full crew | Prior + Expert qualif. | Prior + Ace qualif. | ||
| 3.64 | _.__ | _.__ | _.__ | ||
Ammunition
| Penetration statistics | |||||||
|---|---|---|---|---|---|---|---|
| Ammunition | Type of warhead |
Penetration in mm @ 90° | |||||
| 10m | 100m | 500m | 1000m | 1500m | 2000m | ||
| Shot Mk.1 AP/T | AP | 80 | 79 | 61 | 46 | 32 | 21 |
| Shot Mk.1 APCBC/T | APCBC | 74 | 72 | 64 | 58 | 48 | 43 |
| Shell details | ||||||||||
|---|---|---|---|---|---|---|---|---|---|---|
| Ammunition | Type of warhead |
Velocity in m/s |
Projectile Mass in kg |
Fuse delay
in m: |
Fuse sensitivity
in mm: |
Explosive Mass in g (TNT equivalent): |
Normalization At 30° from horizontal: |
Ricochet: | ||
| 0% | 50% | 100% | ||||||||
| Shot Mk.1 AP/T | AP | 853 | 1.1 | N/A | N/A | N/A | -1° | 47° | 60° | 65° |
| Shot Mk.1 APCBC/T | APCBC | 853 | 1.2 | N/A | N/A | N/A | +4° | 48° | 63° | 71° |
Ammo racks
Last updated: 1.77.2.128

| Full ammo |
1st rack empty |
2nd rack empty |
3rd rack empty |
4th rack empty |
Visual discrepancy |
|---|---|---|---|---|---|
| 50 | 38 (+12) | 25 (+25) | 13 (+27) | 1 (+49) | Yes |
Machine guns
| 7.92 mm BESA | ||||||
|---|---|---|---|---|---|---|
| Coaxial mount | ||||||
| Capacity (Belt capacity) | Fire rate (shots/minute) |
Vertical guidance |
Horizontal guidance | |||
| 2,025 (225) | 600 | N/A | N/A | |||
Usage in the battles
This tank is all about mobility: it can nearly go anywhere fast, surprising the enemy. Being one of the smallest vehicles in game, the Tetrarch will be able to roll through the thinnest passages at high speed. Its short hull enables it to cross hilly woods and rocky ground without ditching. On gear 1, it can climb any hill, as long as it sticks to the ground, thus reaching advantageous spots from where it can snipe using its good gun depression, showing only its tiny turret. Although, it is recommended to change position often since anyone knowing where the Tetrarch is can pin it down easily (remember that the Tetrarch only have 3 crew members and thin armour). Consider flanking with this vehicle since it has such a good speed but beware the Tetrarch's slow turret slewing rate, so pre-aim the cannon in the expected direction of the enemy.
Target isolated enemies since the 2-pounder gun does not have significant post-penetration damage. Shoot the gunner first to disable it from returning fire, then, stop it from moving by shooting the driver, engine or transmission. Et voilà ! then, disable every crewmen one by one. Make sure to shoot at the gunner's and driver's position every 3-4 shots since it takes roughly 15 seconds to replace them.
Use the Tetrarch's awesome off-road mobility and climbing to get into an unusual position behind enemy lines, fire a few shot and disappear in the shadows. If the Tetrarch gets spotted before finishing an enemy, flee: staying alive is more important than destroying someone, finish the enemy off later, when they have forgotten about the Tetrarch's presence.
Otherwise, anyone playing the Tetrach should get back behind friendly lines if two or more enemies are approaching since it's canon can only take down enemies one by one, patiently shooting down each crewmens.
As with any tank equipped with the QF 2-pounder, little post-penetration damage makes large and crowded tanks a nightmare, thus, LVT(A)(1), T-28 and the less common T-35 should be avoided or fleed.
Pros and cons
Pros:
- Powerful gun.
- High top speed.
- Vertical stabilizer available for the 2-pounder.
- Small profile.
- Awesome acceleration (kicks when it starts).
- Good climbing ability.
- Short hull:Hard to cross ditches.
- Fast reloads.
- Coaxial MG.
Cons:
- Rather slow turret traverse.
- High speed often makes the vehicle hard to control.
- Incredibly thin armour.
- Low crew count of 3.
- Very light and thus ramming can deal major internal damage and knockout crew.
- Vulnerable to artillery.
- Only reaches max speed when going down a slope.
History
Development
Development for this tank started in 1937 by Vickers-Armstrongs privately as the Light Tank Mk VII and nicknamed the Purdah.[1]. The intention was for the tank to be sold to either the British Army or foreign countries as the latest light tank of the company. It's predecessor, the Mk VIB Light Tank, was considered insufficient in firepower, armed with only machine guns. The new design would use the new 2-pounder gun along with a coaxial machine gun. The Mk VII design was finished around 1938, and the British War Office (government administrating the British Army) took up the design for trials in May 1938 that lasted until June. The trials tested the Mk VII's ability to act as a "light cruiser", but this failed as the A13 cruiser was much better at the task. Thus, it was suggested that the Mk VII be tested as a light tank instead and production to be started for the trials. During the trials, the War Office gave the Mk VII the specification number A17 for identification and was put into limited production in November 1938 with a few design changes. It was initially known as the "Purdah" from its standardization date, but in September 22, 1941, the Mk VII Light Tank also received the name 'Tetrarch' as part of an order to distinguish tanks by chosen names.
Demand for the tank fluctuated depending on the War Office demand for the tank. In July 1938, the first order came for 70 tanks, then 100, then 120 in November, then back to 70 in July 1940. This order then jumped back to 100, then finally settled on 220 after Metropolitan Cammell Carriage and Wagon, a part of Vickers-Armstrong, had enough armour plating to create that many tanks. Production was suppose to start in July 1940, but was delayed due to many factors, especially with World War II now on full swing against Germany. Light tank also soon fell out of War Office use after the poor performance they showed in the Battle of France, so military production was focused on the infantry and cruiser tanks rather than light tanks. Bombing raids by the Luftwaffe in the Blitz also disrupted the production of the tanks when the factories intended for their production were targeted. These delays due to waning military interest, the pressure of war, and enemy attacks caused only a small number of Tetrarch light tanks to be produced, with 177 units produced from 1938 to 1942.[1]
Design
The Tetrarch featured armour only about 16 mm thick and the whole design weighed about 7.6 tonnes. The vehicle moved on a eight road wheel (four on each side) suspension system and there were no other driver or idler wheel present. The engine powering the vehicle was a 165 hp Meadows Type 30 engine that can propel the vehicle up to a speed of 64 km/h. The vehicle functions on a steering mechanism and mechanical system taken from earlier Vickers tanks, the unique steering mechanism allowed for turning by bending the tracks on each side of the tank rather than by braking a set of track, but the latter was still involved when making sharper turns and low speed turns.[1]
However, the Tetrarch presented many faults in its design during its time with the British military. The small size of the tank only allowed a crew of three for the tank to operate, making it a very cramped and the crew overworked. Also, the Tetrarch's cooling system was faulty, enough so that the Tetrarch was an unsuitable tank for the North Africa campaign due to the hot climate at the area.
Combat usage
The Tetrarch was first issued in November 1940 to the 1st and 6th Armoured Division, the 1st had lost most of their equipment in the Battle of France and the 6th was a newly formed unit. While these units were sent to North Africa, the defects in the engine cooling system forced the Tetrarchs to stay behind, until they were taken out of armoured divisions due to the "light tank" concept becoming obsolete, though they were still used as training vehicles.
The Tetrarchs still saw use overseas as part of the Lend-Lease program, and 20 were supplied to the Soviet Union in 1942 to fight back the invading German Army. In the cold Russian weather, it was noted that the cooling problem was still present and the cold also caused damages to the tank's suspension and tracks. The vehicle was well-liked for its handling, maneuverability, and speed, plus was compatible with low-octane fuel the Soviets used in their diesel-powered tanks. The Soviets compared the Tetrarch's capabilities to their T-70 light tank and employed the Tetrarch in the same roles. Some were used for training, other as propaganda purposes, and combat, with a notable event where two were assigned to the 132nd Separated Tank Battalion in September 1943. Both Tetrarchs were destroyed in combat.
Back to the British, in mid-1941, the Tetrarch was still integrated in the Royal Armoured Corps as part of tank squadrons that would be sent to overseas operations. The three Special Service Squadrons exist as "A", "B", and "C"; "A" and "B" were armed with the older Mk VI light tank and the Valentine tank, but the "C" squadron was equipped with 12 Tetrarchs in its ranks. These squadrons were first used in Freetown, West Africa in order to ensure Spain does not enter the conflict on Germany's side, then the squadrons were withdrawn to Operation Ironclad, the invasion of Madagascar. Six Tetrarchs were deployed alongside Valentines in "B" Special Service Squadron, which took elements of "B" and "C" squadron. The invasion commenced on May 5, 1942 and "B" Squadron encountered difficulty after a Tetrarch became stuck in the beach after coming loose from a landing craft. The Tetrarch and Valentine were still able to assist the infantry after that delay, but the rocky terrain in the region made tank maneuvering difficult. After two days of combat, the forces on the island formally surrendered, the losses experienced by the squadron were 8 tanks knocked out, with only four tanks (1 Valentine and 3 Tetrarchs) left functional.
After Operation Ironclad, the Tetrarchs were shifted in their roles to become part of the airborne forces after War Office and the Army decided that the light tanks of the day were not capable of competing against other tanks. It was in mid-1941 when the Airborne forces decided to use gliders as part of their landing equipment and the General Aircraft Hamilcar glider can carry one Tetrarch tank and its crew in the storage compartment. By 1942, the War Office had redesignated the Tetrarch as an "airborne" tank and the essential unit with the Tetrarch on hand was the "C" Squadron, converted into an independent tank unit and brought to the airborne forces in June 1942. Though intentionally in 1st Airborne Division and primed for the invasion of Sicily, not enough gliders for the Tetrarchs were available so they were left behind, the "C" squadron was transferred to 6th Airborne Division in April 1943. The squadron was expanded into a regiment by bringing in more light tanks and other reconnaissance vehicles, the regiment has at least 21 Tetrarchs on hand in its three squadrons in May 1944, some modified with a 76.2 mm howitzer for close support (CS) and others retaining the 2-pounder that has littlejohn adaptors that increased its penetration capabilities. A consistent problem for the airborne forces was the low number of tanks available to them; with only 50 available Tetrarchs reported in December 1942, the demand could not be met, thus a new airborne tank design must be made to fill this demand, which the specifications was sent to the United States for manufacturing.
The next British operation using the Tetrarch was Operation Tonga, which was an airborne operation that took place alongside D-Day with the objective to capture two bridges over the Caen Canal and Orne River. This began in June 5, 1944 with only parachute brigades landing first to clear anti-glider obstacles on the landing zones, which then allowed the gliders to land on the next day, carrying the tanks with them. As they landed, the tank force of about twenty tanks became depleted by four tanks from glider incidents, the remaining Tetrarchs still operational were ordered to link-up with 8th Parachute Battalion to preform reconnaissance. The general notion with the Tetrarch was for it to avoid any contact with German armour as even the most typical German unit like the Panzer III can destroy the Tetrarch, so the tank was relegated to infantry support. By August 1944, the majority of the Tetrarchs in the squadron were replaced with Cromwells and only three Tetrarchs remained with the Headquarters troop of the Regiment.
Operation Tonga was the last World War II conflict involving the Tetrarch, and it was replaced by the M22 Locust in October 1944. Though declared obsolete in January 1946, the Tetrarchs stayed with a few units like the 3rd Hassar until 1949.[1] The Tetrarch in every military branch, even in training exercises, were formally removed from service by 1950.
Media
An excellent addition to the article will be video guides, as well as screenshots from the game and photos.
References
Read also
Sources
Paste links to sources and external resources, such as:
- topic on the official game forum;
- other literature.
| Britain light tanks | |
|---|---|
| A13 | A13 Mk I · A13 Mk I (3rd R.T.R.) · A13 Mk II · A13 Mk II 1939 |
| A15 | Crusader II · Crusader "The Saint" · Crusader III |
| A17 | Tetrarch I |
| IFV | Warrior |
| Wheeled | Daimler Mk II · AEC Mk II · Fox · Vickers Mk.11 |
| Other | VFM5 |
| South Africa | |
| SARC | SARC MkIVa · SARC MkVI (2pdr) · SARC MkVI (6pdr) |
| Ratel | Ratel 90 · Ratel 20 |
| Rooikat | Rooikat Mk.1D · Rooikat 105 · Rooikat MTTD |
| Other | Concept 3 · Eland 90 Mk.7 |
| USA | Stuart I · Stuart III |
