Difference between revisions of "Tashkent"
(Added tables and basic info.) |
(modules) (Tag: Visual edit) |
||
| (12 intermediate revisions by 5 users not shown) | |||
| Line 3: | Line 3: | ||
== Description == | == Description == | ||
<!--''In the first part of the description, cover the history of the ship’s creation and military application. In the second part, tell the reader about using this ship in the game. Add a screenshot. If a beginner player has a hard time remembering vehicles by name, a picture will help them understand which ship is being discussed.''--> | <!--''In the first part of the description, cover the history of the ship’s creation and military application. In the second part, tell the reader about using this ship in the game. Add a screenshot. If a beginner player has a hard time remembering vehicles by name, a picture will help them understand which ship is being discussed.''--> | ||
| − | + | [[File:GarageImage_{{PAGENAME}}.jpg|420px|thumb|left]] | |
| − | + | {{Break}} | |
| − | The '''{{specs|name}}''' is a | + | The '''{{specs|name}}''' is a rank {{specs|rank}} Soviet destroyer {{Battle-rating|1}}. It was introduced in [[Update 1.85 "Supersonic"]]. This is a final Soviet Destroyer, which is a pinnacle of the line, both historically and in the game as well. |
== General info == | == General info == | ||
=== Survivability and armour === | === Survivability and armour === | ||
| − | + | ''Talk about the vehicle's armour. Note the most well-defended and most vulnerable zones, e.g. the ammo magazine. Evaluate the composition of components and assemblies responsible for movement and manoeuvrability. Evaluate the survivability of the primary and secondary armament separately. Don't forget to mention the size of the crew, which plays an important role in fleet mechanics. Tips for preserving survivability should be saved for the "Use in battle" section.'' | |
| − | |||
| − | |||
| − | |||
| − | |||
| − | |||
| − | |||
| − | |||
| − | |||
| − | |||
| − | |||
| − | |||
| − | |||
| − | |||
| − | |||
| − | |||
| − | |||
| − | |||
| − | |||
| − | |||
| + | ''If necessary, use a graphic template to show the most well-protected or most vulnerable points in the armour.'' | ||
=== Mobility === | === Mobility === | ||
| − | + | ''Write about the ship’s mobility. Evaluate its power and manoeuvrability, rudder rerouting speed, stopping speed at full tilt, with its maximum forward speed and reverse speed.'' | |
| − | |||
| − | |||
| − | |||
| − | |||
| − | |||
| − | |||
| − | |||
| − | |||
| − | |||
| − | |||
| − | |||
| − | |||
| − | |||
| − | |||
| − | |||
| − | |||
| − | |||
| − | |||
| − | |||
| − | |||
| − | |||
| − | |||
| − | |||
== Armament == | == Armament == | ||
=== Primary armament === | === Primary armament === | ||
| − | + | {{main|B-13 (130 mm)}} | |
| − | + | ''Provide information about the characteristics of the primary armament. Evaluate their efficacy in battle based on their reload speed, ballistics and the capacity of their shells.'' | |
| − | |||
| − | + | ''Broadly describe the ammunition available for the primary armament, and provide recommendations on how to use it and which ammunition to choose.'' | |
| − | |||
| − | |||
| − | |||
| − | |||
| − | |||
| − | |||
| − | |||
| − | |||
| − | |||
| − | |||
| − | |||
| − | |||
| − | |||
| − | |||
| − | |||
| − | |||
| − | |||
| − | |||
| − | |||
| − | |||
| − | |||
| − | |||
| − | |||
| − | |||
| − | |||
| − | |||
| − | |||
| − | |||
| − | |||
| − | |||
| − | |||
| − | |||
| − | |||
| − | |||
| − | |||
| − | |||
| − | |||
| − | |||
| − | |||
| − | |||
| − | |||
| − | |||
| − | |||
| − | |||
| − | |||
| − | |||
| − | |||
| − | |||
| − | |||
| − | |||
| − | |||
| − | |||
| − | |||
| − | |||
| − | |||
| − | |||
| − | |||
| − | |||
| − | |||
| − | |||
| − | |||
| − | |||
| − | |||
| − | |||
| − | |||
| − | |||
| − | |||
| − | |||
| − | |||
=== Secondary armament === | === Secondary armament === | ||
| − | + | {{main|39-K (76 mm)}} | |
| + | ''Some ships are fitted with weapons of various calibres. Secondary armament is defined by the weapon chosen with the control <code>Select secondary weapon</code>. Evaluate the secondary armament and give advice on how to use them. Describe the ammunition available for the secondary armament. Provide recommendations on how to use them and which ammunition to choose. Remember that anti-air armament, even heavy calibre weapons, belong in the next section.'' | ||
| − | + | === Anti-aircraft armament === | |
| − | {{main| | + | {{main|70-K (37 mm)|DShK (12.7 mm)}} |
| + | ''An important part of the ship’s armament responsible for air raid defense. Anti-aircraft armament is defined by the weapon chosen with the control <code>Select anti-aircraft weapons</code>. Talk about the ship’s anti-air cannons and machine guns, the number of guns and their positions, their effective range, and about their overall effectiveness – including against surface targets.'' | ||
| − | + | === Torpedo armament === | |
| − | + | {{main|53-39 (533 mm)}} | |
| − | + | ''Many ships are armed with torpedo launchers, and for some vessels such as boats, torpedoes are an extremely important means of defeating an opponent. Evaluate the position of the torpedo launchers, discuss the ammunition available, firing specifics such as dead zones, features of the torpedoes themselves, etc.'' | |
| − | |||
| − | |||
| − | |- | ||
| − | |||
| − | |||
| − | |||
| − | |||
| − | |||
| − | |||
| − | |||
| − | |||
| − | |||
| − | |||
| − | |||
| − | |||
| − | |||
| − | |||
| − | |||
| − | == | + | == Usage in battles == |
| − | + | ''Describe the technique of using this ship, the characteristics of her use in a team and tips on strategy. Abstain from writing an entire guide – don’t get try to provide a single point of view, but give the reader food for thought. Talk about the most dangerous opponents for this vehicle and provide recommendations on fighting them. If necessary, note the specifics of playing with this vehicle in various modes (AB, RB, SB).'' | |
| − | |||
| − | |||
| − | |||
| − | |||
| − | |||
| − | |||
| − | |||
| − | |||
| − | |||
| − | === | + | === Modules === |
| − | + | {| class="wikitable" | |
| − | + | !Tier | |
| − | + | !Seakeeping | |
| − | + | ! colspan="2" |Unsinkability | |
| − | + | ! colspan="3" |Firepower | |
| − | {| class="wikitable" | ||
| − | | | ||
| − | ! colspan=" | ||
|- | |- | ||
| − | + | |I | |
| + | |Dry-Docking | ||
| + | |Tool Set | ||
| + | | | ||
| + | |130 mm PB-46A SAPBC | ||
| + | |76 mm O-361D | ||
| + | |Anti-Air Armament Targeting | ||
|- | |- | ||
| − | + | |II | |
| + | |Rudder Replacement | ||
| + | |Fire Protection System | ||
| + | |Smokescreen | ||
| + | | | ||
| + | |76 mm BR-361 | ||
| + | |Auxiliary Armament Targeting | ||
|- | |- | ||
| − | + | |III | |
| − | | | + | |Propeller Replacement |
| − | + | |Shrapnel Protection | |
| − | + | |Ventilation | |
| − | | | + | |130 mm ZS-46R HE-VT |
| − | |- | + | |Improved Rangefinder |
| − | + | |Primary Armament Targeting | |
| − | |||
| − | |||
| − | |||
| − | | | ||
|- | |- | ||
| + | |IV | ||
| + | |Engine Maintenance | ||
| + | |New Pumps | ||
| + | |Ammo Wetting | ||
| + | | | ||
| + | | | ||
| + | |Torpedo Mode | ||
|} | |} | ||
| − | === | + | === Pros and cons === |
| − | + | ''Summarize and briefly evaluate the vehicle in terms of its characteristics and combat effectiveness. Mark its pros and cons in the bulleted list. Try not to use more than 6 points for each of the characteristics. Avoid using categorical definitions such as "bad", "good" and the like - they have a substitution in the form of softer "inadequate", "effective".'' | |
| − | '' | + | '''Pros:''' |
| − | |||
| − | |||
| − | |||
| − | |||
| − | |||
| − | |||
| − | |||
| − | |||
| − | |||
| − | |||
| − | |||
| − | |||
| − | |||
| − | |||
| − | |||
| − | |||
| − | |||
| − | |||
| − | |||
| − | |||
* | * | ||
'''Cons:''' | '''Cons:''' | ||
| + | |||
* | * | ||
== History == | == History == | ||
| − | '' | + | <!--''Describe the history of the creation and combat usage of the ship in more detail than in the introduction. If the historical reference turns out to be too big, take it to a separate article, taking a link to an article about the vehicle and adding a block "/ History" (example: <nowiki>https://wiki.warthunder.com/(Vehicle-name)/History</nowiki>) and add a link to it here using the <code>main</code> template. Be sure to reference text and sources by using <code><nowiki><ref></nowiki></code>, as well as adding them at the end of the article.''--> |
| + | |||
| + | The Tashkent, also known as the "Blue Cruiser", was designed with the help of Italians to succeed over the failings of the preceding Leningrad-class destroyers. Consequently, the Tashkent-class destroyer became one of the most powerful destroyers in the world, fighting with the Black Sea Fleet and was sunk in Sevastopol in 1942. Guns from the destroyer were used on the succeeding [[Pr. 30 Ognevoy|Ognevoy]] destroyer after the Tashkent was salvaged. | ||
== Media == | == Media == | ||
| + | ''An excellent addition to the article will be video guides, as well as screenshots from the game and photos.'' | ||
| + | == See also == | ||
| + | ''Links to the articles on the War Thunder Wiki that you think will be useful for the reader, for example:'' | ||
| − | + | * ''reference to the series of the ship;'' | |
| − | * | + | * ''links to approximate analogues of other nations and research trees.'' |
| − | == | + | == External links == |
''Paste links to sources and external resources, such as:'' | ''Paste links to sources and external resources, such as:'' | ||
| + | |||
* ''topic on the official game forum;'' | * ''topic on the official game forum;'' | ||
| − | * ''page on ship | + | * ''encyclopedia page on ship;'' |
* ''other literature.'' | * ''other literature.'' | ||
{{USSR destroyers}} | {{USSR destroyers}} | ||
Revision as of 02:03, 5 July 2020
Contents
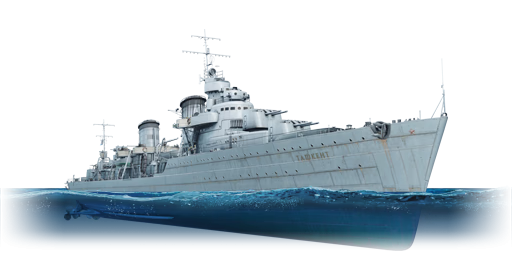
Description

The Pr.20, Tashkent, 1942 is a rank II Soviet destroyer
with a battle rating of 4.7 (AB/RB/SB). It was introduced in Update 1.85 "Supersonic". This is a final Soviet Destroyer, which is a pinnacle of the line, both historically and in the game as well.
General info
Survivability and armour
Talk about the vehicle's armour. Note the most well-defended and most vulnerable zones, e.g. the ammo magazine. Evaluate the composition of components and assemblies responsible for movement and manoeuvrability. Evaluate the survivability of the primary and secondary armament separately. Don't forget to mention the size of the crew, which plays an important role in fleet mechanics. Tips for preserving survivability should be saved for the "Use in battle" section.
If necessary, use a graphic template to show the most well-protected or most vulnerable points in the armour.
Mobility
Write about the ship’s mobility. Evaluate its power and manoeuvrability, rudder rerouting speed, stopping speed at full tilt, with its maximum forward speed and reverse speed.
Armament
Primary armament
Provide information about the characteristics of the primary armament. Evaluate their efficacy in battle based on their reload speed, ballistics and the capacity of their shells.
Broadly describe the ammunition available for the primary armament, and provide recommendations on how to use it and which ammunition to choose.
Secondary armament
Some ships are fitted with weapons of various calibres. Secondary armament is defined by the weapon chosen with the control Select secondary weapon. Evaluate the secondary armament and give advice on how to use them. Describe the ammunition available for the secondary armament. Provide recommendations on how to use them and which ammunition to choose. Remember that anti-air armament, even heavy calibre weapons, belong in the next section.
Anti-aircraft armament
An important part of the ship’s armament responsible for air raid defense. Anti-aircraft armament is defined by the weapon chosen with the control Select anti-aircraft weapons. Talk about the ship’s anti-air cannons and machine guns, the number of guns and their positions, their effective range, and about their overall effectiveness – including against surface targets.
Torpedo armament
Many ships are armed with torpedo launchers, and for some vessels such as boats, torpedoes are an extremely important means of defeating an opponent. Evaluate the position of the torpedo launchers, discuss the ammunition available, firing specifics such as dead zones, features of the torpedoes themselves, etc.
Usage in battles
Describe the technique of using this ship, the characteristics of her use in a team and tips on strategy. Abstain from writing an entire guide – don’t get try to provide a single point of view, but give the reader food for thought. Talk about the most dangerous opponents for this vehicle and provide recommendations on fighting them. If necessary, note the specifics of playing with this vehicle in various modes (AB, RB, SB).
Modules
| Tier | Seakeeping | Unsinkability | Firepower | |||
|---|---|---|---|---|---|---|
| I | Dry-Docking | Tool Set | 130 mm PB-46A SAPBC | 76 mm O-361D | Anti-Air Armament Targeting | |
| II | Rudder Replacement | Fire Protection System | Smokescreen | 76 mm BR-361 | Auxiliary Armament Targeting | |
| III | Propeller Replacement | Shrapnel Protection | Ventilation | 130 mm ZS-46R HE-VT | Improved Rangefinder | Primary Armament Targeting |
| IV | Engine Maintenance | New Pumps | Ammo Wetting | Torpedo Mode | ||
Pros and cons
Summarize and briefly evaluate the vehicle in terms of its characteristics and combat effectiveness. Mark its pros and cons in the bulleted list. Try not to use more than 6 points for each of the characteristics. Avoid using categorical definitions such as "bad", "good" and the like - they have a substitution in the form of softer "inadequate", "effective".
Pros:
Cons:
History
The Tashkent, also known as the "Blue Cruiser", was designed with the help of Italians to succeed over the failings of the preceding Leningrad-class destroyers. Consequently, the Tashkent-class destroyer became one of the most powerful destroyers in the world, fighting with the Black Sea Fleet and was sunk in Sevastopol in 1942. Guns from the destroyer were used on the succeeding Ognevoy destroyer after the Tashkent was salvaged.
Media
An excellent addition to the article will be video guides, as well as screenshots from the game and photos.
See also
Links to the articles on the War Thunder Wiki that you think will be useful for the reader, for example:
- reference to the series of the ship;
- links to approximate analogues of other nations and research trees.
External links
Paste links to sources and external resources, such as:
- topic on the official game forum;
- encyclopedia page on ship;
- other literature.
| USSR destroyers | |
|---|---|
| Imperial Russia | |
| Derzky-class | Frunze |
| Fidonisy-class | Kerch |
| Soviet Union | |
| Pr. 1 | Leningrad · Moskva |
| Pr. 45 | Opytny |
| Pr. 7 | Besposhchadny · Ryany |
| Pr. 7U | Soobrazitelny · Stroyny |
| Pr. 20 | Tashkent |
| Pr. 30 | Ognevoy |
| Pr. 30-bis | Smelyi · Bezuprechny |
| Pr. 41 | Neustrashimy |
| Pr. 56 | Spokoinyy · Blagorodnyy · Bravy |
| Trophies | Romania |
| Regele Ferdinand-class | Letuchiy |
