Difference between revisions of "T-62M-1"
Inceptor57 (talk | contribs) (Restored page) |
|||
| Line 2: | Line 2: | ||
== Description == | == Description == | ||
| − | ''In the description, the first part needs to be about the history of the creation and combat usage of the vehicle, as well as its key features. In the second part, tell the reader about the ground vehicle in the game. Insert the screenshot of the vehicle. If the novice player does not remember the vehicle by name, they will immediately understand what kind of vehicle it is talking about.'' | + | <!--''In the description, the first part needs to be about the history of the creation and combat usage of the vehicle, as well as its key features. In the second part, tell the reader about the ground vehicle in the game. Insert the screenshot of the vehicle. If the novice player does not remember the vehicle by name, they will immediately understand what kind of vehicle it is talking about.''--> |
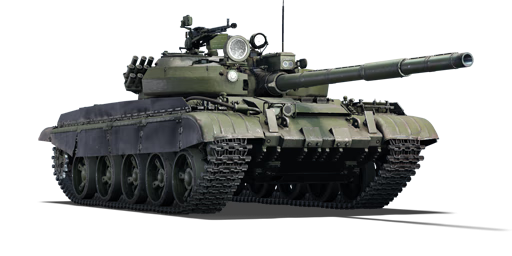
| + | [[File:GarageImage_{{PAGENAME}}.jpg|420px|thumb|left]] | ||
| + | {{break}} | ||
| + | The '''{{Specs|name}}''' is a Rank {{Specs|rank}} Soviet medium tank {{Battle-rating|1}}. It was introduced in [[Update 1.79 "Project X"]]. | ||
| + | |||
| + | The T-62M-1 is very much similar to the premium [[T-55AM-1]], with distinctive metal-polymer composite add-on armour on the turret cheeks and within the upper frontal plate. Though the latter is often inadequate in dealing most-all ammunition it faces, the turret armour on the T-62M-1 is twice as thick as that found on T-55AM-1. In fact, most of the turret( aside from the gun mantlet) is impervious to most kinetic penetrators, vulnerable mainly to the [[Type 90]] and [[AMX-40]]'s extremely high penetration rods. | ||
| + | |||
| + | The T-62M-1 also has wet ammunition storage bins. 24 rounds are placed within the fuel tank located beside the driver, acting as a spaced armour, protecting the ammunition from HEAT. In fact, rounds within the fuel tank are extremely unlikely to be detonated by HEAT. | ||
== General info == | == General info == | ||
| Line 15: | Line 22: | ||
== Armaments == | == Armaments == | ||
=== Main armament === | === Main armament === | ||
| − | ''Give the reader information about the characteristics of the main gun. Assess its effectiveness in a battle based on the reloading speed, ballistics and the power of shells. Do not forget about the flexibilty of the fire, that is how quickly the cannon can be aimed at the target, open fire on it and aim at another enemy. Add a link to the main article on the gun: <code><nowiki>{{main|Name of the weapon}}</nowiki></code>. Describe in general terms the ammunition available for the main gun. Give advice on how to use them and how to fill the ammunition storage.'' | + | <!--''Give the reader information about the characteristics of the main gun. Assess its effectiveness in a battle based on the reloading speed, ballistics and the power of shells. Do not forget about the flexibilty of the fire, that is how quickly the cannon can be aimed at the target, open fire on it and aim at another enemy. Add a link to the main article on the gun: <code><nowiki>{{main|Name of the weapon}}</nowiki></code>. Describe in general terms the ammunition available for the main gun. Give advice on how to use them and how to fill the ammunition storage.''--> |
| + | {{main|U-5TS (115 mm)}} | ||
| + | |||
| + | {| class="wikitable" style="text-align:center" | ||
| + | |- | ||
| + | ! colspan="6" | [[U-5TS (115 mm)|115 mm U-5TS]] | ||
| + | |- | ||
| + | ! colspan="3" rowspan="1" style="width:5em" |Capacity | ||
| + | ! rowspan="1" | Vertical <br> guidance | ||
| + | ! rowspan="1" | Horizontal <br> guidance | ||
| + | ! rowspan="1" | Stabilizer | ||
| + | |- | ||
| + | | colspan="3" | 40 || -6°/+16° || ±180° || Two-plane | ||
| + | |- | ||
| + | ! colspan="6" | Turret rotation speed (°/s) | ||
| + | |- | ||
| + | ! style="width:4em" |Mode | ||
| + | ! style="width:4em" |Stock | ||
| + | ! style="width:4em" |Upgraded | ||
| + | ! style="width:4em" |Prior + Full crew | ||
| + | ! style="width:4em" |Prior + Expert qualif. | ||
| + | ! style="width:4em" |Prior + Ace qualif. | ||
| + | |- | ||
| + | | ''Arcade'' || __.__ || __.__ || __.__ || __.__ || __.__ | ||
| + | |- | ||
| + | | ''Realistic'' || 9.5 || __.__ || __.__ || __.__ || __.__ | ||
| + | |- | ||
| + | ! colspan="4" | Reloading rate (seconds) | ||
| + | |- | ||
| + | ! colspan="1" style="width:4em" |Stock | ||
| + | ! colspan="1" style="width:4em" |Prior + Full crew | ||
| + | ! colspan="1" style="width:4em" |Prior + Expert qualif. | ||
| + | ! colspan="1" style="width:4em" |Prior + Ace qualif. | ||
| + | |- | ||
| + | | 12.00 || __.__ || __.__ || __.__ | ||
| + | |- | ||
| + | |} | ||
| − | === | + | ===== Ammunition ===== |
| − | '' | + | {| class="wikitable sortable" style="text-align:center" width="100%" |
| + | ! colspan="8" | Penetration statistics | ||
| + | |- | ||
| + | ! rowspan="2" data-sort-type="text" | Ammunition | ||
| + | ! rowspan="2" class="unsortable" | Type of <br /> warhead | ||
| + | ! colspan="6" | '''Penetration''' '''''in mm''''' '''@ 0° Angle of Attack''' | ||
| + | |- | ||
| + | ! 10m | ||
| + | ! 100m | ||
| + | ! 500m | ||
| + | ! 1000m | ||
| + | ! 1500m | ||
| + | ! 2000m | ||
| + | |- | ||
| + | | 3BM21 || APFSDS|| 420 || 415 || 405 || 390 || 380 || 370 | ||
| + | |- | ||
| + | | 3BM28 || APFSDS || 450 || 445 || 435 || 420 || 415 || 410 | ||
| + | |- | ||
| + | | 3BK15M || HEATFS || 500 || 500 || 500 || 500 || 500 || 500 | ||
| + | |- | ||
| + | | 3OF27 || HE || 43 || 43 || 43 || 43 || 43 || 43 | ||
| + | |- | ||
| + | | 9M117 || ATGM || 600 || 600 || 600 || 600 || 600 || 600 | ||
| + | |- | ||
| + | |} | ||
| + | {| class="wikitable sortable" style="text-align:center" width="100%" | ||
| + | ! colspan="11" | Shell details | ||
| + | |- | ||
| + | ! rowspan="2" data-sort-type="text" | Ammunition | ||
| + | ! rowspan="2" class="unsortable" | Type of <br /> warhead | ||
| + | ! rowspan="2" |Velocity <br /> in m/s | ||
| + | ! rowspan="2" |Projectile<br />Mass in kg | ||
| + | ! rowspan="2" | ''Fuse delay'' | ||
| + | ''in m:'' | ||
| + | ! rowspan="2" | ''Fuse sensitivity'' | ||
| + | ''in mm:'' | ||
| + | ! rowspan="2" | ''Explosive Mass in g<br /> (TNT equivalent):'' | ||
| + | ! rowspan="2" | ''Normalization At 30° <br> from horizontal:'' | ||
| + | ! colspan="3" | ''Ricochet:'' | ||
| + | |- | ||
| + | ! 0% | ||
| + | ! 50% | ||
| + | ! 100% | ||
| + | |- | ||
| + | | 3BM21 || APFSDS || 1,620 || 4.6 || N/A || N/A || N/A || +1.5° || 76° || 77° || 78° | ||
| + | |- | ||
| + | | 3BM28 || APFSDS || 1,620 || 4.9 || N/A || N/A || N/A || +1.5° || 76° || 77° || 78° | ||
| + | |- | ||
| + | | 3BK15M || HEATFS || 800 || 12 || 0.0 || 0.1 || 1480 || +0° || 65° || 72° || 75° | ||
| + | |- | ||
| + | | 3OF27 || HE || 800 || 18 || 0.1 || 0.1 || 5320 || +0° || 79° || 80° || 81° | ||
| + | |- | ||
| + | | 9M117 || ATGM || 370 || 19 || 0.1 || 0.01 || 3000 || +0° || 80° || 82° || 90° | ||
| + | |- | ||
| + | |} | ||
| + | |||
| + | ===== [[Ammo racks|Ammo racks]] ===== | ||
| + | {| class="wikitable sortable" style="text-align:center" | ||
| + | |- | ||
| + | ! class="wikitable unsortable" |Full<br /> ammo | ||
| + | ! class="wikitable unsortable" |1st<br /> rack empty | ||
| + | ! class="wikitable unsortable" |2nd<br /> rack empty | ||
| + | ! class="wikitable unsortable" |3rd<br /> rack empty | ||
| + | ! class="wikitable unsortable" |4th<br /> rack empty | ||
| + | ! class="wikitable unsortable" |5th<br /> rack empty | ||
| + | ! class="wikitable unsortable" |6th<br /> rack empty | ||
| + | ! class="wikitable unsortable" |Visual<br /> discrepancy | ||
| + | |- | ||
| + | || '''40''' || XX ''(X+)'' || ''(+)'' || ''(+)'' || ''(+)'' || ''(+)'' || ''(+)'' || style="text-align:left" | no | ||
| + | |- | ||
| + | |} | ||
=== Machine guns === | === Machine guns === | ||
| − | ''Offensive and anti-aircraft machine guns not only allow you to fight some aircraft, but also are effective against lightly armoured vehicles. Evaluate machine guns and give recommendations on its use.'' | + | <!--''Offensive and anti-aircraft machine guns not only allow you to fight some aircraft, but also are effective against lightly armoured vehicles. Evaluate machine guns and give recommendations on its use.''--> |
| + | {{main|DShK (12.7 mm)|SGMT (7.62 mm)}} | ||
| + | |||
| + | {| class="wikitable" style="text-align:center" | ||
| + | |- | ||
| + | ! colspan="7" | [[DShK (12.7 mm)|12.7 mm DShK]] | ||
| + | |- | ||
| + | ! colspan="7" | ''Pintle mount'' | ||
| + | |- | ||
| + | ! colspan="4" rowspan="1" style="width:5em" |Capacity (Belt capacity) | ||
| + | ! rowspan="1" | Fire rate <br> (shots/minute) | ||
| + | ! rowspan="1" | Vertical <br> guidance | ||
| + | ! rowspan="1" | Horizontal <br> guidance | ||
| + | |- | ||
| + | | colspan="4" | 300 (50) || 600 || -10°/+60° || ±180° | ||
| + | |- | ||
| + | |} | ||
| + | {| class="wikitable" style="text-align:center" | ||
| + | |- | ||
| + | ! colspan="7" | [[SGMT (7.62 mm)|7.62 mm SGMT]] | ||
| + | |- | ||
| + | ! colspan="7" | ''Coaxial mount'' | ||
| + | |- | ||
| + | ! colspan="4" rowspan="1" style="width:5em" |Capacity (Belt capacity) | ||
| + | ! rowspan="1" | Fire rate <br> (shots/minute) | ||
| + | ! rowspan="1" | Vertical <br> guidance | ||
| + | ! rowspan="1" | Horizontal <br> guidance | ||
| + | |- | ||
| + | | colspan="4" | 2,500 (250) || 600 || N/A || N/A | ||
| + | |- | ||
| + | |} | ||
== Usage in the battles == | == Usage in the battles == | ||
| − | ''Describe the tactics of playing in the vehicle, the features of using vehicles in the team and advice on tactics. Refrain from creating a "guide" - do not impose a single point of view but give the reader food for thought. Describe the most dangerous enemies and give recommendations on fighting them. If necessary, note the specifics of the game in different modes (AB, RB, SB).'' | + | <!--''Describe the tactics of playing in the vehicle, the features of using vehicles in the team and advice on tactics. Refrain from creating a "guide" - do not impose a single point of view but give the reader food for thought. Describe the most dangerous enemies and give recommendations on fighting them. If necessary, note the specifics of the game in different modes (AB, RB, SB).''--> |
| + | The T-62M-1 should be played like other high tier Soviet MBTs, though with an higher emphasis on range and cover. Hide your hull and use your almost impenetrable turret armour to deflect hostile fire. If possible, try to use cover to conceal your cannon breech, as a well-placed APFSDS can disable your cannon and, depending on which side of tank you were hit from, kill your gunner or loader. A turret penetration may result in a one-shot kill if it hits your ammo. Do not allow yourself to fall into close-range combat areas if at all possible. | ||
| + | |||
| + | Those who have fought and/or used the T-55AM-1 will find the same tactics and assumptions work against the T-62M-1, as well. It performs similarly, mostly just having upgraded the strengths the T-55AM-1 is known for; the turret armour is even better, and the power of the variety of rounds these tanks are known for has been increased, thanks to the increased calibre of the cannon (from 100mm on the T-55AM-1 to 115mm on the T-62M-1). This allows the T-62M-1 to have ways of dealing with vehicles all the way up to 10.0. | ||
| + | |||
| + | Thanks to the incredible turret armour, and highly effective and varied ammunition choices, the T-62M-1 is highly suited for a long-range sniping and support role. Players of tanks such as the Chieftain will have an idea of the playstyle. Use your fast and powerful APFSDS rounds to quickly disable targets travelling quickly at ranges out to several kilometres, use your potent HEAT-FS to dispatch targets at closer ranges, or fire the breech-loaded ATGM for highly accurate shots against exposed targets, both ground and air (especially against helicopters). | ||
| + | |||
| + | Try to avoid close-range engagements at all costs. The T-62M-1 suffers in almost all regards compared to other tanks at closer ranges. Compared to other common tanks, such as the [[XM-1 (GM)]], the T-62M-1 has a far longer reload, worse acceleration and top speed, a larger and slower turning circle, and a poorer turret traverse speed. If you get caught out, try to take quick shots to disable the mobility of enemy tanks if you cannot out-right kill them, and make your goal of upmost importance to leave the area immediately. Use your smoke launchers to hide your retreat, and cover your upper frontal plate at all costs; a penetration on the left side of your front plate will spell instant death. | ||
| + | |||
| + | Beware of high tier American MBTs, as their mobility allows them to easily flank you and get a shot into your weaker side armour. The Type 90 and AMX-40 also pose a grave threat, as they can easily penetrate your turret armour and cripple your tank. | ||
| + | |||
| + | Your tank also has a large amount of weak-spots from even the slightest angle above you, so make sure you take enemy helicopters seriously and deal with them as fast as possible. Your gun elevation isn't the greatest, so make sure you use terrain to help lift your gun as well as present thicker armour profiles. | ||
| + | |||
| + | ===Fighting the T-62M-1=== | ||
| + | The T-62M-1's core strengths lie in the frontal armour and versatile ammunition choices. Do not attempt to out-snipe a T-62M-1 in anything short of a hull-down British MBT. Instead, abuse the T-62M-1's inferior mobility to out-flank it and quickly disable the gun. At closer ranges with higher penetration shells (260mm+ penetration, chemical or kinetic), shooting the cannon breech can also serve to turn the T-62M-1 into an easy kill. | ||
| + | |||
| + | If you're engaging a wary T-62M-1 at closer ranges, try to bait out a shot or wait until he fires. The T-62M-1, depending on crew skills, has a reload of up to 12 seconds, giving a smart opponent plenty of time to take out a T-62M-1 after he fires. Using smoke to hide a quick change in your position can also work well, as both the T-62M-1 itself and its turret turn slowly compared to vehicles it will face, giving you time to drive around it in the confusion. | ||
=== Pros and cons === | === Pros and cons === | ||
| − | ''Summarize and briefly evaluate the vehicle in terms of its characteristics and combat effectiveness. Mark its pros and cons in a bulleted list. Do not use more than 6 points for each of the characteristics. Avoid using categorical definitions such as "bad", "good" and the like - they have a substitution in the form of softer "inadequate", "effective".'' | + | <!--''Summarize and briefly evaluate the vehicle in terms of its characteristics and combat effectiveness. Mark its pros and cons in a bulleted list. Do not use more than 6 points for each of the characteristics. Avoid using categorical definitions such as "bad", "good" and the like - they have a substitution in the form of softer "inadequate", "effective".''--> |
| − | |||
'''Pros:''' | '''Pros:''' | ||
| − | * | + | *Powerful and varied ammunition choices, comparable to several top-rank vehicles |
| − | + | *Access to an ATGM with 600mm chemical, for long range or dealing with helicopters | |
| + | *Tough turret cheek armour for the battle rating | ||
| + | *Wet ammunition storage, within the frontal fuel tank | ||
| + | *Four crew members, compared to the three of most Soviet MBTs | ||
'''Cons:''' | '''Cons:''' | ||
| − | * | + | *Upper front plate armour is inadequate |
| + | *One of the most immobile top tier MBTs | ||
| + | *Three crew members lined-up on the right side of the tank | ||
| + | *Weak gun mantlet, leaving cannon breech highly exposed at closer ranges | ||
== History == | == History == | ||
| Line 51: | Line 215: | ||
* ''topic on the official game forum;'' | * ''topic on the official game forum;'' | ||
* ''other literature.'' | * ''other literature.'' | ||
| + | |||
| + | {{USSR medium tanks}} | ||
| + | [[Category:ATGM vehicles]] | ||
Revision as of 15:52, 12 February 2019
Contents
Description

The T-62M-1 is a Rank VI Soviet medium tank
with a battle rating of 9.0 (AB/RB/SB). It was introduced in Update 1.79 "Project X".
The T-62M-1 is very much similar to the premium T-55AM-1, with distinctive metal-polymer composite add-on armour on the turret cheeks and within the upper frontal plate. Though the latter is often inadequate in dealing most-all ammunition it faces, the turret armour on the T-62M-1 is twice as thick as that found on T-55AM-1. In fact, most of the turret( aside from the gun mantlet) is impervious to most kinetic penetrators, vulnerable mainly to the Type 90 and AMX-40's extremely high penetration rods.
The T-62M-1 also has wet ammunition storage bins. 24 rounds are placed within the fuel tank located beside the driver, acting as a spaced armour, protecting the ammunition from HEAT. In fact, rounds within the fuel tank are extremely unlikely to be detonated by HEAT.
General info
Survivability and armour
Describe armour protection. Note the most well protected and key weak areas. Appreciate the layout of modules as well as the number and location of crew members. Is the level of armour protection sufficient, is the placement of modules helpfull for survival in combat?
If necessary use a visual template to indicate the most secure and weak zones of the armour.
Mobility
Write about the mobility of the ground vehicle. Estimate the specific power and maneuverability as well as the maximum speed forward and backward.
Armaments
Main armament
| 115 mm U-5TS | |||||
|---|---|---|---|---|---|
| Capacity | Vertical guidance |
Horizontal guidance |
Stabilizer | ||
| 40 | -6°/+16° | ±180° | Two-plane | ||
| Turret rotation speed (°/s) | |||||
| Mode | Stock | Upgraded | Prior + Full crew | Prior + Expert qualif. | Prior + Ace qualif. |
| Arcade | __.__ | __.__ | __.__ | __.__ | __.__ |
| Realistic | 9.5 | __.__ | __.__ | __.__ | __.__ |
| Reloading rate (seconds) | |||||
| Stock | Prior + Full crew | Prior + Expert qualif. | Prior + Ace qualif. | ||
| 12.00 | __.__ | __.__ | __.__ | ||
Ammunition
| Penetration statistics | |||||||
|---|---|---|---|---|---|---|---|
| Ammunition | Type of warhead |
Penetration in mm @ 0° Angle of Attack | |||||
| 10m | 100m | 500m | 1000m | 1500m | 2000m | ||
| 3BM21 | APFSDS | 420 | 415 | 405 | 390 | 380 | 370 |
| 3BM28 | APFSDS | 450 | 445 | 435 | 420 | 415 | 410 |
| 3BK15M | HEATFS | 500 | 500 | 500 | 500 | 500 | 500 |
| 3OF27 | HE | 43 | 43 | 43 | 43 | 43 | 43 |
| 9M117 | ATGM | 600 | 600 | 600 | 600 | 600 | 600 |
| Shell details | ||||||||||
|---|---|---|---|---|---|---|---|---|---|---|
| Ammunition | Type of warhead |
Velocity in m/s |
Projectile Mass in kg |
Fuse delay
in m: |
Fuse sensitivity
in mm: |
Explosive Mass in g (TNT equivalent): |
Normalization At 30° from horizontal: |
Ricochet: | ||
| 0% | 50% | 100% | ||||||||
| 3BM21 | APFSDS | 1,620 | 4.6 | N/A | N/A | N/A | +1.5° | 76° | 77° | 78° |
| 3BM28 | APFSDS | 1,620 | 4.9 | N/A | N/A | N/A | +1.5° | 76° | 77° | 78° |
| 3BK15M | HEATFS | 800 | 12 | 0.0 | 0.1 | 1480 | +0° | 65° | 72° | 75° |
| 3OF27 | HE | 800 | 18 | 0.1 | 0.1 | 5320 | +0° | 79° | 80° | 81° |
| 9M117 | ATGM | 370 | 19 | 0.1 | 0.01 | 3000 | +0° | 80° | 82° | 90° |
Ammo racks
| Full ammo |
1st rack empty |
2nd rack empty |
3rd rack empty |
4th rack empty |
5th rack empty |
6th rack empty |
Visual discrepancy |
|---|---|---|---|---|---|---|---|
| 40 | XX (X+) | (+) | (+) | (+) | (+) | (+) | no |
Machine guns
| 12.7 mm DShK | ||||||
|---|---|---|---|---|---|---|
| Pintle mount | ||||||
| Capacity (Belt capacity) | Fire rate (shots/minute) |
Vertical guidance |
Horizontal guidance | |||
| 300 (50) | 600 | -10°/+60° | ±180° | |||
| 7.62 mm SGMT | ||||||
|---|---|---|---|---|---|---|
| Coaxial mount | ||||||
| Capacity (Belt capacity) | Fire rate (shots/minute) |
Vertical guidance |
Horizontal guidance | |||
| 2,500 (250) | 600 | N/A | N/A | |||
Usage in the battles
The T-62M-1 should be played like other high tier Soviet MBTs, though with an higher emphasis on range and cover. Hide your hull and use your almost impenetrable turret armour to deflect hostile fire. If possible, try to use cover to conceal your cannon breech, as a well-placed APFSDS can disable your cannon and, depending on which side of tank you were hit from, kill your gunner or loader. A turret penetration may result in a one-shot kill if it hits your ammo. Do not allow yourself to fall into close-range combat areas if at all possible.
Those who have fought and/or used the T-55AM-1 will find the same tactics and assumptions work against the T-62M-1, as well. It performs similarly, mostly just having upgraded the strengths the T-55AM-1 is known for; the turret armour is even better, and the power of the variety of rounds these tanks are known for has been increased, thanks to the increased calibre of the cannon (from 100mm on the T-55AM-1 to 115mm on the T-62M-1). This allows the T-62M-1 to have ways of dealing with vehicles all the way up to 10.0.
Thanks to the incredible turret armour, and highly effective and varied ammunition choices, the T-62M-1 is highly suited for a long-range sniping and support role. Players of tanks such as the Chieftain will have an idea of the playstyle. Use your fast and powerful APFSDS rounds to quickly disable targets travelling quickly at ranges out to several kilometres, use your potent HEAT-FS to dispatch targets at closer ranges, or fire the breech-loaded ATGM for highly accurate shots against exposed targets, both ground and air (especially against helicopters).
Try to avoid close-range engagements at all costs. The T-62M-1 suffers in almost all regards compared to other tanks at closer ranges. Compared to other common tanks, such as the XM-1 (GM), the T-62M-1 has a far longer reload, worse acceleration and top speed, a larger and slower turning circle, and a poorer turret traverse speed. If you get caught out, try to take quick shots to disable the mobility of enemy tanks if you cannot out-right kill them, and make your goal of upmost importance to leave the area immediately. Use your smoke launchers to hide your retreat, and cover your upper frontal plate at all costs; a penetration on the left side of your front plate will spell instant death.
Beware of high tier American MBTs, as their mobility allows them to easily flank you and get a shot into your weaker side armour. The Type 90 and AMX-40 also pose a grave threat, as they can easily penetrate your turret armour and cripple your tank.
Your tank also has a large amount of weak-spots from even the slightest angle above you, so make sure you take enemy helicopters seriously and deal with them as fast as possible. Your gun elevation isn't the greatest, so make sure you use terrain to help lift your gun as well as present thicker armour profiles.
Fighting the T-62M-1
The T-62M-1's core strengths lie in the frontal armour and versatile ammunition choices. Do not attempt to out-snipe a T-62M-1 in anything short of a hull-down British MBT. Instead, abuse the T-62M-1's inferior mobility to out-flank it and quickly disable the gun. At closer ranges with higher penetration shells (260mm+ penetration, chemical or kinetic), shooting the cannon breech can also serve to turn the T-62M-1 into an easy kill.
If you're engaging a wary T-62M-1 at closer ranges, try to bait out a shot or wait until he fires. The T-62M-1, depending on crew skills, has a reload of up to 12 seconds, giving a smart opponent plenty of time to take out a T-62M-1 after he fires. Using smoke to hide a quick change in your position can also work well, as both the T-62M-1 itself and its turret turn slowly compared to vehicles it will face, giving you time to drive around it in the confusion.
Pros and cons
Pros:
- Powerful and varied ammunition choices, comparable to several top-rank vehicles
- Access to an ATGM with 600mm chemical, for long range or dealing with helicopters
- Tough turret cheek armour for the battle rating
- Wet ammunition storage, within the frontal fuel tank
- Four crew members, compared to the three of most Soviet MBTs
Cons:
- Upper front plate armour is inadequate
- One of the most immobile top tier MBTs
- Three crew members lined-up on the right side of the tank
- Weak gun mantlet, leaving cannon breech highly exposed at closer ranges
History
Describe the history of the creation and combat usage of the ground vehicle in more detail than in the introduction. If the historical reference turns out to be too big, take it to a separate article, taking a link to an article about the vehicle and adding a block "/historical reference" (example: https://wiki.warthunder.com/Name-vehicles/historical reference) and add a link to it here using the main template. Be sure to include links to sources at the end of the article.
Media
An excellent addition to the article will be video guides, as well as screenshots from the game and photos.
Read also
Links to the articles on the War Thunder Wiki that you think will be useful for the reader, for example,
- reference to the series of the vehicles;
- links to approximate analogues of other nations and research trees.
ETC.
Sources
Paste links to sources and external resources, such as:
- topic on the official game forum;
- other literature.
| USSR medium tanks | |
|---|---|
| T-28 | T-28 (1938) · T-28 · T-28E |
| T-34-76 | T-34 (Prototype) · T-34 (1940) · T-34 (1941) · T-34 (1st Gv.T.Br.) · T-34 (1942) · T-34E STZ · T-34E |
| T-34-57 | T-34-57 · T-34-57 (1943) |
| T-34-85 | T-34-85 (D-5T) · T-34-85 · T-34-85E |
| T-34-100 | T-34-100 |
| T-44 | T-44 · T-44-100 · T-44-122 |
| T-54 | T-54 (1947) · T-54 (1949) · T-54 (1951) |
| T-55 | TO-55 · T-55A · T-55AM-1 · T-55AMD-1 |
| T-62 | T-62 · T-62M-1 |
| T-64 | Object 435 · T-64A (1971) · T-64B |
| T-72 | T-72A · T-72AV (TURMS-T) · T-72B · T-72B (1989) · T-72B3 · T-72M2 Moderna |
| T-80 | T-80B · T-80U · T-80UD · T-80UK · T-80UM2 · T-80BVM · Object 292 |
| T-90 | Т-90А · T-90M |
| Trophies/Lend-Lease | |
| Germany | ▂T-III · ▂T-V |
| Great Britain | ▂МК-IX "Valentine" |
| USA | ▂M3 Medium · ▂M4A2 |
