Difference between revisions of "T-35"
Colok76286 (talk | contribs) (Edits) |
Colok76286 (talk | contribs) |
||
| (24 intermediate revisions by 9 users not shown) | |||
| Line 6: | Line 6: | ||
== Description == | == Description == | ||
<!-- ''In the description, the first part should be about the history of the creation and combat usage of the vehicle, as well as its key features. In the second part, tell the reader about the ground vehicle in the game. Insert a screenshot of the vehicle, so that if the novice player does not remember the vehicle by name, he will immediately understand what kind of vehicle the article is talking about.'' --> | <!-- ''In the description, the first part should be about the history of the creation and combat usage of the vehicle, as well as its key features. In the second part, tell the reader about the ground vehicle in the game. Insert a screenshot of the vehicle, so that if the novice player does not remember the vehicle by name, he will immediately understand what kind of vehicle the article is talking about.'' --> | ||
| − | The | + | The T-35 was one of many interwar period multi-turreted tanks built by various countries. Unfortunately, usage of multiple turrets proved worse in combat than using just a single, so such tanks were abandoned. The T-35 was the first and only five-turreted tank in the world. Designed in the 1930s, the T-35 was basically an enlarged T-28 multi-turreted medium tank with a crew of ten instead of six. Unfortunately, the T-35 was plagued with mechanical problems and failures, such as weak engine, cramped crew compartments, and thin armour of up to only 30 mm. Only 59 were produced between 1934 and 1939. Last combat usage was recorded during the Battle of Kharkov in 1941. A single example has survived until today, and is now located in Kubinka tank museum, in running condition. |
| + | |||
| + | Introduced to War Thunder in [[Update 1.43]] as an rank I addition to the Soviet ground tech tree, the T-35 possesses a crew of 10, allowing for surviving a few shots that would otherwise be lethal for other vehicles. Unfortunately, the T-35's main gun is a low velocity KT-28 howitzer. The gun itself has problems penetrating most of its opponents, so using the front turret mounted 45 mm 20-K cannon is advised instead. The 45 mm 20-K is able to pierce up to 58 mm of armour using its BR-243 APHEBC shell, which is sufficient for most opponents. Despite being a heavy tank, the T-35 is protected only by 30 mm thin armour from front, 23 mm on the sides and 20 mm at the rear, making the tank vulnerable to even 12.7 mm machine gun fire. The T-35 is also powered by a very weak engine, resulting in very poor manoeuvrability especially in urban areas and a top speed of only 28 km/h. | ||
== General info == | == General info == | ||
| Line 12: | Line 14: | ||
{{Specs-Tank-Armour}} | {{Specs-Tank-Armour}} | ||
<!-- ''Describe armour protection. Note the most well protected and key weak areas. Appreciate the layout of modules as well as the number and location of crew members. Is the level of armour protection sufficient, is the placement of modules helpful for survival in combat? If necessary use a visual template to indicate the most secure and weak zones of the armour.'' --> | <!-- ''Describe armour protection. Note the most well protected and key weak areas. Appreciate the layout of modules as well as the number and location of crew members. Is the level of armour protection sufficient, is the placement of modules helpful for survival in combat? If necessary use a visual template to indicate the most secure and weak zones of the armour.'' --> | ||
| − | The T-35 has | + | The T-35 has a large crew, with 10 crew members. While the armour may not provide great protection against enemies even at Rank I, the large crew count makes up in part for the tank's survivability in combat. The T-35 is large and difficult to conceal. However, don't be deceived by its size: the T-35's armour is barely more than 30 mm thick. Even with a standard Rank I gun, you may be able to penetrate its armour. The roof is only 14 to 20 mm thick, heavy machine guns can easily cut through. The complex armour structure also creates many shot traps. |
'''Armour type:''' | '''Armour type:''' | ||
| Line 39: | Line 41: | ||
{{Specs-Tank-Mobility}} | {{Specs-Tank-Mobility}} | ||
<!-- ''Write about the mobility of the ground vehicle. Estimate the specific power and manoeuvrability, as well as the maximum speed forwards and backwards.'' --> | <!-- ''Write about the mobility of the ground vehicle. Estimate the specific power and manoeuvrability, as well as the maximum speed forwards and backwards.'' --> | ||
| + | The T-35 is very long, making turning difficult with the narrow tracks. In urban environments, it can get stuck into difficult situations in close quarters | ||
{{tankMobility|abMinHp=646|rbMinHp=442}} | {{tankMobility|abMinHp=646|rbMinHp=442}} | ||
| Line 69: | Line 72: | ||
==== Ammunition ==== | ==== Ammunition ==== | ||
| − | { | + | {{:KT-28 (76 mm)/Ammunition|BR-350A (MD-5 fuze), OF-350M, Sh-353}} |
| − | |||
| − | |||
| − | |||
| − | |||
| − | |||
| − | |||
| − | |||
| − | |||
| − | | BR-350A (MD-5 fuze) | ||
| − | |||
| − | |||
| − | |||
| − | |||
| − | |||
| − | |||
| − | |||
| − | |||
| − | |||
| − | |||
| − | |||
| − | |||
| − | |||
| − | |||
| − | |||
| − | |||
| − | |||
| − | |||
| − | |||
| − | |||
| − | |||
| − | |||
| − | |||
| − | |||
| − | |||
| − | |||
| − | |||
==== [[Ammo racks]] ==== | ==== [[Ammo racks]] ==== | ||
| Line 122: | Line 89: | ||
! 8th<br>rack<br>empty | ! 8th<br>rack<br>empty | ||
|- | |- | ||
| − | | '''96''' || 87 ''(+9)'' || 77 ''(+19)'' || 72 ''(+24)'' || 67 ''(+29)'' || 57 ''(+39)'' || 46 ''(+50)'' || 41 ''(+55)'' || 33 ''(+63)'' | + | | '''96''' || 87 ''(+9)'' || 77 ''(+19)'' || 72 ''(+24)'' || 67 ''(+29)'' || 57 ''(+39)'' || 46 ''(+50)'' || 41 ''(+55)'' || 33 ''(+63)'' |
|- | |- | ||
! 9th<br>rack<br>empty | ! 9th<br>rack<br>empty | ||
| Line 160: | Line 127: | ||
|- | |- | ||
! ''Arcade'' | ! ''Arcade'' | ||
| − | | rowspan="2" | 113 || rowspan="2" | -8°/+32° || rowspan="2" | -50°/+123° || rowspan="2" | N/A || | + | | rowspan="2" | 113 || rowspan="2" | -8°/+32° || rowspan="2" | -50°/+123° || rowspan="2" | N/A || 12 || 17 || 20 || 23 || 24 || rowspan="2" | 3.8 || rowspan="2" | 3.4 || rowspan="2" | 3.1 || rowspan="2" | 2.9 |
|- | |- | ||
! ''Realistic'' | ! ''Realistic'' | ||
| Line 176: | Line 143: | ||
|- | |- | ||
! ''Arcade'' | ! ''Arcade'' | ||
| − | | rowspan="2" | 113 || rowspan="2" | -8°/+32° || rowspan="2" | -48°/+117° || rowspan="2" | N/A || | + | | rowspan="2" | 113 || rowspan="2" | -8°/+32° || rowspan="2" | -48°/+117° || rowspan="2" | N/A || 12 || 17 || 20 || 23 || 24 || rowspan="2" | 3.8 || rowspan="2" | 3.4 || rowspan="2" | 3.1 || rowspan="2" | 2.9 |
|- | |- | ||
! ''Realistic'' | ! ''Realistic'' | ||
| − | | 8.9 || | + | | 8.9 || 11 || 13 || 14 || 15 |
|- | |- | ||
|} | |} | ||
==== Ammunition ==== | ==== Ammunition ==== | ||
| − | { | + | {{:20-K (45 mm)/Ammunition|BR-240SP, BR-240}} |
| − | |||
| − | |||
| − | |||
| − | |||
| − | |||
| − | |||
| − | |||
| − | |||
| − | | BR-240SP | ||
| − | |||
| − | |||
| − | |||
| − | |||
| − | |||
| − | |||
| − | |||
| − | |||
| − | |||
| − | |||
| − | |||
| − | |||
| − | |||
| − | |||
| − | |||
| − | |||
| − | |||
| − | |||
| − | |||
| − | |||
| − | |||
| − | |||
| − | |||
==== [[Ammo racks]] ==== | ==== [[Ammo racks]] ==== | ||
| Line 234: | Line 169: | ||
* Racks disappear after you've fired all shells in the rack. | * Racks disappear after you've fired all shells in the rack. | ||
| − | * Rear turret empty: 115 ''(+111)'' shells | + | * Rear turret empty: 115 ''(+111)'' shells. |
| + | * It is possible to run out of ammo for the front secondary turret if it is used too long. | ||
=== Machine guns === | === Machine guns === | ||
| Line 260: | Line 196: | ||
== Usage in battles == | == Usage in battles == | ||
<!-- ''Describe the tactics of playing in the vehicle, the features of using vehicles in the team and advice on tactics. Refrain from creating a "guide" - do not impose a single point of view but instead give the reader food for thought. Describe the most dangerous enemies and give recommendations on fighting them. If necessary, note the specifics of the game in different modes (AB, RB, SB).'' --> | <!-- ''Describe the tactics of playing in the vehicle, the features of using vehicles in the team and advice on tactics. Refrain from creating a "guide" - do not impose a single point of view but instead give the reader food for thought. Describe the most dangerous enemies and give recommendations on fighting them. If necessary, note the specifics of the game in different modes (AB, RB, SB).'' --> | ||
| − | The T-35 is the largest tank among the Rank I vehicles. With a multi-turreted platform of two 45 mm cannons and one 76.2 mm cannon, the tank can combat enemies at an almost 360° angle. However, the armour is quite thin for a vehicle of its size so one should not play this vehicle like a typical heavy tank later down the rank. The speed is decent for a vehicle of its size, however, so it is possible to catch the enemies off guard by attacking from an area they least expect. The T-35 is nothing short of a behemoth, being able to take more penetrating hits than any tank at | + | The T-35 is the largest tank among the Rank I vehicles. With a multi-turreted platform of two 45 mm cannons and one 76.2 mm cannon, the tank can combat enemies at an almost 360° angle. However, the armour is quite thin for a vehicle of its size so one should not play this vehicle like a typical heavy tank later down the rank. The speed is decent for a vehicle of its size, however, so it is possible to catch the enemies off guard by attacking from an area they least expect. The T-35 is nothing short of a behemoth, being able to take more penetrating hits than any tank at this BR with his large crew. Although possessing a relatively heavy armament, the lack of armour for its size and speed really limits its playstyle. |
;Stay with your team | ;Stay with your team | ||
| Line 269: | Line 205: | ||
Probably the most obvious way to play, taking cover and avoiding large and open terrain means you have the best chance of survival. This tactic may not be viable most of the time, it all depends on which maps you play. | Probably the most obvious way to play, taking cover and avoiding large and open terrain means you have the best chance of survival. This tactic may not be viable most of the time, it all depends on which maps you play. | ||
| + | |||
| + | ;Enemies worth noting | ||
| + | |||
| + | * The [[BT-42]] is a fast Swedish tank destroyer with a 114 mm cannon, this captured and modified BT-7 is one of the biggest threats to go up against as a T-35. Both its HE and HEAT shells can instantly eliminate the T-35 due to overpressure mechanics. When spotted, it's best to instantly shoot for its turret to disable it from being able to shoot back since one shot from the BT-42 enough is to send you back to the spawn menu. After neutralizing the gunner, follow up with a shot to the driver's spot. | ||
| + | * The [[Lancia 3Ro (100/17)]] is a fast Italian truck equipped with a 100 mm cannon. This truck might seem weak but be careful of its gun. Any of its shells are capable of knocking the T-35 with overpressure. When spotted, it's best to make use of 1 out of your 5 x 7.62 mm DT machine guns to easily take care of the gunner and the crew, resulting in an elimination. | ||
| + | |||
| + | * SPAAS like the [[Flakpanzer I]], [[Flakpanzer 38]], [[Sd.Kfz. 6/2]], [[M15 CGMC]], [[Pvlvv fm/42]] and the [[AS 42]]. You should be very careful with SPAAs. Just like many tanks at this rank, SPAAs have proven to be very effective at knocking out tanks, including your T-35. These SPAAs sport 20 mm to 37 mm autocannons that are capable of easily neutralizing your whole crew shot after shot if you don't respond fast enough to these threats. But there is an easy way to take care of them: when spotted or being attacked by, make use of 1 out of your 5 x 7.62 mm DT machine guns and aim at their gunner to disarm them. After that, start spraying all over the SPAA and knock out as much crew as possible to neutralize the enemy, you can as well shoot with your main or secondary armament at its engine to prevent it from driving away. | ||
=== Pros and cons === | === Pros and cons === | ||
| Line 275: | Line 218: | ||
'''Pros:''' | '''Pros:''' | ||
| − | * KT-28 cannon destroys anything it penetrates with a single hit | + | * The KT-28 cannon destroys anything it penetrates with a single hit |
| − | * No less than three cannons available for use | + | * No less than three cannons available for use |
| − | * Can have guns pointed towards the front and rear at the same time | + | * Can have guns pointed towards the front and rear at the same time |
| − | * High rate of fire with all weapons | + | * High rate of fire with all weapons |
| − | * Large ammunition capacity | + | * Large ammunition capacity |
* Large frame can often absorb more modular/crew damage than most other tanks | * Large frame can often absorb more modular/crew damage than most other tanks | ||
| − | * Crew of 10 makes | + | * Crew of 10 makes increases the survivability to enemy fire |
| − | |||
'''Cons:''' | '''Cons:''' | ||
| − | * Slow and with poor manoeuvrability | + | * Slow and with poor manoeuvrability |
| − | * | + | * Large target, easily spotted by ground vehicles and aircraft |
| − | * Poorly armoured despite the size | + | * Poorly armoured despite the size |
| − | + | * Gun is mounted high and with poor gun depression | |
| − | + | * Ammo racks are strewn all over the centre compartment when carrying large amounts | |
| − | + | * The main 76 mm gun has a short barrel, meaning its shells have very low muzzle velocity and poor penetration | |
| − | * Gun is mounted high and with poor gun depression | + | * Very likely to be hit by artillery strikes due to its big size |
| − | * Ammo racks are strewn all over the centre compartment when carrying large amounts | ||
| − | |||
| − | * The main 76 mm gun has a short barrel, meaning its shells have very low muzzle velocity and poor penetration | ||
| − | |||
| − | * Very | ||
== History == | == History == | ||
| Line 303: | Line 240: | ||
===Development=== | ===Development=== | ||
| − | The '''T-35''' concept began from the OKMO design bureau of the Bolshevik Factory in 1930 when work began on a heavy tank. Two teams were made for two competing designs, one was headed by German engineer Grotte and the other was headed by N. Tsiets. Grotte worked on a 100-ton four-turreted TG-5 tank, armed with a 107 mm naval gun, using pneumatic servo-controls and suspension, but this was cancelled. N. Tsiets worked on a design that may be inspired by the British tank design Vickers A1E1 Independent, which is a multi-turret tank using one main turret with a gun and smaller one's housing machine guns. This tank may also be the inspiration for the Soviet [[T-28|T-28 medium tank]]. | + | The '''T-35''' concept began from the OKMO design bureau of the Bolshevik Factory in 1930 when work began on a heavy tank. Two teams were made for two competing designs, one was headed by German engineer Grotte and the other was headed by N. Tsiets. Grotte worked on a 100-ton four-turreted TG-5 tank, armed with a 107 mm naval gun, using pneumatic servo-controls and suspension, but this was cancelled. N. Tsiets worked on a design that may be inspired by the British tank design Vickers A1E1 Independent, which is a multi-turret tank using one main turret with a gun and a smaller one's housing machine guns. This tank may also be the inspiration for the Soviet [[T-28|T-28 medium tank]]. |
The development was completed with a prototype by July 1932. The prototype was about 35 tons, had a 76.2 mm main gun and four smaller turrets around it, two with a 37 mm gun and two with machine guns. There were many defects with the transmission design and the design was considered too complex for the manufacturing process, plus it was expensive. Work stopped for a simpler prototype to be produced. This simpler version had a new engine, gearbox, and an improved transmission over the previous prototype. Standardization on the turrets between the prototype and that on the T-28 medium tank was utilized so the small machine gun turret is the same between the two designs, the main gun turret was also nearly identical, but the one on the T-28 has a rear-facing machine gun. The design was approved for production on August 11, 1933, and was produced at the Kharkov Locomotive Factory with about 20 units produced. | The development was completed with a prototype by July 1932. The prototype was about 35 tons, had a 76.2 mm main gun and four smaller turrets around it, two with a 37 mm gun and two with machine guns. There were many defects with the transmission design and the design was considered too complex for the manufacturing process, plus it was expensive. Work stopped for a simpler prototype to be produced. This simpler version had a new engine, gearbox, and an improved transmission over the previous prototype. Standardization on the turrets between the prototype and that on the T-28 medium tank was utilized so the small machine gun turret is the same between the two designs, the main gun turret was also nearly identical, but the one on the T-28 has a rear-facing machine gun. The design was approved for production on August 11, 1933, and was produced at the Kharkov Locomotive Factory with about 20 units produced. | ||
| Line 310: | Line 247: | ||
===Design=== | ===Design=== | ||
| − | The T-35 is the only five-turreted tank to ever enter production. The main turret in the centre and mounted high is equipped with a 76 mm KT-28 cannon, two secondary turrets mounted front right and back left had a 45 mm 20-K gun, and two more secondary turrets on the front left and back right had a 7.62 mm machine gun. Despite being a rather large tank, the interior was quite constricted for its crew. The crew of 11-12 men were crammed together and this directly affected their combat efficiency. The crew layout was a compartment for the driver, each machine gun turret had one man, two men in the turret with 45 mm guns, and three men in the main turret. It was typical for a couple of crewmen to serve outside the tank. A senior driver was responsible for the transmission and running gear. While a mechanic overlooked and took care of the engine. Construction of the T-35s armour was a mix of welds and rivets. The tank was powered by a 12-Cylinder Mikulin M-17M engine generating nearly 500 hp and was considered underpowered. The design had many reliability issues and even flaws, such as the main turret able to render escape hatches on the smaller turrets unable to be opened due to its gun mount. | + | The T-35 is the only five-turreted tank to ever enter production. The main turret in the centre and mounted high is equipped with a 76 mm KT-28 cannon, two secondary turrets mounted front right and back left had a 45 mm 20-K gun, and two more secondary turrets on the front left and back right had a 7.62 mm machine gun. Despite being a rather large tank, the interior was quite constricted for its crew. The crew of 11-12 men were crammed together and this directly affected their combat efficiency. The crew layout was a compartment for the driver, each machine gun turret had one man, two men in the turret with 45 mm guns, and three men in the main turret. It was typical for a couple of crewmen to serve outside the tank. A senior driver was responsible for the transmission and running gear. While a mechanic overlooked and took care of the engine. Construction of the T-35s armour was a mix of welds and rivets. The tank was powered by a 12-Cylinder Mikulin M-17M engine generating nearly 500 hp and was considered underpowered. The design had many reliability issues and even flaws, such as the main turret being able to render escape hatches on the smaller turrets unable to be opened due to its gun mount. |
===Combat usage=== | ===Combat usage=== | ||
| − | The T-35 was issued to the 5th Separate Heavy Tank Brigade in Moscow and was involved in parades through the Red Square from 1935 until 1940. The T-35 was there to impress spectators as well as foreign observers rather than as a fighting piece. In June 1940, the T-35 was subjected to either be withdrawn from front-line duties, be converted into self-propelled artillery, or be sent to military academies for future studies. It was decided to keep them for combat purposes and the T-35s were issued to the 67th and 68th Tank Regiments in the 34th Tank Division in the 8th Mechanized Corps in the Kiev Special Military District. The T-35 then saw action against the German forces when Operation Barbarossa was commenced. Though the tanks actual combat history is not very well documented, the tank regiments they were assigned to report a loss of 90% of the vehicles, more to mechanical failures than to enemy combat. These broken down tanks were subsequently destroyed by their crews to avoid capture. The last reported use of these tanks was during the Battle of Moscow, where two T-35s were deployed and its performance went unrecorded. One such vehicle was captured by the Germans and sent to the Kummersdorf military proving grounds for evaluations. This captured T-35 may or may not be the same one the German used during the Battle of Berlin in April 1945. | + | The T-35 was issued to the 5th Separate Heavy Tank Brigade in Moscow and was involved in parades through the Red Square from 1935 until 1940. The T-35 was there to impress spectators as well as foreign observers rather than as a fighting piece. In June 1940, the T-35 was subjected to either be withdrawn from front-line duties, be converted into self-propelled artillery, or be sent to military academies for future studies. It was decided to keep them for combat purposes and the T-35s were issued to the 67th and 68th Tank Regiments in the 34th Tank Division in the 8th Mechanized Corps in the Kiev Special Military District. The T-35 then saw action against the German forces when Operation Barbarossa was commenced. Though the tanks actual combat history is not very well documented, the tank regiments they were assigned to report a loss of 90% of the vehicles, more to mechanical failures than to enemy combat. These broken-down tanks were subsequently destroyed by their crews to avoid capture. The last reported use of these tanks was during the Battle of Moscow, where two T-35s were deployed and its performance went unrecorded. One such vehicle was captured by the Germans and sent to the Kummersdorf military proving grounds for evaluations. This captured T-35 may or may not be the same one the German used during the Battle of Berlin in April 1945. |
| − | The T-35 was once mistaken for taking part in the Winter War against Finland, this is due to the deployment of the [[SMK]], T-100s, and [[KV-1 (L-11)|KV-1s]] prototypes into the battle as combat testing. The SMK was disabled by the Finnish and was documented in photographs, which the German intelligence designated | + | The T-35 was once mistaken for taking part in the Winter War against Finland, this is due to the deployment of the [[SMK]], T-100s, and [[KV-1 (L-11)|KV-1s]] prototypes into the battle as combat testing. The SMK was disabled by the Finnish and was documented in photographs, which the German intelligence designated as the T-35C, despite being not related to the T-35 tank. |
===Survivors=== | ===Survivors=== | ||
| − | Today, | + | Today, a single T-35 is left not only in an intact state but still in running condition. This tank is held in the Kubinka Tank Museum in Moscow and only survived because it was used as a training facility rather than combat use. Kubinka also holds the second prototype of the aforementioned SU-14 self-propelled artillery gun. |
| − | + | {{break}} | |
| + | {{Navigation-Start|{{Annotation|Archive of the in-game description|An archive of the historical description of the vehicle that was presented in-game prior to Update 1.55 'Royal Armour'}}}} | ||
| + | {{Navigation-First-Simple-Line}} | ||
This tank came into service in 1933 and was mass-produced between 1933 and 1939. In total, around 60 of them were made. The vehicle had a classic layout: the driver's compartment was located in the front, the fighting compartment in the middle and the engine compartment in the rear. Its armament was installed in five turrets on two tiers. A 76.2 mm KT-28 cannon and a 7.62 mm DT machine gun were installed in the central rotating turret. Two 45 mm 20K Mod. 1932 cannons were diagonally mounted on the lower tier and could fire to the forward right and forward left. Two machine guns were also diagonally mounted next to the cannon turrets. The undercarriage was protected by add-on armour plates. | This tank came into service in 1933 and was mass-produced between 1933 and 1939. In total, around 60 of them were made. The vehicle had a classic layout: the driver's compartment was located in the front, the fighting compartment in the middle and the engine compartment in the rear. Its armament was installed in five turrets on two tiers. A 76.2 mm KT-28 cannon and a 7.62 mm DT machine gun were installed in the central rotating turret. Two 45 mm 20K Mod. 1932 cannons were diagonally mounted on the lower tier and could fire to the forward right and forward left. Two machine guns were also diagonally mounted next to the cannon turrets. The undercarriage was protected by add-on armour plates. | ||
| Line 328: | Line 267: | ||
This vehicle's firepower surpassed that of any other contemporary tank in the world. However, this complicated its structural system. The tank's traction and dynamic properties were insufficient, which was particularly noticeable when it turned. All these flaws in combination prevented the heavy tank from completing the tasks set before it. The high number of turrets resulted in the commander being unable to effectively control firing. The tank's weak armour meant that it was vulnerable to artillery, and its low mobility and huge size made it a perfect target. | This vehicle's firepower surpassed that of any other contemporary tank in the world. However, this complicated its structural system. The tank's traction and dynamic properties were insufficient, which was particularly noticeable when it turned. All these flaws in combination prevented the heavy tank from completing the tasks set before it. The high number of turrets resulted in the commander being unable to effectively control firing. The tank's weak armour meant that it was vulnerable to artillery, and its low mobility and huge size made it a perfect target. | ||
| + | {{Navigation-End}} | ||
== Media == | == Media == | ||
| Line 333: | Line 273: | ||
;Skins | ;Skins | ||
| + | |||
* [https://live.warthunder.com/feed/camouflages/?vehicle=ussr_t_35 Skins and camouflages for the {{PAGENAME}} from live.warthunder.com.] | * [https://live.warthunder.com/feed/camouflages/?vehicle=ussr_t_35 Skins and camouflages for the {{PAGENAME}} from live.warthunder.com.] | ||
;Videos | ;Videos | ||
| − | {{Youtube-gallery|RyA5KcS2hAw|'''Multi-turreted Tanks''' | + | {{Youtube-gallery|RyA5KcS2hAw|'''Multi-turreted Tanks''' discusses the {{PAGENAME}} at 4:56 - ''War Thunder Official Channel''|Owf2e7Xtx70|'''A unique exhibit of the T-35A tank''' - ''Kubinka Tank Museum''}} |
== See also == | == See also == | ||
| Line 344: | Line 285: | ||
;Other vehicles of similar configuration and role | ;Other vehicles of similar configuration and role | ||
| + | |||
* [[Nb.Fz.]] | * [[Nb.Fz.]] | ||
* [[Independent]] | * [[Independent]] | ||
* [[Ro-Go]] | * [[Ro-Go]] | ||
| + | * [[2C]] | ||
== External links == | == External links == | ||
| Line 356: | Line 299: | ||
* [[wt:en/news/725--en|A True Land Leviathan]] | * [[wt:en/news/725--en|A True Land Leviathan]] | ||
| + | {{TankManufacturer OKMO}} | ||
{{USSR heavy tanks}} | {{USSR heavy tanks}} | ||
{{USSR premium ground vehicles}} | {{USSR premium ground vehicles}} | ||
Latest revision as of 20:50, 1 April 2024

Contents
Description
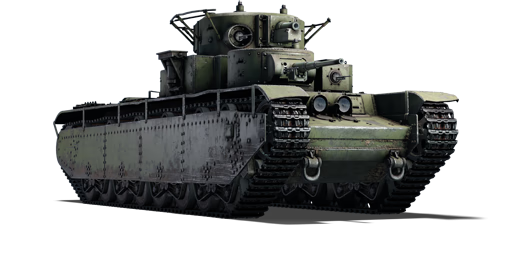
The T-35 was one of many interwar period multi-turreted tanks built by various countries. Unfortunately, usage of multiple turrets proved worse in combat than using just a single, so such tanks were abandoned. The T-35 was the first and only five-turreted tank in the world. Designed in the 1930s, the T-35 was basically an enlarged T-28 multi-turreted medium tank with a crew of ten instead of six. Unfortunately, the T-35 was plagued with mechanical problems and failures, such as weak engine, cramped crew compartments, and thin armour of up to only 30 mm. Only 59 were produced between 1934 and 1939. Last combat usage was recorded during the Battle of Kharkov in 1941. A single example has survived until today, and is now located in Kubinka tank museum, in running condition.
Introduced to War Thunder in Update 1.43 as an rank I addition to the Soviet ground tech tree, the T-35 possesses a crew of 10, allowing for surviving a few shots that would otherwise be lethal for other vehicles. Unfortunately, the T-35's main gun is a low velocity KT-28 howitzer. The gun itself has problems penetrating most of its opponents, so using the front turret mounted 45 mm 20-K cannon is advised instead. The 45 mm 20-K is able to pierce up to 58 mm of armour using its BR-243 APHEBC shell, which is sufficient for most opponents. Despite being a heavy tank, the T-35 is protected only by 30 mm thin armour from front, 23 mm on the sides and 20 mm at the rear, making the tank vulnerable to even 12.7 mm machine gun fire. The T-35 is also powered by a very weak engine, resulting in very poor manoeuvrability especially in urban areas and a top speed of only 28 km/h.
General info
Survivability and armour
The T-35 has a large crew, with 10 crew members. While the armour may not provide great protection against enemies even at Rank I, the large crew count makes up in part for the tank's survivability in combat. The T-35 is large and difficult to conceal. However, don't be deceived by its size: the T-35's armour is barely more than 30 mm thick. Even with a standard Rank I gun, you may be able to penetrate its armour. The roof is only 14 to 20 mm thick, heavy machine guns can easily cut through. The complex armour structure also creates many shot traps.
Armour type:
- Rolled homogeneous armour

| Armour | Front | Sides | Rear | Roof |
|---|---|---|---|---|
| Hull | 30 mm (20°) Front plate 24 mm (77°) Front glacis 30 mm (18-63°) Lower glacis |
11 + 23 mm | 10 mm (20-77°) Top 20 mm (12-63°) Bottom |
10 mm |
| Main Turret | 20 mm Turret front 20 mm (0-7°) Gun mantlet |
20 mm | 21 mm | 15 mm |
| Secondary Turret | 17 mm (0-84°) Turret front 17 mm (1-32°) Gun mantlet |
25 mm (0-1°) | 15 mm | 10 mm |
| Machine gun Turret | 22 mm (1°) | 23 mm (0-1°) | 10 mm | 10 mm |
Notes:
- Suspension wheels are 15 mm thick, bogies are 10 mm thick, and tracks are 20 mm thick.
Mobility
The T-35 is very long, making turning difficult with the narrow tracks. In urban environments, it can get stuck into difficult situations in close quarters
| Game Mode | Max Speed (km/h) | Weight (tons) | Engine power (horsepower) | Power-to-weight ratio (hp/ton) | |||
|---|---|---|---|---|---|---|---|
| Forward | Reverse | Stock | Upgraded | Stock | Upgraded | ||
| Arcade | 30 | 5 | 52 | 646 | 954 | 12.42 | 18.35 |
| Realistic | 28 | 4 | 442 | 500 | 8.5 | 9.62 | |
Modifications and economy
| Mobility | Protection | Firepower | ||||||||||||||||||||
|---|---|---|---|---|---|---|---|---|---|---|---|---|---|---|---|---|---|---|---|---|---|---|
|
|
|
Armaments
Main armament
| 76 mm KT-28 | Turret rotation speed (°/s) | Reloading rate (seconds) | |||||||||||
|---|---|---|---|---|---|---|---|---|---|---|---|---|---|
| Mode | Capacity | Vertical | Horizontal | Stabilizer | Stock | Upgraded | Full | Expert | Aced | Stock | Full | Expert | Aced |
| Arcade | 96 | -5°/+25° | ±180° | N/A | 18.2 | 25.2 | 30.6 | 33.8 | 36.0 | 5.20 | 4.60 | 4.24 | 4.00 |
| Realistic | 13.4 | 15.8 | 19.1 | 21.1 | 22.5 | ||||||||
Ammunition
| Penetration statistics | |||||||
|---|---|---|---|---|---|---|---|
| Ammunition | Type of warhead |
Penetration @ 0° Angle of Attack (mm) | |||||
| 10 m | 100 m | 500 m | 1,000 m | 1,500 m | 2,000 m | ||
| BR-350A (MD-5 fuze) | APHEBC | 37 | 37 | 34 | 30 | 27 | 25 |
| OF-350M | HE | 11 | 11 | 11 | 11 | 11 | 11 |
| Sh-353 | Shrapnel | 18 | 17 | 15 | 13 | 12 | 10 |
| Shell details | ||||||||||||
|---|---|---|---|---|---|---|---|---|---|---|---|---|
| Ammunition | Type of warhead |
Velocity (m/s) |
Projectile mass (kg) |
Fuse delay (m) |
Fuse sensitivity (mm) |
Explosive mass (TNT equivalent) (g) |
Ricochet | |||||
| 0% | 50% | 100% | ||||||||||
| BR-350A (MD-5 fuze) | APHEBC | 370 | 6.3 | 1.2 | 14 | 155 | 48° | 63° | 71° | |||
| OF-350M | HE | 387 | 6.2 | 0.05 | 0.1 | 710 | 79° | 80° | 81° | |||
| Sh-353 | Shrapnel | 381 | 6.44 | 1.2 | 14 | 85 | 62° | 69° | 73° | |||
Ammo racks

| Full ammo |
1st rack empty |
2nd rack empty |
3rd rack empty |
4th rack empty |
5th rack empty |
6th rack empty |
7th rack empty |
8th rack empty |
|---|---|---|---|---|---|---|---|---|
| 96 | 87 (+9) | 77 (+19) | 72 (+24) | 67 (+29) | 57 (+39) | 46 (+50) | 41 (+55) | 33 (+63) |
| 9th rack empty |
10th rack empty |
11th rack empty |
12th rack empty |
13th rack empty |
14th rack empty |
15th rack empty |
Visual discrepancy |
|
| 25 (+71) | 21 (+75) | 18 (+78) | 13 (+83) | 10 (+86) | 6 (+90) | 1 (+95) | Yes |
Notes:
- Racks disappear after you've fired all shells in the rack.
- Side walls empty: 46 (+50) shells
Additional armament
The T-35 sports 2 turrets equipped with 45 mm 20-K cannons in addition to the main turret equipped with the 76 mm howitzer. Despite the huge ammo reserve for the secondary turrets, the total ammo is split between the two turrets. This means that if one 45 mm cannon fires more than the other, it will run out and be unable to fire until resupplied.
| Front 45 mm 20-K | Turret rotation speed (°/s) | Reloading rate (seconds) | |||||||||||
|---|---|---|---|---|---|---|---|---|---|---|---|---|---|
| Mode | Capacity | Vertical | Horizontal | Stabilizer | Stock | Upgraded | Full | Expert | Aced | Stock | Full | Expert | Aced |
| Arcade | 113 | -8°/+32° | -50°/+123° | N/A | 12 | 17 | 20 | 23 | 24 | 3.8 | 3.4 | 3.1 | 2.9 |
| Realistic | 8.9 | 11 | 13 | 14 | 15 | ||||||||
| Rear 45 mm 20-K | Turret rotation speed (°/s) | Reloading rate (seconds) | |||||||||||
|---|---|---|---|---|---|---|---|---|---|---|---|---|---|
| Mode | Capacity | Vertical | Horizontal | Stabilizer | Stock | Upgraded | Full | Expert | Aced | Stock | Full | Expert | Aced |
| Arcade | 113 | -8°/+32° | -48°/+117° | N/A | 12 | 17 | 20 | 23 | 24 | 3.8 | 3.4 | 3.1 | 2.9 |
| Realistic | 8.9 | 11 | 13 | 14 | 15 | ||||||||
Ammunition
| Penetration statistics | |||||||
|---|---|---|---|---|---|---|---|
| Ammunition | Type of warhead |
Penetration @ 0° Angle of Attack (mm) | |||||
| 10 m | 100 m | 500 m | 1,000 m | 1,500 m | 2,000 m | ||
| BR-240SP | APBC | 73 | 70 | 60 | 50 | 41 | 34 |
| BR-240 | APHEBC | 70 | 67 | 58 | 47 | 39 | 32 |
| Shell details | ||||||||||||
|---|---|---|---|---|---|---|---|---|---|---|---|---|
| Ammunition | Type of warhead |
Velocity (m/s) |
Projectile mass (kg) |
Fuse delay (m) |
Fuse sensitivity (mm) |
Explosive mass (TNT equivalent) (g) |
Ricochet | |||||
| 0% | 50% | 100% | ||||||||||
| BR-240SP | APBC | 757 | 1.43 | - | - | - | 47° | 60° | 65° | |||
| BR-240 | APHEBC | 760 | 1.43 | 1.2 | 9 | 29.26 | 48° | 63° | 71° | |||
Ammo racks
| Full ammo |
1st rack empty |
2nd rack empty |
Visual discrepancy |
|---|---|---|---|
| 226 | 115 (+111) | 2 (+224) | No |
Notes:
- Racks disappear after you've fired all shells in the rack.
- Rear turret empty: 115 (+111) shells.
- It is possible to run out of ammo for the front secondary turret if it is used too long.
Machine guns
| 7.62 mm DT | ||||
|---|---|---|---|---|
| Mount | Capacity (Belt) | Fire rate | Vertical | Horizontal |
| Main Coaxial mount | 1,260 (63) | 600 | ±15° | ±15° |
| Turret coaxial mount (x2) | 2,520 (63) | 600 | N/A | N/A |
| Front left turret mount | 1,260 (63) | 600 | ±15° | -130°/+10° |
| Rear right turret mount | 1,260 (63) | 600 | ±15° | -140°/+20° |
Usage in battles
The T-35 is the largest tank among the Rank I vehicles. With a multi-turreted platform of two 45 mm cannons and one 76.2 mm cannon, the tank can combat enemies at an almost 360° angle. However, the armour is quite thin for a vehicle of its size so one should not play this vehicle like a typical heavy tank later down the rank. The speed is decent for a vehicle of its size, however, so it is possible to catch the enemies off guard by attacking from an area they least expect. The T-35 is nothing short of a behemoth, being able to take more penetrating hits than any tank at this BR with his large crew. Although possessing a relatively heavy armament, the lack of armour for its size and speed really limits its playstyle.
- Stay with your team
Staying with your team ensures it isn't as easy for enemy tanks to take you out, this is most easily achieved if playing with friends who you have direct communication to. However, do not overextend, as if your teammates die you're a sitting duck, especially if you were daring enough to be in the middle of the battlefield.
- Stay behind cover
Probably the most obvious way to play, taking cover and avoiding large and open terrain means you have the best chance of survival. This tactic may not be viable most of the time, it all depends on which maps you play.
- Enemies worth noting
- The BT-42 is a fast Swedish tank destroyer with a 114 mm cannon, this captured and modified BT-7 is one of the biggest threats to go up against as a T-35. Both its HE and HEAT shells can instantly eliminate the T-35 due to overpressure mechanics. When spotted, it's best to instantly shoot for its turret to disable it from being able to shoot back since one shot from the BT-42 enough is to send you back to the spawn menu. After neutralizing the gunner, follow up with a shot to the driver's spot.
- The Lancia 3Ro (100/17) is a fast Italian truck equipped with a 100 mm cannon. This truck might seem weak but be careful of its gun. Any of its shells are capable of knocking the T-35 with overpressure. When spotted, it's best to make use of 1 out of your 5 x 7.62 mm DT machine guns to easily take care of the gunner and the crew, resulting in an elimination.
- SPAAS like the Flakpanzer I, Flakpanzer 38, Sd.Kfz. 6/2, M15 CGMC, Pvlvv fm/42 and the AS 42. You should be very careful with SPAAs. Just like many tanks at this rank, SPAAs have proven to be very effective at knocking out tanks, including your T-35. These SPAAs sport 20 mm to 37 mm autocannons that are capable of easily neutralizing your whole crew shot after shot if you don't respond fast enough to these threats. But there is an easy way to take care of them: when spotted or being attacked by, make use of 1 out of your 5 x 7.62 mm DT machine guns and aim at their gunner to disarm them. After that, start spraying all over the SPAA and knock out as much crew as possible to neutralize the enemy, you can as well shoot with your main or secondary armament at its engine to prevent it from driving away.
Pros and cons
Pros:
- The KT-28 cannon destroys anything it penetrates with a single hit
- No less than three cannons available for use
- Can have guns pointed towards the front and rear at the same time
- High rate of fire with all weapons
- Large ammunition capacity
- Large frame can often absorb more modular/crew damage than most other tanks
- Crew of 10 makes increases the survivability to enemy fire
Cons:
- Slow and with poor manoeuvrability
- Large target, easily spotted by ground vehicles and aircraft
- Poorly armoured despite the size
- Gun is mounted high and with poor gun depression
- Ammo racks are strewn all over the centre compartment when carrying large amounts
- The main 76 mm gun has a short barrel, meaning its shells have very low muzzle velocity and poor penetration
- Very likely to be hit by artillery strikes due to its big size
History
Development
The T-35 concept began from the OKMO design bureau of the Bolshevik Factory in 1930 when work began on a heavy tank. Two teams were made for two competing designs, one was headed by German engineer Grotte and the other was headed by N. Tsiets. Grotte worked on a 100-ton four-turreted TG-5 tank, armed with a 107 mm naval gun, using pneumatic servo-controls and suspension, but this was cancelled. N. Tsiets worked on a design that may be inspired by the British tank design Vickers A1E1 Independent, which is a multi-turret tank using one main turret with a gun and a smaller one's housing machine guns. This tank may also be the inspiration for the Soviet T-28 medium tank.
The development was completed with a prototype by July 1932. The prototype was about 35 tons, had a 76.2 mm main gun and four smaller turrets around it, two with a 37 mm gun and two with machine guns. There were many defects with the transmission design and the design was considered too complex for the manufacturing process, plus it was expensive. Work stopped for a simpler prototype to be produced. This simpler version had a new engine, gearbox, and an improved transmission over the previous prototype. Standardization on the turrets between the prototype and that on the T-28 medium tank was utilized so the small machine gun turret is the same between the two designs, the main gun turret was also nearly identical, but the one on the T-28 has a rear-facing machine gun. The design was approved for production on August 11, 1933, and was produced at the Kharkov Locomotive Factory with about 20 units produced.
The tank was upgraded again from experiences of the two prototypes, the chassis was made longer, the hull redesigned, and 45 mm gun turrets from the BT-5 light tanks used instead of a 37 mm gun. This was designated the T-35 Model 1935 and started production in 1935 and had 35 units built by 1938, with small improvements made throughout its production life. A final redesign made in 1938 had new turrets with sloping armour installed and modified side skirts for protecting the idler wheel, six of these Model 1938s were produced. The total production run from 1933 to 1938 produced a total of 61 T-35s for the Soviet Union, its high cost being the deciding factor that ended its production. A variant produced from the chassis was a self-propelled artillery mount called the SU-14, but only two were made and never reached production stages.
Design
The T-35 is the only five-turreted tank to ever enter production. The main turret in the centre and mounted high is equipped with a 76 mm KT-28 cannon, two secondary turrets mounted front right and back left had a 45 mm 20-K gun, and two more secondary turrets on the front left and back right had a 7.62 mm machine gun. Despite being a rather large tank, the interior was quite constricted for its crew. The crew of 11-12 men were crammed together and this directly affected their combat efficiency. The crew layout was a compartment for the driver, each machine gun turret had one man, two men in the turret with 45 mm guns, and three men in the main turret. It was typical for a couple of crewmen to serve outside the tank. A senior driver was responsible for the transmission and running gear. While a mechanic overlooked and took care of the engine. Construction of the T-35s armour was a mix of welds and rivets. The tank was powered by a 12-Cylinder Mikulin M-17M engine generating nearly 500 hp and was considered underpowered. The design had many reliability issues and even flaws, such as the main turret being able to render escape hatches on the smaller turrets unable to be opened due to its gun mount.
Combat usage
The T-35 was issued to the 5th Separate Heavy Tank Brigade in Moscow and was involved in parades through the Red Square from 1935 until 1940. The T-35 was there to impress spectators as well as foreign observers rather than as a fighting piece. In June 1940, the T-35 was subjected to either be withdrawn from front-line duties, be converted into self-propelled artillery, or be sent to military academies for future studies. It was decided to keep them for combat purposes and the T-35s were issued to the 67th and 68th Tank Regiments in the 34th Tank Division in the 8th Mechanized Corps in the Kiev Special Military District. The T-35 then saw action against the German forces when Operation Barbarossa was commenced. Though the tanks actual combat history is not very well documented, the tank regiments they were assigned to report a loss of 90% of the vehicles, more to mechanical failures than to enemy combat. These broken-down tanks were subsequently destroyed by their crews to avoid capture. The last reported use of these tanks was during the Battle of Moscow, where two T-35s were deployed and its performance went unrecorded. One such vehicle was captured by the Germans and sent to the Kummersdorf military proving grounds for evaluations. This captured T-35 may or may not be the same one the German used during the Battle of Berlin in April 1945.
The T-35 was once mistaken for taking part in the Winter War against Finland, this is due to the deployment of the SMK, T-100s, and KV-1s prototypes into the battle as combat testing. The SMK was disabled by the Finnish and was documented in photographs, which the German intelligence designated as the T-35C, despite being not related to the T-35 tank.
Survivors
Today, a single T-35 is left not only in an intact state but still in running condition. This tank is held in the Kubinka Tank Museum in Moscow and only survived because it was used as a training facility rather than combat use. Kubinka also holds the second prototype of the aforementioned SU-14 self-propelled artillery gun.
| Archive of the in-game description | |
|---|---|
|
This tank came into service in 1933 and was mass-produced between 1933 and 1939. In total, around 60 of them were made. The vehicle had a classic layout: the driver's compartment was located in the front, the fighting compartment in the middle and the engine compartment in the rear. Its armament was installed in five turrets on two tiers. A 76.2 mm KT-28 cannon and a 7.62 mm DT machine gun were installed in the central rotating turret. Two 45 mm 20K Mod. 1932 cannons were diagonally mounted on the lower tier and could fire to the forward right and forward left. Two machine guns were also diagonally mounted next to the cannon turrets. The undercarriage was protected by add-on armour plates. Between 1933 and 1939, numerous changes were introduced to the vehicle's basic structure. The 1935 model was longer and received a new turret with a 76.2 mm L-10 cannon. The hull sides were equipped with new add-on armour. The tank's mass grew to 55 tonnes, while the crew complement was reduced to 9. In 1938, turrets with sloping armour were installed on the last six tanks owing to the increased power of anti-tank artillery. Most of these heavy tanks were lost in battle in the summer and autumn of 1941, mostly due to mechanical failures. Two T-35s were used in the Battle of Moscow. The tank was used in combat for the last time at the end of April 1945, when the Germans used a captured T-35 during the defence of Berlin. This vehicle's firepower surpassed that of any other contemporary tank in the world. However, this complicated its structural system. The tank's traction and dynamic properties were insufficient, which was particularly noticeable when it turned. All these flaws in combination prevented the heavy tank from completing the tasks set before it. The high number of turrets resulted in the commander being unable to effectively control firing. The tank's weak armour meant that it was vulnerable to artillery, and its low mobility and huge size made it a perfect target. | |
Media
- Skins
- Videos
See also
- Other vehicles of similar configuration and role
External links
| Experimental Design and Mechanical Engineering Department | |
|---|---|
| Light Tanks | |
| T-26 | T-26 · T-26 (1st Gv.T.Br.) · T-26E · T-26-4 |
| T-50 | T-50 · T-126 |
| Heavy Tanks | T-35 |
| Tank Destroyers | SU-5-1 · SU-100Y |
| Export | |
| T-26 | ␗T-26 · T-26 No.531 |
| See Also | Omsk Transport Engineering Plant |
| USSR heavy tanks | |
|---|---|
| KV-1 | KV-1 (L-11) · KV-1 (ZiS-5) · KV-1E · KV-1S |
| KV-2 | KV-2 (1939) · KV-2 (1940) · KV-2 (ZiS-6) · KV-220 |
| Other KVs | KV-85 · KV-122 |
| IS-1/2 | IS-1 · IS-2 · IS-2 (1944) · IS-2 No.321 · IS-2 "Revenge" · Object 248 |
| Other IS tanks | IS-3 · IS-4M · IS-6 · IS-7 |
| T-10 | T-10A · T-10M |
| Multi-turreted | T-35 · SMK |
| Other | Object 279 |
| Lend-Lease | ▂MK-II "Matilda" |
| USSR premium ground vehicles | |
|---|---|
| Light tanks | BA-11 · RBT-5 · BT-7A (F-32) · T-26 (1st Gv.T.Br.) · T-26E · T-126 · PT-76-57 · 2S38 |
| Medium tanks | T-34 (Prototype) · T-34 (1st Gv.T.Br.) · T-34E · T-34-57 (1943) · T-34-85E · T-34-100 · T-44-122 · TO-55 · T-55AM-1 · T-72AV (TURMS-T) · T-80UD |
| ▂M3 Medium · ▂M4A2 · ▂T-III · ▂T-V · ▂МК-IX "Valentine" | |
| Heavy tanks | SMK · T-35 · ▂MK-II "Matilda" · KV-1E · KV-2 (1940) · KV-2 (ZiS-6) · KV-122 · KV-220 · IS-2 "Revenge" · Object 248 · IS-6 · T-10A |
| Tank destroyers | BM-8-24 · BM-13N · BM-31-12 |
| SU-57 · SU-76D · SU-76M (5th Gv.Kav.Corps) · SU-85A · SU-100Y · SU-122P · Object 120 | |
| SPAA | ▂Phòng không T-34 · ZUT-37 |
