Difference between revisions of "StuG III F"
Inceptor57 (talk | contribs) |
|||
| Line 2: | Line 2: | ||
== Description == | == Description == | ||
| − | ''In the description, the first part needs to be about the history of the creation and combat usage of the vehicle, as well as its key features. In the second part, tell the reader about the ground vehicle in the game. Insert the screenshot of the vehicle. If the novice player does not remember the vehicle by name, they will immediately understand what kind of vehicle it is talking about.'' | + | <!--''In the description, the first part needs to be about the history of the creation and combat usage of the vehicle, as well as its key features. In the second part, tell the reader about the ground vehicle in the game. Insert the screenshot of the vehicle. If the novice player does not remember the vehicle by name, they will immediately understand what kind of vehicle it is talking about.''--> |
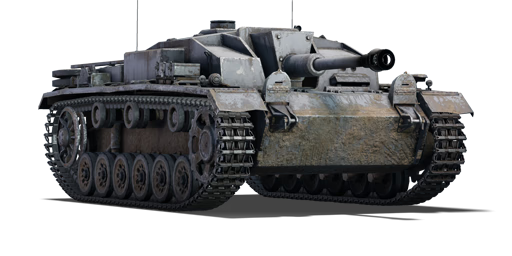
| + | [[File:GarageImage_StuGIIIF.jpg|420px|thumb|left]] | ||
| + | {{break}} | ||
| + | The '''Sturmgeschütz III Ausf. F''' ('''StuG III F''') is a Rank II German tank destroyer with a battle rating of 3.7. It was introduced in during the Closed Beta Test for Ground Forces before Update 1.41. An improvement over the [[Sturmgeschütz III Ausf. F|StuG III A]] with the installation of the longer [[7.5 cm KwK 40|75 mm StuK 40 L/43]] gun. | ||
| + | |||
| + | This tank destroyer has a very high first-shot kill ability, due to the superb penetration, damage and accuracy of its gun. Right off the bat the gun will easily penetrate medium tanks and the KV-1 at certain ranges, and the APCR ammo can consistently pen KV-1's at most ranges. Furthermore, its gun is very accurate and with proper range-finding and aim, hitting the bow-gunner's port on a T-34 is possible from 800 meters. However, its frontal armour is insufficient for any form of "slugging match" and its reload time is extensive, so it should be used at long-medium ranges and moved into cover once a shot is fired. | ||
== General info == | == General info == | ||
=== Survivability and armour === | === Survivability and armour === | ||
| − | ''Describe armour protection. Note the most well protected and key weak areas. Appreciate the layout of modules as well as the number and location of crew members. Is the level of armour protection sufficient, is the placement of modules helpfull for survival in combat?'' | + | <!--''Describe armour protection. Note the most well protected and key weak areas. Appreciate the layout of modules as well as the number and location of crew members. Is the level of armour protection sufficient, is the placement of modules helpfull for survival in combat?'' |
| − | ''If necessary use a visual template to indicate the most secure and weak zones of the armour.'' | + | ''If necessary use a visual template to indicate the most secure and weak zones of the armour.''--> |
| + | '''Armour type:''' | ||
| + | * Rolled homogeneous armour | ||
| + | {| class="wikitable" | ||
| + | |- | ||
| + | ! Armour !! Front (Slope angle) !! Sides !! Rear !! Roof | ||
| + | |- | ||
| + | | Hull || 30 mm (86°), 50 mm (50°) ''Front glacis'' <br> 50 mm (23°) ''Lower glacis'' || 30 mm || 30 mm (33°) ''Top'' <br> 30 mm (11°) ''Bottom'' || 17 mm | ||
| + | |- | ||
| + | | Superstructure || 50 mm (9-10°), 30 mm (76°) || 30 mm || 30 mm (26-30°) || 11 mm | ||
| + | |- | ||
| + | |} | ||
| + | '''Notes:''' | ||
| + | * Suspension wheels are 15 mm thick while tracks are 20 mm thick. | ||
| + | *Front side is not all 80 mm thick, the rest are 30 mm, but are heavily sloped. | ||
| + | *The hull sides are protected by an extra 5 mm thick plate to provide protection against HEAT and HE rounds. | ||
=== Mobility === | === Mobility === | ||
| − | ''Write about the mobility of the ground vehicle. Estimate the specific power and maneuverability as well as the maximum speed forward and backward.'' | + | <!--''Write about the mobility of the ground vehicle. Estimate the specific power and maneuverability as well as the maximum speed forward and backward.''--> |
| + | {| class="wikitable" style="text-align:center" | ||
| + | |- | ||
| + | !colspan="3" | Mobility characteristic | ||
| + | |- | ||
| + | ! Weight (tons) | ||
| + | !colspan="1" | Add-on Armor<br>weight (tons) | ||
| + | !colspan="1" | Max speed (km/h) | ||
| + | |- | ||
| + | |rowspan="2" | 22.7 || colspan="1" rowspan="2" | N/A || colspan="1" | 44 (AB) | ||
| + | |- | ||
| + | |40 (RB/SB) | ||
| + | |- | ||
| + | !colspan="3" | Engine power (horsepower) | ||
| + | |- | ||
| + | !colspan="1" | Mode | ||
| + | !Stock | ||
| + | !Upgraded | ||
| + | |- | ||
| + | |''Arcade'' | ||
| + | |426 | ||
| + | |525 | ||
| + | |- | ||
| + | |''Realistic/Simulator'' | ||
| + | |265 | ||
| + | |300 | ||
| + | |- | ||
| + | !colspan="3" | Power-to-weight ratio (hp/ton) | ||
| + | |- | ||
| + | !colspan="1" | Mode | ||
| + | !Stock | ||
| + | !Upgraded | ||
| + | |- | ||
| + | |''Arcade'' | ||
| + | |18.77 | ||
| + | |23.13 | ||
| + | |- | ||
| + | |''Realistic/Simulator'' | ||
| + | |11.67 | ||
| + | |13.21 | ||
| + | |- | ||
| + | |} | ||
== Armaments == | == Armaments == | ||
=== Main armament === | === Main armament === | ||
| − | ''Give the reader information about the characteristics of the main gun. Assess its effectiveness in a battle based on the reloading speed, ballistics and the power of shells. Do not forget about the flexibilty of the fire, that is how quickly the cannon can be aimed at the target, open fire on it and aim at another enemy. Add a link to the main article on the gun: <code><nowiki>{{main|Name of the weapon}}</nowiki></code>. Describe in general terms the ammunition available for the main gun. Give advice on how to use them and how to fill the ammunition storage.'' | + | <!--''Give the reader information about the characteristics of the main gun. Assess its effectiveness in a battle based on the reloading speed, ballistics and the power of shells. Do not forget about the flexibilty of the fire, that is how quickly the cannon can be aimed at the target, open fire on it and aim at another enemy. Add a link to the main article on the gun: <code><nowiki>{{main|Name of the weapon}}</nowiki></code>. Describe in general terms the ammunition available for the main gun. Give advice on how to use them and how to fill the ammunition storage.''--> |
| + | {{main|StuK 40 (75 mm)}} | ||
| − | === | + | {| class="wikitable" style="text-align:center" |
| − | '' | + | |- |
| + | ! colspan="6" | [[StuK 40 (75 mm)|75 mm StuK 40 L43]] | ||
| + | |- | ||
| + | ! colspan="3" rowspan="1" style="width:5em" |Capacity | ||
| + | ! rowspan="1" | Vertical <br> guidance | ||
| + | ! rowspan="1" | Horizontal <br> guidance | ||
| + | ! rowspan="1" | Stabilizer | ||
| + | |- | ||
| + | | colspan="3" | 44 || -6°/+17° || ±10° || N/A | ||
| + | |- | ||
| + | ! colspan="6" | Turret rotation speed (°/s) | ||
| + | |- | ||
| + | ! style="width:4em" |Mode | ||
| + | ! style="width:4em" |Stock | ||
| + | ! style="width:4em" |Upgraded | ||
| + | ! style="width:4em" |Prior + Full crew | ||
| + | ! style="width:4em" |Prior + Expert qualif. | ||
| + | ! style="width:4em" |Prior + Ace qualif. | ||
| + | |- | ||
| + | | ''Arcade'' || 8.9 || 12.4 || __.__ || __.__ || __.__ | ||
| + | |- | ||
| + | | ''Realistic'' || 8.9 || 10.5 || __.__ || __.__ || __.__ | ||
| + | |- | ||
| + | ! colspan="4" | Reloading rate (seconds) | ||
| + | |- | ||
| + | ! colspan="1" style="width:4em" |Stock | ||
| + | ! colspan="1" style="width:4em" |Prior + Full crew | ||
| + | ! colspan="1" style="width:4em" |Prior + Expert qualif. | ||
| + | ! colspan="1" style="width:4em" |Prior + Ace qualif. | ||
| + | |- | ||
| + | | 7.6 || __.__ || __.__ || __.__ | ||
| + | |- | ||
| + | |} | ||
| − | === | + | ===== Ammunition ===== |
| − | '' | + | {| class="wikitable sortable" style="text-align:center" width="100%" |
| + | ! colspan="8" | Penetration statistics | ||
| + | |- | ||
| + | ! rowspan="2" data-sort-type="text" | Ammunition | ||
| + | ! rowspan="2" class="unsortable" | Type of <br /> warhead | ||
| + | ! colspan="6" | '''Penetration''' '''''in mm''''' '''@ 90°''' | ||
| + | |- | ||
| + | ! 10m | ||
| + | ! 100m | ||
| + | ! 500m | ||
| + | ! 1000m | ||
| + | ! 1500m | ||
| + | ! 2000m | ||
| + | |- | ||
| + | | PzGr 39 || APCBC || 135 || 133 || 121 || 107 || 95 || 85 | ||
| + | |- | ||
| + | | PzGr 40 || APCR || 175 || 173 || 151 || 127 || 108 || 91 | ||
| + | |- | ||
| + | | Hl.Gr 38B || HEAT || 80 || 80 || 80 || 80 || 80 || 80 | ||
| + | |- | ||
| + | | Sprgr. 34 || HE || 10 || 10 || 10 || 10 || 10 || 10 | ||
| + | |- | ||
| + | |} | ||
| + | {| class="wikitable sortable" style="text-align:center" width="100%" | ||
| + | ! colspan="11" | Shell details | ||
| + | |- | ||
| + | ! rowspan="2" data-sort-type="text" | Ammunition | ||
| + | ! rowspan="2" class="unsortable" | Type of <br /> warhead | ||
| + | ! rowspan="2" |Velocity <br /> in m/s | ||
| + | ! rowspan="2" |Projectile<br />Mass in kg | ||
| + | ! rowspan="2" | ''Fuse delay'' | ||
| + | ''in m:'' | ||
| + | ! rowspan="2" | ''Fuse sensitivity'' | ||
| + | ''in mm:'' | ||
| + | ! rowspan="2" | ''Explosive Mass in g<br /> (TNT equivalent):'' | ||
| + | ! rowspan="2" | ''Normalization At 30° <br> from horizontal:'' | ||
| + | ! colspan="3" | ''Ricochet:'' | ||
| + | |- | ||
| + | ! 0% | ||
| + | ! 50% | ||
| + | ! 100% | ||
| + | |- | ||
| + | | PzGr 39 || APCBC || 740 || 6.8 || 1.3 || 15.0 || 28.9 || +4° || 48° || 63° || 71° | ||
| + | |- | ||
| + | | PzGr 40 || APCR || 919 || 4.2 || N/A || N/A || N/A || +1.5° || 66° || 70° || 72° | ||
| + | |- | ||
| + | | Hl.Gr 38B || HEAT || 450 || 4.4 || 0.0 || 0.1 || 872.1 || +0° || 62° || 69° || 73° | ||
| + | |- | ||
| + | | Sprgr. 34 || HE || 570 || 5.7 || 0.1 || 0.1 || 686 || +0° || 79° || 80° || 81° | ||
| + | |- | ||
| + | |} | ||
| + | {| class="wikitable sortable" style="text-align:center" | ||
| + | ! colspan="7" | Smoke characteristic | ||
| + | |- | ||
| + | ! Ammunition | ||
| + | ! Velocity <br /> in m/s | ||
| + | ! Projectile<br />Mass in kg | ||
| + | ! ''Screen radius <br /> in m'' | ||
| + | ! ''Screen time <br /> in s'' | ||
| + | ! ''Screen hold time <br /> in s:'' | ||
| + | ! ''Explosive Mass in g<br /> (TNT equivalent):'' | ||
| + | |- | ||
| + | | K.Gr.Rot Nb. || 423 || 6.8 || 13 || 5 || 20 || 50 | ||
| + | |- | ||
| + | |} | ||
| + | |||
| + | ===== [[Ammo racks|Ammo racks]] ===== | ||
| + | '''Last updated: 1.79.1.10''' | ||
| + | [[File:Ammoracks StuGIIIF.png|right|thumbnail|x250px|[[Ammo Racks|Ammo racks]] of the StuG III F.]] | ||
| + | {| class="wikitable sortable" style="text-align:center" | ||
| + | |- | ||
| + | ! class="wikitable unsortable" |Full<br /> ammo | ||
| + | ! class="wikitable unsortable" |1st<br /> rack empty | ||
| + | ! class="wikitable unsortable" |2nd<br /> rack empty | ||
| + | ! class="wikitable unsortable" |3rd<br /> rack empty | ||
| + | ! class="wikitable unsortable" |Visual<br /> discrepancy | ||
| + | |- | ||
| + | || '''44''' || 22 ''(+22)'' || 17 ''(+27)'' || 1 ''(+43)'' || style="text-align:left" | No | ||
| + | |- | ||
| + | |} | ||
| + | |||
| + | Front right empty: 22 ''(+22)'' | ||
== Usage in the battles == | == Usage in the battles == | ||
| − | ''Describe the tactics of playing in the vehicle, the features of using vehicles in the team and advice on tactics. Refrain from creating a "guide" - do not impose a single point of view but give the reader food for thought. Describe the most dangerous enemies and give recommendations on fighting them. If necessary, note the specifics of the game in different modes (AB, RB, SB).'' | + | <!--''Describe the tactics of playing in the vehicle, the features of using vehicles in the team and advice on tactics. Refrain from creating a "guide" - do not impose a single point of view but give the reader food for thought. Describe the most dangerous enemies and give recommendations on fighting them. If necessary, note the specifics of the game in different modes (AB, RB, SB).''--> |
| + | StuGs, with their thin side and top armour, should be careful of their position. If operating solely, StuGs should either move to the flanks, in order to catch the enemy unaware, or operate behind the friendly lines. Staying in cover is preferable, although many rock formations will block the gun trajectory (whilst other tanks can simply shoot over them). Do always keep at least one flank covered, if the enemy is within range. | ||
| + | |||
| + | A particular useful indicator is the [[PaK40/3_auf_Sfl.38_Ausf._H|Marder III]]. They feature a similar gun, but are higher, and have a largely exposed crew. As a result of the latter, Marders are very fragile. If a Marder survives in a certain position, then the StuG is likely to do too. | ||
| + | |||
| + | Best, of course is to operate in cooperation with the team. | ||
| + | |||
| + | Operate in a squad with other StuGs, and at least one Pv.IV or Pz.III. They are higher, and might thus attract the enemy's attention, but draw fire away from the StuG for support while the StuG uses its gun to destroy the enemy before it destroys the allied medium tanks. | ||
| + | |||
| + | When fighting without support, relocate after each shot as the StuG III is sufficiently mobile to evade detection often; also, if the team does not have air superiority, seek wooded areas, as any plane armed with 20 mm cannons can destroy attempt to penetrate through the thin roof armour. | ||
=== Pros and cons === | === Pros and cons === | ||
| − | ''Summarize and briefly evaluate the vehicle in terms of its characteristics and combat effectiveness. Mark its pros and cons in a bulleted list. Do not use more than 6 points for each of the characteristics. Avoid using categorical definitions such as "bad", "good" and the like - they have a substitution in the form of softer "inadequate", "effective".'' | + | <!--''Summarize and briefly evaluate the vehicle in terms of its characteristics and combat effectiveness. Mark its pros and cons in a bulleted list. Do not use more than 6 points for each of the characteristics. Avoid using categorical definitions such as "bad", "good" and the like - they have a substitution in the form of softer "inadequate", "effective".''--> |
| − | |||
'''Pros:''' | '''Pros:''' | ||
| − | * | + | * Powerful and accurate 75 mm cannon. |
| − | + | * Good mobility to get around the battlefield and into position. | |
| + | * Large gun mantlet and sections of highly sloped armour often deflect poorly aimed shots. | ||
| + | * Low silhouette makes the StuG easy to conceal in RB and SB. | ||
| + | * The flat-shaped armour can ricochet some shots at long ranges, when angled. | ||
| + | * Completely enclosed vehicle means crew is safe from shrapnel and machine guns. | ||
'''Cons:''' | '''Cons:''' | ||
| − | * | + | * Front armour of 50 mm insufficiant for slugging matches. |
| + | * Longer reload time than the StuG III A. | ||
| + | * Bad gun depression of -6°. | ||
| + | * Crew is cramped in interior, with three lined up in front of the driver's port. | ||
| + | * Ammo rack prominently placed in line with the right front plate. | ||
| + | * Weak roof armour of 11-17 mm, makes it vulnerable to air-strafing. | ||
| + | * Lack of a turret means reacting to flanking enemies is harder. | ||
| + | * Obstacles on the ground can easily block the low-profile StuG's gun view. | ||
| + | * Matchmaking can put the StuG III F against challenging foes like the KV-1 heavy tanks. | ||
== History == | == History == | ||
| − | ''Describe the history of the creation and combat usage of the ground vehicle in more detail than in the introduction. If the historical reference turns out to be too big, take it to a separate article, taking a link to an article about the vehicle and adding a block "/historical reference" (example: https://wiki.warthunder.com/Name-vehicles/historical reference) and add a link to it here using the <code>main</code> template. Be sure to include links to sources at the end of the article.'' | + | <!--''Describe the history of the creation and combat usage of the ground vehicle in more detail than in the introduction. If the historical reference turns out to be too big, take it to a separate article, taking a link to an article about the vehicle and adding a block "/historical reference" (example: https://wiki.warthunder.com/Name-vehicles/historical reference) and add a link to it here using the <code>main</code> template. Be sure to include links to sources at the end of the article.''--> |
| + | ===Development=== | ||
| + | The role of a self-propelled gun came from combat experiences in World War I. During the German offensives on the Allied front, infantry lacked artillery support against fortifications in places out-ranged by their heavy artillery behind the lines. A need for a mobile artillery piece was necessary to keep up with the German infantry and fight enemy fortifications with a direct-fire assault role. The father of this concept was German General Erich von Manstein and was coined as the ''Sturmartillerie'' (assault artillery), and these units were to be embedded in infantry divisions. | ||
| + | |||
| + | On June 15, 1936, Daimler-Benz AG was ordered to develop a support vehicle mounting the 75 mm howitzer as its armament in a casemate structure with a traverse of 25 degrees. The vehicle was to provide full protection for its crew and be no taller than an average soldier. Daimler-Benz repurposed the chassis and running gear of their [[Pz.Kpfw. III Ausf. E|Panzer III]] design for the role. These new vehicles were named the '''Sturmgeschütz III''' (assault gun), or the shortened '''StuG III''' and the finished designs were sent to Alkett for prototype production and five were produced in 1937. These prototypes were made of mild steel and had the 75 mm StuK 37 L/24 cannon, an adaption of the original 75 mm KwK 37 cannon on the [[Pz.Kpfw. IV Ausf. E|Panzer IV]]. This gun would be featured on the StuG III variants Ausf. A to Ausf. E. The StuG III entered production from January 1940 to the end of the war on April 1945 due to the many upgrades done on the vehicle to increase serviceability and its low cost. At about a total production of 11,300 StuG III and its variants, the StuG III design was the most produced armoured fighting vehicle in German service. | ||
| + | |||
| + | ===Design=== | ||
| + | The StuG III had a fully enclosed armoured shell, keeping the crew safe withing the vehicle. As a casemate structure, it has a limited traverse range for its front view, and the whole vehicle must be turned if a target is outside its traverse range. The StuG III featured about 50 mm of armour on the front, but about 30 mm of armour everywhere else, this was upgraded as the war progressed to 80 mm. The suspension system is identical to the Panzer III's, a torsion bar system. The StuG III had a crew of four, the commander, driver, loader, and gunner. Initial variants lack machine guns, so the StuG was required to work with support units to ensure it does not get overrun by infantry. It wasn't until December 1942 when a machine gun could be accommodated for the loader to use. Initial variants also did not have a commander's cupola so his view was quite restricted. However, models after September 1943 had them installed. | ||
| + | |||
| + | ===Combat usage=== | ||
| + | The StuG III was placed in the artillery branch of the Wehrmacht Heer as neither the infantry nor Panzer forces could accept the StuG vehicle. The StuGs were organized into battalions with 18 vehicle organized into three batteries of six vehicles each. The intent of the vehicle was to provide close support for infantry and so it was meant to destroy lightly-armoured targets and fortifications, not tanks. The vehicle served well in its intended role in the early parts of World War II in the Poland and France Campaigns, proving highly successful. One prominent commander of the StuG III is Michael Wittman, who would eventually become the most popular tank ace in German service. However, during the German campaigns in World War II, they encounter more heavily armoured and armed tanks in the Allied sides, such as the French heavy tank Char B1, but it was the Soviets [[T-34 1941|T-34]] and [[KV-1 L-11|KV-1]] tanks that made the Germans rearm their vehicles to be better-able to combat these tanks. | ||
| + | |||
| + | The [[Sturmgeschütz III Ausf. A|initial Stug III design]] was upgunned to better combat these newer tanks. The original 75 mm StuK 37 was inadequate so like the [[Pz.Kpfw. IV Ausf. F2|Panzer IV]]s, it was given a 75 mm StuK 40 L/43 cannon. This variant was the '''Ausf. F''' and with its new cannon, could penetrate about 91 mm of armour inclined at 30 degrees at 500 meters distance, being able to engage the Soviet T-34 designs. This upgrade changed the StuG III role from its usual infantry support role into a tank destroyer, though it can serve both roles with acceptable performance. The design was changed with an exhaust fan on top of the vehicle to vent out propellant fume that could accumulate in the tank from firing the cannon. An additional 30 mm of armour was welded on the tank to up the front armour from 50 mm to 80 mm in thickness. This, plus with the StuG III's low profile makes its concealment very easy to ambush tanks with its powerful 75 mm cannon. Some later models from December 1942 onward has the StuG III Ausf. F mounted the longer 75 mm StuK 40 L/48 cannon more commonly seen on the ''[[Sturmgeschütz III Ausf. G|Ausf. G]]'' variant. Another redesign in 1942 had the StuG III chassis built from the improved [[Pz.Kpfw. III Ausf. J|Panzer III Ausf. J]] and [[Pz.Kpfw. III Ausf. L|Ausf. L]] with better rear armour protection and hull design. This redesigned variant was called the ''Ausf. F/8''. About 616 StuG III Ausf. F and F/8 were produced from March 1942 to December 1942. | ||
| + | |||
| + | This upgunned StuG III variant was better able to destroy Allied armours like the [[T-34 1942|T-34]]s and the [[Medium Tank M4A1 Sherman|M4 Sherman]]s. Another upgrade to the StuG III gave it the longer 75 mm StuK 40 L/48 cannon, and this variant was called the [[Sturmgeschütz III Ausf. G|StuG III Ausf. G]].The vehicles were deemed very successful and attributed to more tank kills than any other armoured fighting vehicle in German service. The success of the StuG III urged Germany to prioritize the production of casemate structure vehicles built from chassis of other vehicles for further development in tank destroyers such as the [[Jagdpanzer V Jagdpanther|JagdPanther]], [[Jagdpanzer 38(t) Hetzer|Jagdpanzer 38(t)]], and the [[Panzerjäger Tiger (P) Ferdinand|Ferdinand]]. | ||
| + | |||
| + | The StuG III design was also made into different variants with different armaments, such as a 105 mm howitzer on the ''[[Sturmhaubitze 42 Ausf. G|StuH 42]]'' , a flamethrower on the ''StuG III (Flamm)'', and even a 150 mm sIG 33 infantry gun on the ''Sturm-Infanteriegeschütz 33B''. | ||
| + | |||
| + | ===Legacy=== | ||
| + | The StuG III design would see service in the entire war due to its adaptability to the changing course of the war, going from an offensive support weapon to a defensive tank destroyer. The StuG III holds the distinct title of knocking out the most Allied tanks in German service with about 20,000 tanks killed, much more than the better [[Pz.Kpfw. V Ausf. D|Panther]] and [[Pz.Kpfw. VI Ausf. H1|Tiger]] tanks. It was a widely-exported design to Germany's allies, such as Bulgaria, Hungary, Italy, Romania, Spain, and Finland. The StuG III would continue serving in various countries past World War II in conflicts in the 1960s, such as the Six Days War in Syria's service that were donated by the Soviet Union. Today, some are still serving as static pillboxes on the Golan Heights. | ||
== Media == | == Media == | ||
| Line 51: | Line 265: | ||
* ''topic on the official game forum;'' | * ''topic on the official game forum;'' | ||
* ''other literature.'' | * ''other literature.'' | ||
| + | |||
| + | {{Germany tank destroyers}} | ||
Revision as of 20:24, 18 November 2018
Contents
Description

The Sturmgeschütz III Ausf. F (StuG III F) is a Rank II German tank destroyer with a battle rating of 3.7. It was introduced in during the Closed Beta Test for Ground Forces before Update 1.41. An improvement over the StuG III A with the installation of the longer 75 mm StuK 40 L/43 gun.
This tank destroyer has a very high first-shot kill ability, due to the superb penetration, damage and accuracy of its gun. Right off the bat the gun will easily penetrate medium tanks and the KV-1 at certain ranges, and the APCR ammo can consistently pen KV-1's at most ranges. Furthermore, its gun is very accurate and with proper range-finding and aim, hitting the bow-gunner's port on a T-34 is possible from 800 meters. However, its frontal armour is insufficient for any form of "slugging match" and its reload time is extensive, so it should be used at long-medium ranges and moved into cover once a shot is fired.
General info
Survivability and armour
Armour type:
- Rolled homogeneous armour
| Armour | Front (Slope angle) | Sides | Rear | Roof |
|---|---|---|---|---|
| Hull | 30 mm (86°), 50 mm (50°) Front glacis 50 mm (23°) Lower glacis |
30 mm | 30 mm (33°) Top 30 mm (11°) Bottom |
17 mm |
| Superstructure | 50 mm (9-10°), 30 mm (76°) | 30 mm | 30 mm (26-30°) | 11 mm |
Notes:
- Suspension wheels are 15 mm thick while tracks are 20 mm thick.
- Front side is not all 80 mm thick, the rest are 30 mm, but are heavily sloped.
- The hull sides are protected by an extra 5 mm thick plate to provide protection against HEAT and HE rounds.
Mobility
| Mobility characteristic | ||
|---|---|---|
| Weight (tons) | Add-on Armor weight (tons) |
Max speed (km/h) |
| 22.7 | N/A | 44 (AB) |
| 40 (RB/SB) | ||
| Engine power (horsepower) | ||
| Mode | Stock | Upgraded |
| Arcade | 426 | 525 |
| Realistic/Simulator | 265 | 300 |
| Power-to-weight ratio (hp/ton) | ||
| Mode | Stock | Upgraded |
| Arcade | 18.77 | 23.13 |
| Realistic/Simulator | 11.67 | 13.21 |
Armaments
Main armament
| 75 mm StuK 40 L43 | |||||
|---|---|---|---|---|---|
| Capacity | Vertical guidance |
Horizontal guidance |
Stabilizer | ||
| 44 | -6°/+17° | ±10° | N/A | ||
| Turret rotation speed (°/s) | |||||
| Mode | Stock | Upgraded | Prior + Full crew | Prior + Expert qualif. | Prior + Ace qualif. |
| Arcade | 8.9 | 12.4 | __.__ | __.__ | __.__ |
| Realistic | 8.9 | 10.5 | __.__ | __.__ | __.__ |
| Reloading rate (seconds) | |||||
| Stock | Prior + Full crew | Prior + Expert qualif. | Prior + Ace qualif. | ||
| 7.6 | __.__ | __.__ | __.__ | ||
Ammunition
| Penetration statistics | |||||||
|---|---|---|---|---|---|---|---|
| Ammunition | Type of warhead |
Penetration in mm @ 90° | |||||
| 10m | 100m | 500m | 1000m | 1500m | 2000m | ||
| PzGr 39 | APCBC | 135 | 133 | 121 | 107 | 95 | 85 |
| PzGr 40 | APCR | 175 | 173 | 151 | 127 | 108 | 91 |
| Hl.Gr 38B | HEAT | 80 | 80 | 80 | 80 | 80 | 80 |
| Sprgr. 34 | HE | 10 | 10 | 10 | 10 | 10 | 10 |
| Shell details | ||||||||||
|---|---|---|---|---|---|---|---|---|---|---|
| Ammunition | Type of warhead |
Velocity in m/s |
Projectile Mass in kg |
Fuse delay
in m: |
Fuse sensitivity
in mm: |
Explosive Mass in g (TNT equivalent): |
Normalization At 30° from horizontal: |
Ricochet: | ||
| 0% | 50% | 100% | ||||||||
| PzGr 39 | APCBC | 740 | 6.8 | 1.3 | 15.0 | 28.9 | +4° | 48° | 63° | 71° |
| PzGr 40 | APCR | 919 | 4.2 | N/A | N/A | N/A | +1.5° | 66° | 70° | 72° |
| Hl.Gr 38B | HEAT | 450 | 4.4 | 0.0 | 0.1 | 872.1 | +0° | 62° | 69° | 73° |
| Sprgr. 34 | HE | 570 | 5.7 | 0.1 | 0.1 | 686 | +0° | 79° | 80° | 81° |
| Smoke characteristic | ||||||
|---|---|---|---|---|---|---|
| Ammunition | Velocity in m/s |
Projectile Mass in kg |
Screen radius in m |
Screen time in s |
Screen hold time in s: |
Explosive Mass in g (TNT equivalent): |
| K.Gr.Rot Nb. | 423 | 6.8 | 13 | 5 | 20 | 50 |
Ammo racks
Last updated: 1.79.1.10

| Full ammo |
1st rack empty |
2nd rack empty |
3rd rack empty |
Visual discrepancy |
|---|---|---|---|---|
| 44 | 22 (+22) | 17 (+27) | 1 (+43) | No |
Front right empty: 22 (+22)
Usage in the battles
StuGs, with their thin side and top armour, should be careful of their position. If operating solely, StuGs should either move to the flanks, in order to catch the enemy unaware, or operate behind the friendly lines. Staying in cover is preferable, although many rock formations will block the gun trajectory (whilst other tanks can simply shoot over them). Do always keep at least one flank covered, if the enemy is within range.
A particular useful indicator is the Marder III. They feature a similar gun, but are higher, and have a largely exposed crew. As a result of the latter, Marders are very fragile. If a Marder survives in a certain position, then the StuG is likely to do too.
Best, of course is to operate in cooperation with the team.
Operate in a squad with other StuGs, and at least one Pv.IV or Pz.III. They are higher, and might thus attract the enemy's attention, but draw fire away from the StuG for support while the StuG uses its gun to destroy the enemy before it destroys the allied medium tanks.
When fighting without support, relocate after each shot as the StuG III is sufficiently mobile to evade detection often; also, if the team does not have air superiority, seek wooded areas, as any plane armed with 20 mm cannons can destroy attempt to penetrate through the thin roof armour.
Pros and cons
Pros:
- Powerful and accurate 75 mm cannon.
- Good mobility to get around the battlefield and into position.
- Large gun mantlet and sections of highly sloped armour often deflect poorly aimed shots.
- Low silhouette makes the StuG easy to conceal in RB and SB.
- The flat-shaped armour can ricochet some shots at long ranges, when angled.
- Completely enclosed vehicle means crew is safe from shrapnel and machine guns.
Cons:
- Front armour of 50 mm insufficiant for slugging matches.
- Longer reload time than the StuG III A.
- Bad gun depression of -6°.
- Crew is cramped in interior, with three lined up in front of the driver's port.
- Ammo rack prominently placed in line with the right front plate.
- Weak roof armour of 11-17 mm, makes it vulnerable to air-strafing.
- Lack of a turret means reacting to flanking enemies is harder.
- Obstacles on the ground can easily block the low-profile StuG's gun view.
- Matchmaking can put the StuG III F against challenging foes like the KV-1 heavy tanks.
History
Development
The role of a self-propelled gun came from combat experiences in World War I. During the German offensives on the Allied front, infantry lacked artillery support against fortifications in places out-ranged by their heavy artillery behind the lines. A need for a mobile artillery piece was necessary to keep up with the German infantry and fight enemy fortifications with a direct-fire assault role. The father of this concept was German General Erich von Manstein and was coined as the Sturmartillerie (assault artillery), and these units were to be embedded in infantry divisions.
On June 15, 1936, Daimler-Benz AG was ordered to develop a support vehicle mounting the 75 mm howitzer as its armament in a casemate structure with a traverse of 25 degrees. The vehicle was to provide full protection for its crew and be no taller than an average soldier. Daimler-Benz repurposed the chassis and running gear of their Panzer III design for the role. These new vehicles were named the Sturmgeschütz III (assault gun), or the shortened StuG III and the finished designs were sent to Alkett for prototype production and five were produced in 1937. These prototypes were made of mild steel and had the 75 mm StuK 37 L/24 cannon, an adaption of the original 75 mm KwK 37 cannon on the Panzer IV. This gun would be featured on the StuG III variants Ausf. A to Ausf. E. The StuG III entered production from January 1940 to the end of the war on April 1945 due to the many upgrades done on the vehicle to increase serviceability and its low cost. At about a total production of 11,300 StuG III and its variants, the StuG III design was the most produced armoured fighting vehicle in German service.
Design
The StuG III had a fully enclosed armoured shell, keeping the crew safe withing the vehicle. As a casemate structure, it has a limited traverse range for its front view, and the whole vehicle must be turned if a target is outside its traverse range. The StuG III featured about 50 mm of armour on the front, but about 30 mm of armour everywhere else, this was upgraded as the war progressed to 80 mm. The suspension system is identical to the Panzer III's, a torsion bar system. The StuG III had a crew of four, the commander, driver, loader, and gunner. Initial variants lack machine guns, so the StuG was required to work with support units to ensure it does not get overrun by infantry. It wasn't until December 1942 when a machine gun could be accommodated for the loader to use. Initial variants also did not have a commander's cupola so his view was quite restricted. However, models after September 1943 had them installed.
Combat usage
The StuG III was placed in the artillery branch of the Wehrmacht Heer as neither the infantry nor Panzer forces could accept the StuG vehicle. The StuGs were organized into battalions with 18 vehicle organized into three batteries of six vehicles each. The intent of the vehicle was to provide close support for infantry and so it was meant to destroy lightly-armoured targets and fortifications, not tanks. The vehicle served well in its intended role in the early parts of World War II in the Poland and France Campaigns, proving highly successful. One prominent commander of the StuG III is Michael Wittman, who would eventually become the most popular tank ace in German service. However, during the German campaigns in World War II, they encounter more heavily armoured and armed tanks in the Allied sides, such as the French heavy tank Char B1, but it was the Soviets T-34 and KV-1 tanks that made the Germans rearm their vehicles to be better-able to combat these tanks.
The initial Stug III design was upgunned to better combat these newer tanks. The original 75 mm StuK 37 was inadequate so like the Panzer IVs, it was given a 75 mm StuK 40 L/43 cannon. This variant was the Ausf. F and with its new cannon, could penetrate about 91 mm of armour inclined at 30 degrees at 500 meters distance, being able to engage the Soviet T-34 designs. This upgrade changed the StuG III role from its usual infantry support role into a tank destroyer, though it can serve both roles with acceptable performance. The design was changed with an exhaust fan on top of the vehicle to vent out propellant fume that could accumulate in the tank from firing the cannon. An additional 30 mm of armour was welded on the tank to up the front armour from 50 mm to 80 mm in thickness. This, plus with the StuG III's low profile makes its concealment very easy to ambush tanks with its powerful 75 mm cannon. Some later models from December 1942 onward has the StuG III Ausf. F mounted the longer 75 mm StuK 40 L/48 cannon more commonly seen on the Ausf. G variant. Another redesign in 1942 had the StuG III chassis built from the improved Panzer III Ausf. J and Ausf. L with better rear armour protection and hull design. This redesigned variant was called the Ausf. F/8. About 616 StuG III Ausf. F and F/8 were produced from March 1942 to December 1942.
This upgunned StuG III variant was better able to destroy Allied armours like the T-34s and the M4 Shermans. Another upgrade to the StuG III gave it the longer 75 mm StuK 40 L/48 cannon, and this variant was called the StuG III Ausf. G.The vehicles were deemed very successful and attributed to more tank kills than any other armoured fighting vehicle in German service. The success of the StuG III urged Germany to prioritize the production of casemate structure vehicles built from chassis of other vehicles for further development in tank destroyers such as the JagdPanther, Jagdpanzer 38(t), and the Ferdinand.
The StuG III design was also made into different variants with different armaments, such as a 105 mm howitzer on the StuH 42 , a flamethrower on the StuG III (Flamm), and even a 150 mm sIG 33 infantry gun on the Sturm-Infanteriegeschütz 33B.
Legacy
The StuG III design would see service in the entire war due to its adaptability to the changing course of the war, going from an offensive support weapon to a defensive tank destroyer. The StuG III holds the distinct title of knocking out the most Allied tanks in German service with about 20,000 tanks killed, much more than the better Panther and Tiger tanks. It was a widely-exported design to Germany's allies, such as Bulgaria, Hungary, Italy, Romania, Spain, and Finland. The StuG III would continue serving in various countries past World War II in conflicts in the 1960s, such as the Six Days War in Syria's service that were donated by the Soviet Union. Today, some are still serving as static pillboxes on the Golan Heights.
Media
An excellent addition to the article will be video guides, as well as screenshots from the game and photos.
Read also
Links to the articles on the War Thunder Wiki that you think will be useful for the reader, for example,
- reference to the series of the vehicles;
- links to approximate analogues of other nations and research trees.
ETC.
Sources
Paste links to sources and external resources, such as:
- topic on the official game forum;
- other literature.
| Germany tank destroyers | |
|---|---|
| Pz. I Derivatives | Panzerjäger I |
| Pz. II Derivatives | 15cm sIG 33 B Sfl |
| Pz. 38(t) Derivatives | Marder III · Marder III H · Jagdpanzer 38(t) |
| Pz. III Derivatives | StuG III A · StuG III F · StuG III G · StuH 42 G |
| Pz. IV Derivatives | Jagdpanzer IV · Panzer IV/70(A) · Panzer IV/70(V) · Dicker Max · Nashorn · Brummbär · VFW |
| Pz. V Derivatives | Jagdpanther G1 · Bfw. Jagdpanther G1 |
| Pz. VI Derivatives | Sturer Emil · Elefant · Ferdinand · 38 cm Sturmmörser · Jagdtiger |
| Wheeled/Half-track | 8,8 cm Flak 37 Sfl. · Sd.Kfz.251/9 · Sd.Kfz.251/10 · Sd.Kfz.251/22 · Sd.Kfz.234/3 · Sd.Kfz.234/4 · 15 cm Pz.W.42 |
| ATGM Carrier | RakJPz 2 · RakJPz 2 (HOT) · Wiesel 1A2 |
| Other | Waffenträger · M109G · JPz 4-5 · Raketenautomat · VT1-2 |
