Difference between revisions of "Shackleton MR.Mk.2"
superski01 (talk | contribs) m (Rounded up 999 (999.744) --> 1000) (Tag: Visual edit) |
Kamerad_lubi (talk | contribs) m (Fixed a typo (adaquate) and broke up sentences in the intro to improve flow. Some wording changes were also made to the intro to avoid a repetition.) (Tag: Visual edit) |
||
| (22 intermediate revisions by 8 users not shown) | |||
| Line 6: | Line 6: | ||
== Description == | == Description == | ||
<!-- ''In the description, the first part should be about the history of and the creation and combat usage of the aircraft, as well as its key features. In the second part, tell the reader about the aircraft in the game. Insert a screenshot of the vehicle, so that if the novice player does not remember the vehicle by name, he will immediately understand what kind of vehicle the article is talking about.'' --> | <!-- ''In the description, the first part should be about the history of and the creation and combat usage of the aircraft, as well as its key features. In the second part, tell the reader about the aircraft in the game. Insert a screenshot of the vehicle, so that if the novice player does not remember the vehicle by name, he will immediately understand what kind of vehicle the article is talking about.'' --> | ||
| − | The ''' | + | The '''Avro Shackleton''' is the final military version of the venerated [[Lancaster (Family)|Lancaster series of bombers]]. Developed in 1945 from the now-obsolete [[Lincoln B Mk II|Avro Lincoln]] as an anti-submarine warfare (ASW) and maritime patrol aircraft, the Shackleton featured more specialized armaments, such as a naval radar housed inside a distinctive "bulge" on the belly of the aircraft. The tail gunner position is removed in favour of a flexible mount with 20 mm Hispano Mk.V autocannons to strafe naval targets. The plane also features more efficient Rolls-Royce Griffon engines powering contra-rotating propellers. |
| + | |||
| + | Introduced in [[Update "Direct Hit"]], the {{Specs|name}} can be best described as a "quirky" version of the [[Lincoln B Mk II]], with overall better mobility and payload, but worse defensive coverage and survivability. The plane has access to some of the most efficient payloads available, being capable of taking out 3 bases with its maximum bomb loadout. Due to its powerful Griffon engines, the Shackleton can be played either as a traditional long range bomber by using its decent climb rate or as a fast bomber using its high WEP power. | ||
== General info == | == General info == | ||
| Line 12: | Line 14: | ||
{{Specs-Avia-Flight}} | {{Specs-Avia-Flight}} | ||
<!-- ''Describe how the aircraft behaves in the air. Speed, manoeuvrability, acceleration and allowable loads - these are the most important characteristics of the vehicle.'' --> | <!-- ''Describe how the aircraft behaves in the air. Speed, manoeuvrability, acceleration and allowable loads - these are the most important characteristics of the vehicle.'' --> | ||
| − | + | ||
| + | As with the previous Lancaster family of bombers, the Shackleton has overall good flight performance. The plane is powered by four Rolls-Royce Griffon engines turning contra-rotating propellers, giving the Shackleton a very good thrust and acceleration for its weight, especially with WEP. The plane can also manoeuvre quite well for its size, allowing the pilots to quickly turn the plane around to escape from the enemy, or to adjust the bomb sight for bombing targets. | ||
| + | |||
| + | While the Shackleton has lower wing rip speed at 575 km/h IAS, the plane can retains its speed around 600-650 km/h in a dive quite well. This allows the Shackleton to be used as a fast bomber to dive at an enemy targets. However, a Shackleton pilot should avoid doing snap turns while the plane is at a speed above 500 km/h, as the wings can be easily overloaded and rips from the plane. | ||
{| class="wikitable" style="text-align:center" width="70%" | {| class="wikitable" style="text-align:center" width="70%" | ||
! rowspan="2" | Characteristics | ! rowspan="2" | Characteristics | ||
| − | ! colspan="2" | Max Speed<br>(km/h at | + | ! colspan="2" | Max Speed<br>(km/h at 3,000 m) |
! rowspan="2" | Max altitude<br>(metres) | ! rowspan="2" | Max altitude<br>(metres) | ||
! colspan="2" | Turn time<br>(seconds) | ! colspan="2" | Turn time<br>(seconds) | ||
| Line 25: | Line 30: | ||
|- | |- | ||
! Stock | ! Stock | ||
| − | | 487 || | + | | 487 || 469 || rowspan="2" | {{Specs|ceiling}} || 31.3 || 32.4 || 7.0 || 7.0 || rowspan="2" | 1,000 |
|- | |- | ||
! Upgraded | ! Upgraded | ||
| − | | | + | | 551 || 515 || 28.9 || 30.0 || 15.7 || 10.5 |
|- | |- | ||
|} | |} | ||
| Line 39: | Line 44: | ||
! Combat flaps !! Take-off flaps !! Landing flaps !! Air brakes !! Arrestor gear | ! Combat flaps !! Take-off flaps !! Landing flaps !! Air brakes !! Arrestor gear | ||
|- | |- | ||
| − | | | + | | ✓ || ✓ || ✓ || X || X <!-- ✓ --> |
|- | |- | ||
|} | |} | ||
| Line 54: | Line 59: | ||
! Combat !! Take-off !! Landing !! + !! - | ! Combat !! Take-off !! Landing !! + !! - | ||
|- | |- | ||
| − | | {{Specs|destruction|body}} || {{Specs|destruction|gear}} || | + | | 583<!--{{Specs|destruction|body}}--> || {{Specs|destruction|gear}} || 425 || 404 || 301 || ~3 || ~1 |
|- | |- | ||
|} | |} | ||
| Line 64: | Line 69: | ||
! Ailerons !! Rudder !! Elevators !! Radiator | ! Ailerons !! Rudder !! Elevators !! Radiator | ||
|- | |- | ||
| − | | < | + | | < 350 || < 350 || < 350 || > ___ |
|- | |- | ||
|} | |} | ||
| Line 71: | Line 76: | ||
{{Specs-Avia-Armour}} | {{Specs-Avia-Armour}} | ||
<!-- ''Examine the survivability of the aircraft. Note how vulnerable the structure is and how secure the pilot is, whether the fuel tanks are armoured, etc. Describe the armour, if there is any, and also mention the vulnerability of other critical aircraft systems.'' --> | <!-- ''Examine the survivability of the aircraft. Note how vulnerable the structure is and how secure the pilot is, whether the fuel tanks are armoured, etc. Describe the armour, if there is any, and also mention the vulnerability of other critical aircraft systems.'' --> | ||
| − | + | ||
| + | The Shackleton has large wings where the fuel tank are located. There are two pilots and eight gunners in total, but only two use turrets, the top gunner and the nose gunner. If the top gunner is taken out, the Shackleton becomes much easier to kill. There is only one steel armour plate of 8 mm covering the roof turret gunner. The overall structural strength of the Shackleton were mixed; the plane can endure some fire damage and can put them out using combinations of self-sealing fuel tanks and EFS, yet were incapable of taking many hits from autocannons, especially at the tail and wings. | ||
=== Modifications and economy === | === Modifications and economy === | ||
| Line 92: | Line 98: | ||
* 8 x RP-3 rockets + 25 x 500 lb H.E. M.C. Mk.II bombs (12,500 lb total) | * 8 x RP-3 rockets + 25 x 500 lb H.E. M.C. Mk.II bombs (12,500 lb total) | ||
* 8 x RP-3 rockets + 15 x 1,000 lb M.C. Mk.I bombs (15,000 lb total) | * 8 x RP-3 rockets + 15 x 1,000 lb M.C. Mk.I bombs (15,000 lb total) | ||
| + | |||
| + | While stock, the Shackleton has poor payload of 18 x 250 lb bombs, which is not enough destroy a single normal base and only sufficient to take one small base in frontline mode. | ||
| + | |||
| + | However, the Shackleton can unlock the 25 x 500 lb payload as a tier 2 modification, which actually outclasses the 14 x 1,000 lbs payload found on the Lancaster and Lincoln, due to double the explosive mass compared to the similar bomb of its predecessor, while being a significantly lighter payload. 10 of these bombs can take out a large base and 5 for small bases, which means it can take out at least two and a half bases. The bomb's quantity and sizeable explosive mass also makes it ideal for carpet bombings. | ||
| + | |||
| + | The 15 x 1,000 lb M.C. Mk.I loadout is ideal to destroy bases and airfields. Only 5 bombs are required to destroy normal bases and 3 to destroy weaker bases. A squad of 3 Shackletons is capable of destroying all bases and the airfield without landing on some maps. Given that most Air RB maps at its BR consist of respawning bases with a prevalence of attackers, you will rarely be able to drop all 15 bombs on bases without having to wait for at least 1 to respawn. | ||
| + | |||
| + | Due to the Shackleton's ASW roles, the plane has the peculiar choice of equipping eight RP-3 rockets on the wingtips. Due to the large wingspan and the size of the plane, the rockets are woefully inaccurate; it is best to not to equip them. | ||
=== Defensive armament === | === Defensive armament === | ||
| Line 103: | Line 117: | ||
* 2 x 20 mm Hispano Mk.V cannons, dorsal turret (350 rpg = 700 total) | * 2 x 20 mm Hispano Mk.V cannons, dorsal turret (350 rpg = 700 total) | ||
| + | The Shackleton has four 20 mm Hispano Mk.V autocannons, mounted in a pair of flexible mounts at the nose and a twin mount on dorsal position, as its defensive armaments. Compared to the Lincoln, the Shackleton's armament layout can be considered a downgrade due to the removal of tail turret, thus making it defenceless against any enemies coming from below. | ||
| + | |||
| + | While the flexible nose guns were intended to be used to strafe at surface targets, it has very little use in-game due to it is treated as a defensive turret and are thus very hard to aim at ground targets. The gun also has limited horizontal traverse and are thus not useful against anything but slow-flying AI-controlled planes in which the guns can be directed at them to shoot them down. | ||
| + | |||
| + | This leaves the dorsal twin turrets as the Shackleton's only "real" defensive armament. While the guns are quite accurate and hard-hitting, it only covers the upper part of the plane with blind spots at the rudder and directly behind the tail, thus forcing the pilot to pull the plane's nose up to get the guns on target. The turret can also be easily evaded by simply attacking from below, thus leaving the Shackleton with no way to fight back. | ||
| + | |||
| + | The few belt options for Shackleton's Hispano are adequate. While the stock belt is a hit-or-miss due to only 50% of the belt is composed of a hard-hitting HEI rounds, the other two belt options - the "Armoured targets" and "Universal" belts - consisted of the aforementioned HEI rounds and a high-penetrating AP-T rounds, with both belts switch the 2/3 composition of both rounds around. Both belts has their own speciality; the "Armoured targets" can easily wreck the opponent's engines or knock the enemy pilot out with a well-aimed hits, while the "Universal" belts is better at dealing structural and module damage to enemy planes. | ||
== Usage in battles == | == Usage in battles == | ||
<!-- ''Describe the tactics of playing in the aircraft, the features of using aircraft in a team and advice on tactics. Refrain from creating a "guide" - do not impose a single point of view, but instead, give the reader food for thought. Examine the most dangerous enemies and give recommendations on fighting them. If necessary, note the specifics of the game in different modes (AB, RB, SB).'' --> | <!-- ''Describe the tactics of playing in the aircraft, the features of using aircraft in a team and advice on tactics. Refrain from creating a "guide" - do not impose a single point of view, but instead, give the reader food for thought. Examine the most dangerous enemies and give recommendations on fighting them. If necessary, note the specifics of the game in different modes (AB, RB, SB).'' --> | ||
| − | + | The Shackleton offers a much-needed payload and mobility improvement over its predecessor, the [[Lincoln B Mk II]], at the cost of worse defensive armaments. | |
| + | |||
| + | Because of the powerful Griffon engines, the Shackleton can climb at a much better rate than the Lincoln. This allows the plane to stay out of most of the enemy fighters, though you would has a chance of facing an enemy interceptor who will usually engages from below i.e. where the Shackleton is the weakest. Thus, the best defense for the plane is to avoid any engagements all together using the plane's good thrust power to maintain altitude and energy advantage to speed away from pursuing enemy fighters. | ||
| + | |||
| + | Meanwhile, the Shackleton can also be employed in a high risk, high rewards fast bombing role, diving towards enemy bases. This tactics allows the Shackleton to quickly reach the base before most enemies arrive and dispatch multiple bases using good handling to adjust the bomb aiming. While this may put the Shackleton into a dangerous swarm of enemy fighters, this will also allow the plane to actually fight back as most enemies will usually engage from higher altitude where the Shackleton's dorsal turret can engage. In addition, in larger maps, the enemy fighters will take a longer time to reach their base to intercept, thus leaving the base an easy target for you to take before retreating. | ||
| + | |||
| + | === Manual Engine Control === | ||
| + | {| class="wikitable" style="text-align:center" | ||
| + | |- | ||
| + | ! colspan="7" | MEC elements | ||
| + | |- | ||
| + | ! rowspan="2" | Mixer | ||
| + | ! rowspan="2" | Pitch | ||
| + | ! colspan="3" | Radiator | ||
| + | ! rowspan="2" | Supercharger | ||
| + | ! rowspan="2" | Turbocharger | ||
| + | |- | ||
| + | ! Oil !! Water !! Type | ||
| + | |- | ||
| + | | Controllable || Controllable<br>Auto control available || Controllable<br>Auto control available || Controllable<br>Auto control available || Separate || Controllable<br>2 gears || Not controllable | ||
| + | |- | ||
| + | |} | ||
=== Pros and cons === | === Pros and cons === | ||
<!-- ''Summarise and briefly evaluate the vehicle in terms of its characteristics and combat effectiveness. Mark its pros and cons in the bulleted list. Try not to use more than 6 points for each of the characteristics. Avoid using categorical definitions such as "bad", "good" and the like - use substitutions with softer forms such as "inadequate" and "effective".'' --> | <!-- ''Summarise and briefly evaluate the vehicle in terms of its characteristics and combat effectiveness. Mark its pros and cons in the bulleted list. Try not to use more than 6 points for each of the characteristics. Avoid using categorical definitions such as "bad", "good" and the like - use substitutions with softer forms such as "inadequate" and "effective".'' --> | ||
| − | |||
'''Pros:''' | '''Pros:''' | ||
| − | * | + | * Decent climb rate for a heavy bomber |
| + | * Generally good flight performances, with powerful WEP helping the plane to maintain its speed | ||
| + | * Retains energy and handle quite well for a heavy bomber at high speed, making it usable as a fast bomber | ||
| + | * Self-sealing fuel tanks and overall structural integrity make it resilient to fires | ||
| + | * Very heavy bomb load, with more efficient bomb options | ||
| + | * 20 mm defensive cannons are accurate and will destroy most pursuing aircraft | ||
'''Cons:''' | '''Cons:''' | ||
| − | * | + | * The bomber risks ripping wings when turning at high speeds (~500 km/h) |
| + | * No armour, prone to pilot sniping | ||
| + | * Very poor defensive coverage; lacks defensive armament for the belly and tail, and the frontal turret has limited horizontal traverse | ||
| + | * Low durability; its large tail and wings in particular are very vulnerable to autocannons | ||
| + | * Regularly faces enemy interceptors and fighters with high climb rate and powerful armament, including early jets in an unlucky matchup | ||
== History == | == History == | ||
<!-- ''Describe the history of the creation and combat usage of the aircraft in more detail than in the introduction. If the historical reference turns out to be too long, take it to a separate article, taking a link to the article about the vehicle and adding a block "/History" (example: <nowiki>https://wiki.warthunder.com/(Vehicle-name)/History</nowiki>) and add a link to it here using the <code>main</code> template. Be sure to reference text and sources by using <code><nowiki><ref></ref></nowiki></code>, as well as adding them at the end of the article with <code><nowiki><references /></nowiki></code>. This section may also include the vehicle's dev blog entry (if applicable) and the in-game encyclopedia description (under <code><nowiki>=== In-game description ===</nowiki></code>, also if applicable).'' --> | <!-- ''Describe the history of the creation and combat usage of the aircraft in more detail than in the introduction. If the historical reference turns out to be too long, take it to a separate article, taking a link to the article about the vehicle and adding a block "/History" (example: <nowiki>https://wiki.warthunder.com/(Vehicle-name)/History</nowiki>) and add a link to it here using the <code>main</code> template. Be sure to reference text and sources by using <code><nowiki><ref></ref></nowiki></code>, as well as adding them at the end of the article with <code><nowiki><references /></nowiki></code>. This section may also include the vehicle's dev blog entry (if applicable) and the in-game encyclopedia description (under <code><nowiki>=== In-game description ===</nowiki></code>, also if applicable).'' --> | ||
| − | + | ||
| + | === [[wt:en/news/7309-development-avro-shackleton-mr-mk-2-the-flight-of-a-thousand-rivets-en|Devblog]] === | ||
| + | |||
| + | Following the end of WW2 and going into the Cold War era, submarine development had picked up so much momentum that the previously used submarine counters quickly became obsolete. In addition to this, Britain was faced with a lack of capable long-range maritime patrol aircraft after it was forced to return the lend-lease B-24 Liberator bombers it received during wartime. A stopgap solution in the form of a modified version of the Lancaster bomber was created, but the need for a dedicated maritime patrol aircraft became more and more emphasized in the postwar period. | ||
| + | |||
| + | Development of the Avro Shackleton began in 1945 after the British Air Staff expressed an interest in the conversion of the Avro Lincoln bomber into a general reconnaissance as well as rescue aircraft. As a result, the Avro Type 696 was designed. The Type 696 was primarily based on the Avro Lincoln bomber, but also borrowed some design solutions from the Avro Tudor airliner, of which the latter two themselves were derivative designs of the famous Avro Lancaster. The first prototype, designated Shackleton GR.1, successfully performed its maiden flight in March 1949 and was shortly afterwards ordered into production. | ||
| + | |||
| + | The Avro Shackleton entered service with the RAF in February 1951. The aircraft performed several roles, ranging from its primary role - maritime reconnaissance - over escort and transport duties to search and rescue, whilst being employed all across the globe. However, the aircraft saw numerous modifications during its lifetime, aimed at increasing its capabilities and addressing reliability and structural problems, although at the expense of added weight. The Shackleton and its variants continued to serve throughout the Cold War era, and in the late '80s the Avro Shackleton was finally considered obsolete. | ||
== Media == | == Media == | ||
<!-- ''Excellent additions to the article would be video guides, screenshots from the game, and photos.'' --> | <!-- ''Excellent additions to the article would be video guides, screenshots from the game, and photos.'' --> | ||
| − | + | ||
| + | ;Skins | ||
| + | |||
| + | * [https://live.warthunder.com/feed/camouflages/?vehicle=shackleton_mr_mk_2 Skins and camouflages for the {{PAGENAME}} from live.warthunder.com.] | ||
== See also == | == See also == | ||
| Line 131: | Line 191: | ||
* ''reference to the series of the aircraft;'' | * ''reference to the series of the aircraft;'' | ||
* ''links to approximate analogues of other nations and research trees.'' --> | * ''links to approximate analogues of other nations and research trees.'' --> | ||
| − | |||
| − | * | + | * [[Lincoln B Mk II]] |
| − | * | + | * [[Lancaster (Family)]] |
== External links == | == External links == | ||
| Line 140: | Line 199: | ||
* ''topic on the official game forum;'' | * ''topic on the official game forum;'' | ||
* ''other literature.'' --> | * ''other literature.'' --> | ||
| − | |||
| − | * | + | * [[wt:en/news/7309-development-avro-shackleton-mr-mk-2-the-flight-of-a-thousand-rivets-en|[Devblog] Avro Shackleton MR Mk.2: The Flight of A Thousand Rivets]] |
| − | |||
| + | {{AirManufacturer Avro}} | ||
{{Britain bombers}} | {{Britain bombers}} | ||
Latest revision as of 22:20, 10 November 2023

Contents
Description
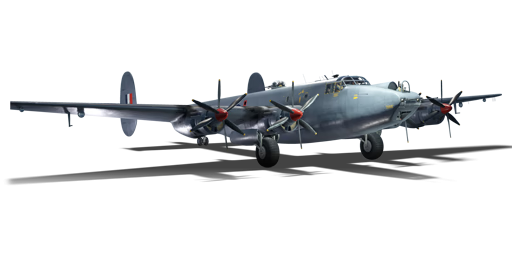
The Avro Shackleton is the final military version of the venerated Lancaster series of bombers. Developed in 1945 from the now-obsolete Avro Lincoln as an anti-submarine warfare (ASW) and maritime patrol aircraft, the Shackleton featured more specialized armaments, such as a naval radar housed inside a distinctive "bulge" on the belly of the aircraft. The tail gunner position is removed in favour of a flexible mount with 20 mm Hispano Mk.V autocannons to strafe naval targets. The plane also features more efficient Rolls-Royce Griffon engines powering contra-rotating propellers.
Introduced in Update "Direct Hit", the Shackleton MR.Mk.2 can be best described as a "quirky" version of the Lincoln B Mk II, with overall better mobility and payload, but worse defensive coverage and survivability. The plane has access to some of the most efficient payloads available, being capable of taking out 3 bases with its maximum bomb loadout. Due to its powerful Griffon engines, the Shackleton can be played either as a traditional long range bomber by using its decent climb rate or as a fast bomber using its high WEP power.
General info
Flight performance
As with the previous Lancaster family of bombers, the Shackleton has overall good flight performance. The plane is powered by four Rolls-Royce Griffon engines turning contra-rotating propellers, giving the Shackleton a very good thrust and acceleration for its weight, especially with WEP. The plane can also manoeuvre quite well for its size, allowing the pilots to quickly turn the plane around to escape from the enemy, or to adjust the bomb sight for bombing targets.
While the Shackleton has lower wing rip speed at 575 km/h IAS, the plane can retains its speed around 600-650 km/h in a dive quite well. This allows the Shackleton to be used as a fast bomber to dive at an enemy targets. However, a Shackleton pilot should avoid doing snap turns while the plane is at a speed above 500 km/h, as the wings can be easily overloaded and rips from the plane.
| Characteristics | Max Speed (km/h at 3,000 m) |
Max altitude (metres) |
Turn time (seconds) |
Rate of climb (metres/second) |
Take-off run (metres) | |||
|---|---|---|---|---|---|---|---|---|
| AB | RB | AB | RB | AB | RB | |||
| Stock | 487 | 469 | 10210 | 31.3 | 32.4 | 7.0 | 7.0 | 1,000 |
| Upgraded | 551 | 515 | 28.9 | 30.0 | 15.7 | 10.5 | ||
Details
| Features | ||||
|---|---|---|---|---|
| Combat flaps | Take-off flaps | Landing flaps | Air brakes | Arrestor gear |
| ✓ | ✓ | ✓ | X | X |
| Limits | ||||||
|---|---|---|---|---|---|---|
| Wings (km/h) | Gear (km/h) | Flaps (km/h) | Max Static G | |||
| Combat | Take-off | Landing | + | - | ||
| 583 | 438 | 425 | 404 | 301 | ~3 | ~1 |
| Optimal velocities (km/h) | |||
|---|---|---|---|
| Ailerons | Rudder | Elevators | Radiator |
| < 350 | < 350 | < 350 | > ___ |
Survivability and armour
The Shackleton has large wings where the fuel tank are located. There are two pilots and eight gunners in total, but only two use turrets, the top gunner and the nose gunner. If the top gunner is taken out, the Shackleton becomes much easier to kill. There is only one steel armour plate of 8 mm covering the roof turret gunner. The overall structural strength of the Shackleton were mixed; the plane can endure some fire damage and can put them out using combinations of self-sealing fuel tanks and EFS, yet were incapable of taking many hits from autocannons, especially at the tail and wings.
Modifications and economy
| Flight performance | Survivability | Weaponry | ||||||||||||||||||||
|---|---|---|---|---|---|---|---|---|---|---|---|---|---|---|---|---|---|---|---|---|---|---|
|
|
|
Armaments
Suspended armament
The Shackleton MR.Mk.2 can be outfitted with the following ordnance:
- 18 x 250 lb G.P. Mk.IV bombs (4,500 lb total)
- 25 x 500 lb H.E. M.C. Mk.II bombs (12,500 lb total)
- 15 x 1,000 lb M.C. Mk.I bombs (15,000 lb total)
- 8 x RP-3 rockets
- 8 x RP-3 rockets + 18 x 250 lb G.P. Mk.IV bombs (4,500 lb total)
- 8 x RP-3 rockets + 25 x 500 lb H.E. M.C. Mk.II bombs (12,500 lb total)
- 8 x RP-3 rockets + 15 x 1,000 lb M.C. Mk.I bombs (15,000 lb total)
While stock, the Shackleton has poor payload of 18 x 250 lb bombs, which is not enough destroy a single normal base and only sufficient to take one small base in frontline mode.
However, the Shackleton can unlock the 25 x 500 lb payload as a tier 2 modification, which actually outclasses the 14 x 1,000 lbs payload found on the Lancaster and Lincoln, due to double the explosive mass compared to the similar bomb of its predecessor, while being a significantly lighter payload. 10 of these bombs can take out a large base and 5 for small bases, which means it can take out at least two and a half bases. The bomb's quantity and sizeable explosive mass also makes it ideal for carpet bombings.
The 15 x 1,000 lb M.C. Mk.I loadout is ideal to destroy bases and airfields. Only 5 bombs are required to destroy normal bases and 3 to destroy weaker bases. A squad of 3 Shackletons is capable of destroying all bases and the airfield without landing on some maps. Given that most Air RB maps at its BR consist of respawning bases with a prevalence of attackers, you will rarely be able to drop all 15 bombs on bases without having to wait for at least 1 to respawn.
Due to the Shackleton's ASW roles, the plane has the peculiar choice of equipping eight RP-3 rockets on the wingtips. Due to the large wingspan and the size of the plane, the rockets are woefully inaccurate; it is best to not to equip them.
Defensive armament
The Shackleton MR.Mk.2 is defended by:
- 2 x 20 mm Hispano Mk.V cannons, nose turret (300 rpg = 600 total)
- 2 x 20 mm Hispano Mk.V cannons, dorsal turret (350 rpg = 700 total)
The Shackleton has four 20 mm Hispano Mk.V autocannons, mounted in a pair of flexible mounts at the nose and a twin mount on dorsal position, as its defensive armaments. Compared to the Lincoln, the Shackleton's armament layout can be considered a downgrade due to the removal of tail turret, thus making it defenceless against any enemies coming from below.
While the flexible nose guns were intended to be used to strafe at surface targets, it has very little use in-game due to it is treated as a defensive turret and are thus very hard to aim at ground targets. The gun also has limited horizontal traverse and are thus not useful against anything but slow-flying AI-controlled planes in which the guns can be directed at them to shoot them down.
This leaves the dorsal twin turrets as the Shackleton's only "real" defensive armament. While the guns are quite accurate and hard-hitting, it only covers the upper part of the plane with blind spots at the rudder and directly behind the tail, thus forcing the pilot to pull the plane's nose up to get the guns on target. The turret can also be easily evaded by simply attacking from below, thus leaving the Shackleton with no way to fight back.
The few belt options for Shackleton's Hispano are adequate. While the stock belt is a hit-or-miss due to only 50% of the belt is composed of a hard-hitting HEI rounds, the other two belt options - the "Armoured targets" and "Universal" belts - consisted of the aforementioned HEI rounds and a high-penetrating AP-T rounds, with both belts switch the 2/3 composition of both rounds around. Both belts has their own speciality; the "Armoured targets" can easily wreck the opponent's engines or knock the enemy pilot out with a well-aimed hits, while the "Universal" belts is better at dealing structural and module damage to enemy planes.
Usage in battles
The Shackleton offers a much-needed payload and mobility improvement over its predecessor, the Lincoln B Mk II, at the cost of worse defensive armaments.
Because of the powerful Griffon engines, the Shackleton can climb at a much better rate than the Lincoln. This allows the plane to stay out of most of the enemy fighters, though you would has a chance of facing an enemy interceptor who will usually engages from below i.e. where the Shackleton is the weakest. Thus, the best defense for the plane is to avoid any engagements all together using the plane's good thrust power to maintain altitude and energy advantage to speed away from pursuing enemy fighters.
Meanwhile, the Shackleton can also be employed in a high risk, high rewards fast bombing role, diving towards enemy bases. This tactics allows the Shackleton to quickly reach the base before most enemies arrive and dispatch multiple bases using good handling to adjust the bomb aiming. While this may put the Shackleton into a dangerous swarm of enemy fighters, this will also allow the plane to actually fight back as most enemies will usually engage from higher altitude where the Shackleton's dorsal turret can engage. In addition, in larger maps, the enemy fighters will take a longer time to reach their base to intercept, thus leaving the base an easy target for you to take before retreating.
Manual Engine Control
| MEC elements | ||||||
|---|---|---|---|---|---|---|
| Mixer | Pitch | Radiator | Supercharger | Turbocharger | ||
| Oil | Water | Type | ||||
| Controllable | Controllable Auto control available |
Controllable Auto control available |
Controllable Auto control available |
Separate | Controllable 2 gears |
Not controllable |
Pros and cons
Pros:
- Decent climb rate for a heavy bomber
- Generally good flight performances, with powerful WEP helping the plane to maintain its speed
- Retains energy and handle quite well for a heavy bomber at high speed, making it usable as a fast bomber
- Self-sealing fuel tanks and overall structural integrity make it resilient to fires
- Very heavy bomb load, with more efficient bomb options
- 20 mm defensive cannons are accurate and will destroy most pursuing aircraft
Cons:
- The bomber risks ripping wings when turning at high speeds (~500 km/h)
- No armour, prone to pilot sniping
- Very poor defensive coverage; lacks defensive armament for the belly and tail, and the frontal turret has limited horizontal traverse
- Low durability; its large tail and wings in particular are very vulnerable to autocannons
- Regularly faces enemy interceptors and fighters with high climb rate and powerful armament, including early jets in an unlucky matchup
History
Devblog
Following the end of WW2 and going into the Cold War era, submarine development had picked up so much momentum that the previously used submarine counters quickly became obsolete. In addition to this, Britain was faced with a lack of capable long-range maritime patrol aircraft after it was forced to return the lend-lease B-24 Liberator bombers it received during wartime. A stopgap solution in the form of a modified version of the Lancaster bomber was created, but the need for a dedicated maritime patrol aircraft became more and more emphasized in the postwar period.
Development of the Avro Shackleton began in 1945 after the British Air Staff expressed an interest in the conversion of the Avro Lincoln bomber into a general reconnaissance as well as rescue aircraft. As a result, the Avro Type 696 was designed. The Type 696 was primarily based on the Avro Lincoln bomber, but also borrowed some design solutions from the Avro Tudor airliner, of which the latter two themselves were derivative designs of the famous Avro Lancaster. The first prototype, designated Shackleton GR.1, successfully performed its maiden flight in March 1949 and was shortly afterwards ordered into production.
The Avro Shackleton entered service with the RAF in February 1951. The aircraft performed several roles, ranging from its primary role - maritime reconnaissance - over escort and transport duties to search and rescue, whilst being employed all across the globe. However, the aircraft saw numerous modifications during its lifetime, aimed at increasing its capabilities and addressing reliability and structural problems, although at the expense of added weight. The Shackleton and its variants continued to serve throughout the Cold War era, and in the late '80s the Avro Shackleton was finally considered obsolete.
Media
- Skins
See also
External links
| Avro Aircraft | |
|---|---|
| Bombers | Lancaster B Mk I · Lancaster B Mk III · Lincoln B Mk II · Shackleton MR.Mk.2 |
| Export/Licensed | Lancaster MR.7 |
| Britain bombers | |
|---|---|
| Torpedo | Swordfish Mk I · Swordfish Mk II · ▄Avenger Mk II |
| Dive | V-156-B1 |
| Hydroplanes | ▄Catalina Mk IIIa · Sunderland Mk IIIa · Sunderland Mk V |
| Light | Blenheim Mk IV · Beaufort Mk VIII · ▄Hudson Mk V · Brigand B 1 |
| Based on A20 | ▄Havoc Mk I · ▄Boston Mk I · ▄DB-7 |
| Hampden | Hampden Mk I · Hampden TB Mk I |
| Wellington | Wellington Mk Ic · Wellington Mk Ic/L · Wellington Mk III · Wellington Mk X |
| Halifax | Halifax B Mk IIIa |
| Stirling | Stirling B Mk I · Stirling B Mk III |
| Lancaster | Lancaster B Mk I · Lancaster B Mk III |
| Lincoln | Lincoln B Mk II |
| Shackleton | Shackleton MR.Mk.2 |
