Difference between revisions of "SU-5-1"
m (→Mobility) |
(Edits) |
||
| Line 2: | Line 2: | ||
== Description == | == Description == | ||
| − | <!--''In the description, the first part | + | <!-- ''In the description, the first part should be about the history of the creation and combat usage of the vehicle, as well as its key features. In the second part, tell the reader about the ground vehicle in the game. Insert a screenshot of the vehicle, so that if the novice player does not remember the vehicle by name, he will immediately understand what kind of vehicle the article is talking about.'' --> |
| − | [[File: | + | [[File:GarageImage_{{PAGENAME}}.jpg|420px|thumb|left]] |
| − | {{ | + | {{Break}} |
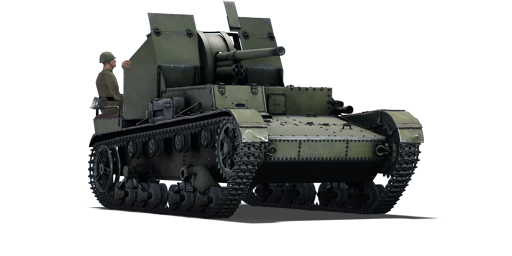
| − | The '''{{Specs|name}}''' is a rank {{Specs|rank}} Soviet tank destroyer {{Battle-rating | + | The '''{{Specs|name}}''' is a rank {{Specs|rank}} Soviet tank destroyer {{Battle-rating}}. It was introduced in [[Update 1.67 "Assault"]]. |
The SU-5-1 is a crude SPG built off the T-26 chassis. The T-26 chassis of the SU-5-1 allows it to place itself with relative ease on any spot of the map. The high gun shield can lure the enemy into firing too high, missing the crew. If a hit goes into the body, with a bit of luck, APHE ammo will not detonate on contact and instead go straight through, leaving little spalling damage. The vehicle's crew of 5 will allow some casualties before loss of efficiency. | The SU-5-1 is a crude SPG built off the T-26 chassis. The T-26 chassis of the SU-5-1 allows it to place itself with relative ease on any spot of the map. The high gun shield can lure the enemy into firing too high, missing the crew. If a hit goes into the body, with a bit of luck, APHE ammo will not detonate on contact and instead go straight through, leaving little spalling damage. The vehicle's crew of 5 will allow some casualties before loss of efficiency. | ||
| Line 11: | Line 11: | ||
== General info == | == General info == | ||
=== Survivability and armour === | === Survivability and armour === | ||
| − | ''Describe armour protection. Note the most well protected and key weak areas. Appreciate the layout of modules as well as the number and location of crew members. Is the level of armour protection sufficient, is the placement of modules helpful for survival in combat? | + | ''Describe armour protection. Note the most well protected and key weak areas. Appreciate the layout of modules as well as the number and location of crew members. Is the level of armour protection sufficient, is the placement of modules helpful for survival in combat? If necessary use a visual template to indicate the most secure and weak zones of the armour.'' |
| − | |||
| − | |||
=== Mobility === | === Mobility === | ||
| Line 41: | Line 39: | ||
== Armaments == | == Armaments == | ||
=== Main armament === | === Main armament === | ||
| − | <!--''Give the reader information about the characteristics of the main gun. Assess its effectiveness in a battle based on the reloading speed, ballistics and the power of shells. Do not forget about the flexibility of the fire, that is how quickly the cannon can be aimed at the target, open fire on it and aim at another enemy. Add a link to the main article on the gun: <code><nowiki>{{main|Name of the weapon}}</nowiki></code>. Describe in general terms the ammunition available for the main gun. Give advice on how to use them and how to fill the ammunition storage.''--> | + | <!-- ''Give the reader information about the characteristics of the main gun. Assess its effectiveness in a battle based on the reloading speed, ballistics and the power of shells. Do not forget about the flexibility of the fire, that is how quickly the cannon can be aimed at the target, open fire on it and aim at another enemy. Add a link to the main article on the gun: <code><nowiki>{{main|Name of the weapon}}</nowiki></code>. Describe in general terms the ammunition available for the main gun. Give advice on how to use them and how to fill the ammunition storage.'' --> |
{{main|1902/30 (76 mm)}} | {{main|1902/30 (76 mm)}} | ||
| + | |||
| + | {| class="wikitable" style="text-align:center" width="100%" | ||
| + | |- | ||
| + | ! colspan="5" | [[1902/30 (76 mm)|76 mm 1902/30]] || colspan="5" | Turret rotation speed (°/s) || colspan="4" | Reloading rate (seconds) | ||
| + | |- | ||
| + | ! Mode !! Capacity !! Vertical !! Horizontal !! Stabilizer | ||
| + | ! Stock !! Upgraded !! Full !! Expert !! Aced | ||
| + | ! Stock !! Full !! Expert !! Aced | ||
| + | |- | ||
| + | ! ''Arcade'' | ||
| + | | rowspan="2" | 8 || rowspan="2" | -5°/+60° || rowspan="2" | ±15° || rowspan="2" | N/A || 7.0 || __._ || __._ || __._ || __._ || rowspan="2" | 6.5 || rowspan="2" | _._ || rowspan="2" | _._ || rowspan="2" | 5.0 | ||
| + | |- | ||
| + | ! ''Realistic'' | ||
| + | | 4.8 || __._ || __._ || __._ || 8.0 | ||
| + | |- | ||
| + | |} | ||
| + | |||
| + | ==== Ammunition ==== | ||
| + | {| class="wikitable sortable" style="text-align:center" width="100%" | ||
| + | ! colspan="8" | Penetration statistics | ||
| + | |- | ||
| + | ! rowspan="2" data-sort-type="text" | Ammunition | ||
| + | ! rowspan="2" | Type of<br>warhead | ||
| + | ! colspan="6" | '''Penetration @ 0° Angle of Attack (mm)''' | ||
| + | |- | ||
| + | ! 10 m !! 100 m !! 500 m !! 1,000 m !! 1,500 m !! 2,000 m | ||
| + | |- | ||
| + | | BR-350A (MD-5 fuze) || APHEBC || 87 || 85 || 76 || 67 || 59 || 52 | ||
| + | |- | ||
| + | | BR-350SP || APBC || 102 || 100 || 91 || 81 || 72 || 64 | ||
| + | |- | ||
| + | | OF-350M || HE || 10 || 10 || 10 || 10 || 10 || 10 | ||
| + | |- | ||
| + | | Sh-354T || Shrapnel || 37 || 35 || 29 || 25 || 20 || 17 | ||
| + | |- | ||
| + | |} | ||
| + | {| class="wikitable sortable" style="text-align:center" width="100%" | ||
| + | ! colspan="11" | Shell details | ||
| + | |- | ||
| + | ! rowspan="2" data-sort-type="text" | Ammunition | ||
| + | ! rowspan="2" | Type of<br>warhead | ||
| + | ! rowspan="2" | Velocity<br>(m/s) | ||
| + | ! rowspan="2" | Projectile<br>Mass (kg) | ||
| + | ! rowspan="2" | Fuse delay<br>(m) | ||
| + | ! rowspan="2" | Fuse sensitivity<br>(mm) | ||
| + | ! rowspan="2" | Explosive Mass<br>(TNT equivalent) (g) | ||
| + | ! rowspan="2" | Normalisation at 30°<br>from horizontal | ||
| + | ! colspan="3" | Ricochet | ||
| + | |- | ||
| + | ! 0% !! 50% !! 100% | ||
| + | |- | ||
| + | | BR-350A (MD-5 fuze) || APHEBC || 662 || 6.3 || 1.2 || 14.0 || 150 || +4.0° || 48° || 63° || 71° | ||
| + | |- | ||
| + | | BR-350SP || APBC || 655 || 6.78 || N/A || N/A || N/A || +4.0° || 48° || 63° || 71° | ||
| + | |- | ||
| + | | OF-350M || HE || 680 || 6.2 || 0.05 || 0.1 || 621 || +0.0° || 79° || 80° || 81° | ||
| + | |- | ||
| + | | Sh-354T || Shrapnel || 680 || 6.2 || 0.5 || 8.0 || 85 || +0.0° || 62° || 69° || 73° | ||
| + | |- | ||
| + | |} | ||
| + | |||
| + | ==== [[Ammo racks]] ==== | ||
| + | <!-- [[File:Ammoracks_{{PAGENAME}}.jpg|right|thumb|x250px|[[Ammo racks]] of the {{PAGENAME}}]] --> | ||
| + | {| class="wikitable" style="text-align:center" | ||
| + | |- | ||
| + | ! Full<br>ammo | ||
| + | ! 1st<br>rack empty | ||
| + | ! Visual<br>discrepancy | ||
| + | |- | ||
| + | | '''8''' || 1 ''(+7)'' || No | ||
| + | |- | ||
| + | |} | ||
| + | |||
| + | ==== [[Optics]] ==== | ||
| + | {| class="wikitable" style="text-align:center" | ||
| + | ! colspan="3" | {{PAGENAME}} Optics | ||
| + | |- | ||
| + | ! | ||
| + | ! Default magnification | ||
| + | ! Maximum magnification | ||
| + | |- | ||
| + | ! Main Gun optics | ||
| + | | X1.9 || X3.5 | ||
| + | |- | ||
| + | ! Comparable optics | ||
| + | | colspan="2" | ___ | ||
| + | |- | ||
| + | |} | ||
== Usage in battles == | == Usage in battles == | ||
| − | <!--''Describe the tactics of playing in the vehicle, the features of using vehicles in the team and advice on tactics. Refrain from creating a "guide" - do not impose a single point of view but give the reader food for thought. Describe the most dangerous enemies and give recommendations on fighting them. If necessary, note the specifics of the game in different modes (AB, RB, SB).''--> | + | <!-- ''Describe the tactics of playing in the vehicle, the features of using vehicles in the team and advice on tactics. Refrain from creating a "guide" - do not impose a single point of view but instead give the reader food for thought. Describe the most dangerous enemies and give recommendations on fighting them. If necessary, note the specifics of the game in different modes (AB, RB, SB).'' --> |
| − | This vehicle is the perfect SPG for Russian tech tree beginners: somewhat fragile, relatively fast and a gun similar to what is found on higher ranks, it is a great trainer for later gameplay. | + | This vehicle is the perfect SPG for Russian tech tree beginners: somewhat fragile, relatively fast and a gun similar to what is found on higher ranks, it is a great trainer for later gameplay. |
As an open-backed SPG, the SU-5-1 should never be seen by the enemy, especially if flanked. Since the gun's ballistics are somewhat tricky and the ammo count is limited, it is recommended to ambush enemies near capture points (preferably by your team's side). | As an open-backed SPG, the SU-5-1 should never be seen by the enemy, especially if flanked. Since the gun's ballistics are somewhat tricky and the ammo count is limited, it is recommended to ambush enemies near capture points (preferably by your team's side). | ||
| − | As an '''ambusher''', bring supporting fire in the rear lines of the team, never at the front but not too far, repelling enemy assaults on the point. Find a spot with a good view near a capture point or bury yourself in a dark alley and wait to see the enemy fall into your sights. Do not forget to move to the nearest captured point after each 1-2 enemy down to reload since your ammo count is that low (sometimes you won't even have enough ammo to finish the second enemy, make sure to engage only if necessary in this case). | + | As an '''ambusher''', bring supporting fire in the rear lines of the team, never at the front but not too far, repelling enemy assaults on the point. Find a spot with a good view near a capture point or bury yourself in a dark alley and wait to see the enemy fall into your sights. Do not forget to move to the nearest captured point after each 1-2 enemy down to reload since your ammo count is that low (sometimes you won't even have enough ammo to finish the second enemy, make sure to engage only if necessary in this case). |
This role can be accomplished at any time in the game but it needs two things to be fulfilled: a ''captured objective'' nearby and a ''cooperative team''. The ''objective'' will be your ammo and target supply since when waiting on a captured point you get an ammo refill. Ammo will be refilled one by one at roughly the same rate as your vehicle can shoot (about a minute for full loadout in this case). A ''cooperative team'' will help holding the point, since you can't do it all by yourself since moving means putting yourself in high risk of being spotted in a wrong position. If your team looses the point, do not rush for it (if you're not out yet...) since the enemy team may follow behind the person capturing the point. Wait for your allies to help and '''stay hidden''', taking careful shots at well-chosen enemies. | This role can be accomplished at any time in the game but it needs two things to be fulfilled: a ''captured objective'' nearby and a ''cooperative team''. The ''objective'' will be your ammo and target supply since when waiting on a captured point you get an ammo refill. Ammo will be refilled one by one at roughly the same rate as your vehicle can shoot (about a minute for full loadout in this case). A ''cooperative team'' will help holding the point, since you can't do it all by yourself since moving means putting yourself in high risk of being spotted in a wrong position. If your team looses the point, do not rush for it (if you're not out yet...) since the enemy team may follow behind the person capturing the point. Wait for your allies to help and '''stay hidden''', taking careful shots at well-chosen enemies. | ||
| + | |||
| + | === Modules === | ||
| + | {| class="wikitable" | ||
| + | ! Tier | ||
| + | ! colspan="2" | Mobility | ||
| + | ! Protection | ||
| + | ! colspan="2" | Firepower | ||
| + | |- | ||
| + | | I | ||
| + | | Tracks | ||
| + | | | ||
| + | | Parts | ||
| + | | Horizontal Drive | ||
| + | | | ||
| + | |- | ||
| + | | II | ||
| + | | Suspension | ||
| + | | Brake System | ||
| + | | FPE | ||
| + | | Adjustment of Fire | ||
| + | | BR-350SP | ||
| + | |- | ||
| + | | III | ||
| + | | Filters | ||
| + | | | ||
| + | | Crew Replenishment | ||
| + | | Elevation Mechanism | ||
| + | | | ||
| + | |- | ||
| + | | IV | ||
| + | | Transmission | ||
| + | | Engine | ||
| + | | | ||
| + | | | ||
| + | | | ||
| + | |- | ||
| + | |} | ||
=== Pros and cons === | === Pros and cons === | ||
| − | <!--'' | + | <!-- ''Summarise and briefly evaluate the vehicle in terms of its characteristics and combat effectiveness. Mark its pros and cons in a bulleted list. Try not to use more than 6 points for each of the characteristics. Avoid using categorical definitions such as "bad", "good" and the like - use substitutions with softer forms such as "inadequate" and "effective".'' --> |
| − | |||
| − | |||
| + | '''Pros:''' | ||
* Decent penetration on stock rounds | * Decent penetration on stock rounds | ||
* Decent reload (6.5s base) | * Decent reload (6.5s base) | ||
| Line 67: | Line 189: | ||
'''Cons:''' | '''Cons:''' | ||
| − | |||
* Extremely low ammo count (8 rounds) | * Extremely low ammo count (8 rounds) | ||
* Exposed and cramped gun crew that can be destroyed with machine gun fire, or a HE shell somewhere in the rear. | * Exposed and cramped gun crew that can be destroyed with machine gun fire, or a HE shell somewhere in the rear. | ||
| Line 76: | Line 197: | ||
== History == | == History == | ||
| − | ''Describe the history of the creation and combat usage of the | + | ''Describe the history of the creation and combat usage of the vehicle in more detail than in the introduction. If the historical reference turns out to be too long, take it to a separate article, taking a link to the article about the vehicle and adding a block "/History" (example: <nowiki>https://wiki.warthunder.com/(Vehicle-name)/History</nowiki>) and add a link to it here using the <code>main</code> template. Be sure to reference text and sources by using <code><nowiki><ref></ref></nowiki></code>, as well as adding them at the end of the article with <code><nowiki><references /></nowiki></code>. This section may also include the vehicle's dev blog entry (if applicable) and the in-game encyclopedia description (under <code><nowiki>=== In-game description ===</nowiki></code>, also if applicable).'' |
== Media == | == Media == | ||
| − | '' | + | ''Excellent additions to the article would be video guides, screenshots from the game, and photos.'' |
== See also == | == See also == | ||
| Line 89: | Line 210: | ||
''Paste links to sources and external resources, such as:'' | ''Paste links to sources and external resources, such as:'' | ||
* ''topic on the official game forum;'' | * ''topic on the official game forum;'' | ||
| − | * ''encyclopedia page on tank;'' | + | * ''encyclopedia page on the tank;'' |
* ''other literature.'' | * ''other literature.'' | ||
{{USSR tank destroyers}} | {{USSR tank destroyers}} | ||
Revision as of 14:22, 6 February 2020
Contents
Description

The SU-5-1 is a rank I Soviet tank destroyer
with a battle rating of 1.0 (AB/RB/SB). It was introduced in Update 1.67 "Assault".
The SU-5-1 is a crude SPG built off the T-26 chassis. The T-26 chassis of the SU-5-1 allows it to place itself with relative ease on any spot of the map. The high gun shield can lure the enemy into firing too high, missing the crew. If a hit goes into the body, with a bit of luck, APHE ammo will not detonate on contact and instead go straight through, leaving little spalling damage. The vehicle's crew of 5 will allow some casualties before loss of efficiency.
General info
Survivability and armour
Describe armour protection. Note the most well protected and key weak areas. Appreciate the layout of modules as well as the number and location of crew members. Is the level of armour protection sufficient, is the placement of modules helpful for survival in combat? If necessary use a visual template to indicate the most secure and weak zones of the armour.
Mobility
| Game Mode | Mobility characteristics | Engine power (horsepower) | Power-to-weight ratio (hp/ton) | ||||
|---|---|---|---|---|---|---|---|
| Max Speed | Weight | AoA Weight | Stock | Upgraded | Stock | Upgraded | |
| Arcade | 33 | 10.0 | N/A | 128 | 157 | 12.80 | 15.70 |
| Realistic | 30 | 80 | 90 | 8.00 | 9.00 | ||
Armaments
Main armament
| 76 mm 1902/30 | Turret rotation speed (°/s) | Reloading rate (seconds) | |||||||||||
|---|---|---|---|---|---|---|---|---|---|---|---|---|---|
| Mode | Capacity | Vertical | Horizontal | Stabilizer | Stock | Upgraded | Full | Expert | Aced | Stock | Full | Expert | Aced |
| Arcade | 8 | -5°/+60° | ±15° | N/A | 7.0 | __._ | __._ | __._ | __._ | 6.5 | _._ | _._ | 5.0 |
| Realistic | 4.8 | __._ | __._ | __._ | 8.0 | ||||||||
Ammunition
| Penetration statistics | |||||||
|---|---|---|---|---|---|---|---|
| Ammunition | Type of warhead |
Penetration @ 0° Angle of Attack (mm) | |||||
| 10 m | 100 m | 500 m | 1,000 m | 1,500 m | 2,000 m | ||
| BR-350A (MD-5 fuze) | APHEBC | 87 | 85 | 76 | 67 | 59 | 52 |
| BR-350SP | APBC | 102 | 100 | 91 | 81 | 72 | 64 |
| OF-350M | HE | 10 | 10 | 10 | 10 | 10 | 10 |
| Sh-354T | Shrapnel | 37 | 35 | 29 | 25 | 20 | 17 |
| Shell details | ||||||||||
|---|---|---|---|---|---|---|---|---|---|---|
| Ammunition | Type of warhead |
Velocity (m/s) |
Projectile Mass (kg) |
Fuse delay (m) |
Fuse sensitivity (mm) |
Explosive Mass (TNT equivalent) (g) |
Normalisation at 30° from horizontal |
Ricochet | ||
| 0% | 50% | 100% | ||||||||
| BR-350A (MD-5 fuze) | APHEBC | 662 | 6.3 | 1.2 | 14.0 | 150 | +4.0° | 48° | 63° | 71° |
| BR-350SP | APBC | 655 | 6.78 | N/A | N/A | N/A | +4.0° | 48° | 63° | 71° |
| OF-350M | HE | 680 | 6.2 | 0.05 | 0.1 | 621 | +0.0° | 79° | 80° | 81° |
| Sh-354T | Shrapnel | 680 | 6.2 | 0.5 | 8.0 | 85 | +0.0° | 62° | 69° | 73° |
Ammo racks
| Full ammo |
1st rack empty |
Visual discrepancy |
|---|---|---|
| 8 | 1 (+7) | No |
Optics
| SU-5-1 Optics | ||
|---|---|---|
| Default magnification | Maximum magnification | |
| Main Gun optics | X1.9 | X3.5 |
| Comparable optics | ___ | |
Usage in battles
This vehicle is the perfect SPG for Russian tech tree beginners: somewhat fragile, relatively fast and a gun similar to what is found on higher ranks, it is a great trainer for later gameplay.
As an open-backed SPG, the SU-5-1 should never be seen by the enemy, especially if flanked. Since the gun's ballistics are somewhat tricky and the ammo count is limited, it is recommended to ambush enemies near capture points (preferably by your team's side).
As an ambusher, bring supporting fire in the rear lines of the team, never at the front but not too far, repelling enemy assaults on the point. Find a spot with a good view near a capture point or bury yourself in a dark alley and wait to see the enemy fall into your sights. Do not forget to move to the nearest captured point after each 1-2 enemy down to reload since your ammo count is that low (sometimes you won't even have enough ammo to finish the second enemy, make sure to engage only if necessary in this case).
This role can be accomplished at any time in the game but it needs two things to be fulfilled: a captured objective nearby and a cooperative team. The objective will be your ammo and target supply since when waiting on a captured point you get an ammo refill. Ammo will be refilled one by one at roughly the same rate as your vehicle can shoot (about a minute for full loadout in this case). A cooperative team will help holding the point, since you can't do it all by yourself since moving means putting yourself in high risk of being spotted in a wrong position. If your team looses the point, do not rush for it (if you're not out yet...) since the enemy team may follow behind the person capturing the point. Wait for your allies to help and stay hidden, taking careful shots at well-chosen enemies.
Modules
| Tier | Mobility | Protection | Firepower | ||
|---|---|---|---|---|---|
| I | Tracks | Parts | Horizontal Drive | ||
| II | Suspension | Brake System | FPE | Adjustment of Fire | BR-350SP |
| III | Filters | Crew Replenishment | Elevation Mechanism | ||
| IV | Transmission | Engine | |||
Pros and cons
Pros:
- Decent penetration on stock rounds
- Decent reload (6.5s base)
- Good gun traverse angle.
- High crew count means it can afford to take a few shots, especially from tanks without HE filler or MG.
- Transmission in the front can absorb shots (i.e. in a sniper battle, it is the "ideal" spot to be shot).
- Good shell diversity (somewhat meaningless since it is recommended to fill it with APHE).
Cons:
- Extremely low ammo count (8 rounds)
- Exposed and cramped gun crew that can be destroyed with machine gun fire, or a HE shell somewhere in the rear.
- Rather tall profile due to gun placement.
- Poor gun depression of -2°.
- weak front armour (machine guns can penetrate this vehicle).
- Somewhat low shell speeds means it's hard to land a shot on a moving target.
History
Describe the history of the creation and combat usage of the vehicle in more detail than in the introduction. If the historical reference turns out to be too long, take it to a separate article, taking a link to the article about the vehicle and adding a block "/History" (example: https://wiki.warthunder.com/(Vehicle-name)/History) and add a link to it here using the main template. Be sure to reference text and sources by using <ref></ref>, as well as adding them at the end of the article with <references />. This section may also include the vehicle's dev blog entry (if applicable) and the in-game encyclopedia description (under === In-game description ===, also if applicable).
Media
Excellent additions to the article would be video guides, screenshots from the game, and photos.
See also
Links to the articles on the War Thunder Wiki that you think will be useful for the reader, for example:
- reference to the series of the vehicles;
- links to approximate analogues of other nations and research trees.
External links
Paste links to sources and external resources, such as:
- topic on the official game forum;
- encyclopedia page on the tank;
- other literature.
| USSR tank destroyers | |
|---|---|
| SU-76M | SU-76M · SU-76M (5th Gv.Kav.Corps) · SU-85A |
| SU-57B | SU-57B · SU-76D |
| T-34 Derivatives | SU-122 · SU-85 · SU-85M · SU-100 · SU-122P |
| Heavy Tank Derivatives | SU-100Y · ISU-122 · ISU-122S · SU-152 · ISU-152 · Object 268 |
| SU-100P and Derivatives | SU-100P · Object 120 |
| Wheeled | YaG-10 (29-K) |
| Airborne | ASU-57 · ASU-85 |
| Rocket | BM-8-24 · BM-13N · BM-31-12 |
| ATGM | IT-1 · Shturm-S · Khrizantema-S |
| Artillery | 2S1 · 2S3M |
| Other | SU-5-1 · ZiS-30 · SU-122-54 · Object 775 |
| USA | SU-57 |
