Difference between pages "How to add Ammo Rack information to vehicle pages" and "A6M5 Ko"
Inceptor57 (talk | contribs) m (→How to upload the image on the wiki: (Image U1)) |
CobraKingII (talk | contribs) (→Details) (Tag: Visual edit) |
||
| Line 1: | Line 1: | ||
| − | {{ | + | {{Specs-Card |
| + | |code = a6m5ko | ||
| + | |store = 3296 | ||
| + | }} | ||
| + | {{About | ||
| + | | about = Japanese gift fighter '''{{PAGENAME}}''' | ||
| + | | usage = other uses | ||
| + | | link = A6M (Family) | ||
| + | }} | ||
| − | + | == Description == | |
| + | <!-- ''In the description, the first part should be about the history of and the creation and combat usage of the aircraft, as well as its key features. In the second part, tell the reader about the aircraft in the game. Insert a screenshot of the vehicle, so that if the novice player does not remember the vehicle by name, he will immediately understand what kind of vehicle the article is talking about.'' --> | ||
| + | [[File:GarageImage_{{PAGENAME}}.jpg|420px|thumb|left]] | ||
| + | {{break}} | ||
| + | The '''{{Specs|name}}''' is a gift rank {{Specs|rank}} Japanese fighter {{Battle-rating}}. It has been in the game since the start of the Open Beta Test prior to Update 1.27. | ||
| − | = | + | == General info == |
| − | + | === Flight performance === | |
| + | <!--Describe the tactics of playing in the vehicle, the features of using vehicles in the team and advice on tactics. Refrain from creating a "guide" - do not impose a single point of view but instead give the reader food for thought. Describe the most dangerous enemies and give recommendations on fighting them. If necessary, note the specifics of the game in different modes (AB, RB, SB).--> | ||
| − | + | This Zero is very similar to its predecessors, albeit slightly faster. It is still as maneuverable as ever. | |
| − | |||
| − | = | + | {| class="wikitable" style="text-align:center" |
| − | + | |- | |
| − | + | ! colspan="8" | Characteristics | |
| + | |- | ||
| + | ! colspan="8" | ''Stock'' | ||
| + | |- | ||
| + | ! colspan="2" | Max Speed<br>(km/h at 6,000 m) | ||
| + | ! rowspan="2" | Max altitude<br>(meters) | ||
| + | ! colspan="2" | Turn time<br>(seconds) | ||
| + | ! colspan="2" | Rate of climb<br>(meters/second) | ||
| + | ! rowspan="2" | Take-off run<br>(meters) | ||
| + | |- | ||
| + | ! AB | ||
| + | ! RB | ||
| + | ! AB | ||
| + | ! RB | ||
| + | ! AB | ||
| + | ! RB | ||
| + | |- | ||
| + | | 521 || 503 || {{Specs|ceiling}} || 16.6 || 17.2 || 13.4 || 13.4 || 190 | ||
| + | |- | ||
| + | ! colspan="8" | ''Upgraded'' | ||
| + | |- | ||
| + | ! colspan="2" | Max Speed<br>(km/h at 6,000 m) | ||
| + | ! rowspan="2" | Max altitude<br>(meters) | ||
| + | ! colspan="2" | Turn time<br>(seconds) | ||
| + | ! colspan="2" | Rate of climb<br>(meters/second) | ||
| + | ! rowspan="2" | Take-off run<br>(meters) | ||
| + | |- | ||
| + | ! AB | ||
| + | ! RB | ||
| + | ! AB | ||
| + | ! RB | ||
| + | ! AB | ||
| + | ! RB | ||
| + | |- | ||
| + | | 563 || 540 || {{Specs|ceiling}} || 15.8 || 16.0 || 21.4 || 16.9 || 190 | ||
| + | |- | ||
| + | |} | ||
| − | = | + | ==== Details ==== |
| − | + | {| class="wikitable" style="text-align:center" | |
| − | + | |- | |
| − | + | ! colspan="5" | Features | |
| + | |- | ||
| + | ! Combat flaps | ||
| + | ! Take-off flaps | ||
| + | ! Landing flaps | ||
| + | ! Air brakes | ||
| + | ! Arrestor gear | ||
| + | |- | ||
| + | | ✓ || ✓ || ✓ || X || ✓ <!-- ✓ --> | ||
| + | |- | ||
| + | |} | ||
| − | = | + | {| class="wikitable" style="text-align:center" |
| − | = | + | |- |
| − | + | ! colspan="5" | Limits | |
| − | + | |- | |
| − | + | ! rowspan="2" | Wing-break speed<br>(km/h) | |
| + | ! rowspan="2" | Gear limit<br>(km/h) | ||
| + | ! rowspan="2" | Combat flaps<br>(km/h) | ||
| + | ! colspan="2" | Max Static G | ||
| + | |- | ||
| + | ! + | ||
| + | ! - | ||
| + | |- | ||
| + | |{{Specs|destruction|body}}||{{Specs|destruction|gear}}|| 420 || ~14 || ~6 | ||
| + | |- | ||
| + | |} | ||
| − | + | {| class="wikitable" style="text-align:center" | |
| + | |- | ||
| + | ! colspan="4" | Optimal velocities | ||
| + | |- | ||
| + | ! Ailerons<br>(km/h) | ||
| + | ! Rudder<br>(km/h) | ||
| + | ! Elevators<br>(km/h) | ||
| + | ! Radiator<br>(km/h) | ||
| + | |- | ||
| + | | < 280 || < 420 || < 410 || > 336 | ||
| + | |- | ||
| + | |} | ||
| − | == | + | {| class="wikitable" style="text-align:center" |
| − | + | |- | |
| − | + | ! colspan="3" | Compressor (RB/SB) | |
| − | + | |- | |
| + | ! colspan="3" | Setting 1 | ||
| + | |- | ||
| + | ! Optimal altitude | ||
| + | ! 100% Engine power | ||
| + | ! WEP Engine power | ||
| + | |- | ||
| + | | 2,500 m || 1,095 hp || 1,226 hp | ||
| + | |- | ||
| + | ! colspan="3" | Setting 2 | ||
| + | |- | ||
| + | ! Optimal altitude | ||
| + | ! 100% Engine power | ||
| + | ! WEP Engine power | ||
| + | |- | ||
| + | | 5,000 m || 965 hp || 1,081 hp | ||
| + | |- | ||
| + | |} | ||
| − | + | === Survivability and armour === | |
| + | ''Examine the survivability of the aircraft. Note how vulnerable the structure is and how secure the pilot is, whether the fuel tanks are armoured, etc. Describe the armour, if there is any, and also mention the vulnerability of other critical aircraft systems.'' | ||
| − | + | == Armaments == | |
| − | + | === Offensive armament === | |
| − | + | <!-- ''Describe the offensive armament of the aircraft, if any. Describe how effective the cannons and machine guns are in a battle, and also what belts or drums are better to use. If there is no offensive weaponry, delete this subsection.'' --> | |
| − | + | {{main|Type 99 Model 2 navy (20 mm)|Type 97 navy (7.7 mm)}} | |
| − | + | The '''''{{PAGENAME}}''''' is armed with: | |
| − | |||
| − | * | + | * 2 x 20 mm Type 99 Model 2 navy cannons, wing-mounted (125 rpg = 250 total) |
| + | * 2 x 7.7 mm Type 97 navy machine guns, nose-mounted (700 rpg = 1,400 total) | ||
| − | + | === Suspended armament === | |
| + | <!-- ''Describe the aircraft's suspended armament: additional cannons under the wings, bombs, rockets and torpedoes. This section is especially important for bombers and attackers. If there is no suspended weaponry remove this subsection.'' --> | ||
| + | {{main|Navy Type 97 Number 6 (60 kg)|Navy Type Number 25 Model 2 (250 kg)}} | ||
| − | + | The '''''{{PAGENAME}}''''' can be outfitted with the following ordnance: | |
| − | + | * Without load | |
| + | * 2 x 60 kg Navy Type 97 Number 6 bombs (120 kg total) | ||
| + | * 1 x 250 kg Navy Type Number 25 Model 2 bomb (250 kg total) | ||
| − | === | + | == Usage in battles == |
| + | <!--Describe the tactics of playing in an aircraft, the features of using aircraft in a team and advice on tactics. Refrain from creating a "guide" - do not impose a single point of view, but instead, give the reader food for thought. Examine the most dangerous enemies and give recommendations on fighting them. If necessary, note the specifics of the game in different modes (AB, RB, SB).--> | ||
| − | + | At this rank, the Zero is outclassed by everything it faces. The only thing left to hang on to is its famous maneuverability. More than ever, the key is to exploit its nimbleness to force the enemy to make mistakes. Every single aircraft in this battle-rating is far faster - the P-47N-15 is nearly ''200'' km/h faster! Given the inferiority of your aircraft, it is not common to see enemies in tight places just make a break for it - if you don't catch them, they're gone. | |
| − | |||
| − | |||
| − | |||
| − | + | The Zero's infamous reputation as a funeral pyre for its pilots continues - there is still a lack of armour, meaning if you're hit, it's likely fatal. This means you need to dodge all the shots. Remember to turn into the enemy to spoil their aim. Your only hope of destroying an enemy is to enrage them and make them dogfight the Zero. Then, it's a simple matter of getting onto their six and lighting them up. You cannot be too aggressive in the Zero - your goal is to remain alive and frustrate your enemies. | |
| − | |||
| − | |||
| − | |||
| − | ==== | + | === Manual Engine Control === |
| − | + | {| class="wikitable" style="text-align:center" | |
| − | + | |- | |
| − | + | ! colspan="7" | MEC elements | |
| + | |- | ||
| + | ! rowspan="2" | Mixer | ||
| + | ! rowspan="2" | Pitch | ||
| + | ! colspan="3" | Radiator | ||
| + | ! rowspan="2" | Supercharger | ||
| + | ! rowspan="2" | Turbocharger | ||
| + | |- | ||
| + | ! Oil | ||
| + | ! Water | ||
| + | ! Type | ||
| + | |- | ||
| + | | Controllable || rowspan="2" | Controllable<br>Not auto controlled || rowspan="2" | Controllable<br>Not auto controlled || rowspan="2" | Controllable<br>Not auto controlled || rowspan="2" | Separate || rowspan="2" | Controllable<br>2 gears || rowspan="2" | Not controllable | ||
| + | |- | ||
| + | |} | ||
| − | === | + | === Modules === |
| + | {| class="wikitable" | ||
| + | ! colspan="1" | Tier | ||
| + | ! colspan="2" | Flight performance | ||
| + | ! colspan="1" | Survivability | ||
| + | ! colspan="2" | Weaponry | ||
| + | |- | ||
| + | | I | ||
| + | | Fuselage repair | ||
| + | | Radiator | ||
| + | | | ||
| + | | Offensive 7 mm | ||
| + | | | ||
| + | |- | ||
| + | | II | ||
| + | | | ||
| + | | Compressor | ||
| + | | Airframe | ||
| + | | New 7 mm MGs | ||
| + | | 9 in (mod30) | ||
| + | |- | ||
| + | | III | ||
| + | | Wings repair | ||
| + | | Engine | ||
| + | | | ||
| + | | Offensive 20 mm | ||
| + | | | ||
| + | |- | ||
| + | | IV | ||
| + | | | ||
| + | | Engine injection | ||
| + | | Cover | ||
| + | | New 20 mm cannons | ||
| + | | 12 in (mod30) | ||
| + | |- | ||
| + | ! colspan="6" |This is a premium vehicle: all modifications are unlocked on purchase | ||
| + | |- | ||
| + | |} | ||
| − | + | === Pros and cons === | |
| − | + | ''Summarise and briefly evaluate the vehicle in terms of its characteristics and combat effectiveness. Mark its pros and cons in the bulleted list. Try not to use more than 6 points for each of the characteristics. Avoid using categorical definitions such as "bad", "good" and the like - use substitutions with softer forms such as "inadequate" and "effective".'' | |
| − | |||
| − | |||
| − | |||
| − | |||
| − | |||
| − | + | '''Pros:''' | |
| − | + | * Effective at altitudes below 6,000 feet (1,800 meters) | |
| − | |||
| − | + | * Type 99 Model 2, 20mm cannons do considerable amount of damage to all aircraft . | |
| − | |||
| − | |||
| − | + | * Type 97 Machine guns have a fast velocity with an abundance of ammo allowing for easy ranging in RB and SB without need to regulate the ammo. | |
| − | + | * The high torque engine and low weight of the aircraft allow for exceptional turning radius fast rate of climb, and above average stall recovery for even the newest of pilots. | |
| − | + | * The A6M5 KO platform rewards the pilot who can use tactics such as Yo-Yo's and Immelmann's and allows newer pilots to perform advanced maneuvers above their skill. | |
| − | + | * | |
| − | + | '''Cons:''' | |
| − | + | * Ineffective above 10,000 feet (3,000 meters) | |
| − | |||
| − | |||
| − | + | * Slower than nearly any other aircraft making you the one being attacked more often then you attack others. | |
| − | |||
| − | ' | + | * The plane is fragile compared to others at it's tier and prone to catching on fire. |
| − | + | * Newer pilots who do not have defensive skills can find the plane frustrating due to it being vulnerable to faster planes that "boom and zoom". | |
| − | + | * The Type 97 Machine Guns lack damage, newer pilots who do not have cannons and machine-guns bound to different buttons will run out of cannons quickly and be left with a plane that cannot reliably damage enemies. | |
| − | + | * | |
| − | |||
| − | |||
| − | |||
| − | |||
| − | ==== | + | == History == |
| − | + | ''Describe the history of the creation and combat usage of the aircraft in more detail than in the introduction. If the historical reference turns out to be too long, take it to a separate article, taking a link to the article about the vehicle and adding a block "/ History" (example: <nowiki>https://wiki.warthunder.com/(Vehicle-name)/History</nowiki>) and add a link to it here using the <code>main</code> template. Be sure to reference text and sources by using <code><nowiki><ref></ref></nowiki></code>, as well as adding them at the end of the article with <code><nowiki><references /></nowiki></code>. This section may also include the vehicle's dev blog entry (if applicable) and the in-game encyclopedia description (under <code><nowiki>=== In-game description ===</nowiki></code>, also if applicable).'' | |
| − | |||
| − | === | + | === In-game description === |
| − | + | Mitsubishi Type 0 Model 52 "Kou" (A6M5 Model 52a, reporting names: Zeke/Hamp/Zero) single-engine carrier-based fighter | |
| − | |||
| − | + | In the middle of 1942, the Allies in the Pacific Ocean Theatre took the offensive, while the Japanese were more and more often on the defensive. In 1943, new types of high-speed fighters entered service with the USAAF and the USNAF, and they outperformed the Zeros in many respects. Low survivability, the main disadvantage of the Japanese aircraft, was made clear in the fierce air duels between the planes. The fighter's flight characteristics also required some improvement, and Mitsubishi Heavy Industries designers began to upgrade the A6M again in August 1943. | |
| − | |||
| − | |||
| − | + | The Zero received a smaller-area wing (with a span of only 11 m) with rounded tips. The wing folding mechanism was removed. To increase the plane's allowable diving speed, its wing surface skin was reinforced. | |
| − | The | ||
| − | + | Since more powerful engines were not yet available, the designers had to make the most of a Nakajima Sakae 21 engine. Every pair of cylinders was given an individual exhaust pipe instead of a common heavy exhaust manifold. This added exhaust gas thrust to the propeller thrust, which resulted in a higher aircraft speed. The fuselage skin had to be reinforced with steel sheets in the area of the pipes, since the hot exhaust gases quickly burned through thin duralumin. | |
| − | + | The new version of the aircraft was designated Model 52 (A6M5 Model 52). The plane became slightly heavier, but its maximum speed at a height of 6,000 m reached 565 km/h. This was the speed limit for the Zero, since all further modifications made to the machine only increased its weight and, consequently, reduced its maximum speed. | |
| − | + | The next stage in upgrading the Zero was the Model 52 "Kou" (A6M5a Model 52a). This improvement significantly reinforced the plane's armament by replacing the wing-mounted Type 99-2 Model 3 drum-fed cannons (with 100 rounds each) with Type 99-2 Model 4 belt-fed cannons (with 125 rounds). This added 25 rounds per cannon and slightly improved the plane's rate of fire. Now the fighter's armament consisted of two synchronous 7.7 mm Type 97 machine guns with 500 rounds each plus two wing-mounted 20 mm Type 99-2 Model 4 cannons with 125 rounds each. | |
| − | [[ | + | The A6M5a fighter could carry bombs: two 60 kg (132 lb) bombs suspended under the wing and one weighing 250 kg (551 kb) under the fuselage. |
| + | |||
| + | In addition, the A6M5a's wing structure was reinforced yet again, which resulted in a maximum allowable diving speed of 740 km/h. However, this was still inferior to the diving speed of the American F4U fighter. | ||
| + | |||
| + | Mass production of the A6M5a variant began in March 1944. Mitsubishi Heavy Industries manufactured 391 machines. An additional unknown quantity of this variant was built by Nakajima Aircraft. | ||
| + | |||
| + | == Media == | ||
| + | <!-- ''Excellent additions to the article would be video guides, screenshots from the game, and photos.'' --> | ||
| + | Skin and Camouflages for the [https://live.warthunder.com/feed/camouflages/?vehicleCountry=japan&vehicleType=aircraft&vehicleClass=fighter&vehicle=a6m5ko A6M5 Ko] in War Thunder Live. | ||
| + | |||
| + | == See also == | ||
| + | <!--''Links to the articles on the War Thunder Wiki that you think will be useful for the reader, for example:'' | ||
| + | * ''reference to the series of the aircraft;'' | ||
| + | * ''links to approximate analogues of other nations and research trees.''--> | ||
| + | |||
| + | ;Related development | ||
| + | |||
| + | *[[template:AirManufacturer Mitsubishi|Mitsubishi]] [[A6M5|A6M5 mod.52]] <small>(previous model)</small> | ||
| + | *[[template:AirManufacturer Mitsubishi|Mitsubishi]] [[A6M5 otsu|A6M5b mod.52B]] <small>(following model)</small> | ||
| + | |||
| + | ;Aircraft of comparable role, configuration and era | ||
| + | |||
| + | *Brewster [[F2A (Family)|F2A]] Buffalo | ||
| + | *Vought [[F4U (Family)|F4U]] Corsair | ||
| + | *Grumman [[F4F (Family)|F4F]] Wildcat | ||
| + | *Grumman [[F6F (Family)|F6F]] Hellcat | ||
| + | *Reggiane [[Re.2001 (Family)|Re.2001]] | ||
| + | *[[IAR-81C|IAR-81]] | ||
| + | *Macchi [[C.202 (Family)|C.202]] | ||
| + | *[[template:AirManufacturer Nakajima|Nakajima]] [[Ki-43 (Family)|Ki-43]] Hayabusa (▃Oscar) | ||
| + | *Supermarine [[Spitfire (Family)|Seafire]] | ||
| + | *Hawker [[Hurricane (Family)|Sea Hurricane]] | ||
| + | |||
| + | == External links == | ||
| + | <!-- ''Paste links to sources and external resources, such as:'' | ||
| + | * ''topic on the official game forum;'' | ||
| + | * ''encyclopedia page on the aircraft;'' | ||
| + | * ''other literature.'' --> | ||
| + | |||
| + | * [[Wikipedia:Mitsubishi_A6M_Zero#A6M5_Type_0_Model_52|[Wikipedia<nowiki>]</nowiki> A6M5 Type 0 Model 52]] | ||
| + | |||
| + | {{AirManufacturer Mitsubishi}} | ||
| + | {{Japan fighters}} | ||
| + | {{Japan premium aircraft}} | ||
Revision as of 00:04, 16 August 2020
Contents
| This page is about the Japanese gift fighter A6M5 Ko. For other uses, see A6M (Family). |
Description

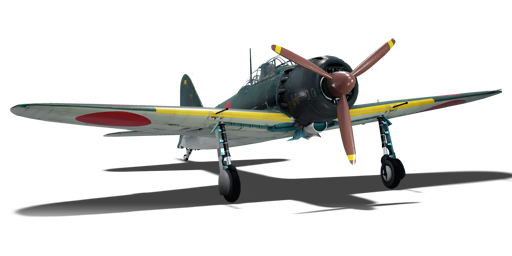
The A6M5 Ko Reisen is a gift rank IV Japanese fighter
with a battle rating of 5.0 (AB), 5.3 (RB), and 4.7 (SB). It has been in the game since the start of the Open Beta Test prior to Update 1.27.
General info
Flight performance
This Zero is very similar to its predecessors, albeit slightly faster. It is still as maneuverable as ever.
| Characteristics | |||||||
|---|---|---|---|---|---|---|---|
| Stock | |||||||
| Max Speed (km/h at 6,000 m) |
Max altitude (meters) |
Turn time (seconds) |
Rate of climb (meters/second) |
Take-off run (meters) | |||
| AB | RB | AB | RB | AB | RB | ||
| 521 | 503 | 10900 | 16.6 | 17.2 | 13.4 | 13.4 | 190 |
| Upgraded | |||||||
| Max Speed (km/h at 6,000 m) |
Max altitude (meters) |
Turn time (seconds) |
Rate of climb (meters/second) |
Take-off run (meters) | |||
| AB | RB | AB | RB | AB | RB | ||
| 563 | 540 | 10900 | 15.8 | 16.0 | 21.4 | 16.9 | 190 |
Details
| Features | ||||
|---|---|---|---|---|
| Combat flaps | Take-off flaps | Landing flaps | Air brakes | Arrestor gear |
| ✓ | ✓ | ✓ | X | ✓ |
| Limits | ||||
|---|---|---|---|---|
| Wing-break speed (km/h) |
Gear limit (km/h) |
Combat flaps (km/h) |
Max Static G | |
| + | - | |||
| 0 | 300 | 420 | ~14 | ~6 |
| Optimal velocities | |||
|---|---|---|---|
| Ailerons (km/h) |
Rudder (km/h) |
Elevators (km/h) |
Radiator (km/h) |
| < 280 | < 420 | < 410 | > 336 |
| Compressor (RB/SB) | ||
|---|---|---|
| Setting 1 | ||
| Optimal altitude | 100% Engine power | WEP Engine power |
| 2,500 m | 1,095 hp | 1,226 hp |
| Setting 2 | ||
| Optimal altitude | 100% Engine power | WEP Engine power |
| 5,000 m | 965 hp | 1,081 hp |
Survivability and armour
Examine the survivability of the aircraft. Note how vulnerable the structure is and how secure the pilot is, whether the fuel tanks are armoured, etc. Describe the armour, if there is any, and also mention the vulnerability of other critical aircraft systems.
Armaments
Offensive armament
The A6M5 Ko is armed with:
- 2 x 20 mm Type 99 Model 2 navy cannons, wing-mounted (125 rpg = 250 total)
- 2 x 7.7 mm Type 97 navy machine guns, nose-mounted (700 rpg = 1,400 total)
Suspended armament
The A6M5 Ko can be outfitted with the following ordnance:
- Without load
- 2 x 60 kg Navy Type 97 Number 6 bombs (120 kg total)
- 1 x 250 kg Navy Type Number 25 Model 2 bomb (250 kg total)
Usage in battles
At this rank, the Zero is outclassed by everything it faces. The only thing left to hang on to is its famous maneuverability. More than ever, the key is to exploit its nimbleness to force the enemy to make mistakes. Every single aircraft in this battle-rating is far faster - the P-47N-15 is nearly 200 km/h faster! Given the inferiority of your aircraft, it is not common to see enemies in tight places just make a break for it - if you don't catch them, they're gone.
The Zero's infamous reputation as a funeral pyre for its pilots continues - there is still a lack of armour, meaning if you're hit, it's likely fatal. This means you need to dodge all the shots. Remember to turn into the enemy to spoil their aim. Your only hope of destroying an enemy is to enrage them and make them dogfight the Zero. Then, it's a simple matter of getting onto their six and lighting them up. You cannot be too aggressive in the Zero - your goal is to remain alive and frustrate your enemies.
Manual Engine Control
| MEC elements | ||||||
|---|---|---|---|---|---|---|
| Mixer | Pitch | Radiator | Supercharger | Turbocharger | ||
| Oil | Water | Type | ||||
| Controllable | Controllable Not auto controlled |
Controllable Not auto controlled |
Controllable Not auto controlled |
Separate | Controllable 2 gears |
Not controllable |
Modules
| Tier | Flight performance | Survivability | Weaponry | ||
|---|---|---|---|---|---|
| I | Fuselage repair | Radiator | Offensive 7 mm | ||
| II | Compressor | Airframe | New 7 mm MGs | 9 in (mod30) | |
| III | Wings repair | Engine | Offensive 20 mm | ||
| IV | Engine injection | Cover | New 20 mm cannons | 12 in (mod30) | |
| This is a premium vehicle: all modifications are unlocked on purchase | |||||
Pros and cons
Summarise and briefly evaluate the vehicle in terms of its characteristics and combat effectiveness. Mark its pros and cons in the bulleted list. Try not to use more than 6 points for each of the characteristics. Avoid using categorical definitions such as "bad", "good" and the like - use substitutions with softer forms such as "inadequate" and "effective".
Pros:
- Effective at altitudes below 6,000 feet (1,800 meters)
- Type 99 Model 2, 20mm cannons do considerable amount of damage to all aircraft .
- Type 97 Machine guns have a fast velocity with an abundance of ammo allowing for easy ranging in RB and SB without need to regulate the ammo.
- The high torque engine and low weight of the aircraft allow for exceptional turning radius fast rate of climb, and above average stall recovery for even the newest of pilots.
- The A6M5 KO platform rewards the pilot who can use tactics such as Yo-Yo's and Immelmann's and allows newer pilots to perform advanced maneuvers above their skill.
Cons:
- Ineffective above 10,000 feet (3,000 meters)
- Slower than nearly any other aircraft making you the one being attacked more often then you attack others.
- The plane is fragile compared to others at it's tier and prone to catching on fire.
- Newer pilots who do not have defensive skills can find the plane frustrating due to it being vulnerable to faster planes that "boom and zoom".
- The Type 97 Machine Guns lack damage, newer pilots who do not have cannons and machine-guns bound to different buttons will run out of cannons quickly and be left with a plane that cannot reliably damage enemies.
History
Describe the history of the creation and combat usage of the aircraft in more detail than in the introduction. If the historical reference turns out to be too long, take it to a separate article, taking a link to the article about the vehicle and adding a block "/ History" (example: https://wiki.warthunder.com/(Vehicle-name)/History) and add a link to it here using the main template. Be sure to reference text and sources by using <ref></ref>, as well as adding them at the end of the article with <references />. This section may also include the vehicle's dev blog entry (if applicable) and the in-game encyclopedia description (under === In-game description ===, also if applicable).
In-game description
Mitsubishi Type 0 Model 52 "Kou" (A6M5 Model 52a, reporting names: Zeke/Hamp/Zero) single-engine carrier-based fighter
In the middle of 1942, the Allies in the Pacific Ocean Theatre took the offensive, while the Japanese were more and more often on the defensive. In 1943, new types of high-speed fighters entered service with the USAAF and the USNAF, and they outperformed the Zeros in many respects. Low survivability, the main disadvantage of the Japanese aircraft, was made clear in the fierce air duels between the planes. The fighter's flight characteristics also required some improvement, and Mitsubishi Heavy Industries designers began to upgrade the A6M again in August 1943.
The Zero received a smaller-area wing (with a span of only 11 m) with rounded tips. The wing folding mechanism was removed. To increase the plane's allowable diving speed, its wing surface skin was reinforced.
Since more powerful engines were not yet available, the designers had to make the most of a Nakajima Sakae 21 engine. Every pair of cylinders was given an individual exhaust pipe instead of a common heavy exhaust manifold. This added exhaust gas thrust to the propeller thrust, which resulted in a higher aircraft speed. The fuselage skin had to be reinforced with steel sheets in the area of the pipes, since the hot exhaust gases quickly burned through thin duralumin.
The new version of the aircraft was designated Model 52 (A6M5 Model 52). The plane became slightly heavier, but its maximum speed at a height of 6,000 m reached 565 km/h. This was the speed limit for the Zero, since all further modifications made to the machine only increased its weight and, consequently, reduced its maximum speed.
The next stage in upgrading the Zero was the Model 52 "Kou" (A6M5a Model 52a). This improvement significantly reinforced the plane's armament by replacing the wing-mounted Type 99-2 Model 3 drum-fed cannons (with 100 rounds each) with Type 99-2 Model 4 belt-fed cannons (with 125 rounds). This added 25 rounds per cannon and slightly improved the plane's rate of fire. Now the fighter's armament consisted of two synchronous 7.7 mm Type 97 machine guns with 500 rounds each plus two wing-mounted 20 mm Type 99-2 Model 4 cannons with 125 rounds each.
The A6M5a fighter could carry bombs: two 60 kg (132 lb) bombs suspended under the wing and one weighing 250 kg (551 kb) under the fuselage.
In addition, the A6M5a's wing structure was reinforced yet again, which resulted in a maximum allowable diving speed of 740 km/h. However, this was still inferior to the diving speed of the American F4U fighter.
Mass production of the A6M5a variant began in March 1944. Mitsubishi Heavy Industries manufactured 391 machines. An additional unknown quantity of this variant was built by Nakajima Aircraft.
Media
Skin and Camouflages for the A6M5 Ko in War Thunder Live.
See also
- Related development
- Mitsubishi A6M5 mod.52 (previous model)
- Mitsubishi A6M5b mod.52B (following model)
- Aircraft of comparable role, configuration and era
- Brewster F2A Buffalo
- Vought F4U Corsair
- Grumman F4F Wildcat
- Grumman F6F Hellcat
- Reggiane Re.2001
- IAR-81
- Macchi C.202
- Nakajima Ki-43 Hayabusa (▃Oscar)
- Supermarine Seafire
- Hawker Sea Hurricane
External links
| Mitsubishi Company (三菱商会) | |
|---|---|
| Fighters | A5M4 · Hagiri's A5M4 |
| A6M2 mod. 11 · A6M2 · A6M3 · A6M3 mod. 22 · A6M3 mod. 22Ko · A6M5 · A6M5 Ko · A6M5 otsu · A6M5 Hei · A6M6c | |
| A7M1 (NK9H) · A7M2 | |
| J2M2 · J2M3 · J2M4 Kai · J2M5 · J2M5 (30 mm) | |
| Hydroplanes | F1M2 |
| Interceptors | Ki-83 · Ki-109 |
| Bombers | G4M1 |
| Ki-21-Ia · Ki-21-I hei · Ki-67-I Ko · Ki-67-I otsu | |
| Jet Fighters | Ki-200 |
| Captured | ▃A6M2 · ␗A6M2 |
| See also | Mitsubishi Heavy Industries, Ltd. (Post-War) |
| Japan fighters | |
|---|---|
| Navy | |
| Carrier-based fighter | |
| A5M | A5M4 · Hagiri's A5M4 |
| A6M | A6M2 mod. 11 · A6M2 · A6M3 · A6M3 mod. 22 · A6M3 mod. 22Ko · A6M5 · A6M5 Ko · A6M5 otsu · A6M5 Hei · A6M6c |
| A7He | A7He1* |
| A7M | A7M1 (NK9H) · A7M2 |
| Land-based Fighter | |
| J2M | J2M2 · J2M3 · J2M4 Kai · J2M5 · J2M5 (30 mm) |
| J6K | J6K1 |
| J7W | J7W1 |
| N1K-J | N1K1-Ja · N1K2-J · N1K2-Ja |
| Fighter seaplane | |
| N1K | N1K1 |
| A6M-N | A6M2-N |
| Army | |
| Ki-10 | Ki-10-I · Ki-10-I C · Ki-10-II · Ki-10-II C |
| Ki-27 | Ki-27 otsu · Ki-27 otsu Tachiarai |
| Ki-43 | Ki-43-I · Ki-43-II · Ki-43-III otsu |
| Ki-44 | Ki-44-I · Ki-44-I 34 · Ki-44-II otsu · Ki-44-II hei |
| Ki-61 | Ki-61-I ko · Ki-61-I otsu · Ki-61-I hei · Tada's Ki-61-I hei · Ki-61-I tei · Ki-61-II Otsu Kai |
| Ki-84 | Ki-84 ko · Ki-84 otsu · Ki-84 hei |
| Ki-87 | Ki-87 |
| Ki-94 | Ki-94-II |
| Ki-100 | Ki-100 · Ki-100-II |
| Other countries | ▅F4U-1A · ▅P-51C-11-NT · ▅Bf 109 E-7 · ▅Fw 190 A-5 |
| *Imported designation of the He 112 (A6M was in development - A7M would take A7 designation after the cancelation of the A7He) | |
| Japan premium aircraft | |
|---|---|
| Fighters | Hagiri's A5M4 · A7He1 · Ki-27 otsu Tachiarai |
| Ki-44-II otsu · ▅Bf 109 E-7 · ▅F4U-1A · Ki-100-II · Ki-44-I 34 | |
| ▅Fw 190 A-5 · A7M1 (NK9H) · Tada's Ki-61-I hei · ▅P-51C-11-NT | |
| J2M4 Kai · A6M5 Ko · A6M6c · J2M5 · Ki-87 · J6K1 | |
| Twin-engine fighters | Ki-96 |
| Jet fighters | F-86F-40 JASDF▅ · T-2 Early · F-4EJ ADTW |
| Bombers | Ki-21-I hei · Ki-48-II otsu · H8K3 · B7A2 (Homare 23) · ▅B-17E |
