Difference between revisions of "SBD-3"
Inceptor57 (talk | contribs) (→Usage in battles: SBD-3 not likely to meet the ZSD63 in its BR range) |
(→History) |
||
| (32 intermediate revisions by 13 users not shown) | |||
| Line 1: | Line 1: | ||
{{Specs-Card | {{Specs-Card | ||
|code=sbd-3 | |code=sbd-3 | ||
| + | |images={{Specs-Card-Image|GarageImage_{{PAGENAME}}.jpg}} | ||
|cockpit=cockpit_sbd-3.jpg | |cockpit=cockpit_sbd-3.jpg | ||
}} | }} | ||
| Line 6: | Line 7: | ||
== Description == | == Description == | ||
<!-- ''In the description, the first part should be about the history of and the creation and combat usage of the aircraft, as well as its key features. In the second part, tell the reader about the aircraft in the game. Insert a screenshot of the vehicle, so that if the novice player does not remember the vehicle by name, he will immediately understand what kind of vehicle the article is talking about.'' --> | <!-- ''In the description, the first part should be about the history of and the creation and combat usage of the aircraft, as well as its key features. In the second part, tell the reader about the aircraft in the game. Insert a screenshot of the vehicle, so that if the novice player does not remember the vehicle by name, he will immediately understand what kind of vehicle the article is talking about.'' --> | ||
| − | + | The SBD Dauntless was the workhorse of the US Navy, serving from 1940 all the way to late 1944 as the main carrier-based dive bomber. It replaced the SBC Helldiver and SBU Corsair aboard US carriers. Featuring a range of about 1,700 km, and quite heavy armaments for its size and role - two 12.7 mm Browning M2 machine guns in the engine cowling and a bomb load of up to 2,250 lbs, it was very versatile plane. The SBD participated in many battles in the Pacific theatre, and achieved successes such as the sinking of Japanese aircraft carrier Shōhō during the Battle of the Coral Sea in May 1942. Its biggest success was during the Battle of Midway in June 1942, when SBD bombers sank four aircraft carriers, namely Akagi, Kaga, Sōryū, and Hiryū. By 1944, the SBD was slowly being replaced by the faster and more modern SB2C Helldiver. Foreign users included the Royal Navy, Free French Air Force, Mexico, Chile, and Morocco. | |
| − | + | ||
| − | + | In War Thunder since the start of the Open Beta Test, the '''{{Specs|name}}''' is one of the first bombers in the American aviation tech tree. It features an airspawn allowing for quick bombing runs out of reach of enemy fighters, as your bombs are dropped before the fighters can climb up to your altitude. The heavy armament compared to contemporaries found in other tech trees allows for engaging enemy fighters using altitude advantage or, after installation of the DGP-1 machine gun pods, engaging enemy medium and heavy bombers such as Fw 200s, He 111s or Ju 88s. Despite being a bomber, SBD is also quite a manoeuvrable aircraft, allowing to win prolonged turn fights with less agile opponents such as the He 112 or MiG-3. | |
== General info == | == General info == | ||
=== Flight performance === | === Flight performance === | ||
| + | {{Specs-Avia-Flight}} | ||
<!-- ''Describe how the aircraft behaves in the air. Speed, manoeuvrability, acceleration and allowable loads - these are the most important characteristics of the vehicle.'' --> | <!-- ''Describe how the aircraft behaves in the air. Speed, manoeuvrability, acceleration and allowable loads - these are the most important characteristics of the vehicle.'' --> | ||
| Line 58: | Line 60: | ||
! Combat !! Take-off !! Landing !! + !! - | ! Combat !! Take-off !! Landing !! + !! - | ||
|- | |- | ||
| − | | {{Specs|destruction|body}} || {{Specs|destruction|gear}} || | + | | {{Specs|destruction|body}} || {{Specs|destruction|gear}} || 490 || 469 || 320 || ~13 || ~13 |
|- | |- | ||
|} | |} | ||
| Line 68: | Line 70: | ||
! Ailerons !! Rudder !! Elevators !! Radiator | ! Ailerons !! Rudder !! Elevators !! Radiator | ||
|- | |- | ||
| − | | < 350 || < 350 || < 380 || > | + | | < 350 || < 350 || < 380 || > 299 |
| − | |||
| − | |||
| − | |||
| − | |||
| − | |||
| − | |||
| − | |||
| − | |||
| − | |||
| − | |||
| − | |||
| − | |||
| − | |||
| − | |||
| − | |||
| − | |||
| − | |||
| − | |||
| − | |||
| − | |||
| − | |||
| − | |||
|- | |- | ||
|} | |} | ||
| Line 146: | Line 126: | ||
=== Survivability and armour === | === Survivability and armour === | ||
| + | {{Specs-Avia-Armour}} | ||
<!-- ''Examine the survivability of the aircraft. Note how vulnerable the structure is and how secure the pilot is, whether the fuel tanks are armoured, etc. Describe the armour, if there is any, and also mention the vulnerability of other critical aircraft systems.'' --> | <!-- ''Examine the survivability of the aircraft. Note how vulnerable the structure is and how secure the pilot is, whether the fuel tanks are armoured, etc. Describe the armour, if there is any, and also mention the vulnerability of other critical aircraft systems.'' --> | ||
| Line 152: | Line 133: | ||
* 12.7 mm steel protecting the gunner | * 12.7 mm steel protecting the gunner | ||
* Self-sealing fuel tanks (2 in each wing) | * Self-sealing fuel tanks (2 in each wing) | ||
| + | |||
| + | === Modifications and economy === | ||
| + | {{Specs-Economy}} | ||
== Armaments == | == Armaments == | ||
| + | {{Specs-Avia-Armaments}} | ||
=== Offensive armament === | === Offensive armament === | ||
| + | {{Specs-Avia-Offensive}} | ||
<!-- ''Describe the offensive armament of the aircraft, if any. Describe how effective the cannons and machine guns are in a battle, and also what belts or drums are better to use. If there is no offensive weaponry, delete this subsection.'' --> | <!-- ''Describe the offensive armament of the aircraft, if any. Describe how effective the cannons and machine guns are in a battle, and also what belts or drums are better to use. If there is no offensive weaponry, delete this subsection.'' --> | ||
{{main|M2 Browning (12.7 mm)}} | {{main|M2 Browning (12.7 mm)}} | ||
| Line 163: | Line 149: | ||
=== Suspended armament === | === Suspended armament === | ||
| + | {{Specs-Avia-Suspended}} | ||
<!-- ''Describe the aircraft's suspended armament: additional cannons under the wings, bombs, rockets and torpedoes. This section is especially important for bombers and attackers. If there is no suspended weaponry remove this subsection.'' --> | <!-- ''Describe the aircraft's suspended armament: additional cannons under the wings, bombs, rockets and torpedoes. This section is especially important for bombers and attackers. If there is no suspended weaponry remove this subsection.'' --> | ||
| − | {{main|AN-M30A1 (100 lb)|AN-M65A1 (1,000 lb)|Type A Mark I mine|M2 Browning (12.7 mm)}} | + | [[File:Dauntless_dive_carrier.JPG.jpg|thumbnail|right|A Dauntless diving towards a Japanese carrier.]] |
| + | {{main|AN-M30A1 (100 lb)|AN-M64A1 (500 lb)|AN-M65A1 (1,000 lb)|Type A Mark I mine|M2 Browning (12.7 mm)}} | ||
The '''''{{PAGENAME}}''''' can be outfitted with the following ordnance: | The '''''{{PAGENAME}}''''' can be outfitted with the following ordnance: | ||
| Line 171: | Line 159: | ||
* 4 x 12.7 mm M2 Browning machine guns, wing-mounted (gunpods) (340 rpg = 1,360 total) | * 4 x 12.7 mm M2 Browning machine guns, wing-mounted (gunpods) (340 rpg = 1,360 total) | ||
* 1 x Type A Mark I mine | * 1 x Type A Mark I mine | ||
| + | * 1 x 500 lb AN-M64A1 bomb (500 lb total) | ||
| + | * 1 x 500 lb AN-M64A1 bomb + 2 x 100 lb AN-M30A1 bombs (700 lb total) | ||
=== Defensive armament === | === Defensive armament === | ||
| + | {{Specs-Avia-Defensive}} | ||
<!-- ''Defensive armament with turret machine guns or cannons, crewed by gunners. Examine the number of gunners and what belts or drums are better to use. If defensive weaponry is not available, remove this subsection.'' --> | <!-- ''Defensive armament with turret machine guns or cannons, crewed by gunners. Examine the number of gunners and what belts or drums are better to use. If defensive weaponry is not available, remove this subsection.'' --> | ||
{{main|Browning (7.62 mm)}} | {{main|Browning (7.62 mm)}} | ||
| Line 184: | Line 175: | ||
The Dauntless is an underrated aircraft, as it is viewed as a weak and sluggish bomber by a majority of tier 1 players. Use this to your advantage by catching unsuspecting bombers and fighters. Its manoeuvrability is good enough to energy fight the enemy. You should try to keep your speed higher than 200 km/h and stay at altitudes lower than 2km. | The Dauntless is an underrated aircraft, as it is viewed as a weak and sluggish bomber by a majority of tier 1 players. Use this to your advantage by catching unsuspecting bombers and fighters. Its manoeuvrability is good enough to energy fight the enemy. You should try to keep your speed higher than 200 km/h and stay at altitudes lower than 2km. | ||
| − | This plane is good at what it was designed for Dive Bombing. Start at a high altitude at around 4-5,000 feet, fly directly above the target, invert the plane, cut the throttle and deploy airbrakes ( | + | This plane is good at what it was designed for Dive Bombing. Start at a high altitude at around 4-5,000 feet, fly directly above the target, invert the plane, cut the throttle and deploy airbrakes (H key by default), dive, at 1,000-700 feet release bombs, pull the nose up, retract air brakes, push the throttle to full, then pitch up in a climb. |
The small bomb load requires you pick your targets carefully and make your bombs count, choose to attack artillery positions or bases, where you have a higher chance of hitting due to their stationary position. Ships are also prime targets (it is what it was designed for), as the 1000lb bomb is plenty to sink a small ship. | The small bomb load requires you pick your targets carefully and make your bombs count, choose to attack artillery positions or bases, where you have a higher chance of hitting due to their stationary position. Ships are also prime targets (it is what it was designed for), as the 1000lb bomb is plenty to sink a small ship. | ||
| Line 190: | Line 181: | ||
Do not rely on fighter support when focusing on ground targets. After you drop your bombs, the plane should be manoeuvrable enough to dogfight enemies. You should stay on deck and manoeuvre wisely to not expose your weak underbelly. If you are caught at high altitude, go into a steep dive until you are at the deck, there is a good chance you may out dive them. If you cannot lose the enemy, try to quickly turn to your enemy's direction. your high G tolerance is equal, if not better than most enemies so you could lose them if they cant follow your turn. | Do not rely on fighter support when focusing on ground targets. After you drop your bombs, the plane should be manoeuvrable enough to dogfight enemies. You should stay on deck and manoeuvre wisely to not expose your weak underbelly. If you are caught at high altitude, go into a steep dive until you are at the deck, there is a good chance you may out dive them. If you cannot lose the enemy, try to quickly turn to your enemy's direction. your high G tolerance is equal, if not better than most enemies so you could lose them if they cant follow your turn. | ||
| − | + | '''Realistic battles''' | |
| − | With the gun pods attached, you could act as menacing fighter support. With a high altitude spawn, try to hunt bombers first before you consider killing fighters. climb up to 4,500 | + | With the gun pods attached, you could act as menacing fighter support. With a high altitude spawn, try to hunt bombers first before you consider killing fighters. climb up to 4,500 m to get your max speed so you can dive down to the bombers. After eliminating a bomber or two, you should find that your allies are starting to engage the enemy. You could help them by catching enemies that are turning, have low speed, or attacking an ally. It should be easy to do all of this because of your energy advantage. You are still marked as a bomber, so enemies will surely consider you as an easy kill. You can not outrun them, but you can turn very well at almost every speed except stall. If they are coming from behind, a sudden reverse would be a good manoeuvre to throw them off. After that, you could either perform a head-on or fly under the enemy to avoid them. Avoid rushing upwards to maintain speed. Combine all of that with good trigger discipline, it is possible to achieve a five kill game. |
| − | + | '''Simulator battles''' | |
Hands-off carrier take-off (Auto engine control): Start the engine, flaps: raised, elevator trim: 15%, aileron trim: 11%, rudder trim: 6%, WEP throttle, hands-off controls until you lift off the carrier. | Hands-off carrier take-off (Auto engine control): Start the engine, flaps: raised, elevator trim: 15%, aileron trim: 11%, rudder trim: 6%, WEP throttle, hands-off controls until you lift off the carrier. | ||
| − | '''Enemies worth noting | + | '''Enemies worth noting''' |
| − | [[Yak-2 KABB]]: Do not think that the {{PAGENAME}} can confidently | + | [[Yak-2 KABB]]: Do not think that the {{PAGENAME}} can confidently outmanoeuvre this plane just because it is twin-engined. The Yak-2 has an amazing turn rate for a heavy fighter, thus the {{PAGENAME}} must avoid turning with it, if not dogfighting with it in general. It bears a pair of ShVAK cannons that can easily damage vital parts like engine or cooling systems. It has green camo, greatly resembling an Me 410 but with an H-tail like a Bf 110's. |
| + | |||
| + | '''Facing the SBD''' | ||
| + | |||
| + | It is very common in the game to encounter the SBD equipped with the gunpods, instead of its more usual historical role as a dive bomber. If you are playing against the Americans, in a battle rating where you are likely to encounter it, and especially if you are on a base-bombing run, it is wise to assume that you are facing six forward-firing .50 cal M2 machine guns, until proven otherwise. The best countermeasures are altitude, speed, and manoeuvrability. | ||
=== Manual Engine Control === | === Manual Engine Control === | ||
| Line 216: | Line 211: | ||
|- | |- | ||
| Controllable || Controllable<br>Not auto controlled || Controllable<br>Auto control available || Controllable<br>Auto control available || Separate || Controllable<br>2 gears || Not controllable | | Controllable || Controllable<br>Not auto controlled || Controllable<br>Auto control available || Controllable<br>Auto control available || Separate || Controllable<br>2 gears || Not controllable | ||
| − | |||
| − | |||
| − | |||
| − | |||
| − | |||
| − | |||
| − | |||
| − | |||
| − | |||
| − | |||
| − | |||
| − | |||
| − | |||
| − | |||
| − | |||
| − | |||
| − | |||
| − | |||
| − | |||
| − | |||
| − | |||
| − | |||
| − | |||
| − | |||
| − | |||
| − | |||
| − | |||
| − | |||
| − | |||
| − | |||
| − | |||
| − | |||
| − | |||
| − | |||
| − | |||
| − | |||
| − | |||
|- | |- | ||
|} | |} | ||
| Line 286: | Line 244: | ||
* Slow speed | * Slow speed | ||
* WEP only works on low altitude | * WEP only works on low altitude | ||
| + | * Unprotected engine, any gunfire get your engine knocked out or badly damaged, forcing you to return to base | ||
== History == | == History == | ||
<!-- ''Describe the history of the creation and combat usage of the aircraft in more detail than in the introduction. If the historical reference turns out to be too long, take it to a separate article, taking a link to the article about the vehicle and adding a block "/History" (example: <nowiki>https://wiki.warthunder.com/(Vehicle-name)/History</nowiki>) and add a link to it here using the <code>main</code> template. Be sure to reference text and sources by using <code><nowiki><ref></ref></nowiki></code>, as well as adding them at the end of the article with <code><nowiki><references /></nowiki></code>. This section may also include the vehicle's dev blog entry (if applicable) and the in-game encyclopedia description (under <code><nowiki>=== In-game description ===</nowiki></code>, also if applicable).'' --> | <!-- ''Describe the history of the creation and combat usage of the aircraft in more detail than in the introduction. If the historical reference turns out to be too long, take it to a separate article, taking a link to the article about the vehicle and adding a block "/History" (example: <nowiki>https://wiki.warthunder.com/(Vehicle-name)/History</nowiki>) and add a link to it here using the <code>main</code> template. Be sure to reference text and sources by using <code><nowiki><ref></ref></nowiki></code>, as well as adding them at the end of the article with <code><nowiki><references /></nowiki></code>. This section may also include the vehicle's dev blog entry (if applicable) and the in-game encyclopedia description (under <code><nowiki>=== In-game description ===</nowiki></code>, also if applicable).'' --> | ||
| + | The SBD ("Scout Bomber Douglas") was introduced in 1940 and was produced by Douglas until 1944. However its roots go further than that. The predecessor of the SBD, the Northrop BT-1, was designed in 1935. In 1937, Northrop Corporation was taken over by Douglas, and the Northrop BT-2, developed from the BT-1, served as a basis of what was to become the SBD. In 1938, the US Navy and US Marine Corps placed orders for a new dive bomber designated SBD-1 and SBD-2. The SBD-1 was delivered to the Marines in 1940 and the SBD-2 to the Navy in early 1941, replacing obsolete SBU Corsair and SBC Helldiver carrier-based dive bombers. The SBD, unusually for a carrier aircraft, did not possess folding wings - the designers opted to maintain the structural integrity of the plane instead. The next version, SBD-3, had increased armour protection, self-sealing fuel tanks, and the rear gunner's 7.62 mm Browning M1919 machine gun was switched to a dual-mount instead of the single mount on previous aircraft. The most produced version of SBD was SBD-5, over 2,400 of these were built, equipped with more powerful 1,200 hp Wright R-1820-60 Cyclone engines and increased ammo supply. The US Army Air Force used denavalized variants of the SBD, called the A-24 Banshee. These were flown during the early stages of the war, but quickly withdrawn from service. | ||
| + | |||
| + | In total, 5,936 SBDs were produced, with the last assembled on 21st July 1944. During their career, SBDs sunk six aircraft carriers, fourteen cruisers, six destroyers, fifteen cargo or transport ships, and numerous lesser craft. During and after the war, SBDs served with the Free French Air Force and French Navy, retiring in 1949. Other foreign users included the Royal New Zealand Air Force and Royal Navy, and after the war some examples were sold to Chile, Mexico, and Morocco. | ||
| + | |||
| + | === Operational history === | ||
| + | The SBD's first action was during the attack on Pearl Harbor in December 1941, most of the Marine Corps SBDs of Marine Corps Scout Bombing Squadron 232 (VMSB-232) were destroyed on the ground while parked at Ewa Mooring Mast Field. The first victim of SBDs, 3 days after the attack on Pearl Harbor, was Japanese submarine I-70 which was sunk by SBDs from Yorktown-class carrier USS Enterprise, making it the first Japanese warship sunk by US aircraft during WWII. After that, SBDs were present at every US Pacific theater campaign, supporting troops with precision strikes and patrolling around allied ships. | ||
| − | + | ==== Battle of the Coral Sea ==== | |
| + | At the beginning of May 1942, SBDs participated in the Battle of the Coral Sea where they sank Japanese light aircraft carrier Shōhō and damaged fleet carrier Shōkaku. During the battle, SBDs were flying anti-torpedo combat patrols focused on intercepting Japanese torpedo bombers trying to sink USS Lexington and USS Yorktown, scoring several victories. One of the pilots, Stanley "Swede" Vejtasa, scored two kills on A6M fighters after being attacked by them, and cut the wing of a third with his own wingtip during a head-on pass. | ||
| − | The | + | ==== Battle of Midway ==== |
| + | The most successful action of SBDs happened during the Battle of Midway in early June 1942, where four squadrons of Navy SBDs attacked the Japanese fleet, and sank all four aircraft carriers present, as well as multiple cruisers and destroyers. The carriers sunk were Akagi, Kaga, Sōryū, and Hiryū. Later that day, SBDs sighted a group of Japanese heavy cruisers en route from bombarding Midway, consisting of the four Mogami-class heavy cruisers Kumano, Suzuya, Mikuma, and Mogami. They heavily damaged Mogami and Mikuma, with Mikuma later sinking. | ||
| − | + | ==== Guadalcanal Campaign ==== | |
| + | During the Guadalcanal Campaign, SBDs were conducting sorties from both US Navy carriers and Henderson Field, sinking Japanese shipping trying to reinforce the island with new troops. Aircraft carrier Ryūjō fell victim to 31 SBDs from USS Saratoga. In total, another three aircraft carriers were damaged, one heavy cruiser, and nine transport vessels were sunk during the six-month campaign. | ||
| − | + | ==== Battle of the Philippine Sea ==== | |
| + | The Battle of the Philippine Sea was the last major battle where SBDs participated, before being replaced by the more powerful Curtiss SB2C Helldiver bombers. The Helldiver was faster, could carry bigger payload, and had more powerful engine, but had some characteristics that made it hard to fly. SBDs were favoured by pilots due to superior handling at low speed, crucial for carrier landing. Pilots nicknamed the plane "Slow But Deadly" | ||
| − | + | {{break}} | |
| + | {{Navigation-Start|{{Annotation|Archive of the in-game description|An archive of the historical description of the vehicle that was presented in-game prior to Update 1.55 'Royal Armour'}}}} | ||
| + | {{Navigation-First-Simple-Line}} | ||
A carrier-based dive-bomber/reconnaissance aircraft. | A carrier-based dive-bomber/reconnaissance aircraft. | ||
| − | The most well-known | + | The most well-known US Navy bomber, and perhaps the most significant dive-bomber of the war. Despite the fact that the decision to write off the SBD as outdated was made before the war, the bomber was still actively involved in combat, and in 1942 it sunk more enemy ships than all other Navy aircraft combined. |
Originally, the series was called the XBT, and showed as many innovations as it did drawbacks. This aircraft had a revolutionary honeycomb wing structure and a reasonably small fuselage. But its wings could not be folded, and occasionally it would spontaneously go into a barrel roll, which caused a series of catastrophic accidents. After intensive research in conjunction with NACA, the dive-bomber was radically redesigned, most of its shortcomings were removed, and it was named the Scout Bomber. | Originally, the series was called the XBT, and showed as many innovations as it did drawbacks. This aircraft had a revolutionary honeycomb wing structure and a reasonably small fuselage. But its wings could not be folded, and occasionally it would spontaneously go into a barrel roll, which caused a series of catastrophic accidents. After intensive research in conjunction with NACA, the dive-bomber was radically redesigned, most of its shortcomings were removed, and it was named the Scout Bomber. | ||
| − | The SBD-3 variant was a Scout Bomber which was finally fit for combat. It had self-sealing fuel tanks, | + | The SBD-3 variant was a Scout Bomber which was finally fit for combat. It had self-sealing fuel tanks, armour, and bulletproof cockpit glass. To keep its performance characteristics, the aircraft's weight was reduced by replacing its duralumin sheeting with a much lighter material. Also, all the equipment designed to keep the plane afloat in the event of a water landing was removed. |
Soldiers dubbed the SBD the "Slow But Deadly". This aircraft destroyed the pride of the Japanese carrier force at the Battle of Midway, inflicting damage from which the Japanese Imperial Navy was never able to recover. | Soldiers dubbed the SBD the "Slow But Deadly". This aircraft destroyed the pride of the Japanese carrier force at the Battle of Midway, inflicting damage from which the Japanese Imperial Navy was never able to recover. | ||
| + | {{Navigation-End}} | ||
== Media == | == Media == | ||
| Line 314: | Line 286: | ||
;Skins | ;Skins | ||
| − | * [ | + | * [https://live.warthunder.com/feed/camouflages/?vehicle=sbd-3 Skins and camouflages for the {{PAGENAME}} from live.warthunder.com.] |
;Videos | ;Videos | ||
| Line 320: | Line 292: | ||
== See also == | == See also == | ||
| − | ''Links to the articles on the War Thunder Wiki that you think will be useful for the reader, for example:'' | + | <!-- ''Links to the articles on the War Thunder Wiki that you think will be useful for the reader, for example:'' |
| + | * ''reference to the series of the aircraft;'' | ||
| + | * ''links to approximate analogues of other nations and research trees.'' --> | ||
| − | + | ;Aircraft of comparable role, configuration and era | |
| − | * | + | |
| + | * [[SB2 (Disambiguation)|SB2 dive bombers]] | ||
== External links == | == External links == | ||
<!-- ''Paste links to sources and external resources, such as:'' | <!-- ''Paste links to sources and external resources, such as:'' | ||
* ''topic on the official game forum;'' | * ''topic on the official game forum;'' | ||
| − | |||
* ''other literature.'' --> | * ''other literature.'' --> | ||
| − | * [[wt:en/news/4442-profile-sbd-3-dauntless-slow-but-deadly-en | + | * [[wt:en/news/4442-profile-sbd-3-dauntless-slow-but-deadly-en|[Profile] SBD-3 Dauntless - Slow But Deadly]] |
| + | * [https://forum.warthunder.com/index.php?/topic/491957-sbd-3/ Official data sheet - more details about the performance] | ||
{{AirManufacturer Douglas}} | {{AirManufacturer Douglas}} | ||
{{USA bombers}} | {{USA bombers}} | ||
Latest revision as of 19:39, 11 September 2023

Contents
Description
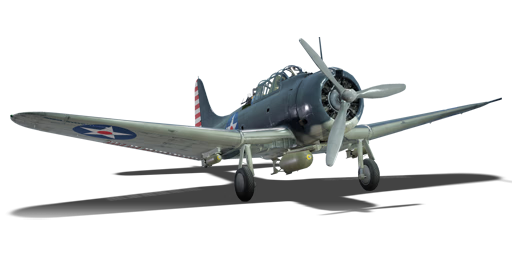
The SBD Dauntless was the workhorse of the US Navy, serving from 1940 all the way to late 1944 as the main carrier-based dive bomber. It replaced the SBC Helldiver and SBU Corsair aboard US carriers. Featuring a range of about 1,700 km, and quite heavy armaments for its size and role - two 12.7 mm Browning M2 machine guns in the engine cowling and a bomb load of up to 2,250 lbs, it was very versatile plane. The SBD participated in many battles in the Pacific theatre, and achieved successes such as the sinking of Japanese aircraft carrier Shōhō during the Battle of the Coral Sea in May 1942. Its biggest success was during the Battle of Midway in June 1942, when SBD bombers sank four aircraft carriers, namely Akagi, Kaga, Sōryū, and Hiryū. By 1944, the SBD was slowly being replaced by the faster and more modern SB2C Helldiver. Foreign users included the Royal Navy, Free French Air Force, Mexico, Chile, and Morocco.
In War Thunder since the start of the Open Beta Test, the SBD-3 Dauntless is one of the first bombers in the American aviation tech tree. It features an airspawn allowing for quick bombing runs out of reach of enemy fighters, as your bombs are dropped before the fighters can climb up to your altitude. The heavy armament compared to contemporaries found in other tech trees allows for engaging enemy fighters using altitude advantage or, after installation of the DGP-1 machine gun pods, engaging enemy medium and heavy bombers such as Fw 200s, He 111s or Ju 88s. Despite being a bomber, SBD is also quite a manoeuvrable aircraft, allowing to win prolonged turn fights with less agile opponents such as the He 112 or MiG-3.
General info
Flight performance
As a dive bomber, it has very good dive characteristics and manoeuvres decently at most speeds. Although the engine is relatively weak, it could be WEP-ed for a long time before it reaches the overheating stage. This is not an aircraft which you will want to fly at high altitudes but should remain lower where it is a capable dive bomber.
| Characteristics | Max Speed (km/h at 4,500 m) |
Max altitude (metres) |
Turn time (seconds) |
Rate of climb (metres/second) |
Take-off run (metres) | |||
|---|---|---|---|---|---|---|---|---|
| AB | RB | AB | RB | AB | RB | |||
| Stock | 422 | 409 | 5700 | 26.6 | 27.8 | 7.9 | 7.8 | 291 |
| Upgraded | 456 | 439 | 24.3 | 25.5 | 14.3 | 9.8 | ||

Details
| Features | ||||
|---|---|---|---|---|
| Combat flaps | Take-off flaps | Landing flaps | Air brakes | Arrestor gear |
| ✓ | ✓ | ✓ | ✓ | ✓ |
| Limits | ||||||
|---|---|---|---|---|---|---|
| Wings (km/h) | Gear (km/h) | Flaps (km/h) | Max Static G | |||
| Combat | Take-off | Landing | + | - | ||
| 740 | 450 | 490 | 469 | 320 | ~13 | ~13 |
| Optimal velocities (km/h) | |||
|---|---|---|---|
| Ailerons | Rudder | Elevators | Radiator |
| < 350 | < 350 | < 380 | > 299 |
Engine performance
| Engine | |||||
|---|---|---|---|---|---|
| Engine Name | Number present | ||||
| Wright Cyclone R-1820-52 9-cylinder | 1 | ||||
| Engine characteristics | |||||
| Weight (each) | Type | Cooling | |||
| 907 kg | Radial | Air | |||
| Engine power (Stock) | |||||
| Mode | Max | Take-off | |||
| Arcade | 889 hp | 939 hp | |||
| Realistic/Simulator | 879 hp | 930 hp | |||
| Engine power (Upgraded) | |||||
| Mode | Max | Take-off | |||
| Arcade | 1,023 hp | 1,074 hp | |||
| Realistic/Simulator | 950 hp | 1,000 hp | |||
| WEP Duration | |||
|---|---|---|---|
| Arcade | Realistic/Simulator | ||
| 25 seconds | Infinite | ||
Survivability and armour
- 38 mm bulletproof glass in the windshield
- 12.7 mm steel pilot seat
- 12.7 mm steel protecting the gunner
- Self-sealing fuel tanks (2 in each wing)
Modifications and economy
| Flight performance | Survivability | Weaponry | ||||||||||||||||||||
|---|---|---|---|---|---|---|---|---|---|---|---|---|---|---|---|---|---|---|---|---|---|---|
|
|
|
Armaments
Offensive armament
The SBD-3 is armed with:
- 2 x 12.7 mm M2 Browning machine guns, nose-mounted (180 rpg = 360 total)
Suspended armament

The SBD-3 can be outfitted with the following ordnance:
- 1 x 1,000 lb AN-M65A1 bomb + 2 x 100 lb AN-M30A1 bombs (1,200 lb total)
- 4 x 12.7 mm M2 Browning machine guns, wing-mounted (gunpods) (340 rpg = 1,360 total)
- 1 x Type A Mark I mine
- 1 x 500 lb AN-M64A1 bomb (500 lb total)
- 1 x 500 lb AN-M64A1 bomb + 2 x 100 lb AN-M30A1 bombs (700 lb total)
Defensive armament
The SBD-3 is defended by:
- 2 x 7.62 mm Browning machine guns, dorsal turret (1,000 rpg = 2,000 total)
Usage in battles
The Dauntless is an underrated aircraft, as it is viewed as a weak and sluggish bomber by a majority of tier 1 players. Use this to your advantage by catching unsuspecting bombers and fighters. Its manoeuvrability is good enough to energy fight the enemy. You should try to keep your speed higher than 200 km/h and stay at altitudes lower than 2km.
This plane is good at what it was designed for Dive Bombing. Start at a high altitude at around 4-5,000 feet, fly directly above the target, invert the plane, cut the throttle and deploy airbrakes (H key by default), dive, at 1,000-700 feet release bombs, pull the nose up, retract air brakes, push the throttle to full, then pitch up in a climb.
The small bomb load requires you pick your targets carefully and make your bombs count, choose to attack artillery positions or bases, where you have a higher chance of hitting due to their stationary position. Ships are also prime targets (it is what it was designed for), as the 1000lb bomb is plenty to sink a small ship.
Do not rely on fighter support when focusing on ground targets. After you drop your bombs, the plane should be manoeuvrable enough to dogfight enemies. You should stay on deck and manoeuvre wisely to not expose your weak underbelly. If you are caught at high altitude, go into a steep dive until you are at the deck, there is a good chance you may out dive them. If you cannot lose the enemy, try to quickly turn to your enemy's direction. your high G tolerance is equal, if not better than most enemies so you could lose them if they cant follow your turn.
Realistic battles
With the gun pods attached, you could act as menacing fighter support. With a high altitude spawn, try to hunt bombers first before you consider killing fighters. climb up to 4,500 m to get your max speed so you can dive down to the bombers. After eliminating a bomber or two, you should find that your allies are starting to engage the enemy. You could help them by catching enemies that are turning, have low speed, or attacking an ally. It should be easy to do all of this because of your energy advantage. You are still marked as a bomber, so enemies will surely consider you as an easy kill. You can not outrun them, but you can turn very well at almost every speed except stall. If they are coming from behind, a sudden reverse would be a good manoeuvre to throw them off. After that, you could either perform a head-on or fly under the enemy to avoid them. Avoid rushing upwards to maintain speed. Combine all of that with good trigger discipline, it is possible to achieve a five kill game.
Simulator battles
Hands-off carrier take-off (Auto engine control): Start the engine, flaps: raised, elevator trim: 15%, aileron trim: 11%, rudder trim: 6%, WEP throttle, hands-off controls until you lift off the carrier.
Enemies worth noting
Yak-2 KABB: Do not think that the SBD-3 can confidently outmanoeuvre this plane just because it is twin-engined. The Yak-2 has an amazing turn rate for a heavy fighter, thus the SBD-3 must avoid turning with it, if not dogfighting with it in general. It bears a pair of ShVAK cannons that can easily damage vital parts like engine or cooling systems. It has green camo, greatly resembling an Me 410 but with an H-tail like a Bf 110's.
Facing the SBD
It is very common in the game to encounter the SBD equipped with the gunpods, instead of its more usual historical role as a dive bomber. If you are playing against the Americans, in a battle rating where you are likely to encounter it, and especially if you are on a base-bombing run, it is wise to assume that you are facing six forward-firing .50 cal M2 machine guns, until proven otherwise. The best countermeasures are altitude, speed, and manoeuvrability.
Manual Engine Control
| MEC elements | ||||||
|---|---|---|---|---|---|---|
| Mixer | Pitch | Radiator | Supercharger | Turbocharger | ||
| Oil | Water | Type | ||||
| Controllable | Controllable Not auto controlled |
Controllable Auto control available |
Controllable Auto control available |
Separate | Controllable 2 gears |
Not controllable |
Pros and cons
Pros:
- Gets a bomber spawn which really makes up for its performance
- Can turn with most enemy fighters on its rank
- It has two powerful machine guns that are centrally mounted, meaning you can effectively hunt down low-tier bombers and in most situations, be a quasi-fighter aircraft
- Its bombs are powerful enough to destroy packed enemy ground vehicles
- Its manoeuvrability is good enough to attack enemy bombers and support friendly fighters
- Tail gunner has excellent coverage, almost a perfect 180 degrees on a horizontal plane
- Can "pullout" from a 60-degree dive quite effectively
- Tail gun also has plenty of ammunition
- Can be used as a fighter when needed
- Can increase the total firepower to 6 .50 cals, one of the earliest plane that has six M2 Brownings
- Good firepower, enough to make quick kills on planes and ground targets alike. Extremely useful for attacking weakly armoured tanks
- Decent dive characteristics
- Will not break its wing on high G turns up to 600 km/h
Cons:
- It is still a dive bomber, so its manoeuvrability is limited by its poor energy retention
- Low ammo capacity for the nose-mounted machine guns
- The tail gunner won't do so much, because he is too exposed and the 2 x 7.62 is not powerful enough to destroy planes of its tier
- Limited selection of bombs, only one payload is available to choose from
- Slow acceleration
- Poor climb rate
- Poor energy retention
- Slow speed
- WEP only works on low altitude
- Unprotected engine, any gunfire get your engine knocked out or badly damaged, forcing you to return to base
History
The SBD ("Scout Bomber Douglas") was introduced in 1940 and was produced by Douglas until 1944. However its roots go further than that. The predecessor of the SBD, the Northrop BT-1, was designed in 1935. In 1937, Northrop Corporation was taken over by Douglas, and the Northrop BT-2, developed from the BT-1, served as a basis of what was to become the SBD. In 1938, the US Navy and US Marine Corps placed orders for a new dive bomber designated SBD-1 and SBD-2. The SBD-1 was delivered to the Marines in 1940 and the SBD-2 to the Navy in early 1941, replacing obsolete SBU Corsair and SBC Helldiver carrier-based dive bombers. The SBD, unusually for a carrier aircraft, did not possess folding wings - the designers opted to maintain the structural integrity of the plane instead. The next version, SBD-3, had increased armour protection, self-sealing fuel tanks, and the rear gunner's 7.62 mm Browning M1919 machine gun was switched to a dual-mount instead of the single mount on previous aircraft. The most produced version of SBD was SBD-5, over 2,400 of these were built, equipped with more powerful 1,200 hp Wright R-1820-60 Cyclone engines and increased ammo supply. The US Army Air Force used denavalized variants of the SBD, called the A-24 Banshee. These were flown during the early stages of the war, but quickly withdrawn from service.
In total, 5,936 SBDs were produced, with the last assembled on 21st July 1944. During their career, SBDs sunk six aircraft carriers, fourteen cruisers, six destroyers, fifteen cargo or transport ships, and numerous lesser craft. During and after the war, SBDs served with the Free French Air Force and French Navy, retiring in 1949. Other foreign users included the Royal New Zealand Air Force and Royal Navy, and after the war some examples were sold to Chile, Mexico, and Morocco.
Operational history
The SBD's first action was during the attack on Pearl Harbor in December 1941, most of the Marine Corps SBDs of Marine Corps Scout Bombing Squadron 232 (VMSB-232) were destroyed on the ground while parked at Ewa Mooring Mast Field. The first victim of SBDs, 3 days after the attack on Pearl Harbor, was Japanese submarine I-70 which was sunk by SBDs from Yorktown-class carrier USS Enterprise, making it the first Japanese warship sunk by US aircraft during WWII. After that, SBDs were present at every US Pacific theater campaign, supporting troops with precision strikes and patrolling around allied ships.
Battle of the Coral Sea
At the beginning of May 1942, SBDs participated in the Battle of the Coral Sea where they sank Japanese light aircraft carrier Shōhō and damaged fleet carrier Shōkaku. During the battle, SBDs were flying anti-torpedo combat patrols focused on intercepting Japanese torpedo bombers trying to sink USS Lexington and USS Yorktown, scoring several victories. One of the pilots, Stanley "Swede" Vejtasa, scored two kills on A6M fighters after being attacked by them, and cut the wing of a third with his own wingtip during a head-on pass.
Battle of Midway
The most successful action of SBDs happened during the Battle of Midway in early June 1942, where four squadrons of Navy SBDs attacked the Japanese fleet, and sank all four aircraft carriers present, as well as multiple cruisers and destroyers. The carriers sunk were Akagi, Kaga, Sōryū, and Hiryū. Later that day, SBDs sighted a group of Japanese heavy cruisers en route from bombarding Midway, consisting of the four Mogami-class heavy cruisers Kumano, Suzuya, Mikuma, and Mogami. They heavily damaged Mogami and Mikuma, with Mikuma later sinking.
Guadalcanal Campaign
During the Guadalcanal Campaign, SBDs were conducting sorties from both US Navy carriers and Henderson Field, sinking Japanese shipping trying to reinforce the island with new troops. Aircraft carrier Ryūjō fell victim to 31 SBDs from USS Saratoga. In total, another three aircraft carriers were damaged, one heavy cruiser, and nine transport vessels were sunk during the six-month campaign.
Battle of the Philippine Sea
The Battle of the Philippine Sea was the last major battle where SBDs participated, before being replaced by the more powerful Curtiss SB2C Helldiver bombers. The Helldiver was faster, could carry bigger payload, and had more powerful engine, but had some characteristics that made it hard to fly. SBDs were favoured by pilots due to superior handling at low speed, crucial for carrier landing. Pilots nicknamed the plane "Slow But Deadly"
| Archive of the in-game description | |
|---|---|
|
A carrier-based dive-bomber/reconnaissance aircraft. The most well-known US Navy bomber, and perhaps the most significant dive-bomber of the war. Despite the fact that the decision to write off the SBD as outdated was made before the war, the bomber was still actively involved in combat, and in 1942 it sunk more enemy ships than all other Navy aircraft combined. Originally, the series was called the XBT, and showed as many innovations as it did drawbacks. This aircraft had a revolutionary honeycomb wing structure and a reasonably small fuselage. But its wings could not be folded, and occasionally it would spontaneously go into a barrel roll, which caused a series of catastrophic accidents. After intensive research in conjunction with NACA, the dive-bomber was radically redesigned, most of its shortcomings were removed, and it was named the Scout Bomber. The SBD-3 variant was a Scout Bomber which was finally fit for combat. It had self-sealing fuel tanks, armour, and bulletproof cockpit glass. To keep its performance characteristics, the aircraft's weight was reduced by replacing its duralumin sheeting with a much lighter material. Also, all the equipment designed to keep the plane afloat in the event of a water landing was removed. Soldiers dubbed the SBD the "Slow But Deadly". This aircraft destroyed the pride of the Japanese carrier force at the Battle of Midway, inflicting damage from which the Japanese Imperial Navy was never able to recover. | |
Media
- Skins
- Videos
See also
- Aircraft of comparable role, configuration and era
External links
- [Profile] SBD-3 Dauntless - Slow But Deadly
- Official data sheet - more details about the performance
| Douglas Aircraft Company | |
|---|---|
| Strike Aircraft | A-20G-25 · A-26B-10 · A-26B-50 · AD-2 · AD-4 · A-1H |
| Bombers | TBD-1 · B-18A · SBD-3 · BTD-1 · A-26C-45 · A-26C-45DT |
| Turboprops | A2D-1 |
| Jet Aircraft | F3D-1 · F4D-1 |
| A-4 Skyhawk | A-4B · A-4E Early |
| Export | ▄Havoc Mk I · ▄Boston Mk I · ▄DB-7 · ▂A-20G-30 · ▄AD-4 · ▄AD-4NA |
| A-4 Skyhawk | A-4H · A-4E Early (M) · Ayit · A-4E |
| The Douglas Aircraft Company merged with McDonnell Aircraft Corporation in 1967 to form McDonnell Douglas. | |
| USA bombers | |
|---|---|
| Dive | SB2U-2 · SB2U-3 · SBD-3 · SB2C-1C · SB2C-4 |
| Torpedo | TBD-1 · PBY-5 Catalina · PBY-5A Catalina · TBF-1C · BTD-1 |
| Medium | B-10B · B-18A · B-34 · PV-2D · B-25J-1 · B-25J-20 · A-26C-45 · A-26C-45DT · B-26B |
| Heavy | B-17E · B-17E/L · B-17G-60-VE · PB4Y-2 · B-24D-25-CO · B-29A-BN |
| Hydroplanes | OS2U-1 · OS2U-3 · PBM-1 "Mariner" · PBM-3 "Mariner" |
