Difference between revisions of "Pz.II C"
Inceptor57 (talk | contribs) (Major edits, filled in page, fixed up text for presentation) |
Colok76286 (talk | contribs) (→Usage in the battles: Added modules) |
||
| (16 intermediate revisions by 9 users not shown) | |||
| Line 3: | Line 3: | ||
== Description == | == Description == | ||
<!--''In the description, the first part needs to be about the history of the creation and combat usage of the vehicle, as well as its key features. In the second part, tell the reader about the ground vehicle in the game. Insert the screenshot of the vehicle. If the novice player does not remember the vehicle by name, they will immediately understand what kind of vehicle it is talking about.''--> | <!--''In the description, the first part needs to be about the history of the creation and combat usage of the vehicle, as well as its key features. In the second part, tell the reader about the ground vehicle in the game. Insert the screenshot of the vehicle. If the novice player does not remember the vehicle by name, they will immediately understand what kind of vehicle it is talking about.''--> | ||
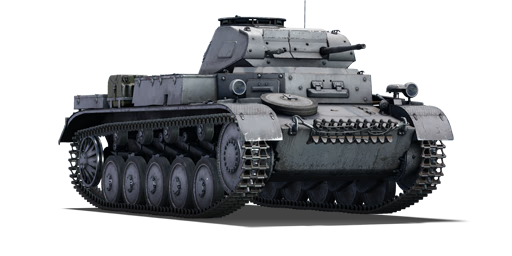
| − | The '''{{Specs|name}}''' ('''{{Specs|pseudonym}}''') is a | + | [[File:GarageImage {{PAGENAME}}.jpg|420px|thumb|left]] |
| + | {{break}} | ||
| + | The '''{{Specs|name}}''' ('''{{Specs|pseudonym}}''') is a rank {{Specs|rank}} German light tank {{Battle-rating}}. It was introduced during the Closed Beta Test for Ground Forces before Update 1.41. | ||
| − | The Pz.II C is a vehicle that fits well | + | The Pz.II C is a vehicle that fits well in any line-up using low-rank German tanks. The first of its column in the German tech tree, the Pz.II C can be distinguished from the later [[Pz.II F|Ausf. F]] model by its heavier frontal armour. A distinguishing feature for this series of Panzer II is the trademark 20 mm automatic cannon, which can be a curse to new users or a gift to players who know how to use the vehicle well. This autocannon can give several misconceptions on the Pz.II's utilities that can lure players into assuming it is a close quarters vehicle. The reality is much different - at close ranges, the 20 mm autocannon with its 280 round per minute (RPM) rate of fire and ''PzGr.40'' APCR ammo can have a great effect on a single target, but the reload time and 10 round-capacity per magazine can backfire hard if the Pz.II C faces against more tanks than a single magazine can deal with. |
== General info == | == General info == | ||
=== Survivability and armour === | === Survivability and armour === | ||
| − | <!--''Describe armour protection. Note the most well protected and key weak areas. Appreciate the layout of modules as well as the number and location of crew members. Is the level of armour protection sufficient, is the placement of modules | + | <!--''Describe armour protection. Note the most well protected and key weak areas. Appreciate the layout of modules as well as the number and location of crew members. Is the level of armour protection sufficient, is the placement of modules helpful for survival in combat?'' |
| − | ''If necessary use a visual template to indicate the most secure and weak zones of the armour.''--> | + | ''If necessary use a visual template to indicate the most secure and weak zones of the armour.''-->[[File:Pz.II C Screenshot 2.jpg|thumb|Pz.II C on frozen pass]] |
| − | The Pz.II C has (on the surface) decent frontal | + | The Pz.II C has (on the surface) decent frontal armour, with 35 mm for the front plate with a section of heavily sloped 30 mm armour on the glacis, then a sloped lower glacis that has 35 mm as well. The side, rear, and hull roof armour are a paltry 15 mm, including the turret sides. The front turret face is 30 mm that do not overlap with the 30 mm thick gun mantlet well so it will be rare, if not impossible, for a chance at relying on a 60 mm overlapping area to deflect rounds. |
| − | Generally speaking, the Pz.II C does not have enough | + | Generally speaking, the Pz.II C does not have enough armour to defend itself unless fighting from an extreme range (which most early-ranked tanks can't reasonably do well), facing SPAA vehicles that are only using high-explosive shells or facing against some early-ranked French tanks. |
| − | Put shortly - do everything | + | Put shortly - do everything to ensure that the Pz.II C does not get hit, because even one well placed shot in the crew compartment will likely knock the Pz.II C out. |
'''Armour type:''' | '''Armour type:''' | ||
| + | |||
* Rolled homogeneous armour | * Rolled homogeneous armour | ||
| + | |||
{| class="wikitable" | {| class="wikitable" | ||
|- | |- | ||
| Line 33: | Line 37: | ||
|} | |} | ||
'''Notes:''' | '''Notes:''' | ||
| + | |||
* Suspension wheels are 10 mm thick while tracks are 15 mm thick. | * Suspension wheels are 10 mm thick while tracks are 15 mm thick. | ||
* Belly armour is 5 mm thick. | * Belly armour is 5 mm thick. | ||
=== Mobility === | === Mobility === | ||
| − | <!--''Write about the mobility of the ground vehicle. Estimate the specific power and | + | <!-- ''Write about the mobility of the ground vehicle. Estimate the specific power and manoeuvrability, as well as the maximum speed forwards and backwards.'' --> |
| − | + | ||
| + | {{tankMobility|abMinHp= 217|rbMinHp= 124|<!--AoAweight=(optional) -->}} | ||
| − | + | Mobility-wise, the {{PAGENAME}} is actually better than most of its peers, but the [[BT-5|BT]] series tanks and [[M3 Stuart]]s will still outpace it quite easily. Regardless, the {{PAGENAME}} can get around the battlefield quite respectably, and the vehicle's power-to-weight ratio makes it easy to go up steep inclines than larger, heavier vehicles. However, the {{PAGENAME}} is not going to outrun a pursuing enemy team, so locating good cover is immensely useful for its survival. | |
| − | |||
| − | |||
| − | |||
| − | |||
| − | |||
| − | |||
| − | |||
| − | | | ||
| − | |||
| − | |||
| − | |||
| − | |||
| − | |||
| − | |||
| − | |||
| − | |||
| − | |||
| − | |||
| − | |||
| − | |||
| − | |||
| − | |||
| − | |||
| − | |||
| − | |||
| − | |||
| − | |||
| − | |||
| − | |||
| − | |||
| − | |||
| − | |||
| − | |||
| − | |||
| − | |||
| − | |||
| − | |||
| − | |||
| − | |||
| − | |||
== Armaments == | == Armaments == | ||
=== Main armament === | === Main armament === | ||
| − | <!--''Give the reader information about the characteristics of the main gun. Assess its effectiveness in a battle based on the reloading speed, ballistics and the power of shells. Do not forget about the | + | <!--''Give the reader information about the characteristics of the main gun. Assess its effectiveness in a battle based on the reloading speed, ballistics and the power of shells. Do not forget about the flexibility of the fire, that is how quickly the cannon can be aimed at the target, open fire on it and aim at another enemy. Add a link to the main article on the gun: <code><nowiki>{{main|Name of the weapon}}</nowiki></code>. Describe in general terms the ammunition available for the main gun. Give advice on how to use them and how to fill the ammunition storage.''--> |
{{main|KwK 30 (20 mm)}} | {{main|KwK 30 (20 mm)}} | ||
| − | The main armament of the Pz.II C is the KwK 30 | + | The main armament of the Pz.II C is the 20 mm KwK 30 automatic cannon. |
| − | With the ability to access APCR capable of penetrating | + | With the ability to access APCR capable of penetrating 64 mm at point blank range, combined with its magazine-loaded rapid fire, the 20 mm can puncture through most enemy armour at this battle rating range like it is fabric. |
| − | |||
| − | |||
| + | The biggest problem with the 20 mm autocannon is the 10 round magazines combined with a 7.4 stock reload time, meaning that the tank may successfully take out two or three enemy tanks with controlled bursts, but is likely to be taken out during the reload. Another problem to consider is in the powerful APCR ammunition, in that its impressive penetration statistics can make the gun reach out to about 200-300 meters, but the penetrative power drops off rapidly after that due to velocity drop, even more so than the standard ''PzGr.'' round. | ||
| + | [[File:Pz.II C Screenshot 1.jpg|thumb|Pz.II C firing its main weapon]] | ||
{| class="wikitable" style="text-align:center" | {| class="wikitable" style="text-align:center" | ||
|- | |- | ||
| Line 114: | Line 80: | ||
! style="width:4em" |Prior + Ace qualif. | ! style="width:4em" |Prior + Ace qualif. | ||
|- | |- | ||
| − | | ''Arcade'' || | + | | ''Arcade'' || 13.3 || 18.4 || 22.4 || 24.8 || 26.35 |
|- | |- | ||
| − | | ''Realistic'' || 8.30 || 9.80 || | + | | ''Realistic'' || 8.30 || 9.80 || 11.9 || 13.2 || 14.00 |
|- | |- | ||
! colspan="4" | Reloading rate (seconds) | ! colspan="4" | Reloading rate (seconds) | ||
| Line 125: | Line 91: | ||
! colspan="1" style="width:4em" |Prior + Ace qualif. | ! colspan="1" style="width:4em" |Prior + Ace qualif. | ||
|- | |- | ||
| − | | 7.80 || | + | | 7.80 || 6.9 || 6.36 || 6.0 |
|- | |- | ||
|} | |} | ||
| Line 133: | Line 99: | ||
! colspan="8" | Penetration statistics | ! colspan="8" | Penetration statistics | ||
|- | |- | ||
| − | ! rowspan="2" data-sort-type="text" | Ammunition | + | ! rowspan="2" data-sort-type="text" | Ammunition (Belt) |
! rowspan="2" class="unsortable" | Type of <br /> warhead | ! rowspan="2" class="unsortable" | Type of <br /> warhead | ||
! colspan="6" | '''Penetration''' '''''in mm''''' '''@ 90°''' | ! colspan="6" | '''Penetration''' '''''in mm''''' '''@ 90°''' | ||
| Line 144: | Line 110: | ||
! 2000m | ! 2000m | ||
|- | |- | ||
| − | | | + | | Default || API-T/HEFI-T || 36 || 34 || 26 || 19 || 14 || 10 |
|- | |- | ||
| − | | PzGr 40 || HVAP-T || 64 || 63 || | + | | PzGr 40 || HVAP-T || 64 || 63 || 26 || 8 || 3 || 1 |
|- | |- | ||
| − | | | + | | PzGr || API-T || 36 || 34 || 26 || 19 || 14 || 10 |
|- | |- | ||
|} | |} | ||
| Line 170: | Line 136: | ||
! 100% | ! 100% | ||
|- | |- | ||
| − | | | + | | Default || API-T/HEFI-T || N/A* || N/A* || N/A || N/A || N/A || N/A || N/A* || N/A* || N/A* |
|- | |- | ||
| PzGr 40 || HVAP-T || 1050 || 0.1 || N/A || N/A || N/A || +1.5° || 66° || 70° || 72° | | PzGr 40 || HVAP-T || 1050 || 0.1 || N/A || N/A || N/A || +1.5° || 66° || 70° || 72° | ||
|- | |- | ||
| − | | | + | | PzGr || API-T || 780 || 0.15 || N/A || N/A || N/A || +0° || 47° || 60° || 65° |
|- | |- | ||
|} | |} | ||
| + | (*More detailed information for the default belt is not displayed ingame e.g. Velocity, Mass & Ricochet stats) | ||
=====Belt types===== | =====Belt types===== | ||
| − | {|class="wikitable" | + | {| class="wikitable" |
| '''Belts''' || '''Shell composition''' || '''Combat usage''' | | '''Belts''' || '''Shell composition''' || '''Combat usage''' | ||
|- | |- | ||
| − | |align="left"|'''''Default ''''' ||align="left"| [[:Category:Ammunition#Kinetic_energy_shells|API-T]], [[:Category:Ammunition#Cannon_shells|HEFI-T]] <br>(Armour Piercing Incendiary tracer – High Explosive Fragmentation Incendiary tracer) shell ||align="left"| 50% of | + | | align="left" |'''''Default ''''' || align="left" | [[:Category:Ammunition#Kinetic_energy_shells|API-T]], [[:Category:Ammunition#Cannon_shells|HEFI-T]] <br>(Armour Piercing Incendiary tracer – High Explosive Fragmentation Incendiary tracer) shell || align="left" | The belt composition means that 50% of the shells (HEFI-T) are useless against tanks while the other 50% (API-T) is nearly useless against planes. However, this belt is reliable against open-topped or thin-skinned vehicles like SPAA vehicles. Since there are no dedicated high-explosive shells for the selection, having one belt of this in reserve does not hurt for those situations. |
|- | |- | ||
| − | |align="left"|'''''PzGr''''' ||align="left"| [[:Category:Ammunition#Kinetic_energy_shells|API-T]] <br> (Armour Piercing Incendiary tracer) shell ||align="left"| | + | | align="left" |'''''PzGr''''' || align="left" | [[:Category:Ammunition#Kinetic_energy_shells|API-T]] <br> (Armour Piercing Incendiary tracer) shell || align="left" | This belt offers a good transition from the ''Default'' to the ''PzGr 40'' APCR belt. The round offers decent use and damage against lightly armoured tanks, especially at close range. Due to lack of high-explosive filler, however, it is better to focus on the ''PzGr 40'' belt to maximize penetration power. |
|- | |- | ||
| − | |align="left"|'''''PzGr''''' ||align="left"| HVAP-T <br> (High Velocity Armour Piercing tracer) shell ||align="left"| | + | | align="left" |'''''PzGr 40''''' || align="left" | HVAP-T <br> (High Velocity Armour Piercing tracer) shell || align="left" | Probably the best belt with the best penetrating shell for the vehicle. While the damage effects post-penetration can be quite poor, the rapid fire from the autocannon can mitigate this problem by following up quickly with another penetrating shot. In close combat, these shells should be used against modules and crew member to make the most of each shell. Against angled armour, however, the APCR ammo may not be very effective, just like any other APCR shell. Unlike the Flakpanzer 1 and Flakpanzer 38, this belt is still 100% APCR. |
|} | |} | ||
| + | |||
| + | [[File:Ammoracks of the Pz.II C.jpg|thumb|[[Ammo racks|Ammo Racks]] of the Pz.II C]] | ||
===== [[Ammo racks|Ammo racks]] ===== | ===== [[Ammo racks|Ammo racks]] ===== | ||
| Line 202: | Line 171: | ||
=== Machine guns === | === Machine guns === | ||
| − | <!--''Offensive and anti-aircraft machine guns not only allow you to fight some aircraft | + | <!--''Offensive and anti-aircraft machine guns not only allow you to fight some aircraft but also are effective against lightly armoured vehicles. Evaluate machine guns and give recommendations on its use.''--> |
{{main|MG 34 (7.92 mm)}} | {{main|MG 34 (7.92 mm)}} | ||
| − | Mounted opposite to the 20 mm | + | Mounted opposite to the 20 mm autocannon is the MG 34, which is loaded with a 50 round belt with an AP-I/AP-I/AP-T ammo pattern. With 13 mm of maximum penetration at point blank range, this gun's 800 RPM rate of fire will make short work of unarmoured vehicles like truck-based SPAA, as well as exposed enemy crewmen. |
{| class="wikitable" style="text-align:center" | {| class="wikitable" style="text-align:center" | ||
| Line 224: | Line 193: | ||
== Usage in the battles == | == Usage in the battles == | ||
<!--''Describe the tactics of playing in the vehicle, the features of using vehicles in the team and advice on tactics. Refrain from creating a "guide" - do not impose a single point of view but give the reader food for thought. Describe the most dangerous enemies and give recommendations on fighting them. If necessary, note the specifics of the game in different modes (AB, RB, SB).''--> | <!--''Describe the tactics of playing in the vehicle, the features of using vehicles in the team and advice on tactics. Refrain from creating a "guide" - do not impose a single point of view but give the reader food for thought. Describe the most dangerous enemies and give recommendations on fighting them. If necessary, note the specifics of the game in different modes (AB, RB, SB).''--> | ||
| − | The main key to success with this vehicle is to drive aggressively, trying to | + | The main key to success with this vehicle is to drive aggressively, trying to take shots at relatively close range (100-300 meters or even less). Aim for the enemy's weak spots such as modules and crew members. Go for flank or rear shots in order to make the most of the 20 mm close-range penetration power on the enemy's thinner armour plates. |
| − | + | When positioning the Pz.II C, try to use the terrain to remain hull down so that a quick reverse can mask the hull. With this position, the Pz.II C can quickly scoot forward and fire off a few quick shots before reversing to a safe position away from enemy fire. Keep this in mind when attempting to ambush the enemy in an open arena with little cover, as cover and concealment are more reliable in disrupting enemy return fire accuracy than the Pz.II's thin armour. | |
| − | + | Alternatively, the Pz.II C can be played as a support vehicle, a second line tank, to say the least, to assist more armoured allies when pushing the cap. Use short bursts (2-4 rounds ideally) to disable enemy vehicles by targeting weak points like their transmission or turret crew, then use the remaining ammo to take out the rest of the enemy crew, or let friendly tankers take them out for assists. The Pz.II C lacks the mobility to disengage and run from tanks like the M3 Stuarts or BT series tanks, but if their transmission, driver, or tracks are taken out, they will be temporarily immobilized and the Pz.II C player has bought themselves time to scurry back to friendly lines, where more powerful guns and numbers can be brought to counter the enemy. | |
| − | + | Also, as a light tank with decent speed and low profile, the Pz.II C can act as a spotter (unfortunately without the use of the [[Scouting|scout]] mechanics) to locate enemy tanks for allies to prioritize and hit with guns, artillery, or airstrikes. | |
| + | [[File:Pz.II C Screenshot 3.jpg|thumb|Pz.II C driving through frozen pass]] | ||
| + | The biggest threat to the Pz.II C on the battlefield are tanks that have very good armour and firepower at the expense of their mobility. The [[Valentine Mk I|Valentine]], [[FCM.36]], and [[Matilda Mk II|Matilda]] are examples of tanks that will easily deflect even 20 mm ''PzGr 40'' shots, either due to their impressive frontal hull and turret armour, or just because they are so slow that the Pz.II C will engage them at ranges that render the shell penetration power ineffective. If one of these tanks are spotted trundling along in the distance, do not bother taking the shot because the 20 mm are unlikely able to do even cosmetic damages, while at the same time drawing their attention and revealing the Pz.II C's position due to the shell tracers. | ||
| − | + | Generally speaking, if the target is about the size of a coin when looking at it on max zoom in the gunner's sight, it is too far for effective fire and should not be engaged. | |
| − | + | A more advanced method of playing this is to use it like an autoloading gun from higher BRs - fire only one or two shots per click at a given time. This helps avoid spraying uselessly at bigger, more stubborn targets. | |
| + | |||
| + | === Modules === | ||
| + | {| class="wikitable" | ||
| + | !Tier | ||
| + | ! colspan="2" |Mobility | ||
| + | !Protection | ||
| + | ! colspan="2" |Firepower | ||
| + | |- | ||
| + | |I | ||
| + | |Tracks | ||
| + | | | ||
| + | |Parts | ||
| + | |Horizontal Drive | ||
| + | | | ||
| + | |- | ||
| + | |II | ||
| + | |Suspension | ||
| + | |Brake System | ||
| + | |FPE | ||
| + | |Adjustment of Fire | ||
| + | |PzGr | ||
| + | |- | ||
| + | |III | ||
| + | |Filters | ||
| + | | | ||
| + | |Crew Replenishment | ||
| + | |Elevation Mechanism | ||
| + | | | ||
| + | |- | ||
| + | |IV | ||
| + | |Transmission | ||
| + | |Engine | ||
| + | | | ||
| + | |Artillery Support | ||
| + | |PzGr 40 | ||
| + | |- | ||
| + | |} | ||
=== Pros and cons === | === Pros and cons === | ||
'''Pros:''' | '''Pros:''' | ||
| + | |||
* Good armour on the front | * Good armour on the front | ||
| − | * Autocannon provides better damage than most guns of its rank | + | * Autocannon provides better damage than most guns of its rank due to the ability to fire in quick succession |
| − | |||
* Fast, very agile | * Fast, very agile | ||
| + | * Very good on urban-based maps, small width can manoeuvre through narrow passages | ||
* Low Profile | * Low Profile | ||
| − | * | + | * In simulator mode, friendly fire is less likely due to the very obvious shape and profile not shared by much of anything else |
| − | + | ||
| − | |||
| − | |||
| − | |||
| − | |||
| − | |||
| − | |||
'''Cons:''' | '''Cons:''' | ||
| + | |||
* Poor penetration when not using HVAP-T rounds | * Poor penetration when not using HVAP-T rounds | ||
| − | * | + | * 20 mm autocannon is lacking at ranged shootouts |
| − | + | * Magazine-loaded armament means there are lengthy and vulnerable downtime for reloads | |
| − | * | + | * Only three crew members |
* Top speed is slower than the fastest tank encountered, which are common opponents | * Top speed is slower than the fastest tank encountered, which are common opponents | ||
| − | + | * Relatively cramped interior makes it easy for the tank to be decimated in one shot, as a shot can hit crew, fuel, or ammo | |
| − | |||
| − | * Relatively cramped interior | ||
== History == | == History == | ||
<!--''Describe the history of the creation and combat usage of the ground vehicle in more detail than in the introduction. If the historical reference turns out to be too big, take it to a separate article, taking a link to an article about the vehicle and adding a block "/historical reference" (example: https://wiki.warthunder.com/Name-vehicles/historical reference) and add a link to it here using the <code>main</code> template. Be sure to include links to sources at the end of the article.''--> | <!--''Describe the history of the creation and combat usage of the ground vehicle in more detail than in the introduction. If the historical reference turns out to be too big, take it to a separate article, taking a link to an article about the vehicle and adding a block "/historical reference" (example: https://wiki.warthunder.com/Name-vehicles/historical reference) and add a link to it here using the <code>main</code> template. Be sure to include links to sources at the end of the article.''--> | ||
===Development=== | ===Development=== | ||
| − | In 1934, the development of the new German tanks, which would be the [[Pz.III E|Panzer III]] and [[Pz.IV E|Panzer IV]], was falling behind schedule despite an urgent need for tanks. As a stopgap solution until the designs were finalized, the Germany Army submitted a request for a new tank, giving the responsibility of designing to Krupp, MAN, Henschel, and Daimler-Benz. The product was a design | + | In 1934, the development of the new German tanks, which would be the [[Pz.III E|Panzer III]] and [[Pz.IV E|Panzer IV]], was falling behind schedule despite an urgent need for tanks. As a stopgap solution until the designs were finalized, the Germany Army submitted a request for a new tank, giving the responsibility of designing to Krupp, MAN, Henschel, and Daimler-Benz. The product was a design based off the German Panzer I light tank, but was larger with the addition of an extra bogie wheel and had a 20 mm autocannon as its main armament. The finished tank was designated the '''Panzer II''' and production was to start in 1935, but tank deliveries did not start until 18 months later. At this time, it was in a low rate production status by 1936. By the time the Panzer II reached the '''Ausf. C''' designation, it was fitted with an improved suspension system to support the tank's weight. The changes included five larger wheels attached to new leaf springs. In 1937, the Ausf. C entered full production with MAN and other manufacturers. Over 1,600 Panzer II light tanks were produced between 1937 to 1942. |
| + | |||
| + | ===Combat usage=== | ||
| + | The Panzer II would serve in the initial stages of World War II in Poland, France, North African Campaign, and Operation Barbarossa as Germany's most numerous tank (By May 1940, there were about a thousand Panzer Is and IIs, but only 381 Panzer III and 290 Panzer IVs). By 1941, it was clear that the Panzer II was starting to become obsolete. With increasing quantity of Panzer IIIs and IVs, the Panzer II was relegated to reconnaissance duties. By 1942, it was largely removed from front lines and production ceased by 1943. The turrets of these tanks were repurposed for use on defensive bunkers on the Atlantic Wall, and the chassis continued in service for other roles, such as a self-propelled gun and tank destroyer in the ''Wespe'' and ''Marder II'' respectively. | ||
| + | |||
| + | Early in the war during Poland and French Campaigns, the Panzer II Ausf. C's armour was deemed inadequate as every anti-tank weapon in service at the time could penetrate the armour. The German response was to increase the armour, first with a front armour increase to 30 mm on the Ausf. D, then ending with a 35 mm front armour and 20 mm side armour on the [[Pz.II F|Panzer II Ausf. F]]. | ||
| + | |||
| + | === In-game description === | ||
| + | "This variant of the Pz.Kpfw. II light tank was designed by Henschel and produced by Daimler-Benz. | ||
| + | The Pz.Kpfw. II Ausf. C was the third production variant of the tank. It differed from the Ausf. A and Ausf. B tank variants in its improved engine cooling system and the installation of 50 mm thick armored glass in the observation units. The new tank hull was 30 mm taller and 57 mm wider. | ||
| − | + | In 1940, Ausf.C variant tanks were upgraded: the frontal armor of the turret was reinforced with armor sheets 14.5 mm and 20 mm thick, and the frontal armor of the hull was further enhanced 20 mm plates. The construction of the body's front section was modified: over the bent 14.5 mm armor plating protecting the crew, two more plates were welded, joined to one another at a 70° angle. The upper plate had a thickness of 14.5 mm, the lower, 20 mm. A mounted turret which allowed for 360° observation replaced the two-hinged hatch in the tank's roof. | |
| − | + | The front and rear rim of the turret was protected by a special armored collar. The gun mantlet was equipped with a protective lipped shield on the top and bottom that prevented the joints of the mantlet and edges of the opening from being hit with shrapnel. The gap between the turret box and turret was protected by an armored collar which was welded to the roof of the box. The driver/mechanic's hatch also received an armored shield. | |
| − | The | + | The tank's armament remained unchanged, but a modified TZF4/38 sight was installed, and the rear of the hull could have smoke grenade launchers (two on each side) mounted to it. |
| − | + | Serial production of Pz.Kpfw. II Ausf. C tanks lasted from July 1938 to March 1940 and manufactured 100 vehicles. | |
| + | Despite its outdated design and weak armament, the Pz.Kpfw. II Ausf. C was used very actively in combat until mid-1942. Some tank divisions on the Eastern Front used the tanks till 1943." | ||
== Media == | == Media == | ||
| Line 279: | Line 291: | ||
===Sights=== | ===Sights=== | ||
| + | |||
* [https://live.warthunder.com/post/675135/en/ RideR2's Realistic gunsight (TZF4a, TZF 5a/b/d/e/f/f2, TZF 9b/b1/c/d, TZF 12/a) for Pzkpfw II, Pzkpfw III, Pzkpfw IV, Pzkpfw V, Pzkpfw VI] | * [https://live.warthunder.com/post/675135/en/ RideR2's Realistic gunsight (TZF4a, TZF 5a/b/d/e/f/f2, TZF 9b/b1/c/d, TZF 12/a) for Pzkpfw II, Pzkpfw III, Pzkpfw IV, Pzkpfw V, Pzkpfw VI] | ||
== Read also == | == Read also == | ||
| + | |||
* [https://warthunder.com/en/news/2778/current/ Official War Thunder forum article: [Vehicle Profile<nowiki>]</nowiki> PzKpfw II Ausf C/F and DAK] | * [https://warthunder.com/en/news/2778/current/ Official War Thunder forum article: [Vehicle Profile<nowiki>]</nowiki> PzKpfw II Ausf C/F and DAK] | ||
== Sources == | == Sources == | ||
''Paste links to sources and external resources, such as:'' | ''Paste links to sources and external resources, such as:'' | ||
| + | |||
* ''topic on the official game forum;'' | * ''topic on the official game forum;'' | ||
* ''other literature.'' | * ''other literature.'' | ||
{{Germany light tanks}} | {{Germany light tanks}} | ||
Revision as of 16:37, 19 May 2020
Contents
Description

The Pz.Kpfw. II Ausf. C (Pz.II C) is a rank I German light tank
with a battle rating of 1.3 (AB/RB/SB). It was introduced during the Closed Beta Test for Ground Forces before Update 1.41.
The Pz.II C is a vehicle that fits well in any line-up using low-rank German tanks. The first of its column in the German tech tree, the Pz.II C can be distinguished from the later Ausf. F model by its heavier frontal armour. A distinguishing feature for this series of Panzer II is the trademark 20 mm automatic cannon, which can be a curse to new users or a gift to players who know how to use the vehicle well. This autocannon can give several misconceptions on the Pz.II's utilities that can lure players into assuming it is a close quarters vehicle. The reality is much different - at close ranges, the 20 mm autocannon with its 280 round per minute (RPM) rate of fire and PzGr.40 APCR ammo can have a great effect on a single target, but the reload time and 10 round-capacity per magazine can backfire hard if the Pz.II C faces against more tanks than a single magazine can deal with.
General info
Survivability and armour

The Pz.II C has (on the surface) decent frontal armour, with 35 mm for the front plate with a section of heavily sloped 30 mm armour on the glacis, then a sloped lower glacis that has 35 mm as well. The side, rear, and hull roof armour are a paltry 15 mm, including the turret sides. The front turret face is 30 mm that do not overlap with the 30 mm thick gun mantlet well so it will be rare, if not impossible, for a chance at relying on a 60 mm overlapping area to deflect rounds.
Generally speaking, the Pz.II C does not have enough armour to defend itself unless fighting from an extreme range (which most early-ranked tanks can't reasonably do well), facing SPAA vehicles that are only using high-explosive shells or facing against some early-ranked French tanks.
Put shortly - do everything to ensure that the Pz.II C does not get hit, because even one well placed shot in the crew compartment will likely knock the Pz.II C out.
Armour type:
- Rolled homogeneous armour
| Armour | Front (Slope angle) | Sides | Rear | Roof |
|---|---|---|---|---|
| Hull | 35 mm (11°) Front plate 30 mm (73°) Front glacis 35 mm (36°) Bottom glacis |
15 mm | 15 mm | 15 mm |
| Turret | 30 mm (9-74°) Turret front 30 mm (5-52°) Gun mantlet |
15 mm (20-46°) | 15 mm (16-22°) | 10 mm |
| Armour | Sides | Roof | ||
| Cupola | 15 mm | 10 mm |
Notes:
- Suspension wheels are 10 mm thick while tracks are 15 mm thick.
- Belly armour is 5 mm thick.
Mobility
| Game Mode | Max Speed (km/h) | Weight (tons) | Engine power (horsepower) | Power-to-weight ratio (hp/ton) | |||
|---|---|---|---|---|---|---|---|
| Forward | Reverse | Stock | Upgraded | Stock | Upgraded | ||
| Arcade | 49 | 10 | 9.1 | 217 | 267 | 23.85 | 29.34 |
| Realistic | 44 | 9 | 124 | 140 | 13.63 | 15.38 | |
Mobility-wise, the Pz.II C is actually better than most of its peers, but the BT series tanks and M3 Stuarts will still outpace it quite easily. Regardless, the Pz.II C can get around the battlefield quite respectably, and the vehicle's power-to-weight ratio makes it easy to go up steep inclines than larger, heavier vehicles. However, the Pz.II C is not going to outrun a pursuing enemy team, so locating good cover is immensely useful for its survival.
Armaments
Main armament
The main armament of the Pz.II C is the 20 mm KwK 30 automatic cannon.
With the ability to access APCR capable of penetrating 64 mm at point blank range, combined with its magazine-loaded rapid fire, the 20 mm can puncture through most enemy armour at this battle rating range like it is fabric.
The biggest problem with the 20 mm autocannon is the 10 round magazines combined with a 7.4 stock reload time, meaning that the tank may successfully take out two or three enemy tanks with controlled bursts, but is likely to be taken out during the reload. Another problem to consider is in the powerful APCR ammunition, in that its impressive penetration statistics can make the gun reach out to about 200-300 meters, but the penetrative power drops off rapidly after that due to velocity drop, even more so than the standard PzGr. round.

| 20 mm KwK 30 | |||||
|---|---|---|---|---|---|
| Capacity (Belt capacity) | Fire rate (shots/minute) |
Vertical guidance |
Horizontal guidance |
Stabilizer | |
| 150 (10) | 280 | -9°/+20° | ±180° | N/A | |
| Turret rotation speed (°/s) | |||||
| Mode | Stock | Upgraded | Prior + Full crew | Prior + Expert qualif. | Prior + Ace qualif. |
| Arcade | 13.3 | 18.4 | 22.4 | 24.8 | 26.35 |
| Realistic | 8.30 | 9.80 | 11.9 | 13.2 | 14.00 |
| Reloading rate (seconds) | |||||
| Stock | Prior + Full crew | Prior + Expert qualif. | Prior + Ace qualif. | ||
| 7.80 | 6.9 | 6.36 | 6.0 | ||
Ammunition
| Penetration statistics | |||||||
|---|---|---|---|---|---|---|---|
| Ammunition (Belt) | Type of warhead |
Penetration in mm @ 90° | |||||
| 10m | 100m | 500m | 1000m | 1500m | 2000m | ||
| Default | API-T/HEFI-T | 36 | 34 | 26 | 19 | 14 | 10 |
| PzGr 40 | HVAP-T | 64 | 63 | 26 | 8 | 3 | 1 |
| PzGr | API-T | 36 | 34 | 26 | 19 | 14 | 10 |
| Shell details | ||||||||||
|---|---|---|---|---|---|---|---|---|---|---|
| Ammunition | Type of warhead |
Velocity in m/s |
Projectile Mass in kg |
Fuse delay
in m: |
Fuse sensitivity
in mm: |
Explosive Mass in g (TNT equivalent): |
Normalization At 30° from horizontal: |
Ricochet: | ||
| 0% | 50% | 100% | ||||||||
| Default | API-T/HEFI-T | N/A* | N/A* | N/A | N/A | N/A | N/A | N/A* | N/A* | N/A* |
| PzGr 40 | HVAP-T | 1050 | 0.1 | N/A | N/A | N/A | +1.5° | 66° | 70° | 72° |
| PzGr | API-T | 780 | 0.15 | N/A | N/A | N/A | +0° | 47° | 60° | 65° |
(*More detailed information for the default belt is not displayed ingame e.g. Velocity, Mass & Ricochet stats)
Belt types
| Belts | Shell composition | Combat usage |
| Default | API-T, HEFI-T (Armour Piercing Incendiary tracer – High Explosive Fragmentation Incendiary tracer) shell |
The belt composition means that 50% of the shells (HEFI-T) are useless against tanks while the other 50% (API-T) is nearly useless against planes. However, this belt is reliable against open-topped or thin-skinned vehicles like SPAA vehicles. Since there are no dedicated high-explosive shells for the selection, having one belt of this in reserve does not hurt for those situations. |
| PzGr | API-T (Armour Piercing Incendiary tracer) shell |
This belt offers a good transition from the Default to the PzGr 40 APCR belt. The round offers decent use and damage against lightly armoured tanks, especially at close range. Due to lack of high-explosive filler, however, it is better to focus on the PzGr 40 belt to maximize penetration power. |
| PzGr 40 | HVAP-T (High Velocity Armour Piercing tracer) shell |
Probably the best belt with the best penetrating shell for the vehicle. While the damage effects post-penetration can be quite poor, the rapid fire from the autocannon can mitigate this problem by following up quickly with another penetrating shot. In close combat, these shells should be used against modules and crew member to make the most of each shell. Against angled armour, however, the APCR ammo may not be very effective, just like any other APCR shell. Unlike the Flakpanzer 1 and Flakpanzer 38, this belt is still 100% APCR. |
Ammo racks
| Full ammo |
1st rack empty |
2nd rack empty |
Visual discrepancy |
|---|---|---|---|
| 15 | 8 (+7) | 1 (+14) | Yes |
Machine guns
Mounted opposite to the 20 mm autocannon is the MG 34, which is loaded with a 50 round belt with an AP-I/AP-I/AP-T ammo pattern. With 13 mm of maximum penetration at point blank range, this gun's 800 RPM rate of fire will make short work of unarmoured vehicles like truck-based SPAA, as well as exposed enemy crewmen.
| 7.92 mm MG 34 | ||||||
|---|---|---|---|---|---|---|
| Coaxial mount | ||||||
| Capacity (Belt capacity) | Fire rate (shots/minute) |
Vertical guidance |
Horizontal guidance | |||
| 1,800 (150) | 900 | N/A | N/A | |||
Usage in the battles
The main key to success with this vehicle is to drive aggressively, trying to take shots at relatively close range (100-300 meters or even less). Aim for the enemy's weak spots such as modules and crew members. Go for flank or rear shots in order to make the most of the 20 mm close-range penetration power on the enemy's thinner armour plates.
When positioning the Pz.II C, try to use the terrain to remain hull down so that a quick reverse can mask the hull. With this position, the Pz.II C can quickly scoot forward and fire off a few quick shots before reversing to a safe position away from enemy fire. Keep this in mind when attempting to ambush the enemy in an open arena with little cover, as cover and concealment are more reliable in disrupting enemy return fire accuracy than the Pz.II's thin armour.
Alternatively, the Pz.II C can be played as a support vehicle, a second line tank, to say the least, to assist more armoured allies when pushing the cap. Use short bursts (2-4 rounds ideally) to disable enemy vehicles by targeting weak points like their transmission or turret crew, then use the remaining ammo to take out the rest of the enemy crew, or let friendly tankers take them out for assists. The Pz.II C lacks the mobility to disengage and run from tanks like the M3 Stuarts or BT series tanks, but if their transmission, driver, or tracks are taken out, they will be temporarily immobilized and the Pz.II C player has bought themselves time to scurry back to friendly lines, where more powerful guns and numbers can be brought to counter the enemy.
Also, as a light tank with decent speed and low profile, the Pz.II C can act as a spotter (unfortunately without the use of the scout mechanics) to locate enemy tanks for allies to prioritize and hit with guns, artillery, or airstrikes.

The biggest threat to the Pz.II C on the battlefield are tanks that have very good armour and firepower at the expense of their mobility. The Valentine, FCM.36, and Matilda are examples of tanks that will easily deflect even 20 mm PzGr 40 shots, either due to their impressive frontal hull and turret armour, or just because they are so slow that the Pz.II C will engage them at ranges that render the shell penetration power ineffective. If one of these tanks are spotted trundling along in the distance, do not bother taking the shot because the 20 mm are unlikely able to do even cosmetic damages, while at the same time drawing their attention and revealing the Pz.II C's position due to the shell tracers.
Generally speaking, if the target is about the size of a coin when looking at it on max zoom in the gunner's sight, it is too far for effective fire and should not be engaged.
A more advanced method of playing this is to use it like an autoloading gun from higher BRs - fire only one or two shots per click at a given time. This helps avoid spraying uselessly at bigger, more stubborn targets.
Modules
| Tier | Mobility | Protection | Firepower | ||
|---|---|---|---|---|---|
| I | Tracks | Parts | Horizontal Drive | ||
| II | Suspension | Brake System | FPE | Adjustment of Fire | PzGr |
| III | Filters | Crew Replenishment | Elevation Mechanism | ||
| IV | Transmission | Engine | Artillery Support | PzGr 40 | |
Pros and cons
Pros:
- Good armour on the front
- Autocannon provides better damage than most guns of its rank due to the ability to fire in quick succession
- Fast, very agile
- Very good on urban-based maps, small width can manoeuvre through narrow passages
- Low Profile
- In simulator mode, friendly fire is less likely due to the very obvious shape and profile not shared by much of anything else
Cons:
- Poor penetration when not using HVAP-T rounds
- 20 mm autocannon is lacking at ranged shootouts
- Magazine-loaded armament means there are lengthy and vulnerable downtime for reloads
- Only three crew members
- Top speed is slower than the fastest tank encountered, which are common opponents
- Relatively cramped interior makes it easy for the tank to be decimated in one shot, as a shot can hit crew, fuel, or ammo
History
Development
In 1934, the development of the new German tanks, which would be the Panzer III and Panzer IV, was falling behind schedule despite an urgent need for tanks. As a stopgap solution until the designs were finalized, the Germany Army submitted a request for a new tank, giving the responsibility of designing to Krupp, MAN, Henschel, and Daimler-Benz. The product was a design based off the German Panzer I light tank, but was larger with the addition of an extra bogie wheel and had a 20 mm autocannon as its main armament. The finished tank was designated the Panzer II and production was to start in 1935, but tank deliveries did not start until 18 months later. At this time, it was in a low rate production status by 1936. By the time the Panzer II reached the Ausf. C designation, it was fitted with an improved suspension system to support the tank's weight. The changes included five larger wheels attached to new leaf springs. In 1937, the Ausf. C entered full production with MAN and other manufacturers. Over 1,600 Panzer II light tanks were produced between 1937 to 1942.
Combat usage
The Panzer II would serve in the initial stages of World War II in Poland, France, North African Campaign, and Operation Barbarossa as Germany's most numerous tank (By May 1940, there were about a thousand Panzer Is and IIs, but only 381 Panzer III and 290 Panzer IVs). By 1941, it was clear that the Panzer II was starting to become obsolete. With increasing quantity of Panzer IIIs and IVs, the Panzer II was relegated to reconnaissance duties. By 1942, it was largely removed from front lines and production ceased by 1943. The turrets of these tanks were repurposed for use on defensive bunkers on the Atlantic Wall, and the chassis continued in service for other roles, such as a self-propelled gun and tank destroyer in the Wespe and Marder II respectively.
Early in the war during Poland and French Campaigns, the Panzer II Ausf. C's armour was deemed inadequate as every anti-tank weapon in service at the time could penetrate the armour. The German response was to increase the armour, first with a front armour increase to 30 mm on the Ausf. D, then ending with a 35 mm front armour and 20 mm side armour on the Panzer II Ausf. F.
In-game description
"This variant of the Pz.Kpfw. II light tank was designed by Henschel and produced by Daimler-Benz. The Pz.Kpfw. II Ausf. C was the third production variant of the tank. It differed from the Ausf. A and Ausf. B tank variants in its improved engine cooling system and the installation of 50 mm thick armored glass in the observation units. The new tank hull was 30 mm taller and 57 mm wider.
In 1940, Ausf.C variant tanks were upgraded: the frontal armor of the turret was reinforced with armor sheets 14.5 mm and 20 mm thick, and the frontal armor of the hull was further enhanced 20 mm plates. The construction of the body's front section was modified: over the bent 14.5 mm armor plating protecting the crew, two more plates were welded, joined to one another at a 70° angle. The upper plate had a thickness of 14.5 mm, the lower, 20 mm. A mounted turret which allowed for 360° observation replaced the two-hinged hatch in the tank's roof.
The front and rear rim of the turret was protected by a special armored collar. The gun mantlet was equipped with a protective lipped shield on the top and bottom that prevented the joints of the mantlet and edges of the opening from being hit with shrapnel. The gap between the turret box and turret was protected by an armored collar which was welded to the roof of the box. The driver/mechanic's hatch also received an armored shield. The tank's armament remained unchanged, but a modified TZF4/38 sight was installed, and the rear of the hull could have smoke grenade launchers (two on each side) mounted to it.
Serial production of Pz.Kpfw. II Ausf. C tanks lasted from July 1938 to March 1940 and manufactured 100 vehicles. Despite its outdated design and weak armament, the Pz.Kpfw. II Ausf. C was used very actively in combat until mid-1942. Some tank divisions on the Eastern Front used the tanks till 1943."
Media
Live.Warthunder
Skins and camouflages for the Panzer II C from live.warthunder.com.
Sights
Read also
Sources
Paste links to sources and external resources, such as:
- topic on the official game forum;
- other literature.
| Germany light tanks | |
|---|---|
| Pz.II | Pz.II C · Pz.II C (DAK) · Pz.II C TD · Pz.II F · Pz.Sfl.Ic |
| Sd.Kfz.234 | Sd.Kfz.234/1 · Sd.Kfz.234/2 · Sd.Kfz.234/2 TD |
| Marder | Marder A1- · Marder 1A3 · Begleitpanzer 57 · DF105 |
| PUMA | |
| Wheeled | Sd.Kfz.221 (s.Pz.B.41) · Class 3 (P) · Radkampfwagen 90 |
| Other | Ru 251 · SPz 12-3 LGS |
| Argentina | TAM · TAM 2C · TAM 2IP · JaPz.K A2 |
| Czechoslovakia | Pz.35(t) · Pz.38(t) A · Pz.38(t) F · Pz.38(t) n.A. · Sd.Kfz. 140/1 |
| France | Pz.Sp.Wg.P204(f) KwK |
| Lithuania | Vilkas |
| USA | leKPz M41 |
| USSR | SPz BMP-1 |
