Difference between revisions of "PUMA"
Colok76286 (talk | contribs) (Edits) |
WigglyGripen (talk | contribs) (Added Usage in battles and Pros and cons) (Tag: Visual edit) |
||
| Line 21: | Line 21: | ||
;MUSS Active Protection System | ;MUSS Active Protection System | ||
| + | |||
The Puma has access to an infra-red jammer, the MUSS APS. It is a constant active APS which provides protection against a wide variety of threats. The jamming device (commander's optics like system on the highest mount of the turret's roof) is mounted on the roof of the tank to cover the vulnerable frontal arc. It is called "Infrared Countermeasure" for the following reason: SACLOS guidance utilizes a beam-riding guidance which is connected to the GPS (gunner main sight in some cases, on others it is a different sight like on [[T-55AM-1]] and [[T-62M-1]]) which uses a flare as reference point for the guidance system in the ATGM. The missile moves with the gunner's sight and the flare tries to stay on the crosshairs. IRCM confuses the GPS with a brighter IR light decoy acting as the flare (the flare is also IR) which signals the ATGM to move to a different position nowhere near from the gunner's target. Furthermore, PUMA's MUSS active protection system provides a protective sphere around the vehicle against incoming missiles. The system works in a similar fashion to the Shtora system found on the Soviet T-90A and the EIREL system found on the French AMX-30B2 BRENUS. Contrary to the Soviet and French systems however, there is no need to point in the direction of the incoming threat however. Instead, the system is fully automatic and constantly surveys the 360 degrees of the vehicle's surroundings. | The Puma has access to an infra-red jammer, the MUSS APS. It is a constant active APS which provides protection against a wide variety of threats. The jamming device (commander's optics like system on the highest mount of the turret's roof) is mounted on the roof of the tank to cover the vulnerable frontal arc. It is called "Infrared Countermeasure" for the following reason: SACLOS guidance utilizes a beam-riding guidance which is connected to the GPS (gunner main sight in some cases, on others it is a different sight like on [[T-55AM-1]] and [[T-62M-1]]) which uses a flare as reference point for the guidance system in the ATGM. The missile moves with the gunner's sight and the flare tries to stay on the crosshairs. IRCM confuses the GPS with a brighter IR light decoy acting as the flare (the flare is also IR) which signals the ATGM to move to a different position nowhere near from the gunner's target. Furthermore, PUMA's MUSS active protection system provides a protective sphere around the vehicle against incoming missiles. The system works in a similar fashion to the Shtora system found on the Soviet T-90A and the EIREL system found on the French AMX-30B2 BRENUS. Contrary to the Soviet and French systems however, there is no need to point in the direction of the incoming threat however. Instead, the system is fully automatic and constantly surveys the 360 degrees of the vehicle's surroundings. | ||
| Line 59: | Line 60: | ||
'''Armour type:''' | '''Armour type:''' | ||
| + | |||
* Rolled homogeneous armour (hull, slat) | * Rolled homogeneous armour (hull, slat) | ||
* High hardness rolled armour (turret) | * High hardness rolled armour (turret) | ||
| Line 206: | Line 208: | ||
== Usage in battles == | == Usage in battles == | ||
| − | + | The PUMA IFV is an effective vehicle against all types of targets, and even the heaviest of tanks such as the T-10M can even be defeated with a flanking maneuvre with APFSDS to the direct side at point blank. The best way to play the PUMA IFV is to go on the flank, using its mobility to get to places quickly. It has access to generation 2 thermals for the gunner and commander, and a very good optic which makes sniping an easy job to do. With the crewless turret, you can easily sit hull down in most positions which makes it hard for your enemies to effectively target you, though you are a big target, so it's best to be aware on the move. Another way to play is being a support vehicle and slightly being aggressive, where you can support your teammates at the frontline aiming for weak spots of enemies with APFSDS, or flanking them as the APFSDS can cut through easy weak spots and the sides and rear of enemies. While the PUMA can survive and soak up shots due to the empty space inside the vehicle, you can still be disabled by an engine shot, or a well placed shot to the side where all your crew is packed together. The PUMA provides good protection against most chemical warhead weapons aside from tandem charged warheads, as the PUMA is equipped with a mix of CLARA Explosive Reactive Armor, and composite armor. It may occasionally bounce early APDS and APFSDS to the angle of the frontal armor but it's best to still play cautiously as no vehicle is invincible. | |
| − | |||
| − | |||
=== Pros and cons === | === Pros and cons === | ||
<!-- ''Summarise and briefly evaluate the vehicle in terms of its characteristics and combat effectiveness. Mark its pros and cons in a bulleted list. Try not to use more than 6 points for each of the characteristics. Avoid using categorical definitions such as "bad", "good" and the like - use substitutions with softer forms such as "inadequate" and "effective".'' --> | <!-- ''Summarise and briefly evaluate the vehicle in terms of its characteristics and combat effectiveness. Mark its pros and cons in a bulleted list. Try not to use more than 6 points for each of the characteristics. Avoid using categorical definitions such as "bad", "good" and the like - use substitutions with softer forms such as "inadequate" and "effective".'' --> | ||
| − | '' | + | '''Pros:''' |
| − | + | * Access to IRCM that can disrupt most missiles. | |
| + | * ERA on the side of the tank that will stop any chemical warheads. | ||
| + | * Crewless turret that can enable you to hull down effectively | ||
| + | * Empty space in the hull that can absorb shots. | ||
| + | * Access to APFSDS for an autocannon. | ||
| + | * Good mobility for its size. | ||
| + | * Blowout Panel for the turret. | ||
| + | * Very good optics | ||
| + | * Generation 2 Thermals for Commander and Gunner | ||
| + | * Laser Warning System to alert you of incoming fire from tanks or helicopters. | ||
* | * | ||
'''Cons:''' | '''Cons:''' | ||
| + | |||
| + | * Big target for its vehicle type. | ||
| + | * Fire rate is subpar compared to most of its counterparts. | ||
| + | * Has a timed HEI-T shell instead of HE-VT. | ||
| + | * IRCM can be spotted easily in NVD and Thermal sights. | ||
| + | * No access to ATGMs unlike its counterparts. | ||
| + | * Stock belt is subpar for defeating ground vehicles. | ||
| + | * Engine area is in the front, which can easily be disabled. | ||
* | * | ||
Revision as of 00:30, 28 March 2022

Contents
Description
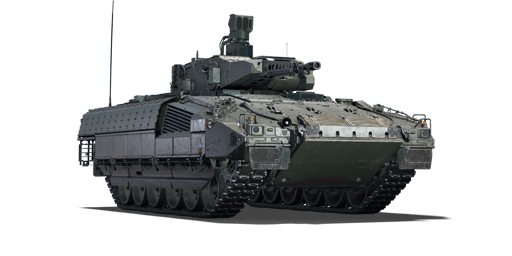
The Schützenpanzer PUMA is a rank VII German light tank with a battle rating of 10.0 (AB/RB/SB). It was introduced in Update "Wind of Change".
The PUMA is a futuristic and unusual vehicle. It has a large profile, strong armor for an IFV, and weighs more than a T-72A, but the mobility is still very good because of its impressive engine with more than 1,000 horsepower. The unmanned turret is equipped with a 30 mm autocannon with access to APFSDS and airburst rounds, reminiscent of the Swedish CV90 family. The cherry on top is the MUSS soft-kill active protection system, which interferes with the guidance of incoming ATGMs. Although the PUMA is difficult to hide and is not particularly threatening to most MBTs from the front, it is a fairly tough target to destroy and can be a nightmare for enemy IFVs and helicopters, as it can shrug off most of their weapons and retaliate in turn.
General info
Survivability and armour
The Puma has mediocre armour at first sight, barely withstanding 12.7 mm rounds.. Its most protected piece is the 15 mm additional plate on the lower glacis. However, the spacing and modules make this vehicle a very capable one when it comes to survivability. The frontal glacis is in two parts, the upper area is 5 mm RHA sloped at 76 degrees and the lower one is 15 mm RHA sloped at 32 degrees. Both the upper and lower plates will not stop anything but SPAA ammunition at the battle rating and HEATFS projectiles. The lower glacis plate is not as strong since not sloped as much, but penetrating this plate will often result in shrapnel stopped by the engine deck.

Thanks to the engine bay being on the front of the tank, it acts as a spaced armour to protect the crew from all sorts of attacks, along with the lower glacis composite armour and spall shields dividing the engine bay and the crew compartment. However, it comes at the expense of being lit on fire multiple times. The Puma has access to a powerful ERA that protects its sides. However, it is only effective on certain chemical munitions as the side armour of the Puma is non-existent. This armour is similar to the armour package seen on the skirts of the Challenger 2 and it offers a 500 mm protection against chemical munitions with a successful disruption up to 550 mm at 0° LOS. This protection is increased as the angling is higher. It is unable to fight against tandem warheads and ATGMs with a penetration above the stipulated.
The space inside the crew compartment offers a really good protection for chemical energy shells such as HEATFS, ATGMs and anti-tank grenades, having a similar effect as on the Class 3(P). This makes the Puma capable of withstanding hits of almost all HEATFS of the BR and even some ATGMs without fatal damage. It is also able to reduce the penetration or stop ATGM like the 9M113 Konkurs and 9M112 (ATGM of the T-64B) although do not expect it to happen all the time, it depends on your angling, where the missile impacts and overpressure mechanics.
- MUSS Active Protection System
The Puma has access to an infra-red jammer, the MUSS APS. It is a constant active APS which provides protection against a wide variety of threats. The jamming device (commander's optics like system on the highest mount of the turret's roof) is mounted on the roof of the tank to cover the vulnerable frontal arc. It is called "Infrared Countermeasure" for the following reason: SACLOS guidance utilizes a beam-riding guidance which is connected to the GPS (gunner main sight in some cases, on others it is a different sight like on T-55AM-1 and T-62M-1) which uses a flare as reference point for the guidance system in the ATGM. The missile moves with the gunner's sight and the flare tries to stay on the crosshairs. IRCM confuses the GPS with a brighter IR light decoy acting as the flare (the flare is also IR) which signals the ATGM to move to a different position nowhere near from the gunner's target. Furthermore, PUMA's MUSS active protection system provides a protective sphere around the vehicle against incoming missiles. The system works in a similar fashion to the Shtora system found on the Soviet T-90A and the EIREL system found on the French AMX-30B2 BRENUS. Contrary to the Soviet and French systems however, there is no need to point in the direction of the incoming threat however. Instead, the system is fully automatic and constantly surveys the 360 degrees of the vehicle's surroundings.
MUSS will jam SACLOS missiles including wire-guidance:- 3M7 (IT-1)
- 9M17M Falanga (Mi-4AV/Mi-24A)
- 9M17P Falanga-PV (Mi-24D)
- 9M112 (T-64B / T-80B)
- 9M113 (BMP-1/SPz BMP-1/BMP-2)
- 9M114 Shturm (Shturm-S/Russian Helicopters)
- 9M117 (T-55AM-1/T-62M-1/BMP-3)
- 9M119 (T-72B/T-72B (1989)/T-80U)
- 9M120 Ataka (Mi-35M/Mi-28N/Ka-52)
- 9M311 (ZPRK 2S6)
- BGM-71A TOW
- BGM-71B TOW
- BGM-71C I-TOW
- AS.11
- HOT-1
- HOT-2 TOW
- HOT-3 (EC-665 Tiger HAD/EC-665 Tiger HAP/EC-665 Tiger UHT)
- MGM-51B (M551/M60A2)
- MGM-51C (XM-803/MBT-70/KPz-70)
- Swingfire (Swingfire/Striker)
- MILAN (Marder A1-/Ratel 20/Warrior)
- HJ-73E (ZBD86)
- Type 79 (Type 89)
- Roland (FlaRakPz 1/Roland 1/FlaRakRad)
- VT1 (FlaRakRad/ItO 90M)
- ACRA (AMX-30 ACRA)
- Rbs 55 (UDES 33/Pvrbv 551)
- Rbs 56 (Strf 9040 BILL)
Laser-guided missiles (AGM-114 Hellfire, MIM146 ADATS, etc) will not be jammed by MUSS. In order to let the APS work, it must be turned on with a key in the control section. The APS module can be destroyed.
MUSS can be used while on the move. While on the move (specially horizontally), the jammed ATGM will move in an uncontrolled direction like normal jamming but riskier, keep this in mind as it can hit a track, engine deck or close enough to create fragmentation and spot the Puma and/or friendlies. When moving forward to an enemy who fired an ATGM, it will be affected by the APS but due to the momentum, the ATGM can hit the Puma if the ATGM is redirected towards the ground. MUSS creates a thermal signature which can be seen with thermal sights. It also can also be used as an IR spotlight. It should be noted that this can be a disadvantage when in night maps as tanks with NVD (except when tanks are using thermal view) will be able to see the light beam. The APS should be turned on and off at commander's discretion. When on day maps, this will not be an issue. MUSS must have a clear line-of-sight with the enemy launcher (at least enemy sights must be able to see the tank). Tanks firing behind cover like the Swingfire can also be affected by the APS. As long as the enemy is within the jamming arc, the Puma will be protected against SACLOS ATGMs. It should be noted that the Puma has access to Laser Warning Receiver (LWR), so the player does not need to rely on visual contact with the ATGM and the launcher. Thankfully, the thermal sights will be capable of detecting the fireball created by the ATGMs at certain distances.
Armour type:
- Rolled homogeneous armour (hull, slat)
- High hardness rolled armour (turret)
- Aliminium alloy 7039 (turret)
- Composite screen (hull roof)
- Bulletproof glass (rear door pane)
- ERA/NERA (hull sides)
| Armour | Front (Slope angle) | Sides | Rear | Roof |
|---|---|---|---|---|
| Hull | 15+5 mm (76°) Upper glacis - Top 15 mm (61°) Upper glacis - Bottom 15 mm (58-60°) Lower glacis |
15 mm (13°) Top 10+15 mm Bottom |
15 mm (10-15°) 60 mm (13°) Door window |
15+5 mm (14°) Front glacis 15+30 mm Fighting compartment 10 mm Radiator vent |
| Turret | 25 mm Turret front 10 mm Gun mantlet |
25+15 mm | 25+15 mm | 15+5 mm |
Notes:
- Suspension wheels, tracks, and torsion bars are 20 mm thick.
- Belly armour is 15 mm thick.
- ERA and NERA panels cover the sides of the PUMA:
| Armour | Sides |
|---|---|
| Hull | ERA: 340 mm Top NERA: 100+150 mm Radiator vent NERA: 250 mm Bottom |
Mobility
Write about the mobility of the ground vehicle. Estimate the specific power and manoeuvrability, as well as the maximum speed forwards and backwards.
| Game Mode | Max Speed (km/h) | Weight (tons) | Engine power (horsepower) | Power-to-weight ratio (hp/ton) | |||
|---|---|---|---|---|---|---|---|
| Forward | Reverse | Stock | Upgraded | Stock | Upgraded | ||
| Arcade | 78 | 34 | 43 | _,___ | 2,076 | __.__ | 48.28 |
| Realistic | 71 | 31 | _,___ | 1,088 | __.__ | 25.3 | |
Modifications and economy
| Mobility | Protection | Firepower | ||||||||||||||||||||||||
|---|---|---|---|---|---|---|---|---|---|---|---|---|---|---|---|---|---|---|---|---|---|---|---|---|---|---|
|
|
|
Armaments
Main armament
Give the reader information about the characteristics of the main gun. Assess its effectiveness in a battle based on the reloading speed, ballistics and the power of shells. Do not forget about the flexibility of the fire, that is how quickly the cannon can be aimed at the target, open fire on it and aim at another enemy. Add a link to the main article on the gun: {{main|Name of the weapon}}. Describe in general terms the ammunition available for the main gun. Give advice on how to use them and how to fill the ammunition storage.
| 30 mm MK 30-2/ABM | Turret rotation speed (°/s) | Reloading rate (seconds) | ||||||||||||
|---|---|---|---|---|---|---|---|---|---|---|---|---|---|---|
| Mode | Capacity (Belt) | Fire rate | Vertical | Horizontal | Stabilizer | Stock | Upgraded | Full | Expert | Aced | Stock | Full | Expert | Aced |
| Arcade | 400 (100) | 200 | -10°/+45° | ±180° | Two-plane | __._ | __._ | __._ | __._ | __._ | _.__ | _.__ | _.__ | _.__ |
| Realistic | __._ | __._ | __._ | __._ | __._ | |||||||||
Ammunition
- Default: APDS · HEI-T* · HEI-T*
- MK266: HEI-T*
- PMC308: HEI-T
- PMC287: APFSDS
| Penetration statistics | ||||||
|---|---|---|---|---|---|---|
| Belt | Penetration @ 0° Angle of Attack (mm) | |||||
| 10 m | 100 m | 500 m | 1,000 m | 1,500 m | 2,000 m | |
| Default | 87 | 86 | 81 | 75 | 70 | 65 |
| MK266 | 3 | 3 | 3 | 3 | 3 | 3 |
| PMC308 | 47 | 44 | 36 | 28 | 22 | 17 |
| PMC287 | 121 | 119 | 111 | 97 | 93 | 83 |
| Shell details | |||||||||
|---|---|---|---|---|---|---|---|---|---|
| Ammunition | Type of warhead |
Velocity (m/s) |
Projectile Mass (kg) |
Fuse delay (m) |
Fuse sensitivity (mm) |
Explosive Mass (TNT equivalent) (g) |
Ricochet | ||
| 0% | 50% | 100% | |||||||
| MK266 | HEI-T* | 1,080 | 0.36 | 0 | 0.1 | 54.4 | 79° | 80° | 81° |
| PMC308 | HEI-T | 1,100 | 0.36 | 0.2 | 1.5 | 0.8 | 79° | 80° | 81° |
| PMC287 | APFSDS | 1,405 | 0.1 | N/A | N/A | N/A | 78° | 80° | 81° |
Ammo racks
| Full ammo |
1st rack empty |
2nd rack empty |
3rd rack empty |
4th rack empty |
5th rack empty |
6th rack empty |
Visual discrepancy |
|---|---|---|---|---|---|---|---|
| 4 | __ (+__) | __ (+__) | __ (+__) | __ (+__) | __ (+__) | __ (+__) | __ |
Machine guns
Offensive and anti-aircraft machine guns not only allow you to fight some aircraft but also are effective against lightly armoured vehicles. Evaluate machine guns and give recommendations on its use.
| 5.56 mm MG4 | ||||
|---|---|---|---|---|
| Mount | Capacity (Belt) | Fire rate | Vertical | Horizontal |
| Coaxial | 2,000 (1,000) | 890 | N/A | N/A |
Usage in battles
The PUMA IFV is an effective vehicle against all types of targets, and even the heaviest of tanks such as the T-10M can even be defeated with a flanking maneuvre with APFSDS to the direct side at point blank. The best way to play the PUMA IFV is to go on the flank, using its mobility to get to places quickly. It has access to generation 2 thermals for the gunner and commander, and a very good optic which makes sniping an easy job to do. With the crewless turret, you can easily sit hull down in most positions which makes it hard for your enemies to effectively target you, though you are a big target, so it's best to be aware on the move. Another way to play is being a support vehicle and slightly being aggressive, where you can support your teammates at the frontline aiming for weak spots of enemies with APFSDS, or flanking them as the APFSDS can cut through easy weak spots and the sides and rear of enemies. While the PUMA can survive and soak up shots due to the empty space inside the vehicle, you can still be disabled by an engine shot, or a well placed shot to the side where all your crew is packed together. The PUMA provides good protection against most chemical warhead weapons aside from tandem charged warheads, as the PUMA is equipped with a mix of CLARA Explosive Reactive Armor, and composite armor. It may occasionally bounce early APDS and APFSDS to the angle of the frontal armor but it's best to still play cautiously as no vehicle is invincible.
Pros and cons
Pros:
- Access to IRCM that can disrupt most missiles.
- ERA on the side of the tank that will stop any chemical warheads.
- Crewless turret that can enable you to hull down effectively
- Empty space in the hull that can absorb shots.
- Access to APFSDS for an autocannon.
- Good mobility for its size.
- Blowout Panel for the turret.
- Very good optics
- Generation 2 Thermals for Commander and Gunner
- Laser Warning System to alert you of incoming fire from tanks or helicopters.
Cons:
- Big target for its vehicle type.
- Fire rate is subpar compared to most of its counterparts.
- Has a timed HEI-T shell instead of HE-VT.
- IRCM can be spotted easily in NVD and Thermal sights.
- No access to ATGMs unlike its counterparts.
- Stock belt is subpar for defeating ground vehicles.
- Engine area is in the front, which can easily be disabled.
History
Describe the history of the creation and combat usage of the vehicle in more detail than in the introduction. If the historical reference turns out to be too long, take it to a separate article, taking a link to the article about the vehicle and adding a block "/History" (example: https://wiki.warthunder.com/(Vehicle-name)/History) and add a link to it here using the main template. Be sure to reference text and sources by using <ref></ref>, as well as adding them at the end of the article with <references />. This section may also include the vehicle's dev blog entry (if applicable) and the in-game encyclopedia description (under === In-game description ===, also if applicable).
Media
Excellent additions to the article would be video guides, screenshots from the game, and photos.
See also
Links to the articles on the War Thunder Wiki that you think will be useful for the reader, for example:
- reference to the series of the vehicles;
- links to approximate analogues of other nations and research trees.
External links
| Germany light tanks | |
|---|---|
| Pz.II | Pz.II C · Pz.II C (DAK) · Pz.II C TD · Pz.II F · Pz.Sfl.Ic |
| Sd.Kfz.234 | Sd.Kfz.234/1 · Sd.Kfz.234/2 · Sd.Kfz.234/2 TD |
| Marder | Marder A1- · Marder 1A3 · Begleitpanzer 57 · DF105 |
| PUMA | |
| Wheeled | Sd.Kfz.221 (s.Pz.B.41) · Class 3 (P) · Radkampfwagen 90 |
| Other | Ru 251 · SPz 12-3 LGS |
| Argentina | TAM · TAM 2C · TAM 2IP · JaPz.K A2 |
| Czechoslovakia | Pz.35(t) · Pz.38(t) A · Pz.38(t) F · Pz.38(t) n.A. · Sd.Kfz. 140/1 |
| France | Pz.Sp.Wg.P204(f) KwK |
| Lithuania | Vilkas |
| USA | leKPz M41 |
| USSR | SPz BMP-1 |
- Ground vehicles
- Germany ground vehicles
- Seventh rank ground vehicles
- Light tanks
- Ground vehicles with explosive reactive armour
- Ground vehicles with composite armour
- Ground vehicles with smoke grenades
- Ground vehicles with night vision device
- Ground vehicles with thermal sight
- Ground vehicles with gun stabilizer
