Difference between revisions of "PB4Y-2 (China)"
m (Edits.) |
(→Pros and cons: A lot of additions. Survivability and armour, Usage in battles, suspended armament and defensive armament) (Tag: Visual edit) |
||
| Line 107: | Line 107: | ||
=== Survivability and armour === | === Survivability and armour === | ||
| − | + | [[File:PB4Y Armour .png|thumb|500x500px|Bluish Green - 6.35 mm SteelGreen - 9.5 mm Steel | |
| + | |||
| + | Yellowish Green - 12.7 mm steel | ||
| + | |||
| + | Yellow - 38 mm Bulletproof glass | ||
| + | |||
| + | Red - 55 mm Bulletproof glass]] | ||
| + | The PB4Y has a lot of armour and also has self-sealing fuel tanks. The self-sealing tanks are located where the wings and fuselage meet. | ||
== Armaments == | == Armaments == | ||
| − | |||
| − | |||
=== Suspended armament === | === Suspended armament === | ||
| − | '' | + | |
| + | * 100 lb x20 ([https://wiki.warthunder.com/AN-M30A1_(100_lb) '''AN-M30A1''']) | ||
| + | * 500 lb x8 ([https://wiki.warthunder.com/AN-M64A1_(500_lb) '''AN-M64A1''']) | ||
| + | * 1000 lb x4 ([https://wiki.warthunder.com/AN-M65A1_(1,000_lb) '''AN-M65A1''']) | ||
| + | * 1000 lb x8 ([https://wiki.warthunder.com/AN-M65A1_(1,000_lb) '''AN-M65A1''']) | ||
| + | * 2000 lb x4 ([https://wiki.warthunder.com/AN-M66A2_(2,000_lb) '''AN-M66A2''']) | ||
=== Defensive armament === | === Defensive armament === | ||
| − | + | 6 turrets each with 2 M2 Brownings (Total ammo 5120) | |
| + | |||
| + | * Nose turret | ||
| + | ** 600 ammo | ||
| + | ** 750 rounds per minute | ||
| + | ** Horizontal Guidance: ±80° | ||
| + | ** Vertical Guidance: -55°, +70° | ||
| + | * Dorsal turrets | ||
| + | ** 380 ammo | ||
| + | ** 750 rounds per minute | ||
| + | ** Horizontal guidance: ±180° | ||
| + | ** Vertical Guidance: 0°, +67° | ||
| + | * Side turrets | ||
| + | ** 400 ammo | ||
| + | ** 750 rounds per minute | ||
| + | ** Horizontal Guidance: -95°, +55° | ||
| + | ** Vertical Guidance: -55°,+80° | ||
| + | * Rear turret | ||
| + | ** 400 ammo | ||
| + | ** 750 rounds per minute | ||
| + | ** Horizontal Guidance: ±70° | ||
| + | ** Vertical Guidance: -41°, +70° | ||
== Usage in battles == | == Usage in battles == | ||
| − | + | There are 2 ways you can go about playing the ␗PB4Y-2 Privateer, side climbing or diving. | |
| + | |||
| + | === Side-climbing === | ||
| + | Side climbing is the safest way of going about. Start by spawning with your Heavy Bomber air spawn, and climb away from the battle. This will give your fighters enough to time to climb up and duel with the enemies. After you see most of the enemies at low alt, you are safe to go in and bomb a point and return-to-base. | ||
| + | |||
| + | '''Pros:''' | ||
| + | |||
| + | * Your chance of surviving to the bombing point is high | ||
| + | * Enemies looking for bombers will most likely not find you | ||
| + | * Gaining altitude | ||
| + | |||
| + | '''Cons:''' | ||
| + | |||
| + | * Takes up more time | ||
| + | * Game can end before reaching the bombing point | ||
| + | * Team may not survive,leaving you the last one alive | ||
| + | |||
| + | === Diving === | ||
| + | Diving is probably the most risky way of trying to bomb but it is the quickest if you do it right.. Start by spawning in then dive at about 10 degrees. This will make sure you will not overspeed before reaching the bombing point. This also has its pros and cons. | ||
| + | |||
| + | '''Pros:''' | ||
| + | |||
| + | * Quickest way to a bombing point | ||
| + | * You can get rid of your major gunnery blind spot, beneath your plane | ||
| + | * Engines are meant for low alt | ||
| + | * Helps your team by bringing down enemy fighters | ||
| + | |||
| + | '''Cons:''' | ||
| + | |||
| + | * Axis fighters may swarm you | ||
| + | * AAA can hit you | ||
| + | * Extremely risky | ||
=== Manual Engine Control === | === Manual Engine Control === | ||
| Line 143: | Line 205: | ||
'''Pros:''' | '''Pros:''' | ||
| + | |||
| + | * Great defensive armament | ||
| + | * Good payload | ||
| + | * Almost full coverage from the turrets | ||
| + | |||
* | * | ||
'''Cons:''' | '''Cons:''' | ||
| + | |||
| + | * Very slow | ||
| + | * Big target | ||
| + | * Tail is prone to being shot off | ||
| + | |||
* | * | ||
| Line 156: | Line 228: | ||
== See also == | == See also == | ||
''Links to the articles on the War Thunder Wiki that you think will be useful for the reader, for example:'' | ''Links to the articles on the War Thunder Wiki that you think will be useful for the reader, for example:'' | ||
| + | |||
* ''reference to the series of the aircraft;'' | * ''reference to the series of the aircraft;'' | ||
* ''links to approximate analogues of other nations and research trees.'' | * ''links to approximate analogues of other nations and research trees.'' | ||
| Line 161: | Line 234: | ||
== External links == | == External links == | ||
''Paste links to sources and external resources, such as:'' | ''Paste links to sources and external resources, such as:'' | ||
| + | |||
* ''topic on the official game forum;'' | * ''topic on the official game forum;'' | ||
* ''encyclopedia page on the aircraft;'' | * ''encyclopedia page on the aircraft;'' | ||
Revision as of 15:37, 10 November 2019
Contents
| This page is about the aircraft PB4Y-2 (China). For other uses, see B-24/PB4Y (Family). |
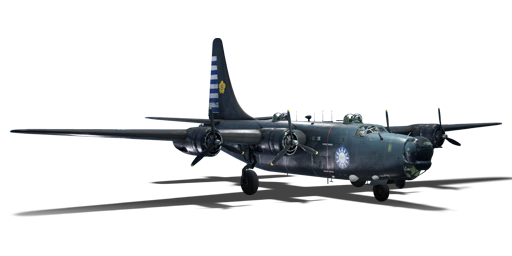
Description
.jpg)
The ␗PB4Y-2 Privateer is a rank IV Chinese bomber
with a battle rating of 4.7 (AB), 5.0 (RB), and 5.7 (SB). It was introduced in Update 1.91 "Night Vision".
General info
Flight performance
Describe how the aircraft behaves in the air. Speed, manoeuvrability, acceleration and allowable loads - these are the most important characteristics of the vehicle.
| Characteristics | |||||||
|---|---|---|---|---|---|---|---|
| Stock | |||||||
| Max Speed (km/h at 7,620 m) |
Max altitude (meters) |
Turn time (seconds) |
Rate of climb (meters/second) |
Take-off run (meters) | |||
| AB | RB | AB | RB | AB | RB | ||
| ??? | ??? | 10000 | ??.? | ??.? | ??.? | ??.? | 950 |
| Upgraded | |||||||
| Max Speed (km/h at 7,620 m) |
Max altitude (meters) |
Turn time (seconds) |
Rate of climb (meters/second) |
Take-off run (meters) | |||
| AB | RB | AB | RB | AB | RB | ||
| ??? | ??? | 10000 | ??.? | ??.? | ??.? | ??.? | 950 |
Details
| Features | ||||
|---|---|---|---|---|
| Combat flaps | Take-off flaps | Landing flaps | Air brakes | Arrestor gear |
| X | ✓ | ✓ | X | X |
| Limits | ||||
|---|---|---|---|---|
| Wing-break speed (km/h) |
Gear limit (km/h) |
Combat flaps (km/h) |
Max Static G | |
| + | - | |||
| 394 | ~3 | ~1 | ||
| Optimal velocities | |||
|---|---|---|---|
| Ailerons (km/h) |
Rudder (km/h) |
Elevators (km/h) |
Radiator (km/h) |
| < 200 | < 180 | < 180 | > 300 |
| Compressor (RB/SB) | ||
|---|---|---|
| Setting 1 | ||
| Optimal altitude | 100% Engine power | WEP Engine power |
| 2,346 m | 1,100 hp | 1,331 hp |
| Setting 2 | ||
| Optimal altitude | 100% Engine power | WEP Engine power |
| 4,389 m | 1,000 hp | 1,133 hp |
Survivability and armour
The PB4Y has a lot of armour and also has self-sealing fuel tanks. The self-sealing tanks are located where the wings and fuselage meet.
Armaments
Suspended armament
- 100 lb x20 (AN-M30A1)
- 500 lb x8 (AN-M64A1)
- 1000 lb x4 (AN-M65A1)
- 1000 lb x8 (AN-M65A1)
- 2000 lb x4 (AN-M66A2)
Defensive armament
6 turrets each with 2 M2 Brownings (Total ammo 5120)
- Nose turret
- 600 ammo
- 750 rounds per minute
- Horizontal Guidance: ±80°
- Vertical Guidance: -55°, +70°
- Dorsal turrets
- 380 ammo
- 750 rounds per minute
- Horizontal guidance: ±180°
- Vertical Guidance: 0°, +67°
- Side turrets
- 400 ammo
- 750 rounds per minute
- Horizontal Guidance: -95°, +55°
- Vertical Guidance: -55°,+80°
- Rear turret
- 400 ammo
- 750 rounds per minute
- Horizontal Guidance: ±70°
- Vertical Guidance: -41°, +70°
Usage in battles
There are 2 ways you can go about playing the ␗PB4Y-2 Privateer, side climbing or diving.
Side-climbing
Side climbing is the safest way of going about. Start by spawning with your Heavy Bomber air spawn, and climb away from the battle. This will give your fighters enough to time to climb up and duel with the enemies. After you see most of the enemies at low alt, you are safe to go in and bomb a point and return-to-base.
Pros:
- Your chance of surviving to the bombing point is high
- Enemies looking for bombers will most likely not find you
- Gaining altitude
Cons:
- Takes up more time
- Game can end before reaching the bombing point
- Team may not survive,leaving you the last one alive
Diving
Diving is probably the most risky way of trying to bomb but it is the quickest if you do it right.. Start by spawning in then dive at about 10 degrees. This will make sure you will not overspeed before reaching the bombing point. This also has its pros and cons.
Pros:
- Quickest way to a bombing point
- You can get rid of your major gunnery blind spot, beneath your plane
- Engines are meant for low alt
- Helps your team by bringing down enemy fighters
Cons:
- Axis fighters may swarm you
- AAA can hit you
- Extremely risky
Manual Engine Control
| MEC elements | ||||||
|---|---|---|---|---|---|---|
| Mixer | Pitch | Radiator | Supercharger | Turbocharger | ||
| Oil | Water | Type | ||||
| Controllable | Controllable Auto control available |
Not controllable Not auto controlled |
Controllable Not auto controlled |
Combined | Controllable 2 gears |
Not controllable |
Pros and cons
Summarise and briefly evaluate the vehicle in terms of its characteristics and combat effectiveness. Mark its pros and cons in the bulleted list. Try not to use more than 6 points for each of the characteristics. Avoid using categorical definitions such as "bad", "good" and the like - use substitutions with softer forms such as "inadequate" and "effective".
Pros:
- Great defensive armament
- Good payload
- Almost full coverage from the turrets
Cons:
- Very slow
- Big target
- Tail is prone to being shot off
History
Describe the history of the creation and combat usage of the aircraft in more detail than in the introduction. If the historical reference turns out to be too long, take it to a separate article, taking a link to the article about the vehicle and adding a block "/History" (example: https://wiki.warthunder.com/(Vehicle-name)/History) and add a link to it here using the main template. Be sure to reference text and sources by using <ref></ref>, as well as adding them at the end of the article with <references />. This section may also include the vehicle's dev blog entry (if applicable) and the in-game encyclopedia description (under === In-game description ===, also if applicable).
Media
Excellent additions to the article would be video guides, screenshots from the game, and photos.
See also
Links to the articles on the War Thunder Wiki that you think will be useful for the reader, for example:
- reference to the series of the aircraft;
- links to approximate analogues of other nations and research trees.
External links
Paste links to sources and external resources, such as:
- topic on the official game forum;
- encyclopedia page on the aircraft;
- other literature.
| China bombers | |
|---|---|
| American | Martin 139WC*(␗B-10B) · ␗A-29 · ␗B-25J-30 · ␗PB4Y-2 |
| German | ␗Hs 123 A-1 |
| Soviet | ␗SB 2M-103U · ␗DB-3A · ␗Tu-2S-44 · ␗Tu-4 |
| Japanese | ␗P1Y1 mod. 11 |
| *Export Name | |
