Difference between revisions of "P1Y1 mod. 11 (China)"
(→General info) (Tag: Visual edit) |
(Edits) |
||
| Line 10: | Line 10: | ||
[[File:GarageImage_{{PAGENAME}}.jpg|420px|thumb|left]] | [[File:GarageImage_{{PAGENAME}}.jpg|420px|thumb|left]] | ||
{{Break}} | {{Break}} | ||
| − | The '''{{Specs|name}}''' is a rank {{Specs|rank}} Chinese bomber {{Battle-rating}}. It was introduced in [[Update 1.91 "Night Vision"]]. | + | The '''{{Specs|name}}''' is a rank {{Specs|rank}} Chinese bomber {{Battle-rating}}. It was introduced in [[Update 1.91 "Night Vision"]]. |
The P1Y1 was nicknamed "Frances" by the Allied pilots, and "Ginga" (Galaxy) by Japanese pilots. The Ginga is known for being one of the fastest bombers and is played similarly to the German Ju 288 and Arado 234. The overall tactic - dive, drop payload, retreat, repeat. The P1Y1 can go a little over 675 km/h (400 mph) in a dive, which is very fast for the battle rating. | The P1Y1 was nicknamed "Frances" by the Allied pilots, and "Ginga" (Galaxy) by Japanese pilots. The Ginga is known for being one of the fastest bombers and is played similarly to the German Ju 288 and Arado 234. The overall tactic - dive, drop payload, retreat, repeat. The P1Y1 can go a little over 675 km/h (400 mph) in a dive, which is very fast for the battle rating. | ||
| Line 127: | Line 127: | ||
== Usage in battles == | == Usage in battles == | ||
<!-- ''Describe the tactics of playing in the aircraft, the features of using aircraft in a team and advice on tactics. Refrain from creating a "guide" - do not impose a single point of view, but instead, give the reader food for thought. Examine the most dangerous enemies and give recommendations on fighting them. If necessary, note the specifics of the game in different modes (AB, RB, SB).'' --> | <!-- ''Describe the tactics of playing in the aircraft, the features of using aircraft in a team and advice on tactics. Refrain from creating a "guide" - do not impose a single point of view, but instead, give the reader food for thought. Examine the most dangerous enemies and give recommendations on fighting them. If necessary, note the specifics of the game in different modes (AB, RB, SB).'' --> | ||
| − | In Arcade battles, the light payload is somewhat countered by the ability to reload. It is recommended to use the plane to hit high value targets such as pillboxes | + | In Arcade battles, the light payload is somewhat countered by the ability to reload. It is recommended to use the plane to hit high-value targets such as pillboxes since it is limited to two bombs (though it is one of the few Japanese medium bombers able to carry 2 x 500 kg). Other planes with larger numbers of 60 kg bombs are better suited for taking out tanks and soft targets. It is at a huge disadvantage when compared to planes such as the B7A2, which has forward cannons able to strafe soft ground targets while bombs reload. As such, most pilots would use the B7A2 over the P1Y1, though this plane may still be useful in one's lineup for use after the B7A2 has been lost. |
| − | + | [[File:P1Y1 torpedoedship.png|thumb|right|400px|Direct hit!]] | |
| − | In Realistic tank battles, the best option is likely to take the 2 x 500 kg bomb option and again use its speed to quickly get in, hit 2 targets and run away before enemy fighters realize it is there and intercepts. Again, its speed should allow multiple runs somewhat making up for the light payload. | + | In Realistic tank battles, the best option is likely to take the 2 x 500 kg bomb option and again use its speed to quickly get in, hit 2 targets and run away before enemy fighters realize it is there and intercepts. Again, its speed should allow multiple runs somewhat making up for the light payload. In Realistic battles, the main question is how to utilise this rather delicate aircraft effectively. The general tactic which provides the most effective outcome is to use this aircraft as a ground pounder. The most effective targets for this aircraft will be pillboxes, vehicles and anti-aircraft artillery. Leave the dog-fighting, bomber hunting and base bombing for the arcade battles. This is for a number of reasons, the first being the Ginga's payload which consists of only one 800 kg bomb or two 500 kg bombs. That being said, this measly amount barely has enough destructive power to destroy half a base. Instead, pillboxes will provide excellent sources of research points and will bleed enemy tickets. To kill pillboxes, take the 500 kg bombs with a two-second fuse. To set up a run, you will need to dive as soon as the match starts and need to be as close to the ground as possible to accurately bomb the pillboxes. Try to drop the bomb just a little before the crosshair, due to a slight delay in the bomb drop. This shouldn't be too noticeable, so just remember to release the bombs a little before you typically would release them. After destroying two pillboxes, destroy lightly armoured targets with your turrets, or, if there are enemy fighters inbound, go in a straight line for your home base and keep your speed high. Reload, repair, and get back out on the next target! The Ginga can make many bombing runs in one match thanks to its speed. |
Unfortunately, there might be a problem on Pacific maps as carrier landings in the P1Y1 are tricky. If the carrier is moving, your option is to try to land on it. Drop your speed to around 165 km/h (100 mph), with landing flaps and gear, but without airbrakes. Next, land on the very edge of the carrier and retract flaps and use airbrakes. If you break a wing on the tower, it should stop and repair you. However, if the carrier isn't moving the safest option is to belly land. Try going as slow as possible and try to land flat, not tail first. Snapping a wing on the tower is a good idea because it will aid in bringing you to a full stop. | Unfortunately, there might be a problem on Pacific maps as carrier landings in the P1Y1 are tricky. If the carrier is moving, your option is to try to land on it. Drop your speed to around 165 km/h (100 mph), with landing flaps and gear, but without airbrakes. Next, land on the very edge of the carrier and retract flaps and use airbrakes. If you break a wing on the tower, it should stop and repair you. However, if the carrier isn't moving the safest option is to belly land. Try going as slow as possible and try to land flat, not tail first. Snapping a wing on the tower is a good idea because it will aid in bringing you to a full stop. | ||
| Line 195: | Line 195: | ||
=== Pros and cons === | === Pros and cons === | ||
| − | <!-- ''Summarise and briefly evaluate the vehicle in terms of its characteristics and combat effectiveness. Mark its pros and cons in the bulleted list. Try not to use more than 6 points for each of the characteristics. Avoid using categorical definitions such as "bad", "good" and the like - use substitutions with softer forms such as "inadequate" and "effective".'' --> | + | <!-- ''Summarise and briefly evaluate the vehicle in terms of its characteristics and combat effectiveness. Mark its pros and cons in the bulleted list. Try not to use more than 6 points for each of the characteristics. Avoid using categorical definitions such as "bad", "good" and the like - use substitutions with softer forms such as "inadequate" and "effective".'' --> |
| − | *Very fast & surprisingly manoeuvrable | + | '''Pros:''' |
| − | *20 mm turrets quickly destroy fighters when they hit | + | |
| − | *Has really effective airbrakes | + | * Very fast & surprisingly manoeuvrable |
| − | *Its speed forces enemies to tail you in line with your rear gunner | + | * 20 mm turrets quickly destroy fighters when they hit |
| − | *Bomber | + | * Has really effective airbrakes |
| − | *Self-sealing fuel tanks can sometimes extinguish fires | + | * Its speed forces enemies to tail you in line with your rear gunner |
| − | *Can carry the Type 91 Mod. 3 | + | * Bomber air spawn |
| + | * Self-sealing fuel tanks can sometimes extinguish fires | ||
| + | * Can carry the Type 91 Mod. 3 torpedoes, the best torpedo in the game | ||
'''Cons:''' | '''Cons:''' | ||
| − | *No fixed forward armament | + | * No fixed forward armament |
| − | *Payload is limited to 2 x 500 kgs or 800 kg max, pillbox bombing is your ultimate goal | + | * Payload is limited to 2 x 500 kgs or 800 kg max, pillbox bombing is your ultimate goal |
| − | *No tail hook, you might have trouble landing on pacific maps | + | * No tail hook, you might have trouble landing on pacific maps |
| − | *Forward turret has a very limited firing arc, and AI gunner rarely engages | + | * Forward turret has a very limited firing arc, and AI gunner rarely engages |
| − | *Easy to set ablaze, 50/50 chance of | + | * Easy to set ablaze, 50/50 chance of surviving |
| − | *Long gunner reload time | + | * Long gunner reload time |
| − | *Inaccurate and slow firing 20 mm turrets | + | * Inaccurate and slow firing 20 mm turrets |
== History == | == History == | ||
| Line 222: | Line 224: | ||
== See also == | == See also == | ||
| − | + | ;Contemporary aircraft | |
| − | + | *[[G4M1|G4M2]] - The predecessor to the P1Y1 | |
| − | + | *[[T18B-1]] - A Swedish Torpedo bomber with two engines | |
| − | + | *[[Do 217 K-1|Do-217]] -A German twin-engine torpedo bomber | |
| − | + | *[[B7A2]] - A more practical Japanese torpedo bomber | |
== External links == | == External links == | ||
Revision as of 15:26, 27 October 2020
Contents
| This page is about the Chinese dive bomber P1Y1 mod. 11 (China). For other variant, see P1Y1 mod. 11. |
Description
.jpg)
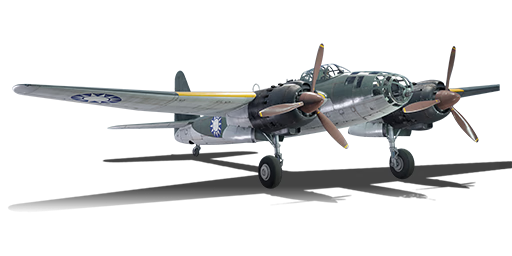
The ␗P1Y1 mod. 11 "Ginga" is a rank II Chinese bomber
with a battle rating of 3.3 (AB/RB) and 4.0 (SB). It was introduced in Update 1.91 "Night Vision".
The P1Y1 was nicknamed "Frances" by the Allied pilots, and "Ginga" (Galaxy) by Japanese pilots. The Ginga is known for being one of the fastest bombers and is played similarly to the German Ju 288 and Arado 234. The overall tactic - dive, drop payload, retreat, repeat. The P1Y1 can go a little over 675 km/h (400 mph) in a dive, which is very fast for the battle rating.
The P1Y1 is a rather fragile aircraft, specifically to its detriment it has poor defensive guns and sadly has no turret coverage for the underside of the aircraft. This typically results in a situation where the P1Y1 is easy prey to enemy fighters attacking from underneath without fear of reprisal.
The P1Y1 becomes extremely vulnerable after the loss of both speed and altitude. Since the P1Y1 can outrun all Japanese fighters that you will face (except the J5N1, Ki-108, and J2M), you can speed away to fighter cover or the home airfield if caught in a sticky situation. For the planes you can't outrun, there are one of two strategies. If the plane chasing you is heavier than the P1Y1, you can generally outmanoeuvre it, which will make them lose energy and retreat. Another strategy is making them follow behind your rear gunner, so long as your gunner is firing, the enemy aircraft will need to manoeuvre to avoid being hit, effectively messing up
General info
Flight performance
The P1Y1 is a highly agile and fast aircraft. It can make sharp turns and can pull out of a dive quickly with the use of airbrakes. The airbrakes on this plane are extremely effective, but they take five seconds to deploy, so keep that in mind. The P1Y1 can also turn extremely well, although its roll rate is rather poor. The plane has good elevator authority, meaning it will be able to pull up very quickly. This is good for ground battles or naval battles. The performance of the P1Y1 is excellent. There is only one small flaw, and that is the P1Y1 locks up at redline speeds, so make sure to use those airbrakes!
| Characteristics | Max Speed (km/h at 5,900 m) |
Max altitude (metres) |
Turn time (seconds) |
Rate of climb (metres/second) |
Take-off run (metres) | |||
|---|---|---|---|---|---|---|---|---|
| AB | RB | AB | RB | AB | RB | |||
| Stock | 523 | 506 | 9400 | 26.9 | 27.5 | 6.5 | 6.5 | 720 |
| Upgraded | 573 | 546 | 25.7 | 26.0 | 15.2 | 10.2 | ||
Details
| Features | ||||
|---|---|---|---|---|
| Combat flaps | Take-off flaps | Landing flaps | Air brakes | Arrestor gear |
| ✓ | ✓ | ✓ | ✓ | X |
| Limits | ||||||
|---|---|---|---|---|---|---|
| Wings (km/h) | Gear (km/h) | Flaps (km/h) | Max Static G | |||
| Combat | Take-off | Landing | + | - | ||
| 0 | 275 | 450 | 450 | 275 | ~6 | ~3 |
| Optimal velocities (km/h) | |||
|---|---|---|---|
| Ailerons | Rudder | Elevators | Radiator |
| < 360 | < 360 | < 400 | > 301 |
| Compressor (RB/SB) | ||
|---|---|---|
| Setting 1 | ||
| Optimal altitude | 100% Engine power | WEP Engine power |
| 1,799 m | 1,645 hp | 1,949 hp |
| Setting 2 | ||
| Optimal altitude | 100% Engine power | WEP Engine power |
| 5,700 m | 1,430 hp | 1,695 hp |
Survivability and armour
- 7 mm Steel plate behind the pilot
- Self-sealing fuel tanks
Armaments
Suspended armament
The P1Y1 mod. 11 (China) can be outfitted with the following ordnance:
- 2 x 250 kg Navy Type Number 25 Model 2 bombs (500 kg total)
- 1 x 835 kg Type 91 Model 2 torpedo
- 2 x 500 kg Navy Type Number 50 Model 2 bombs (1,000 kg total)
- 1 x 800 kg Navy Type Number 80 Model 1 bomb (800 kg total)
Defensive armament
The P1Y1 mod. 11 (China) is defended by:
- 1 x 20 mm Type 99 Model 1 cannon, nose turret (225 rpg)
- 1 x 20 mm Type 99 Model 1 cannon, dorsal turret (225 rpg)
The 20 mm cannons on the Ginga are early Type 99 cannons, so they do not have good explosive filler. What's more is that the cannons are inaccurate, and have a low rate of fire. Do not expect to go kill anything with them. What you can do is use these cannons as a deterrent. You can outrun a P-51 using a special method that is known to Ginga pilots as "scrambling." Since the P1Y1 has a good top speed, you can show your rear of the aircraft to the approaching fighter. If they are catching up, dive. If you hit the deck and are cruising at ground level, you can force the enemy fighter to tail behind your 20 mm. This gives you a great shot at them, and it will most likely deter them.
Usage in battles
In Arcade battles, the light payload is somewhat countered by the ability to reload. It is recommended to use the plane to hit high-value targets such as pillboxes since it is limited to two bombs (though it is one of the few Japanese medium bombers able to carry 2 x 500 kg). Other planes with larger numbers of 60 kg bombs are better suited for taking out tanks and soft targets. It is at a huge disadvantage when compared to planes such as the B7A2, which has forward cannons able to strafe soft ground targets while bombs reload. As such, most pilots would use the B7A2 over the P1Y1, though this plane may still be useful in one's lineup for use after the B7A2 has been lost.

In Realistic tank battles, the best option is likely to take the 2 x 500 kg bomb option and again use its speed to quickly get in, hit 2 targets and run away before enemy fighters realize it is there and intercepts. Again, its speed should allow multiple runs somewhat making up for the light payload. In Realistic battles, the main question is how to utilise this rather delicate aircraft effectively. The general tactic which provides the most effective outcome is to use this aircraft as a ground pounder. The most effective targets for this aircraft will be pillboxes, vehicles and anti-aircraft artillery. Leave the dog-fighting, bomber hunting and base bombing for the arcade battles. This is for a number of reasons, the first being the Ginga's payload which consists of only one 800 kg bomb or two 500 kg bombs. That being said, this measly amount barely has enough destructive power to destroy half a base. Instead, pillboxes will provide excellent sources of research points and will bleed enemy tickets. To kill pillboxes, take the 500 kg bombs with a two-second fuse. To set up a run, you will need to dive as soon as the match starts and need to be as close to the ground as possible to accurately bomb the pillboxes. Try to drop the bomb just a little before the crosshair, due to a slight delay in the bomb drop. This shouldn't be too noticeable, so just remember to release the bombs a little before you typically would release them. After destroying two pillboxes, destroy lightly armoured targets with your turrets, or, if there are enemy fighters inbound, go in a straight line for your home base and keep your speed high. Reload, repair, and get back out on the next target! The Ginga can make many bombing runs in one match thanks to its speed.
Unfortunately, there might be a problem on Pacific maps as carrier landings in the P1Y1 are tricky. If the carrier is moving, your option is to try to land on it. Drop your speed to around 165 km/h (100 mph), with landing flaps and gear, but without airbrakes. Next, land on the very edge of the carrier and retract flaps and use airbrakes. If you break a wing on the tower, it should stop and repair you. However, if the carrier isn't moving the safest option is to belly land. Try going as slow as possible and try to land flat, not tail first. Snapping a wing on the tower is a good idea because it will aid in bringing you to a full stop.
Manual Engine Control
| MEC elements | ||||||
|---|---|---|---|---|---|---|
| Mixer | Pitch | Radiator | Supercharger | Turbocharger | ||
| Oil | Water | Type | ||||
| Controllable | Controllable Not auto controlled |
Controllable Auto control available |
Controllable Auto control available |
Separate | Controllable 2 gears |
Not controllable |
The Ginga has solid engines, providing a maximum combined 3,662 units of horsepower on takeoff. They also come with a two-stage supercharger. The propeller pitch should be used at 90%-100% when on WEP. Lower the propeller pitch to 90% when at high speeds. The radiators can be kept at 10-20%, and the supercharger can be activated at 3.5 km (11k ft), and the mixture can be set to the following at each specific altitude:
- Sea Level: 100%-110% Mixture
- 3000 feet: 92% Mixture
- 6000 feet: 84% Mixture
- 1000 feet: 70% Mixture
- 15000 feet: 60% Mixture
Modules
| Tier | Flight performance | Survivability | Weaponry | ||
|---|---|---|---|---|---|
| I | Fuselage repair | Radiator | Turret 20 mm | 17 3/4 in (mod45) | |
| II | Compressor | Airframe | New 20 mm cannons (turret) | ||
| III | Wings repair | Engine | 14 in (mod30) | ||
| IV | Engine injection | Cover | 14 in (mod35) | ||
The stock payload for the Ginga is poor, so rush all payload modules. The torpedo will be useful on Pacific maps to target destroyers. However, if cargo ships or pillboxes are present, the 500 kg bombs are your best bet.
Pros and cons
Pros:
- Very fast & surprisingly manoeuvrable
- 20 mm turrets quickly destroy fighters when they hit
- Has really effective airbrakes
- Its speed forces enemies to tail you in line with your rear gunner
- Bomber air spawn
- Self-sealing fuel tanks can sometimes extinguish fires
- Can carry the Type 91 Mod. 3 torpedoes, the best torpedo in the game
Cons:
- No fixed forward armament
- Payload is limited to 2 x 500 kgs or 800 kg max, pillbox bombing is your ultimate goal
- No tail hook, you might have trouble landing on pacific maps
- Forward turret has a very limited firing arc, and AI gunner rarely engages
- Easy to set ablaze, 50/50 chance of surviving
- Long gunner reload time
- Inaccurate and slow firing 20 mm turrets
History
Describe the history of the creation and combat usage of the aircraft in more detail than in the introduction. If the historical reference turns out to be too long, take it to a separate article, taking a link to the article about the vehicle and adding a block "/History" (example: https://wiki.warthunder.com/(Vehicle-name)/History) and add a link to it here using the main template. Be sure to reference text and sources by using <ref></ref>, as well as adding them at the end of the article with <references />. This section may also include the vehicle's dev blog entry (if applicable) and the in-game encyclopedia description (under === In-game description ===, also if applicable).
Media
Excellent additions to the article would be video guides, screenshots from the game, and photos.
See also
- Contemporary aircraft
- G4M2 - The predecessor to the P1Y1
- T18B-1 - A Swedish Torpedo bomber with two engines
- Do-217 -A German twin-engine torpedo bomber
- B7A2 - A more practical Japanese torpedo bomber
External links
Paste links to sources and external resources, such as:
| China bombers | |
|---|---|
| American | Martin 139WC*(␗B-10B) · ␗A-29 · ␗B-25J-30 · ␗PB4Y-2 |
| German | ␗Hs 123 A-1 |
| Soviet | ␗SB 2M-103U · ␗DB-3A · ␗Tu-2S-44 · ␗Tu-4 |
| Japanese | ␗P1Y1 mod. 11 |
| *Export Name | |
