Difference between revisions of "Na-To"
Colok76286 (talk | contribs) (→Usage in battles: Corrected header) |
(Edits) |
||
| Line 2: | Line 2: | ||
== Description == | == Description == | ||
| − | <!--''In the description, the first part | + | <!-- ''In the description, the first part should be about the history of the creation and combat usage of the vehicle, as well as its key features. In the second part, tell the reader about the ground vehicle in the game. Insert a screenshot of the vehicle, so that if the novice player does not remember the vehicle by name, he will immediately understand what kind of vehicle the article is talking about.'' --> |
[[File:GarageImage_{{PAGENAME}}.jpg|420px|thumb|left]] | [[File:GarageImage_{{PAGENAME}}.jpg|420px|thumb|left]] | ||
| − | {{ | + | {{Break}} |
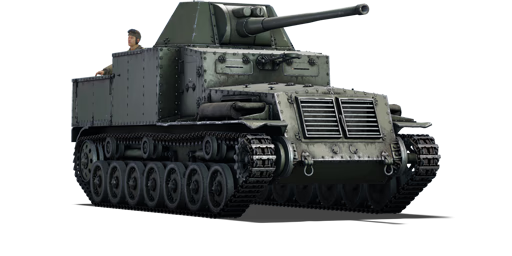
| − | The '''{{ | + | The '''{{Specs|name}}''' is a rank {{Specs|rank}} Japanese tank destroyer {{Battle-rating}}. It was introduced along with the initial Japanese Ground Forces tree in [[Update 1.65 "Way of the Samurai"]]. |
The Type 5 Na-To is a rather traditional tank destroyer of a simple vehicle chassis with a gun pasted on top. It is highly vulnerable to many battlefield weapons due to its weak overall armour, but if it can get the jump on an enemy, it can wreck havoc. Thus, one should not play the Na-To as a front-line weapon but as a sniper far back behind the front lines. This will ensure the Na-To will not become a priority target and also to maximize the gun's long-range capacity to take out targets. Watch frequently traveled roads and choke points for enemy, then blast them away before retreating to reload in case they are still active after the first shot. | The Type 5 Na-To is a rather traditional tank destroyer of a simple vehicle chassis with a gun pasted on top. It is highly vulnerable to many battlefield weapons due to its weak overall armour, but if it can get the jump on an enemy, it can wreck havoc. Thus, one should not play the Na-To as a front-line weapon but as a sniper far back behind the front lines. This will ensure the Na-To will not become a priority target and also to maximize the gun's long-range capacity to take out targets. Watch frequently traveled roads and choke points for enemy, then blast them away before retreating to reload in case they are still active after the first shot. | ||
| Line 11: | Line 11: | ||
== General info == | == General info == | ||
=== Survivability and armour === | === Survivability and armour === | ||
| − | <!--''Describe armour protection. Note the most well protected and key weak areas. Appreciate the layout of modules as well as the number and location of crew members. Is the level of armour protection sufficient, is the placement of modules | + | <!-- ''Describe armour protection. Note the most well protected and key weak areas. Appreciate the layout of modules as well as the number and location of crew members. Is the level of armour protection sufficient, is the placement of modules helpful for survival in combat? If necessary use a visual template to indicate the most secure and weak zones of the armour.'' --> |
| − | |||
| − | |||
'''Armour type:''' | '''Armour type:''' | ||
| Line 36: | Line 34: | ||
<!-- ''Write about the mobility of the ground vehicle. Estimate the specific power and manoeuvrability, as well as the maximum speed forwards and backwards.'' --> | <!-- ''Write about the mobility of the ground vehicle. Estimate the specific power and manoeuvrability, as well as the maximum speed forwards and backwards.'' --> | ||
| − | {{tankMobility|abMinHp= 234|rbMinHp= 146}} | + | {{tankMobility|abMinHp=234|rbMinHp=146}} |
== Armaments == | == Armaments == | ||
=== Main armament === | === Main armament === | ||
| − | <!--''Give the reader information about the characteristics of the main gun. Assess its effectiveness in a battle based on the reloading speed, ballistics and the power of shells. Do not forget about the | + | <!-- ''Give the reader information about the characteristics of the main gun. Assess its effectiveness in a battle based on the reloading speed, ballistics and the power of shells. Do not forget about the flexibility of the fire, that is how quickly the cannon can be aimed at the target, open fire on it and aim at another enemy. Add a link to the main article on the gun: <code><nowiki>{{main|Name of the weapon}}</nowiki></code>. Describe in general terms the ammunition available for the main gun. Give advice on how to use them and how to fill the ammunition storage.'' --> |
{{main|Lightweight Type I Model II (75 mm)}} | {{main|Lightweight Type I Model II (75 mm)}} | ||
| − | {| class="wikitable" style="text-align:center | + | {| class="wikitable" style="text-align:center" width="100%" |
| − | |||
| − | |||
| − | |||
| − | |||
| − | |||
| − | |||
| − | |||
| − | |||
| − | |||
| − | |||
| − | |||
| − | |||
| − | |||
| − | |||
| − | |||
| − | |||
| − | |||
| − | |||
| − | |||
| − | |||
|- | |- | ||
| − | | | + | ! colspan="5" | [[Lightweight Type I Model II (75 mm)|75 mm Lightweight Type I Model II]] || colspan="5" | Turret rotation speed (°/s) || colspan="4" | Reloading rate (seconds) |
|- | |- | ||
| − | ! | + | ! Mode !! Capacity !! Vertical !! Horizontal !! Stabilizer |
| + | ! Stock !! Upgraded !! Full !! Expert !! Aced | ||
| + | ! Stock !! Full !! Expert !! Aced | ||
|- | |- | ||
| − | ! | + | ! ''Arcade'' |
| − | + | | rowspan="2" | 40 || rowspan="2" | -8°/+19° || rowspan="2" | ±20° || rowspan="2" | N/A || 5.28 || 7.31 || 8.88 || 9.82 || 10.45 || rowspan="2" | 7.67 || rowspan="2" | 6.79 || rowspan="2" | 6.25 || rowspan="2" | 5.90 | |
| − | |||
| − | |||
|- | |- | ||
| − | | | + | ! ''Realistic'' |
| + | | 3.57 || 4.20 || 5.10 || 5.64 || 6.00 | ||
|- | |- | ||
|} | |} | ||
| − | + | ==== Ammunition ==== | |
{| class="wikitable sortable" style="text-align:center" width="100%" | {| class="wikitable sortable" style="text-align:center" width="100%" | ||
! colspan="8" | Penetration statistics | ! colspan="8" | Penetration statistics | ||
|- | |- | ||
! rowspan="2" data-sort-type="text" | Ammunition | ! rowspan="2" data-sort-type="text" | Ammunition | ||
| − | ! rowspan="2 | + | ! rowspan="2" | Type of<br>warhead |
| − | ! colspan="6" | '''Penetration | + | ! colspan="6" | '''Penetration @ 0° Angle of Attack (mm)''' |
|- | |- | ||
| − | ! | + | ! 10 m !! 100 m !! 500 m !! 1,000 m !! 1,500 m !! 2,000 m |
| − | ! | ||
| − | ! | ||
| − | ! | ||
| − | ! | ||
| − | ! | ||
|- | |- | ||
| − | | Type 1 APHE || APHE || | + | | Type 1 APHE || APHE || 140 || 137 || 125 || 111 || 99 || 88 |
|- | |- | ||
| − | | Type 4 APCR || APCR || 177 || 175 || 151 || 127 || 108 || 91 | + | | Type 4 APCR || APCR || 177 || 175 || 151 || 127 || 108 || 91 |
|- | |- | ||
| − | | Type 90 HE || HE || 8 || 8 || 8 || 8 || 8 || 8 | + | | Type 90 HE || HE || 8 || 8 || 8 || 8 || 8 || 8 |
|- | |- | ||
|} | |} | ||
{| class="wikitable sortable" style="text-align:center" width="100%" | {| class="wikitable sortable" style="text-align:center" width="100%" | ||
| − | ! colspan=" | + | ! colspan="10" | Shell details |
|- | |- | ||
! rowspan="2" data-sort-type="text" | Ammunition | ! rowspan="2" data-sort-type="text" | Ammunition | ||
| − | ! rowspan="2 | + | ! rowspan="2" | Type of<br>warhead |
| − | ! rowspan="2" |Velocity <br | + | ! rowspan="2" | Velocity<br>(m/s) |
| − | ! rowspan="2" |Projectile<br | + | ! rowspan="2" | Projectile<br>Mass (kg) |
| − | ! rowspan="2" | | + | ! rowspan="2" | Fuse delay<br>(m) |
| − | + | ! rowspan="2" | Fuse sensitivity<br>(mm) | |
| − | ! rowspan="2" | | + | ! rowspan="2" | Explosive Mass<br>(TNT equivalent) (g) |
| − | + | ! colspan="3" | Ricochet | |
| − | ! rowspan="2" | | ||
| − | |||
| − | ! colspan="3" | | ||
|- | |- | ||
| − | ! 0% | + | ! 0% !! 50% !! 100% |
| − | ! 50% | ||
| − | ! 100% | ||
|- | |- | ||
| − | | Type 1 APHE || APHE || 830 || 6. | + | | Type 1 APHE || APHE || 830 || 6.56 || 1.3 || 15 || 84.8 || 47° || 60° || 65° |
|- | |- | ||
| − | | Type 4 APCR || APCR || 930 || 4. | + | | Type 4 APCR || APCR || 930 || 4.15 || N/A || N/A || N/A || 66° || 70° || 72° |
|- | |- | ||
| − | | Type 90 HE || HE || 830 || 6. | + | | Type 90 HE || HE || 830 || 6.17 || 0.1 || 0.1 || 490 || 79° || 80° || 81° |
|- | |- | ||
|} | |} | ||
| − | + | ==== [[Ammo racks]] ==== | |
| − | [[File: | + | [[File:Ammoracks_{{PAGENAME}}.png|right|thumb|x200px|[[Ammo racks]] of the {{PAGENAME}}]] |
| − | {| class="wikitable | + | '''Last update: 1.101.0.44''' |
| + | {| class="wikitable" style="text-align:center" | ||
|- | |- | ||
| − | ! | + | ! Full<br>ammo |
| − | ! | + | ! 1st<br>rack empty |
| − | ! | + | ! 2nd<br>rack empty |
| − | ! | + | ! Visual<br>discrepancy |
|- | |- | ||
| − | + | | '''40''' || 21 ''(+19)'' || 1 ''(+39)'' || style="text-align:left" | No | |
|- | |- | ||
|} | |} | ||
| − | + | * Left side empty: 21 ''(+19)'' | |
== Usage in battles == | == Usage in battles == | ||
| − | <!--''Describe the tactics of playing in the vehicle, the features of using vehicles in the team and advice on tactics. Refrain from creating a "guide" - do not impose a single point of view but give the reader food for thought. Describe the most dangerous enemies and give recommendations on fighting them. If necessary, note the specifics of the game in different modes (AB, RB, SB).''--> | + | <!-- ''Describe the tactics of playing in the vehicle, the features of using vehicles in the team and advice on tactics. Refrain from creating a "guide" - do not impose a single point of view but instead give the reader food for thought. Describe the most dangerous enemies and give recommendations on fighting them. If necessary, note the specifics of the game in different modes (AB, RB, SB).'' --> |
With the [[Lightweight Type I Model II (75 mm)|Lightweight Type I Model II tank gun]], the Na-To presents a lethal gun that can penetrate all the the tanks at its 3.3 BR range. Assuming it is not upped by another vehicle in the line-up with a higher BR, the worst heavy tank the Na-To could face are the Soviet [[KV-1S]] and British [[Churchill Mk III]], both with front armour easily penetratable by the Na-To's 75 mm gun at standard ranges without taking angling into consideration. However, the thin armour of the Na-To does mean that any tank it faces could defeat the Na-To, so always get the first shot off at the enemy. | With the [[Lightweight Type I Model II (75 mm)|Lightweight Type I Model II tank gun]], the Na-To presents a lethal gun that can penetrate all the the tanks at its 3.3 BR range. Assuming it is not upped by another vehicle in the line-up with a higher BR, the worst heavy tank the Na-To could face are the Soviet [[KV-1S]] and British [[Churchill Mk III]], both with front armour easily penetratable by the Na-To's 75 mm gun at standard ranges without taking angling into consideration. However, the thin armour of the Na-To does mean that any tank it faces could defeat the Na-To, so always get the first shot off at the enemy. | ||
| − | Playing the Na-To as a sniper support from a long distance from the front-line will provide the Na-To increased survivability and also potentially more targets to aim at than with its limited traverse arc up close. If long range is not possible, keep the Na-To stationed at a cover's corner watching an enemy's frequented area. As soon as one shows up, blast away before retreating to cover. | + | Playing the Na-To as a sniper support from a long distance from the front-line will provide the Na-To increased survivability and also potentially more targets to aim at than with its limited traverse arc up close. If long range is not possible, keep the Na-To stationed at a cover's corner watching an enemy's frequented area. As soon as one shows up, blast away before retreating to cover. |
| − | ===Modules=== | + | === Modules === |
{| class="wikitable" | {| class="wikitable" | ||
| − | !Tier | + | ! Tier |
| − | ! colspan="2" |Mobility | + | ! colspan="2" | Mobility |
| − | !Protection | + | ! Protection |
| − | ! colspan="2" |Firepower | + | ! colspan="2" | Firepower |
|- | |- | ||
| − | |I | + | | I |
| − | |Tracks | + | | Tracks |
| − | |Parts | + | | |
| − | |Horizontal Drive | + | | Parts |
| + | | Horizontal Drive | ||
| | | | ||
|- | |- | ||
| − | |II | + | | II |
| − | |Suspension | + | | Suspension |
| − | |FPE | + | | Brake System |
| − | |Adjustment of Fire | + | | FPE |
| − | |Type 4 APCR | + | | Adjustment of Fire |
| + | | Type 4 APCR | ||
|- | |- | ||
| − | |III | + | | III |
| − | |Filters | + | | Filters |
| − | |Crew Replenishment | + | | |
| − | |Elevation Mechanism | + | | Crew Replenishment |
| + | | Elevation Mechanism | ||
| | | | ||
|- | |- | ||
| − | |IV | + | | IV |
| − | |Transmission | + | | Transmission |
| + | | Engine | ||
| | | | ||
| | | | ||
| Line 182: | Line 156: | ||
=== Pros and cons === | === Pros and cons === | ||
| − | <!--'' | + | <!-- ''Summarise and briefly evaluate the vehicle in terms of its characteristics and combat effectiveness. Mark its pros and cons in a bulleted list. Try not to use more than 6 points for each of the characteristics. Avoid using categorical definitions such as "bad", "good" and the like - use substitutions with softer forms such as "inadequate" and "effective".'' --> |
| + | |||
'''Pros:''' | '''Pros:''' | ||
| Line 203: | Line 178: | ||
== History == | == History == | ||
| − | <!--''Describe the history of the creation and combat usage of the | + | <!-- ''Describe the history of the creation and combat usage of the vehicle in more detail than in the introduction. If the historical reference turns out to be too long, take it to a separate article, taking a link to the article about the vehicle and adding a block "/History" (example: <nowiki>https://wiki.warthunder.com/(Vehicle-name)/History</nowiki>) and add a link to it here using the <code>main</code> template. Be sure to reference text and sources by using <code><nowiki><ref></ref></nowiki></code>, as well as adding them at the end of the article with <code><nowiki><references /></nowiki></code>. This section may also include the vehicle's dev blog entry (if applicable) and the in-game encyclopedia description (under <code><nowiki>=== In-game description ===</nowiki></code>, also if applicable).'' --> |
| − | The Type 5 Na-to was a tank destroyer based on the Type 4 Chi-So armored medium tracked carrier developed in 1945. It used a | + | The Type 5 Na-to was a tank destroyer based on the Type 4 Chi-So armored medium tracked carrier developed in 1945. It used a 75 mm tank gun, known as the Type I 75 mm. This was a lighter version of the Type II 75 mm tank gun used by the Chi-To and Chi-Ri. |
| − | The Na-To had two prototypes, known simply as the Na-To I and Na-To II. The Na-To I used a variant of the Type I | + | The Na-To had two prototypes, known simply as the Na-To I and Na-To II. The Na-To I used a variant of the Type I 75 mm gun known as the "Type 1 75 mm Model I". The Na-To II used the Type I 75 mm Model II. |
Following trials, the Na-To II was selected over the Na-To I to be mass-produced. An order was placed for 200 vehicles to be made, but by the end of the war only 70 of them were started, with none reaching completion. | Following trials, the Na-To II was selected over the Na-To I to be mass-produced. An order was placed for 200 vehicles to be made, but by the end of the war only 70 of them were started, with none reaching completion. | ||
| − | |||
| − | |||
== Media == | == Media == | ||
| − | '' | + | ''Excellent additions to the article would be video guides, screenshots from the game, and photos.'' |
| − | |||
| − | |||
| − | |||
| + | == See also == | ||
| + | ''Links to the articles on the War Thunder Wiki that you think will be useful for the reader, for example:'' | ||
* ''reference to the series of the vehicles;'' | * ''reference to the series of the vehicles;'' | ||
* ''links to approximate analogues of other nations and research trees.'' | * ''links to approximate analogues of other nations and research trees.'' | ||
| − | '' | + | == External links == |
| − | + | <!-- ''Paste links to sources and external resources, such as:'' | |
| − | + | * ''topic on the official game forum;'' | |
| − | + | * ''encyclopedia page on the tank;'' | |
| − | * | + | * ''other literature.'' --> |
| + | * [https://ja.wikipedia.org/wiki/%E8%A9%A6%E8%A3%BD%E4%B8%83%E7%B3%8E%E5%8D%8A%E5%AF%BE%E6%88%A6%E8%BB%8A%E8%87%AA%E8%B5%B0%E7%A0%B2_%E3%83%8A%E3%83%88 Japanese Wikipedia page on the Na-To] | ||
{{Japan tank destroyers}} | {{Japan tank destroyers}} | ||
Revision as of 11:22, 9 September 2020
Contents
Description

The Type 5 Na-To is a rank III Japanese tank destroyer
with a battle rating of 3.3 (AB/RB/SB). It was introduced along with the initial Japanese Ground Forces tree in Update 1.65 "Way of the Samurai".
The Type 5 Na-To is a rather traditional tank destroyer of a simple vehicle chassis with a gun pasted on top. It is highly vulnerable to many battlefield weapons due to its weak overall armour, but if it can get the jump on an enemy, it can wreck havoc. Thus, one should not play the Na-To as a front-line weapon but as a sniper far back behind the front lines. This will ensure the Na-To will not become a priority target and also to maximize the gun's long-range capacity to take out targets. Watch frequently traveled roads and choke points for enemy, then blast them away before retreating to reload in case they are still active after the first shot.
General info
Survivability and armour
Armour type:
- Rolled homogeneous armour
- Cast homogeneous armour (Gun mount)
| Armour | Front | Sides | Rear | Roof |
|---|---|---|---|---|
| Hull | 12 mm (25°) Front 12 mm (52°) Bottom 8 mm (83°) Engine deck 12 mm (6°) Driver's plate |
12 mm | 4 mm (1°) Top 8.5 mm (46°) Bottom |
8 mm |
| Gun mount | 12 mm (21°) Gun mount 30 mm (6-73°) Gun mantlet |
12 mm (26°) | N/A | N/A |
Notes:
- Suspension wheels and tracks are both 15 mm thick.
- Belly armour is 8.5 mm thick.
Mobility
| Game Mode | Max Speed (km/h) | Weight (tons) | Engine power (horsepower) | Power-to-weight ratio (hp/ton) | |||
|---|---|---|---|---|---|---|---|
| Forward | Reverse | Stock | Upgraded | Stock | Upgraded | ||
| Arcade | 44 | 9 | 13.7 | 234 | 315 | 17.08 | 22.99 |
| Realistic | 40 | 9 | 146 | 165 | 10.66 | 12.04 | |
Armaments
Main armament
| 75 mm Lightweight Type I Model II | Turret rotation speed (°/s) | Reloading rate (seconds) | |||||||||||
|---|---|---|---|---|---|---|---|---|---|---|---|---|---|
| Mode | Capacity | Vertical | Horizontal | Stabilizer | Stock | Upgraded | Full | Expert | Aced | Stock | Full | Expert | Aced |
| Arcade | 40 | -8°/+19° | ±20° | N/A | 5.28 | 7.31 | 8.88 | 9.82 | 10.45 | 7.67 | 6.79 | 6.25 | 5.90 |
| Realistic | 3.57 | 4.20 | 5.10 | 5.64 | 6.00 | ||||||||
Ammunition
| Penetration statistics | |||||||
|---|---|---|---|---|---|---|---|
| Ammunition | Type of warhead |
Penetration @ 0° Angle of Attack (mm) | |||||
| 10 m | 100 m | 500 m | 1,000 m | 1,500 m | 2,000 m | ||
| Type 1 APHE | APHE | 140 | 137 | 125 | 111 | 99 | 88 |
| Type 4 APCR | APCR | 177 | 175 | 151 | 127 | 108 | 91 |
| Type 90 HE | HE | 8 | 8 | 8 | 8 | 8 | 8 |
| Shell details | |||||||||
|---|---|---|---|---|---|---|---|---|---|
| Ammunition | Type of warhead |
Velocity (m/s) |
Projectile Mass (kg) |
Fuse delay (m) |
Fuse sensitivity (mm) |
Explosive Mass (TNT equivalent) (g) |
Ricochet | ||
| 0% | 50% | 100% | |||||||
| Type 1 APHE | APHE | 830 | 6.56 | 1.3 | 15 | 84.8 | 47° | 60° | 65° |
| Type 4 APCR | APCR | 930 | 4.15 | N/A | N/A | N/A | 66° | 70° | 72° |
| Type 90 HE | HE | 830 | 6.17 | 0.1 | 0.1 | 490 | 79° | 80° | 81° |
Ammo racks

Last update: 1.101.0.44
| Full ammo |
1st rack empty |
2nd rack empty |
Visual discrepancy |
|---|---|---|---|
| 40 | 21 (+19) | 1 (+39) | No |
- Left side empty: 21 (+19)
Usage in battles
With the Lightweight Type I Model II tank gun, the Na-To presents a lethal gun that can penetrate all the the tanks at its 3.3 BR range. Assuming it is not upped by another vehicle in the line-up with a higher BR, the worst heavy tank the Na-To could face are the Soviet KV-1S and British Churchill Mk III, both with front armour easily penetratable by the Na-To's 75 mm gun at standard ranges without taking angling into consideration. However, the thin armour of the Na-To does mean that any tank it faces could defeat the Na-To, so always get the first shot off at the enemy.
Playing the Na-To as a sniper support from a long distance from the front-line will provide the Na-To increased survivability and also potentially more targets to aim at than with its limited traverse arc up close. If long range is not possible, keep the Na-To stationed at a cover's corner watching an enemy's frequented area. As soon as one shows up, blast away before retreating to cover.
Modules
| Tier | Mobility | Protection | Firepower | ||
|---|---|---|---|---|---|
| I | Tracks | Parts | Horizontal Drive | ||
| II | Suspension | Brake System | FPE | Adjustment of Fire | Type 4 APCR |
| III | Filters | Crew Replenishment | Elevation Mechanism | ||
| IV | Transmission | Engine | |||
Pros and cons
Pros:
- High penetrating 75 mm cannon can pretty much destroy any vehicle in its BR range.
- Gun can traverse a rather wide angle to the side.
- Six-man crew can provide some degree of crew loss before a crew knockout occurs.
- Rear ammo racks can lessen the chance of front penetrations detonating it.
- Excellent reloading speed for a gun of such high penetration and damage.
Cons:
- Large vehicle, large target.
- Paper-thin armour of overall 12 mm.
- Can be hull-broken.
- Reloads are rather long.
- Front engine an easy target that will immobilize vehicle if hit.
- Open-top crew compartment exposes crew to artillery and airstrikes.
- All the crew are rather lined up, leading to shells able to knock out 2-4 crew members at a time.
- Two prominent ammo racks on the rear sides of the cabin, easy targets to ammo-rack kill.
History
The Type 5 Na-to was a tank destroyer based on the Type 4 Chi-So armored medium tracked carrier developed in 1945. It used a 75 mm tank gun, known as the Type I 75 mm. This was a lighter version of the Type II 75 mm tank gun used by the Chi-To and Chi-Ri.
The Na-To had two prototypes, known simply as the Na-To I and Na-To II. The Na-To I used a variant of the Type I 75 mm gun known as the "Type 1 75 mm Model I". The Na-To II used the Type I 75 mm Model II.
Following trials, the Na-To II was selected over the Na-To I to be mass-produced. An order was placed for 200 vehicles to be made, but by the end of the war only 70 of them were started, with none reaching completion.
Media
Excellent additions to the article would be video guides, screenshots from the game, and photos.
See also
Links to the articles on the War Thunder Wiki that you think will be useful for the reader, for example:
- reference to the series of the vehicles;
- links to approximate analogues of other nations and research trees.
External links
| Japan tank destroyers | |
|---|---|
| Ro-Go Derivatives | Ro-Go Exp. |
| Chi-Ha Derivatives | Ho-Ni I · Ho-Ni III · Ho-Ro · Chi-Ha LG |
| Ho-Ri | Ho-Ri Prototype · Ho-Ri Production |
| Other | Na-To |
| JGSDF | |
| SPRG | Type 60 (C) |
| SPH | Type 75 · Type 99 |
| ATGM | Type 60 ATM |
| Rocket | Type 75 MLRS |
| USA | ▅M36 |
