Difference between revisions of "Light AA Mk I"
(→History) (Tag: Visual edit) |
Colok76286 (talk | contribs) (→Mobility: Added table with mobility characteristics) |
||
| (5 intermediate revisions by 3 users not shown) | |||
| Line 5: | Line 5: | ||
[[File:GarageImage_{{PAGENAME}}.jpg|420px|thumb|left]] | [[File:GarageImage_{{PAGENAME}}.jpg|420px|thumb|left]] | ||
{{Break}} | {{Break}} | ||
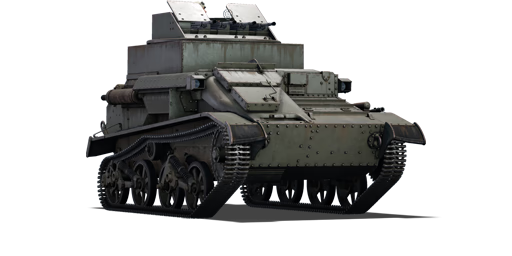
| − | The '''{{Specs|name}}''' is a | + | The '''{{Specs|name}}''' is a rank {{Specs|rank}} British self-propelled anti-aircraft gun {{Battle-rating}}. It was introduced in [[Update 1.79 "Project X"]]. |
| − | This tank makes for a good entry level | + | This tank makes for a good entry-level anti-aircraft vehicle; Good speed, manoeuvrability and a devastating short to medium range AA attack. This vehicle should be used in the rear end of an assault, watching the skies for incoming bogies. However, the real ace is that the guns lack accuracy but the trade-off for a sheer volume of fire, filling the skies with a hailstorm of bullets that can discourage bandits from lining up on an attack run. However, anything beyond effective range won't be struck down effectively. |
== General info == | == General info == | ||
=== Survivability and armour === | === Survivability and armour === | ||
| − | ''Describe armour protection. Note the most well protected and key weak areas. Appreciate the layout of modules as well as the number and location of crew members. Is the level of armour protection sufficient, is the placement of modules | + | ''Describe armour protection. Note the most well protected and key weak areas. Appreciate the layout of modules as well as the number and location of crew members. Is the level of armour protection sufficient, is the placement of modules helpful for survival in combat?'' |
''If necessary use a visual template to indicate the most secure and weak zones of the armour.'' | ''If necessary use a visual template to indicate the most secure and weak zones of the armour.'' | ||
=== Mobility === | === Mobility === | ||
| − | ''Write about the mobility of the ground vehicle. Estimate the specific power and | + | <!-- ''Write about the mobility of the ground vehicle. Estimate the specific power and manoeuvrability, as well as the maximum speed forwards and backwards.'' --> |
| + | |||
| + | {| class="wikitable" style="text-align:center" width="70%" | ||
| + | ! rowspan="2" | Game Mode | ||
| + | ! colspan="3" | Mobility characteristics | ||
| + | ! colspan="2" | Engine power (horsepower) | ||
| + | ! colspan="2" | Power-to-weight ratio (hp/ton) | ||
| + | |- | ||
| + | ! {{Annotation|Max Speed|Maximum Speed (km/h)}} | ||
| + | ! {{Annotation|Weight|Vehicle Weight (tons)}} | ||
| + | ! {{Annotation|AoA Weight|Add on Armour Weight (tons)}} | ||
| + | ! Stock | ||
| + | ! Upgraded | ||
| + | ! Stock | ||
| + | ! Upgraded | ||
| + | |- | ||
| + | ! Arcade | ||
| + | | 55 || rowspan="2" | 4.9 || rowspan="2" | N/A || 125 || 154 || 25.51 || 31.43 | ||
| + | |- | ||
| + | ! {{Annotation|Realistic|Simulator uses Realistic FMs}} | ||
| + | | 50 || 78 || 88 || 15.92 || 17.96 | ||
| + | |} | ||
== Armaments == | == Armaments == | ||
=== Main armament === | === Main armament === | ||
| − | <!--''Give the reader information about the characteristics of the main gun. Assess its effectiveness in a battle based on the reloading speed, ballistics and the power of shells. Do not forget about the | + | <!--''Give the reader information about the characteristics of the main gun. Assess its effectiveness in a battle based on the reloading speed, ballistics and the power of shells. Do not forget about the flexibility of the fire, that is how quickly the cannon can be aimed at the target, open fire on it and aim at another enemy. Add a link to the main article on the gun: <code><nowiki>{{main|Name of the weapon}}</nowiki></code>. Describe in general terms the ammunition available for the main gun. Give advice on how to use them and how to fill the ammunition storage.''--> |
{{main|BESA (7.92 mm)}} | {{main|BESA (7.92 mm)}} | ||
| Line 36: | Line 57: | ||
|- | |- | ||
|| '''3600''' || 288 ''(X+)'' || 576 ''(+)'' || 936 ''(+)'' || 1800 ''(+)'' || style="text-align:left" | Keep full || style="text-align:left" | no | || '''3600''' || 288 ''(X+)'' || 576 ''(+)'' || 936 ''(+)'' || 1800 ''(+)'' || style="text-align:left" | Keep full || style="text-align:left" | no | ||
| + | |- | ||
| + | |} | ||
| + | |||
| + | ===== Optics ===== | ||
| + | |||
| + | ''Explain how the optic's status can affect the tank's gameplay in any unique or meaningful way. A comparison to rival tanks of the rank is welcome.'' | ||
| + | |||
| + | ''If you are having problems with it, refer to the [[Optics|optics gallery]] page for examples.'' | ||
| + | |||
| + | {| class="wikitable" style="text-align:center" width="50%" | ||
| + | ! colspan="3" | {{PAGENAME}} [[Optics]] | ||
| + | |- | ||
| + | ! Which ones | ||
| + | ! Default magnification | ||
| + | ! Maximum magnification | ||
| + | |- | ||
| + | ! Main Gun optics | ||
| + | | x2.1 || x3.7 <!--Sometimes the actual value may not be known and here it should be referenced if the optic values are an estimate such as with an "X8.3 (estimated)" notation or something else that way the user will then be able to look to the comparable optics section and see a referenced optic which will have actual in-game data to back up the claim.--> | ||
| + | |- | ||
| + | ! Comparable optics | ||
| + | | colspan="2;" style="text-align:center;" | [[M13 MGMC]] | ||
|- | |- | ||
|} | |} | ||
| Line 41: | Line 83: | ||
== Usage in the battles == | == Usage in the battles == | ||
<!--''Describe the tactics of playing in the vehicle, the features of using vehicles in the team and advice on tactics. Refrain from creating a "guide" - do not impose a single point of view but give the reader food for thought. Describe the most dangerous enemies and give recommendations on fighting them. If necessary, note the specifics of the game in different modes (AB, RB, SB).''--> | <!--''Describe the tactics of playing in the vehicle, the features of using vehicles in the team and advice on tactics. Refrain from creating a "guide" - do not impose a single point of view but give the reader food for thought. Describe the most dangerous enemies and give recommendations on fighting them. If necessary, note the specifics of the game in different modes (AB, RB, SB).''--> | ||
| − | The key to playing this vehicle effectively is by being patient. Wait until your target is nice close and then let loose. The four machine guns will shred enemy bogies if you aim well so try and nail him before he has a chance to dart out of range. | + | The key to playing this vehicle effectively is by being patient. Wait until your target is nice and close and then let loose. The four machine guns will shred enemy bogies if you aim well so try and nail him before he has a chance to dart out of range. |
Avoid engaging enemy aircraft at long range as the drop-off goes away out of effective range; Not only will you give away your position, the enemy will be very likely to hunt you down and it won't fare well against a direct confrontation with ground units. | Avoid engaging enemy aircraft at long range as the drop-off goes away out of effective range; Not only will you give away your position, the enemy will be very likely to hunt you down and it won't fare well against a direct confrontation with ground units. | ||
| Line 49: | Line 91: | ||
'''Pros:''' | '''Pros:''' | ||
| − | * Great placement as a Rank I SPAA | + | * Great placement as a Rank I SPAA |
| − | * | + | * 4 x BESA machine guns mean a high ammo load and a good rate of fire |
| − | * | + | * 4 x machine guns means that you have a high hit probability |
| − | * Armour provides some protection from machine gun fire, though the gunner is vulnerable if hit | + | * Armour provides some protection from machine-gun fire, though the gunner is vulnerable if hit |
| − | * Excels at taking down fighters | + | * Excels at taking down fighters |
| − | * Can be used against low tier SPAA and open top tank destroyers, however, it is best suited to strictly SPAA duties | + | * Can be used against low tier SPAA and open-top tank destroyers, however, it is best suited to strictly SPAA duties |
| − | * Small and mobile | + | * Small and mobile |
'''Cons:''' | '''Cons:''' | ||
| − | * Cannot defend itself from ground attacks, all belts cannot penetrate any tanks | + | * Cannot defend itself from ground attacks, all belts cannot penetrate any tanks |
| − | * Damage output is | + | * Damage output is nowhere near comparable to SPAA armed with 20 mm autocannons at this tier |
| − | * The gunner is exposed to machine gun fire from above and the front | + | * The gunner is exposed to machine-gun fire from above and the front |
| − | * The armour will not protect you from 12.7mm rounds and above | + | * The armour will not protect you from 12.7mm rounds and above |
| − | * Vulnerable to artillery | + | * Vulnerable to artillery |
== History == | == History == | ||
| − | The machine-gun armed Mark VI light tank formed the bulk of British tank strength in 1939. They were intended for colonial duties and reconnaissance | + | <!--''Describe the history of the creation and combat usage of the ground vehicle in more detail than in the introduction. If the historical reference turns out to be too big, take it to a separate article, taking a link to an article about the vehicle and adding a block "/historical reference" (example: https://wiki.warthunder.com/Name-vehicles/historical reference) and add a link to it here using the <code>main</code> template. Be sure to include links to sources at the end of the article.''--> |
| + | |||
| + | The machine-gun armed Mark VI light tank formed the bulk of British tank strength in 1939. They were intended for colonial duties and reconnaissance but would see front-line combat as late as the British defeats in Java in early 1942. In 1940 they were in use in the light tank squadrons of armoured regiments and the main body of the divisional cavalry regiments. They carried a .50 calibre or 15 mm machine gun as the main armament. They were also used in the early war as command vehicles for armoured units. | ||
| − | As they were withdrawn from service, some Mark VI's were converted to anti-aircraft vehicles, raising the superstructure and replacing the turret. In practice the commander also being the gunner was ineffective. British armoured regiments and tank battalions were supposed to have 4-8 of these vehicles each in mid-1942. By mid-1943 they were taken out of service, replaced for this purpose by the | + | As they were withdrawn from service, some Mark VI's were converted to anti-aircraft vehicles, raising the superstructure and replacing the turret. In practice the commander also being the gunner was ineffective. British armoured regiments and tank battalions were supposed to have 4-8 of these vehicles each in mid-1942. By mid-1943 they were taken out of service, replaced for this purpose by the significantly more versatile 20 mm-armed Crusader AA Mk II tank. |
== Media == | == Media == | ||
Revision as of 11:57, 7 February 2020
Contents
Description

The Tank, Light AA Mk I is a rank I British self-propelled anti-aircraft gun
with a battle rating of 1.0 (AB/RB/SB). It was introduced in Update 1.79 "Project X".
This tank makes for a good entry-level anti-aircraft vehicle; Good speed, manoeuvrability and a devastating short to medium range AA attack. This vehicle should be used in the rear end of an assault, watching the skies for incoming bogies. However, the real ace is that the guns lack accuracy but the trade-off for a sheer volume of fire, filling the skies with a hailstorm of bullets that can discourage bandits from lining up on an attack run. However, anything beyond effective range won't be struck down effectively.
General info
Survivability and armour
Describe armour protection. Note the most well protected and key weak areas. Appreciate the layout of modules as well as the number and location of crew members. Is the level of armour protection sufficient, is the placement of modules helpful for survival in combat?
If necessary use a visual template to indicate the most secure and weak zones of the armour.
Mobility
| Game Mode | Mobility characteristics | Engine power (horsepower) | Power-to-weight ratio (hp/ton) | ||||
|---|---|---|---|---|---|---|---|
| Max Speed | Weight | AoA Weight | Stock | Upgraded | Stock | Upgraded | |
| Arcade | 55 | 4.9 | N/A | 125 | 154 | 25.51 | 31.43 |
| Realistic | 50 | 78 | 88 | 15.92 | 17.96 | ||
Armaments
Main armament
Ammo racks

| Full ammo |
1st rack empty |
2nd rack empty |
3rd rack empty |
4th rack empty |
Recommendations | Visual discrepancy |
|---|---|---|---|---|---|---|
| 3600 | 288 (X+) | 576 (+) | 936 (+) | 1800 (+) | Keep full | no |
Optics
Explain how the optic's status can affect the tank's gameplay in any unique or meaningful way. A comparison to rival tanks of the rank is welcome.
If you are having problems with it, refer to the optics gallery page for examples.
| Light AA Mk I Optics | ||
|---|---|---|
| Which ones | Default magnification | Maximum magnification |
| Main Gun optics | x2.1 | x3.7 |
| Comparable optics | M13 MGMC | |
Usage in the battles
The key to playing this vehicle effectively is by being patient. Wait until your target is nice and close and then let loose. The four machine guns will shred enemy bogies if you aim well so try and nail him before he has a chance to dart out of range.
Avoid engaging enemy aircraft at long range as the drop-off goes away out of effective range; Not only will you give away your position, the enemy will be very likely to hunt you down and it won't fare well against a direct confrontation with ground units.
Pros and cons
Pros:
- Great placement as a Rank I SPAA
- 4 x BESA machine guns mean a high ammo load and a good rate of fire
- 4 x machine guns means that you have a high hit probability
- Armour provides some protection from machine-gun fire, though the gunner is vulnerable if hit
- Excels at taking down fighters
- Can be used against low tier SPAA and open-top tank destroyers, however, it is best suited to strictly SPAA duties
- Small and mobile
Cons:
- Cannot defend itself from ground attacks, all belts cannot penetrate any tanks
- Damage output is nowhere near comparable to SPAA armed with 20 mm autocannons at this tier
- The gunner is exposed to machine-gun fire from above and the front
- The armour will not protect you from 12.7mm rounds and above
- Vulnerable to artillery
History
The machine-gun armed Mark VI light tank formed the bulk of British tank strength in 1939. They were intended for colonial duties and reconnaissance but would see front-line combat as late as the British defeats in Java in early 1942. In 1940 they were in use in the light tank squadrons of armoured regiments and the main body of the divisional cavalry regiments. They carried a .50 calibre or 15 mm machine gun as the main armament. They were also used in the early war as command vehicles for armoured units.
As they were withdrawn from service, some Mark VI's were converted to anti-aircraft vehicles, raising the superstructure and replacing the turret. In practice the commander also being the gunner was ineffective. British armoured regiments and tank battalions were supposed to have 4-8 of these vehicles each in mid-1942. By mid-1943 they were taken out of service, replaced for this purpose by the significantly more versatile 20 mm-armed Crusader AA Mk II tank.
Media
An excellent addition to the article will be video guides, as well as screenshots from the game and photos.
Read also
Links to the articles on the War Thunder Wiki that you think will be useful for the reader, for example,
- reference to the series of the vehicles;
- links to approximate analogues of other nations and research trees.
ETC.
Sources
Paste links to sources and external resources, such as:
- topic on the official game forum;
- other literature.
| Britain anti-aircraft vehicles | |
|---|---|
| Crusader AA | Crusader AA Mk I · Crusader AA Mk II |
| Wheeled | Staghound AA · AEC AA |
| Radar SPAAG | Chieftain Marksman |
| Missile SPAA | Stormer HVM |
| Other | Light AA Mk I · Falcon |
| Canada | Skink |
| South Africa | Ystervark · Bosvark · ZA-35 |
