|
|
| Line 1: |
Line 1: |
| − | {{Specs-Card|code=us_m4_sherman}} | + | {{Specs-Card|code=us_m48a1_patton_III}} |
| | | | |
| | == Description == | | == Description == |
| − | [[File:GarageImage_M4Sherman.jpg|420px|thumb|left]]
| + | ''In the description, the first part needs to be about the history of the creation and combat usage of the vehicle, as well as its key features. In the second part, tell the reader about the ground vehicle in the game. Insert the screenshot of the vehicle. If the novice player does not remember the vehicle by name, they will immediately understand what kind of vehicle it is talking about.'' |
| − | {{Break}}
| |
| − | The '''M4 ''Sherman''''' is a Rank II American medium tank with a battle rating of 3.7 (AB/RB/SB). It was introduced along with the rest of the American ground tree in [[Update 1.45 "Steel Generals"]].
| |
| − | | |
| − | Armed with a 75 mm cannon and a sloped front armour, the M4 Sherman gives the balance of fire power and mobility for the US ground tree. The in-game model represents a "Sherman 1.5" design with a M55 telescopic sight in a new gun mantlet with appliqué armour added in front of the gunner and on the ammo racks.
| |
| − | | |
| − | The iconic American medium tank has a very distinctive silhouette with its high front sloping armour, flat sides, and rounded turret shape. The olive-drab green M4 medium uses a welded construction for the hull, resulting in the sharp edged hull shape compared to the [[M4A1|cast M4A1 medium]]. The turret, constructed the same way with cast in all 75 mm M4 medium variants, used a M34A1 gun mount for the 75 mm M3 gun; a change from the M34 gun mount in that the M34A1 used a combination of a M55 telescopic sight and a M4 periscope with a M38 telescopic sight in it.
| |
| − | | |
| − | The hull's sloping glacis is at 56 degrees, as usual with the early model of M4 Shermans. The model is a "small hatch" variant as seen with the parallel hatch shape with the hull. This configuration also caused the hull to protrude with the hatch for the driver and assistant driver, resulting in the interruptions in the slope that compromises the sloped armour overall effectiveness. To mitigate this problem, armour plates are welded in front of the interruptions for additional protection. Aside from this note, some other features on the front glacis are the bundled desert-coloured jerry cans in the driver's area and the road wheel right on the transmission cover. On the side hull, one distinctive feature of the M4 Sherman was the added appliqué over the sponson ammunition area. While this does provide minute protection, they also serve as highlights for the enemy to aim for an ammo rack destruction.
| |
| − | | |
| − | The 75 mm cast turret, designated D50878, was one produced in early 1943. The early M34A1 gun mount design added onto the tank as well as an appliqué "cheek" in front of the gunner, as the redesign of the turret and room for the power traverse caused the armour in front of the gunner to be thinner than the rest of the turret. The M34A1 gun mount is noted as early due to the presence of lifting rings on the top of the gun mount as well as mounting bolts on the sides, both that are eliminated in the later model. A curious note for keen eyes is the lack of a loader hatch on the turret top, a feature not introduced until productions in late 1943. Another note is the pistol port on the left rear side of the turret. On top of the commander's cupola is the distinctive .50 cal M2 Browning machine gun that is commonly seen on American vehicles.
| |
| − | | |
| − | The M4 medium's use of the Continental R975 radial engine results in a distinctive engine deck as well. It has a protruding hood over the air intake on top, followed by a relatively flat top all the way to the rear. Besides the hooded air intake on both sides within the shielded wall are filler ports for the radiators. Outside of the wall are two more filler ports for the fuel tanks on both sides. On the very rear, the large engine doors are visible, featuring early door hinges used as early as the M3 medium. On both sides of the door, engine filters are also present.
| |
| | | | |
| | == General info == | | == General info == |
| | === Survivability and armour === | | === Survivability and armour === |
| − | '''Armour type:''' | + | ''Describe armour protection. Note the most well protected and key weak areas. Appreciate the layout of modules as well as the number and location of crew members. Is the level of armour protection sufficient, is the placement of modules helpfull for survival in combat?'' |
| | | | |
| − | *Rolled homogeneous armour (Front, Side, Rear, Hull roof)
| + | ''If necessary use a visual template to indicate the most secure and weak zones of the armour.'' |
| − | *Cast homogeneous armour (Turret, Transmission area)
| |
| − | | |
| − | {| class="wikitable"
| |
| − | |-
| |
| − | ! Armour !! Front (Slope angle) !! Sides !! Rear !! Roof
| |
| − | |-
| |
| − | | Hull || 50.8 mm (56°) ''Front glacis'' <br> 50.8 mm (12-56°) ''Transmission area'' <br> 50.8 (13-20°) + 25.4 mm (35°) ''Protruding hatches'' || 38.1 mm <br> 38.1 + 25.4 mm ''Appliqué addition'' || 38.1 mm (0-10°) ''Top'' <br> 25.4 mm (33-64°) ''Bottom'' || 19.5 mm ''Sides'' <br> 12.7 mm ''Engine deck and center''
| |
| − | |-
| |
| − | | Turret || 76.2-88.9 mm (4-67°) ''Turret front'' <br> 50.8 + 88.9 mm ''Gun mantlet'' || 50.8 mm (0-68°) || 50.8 mm (2-66°) || 25.4 mm
| |
| − | |-
| |
| − | ! Armour !! Sides !! Roof
| |
| − | |-
| |
| − | | Cupola || 50.8 mm || 25.4 mm
| |
| − | |-
| |
| − | |}
| |
| − | '''Notes:'''
| |
| − | | |
| − | * Suspension wheels are 15 mm thick, bogies are 10 mm thick, and tracks are 20 mm thick.
| |
| − | * Front armour has two protruding areas for driver and co-driver hatches. These are weak points as they present a flat armour surface.
| |
| − | * Belly armour is 12.7 mm thick.
| |
| | | | |
| | === Mobility === | | === Mobility === |
| − | {| class="wikitable" style="text-align:center"
| + | ''Write about the mobility of the ground vehicle. Estimate the specific power and maneuverability as well as the maximum speed forward and backward.'' |
| − | |-
| |
| − | ! colspan="4" | Mobility characteristic
| |
| − | |-
| |
| − | ! colspan="2" | Weight (tons)
| |
| − | ! colspan="2" | Max speed (km/h)
| |
| − | |-
| |
| − | | colspan="2" | 30.6 || colspan="2" | 42
| |
| − | |-
| |
| − | ! colspan="4" | Engine power
| |
| − | |-
| |
| − | ! colspan="2" | Stock (hp/ton ratio)
| |
| − | ! colspan="2" | Upgraded (hp/ton ratio)
| |
| − | |-
| |
| − | | colspan="2" | 620 (20.26) || colspan="2" | 763 (24.93)
| |
| − | |-
| |
| − | |}
| |
| − | | |
| − | The M4 Sherman is powered with an engine able to adequate for it weight class, coming with a hp/ton ratio of 11 ish. While accelerating up to this speed can be sluggish at first, the M4 Sherman takes to a running start after Gear 4.
| |
| | | | |
| | == Armaments == | | == Armaments == |
| | === Main armament === | | === Main armament === |
| − | {{main|M3 (75 mm)}} | + | {{main|M41 (90 mm)}} |
| | | | |
| | {| class="wikitable" style="text-align:center" | | {| class="wikitable" style="text-align:center" |
| | |- | | |- |
| − | ! colspan="5" | [[M3 (75 mm)|75 mm M3]] | + | ! colspan="5" | [[M41_(90_mm)|90 mm M41]] |
| | |- | | |- |
| | ! colspan="3" rowspan="1" style="width:5em" |Capacity | | ! colspan="3" rowspan="1" style="width:5em" |Capacity |
| Line 75: |
Line 25: |
| | ! rowspan="1" | Gun <br> Elevation | | ! rowspan="1" | Gun <br> Elevation |
| | |- | | |- |
| − | | colspan="3" | 97 || -10° || 25° | + | | colspan="3" | 60 || -9° || 19° |
| | |- | | |- |
| | ! colspan="5" | Turret rotation speed (°/s) | | ! colspan="5" | Turret rotation speed (°/s) |
| Line 85: |
Line 35: |
| | ! style="width:4em" |Prior + Ace Qualif. | | ! style="width:4em" |Prior + Ace Qualif. |
| | |- | | |- |
| − | | 14.28 || 19.80 || 24.0 || 26.60 || 28.20 | + | | 14.28 || 16.80 || 20.4 || 22.60 || 24.00 |
| | |- | | |- |
| − | ! colspan="4" | Reloading rate | + | ! colspan="4" | Reloading rate (seconds) |
| | |- | | |- |
| | ! colspan="1" style="width:4em" |Stock | | ! colspan="1" style="width:4em" |Stock |
| Line 94: |
Line 44: |
| | ! colspan="1" style="width:4em" |Prior + Ace Qualif. | | ! colspan="1" style="width:4em" |Prior + Ace Qualif. |
| | |- | | |- |
| − | | 6.50 || 5.75 || 5.30 || 5.00 | + | | 9.75 || 8.63 || 7.95 || 7.50 |
| | |- | | |- |
| | |} | | |} |
| − |
| |
| | | | |
| | ===== Ammunition ===== | | ===== Ammunition ===== |
| Line 114: |
Line 63: |
| | ! 2000m | | ! 2000m |
| | |- | | |- |
| − | | M72 shot || AP || 110 || 109 || 92 || 76 || 62 || 51 | + | | M332 shot || APCR || 271 || 270 || 245 || 217 || 192 || 170 |
| | |- | | |- |
| − | | M48 shell || HE || 10 || 10 || 10 || 10 || 10 || 10 | + | | M82 shot || APCBC || 170 || 169 || 164 || 151 || 138 || 127 |
| | |- | | |- |
| − | | M61 shot || APCBC || 90 || 88 || 81 || 73 || 65 || 59 | + | | M431 shell || HEATFS || 320 || 320 || 320 || 320 || 320 || 320 |
| | + | |- |
| | + | | M71 shell || HE || 13 || 13 || 13 || 13 || 13 || 13 |
| | + | |- |
| | + | | T142E3 || HESH || 102 || 102 || 102 || 102 || 102 || 102 |
| | |- | | |- |
| | |} | | |} |
| Line 139: |
Line 92: |
| | ! 100% | | ! 100% |
| | |- | | |- |
| − | | M72 shot || 619 || 6.3 || N/A || N/A || N/A || -1° || 47° || 60° || 65° | + | | M332 shot || 1178 || 5.6 || N/A || N/A || N/A || +1.5° || 66° || 70° || 72° |
| | |- | | |- |
| − | | M48 shell || 463 || 6.3 || 0.4 || 0.5 || 666 || +0° || 79° || 80° || 81° | + | | M82 shot || 853 || 11 || 1.2 || 20 || 137.2 || +4° || 48° || 63° || 71° |
| | |- | | |- |
| − | | M61 shot || 618 || 6.8 || 1.2 || 20 || 63.7 || +4° || 48° || 63° || 71° | + | | M431 shell || 1216 || 5.8 || 0.0 || 0.1 || 712.64 || +0° || 65° || 72° || 75° |
| | |- | | |- |
| | + | | M71 shell || 823 || 11 || 0.1 || 0.5 || 925 || +0° || 79° || 80° || 81° |
| | + | |- |
| | + | | T142E3 || 792 || 11 || 0.4 || 0.1 || 792 || +0° || 73° || 77° || 80° |
| | + | |- |
| | |} | | |} |
| | {| class="wikitable sortable" style="text-align:center" | | {| class="wikitable sortable" style="text-align:center" |
| Line 157: |
Line 114: |
| | ! ''Explosive Mass in g<br /> (TNT equivalent):'' | | ! ''Explosive Mass in g<br /> (TNT equivalent):'' |
| | |- | | |- |
| − | | M89 || 259 || 3 || 13 || 5 || 20 || 50 | + | | M313 || 821 || 11 || 13 || 5 || 20 || 50 |
| | |- | | |- |
| | |} | | |} |
| Line 176: |
Line 133: |
| | ! class="wikitable unsortable" |Visual<br /> discrepancy | | ! class="wikitable unsortable" |Visual<br /> discrepancy |
| | |- | | |- |
| − | || '''97''' || 85 ''(+12)'' || 73 ''(+24)'' || 61 ''(+36)'' || 49 ''(+48)'' || 37 ''(+60)'' || 25 ''(+72)'' || 13 ''(+84)'' || 1 ''(+96)'' || style="text-align:center" | Yes | + | || '''60''' || 54 ''(+6)'' || 38 ''(+22)'' || 30 ''(+30)'' || 12 ''(+48)'' || 1 ''(+59)'' || style="text-align:center" | No |
| | |- | | |- |
| | |} | | |} |
| | | | |
| | === Machine guns === | | === Machine guns === |
| − | {{main|Browning M2 (12.7 mm)|Browning (7.62 mm)}} | + | <!--''Offensive and anti-aircraft machine guns not only allow you to fight some aircraft, but also are effective against lightly armoured vehicles. Evaluate machine guns and give recommendations on its use.''--> |
| − | | + | {{main|M85 (12.7 mm)|M73 (7.62 mm)}} |
| − | * 12.7 mm [[Browning M2 (12.7 mm)|M2HB]] heavy machine gun (pintle mount)
| |
| − | * 7.62 mm [[Browning (7.62 mm)|M1919A4]] machine gun (coaxial)
| |
| − | | |
| − | The M4 Sherman is armed with two machine guns, a 12.7 mm heavy machine gun on the pintle-mount atop the M4 Sherman turret, the famous .50 cal "Ma Deuce" machine gun. This weapon is the same type as the one used in American aircraft, though at a lower fire rate. However, this leads to the anti-aircraft power of the weapon as most formidable against low strafing attacking aircraft.
| |
| | | | |
| − | The second machine gun is a general-purpose 7.62 mm M1919A4 Browning machine gun mounted in the coaxial position. A typical machine gun not too unlike on many other vehicles, the machine gun is just average.
| + | * 12.7 mm [[M85_(12.7_mm)|M85]] heavy machine gun (Commander's cupola) |
| | + | * 7.62 mm [[M73_(7.62_mm)|M73]] machine gun (coaxial) |
| | | | |
| | == Usage in the battles == | | == Usage in the battles == |
| − | The M4 Sherman is an effective medium-range combat tank. Equipped with a fast-firing 75mm gun and with good handling characteristics, the M4 can be an extremely useful asset in most battles.
| + | ''Describe the tactics of playing in the vehicle, the features of using vehicles in the team and advice on tactics. Refrain from creating a "guide" - do not impose a single point of view but give the reader food for thought. Describe the most dangerous enemies and give recommendations on fighting them. If necessary, note the specifics of the game in different modes (AB, RB, SB).'' |
| − | | |
| − | In battle the M4 performs well as an all-rounder; the thick turret front and 10 degrees of gun depression make the tank ideal for taking hull-down positions which protect the thinner hull armour from being penetrated by enemy fire. The sloped front upper glacis, when angled, also provides good protection against enemy fire. An unusual - and useful - difference is that the upper glacis is sloped at 56 degrees rather than the standard 45 degrees, making it more of a threat and more powerful due to improving the chances of a round ricochet. The only downfall may be the 2 crew member position in the front that protrudes out to form a flat surface, but both are covered with an additional 20 mm plate. The reasonable mobility of the Sherman makes flanking a viable tactic. The main weakness of the M4 is the side armour - not only is it vertical and thin, but behind it most of the ammunition is stowed. The tall silhouette of the tank also makes finding suitable cover difficult. Overall, the M4 Sherman can be considered as an armoured jack-of-all trades - it will serve a tanker well, however it will not excel in any particular role.
| |
| − | | |
| − | === Tactics ===
| |
| − | In battle, try to use terrain as cover. Hull-down positions are especially strong in the M4 Sherman, as it has a good 10 degrees of gun depression. The gun mantlet and turret is reasonably strong, but avoiding shots is still the best strategy. In this respect, a hull-down position hides the vulnerable hull. If this is not available, then angling the hull armour to present a greater slope is often a good idea, as this can bounce some low-powered cannon at any range and at longer ranges, render the hull impenetrable.
| |
| − | | |
| − | Another way to play the M4 Sherman is to tap into its traditional cavalry role, its mobility. The M4 Sherman is a great flanker as it is fast enough to get the jump on the enemy's side. Defeat the enemy at their weak front lines or go around the entire enemy force. Once in position at their sides or rear, ambush them. Ideally, the enemy should be too busy focusing on allies attacking in the front to notice the M4 instantly. Take out the weaker light or medium tanks, the 75 mm gun is not very ideal against heavy tanks like the [[KV-1 (L-11)|KV-1]] so take out its friends to allow allies more room to outmaneuver the KV tank. An organized attack will increase the M4 chances on the battlefield and success.
| |
| − | | |
| − | The presence of a pivot-mounted .50 caliber machine gun gives the Sherman some flexibility. It can engage softer targets such as some tank destroyers and many SPAAGs at short ranges, when loading a HE shell would be inconvenient. While not ideal, they provide the Sherman tank some measure of protection against aircraft- sometimes enough to dissuade a pilot from making another pass. It can be an effective rang-finder for targets at longer ranges where the M1919 in the turret would be less effective. While it pales in comparison to the destructive effect of tank guns, it provides the Sherman some flexibility over other comparable vehicles, who are restricted to their rifle-caliber coaxial machine guns.
| |
| − | | |
| − | ===Specific enemies worth noting===
| |
| − | A vehicle that the M4 Sherman will have trouble against is the KV-1. While the [[KV-1 (L-11)|L-11]] is underpowered, the [[KV-1 (ZiS-5)|ZiS-5]] is potent enough to punch through the Sherman's front, and the Sherman is unable to penetrate the KV-1's thick frontal armour. If this heavy tanks is encountered, try to shoot it in its sides and rear, where its armour is thinner and unsloped, though it will still have to be at a close range to penetrate the armour. In addition, shots to the sides will most likely hit fuel tanks or ammunition storage, causing a fire or ammunition detonation and at best, time to reassess the situation.
| |
| − | | |
| − | '''Panzer IV F2/G/H/J'''<br>
| |
| − | The historical nemesis of any Sherman, the Panzer IV is one of the Shermans biggest threats at this rank. The long barrel 75mm gun will easily penetrate the Sherman from the front. The F2 variant is admittedly easy to deal with. A single APCBC to its hull or turret should end it pretty quickly, even at long range. The other variants are slightly harder to deal with. They have thicker hull armour, at 80mm, which will be much harder to penetrate with the APCBC over 500m. Luckily the turret armour remains the same at 50mm. Either aim here with APCBC or sacrifice damage potential and use the AP round to penetrate the hull.
| |
| − | | |
| − | '''StuG III F/G'''<br> | |
| − | Another historical nemesis of the Sherman, and another big threat. The StuG III packs the same punch as the Panzer IV line with its long barrel 75mm gun, whilst losing the turret, which turns out to be both an advantage and a disadvantage. Lacking a turret means that it will have to traverse the whole vehicle to target an enemy, but it also means that it has a lower profile. The StuG's armour profile is also more complex than the Panzer IV, with less flat areas. Certain areas are sloped and very bouncy. Luckily, there is a big weak spot. There are two flat plates on the front of the hull. The flat plate on the right is the drivers port. Shoot that and you are able to kill the driver, gunner and loader in one go. This is a very efficient way to destroy this vehicle. With the F variant you can use APCBC to instantly one shot this vehicle. With the G variant it is more reliable to use AP at ranges over 500m to ensure penetration.
| |
| − | | |
| − | === Modules ===
| |
| − | {| class="wikitable"
| |
| − | ! Tier
| |
| − | ! Mobility
| |
| − | ! Protection
| |
| − | ! Firepower
| |
| − | |-
| |
| − | | I
| |
| − | | [[File:Module_tank_tracks.jpg|x50px|link=]]
| |
| − | | [[File:Module_tank_parts.jpg|x50px|link=]]
| |
| − | | [[File:Module_tank_horizontaldrive.jpg|x50px|link=]]
| |
| − | |-
| |
| − | | II
| |
| − | | [[File:Module tank suspension.jpg|x50px|link=]] [[File:Module_tank_brakesystem.jpg|x50px|link=]]
| |
| − | | [[File:Module_tank_FPE.jpg|x50px|link=]]
| |
| − | | [[File:Module_tank_adjustmentoffire.jpg|x50px|link=]] [[File:Module_tank_ammo_APCBC_M61.jpg|x50px|link=]]
| |
| − | |-
| |
| − | | III
| |
| − | | [[File:Module_tank_filters.jpg|x50px|link=]]
| |
| − | | [[File:Module_tank_crewreplenishment.jpg|x50px|link=]]
| |
| − | | [[File:Module_tank_elevationmechanism.jpg|x50px|link=]]
| |
| − | |-
| |
| − | | IV
| |
| − | | [[File:Module_tank_transmission.jpg|x50px|link=]] [[File:Module_tank_engine.jpg|x50px|link=]]
| |
| − | |
| |
| − | | [[File:Module_tank_artillerysupport.jpg|x50px|link=]] [[File:Module_tank_ammo_Smoke_M89.jpg|x50px|link=]]
| |
| − | |-
| |
| − | |}
| |
| − | | |
| − | At this rank, the difference between a stock tank and an upgraded one are quite minimal as the M4 Sherman still has adequate firepower and mobility to make a difference on the front-lines. The most notable traits would be sluggishness due to the engine and general inaccuracy over long ranges.
| |
| − | | |
| − | Focus on the survival parts, and then move on towards the M61 shot module, which will improve one-shot kills great.
| |
| − | Module section concept
| |
| | | | |
| | === Pros and cons === | | === Pros and cons === |
| | + | <!--''Summarize and briefly evaluate the vehicle in terms of its characteristics and combat effectiveness. Mark its pros and cons in a bulleted list. Do not use more than 6 points for each of the characteristics. Avoid using categorical definitions such as "bad", "good" and the like - they have a substitution in the form of softer "inadequate", "effective".''--> |
| | '''Pros:''' | | '''Pros:''' |
| − | | + | * Very fast reload for the rank. |
| − | * 75 mm gun can prove quite effective with a generally fast firing rate with adequate beyond-armour damage with the M61 round. | + | * Semi-hemispherical design removes shot traps seen on [[M47|M47 Patton]]. |
| − | * Very mobile once accelerated to a certain speed. | + | * Better sloped armour than its predecessors. |
| − | * Front armour is very resilient and well-sloped with minimal weak spots. | + | * Access to HEATFS when unlocked. |
| − | * Pintle mounted HMG provides anti-aircraft defense. | + | * Strong roof armour of 57 mm on the hull. |
| − | * Jack of all trades; can accomplish most roles on the battlefield. | |
| | | | |
| | '''Cons:''' | | '''Cons:''' |
| − | | + | * Quite underarmoured for the rank. |
| − | * 75 mm gun may not prove the most penetrative weapon against its contemporaries. | + | * Same ammunition stats as the M47, which may not be the best at the rank except the HEATFS round. |
| − | * Front glacis has driver and co-driver hatch protruding from front armour, exposing some weak points. | + | * Slower turret traverse rate. |
| − | * Weak side armour. | + | * Painful stock grind due to having APCR as default ammo. |
| − | * Fuel tanks and ammunition stored in upper hull; penetrating shots are prone to setting these off. | + | * Turret roof armour is 25 mm at its thinnest, which can allow even air attacks with heavy machine guns to penetrate at preferential conditions. |
| − | * Ammunition is highlighted by bulges in the side armour. | |
| − | * High profile makes it an easier target than most.
| |
| − | * Jack of all trades, but is thus not very specialized in any specific role.
| |
| | | | |
| | == History == | | == History == |
| − | The Battle of France in 1940 proved to America that their current tank arsenal would not be able to withstand a German assault. The only tanks in their inventory at that time was the [[M2A4|M2 light tank]] and the [[M2|M2 medium tank]], both are inadequate against the German [[Pz.III F|Panzer IIIs]] and the [[Pz.IV F1|Panzer IVs]]. The US Army, in response, ordered for a tank armed with a 75 mm gun. While a 75 mm gun was available for use, a turret able to mount the gun was not. So while the turret and tank design underwent development, the 75 mm would be mounted on the stopgap [[M3 Lee|M3 Lee]] tank in a sponson mount. This interim design put the 75 mm on a lower and limited traverse mount that restricted its firing angle, but it did give the Western Allies a tank with the gun, so it was issued by the thousands until a better design could be produced.
| + | <!--''Describe the history of the creation and combat usage of the ground vehicle in more detail than in the introduction. If the historical reference turns out to be too big, take it to a separate article, taking a link to an article about the vehicle and adding a block "/historical reference" (example: https://wiki.warthunder.com/Name-vehicles/historical reference) and add a link to it here using the <code>main</code> template. Be sure to include links to sources at the end of the article.''--> |
| − | | + | ===Development=== |
| − | During the M3 medium's development, the designs of the 75 mm armed vehicle were being drawn up and submitted by the Ordnance Department. Specifications on the tank design were strict in order to maximize logistical support. Restrictions were made on the tank's height, width, and weight in order to make it able to be transported over bridges, roads, railroads, and on naval ships. These specifications would help the Army by making the tank be very flexible on strategic, logistical, and tactical grounds. On April 1941, the Armored Force Board chose the simplest of the designs, which was a redesigned M3 hull and chassis with a turret mounting the 75 mm gun designated the ''T6'', completed in September 1941. This tank would then designated the '''Medium Tank M4''' in American service. The tank would eventually become the most used Allied tank during World War II as it was lended out by the thousands in the Lend-Lease program to the Allied countries. The British designated the M4 the "[[Sherman II|Sherman]]", which coined into the tank's name '''M4 Sherman''' that it would be known as in history. The production for the Shermans began on October 1941 and would continue to be produced until the end of the war in 1945 with around 50,000 units produced, making it the second most-produced tank in World War II before the [[T-34 (1942)|T-34 tank]].
| + | In February 1951, Ordnance opted for a new tank design to modernize the [[M46]] and [[M47]] in the U.S. inventory. The tank was designated the ''90 mm Gun Tank T-48'' and featured a new hemispherical turret, new hull, and an improved suspension. The new design was also the first to remove the hull machine gunner position in American tanks, reducing the total crew from the usual 5 to 4. Further testing and trials with the T-48 design proved its worth and in April 1953, Ordnance standardized the design as the '''90 mm Gun Tank M48 Patton''', which would be the third in the [[Patton]] series, all named after General George S. Patton. |
| − | | |
| − | === Design === | |
| − | Many variants of the Shermans were produced, but they all followed a similar layout. The driver and bow gunner sat in the front driving compartment, the fighting compartment in the middle housed the turret its three crew member, and in the back was the engine compartment. The Sherman used many features present in previous American tank designs, the vertical volute suspension system (VVSS) and radial engine from the [[M2A4|M2 Light Tanks]], and the sloping armour of the [[M2|M2 Medium Tanks]]. This became a contributing factor on the Sherman's reliability on the field, as most of the design flaws were ironed out with the previous tank designs. The tank mounted the 75 mm M3 gun, giving the tank very good AP and HE capabilities. The Sherman's turret traverse speed was very fast, able to traverse a full 360 degrees in only 15 seconds, which is considerably faster than the traverse speed on most German tanks. Another unique feature on the Sherman was the installation of a gyroscopic stabilizer on the gun and sight, making the Sherman one of the first produced tanks to incorporate those features. While the stabilization was only done for the vertical plane, it kept the gun stable enough to be able to shoot on the move effectively, with a study showing a 70 % hit probability on an enemy 300 to 1,200 yards away when moving at a speed of 15 mph. However, this feature was controversial among the crew and experiences with it vary.
| |
| − | | |
| − | The '''M4 Sherman''' model ran on a gasoline Continental R975 radial engine and was one of the first models of the Sherman developed. The early M4 Sherman featured the M38 telescopic sight in the M4 periscope with no zoom, but experience in North Africa and recommendations from the British changed the sight into the M55 telescopic sight integrated in the gun mantlet.<ref name="ZalogaArmorT1">Zaloga Steven. ''Armored Thunderbolt: The U.S. Army Sherman in World War II'' Stackpole Books, 2008, "Baptism Of Fire"</ref> This change in sights required appliqué armour to be added at the turret area in front of the gunner since the modification left the area weaker than the overall turret. This problem would be fixed in later-production models of the M4 Sherman. The tank's hull was welded, with the front armour plate placed on a 56 degree sloping angle. An early design defect with the design was the protruding armoured hatches for the driver and assistant driver. These protrusions creates "shot traps" as they were in a near vertical position that gave less protection on the front armour than the sloping areas. This was fixed on later models as well. Up to 6,748 M4A1s were produced from July 1942 to January 1944, out of the 49,234 total Sherman units produced in the war.
| |
| − | | |
| − | ===Combat Usage===
| |
| − | ====European Theater====
| |
| − | The Shermans first saw combat in the North African Campaign in the Second Battle of El Alamein on October 1942 in the hands of the British. It was much quicker to reinforce the British armoured divisions with the more than 300 Shermans sent to North Africa than it was to create new American ones. It proved much better than the German [[Pz.III F|Panzer IIIs]] and [[Pz.IV F1|Panzer IVs]], able to eliminate them at distances more than 2,000 yards away. The Americans received their first Shermans in the next month in Operation Torch. However better the Shermans were to the German tanks at the time, the Allied armoured units still suffered casualties against the German tanks and anti-tank guns, most notably in the Battle of Kasserine Pass. In Italy, the Shermans proved much more mobile than the German Panzers, able to travel cross-country on the hilly terrain with ease. However, it was at this stage that the Sherman's shortcoming began to take face in the advent of the newer German tanks, the [[Tiger H1|Tiger Is]] and [[Panther D|Panthers]]. These two tanks featured armour that proved impenetrable when fired at the front, and with guns that could take out the Shermans from farther than the Sherman's effective combat range. The Shermans have to hit the side of these tanks for a penetration, and at ranges that were considered suicidal. Although programs were initiated to [[M4A1 (76) W|up-gun the Sherman with a 76 mm gun]], American leaders determine that the Panther and Tigers would not be produced in large quantities and were not as great as a threat as these two vehicles could still be destroyed by the 75 mm gun and standard anti-tank equipment. | |
| − | | |
| − | During the invasion of France, it was clear that the Sherman's current build with a 75 mm gun was no longer going to cut it against the German armoured forces. While the Sherman was adequate against what little Panzer III and IVs the Germans have left and against infantry and fortifications with the 75 mm gun, the Panthers and Tigers were in much large quantity than expected, and proved better in armour and firepower to the Shermans. Though in the bocage country of France, the Allies lost more tanks to hidden anti-tank guns and infantry weapons than to tanks. Despite these losses, the mass production of M4 Sherman back in the United States ensured that enough tanks were available for the Allied Forces as they spearhead through France, plus the lack of any other capable tanks meant they had to use the Shermans for the time being. The large quantities of Shermans produced during the war gave the Allied armoured units a major advantage of being fully equipped as the German panzer divisions were rarely in full strength, with some US infantry divisions having more tracked vehicles than some of the panzer divisions. Due to the high attrition rates, tank crews sometimes add [[Add-on_Armor|improvised armour]] onto their Shermans in the form of sandbags and logs in hopes of increased survival, but these were determined to be ineffective from evaluations. A more effective method was to have metal armour welded on in improvisation, and an official project was made for such "assault tanks" that ended with the [[M4A3E2|M4A3E2 "Jumbos"]] with 254 made for the fighting in Europe. The Allies continued to use 75 mm Shermans until the Battle of the Bulge in Winter 1944, when the commanders request only 76 mm Shermans to be brought into Europe as the battle showed the intense armour disparity with the German's large numbers of [[Panther G|Panthers]] and [[Tiger II (H)|Tiger II tanks]]. While new units arriving in Europe were armed exclusively with 76 mm armed-Shermans, the veteran units kept the 75 mm Shermans, to which it continued to do well against softer targets with little threat from German armour due to their declining numbers.
| |
| | | | |
| − | ====Pacific Theater====
| + | Production started in 1952 with the original ''M48'' models. During the initial production run, several hundreds of the M48s were found to not be up to the standard protection ratings it should be, these were relegated to training tanks as the ''M48C''. The model was developed into the '''M48A1''' with a redesigned driver hatch and commander's cupola that integrates a .50 cal machine gun for the commander to use. Next variant was the ''M48A2'' with an improved power pack and transmission, along with a new rear plate and improved turret control. The M48A1 models improved with the M48A2 specifications in 1959, up to 1,019 were converted and are labeled the ''M48A3''. The last major model was the ''M48A5'', which is a upgrade of the M48 models in the 1970s with a the [[M68_(105_mm)|105 mm Gun M68]], up to 2,069 converted. In total, about 12,000 M48 models were produced in all from the time period of 1952 to 1959. |
| − | The M4 Sherman's importance in the Pacific theater was less than that of the European theater due to the different tactical doctrine established from the amphibious nature of combat. Only about 20 tank battalions fielded by the US Army were sent to support the Pacific theater of operations, compared to the total 16 armored divisions and 70 tank battalions they have in service. The low priority in tanks were due to the following reasons. Firstly, the jungle terrain on most of the islands fought on were unsuitable for the deployment of large-scale armoured units, relegating armour support to light tanks such as the [[M3 Stuart|M3 Stuarts]]. Secondly, the Japanese forces' armoured units were rather inferior to the American tank forces by 1943. While the Japanese [[Ha-Go|Type 95 Ha-Go]] tank was comparable to the [[M2A4|M2A4 Light Tank]], the Shermans out gun these tanks by a large margin. Such a large margin that the tank crew prefer to use high-explosive shots against the Japanese tank than regular armour-piercing as the AP rounds would penetrate straight through without causing much damage in the interior of the tank. The Japanese developed the [[Chi-Nu|Type 3 Chi-Nu]] and the [[Chi-To|Type 4 Chi-To]] to fight back the Shermans, but these two never saw combat as they were kept at the Japanese homeland for the defense against the Allied invasion.
| |
| | | | |
| − | The Shermans, when deployed, were superior to most of the Japanese anti-tank equipment and often were essential to some of the Marines advances on some of the island assaults. In 1945, the equipping of flamethrower Shermans known as ''M4A3R3'', nicknamed "Zippos", were a significant boost to the infantry's firepower in having a very long range of fire compared to the standard infantry-modeled flamethrowers with the benefit of being in an armoured vehicle. The Japanese solution against the Shermans, other than with their 47 mm anti-tank guns, were often suicidal tactics ranging from placing satchel charges right onto the tank, using pole-mounted anti-tank mines to reach and destroy the tank, or even simply throwing oneself underneath a tank with a mine or other explosive and triggering it manually. | + | ===Combat usage=== |
| | + | The Americans mainly used the M48A3 Patton tanks in Vietnam, with 600 models deployed. Each battalions in the US Army and Marines armed with the M48 Pattons had 57 tanks each. The Armored Cavalry Squadrons were initially armed with M48s before they were replaced by the lighter [[M551|M551 Sheridan]]. A flamethrower variant was developed from the M48, which became known as the ''M67A1 "Zippo"''. The M48 also strengthened the Army of the Republic of Vietnam (ARVN) forces by supplementing their [[M41A1|M41A1 Walker Bulldog]] light tanks. The main armour conflicts between the North and South Vietnamese forces usually involved a armour mix of [[T-54_(1951)|T-54]]/[[PT-76B]] for the North and M48 Pattons/M41A1 Bulldogs for the South. In the conflicts, an incident in 23 April 1972 had a NVA anti-tank force with the new 9M14M Malyutka [[Anti-tank_guided_missiles|anti-tank guided missile]] destroy a M48 Patton, marking one of the early uses of the wide-spread infantry anti-tank missiles. Despite that, the M48s performed favorably in the Southern forces. Even after US forces withdrew from South Vietnam and North Vietnam started the Ho Chi Minh Offensive in 1975, the M48s left in the ARVN hands were able to hold back the assaulting [[T-34-85|T-34]] and T-54/55 tanks, only falling when supplies ran out. After the war, the Americans mainly replaced their main tanks with the [[M60|M60 Patton]]. |
| | | | |
| − | ==== Lend-Lease ====
| + | Like with most of American equipment, the M48s were supplied to NATO allies across the world to assist in their conflicts. They became involved in the Indo-Pakistani War of 1965 and 1971 in the hands of Pakistan along with some [[M47|M47s]] against India's [[Centurion_Mk_3|Centurions]]. Its overall performance in the conflicts was that they performed very well in the battlefield, only failing due to the poor tactics used by the armour forces. The M48s also saw service in the Middle Eastern conflicts. It was notably used in the conflicts against Israel in the Six-Day War of 1967 and the Yom Kippur War of 1973 in the hands of the Israelis and Jordanian Army. The Israels upgraded their M48s with the 105 mm guns, about 5 years earlier than the Americans, and fight against the Egyptian Soviet-supplied armour. They also saw use in the Lebanese Civil War in the hands of nearly all sides involved. They were also used in Turkey's military in the Turkish invasion of Cyprus in 1974. The M48s were also used in Iranian hands in the Iran-Iraq war against Soviet-supplied weaponry in Iraq's hands. Morocco also received a hundred M48A5 Pattons from America in 1987. One of the most recent conflicts the M48s were used were in the Battle of Mogadishu in 1993 when assisting the stranded US Rangers and Delta Force in the city. |
| − | The Sherman tank was given out in large numbers to American Allies during World War II under the Lend-Lease policy. While America retained about 20,361 Shermans in the Army and Marine Corps, 17,184 went to Britain (about 34% of Shermans produced and 78% of Shermans given out) and the Soviet Union obtained 4,102 Shermans.<ref name="ZalogaArmorT2">Zaloga Steven. ''Armored Thunderbolt: The U.S. Army Sherman in World War II'' Stackpole Books, 2008, "The British Sherman"</ref> China obtained 812 Shermans, Brazil with 53, and New Zealand and Australia for 153 Shermans total. Other countries using the Shermans were Poland, Free France, and Czechoslovakia. The British deployed the Sherman among their armoured squandrons in such a large number to become the standard tank of their armoured forces. The increased threat of German tanks in the European theater also provoked the British to upgun the M4 Sherman with a more capable gun, resulting in the [[Sherman Firefly|Firefly]].
| |
| | | | |
| − | ==== Post-War ====
| + | The M48s were used by 19 different countries in the world during its service life, of which 9 countries still use in varying quantities. Despite being rather outdated in the later part of the Cold War, which warranted its replacement by the M60, it help supplemented the forces around the world in their conflicts. With many models remain in inventory across the world, it still proves a valuable weapon against countries without advanced anti-tank weaponry. |
| − | After the war, the Shermans continued serving America and its allies as the [[M4A3 (76) W|M4A3E8]] with a new suspension and the 76 mm gun. The [[M26|M26 Pershing]] that was introduced late in World War II was phased out for the Shermans due to its unreliability, and the Sherman stayed until the [[M46|M46 Patton]] was introduced. After being phased out of American service, many other countries still used the Sherman as their main tank, mainly Israel where they up-gun the tank with the much powerful post-war French 75 mm and 105 mm gun as the M-50 and M-51 respectively (nicknamed "Super Shermans"). These proved successful as they were able to fight against the Soviet-supplied [[T-54 (1947)|T-54 tanks]] and [[T-34-85]]s in Middle East service, proving the Sherman as a successful and adaptable design for many years to come.
| |
| | | | |
| | == Media == | | == Media == |
| | ''An excellent addition to the article will be video guides, as well as screenshots from the game and photos.'' | | ''An excellent addition to the article will be video guides, as well as screenshots from the game and photos.'' |
| − |
| |
| − | == References ==
| |
| − | <references />
| |
| | | | |
| | == Read also == | | == Read also == |
| − | | + | ''Links to the articles on the War Thunder Wiki that you think will be useful for the reader, for example,'' |
| − | * [https://warthunder.com/en/news/2988/current/ Official War Thunder forum article: [Vehicle Profile<nowiki>]</nowiki> M4 Sherman [Decal Included<nowiki>]</nowiki>] | + | * ''reference to the series of the vehicles;'' |
| | + | * ''links to approximate analogues of other nations and research trees.'' |
| | + | ''ETC.'' |
| | | | |
| | == Sources == | | == Sources == |
| | ''Paste links to sources and external resources, such as:'' | | ''Paste links to sources and external resources, such as:'' |
| − |
| |
| | * ''topic on the official game forum;'' | | * ''topic on the official game forum;'' |
| | * ''other literature.'' | | * ''other literature.'' |
| − |
| |
| − | {{USA medium tanks}}
| |
M48A1
Research:48 000 
Purchase:270 000 
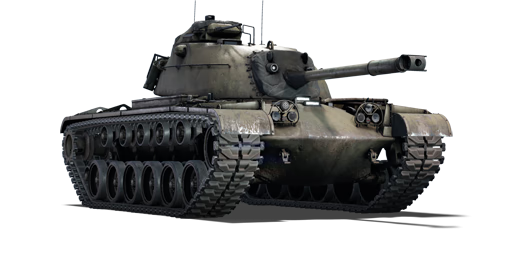
Description
In the description, the first part needs to be about the history of the creation and combat usage of the vehicle, as well as its key features. In the second part, tell the reader about the ground vehicle in the game. Insert the screenshot of the vehicle. If the novice player does not remember the vehicle by name, they will immediately understand what kind of vehicle it is talking about.
General info
Survivability and armour
Describe armour protection. Note the most well protected and key weak areas. Appreciate the layout of modules as well as the number and location of crew members. Is the level of armour protection sufficient, is the placement of modules helpfull for survival in combat?
If necessary use a visual template to indicate the most secure and weak zones of the armour.
Mobility
Write about the mobility of the ground vehicle. Estimate the specific power and maneuverability as well as the maximum speed forward and backward.
Armaments
Main armament
| 90 mm M41
|
| Capacity
|
Gun
Depression
|
Gun
Elevation
|
| 60 |
-9° |
19°
|
| Turret rotation speed (°/s)
|
| Stock
|
Upgraded
|
Prior + Full crew
|
Prior + Expert Qualif.
|
Prior + Ace Qualif.
|
| 14.28 |
16.80 |
20.4 |
22.60 |
24.00
|
| Reloading rate (seconds)
|
| Stock
|
Prior + Full crew
|
Prior + Expert Qualif.
|
Prior + Ace Qualif.
|
| 9.75 |
8.63 |
7.95 |
7.50
|
Ammunition
| Penetration statistics
|
| Ammunition
|
Type of
warhead
|
Penetration in mm @ 90°
|
| 10m
|
100m
|
500m
|
1000m
|
1500m
|
2000m
|
| M332 shot |
APCR |
271 |
270 |
245 |
217 |
192 |
170
|
| M82 shot |
APCBC |
170 |
169 |
164 |
151 |
138 |
127
|
| M431 shell |
HEATFS |
320 |
320 |
320 |
320 |
320 |
320
|
| M71 shell |
HE |
13 |
13 |
13 |
13 |
13 |
13
|
| T142E3 |
HESH |
102 |
102 |
102 |
102 |
102 |
102
|
| Shell details
|
| Ammunition
|
Velocity
in m/s
|
Projectile
Mass in kg
|
Fuse delay
in m:
|
Fuse sensitivity
in mm:
|
Explosive Mass in g
(TNT equivalent):
|
Normalization At 30°
from horizontal:
|
Ricochet:
|
| 0%
|
50%
|
100%
|
| M332 shot |
1178 |
5.6 |
N/A |
N/A |
N/A |
+1.5° |
66° |
70° |
72°
|
| M82 shot |
853 |
11 |
1.2 |
20 |
137.2 |
+4° |
48° |
63° |
71°
|
| M431 shell |
1216 |
5.8 |
0.0 |
0.1 |
712.64 |
+0° |
65° |
72° |
75°
|
| M71 shell |
823 |
11 |
0.1 |
0.5 |
925 |
+0° |
79° |
80° |
81°
|
| T142E3 |
792 |
11 |
0.4 |
0.1 |
792 |
+0° |
73° |
77° |
80°
|
| Smoke characteristic
|
| Ammunition
|
Velocity
in m/s
|
Projectile
Mass in kg
|
Screen radius
in m
|
Screen time
in s
|
Screen hold time
in s:
|
Explosive Mass in g
(TNT equivalent):
|
| M313 |
821 |
11 |
13 |
5 |
20 |
50
|
Full
ammo
|
1st
rack empty
|
2nd
rack empty
|
3rd
rack empty
|
4th
rack empty
|
5th
rack empty
|
6th
rack empty
|
7th
rack empty
|
8th
rack empty
|
Visual
discrepancy
|
| 60 |
54 (+6) |
38 (+22) |
30 (+30) |
12 (+48) |
1 (+59) |
No
|
Machine guns
- 12.7 mm M85 heavy machine gun (Commander's cupola)
- 7.62 mm M73 machine gun (coaxial)
Usage in the battles
Describe the tactics of playing in the vehicle, the features of using vehicles in the team and advice on tactics. Refrain from creating a "guide" - do not impose a single point of view but give the reader food for thought. Describe the most dangerous enemies and give recommendations on fighting them. If necessary, note the specifics of the game in different modes (AB, RB, SB).
Pros and cons
Pros:
- Very fast reload for the rank.
- Semi-hemispherical design removes shot traps seen on M47 Patton.
- Better sloped armour than its predecessors.
- Access to HEATFS when unlocked.
- Strong roof armour of 57 mm on the hull.
Cons:
- Quite underarmoured for the rank.
- Same ammunition stats as the M47, which may not be the best at the rank except the HEATFS round.
- Slower turret traverse rate.
- Painful stock grind due to having APCR as default ammo.
- Turret roof armour is 25 mm at its thinnest, which can allow even air attacks with heavy machine guns to penetrate at preferential conditions.
History
Development
In February 1951, Ordnance opted for a new tank design to modernize the M46 and M47 in the U.S. inventory. The tank was designated the 90 mm Gun Tank T-48 and featured a new hemispherical turret, new hull, and an improved suspension. The new design was also the first to remove the hull machine gunner position in American tanks, reducing the total crew from the usual 5 to 4. Further testing and trials with the T-48 design proved its worth and in April 1953, Ordnance standardized the design as the 90 mm Gun Tank M48 Patton, which would be the third in the Patton series, all named after General George S. Patton.
Production started in 1952 with the original M48 models. During the initial production run, several hundreds of the M48s were found to not be up to the standard protection ratings it should be, these were relegated to training tanks as the M48C. The model was developed into the M48A1 with a redesigned driver hatch and commander's cupola that integrates a .50 cal machine gun for the commander to use. Next variant was the M48A2 with an improved power pack and transmission, along with a new rear plate and improved turret control. The M48A1 models improved with the M48A2 specifications in 1959, up to 1,019 were converted and are labeled the M48A3. The last major model was the M48A5, which is a upgrade of the M48 models in the 1970s with a the 105 mm Gun M68, up to 2,069 converted. In total, about 12,000 M48 models were produced in all from the time period of 1952 to 1959.
Combat usage
The Americans mainly used the M48A3 Patton tanks in Vietnam, with 600 models deployed. Each battalions in the US Army and Marines armed with the M48 Pattons had 57 tanks each. The Armored Cavalry Squadrons were initially armed with M48s before they were replaced by the lighter M551 Sheridan. A flamethrower variant was developed from the M48, which became known as the M67A1 "Zippo". The M48 also strengthened the Army of the Republic of Vietnam (ARVN) forces by supplementing their M41A1 Walker Bulldog light tanks. The main armour conflicts between the North and South Vietnamese forces usually involved a armour mix of T-54/PT-76B for the North and M48 Pattons/M41A1 Bulldogs for the South. In the conflicts, an incident in 23 April 1972 had a NVA anti-tank force with the new 9M14M Malyutka anti-tank guided missile destroy a M48 Patton, marking one of the early uses of the wide-spread infantry anti-tank missiles. Despite that, the M48s performed favorably in the Southern forces. Even after US forces withdrew from South Vietnam and North Vietnam started the Ho Chi Minh Offensive in 1975, the M48s left in the ARVN hands were able to hold back the assaulting T-34 and T-54/55 tanks, only falling when supplies ran out. After the war, the Americans mainly replaced their main tanks with the M60 Patton.
Like with most of American equipment, the M48s were supplied to NATO allies across the world to assist in their conflicts. They became involved in the Indo-Pakistani War of 1965 and 1971 in the hands of Pakistan along with some M47s against India's Centurions. Its overall performance in the conflicts was that they performed very well in the battlefield, only failing due to the poor tactics used by the armour forces. The M48s also saw service in the Middle Eastern conflicts. It was notably used in the conflicts against Israel in the Six-Day War of 1967 and the Yom Kippur War of 1973 in the hands of the Israelis and Jordanian Army. The Israels upgraded their M48s with the 105 mm guns, about 5 years earlier than the Americans, and fight against the Egyptian Soviet-supplied armour. They also saw use in the Lebanese Civil War in the hands of nearly all sides involved. They were also used in Turkey's military in the Turkish invasion of Cyprus in 1974. The M48s were also used in Iranian hands in the Iran-Iraq war against Soviet-supplied weaponry in Iraq's hands. Morocco also received a hundred M48A5 Pattons from America in 1987. One of the most recent conflicts the M48s were used were in the Battle of Mogadishu in 1993 when assisting the stranded US Rangers and Delta Force in the city.
The M48s were used by 19 different countries in the world during its service life, of which 9 countries still use in varying quantities. Despite being rather outdated in the later part of the Cold War, which warranted its replacement by the M60, it help supplemented the forces around the world in their conflicts. With many models remain in inventory across the world, it still proves a valuable weapon against countries without advanced anti-tank weaponry.
Media
An excellent addition to the article will be video guides, as well as screenshots from the game and photos.
Read also
Links to the articles on the War Thunder Wiki that you think will be useful for the reader, for example,
- reference to the series of the vehicles;
- links to approximate analogues of other nations and research trees.
ETC.
Sources
Paste links to sources and external resources, such as:
- topic on the official game forum;
- other literature.