Difference between revisions of "MK-II "Matilda" (USSR)"
Colok76286 (talk | contribs) (→Modules: Added missing modules) |
Colok76286 (talk | contribs) (→Usage in battles: Completed section (Gameplay + Pros & Cons)) |
||
| Line 182: | Line 182: | ||
The small caliber of the MG will only allow you to use it as a spotting gun or to mow down minor obstacles blocking your ligne of sight. | The small caliber of the MG will only allow you to use it as a spotting gun or to mow down minor obstacles blocking your ligne of sight. | ||
| − | == Usage in battles == | + | == Usage in the battles == |
| − | <!-- ''Describe the tactics of playing in the vehicle, the features of using vehicles in the team and advice on tactics. Refrain from creating a "guide" - do not impose a single point of view but | + | <!--''Describe the tactics of playing in the vehicle, the features of using vehicles in the team and advice on tactics. Refrain from creating a "guide" - do not impose a single point of view but give the reader food for thought. Describe the most dangerous enemies and give recommendations on fighting them. If necessary, note the specifics of the game in different modes (AB, RB, SB).''--> |
| − | + | ||
| + | ;Offensive role | ||
| + | The {{PAGENAME}} should be played as a support tank like the [[KV-1 (L-11)]], taking advantage of its good armour and good penetration power. | ||
| + | When playing as a support tank, you will help friendly tanks successfully defeat enemy tanks in their frontline engagements. Stay in proximity of the frontline to rely on penetration power, all while staying at a reasonable distance from it to maximize your armour and avoid being flanked or swarmed. Once the enemy push destroyed, you move forward together with frontline tanks and help capturing objectives. | ||
| + | |||
| + | When engaging enemy tanks, position your lower glacis behind cover to protect it from incoming fire. Unexperienced players will most likely waste shots on your frontal armour. With the BR-350B (MD-8 fuze) shell, the {{PAGENAME}} easily can take on most opponents at this BR. | ||
| + | |||
| + | ;Defensive role | ||
| + | In the event the spearhead tanks of your team get crushed by the enemy, you will then play a defensive role by containing enemy breakthrough attempts. | ||
| + | It will fall upon you to stop enemy tanks dead in their tracks. Being at a distance from the frontline will force enemy tanks to drive in the open to get to you. Always play with a nearby obstacle you can use as cover if you get hit and need to repair. Have a planned escape plan as the enemy will try to use artillery or CAS to dislodge you from cover. | ||
| + | A good player in a {{PAGENAME}} can lock a side of the battlefield, especially in corridor maps. | ||
| + | |||
| + | ;Other roles | ||
| + | If you try to use the {{PAGENAME}} in a different role on the battlefield, you will quickly reach its limits: | ||
| + | * If you try to play the {{PAGENAME}} as a frontline tank, you will suffer from the tank's poor mobility and be easily flanked by light tanks or armored cars and, especially if they swarm you. Your turning speed is too poor to manoeuvre quickly and your reverse speed is too poor to get out of hot spots quickly. | ||
| + | * If you attempt to play long range engagements, your gun will lack accuracy and penetration will drop over distance, while your silhouette will make you a target of choice for enemy counterfire. The absence of gun depression will prevent you from firing behind the cover of a ridge. | ||
| + | |||
| + | ;Notable enemies: | ||
| + | Your worst enemies will be the ones equipped with long cannons, able to penetrate you easily from middle to long range. | ||
| + | * Tank destroyers: M10 GMC, Archer, 90/53 M41M, Na-To, Pvkv II, Pvkv m/43 (1946). | ||
| + | * Frontline tanks: M4, Pz. IV F2, T-34s, Chi-Nu. | ||
| + | |||
| + | ;Defeating a {{PAGENAME}} | ||
| + | The {{PAGENAME}} has a pretty strong hull and turret armour but several weak spots exist: | ||
| + | * In a frontal encounter, the gun breech is the easiest to target (under the gun). The sides of the lower glacis are also extremely weak (20mm). | ||
| + | * If you have a very high penetrating power, aim for the turret: a successful penetration will most likely knock out 3 out of 4 crew members. | ||
| + | * When flanking, aim for the turret ring (small area). | ||
| + | |||
| + | In case of a frontal attack, try blinding the {{PAGENAME}} with smoke and then swarm it with several fast tanks to saturate its defensive capacities. If you are alone, flanking a {{PAGENAME}} undetected remains your best chance to destroy it. | ||
=== Modules === | === Modules === | ||
| Line 227: | Line 255: | ||
=== Pros and cons === | === Pros and cons === | ||
<!-- ''Summarise and briefly evaluate the vehicle in terms of its characteristics and combat effectiveness. Mark its pros and cons in a bulleted list. Try not to use more than 6 points for each of the characteristics. Avoid using categorical definitions such as "bad", "good" and the like - use substitutions with softer forms such as "inadequate" and "effective".'' The text within these arrows are not to be deleted --> | <!-- ''Summarise and briefly evaluate the vehicle in terms of its characteristics and combat effectiveness. Mark its pros and cons in a bulleted list. Try not to use more than 6 points for each of the characteristics. Avoid using categorical definitions such as "bad", "good" and the like - use substitutions with softer forms such as "inadequate" and "effective".'' The text within these arrows are not to be deleted --> | ||
| − | |||
'''Pros:''' | '''Pros:''' | ||
| − | * | + | * Strong armour, comparable to the KV-1s. |
| + | * Gun with sufficient penetration to oppose enemy threat. | ||
| + | * Quick turret rotation for a heavy tank. | ||
'''Cons:''' | '''Cons:''' | ||
| − | * | + | * Poor mobility: slow (25 km/h max), can't outflank others and will take a long time just to get to the combat zone. |
| + | * Insufficient gun depression. | ||
| + | * Struggles going uphill and through uneven terrain. | ||
| + | * 3 crew members in small size turret: a penetrating shot is more likely to incapacitate the tank. | ||
| + | * Can easily be penetrated by projectiles with high penetrating power: HEAT or APCR shells. | ||
== History == | == History == | ||
Revision as of 22:12, 13 June 2020
Contents
Description
.jpg)
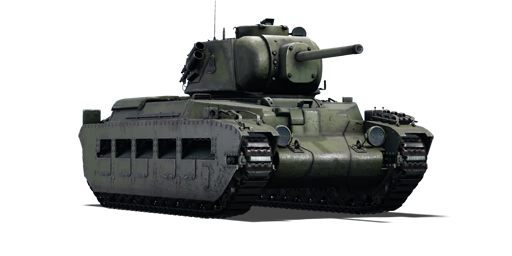
The ▂Tank MK-II "Matilda" (F-96) is a gift rank II Soviet heavy tank
with a battle rating of 3.7 (AB) and 3.3 (RB/SB). This tank was introduced in Update 1.67 "Assault" during the 2017 World War Two: Chronicle events, unlocked after obtaining 6 Chronicle Awards. This is a British Matilda supplied to the Soviets through the Lend-Lease program whose turret was modified to receive a 76mm cannon.
General info
Survivability and armour
Armour type:
- Cast homogeneous armour (hull front, turret, gun mantlet, cupola, hull sides top -above the tracks-)
- Rolled homogeneous armour (hull sides bottom -tracks compartment-, hull rear, hull roof, turret roof, cupola roof, gun breech, side skirts).
| Armour | Front (Slope angle) | Sides | Rear | Roof |
|---|---|---|---|---|
| Hull | 75 mm (0-7°) Front plate 22-47 mm (69°) Front glacis 22-78 mm (12-46°) Joint area 22-45 mm (56°) Lower glacis |
70 mm (21-26°) Top 40vmm + 25 mm Bottom |
20 mm (32-79°) Top 55 mm (25°) Bottom |
20 mm 35 mm Driver's port |
| Turret | 75 mm (1-48°) Turret front 75 mm (0-22°) Gun mantlet |
75 mm (0-22°) | 75 mm | 18 mm |
| Cupola | 75 mm (6-7°) Cupola wall + 50mm Cupola base | 18 mm | ||
Notes:
- Suspension wheels and tracks are both 20 mm thick.
- Openings in the center area of side skirts are 13 mm thick (54°).
- The gun breech is very prominent and only 45mm thick, making it a weak spot.
- The sides of the joint area on the front glacis also are weak spots with only 22 mm of thickness.
- 2 smoke launchers are installed on the right side of the turret. Both smoke grenades are launched simultaneously in the direction the gun is pointing at, 30m away from your tank.
- Smoke shells can also be used as protection but the absence of gun depression will prevent to shoot them close to your vehicle.
Mobility
| Game Mode | Max Speed (km/h) | Weight (tons) | Engine power (horsepower) | Power-to-weight ratio (hp/ton) | |||
|---|---|---|---|---|---|---|---|
| Forward | Reverse | Stock | Upgraded | Stock | Upgraded | ||
| Arcade | 26 | 5 | 28.5 | 245 | 363 | 8.6 | 12.74 |
| Realistic | 24 | 4 | 168 | 190 | 5.89 | 6.67 | |
Originally designed as an infantry support, the MK-II "Matilda" (USSR) is underpowered and sluggish when compared to other tanks at the same battle rating. With a maximum speed of only 23-25 km/h, the MK-II "Matilda" (USSR) always needs time to get in position and inevitably arrives last.
The acceleration is good: the maximum speed is reached in seconds. The braking is good as well, as the tank is heavy and the maximum speed poor. The reverse speed is too poor to retreat quickly from an unexpected situation or allow any type of overextend tactic.
While the tank weighs only 28.5 tons for heavy tank (that's the average weight of a T-34 at the same BR), its narrow tracks make driving on soft terrain difficult (sand, snow, mud). Turning when moving is good and turning 180° on flat terrain only takes a few seconds. But turning from idling is very slow as there is no neutral steering. This also causes noticeable gun wobbling. Finally, going uphill is always difficult as the MK-II "Matilda" (USSR) loses speed very quickly.
Armaments
Main armament
| 76 mm F-96 | Turret rotation speed (°/s) | Reloading rate (seconds) | |||||||||||
|---|---|---|---|---|---|---|---|---|---|---|---|---|---|
| Mode | Capacity | Vertical | Horizontal | Stabilizer | Stock | Upgraded | Full | Expert | Aced | Stock | Full | Expert | Aced |
| Arcade | 54 | -2°/+20° | ±180° | N/A | 16.18 | 22.4 | __.__ | __.__ | 32.0 | 8.97 | _.__ | _.__ | 6.9 |
| Realistic | 11.9 | 14.0 | __.__ | __.__ | 20.0 | ||||||||
The gun accuracy starts dropping at 800m and becomes a handicap over 1000m. The muzzle velocity is good and offers rather flat trajectories. While the turret rotation speed is good, the poor depression clearly is a handicap: the gun is situated very high due to the profile of the Matilda. This can make targeting an enemy close to you very difficult, especially if there is a little slope putting the enemy tank slightly under your level. The recoil is minimal and does not impact targeting quality. The reload time is a little longer than most of your opponents but the same as any T-34 tank at the same BR. The penetration values are good, like the T-34s.
Ammunition
The available choice of ammunition offers a complete range to engage all types of targets:
- BR-350A (MD-5 fuze): APHEBC; a shell with high explosive mass that will one-shot any tank that is penetrates but has an average penetration power.
- BR-350B (MD-8 fuze): APHEBC; increased penetration at the cost of slightly less explosive filler.
- BR-350SP: APBC; a solid shot with the best penetration but no explosive filler.
- OF-350M: HE; useful for destroying open and lightly armoured vehicles.
- Sh-354T: Shrapnel; useful against vehicles that are resistant to the HE shells but too thinly armoured to trigger the fuzes of AP shells.
- D-350A: Smoke; useful to blind enemy vehicles that are too remote for you to penetrate.
| Penetration statistics | |||||||
|---|---|---|---|---|---|---|---|
| Ammunition | Type of warhead |
Penetration @ 0° Angle of Attack (mm) | |||||
| 10 m | 100 m | 500 m | 1,000 m | 1,500 m | 2,000 m | ||
| BR-350A (MD-5 fuze) | APHEBC | 87 | 85 | 76 | 67 | 59 | 52 |
| BR-350SP | APBC | 102 | 100 | 91 | 81 | 72 | 64 |
| BR-350B (MD-8 fuze) | APHEBC | 94 | 92 | 83 | 73 | 65 | 57 |
| OF-350M | HE | 10 | 10 | 10 | 10 | 10 | 10 |
| Sh-354T | Shrapnel | 37 | 35 | 29 | 25 | 20 | 17 |
| Shell details | ||||||
|---|---|---|---|---|---|---|
| Ammunition | Type of warhead |
Velocity (m/s) |
Projectile Mass (kg) |
Fuse delay (m) |
Fuse sensitivity (mm) |
Explosive Mass (TNT equivalent) (g) |
| BR-350A (MD-5 fuze) | APHEBC | 662 | 6.3 | 1.2 | 14 | 150 |
| BR-350SP | APBC | 655 | 6.78 | N/A | N/A | N/A |
| BR-350B (MD-8 fuze) | APHEBC | 655 | 6.3 | 0.9 | 14 | 98.56 |
| OF-350M | HE | 680 | 6.2 | 0.05 | 0.1 | 621 |
| Sh-354T | Shrapnel | 680 | 6.2 | 0.5 | 8 | 85 |
| Smoke shell characteristics | ||||||
|---|---|---|---|---|---|---|
| Ammunition | Velocity (m/s) |
Projectile Mass (kg) |
Screen radius (m) |
Screen deploy time (s) |
Screen hold time (s) |
Explosive Mass (TNT equivalent) (g) |
| D-350A | 680 | 6.45 | 13 | 5 | 20 | 50 |
Ammo racks
.png)
| Full ammo |
1st rack empty |
2nd rack empty |
3rd rack empty |
Visual discrepancy |
|---|---|---|---|---|
| 54 | 43 (+11) | 31 (+23) | 1 (+53) | Yes |
Notes:
- To go into battle with flank racks depleted, pack 31 (+23) shells.
- The visual discrepancy is the floor rack: 36 shells are modeled but it contains only 30 shells.
Machine guns
| 7.62 mm DT | ||||
|---|---|---|---|---|
| Mount | Capacity (Belt) | Fire rate | Vertical | Horizontal |
| Coaxial | 3150 (63) | 600 | N/A | N/A |
The small caliber of the MG will only allow you to use it as a spotting gun or to mow down minor obstacles blocking your ligne of sight.
Usage in the battles
- Offensive role
The MK-II "Matilda" (USSR) should be played as a support tank like the KV-1 (L-11), taking advantage of its good armour and good penetration power. When playing as a support tank, you will help friendly tanks successfully defeat enemy tanks in their frontline engagements. Stay in proximity of the frontline to rely on penetration power, all while staying at a reasonable distance from it to maximize your armour and avoid being flanked or swarmed. Once the enemy push destroyed, you move forward together with frontline tanks and help capturing objectives.
When engaging enemy tanks, position your lower glacis behind cover to protect it from incoming fire. Unexperienced players will most likely waste shots on your frontal armour. With the BR-350B (MD-8 fuze) shell, the MK-II "Matilda" (USSR) easily can take on most opponents at this BR.
- Defensive role
In the event the spearhead tanks of your team get crushed by the enemy, you will then play a defensive role by containing enemy breakthrough attempts. It will fall upon you to stop enemy tanks dead in their tracks. Being at a distance from the frontline will force enemy tanks to drive in the open to get to you. Always play with a nearby obstacle you can use as cover if you get hit and need to repair. Have a planned escape plan as the enemy will try to use artillery or CAS to dislodge you from cover. A good player in a MK-II "Matilda" (USSR) can lock a side of the battlefield, especially in corridor maps.
- Other roles
If you try to use the MK-II "Matilda" (USSR) in a different role on the battlefield, you will quickly reach its limits:
- If you try to play the MK-II "Matilda" (USSR) as a frontline tank, you will suffer from the tank's poor mobility and be easily flanked by light tanks or armored cars and, especially if they swarm you. Your turning speed is too poor to manoeuvre quickly and your reverse speed is too poor to get out of hot spots quickly.
- If you attempt to play long range engagements, your gun will lack accuracy and penetration will drop over distance, while your silhouette will make you a target of choice for enemy counterfire. The absence of gun depression will prevent you from firing behind the cover of a ridge.
- Notable enemies
Your worst enemies will be the ones equipped with long cannons, able to penetrate you easily from middle to long range.
- Tank destroyers: M10 GMC, Archer, 90/53 M41M, Na-To, Pvkv II, Pvkv m/43 (1946).
- Frontline tanks: M4, Pz. IV F2, T-34s, Chi-Nu.
- Defeating a MK-II "Matilda" (USSR)
The MK-II "Matilda" (USSR) has a pretty strong hull and turret armour but several weak spots exist:
- In a frontal encounter, the gun breech is the easiest to target (under the gun). The sides of the lower glacis are also extremely weak (20mm).
- If you have a very high penetrating power, aim for the turret: a successful penetration will most likely knock out 3 out of 4 crew members.
- When flanking, aim for the turret ring (small area).
In case of a frontal attack, try blinding the MK-II "Matilda" (USSR) with smoke and then swarm it with several fast tanks to saturate its defensive capacities. If you are alone, flanking a MK-II "Matilda" (USSR) undetected remains your best chance to destroy it.
Modules
| Tier | Mobility | Protection | Firepower | ||
|---|---|---|---|---|---|
| I | Tracks | Parts | Horizontal Drive | BR-350SP | |
| II | Suspension | Brake System | FPE | Adjustment of Fire | BR-350B (MD-8 fuze) |
| III | Filters | Crew Replenishment | Elevation Mechanism | ||
| IV | Transmission | Engine | D-350A | ||
| This is a premium vehicle: all modifications are unlocked on purchase | |||||
Pros and cons
Pros:
- Strong armour, comparable to the KV-1s.
- Gun with sufficient penetration to oppose enemy threat.
- Quick turret rotation for a heavy tank.
Cons:
- Poor mobility: slow (25 km/h max), can't outflank others and will take a long time just to get to the combat zone.
- Insufficient gun depression.
- Struggles going uphill and through uneven terrain.
- 3 crew members in small size turret: a penetrating shot is more likely to incapacitate the tank.
- Can easily be penetrated by projectiles with high penetrating power: HEAT or APCR shells.
History
Britain and Canada provided the Soviet Union with around 5,200 tanks, of which 4,600 arrived, while they were recovering from the setbacks of 1941. The Soviets belittled these lend-lease AFVs, and tended to use them on secondary fronts, releasing their own tanks for the more important areas. While the Matilda II was the second-most-common British tank used by the Soviets, with over 1,000 delivered, it was disliked for its slow speed and poor winter performance and used primarily for infantry support. The remaining tanks were out of service by the end of 1943.
Media
- Videos
See also
- Vehicles equipped with the same chassis
- Similar Soviet vehicles
- Other Soviet vehicles equipped with a 76mm gun
- Other vehicles of similar configuration and role
External links
- [Development] WW2 Chronicles vehicles: Matilda MK-2 F-96: A Soviet Lady
- [Special] War Thunder Chronicles
- Wikipedia - Matilda_II - Other variants, field modifications and prototypes
- Tanks Encyclopedia - Matilda II Mk.IV with ZiS-5 76mm
| USSR heavy tanks | |
|---|---|
| KV-1 | KV-1 (L-11) · KV-1 (ZiS-5) · KV-1E · KV-1S |
| KV-2 | KV-2 (1939) · KV-2 (1940) · KV-2 (ZiS-6) |
| Other KVs | KV-85 · KV-122 · KV-220 |
| IS-1/2 | IS-1 · IS-2 · IS-2 (1944) · IS-2 No.321 · IS-2 "Revenge" · Object 248 |
| Other IS tanks | IS-3 · IS-4M · IS-6 · IS-7 |
| T-10 | T-10A · T-10M |
| Multi-turreted | T-35 · SMK |
| Other | Object 279 |
| Lend-Lease | ▂MK-II "Matilda" |
| USSR premium ground vehicles | |
|---|---|
| Light tanks | BA-11 · RBT-5 · BT-7A (F-32) · T-26 (1st Gv.T.Br.) · T-26E · T-126 · PT-76-57 · 2S38 |
| Medium tanks | T-34 (Prototype) · T-34 (1st Gv.T.Br.) · T-34E · T-34-57 (1943) · T-34-85E · T-34-100 · T-44-122 · TO-55 · T-55AM-1 · T-72AV (TURMS-T) · T-80UD |
| ▂M3 Medium · ▂M4A2 · ▂T-III · ▂T-V · ▂МК-IX "Valentine" | |
| Heavy tanks | SMK · T-35 · ▂MK-II "Matilda" · KV-1E · KV-2 (1940) · KV-2 (ZiS-6) · KV-122 · KV-220 · IS-2 "Revenge" · Object 248 · IS-6 · T-10A |
| Tank destroyers | BM-8-24 · BM-13N · BM-31-12 |
| SU-57 · SU-76D · SU-76M (5th Gv.Kav.Corps) · SU-85A · SU-100Y · SU-122P · Object 120 | |
| SPAA | ▂Phòng không T-34 · ZUT-37 |
