Difference between revisions of "M4A4 (China)"
CLOSE_RANGE (talk | contribs) m (Expanded the sections, made a few corrections) |
(→Armaments: Edits) |
||
| (5 intermediate revisions by 4 users not shown) | |||
| Line 2: | Line 2: | ||
== Description == | == Description == | ||
| − | <!--''In the description, the first part should be about the history of the creation and combat usage of the vehicle, as well as its key features. In the second part, tell the reader about the ground vehicle in the game. Insert a screenshot of the vehicle, so that if the novice player does not remember the vehicle by name, he will immediately understand what kind of vehicle the article is talking about.''--> | + | <!-- ''In the description, the first part should be about the history of the creation and combat usage of the vehicle, as well as its key features. In the second part, tell the reader about the ground vehicle in the game. Insert a screenshot of the vehicle, so that if the novice player does not remember the vehicle by name, he will immediately understand what kind of vehicle the article is talking about.'' --> |
| − | + | [[File:GarageImage_{{PAGENAME}}.jpg|420px|thumb|left]] | |
| − | {{ | + | {{Break}} |
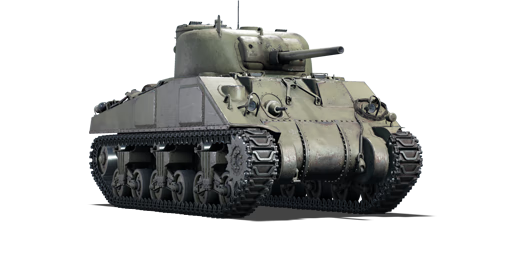
The '''{{Specs|name}}''' is a rank {{Specs|rank}} Chinese medium tank {{Battle-rating}}. It was introduced in [[Update 1.91 "Night Vision"]]. | The '''{{Specs|name}}''' is a rank {{Specs|rank}} Chinese medium tank {{Battle-rating}}. It was introduced in [[Update 1.91 "Night Vision"]]. | ||
== General info == | == General info == | ||
=== Survivability and armour === | === Survivability and armour === | ||
| − | <!--Describe armour protection. Note the most well protected and key weak areas. Appreciate the layout of modules as well as the number and location of crew members. Is the level of armour protection sufficient, is the placement of modules helpful for survival in combat? If necessary use a visual template to indicate the most secure and weak zones of the armour.--> | + | <!-- ''Describe armour protection. Note the most well protected and key weak areas. Appreciate the layout of modules as well as the number and location of crew members. Is the level of armour protection sufficient, is the placement of modules helpful for survival in combat? If necessary use a visual template to indicate the most secure and weak zones of the armour.'' --> |
| − | |||
The hull is very similar to the American [[M4|M4 Sherman]], with a 50.8 mm thick upper glacis and protruding hatches interrupting the glacis (augmented with appliqué armour). Weak spots here include the machine gun port and ventilator on the right side. The hull sides feature appliqué armour plates covering the ammunition storage racks. The turret is also very similar but lacks the appliqué armour on the right cheek, leaving a small weakened zone in that area. Frontal protection is quite good for its rank and shots from smaller anti-tank guns can generally be shrugged off, particularly when hull down. However more powerful guns such as the [[Pz.IV F2|Panzer IV F2's]] long 75mm can destroy the tank easily, so care should be taken. The side armour is only 38.1 mm thick and can be easily penetrated by just about any anti-tank gun, but the appliqué armour on this model can help if the tank is angled. | The hull is very similar to the American [[M4|M4 Sherman]], with a 50.8 mm thick upper glacis and protruding hatches interrupting the glacis (augmented with appliqué armour). Weak spots here include the machine gun port and ventilator on the right side. The hull sides feature appliqué armour plates covering the ammunition storage racks. The turret is also very similar but lacks the appliqué armour on the right cheek, leaving a small weakened zone in that area. Frontal protection is quite good for its rank and shots from smaller anti-tank guns can generally be shrugged off, particularly when hull down. However more powerful guns such as the [[Pz.IV F2|Panzer IV F2's]] long 75mm can destroy the tank easily, so care should be taken. The side armour is only 38.1 mm thick and can be easily penetrated by just about any anti-tank gun, but the appliqué armour on this model can help if the tank is angled. | ||
=== Mobility === | === Mobility === | ||
| − | + | ''Write about the mobility of the ground vehicle. Estimate the specific power and manoeuvrability, as well as the maximum speed forwards and backwards.'' | |
| − | {{tankMobility|abMinHp= 620|rbMinHp= 354}} | + | {{tankMobility|abMinHp=620|rbMinHp=354}} |
== Armaments == | == Armaments == | ||
=== Main armament === | === Main armament === | ||
| − | <!--Give the reader information about the characteristics of the main gun. Assess its effectiveness in a battle based on the reloading speed, ballistics and the power of shells. Do not forget about the flexibility of the fire, that is how quickly the cannon can be aimed at the target, open fire on it and aim at another enemy. Add a link to the main article on the gun: <code><nowiki>{{main|Name of the weapon}}</nowiki></code>. Describe in general terms the ammunition available for the main gun. Give advice on how to use them and how to fill the ammunition storage.--> | + | <!-- ''Give the reader information about the characteristics of the main gun. Assess its effectiveness in a battle based on the reloading speed, ballistics and the power of shells. Do not forget about the flexibility of the fire, that is how quickly the cannon can be aimed at the target, open fire on it and aim at another enemy. Add a link to the main article on the gun: <code><nowiki>{{main|Name of the weapon}}</nowiki></code>. Describe in general terms the ammunition available for the main gun. Give advice on how to use them and how to fill the ammunition storage.'' --> |
{{main|M3 (75 mm)}} | {{main|M3 (75 mm)}} | ||
| − | {| class="wikitable" style="text-align:center | + | {| class="wikitable" style="text-align:center" width="100%" |
| − | |||
| − | |||
| − | |||
| − | |||
| − | |||
| − | |||
| − | |||
| − | |||
| − | |||
| − | |||
| − | |||
| − | |||
| − | |||
| − | |||
| − | |||
| − | |||
| − | |||
| − | |||
|- | |- | ||
| − | | | + | ! colspan="5" | [[M3 (75 mm)|75 mm M3]] || colspan="5" | Turret rotation speed (°/s) || colspan="4" | Reloading rate (seconds) |
|- | |- | ||
| − | + | ! Mode !! Capacity !! Vertical !! Horizontal !! Stabilizer | |
| + | ! Stock !! Upgraded !! Full !! Expert !! Aced | ||
| + | ! Stock !! Full !! Expert !! Aced | ||
|- | |- | ||
| − | ! | + | ! ''Arcade'' |
| + | | rowspan="2" | 98 || rowspan="2" | -10°/+25° || rowspan="2" | ±180° || rowspan="2" | Vertical || 22.85 || 31.62 || 38.40 || 42.47 || 45.18 || rowspan="2" | 6.50 || rowspan="2" | 5.75 || rowspan="2" | 5.30 || rowspan="2" | 5.00 | ||
|- | |- | ||
| − | ! | + | ! ''Realistic'' |
| − | + | | 14.28 || 16.80 || 20.40 || 22.56 || 24.00 | |
| − | |||
| − | |||
| − | | | ||
| − | | | ||
|- | |- | ||
|} | |} | ||
| − | + | ==== Ammunition ==== | |
{| class="wikitable sortable" style="text-align:center" width="100%" | {| class="wikitable sortable" style="text-align:center" width="100%" | ||
! colspan="8" | Penetration statistics | ! colspan="8" | Penetration statistics | ||
|- | |- | ||
! rowspan="2" data-sort-type="text" | Ammunition | ! rowspan="2" data-sort-type="text" | Ammunition | ||
| − | ! rowspan="2 | + | ! rowspan="2" | Type of<br>warhead |
| − | ! colspan="6" | '''Penetration | + | ! colspan="6" | '''Penetration @ 0° Angle of Attack (mm)''' |
| + | |- | ||
| + | ! 10 m !! 100 m !! 500 m !! 1,000 m !! 1,500 m !! 2,000 m | ||
|- | |- | ||
| − | + | | M72 shot || AP || 91 || 88 || 78 || 67 || 57 ||49 | |
| − | |||
| − | |||
| − | |||
| − | |||
| − | |||
|- | |- | ||
| − | | | + | | M48 shell || HE || 10 || 10 || 10 || 10 || 10 || 10 |
|- | |- | ||
| − | | M61 shot || APCBC || | + | | M61 shot || APCBC || 104 || 101 || 90 || 78 || 68 || 59 |
| − | |||
| − | |||
|- | |- | ||
|} | |} | ||
{| class="wikitable sortable" style="text-align:center" width="100%" | {| class="wikitable sortable" style="text-align:center" width="100%" | ||
| − | ! colspan=" | + | ! colspan="11" | Shell details |
|- | |- | ||
! rowspan="2" data-sort-type="text" | Ammunition | ! rowspan="2" data-sort-type="text" | Ammunition | ||
| − | ! rowspan="2" |Velocity <br | + | ! rowspan="2" | Type of<br>warhead |
| − | ! rowspan="2" |Projectile<br | + | ! rowspan="2" | Velocity<br>(m/s) |
| − | ! rowspan="2" | | + | ! rowspan="2" | Projectile<br>Mass (kg) |
| − | + | ! rowspan="2" | Fuse delay<br>(m) | |
| − | ! rowspan="2" | | + | ! rowspan="2" | Fuse sensitivity<br>(mm) |
| − | + | ! rowspan="2" | Explosive Mass<br>(TNT equivalent) (g) | |
| − | ! rowspan="2" | | + | ! rowspan="2" | Normalisation at 30°<br>from horizontal |
| − | ! rowspan="2" | | + | ! colspan="3" | Ricochet |
| − | ! colspan="3" | | + | |- |
| + | ! 0% !! 50% !! 100% | ||
|- | |- | ||
| − | + | | M72 shot || AP || 619 || 6.3 || N/A || N/A || N/A || -1.0° || 47° || 60° || 65° | |
| − | |||
| − | |||
|- | |- | ||
| − | | | + | | M48 shell || HE || 463 || 6.3 || 0.4 || 0.5 || 666 || +0.0° || 79° || 80° || 81° |
|- | |- | ||
| − | | M61 shot || 618 || 6.79 || 1.2 || | + | | M61 shot || APCBC || 618 || 6.79 || 1.2 || 14.0 || 63.7 || +4.0° || 48° || 63° || 71° |
| − | |||
| − | |||
|- | |- | ||
|} | |} | ||
| − | {| class="wikitable | + | {| class="wikitable" style="text-align:center" |
| − | ! colspan="7" | Smoke | + | ! colspan="7" | Smoke shell characteristics |
|- | |- | ||
! Ammunition | ! Ammunition | ||
| − | ! Velocity <br | + | ! Velocity<br>(m/s) |
| − | ! Projectile<br | + | ! Projectile<br>Mass (kg) |
| − | ! | + | ! Screen radius<br>(m) |
| − | ! | + | ! Screen deploy time<br>(s) |
| − | ! | + | ! Screen hold time<br>(s) |
| − | ! | + | ! Explosive Mass<br>(TNT equivalent) (g) |
|- | |- | ||
| − | | M89 || 259 || 3 || 13 || 5 || 20 || 50 | + | | M89 || 259 || 3.0 || 13 || 5 || 20 || 50 |
|- | |- | ||
|} | |} | ||
| − | + | ==== [[Ammo racks]] ==== | |
| − | [[File: | + | [[File:Ammoracks_M4.png|right|thumb|x250px|[[Ammo racks]] of the {{PAGENAME}}]] |
| − | {| class="wikitable | + | {| class="wikitable" style="text-align:center" |
|- | |- | ||
| − | ! | + | ! Full<br>ammo |
| − | ! | + | ! 1st<br>rack empty |
| − | ! | + | ! 2nd<br>rack empty |
| − | ! | + | ! 3rd<br>rack empty |
| − | ! | + | ! 4th<br>rack empty |
| − | ! | + | ! 5th<br>rack empty |
| − | ! | + | ! 6th<br>rack empty |
| − | ! | + | ! 7th<br>rack empty |
| − | ! | + | ! 8th<br>rack empty |
| − | ! | + | ! Visual<br>discrepancy |
|- | |- | ||
| − | + | | '''98''' || __ ''(+__)'' || __ ''(+__)'' || __ ''(+__)'' || __ ''(+__)'' || __ ''(+__)'' || __ ''(+__)'' || __ ''(+__)'' || __ ''(+__)'' || __ | |
|- | |- | ||
|} | |} | ||
| − | |||
=== Machine guns === | === Machine guns === | ||
| + | <!-- ''Offensive and anti-aircraft machine guns not only allow you to fight some aircraft but also are effective against lightly armoured vehicles. Evaluate machine guns and give recommendations on its use.'' --> | ||
{{main|M1919A4 (7.62 mm)}} | {{main|M1919A4 (7.62 mm)}} | ||
| − | {| class="wikitable" style="text-align:center" | + | The M4A4 only has a coaxial 7.62 mm machine gun and lacks the familiar pintle-mounted M2 Browning seen on other Sherman models. This makes fending off lightly-armoured and fast opponents like the [[Sd.Kfz.234/2 | Puma]] more difficult as the main gun must be used instead. The lone M1919A4 is also unlikely to do significant damage to incoming aircraft. |
| − | + | ||
| − | + | {| class="wikitable" style="text-align:center" width="50%" | |
|- | |- | ||
| − | ! colspan="7 | + | ! colspan="5" | [[M1919A4 (7.62 mm)|7.62 mm M1919A4]] |
|- | |- | ||
| − | ! | + | ! Mount !! Capacity (Belt) !! Fire rate !! Vertical !! Horizontal |
| − | ! | ||
| − | ! | ||
| − | ! | ||
|- | |- | ||
| − | | | + | | Coaxial || 3,000 (250) || 500 || N/A || N/A |
|- | |- | ||
|} | |} | ||
| − | |||
| − | |||
| − | |||
| − | |||
== Usage in battles == | == Usage in battles == | ||
| − | <!--''Describe the tactics of playing in the vehicle, the features of using vehicles in the team and advice on tactics. Refrain from creating a "guide" - do not impose a single point of view but instead give the reader food for thought. Describe the most dangerous enemies and give recommendations on fighting them. If necessary, note the specifics of the game in different modes (AB, RB, SB).''--> | + | <!-- ''Describe the tactics of playing in the vehicle, the features of using vehicles in the team and advice on tactics. Refrain from creating a "guide" - do not impose a single point of view but instead give the reader food for thought. Describe the most dangerous enemies and give recommendations on fighting them. If necessary, note the specifics of the game in different modes (AB, RB, SB).'' --> |
| + | A well-rounded tank like most Shermans, the M4A4 enjoys decent armour, mobility, and firepower compared to its peers. Anyone familiar with the early Sherman models from other tech trees will feel right at home. It is best used at medium ranges, where the gun and armour are both quite effective, but it can partake in close range brawling in a pinch thanks to its vertical stabilizer. Stick close to teammates, keep an eye on the surroundings, and avoid overextending, as the reverse speed is bad and it is hard to retreat quickly. | ||
| − | + | While the frontal armour is good, especially when angled, staying constantly exposed to enemy fire is not advised due to a large number of weak spots. When hull-down, try to hide the portion of the right turret cheek next to the gun mantlet when possible, as the armour there is thin and lucky shot from a reserve tank might go through it. The side armour is very poor and it pays to watch out for flankers, even SPAAs. | |
| − | + | Compared to the contemporary [[T-34 (1943) (China)|T-34 (1943)]] in the PLA line of the Chinese tree, the M4A4 has worse mobility but enjoys vastly improved gun handling. They are good complements to each other, as the T-34 excels in fast, aggressive attacks while the M4A4 is good for methodical pushes and hull-down scenarios. | |
| − | + | === Modules === | |
| + | {| class="wikitable" | ||
| + | ! Tier | ||
| + | ! colspan="2" | Mobility | ||
| + | ! Protection | ||
| + | ! colspan="2" | Firepower | ||
| + | |- | ||
| + | | I | ||
| + | | Tracks | ||
| + | | | ||
| + | | Parts | ||
| + | | Horizontal Drive | ||
| + | | | ||
| + | |- | ||
| + | | II | ||
| + | | Suspension | ||
| + | | Brake System | ||
| + | | FPE | ||
| + | | Adjustment of Fire | ||
| + | | M61 shot | ||
| + | |- | ||
| + | | III | ||
| + | | Filters | ||
| + | | | ||
| + | | Crew Replenishment | ||
| + | | Elevation Mechanism | ||
| + | | | ||
| + | |- | ||
| + | | IV | ||
| + | | Transmission | ||
| + | | Engine | ||
| + | | | ||
| + | | Artillery Support | ||
| + | | M89 | ||
| + | |- | ||
| + | |} | ||
=== Pros and cons === | === Pros and cons === | ||
| − | <!--Summarise and briefly evaluate the vehicle in terms of its characteristics and combat effectiveness. Mark its pros and cons in a bulleted list. Try not to use more than 6 points for each of the characteristics. Avoid using categorical definitions such as "bad", "good" and the like - use substitutions with softer forms such as "inadequate" and "effective".--> | + | <!-- ''Summarise and briefly evaluate the vehicle in terms of its characteristics and combat effectiveness. Mark its pros and cons in a bulleted list. Try not to use more than 6 points for each of the characteristics. Avoid using categorical definitions such as "bad", "good" and the like - use substitutions with softer forms such as "inadequate" and "effective".'' --> |
'''Pros:''' | '''Pros:''' | ||
| − | + | * Excellent gun depression of -10° plus the angled frontal turret allows it to utilise hills very well | |
| − | + | * Great penetration and post-penetration damage when using M61 shells; can frontally penetrate and one-shot most opponents like the [[T-34 (Family)|T-34,]] Crusader, [[M4]] and others | |
| − | * Excellent gun depression | + | * Vertical stabiliser allows it to fire on the move, or, in a sudden encounter, fire before the enemy which is critical |
| − | * | + | * Well angled frontal armour; when angling the hull it can deflect some low calibre / low-penetrating shells like the Stuarts' 37 mm, 75 mm M1, 76 mm F-34 / Zis-5 and others |
| + | * Adequate top speed allows it to get to positions in time, or to do tactical manoeuvres like flanking | ||
| + | * Rather fast reload speed for follow up shots | ||
| + | * Plenty of reserve ammunition for prolonged fighting without replenishing at captured points | ||
| + | * Due to it being a part of the German tech tree, you will not have to face the long barrel 75 mm (RB/SB) which increases its survivability quite a bit | ||
'''Cons:''' | '''Cons:''' | ||
| − | * Large profile | + | * Large profile and weak side armour; flankers like the M24 Chaffee can easily see and penetrate it |
| − | * | + | * Frontal armour is still inadequate, will get frontally penetrated and one-shot by tanks like Achilles, [[M10 (Family)|M10]] and T-34-57 |
| − | * | + | * The best M61 shell struggles to penetrate heavy targets like [[KV-1 (ZiS-5)]], Churchill Mk.III or even the T-34 and M10 when angled |
| + | * Trajectory is curved and velocity is low due to its short barrel, thus distant/moving targets are hard to shoot at | ||
| + | * Hull traverse is quite slow, making it sluggish in a turn | ||
| + | * Roof armour of 19.5 mm thick is vulnerable to airstrikes with AP cannons. For example the widely used [[M2 Browning (12.7 mm)|M2 Browning]] | ||
== History == | == History == | ||
Revision as of 09:35, 29 May 2020
Contents
Description
.jpg)
The ␗Medium Tank M4A4 Sherman is a rank II Chinese medium tank
with a battle rating of 3.7 (AB/RB/SB). It was introduced in Update 1.91 "Night Vision".
General info
Survivability and armour
The hull is very similar to the American M4 Sherman, with a 50.8 mm thick upper glacis and protruding hatches interrupting the glacis (augmented with appliqué armour). Weak spots here include the machine gun port and ventilator on the right side. The hull sides feature appliqué armour plates covering the ammunition storage racks. The turret is also very similar but lacks the appliqué armour on the right cheek, leaving a small weakened zone in that area. Frontal protection is quite good for its rank and shots from smaller anti-tank guns can generally be shrugged off, particularly when hull down. However more powerful guns such as the Panzer IV F2's long 75mm can destroy the tank easily, so care should be taken. The side armour is only 38.1 mm thick and can be easily penetrated by just about any anti-tank gun, but the appliqué armour on this model can help if the tank is angled.
Mobility
Write about the mobility of the ground vehicle. Estimate the specific power and manoeuvrability, as well as the maximum speed forwards and backwards.
| Game Mode | Max Speed (km/h) | Weight (tons) | Engine power (horsepower) | Power-to-weight ratio (hp/ton) | |||
|---|---|---|---|---|---|---|---|
| Forward | Reverse | Stock | Upgraded | Stock | Upgraded | ||
| Arcade | 45 | 6 | 32.2 | 620 | 811 | 19.25 | 25.19 |
| Realistic | 41 | 5 | 354 | 425 | 10.99 | 13.2 | |
Armaments
Main armament
| 75 mm M3 | Turret rotation speed (°/s) | Reloading rate (seconds) | |||||||||||
|---|---|---|---|---|---|---|---|---|---|---|---|---|---|
| Mode | Capacity | Vertical | Horizontal | Stabilizer | Stock | Upgraded | Full | Expert | Aced | Stock | Full | Expert | Aced |
| Arcade | 98 | -10°/+25° | ±180° | Vertical | 22.85 | 31.62 | 38.40 | 42.47 | 45.18 | 6.50 | 5.75 | 5.30 | 5.00 |
| Realistic | 14.28 | 16.80 | 20.40 | 22.56 | 24.00 | ||||||||
Ammunition
| Penetration statistics | |||||||
|---|---|---|---|---|---|---|---|
| Ammunition | Type of warhead |
Penetration @ 0° Angle of Attack (mm) | |||||
| 10 m | 100 m | 500 m | 1,000 m | 1,500 m | 2,000 m | ||
| M72 shot | AP | 91 | 88 | 78 | 67 | 57 | 49 |
| M48 shell | HE | 10 | 10 | 10 | 10 | 10 | 10 |
| M61 shot | APCBC | 104 | 101 | 90 | 78 | 68 | 59 |
| Shell details | ||||||||||
|---|---|---|---|---|---|---|---|---|---|---|
| Ammunition | Type of warhead |
Velocity (m/s) |
Projectile Mass (kg) |
Fuse delay (m) |
Fuse sensitivity (mm) |
Explosive Mass (TNT equivalent) (g) |
Normalisation at 30° from horizontal |
Ricochet | ||
| 0% | 50% | 100% | ||||||||
| M72 shot | AP | 619 | 6.3 | N/A | N/A | N/A | -1.0° | 47° | 60° | 65° |
| M48 shell | HE | 463 | 6.3 | 0.4 | 0.5 | 666 | +0.0° | 79° | 80° | 81° |
| M61 shot | APCBC | 618 | 6.79 | 1.2 | 14.0 | 63.7 | +4.0° | 48° | 63° | 71° |
| Smoke shell characteristics | ||||||
|---|---|---|---|---|---|---|
| Ammunition | Velocity (m/s) |
Projectile Mass (kg) |
Screen radius (m) |
Screen deploy time (s) |
Screen hold time (s) |
Explosive Mass (TNT equivalent) (g) |
| M89 | 259 | 3.0 | 13 | 5 | 20 | 50 |
Ammo racks

| Full ammo |
1st rack empty |
2nd rack empty |
3rd rack empty |
4th rack empty |
5th rack empty |
6th rack empty |
7th rack empty |
8th rack empty |
Visual discrepancy |
|---|---|---|---|---|---|---|---|---|---|
| 98 | __ (+__) | __ (+__) | __ (+__) | __ (+__) | __ (+__) | __ (+__) | __ (+__) | __ (+__) | __ |
Machine guns
The M4A4 only has a coaxial 7.62 mm machine gun and lacks the familiar pintle-mounted M2 Browning seen on other Sherman models. This makes fending off lightly-armoured and fast opponents like the Puma more difficult as the main gun must be used instead. The lone M1919A4 is also unlikely to do significant damage to incoming aircraft.
| 7.62 mm M1919A4 | ||||
|---|---|---|---|---|
| Mount | Capacity (Belt) | Fire rate | Vertical | Horizontal |
| Coaxial | 3,000 (250) | 500 | N/A | N/A |
Usage in battles
A well-rounded tank like most Shermans, the M4A4 enjoys decent armour, mobility, and firepower compared to its peers. Anyone familiar with the early Sherman models from other tech trees will feel right at home. It is best used at medium ranges, where the gun and armour are both quite effective, but it can partake in close range brawling in a pinch thanks to its vertical stabilizer. Stick close to teammates, keep an eye on the surroundings, and avoid overextending, as the reverse speed is bad and it is hard to retreat quickly.
While the frontal armour is good, especially when angled, staying constantly exposed to enemy fire is not advised due to a large number of weak spots. When hull-down, try to hide the portion of the right turret cheek next to the gun mantlet when possible, as the armour there is thin and lucky shot from a reserve tank might go through it. The side armour is very poor and it pays to watch out for flankers, even SPAAs.
Compared to the contemporary T-34 (1943) in the PLA line of the Chinese tree, the M4A4 has worse mobility but enjoys vastly improved gun handling. They are good complements to each other, as the T-34 excels in fast, aggressive attacks while the M4A4 is good for methodical pushes and hull-down scenarios.
Modules
| Tier | Mobility | Protection | Firepower | ||
|---|---|---|---|---|---|
| I | Tracks | Parts | Horizontal Drive | ||
| II | Suspension | Brake System | FPE | Adjustment of Fire | M61 shot |
| III | Filters | Crew Replenishment | Elevation Mechanism | ||
| IV | Transmission | Engine | Artillery Support | M89 | |
Pros and cons
Pros:
- Excellent gun depression of -10° plus the angled frontal turret allows it to utilise hills very well
- Great penetration and post-penetration damage when using M61 shells; can frontally penetrate and one-shot most opponents like the T-34, Crusader, M4 and others
- Vertical stabiliser allows it to fire on the move, or, in a sudden encounter, fire before the enemy which is critical
- Well angled frontal armour; when angling the hull it can deflect some low calibre / low-penetrating shells like the Stuarts' 37 mm, 75 mm M1, 76 mm F-34 / Zis-5 and others
- Adequate top speed allows it to get to positions in time, or to do tactical manoeuvres like flanking
- Rather fast reload speed for follow up shots
- Plenty of reserve ammunition for prolonged fighting without replenishing at captured points
- Due to it being a part of the German tech tree, you will not have to face the long barrel 75 mm (RB/SB) which increases its survivability quite a bit
Cons:
- Large profile and weak side armour; flankers like the M24 Chaffee can easily see and penetrate it
- Frontal armour is still inadequate, will get frontally penetrated and one-shot by tanks like Achilles, M10 and T-34-57
- The best M61 shell struggles to penetrate heavy targets like KV-1 (ZiS-5), Churchill Mk.III or even the T-34 and M10 when angled
- Trajectory is curved and velocity is low due to its short barrel, thus distant/moving targets are hard to shoot at
- Hull traverse is quite slow, making it sluggish in a turn
- Roof armour of 19.5 mm thick is vulnerable to airstrikes with AP cannons. For example the widely used M2 Browning
History
The product of a production shortage of Ford GAA V8 engines, the M4A4 instead used the Chrysler A57 multibank. Due to the much more complex maintenance that the engine required, the A4 was unpopular with American mechanics and nearly all models were sent to the British, Soviets, and Chinese.
Media
Excellent additions to the article would be video guides, screenshots from the game, and photos.
See also
Links to the articles on the War Thunder Wiki that you think will be useful for the reader, for example:
- reference to the series of the vehicles;
- links to approximate analogues of other nations and research trees.
External links
Paste links to sources and external resources, such as:
- topic on the official game forum;
- encyclopedia page on the tank;
- other literature.
| China medium tanks | |
|---|---|
| ZTZ59 | Type 59 · ZTZ59A · ZTZ59D1 |
| ZTZ69 | Type 69 · Type 69-IIa · T-69 II G |
| ZTZ88/96 | ZTZ88A · ZTZ88B |
| ZTZ96 · ZTZ96A · ZTZ96A (P) | |
| ZTZ99 | ZTZ99-II · ZTZ99-III |
| ZTZ99A | ZTZ99A · WZ1001(E) LCT |
| Export series | MBT2000 · VT-4A1 |
| ROC | CM11 |
| Other | Т-34-85 Gai · Object 122MT "MC" |
| Japan | ␗Chi-Ha · ␗Chi-Ha Kai |
| USA | ␗M4A4 · ␗M4A4 (1st PTG) · ␗M4A1 (75) W · ␗M48A1 · ␗M60A3 TTS |
| USSR | ␗T-34 (1943) · ␗Т-34-85 (S-53) · T-34-85 No.215 · Т-62 №545 |
