Difference between revisions of "M4A1 (FL10)"
RuskiSpijon (talk | contribs) (→Usage in battles) (Tag: Visual edit) |
Colok76286 (talk | contribs) (→Ammo racks: Added "Last updated" note) |
||
| (14 intermediate revisions by 7 users not shown) | |||
| Line 10: | Line 10: | ||
== Description == | == Description == | ||
| − | <!--''In the description, the first part | + | <!-- ''In the description, the first part should be about the history of the creation and combat usage of the vehicle, as well as its key features. In the second part, tell the reader about the ground vehicle in the game. Insert a screenshot of the vehicle, so that if the novice player does not remember the vehicle by name, he will immediately understand what kind of vehicle the article is talking about.'' --> |
[[File:GarageImage_{{PAGENAME}}.jpg|420px|thumb|left]] | [[File:GarageImage_{{PAGENAME}}.jpg|420px|thumb|left]] | ||
| − | {{ | + | {{Break}} |
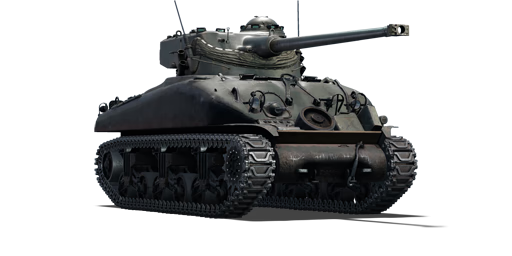
| − | The '''{{Specs|name}}''' is a gift rank {{Specs|rank}} French medium tank {{Battle-rating}}. It was introduced in [[Update 1.75 "La Résistance"]]. | + | The '''{{Specs|name}}''' is a premium gift rank {{Specs|rank}} French medium tank {{Battle-rating}}. It was introduced in [[Update 1.75 "La Résistance"]]. It combines the turret of the [[AMX-13]] (BR 6.0) with the hull of the [[M4A1]] Sherman (BR 3.3) and therefore epitomizes the glass cannon role at a BR of 4.7. |
== General info == | == General info == | ||
=== Survivability and armour === | === Survivability and armour === | ||
| − | ''Describe armour protection. Note the most well protected and key weak areas. Appreciate the layout of modules as well as the number and location of crew members. Is the level of armour protection sufficient, is the placement of modules helpful for survival in combat?'' | + | <!-- ''Describe armour protection. Note the most well protected and key weak areas. Appreciate the layout of modules as well as the number and location of crew members. Is the level of armour protection sufficient, is the placement of modules helpful for survival in combat? If necessary use a visual template to indicate the most secure and weak zones of the armour.'' --> |
| − | '' | + | '''Armour type:''' <!-- The types of armour present on the vehicle and their general locations --> |
| + | <!-- Example: * Rolled homogeneous armour (Front, Side, Rear, Hull roof) | ||
| + | * Cast homogeneous armour (Turret, Transmission area) --> | ||
| + | |||
| + | {| class="wikitable" | ||
| + | |- | ||
| + | ! Armour !! Front (Slope angle) !! Sides !! Rear !! Roof | ||
| + | |- | ||
| + | | Hull || ___ mm || ___ mm ''Top'' <br> ___ mm ''Bottom'' || ___ mm || ___ - ___ mm | ||
| + | |- | ||
| + | | Turret || ___ - ___ mm ''Turret front'' <br> ___ mm ''Gun mantlet'' || ___ - ___ mm || ___ - ___ mm || ___ - ___ mm | ||
| + | |- | ||
| + | | Cupola || ___ mm || ___ mm || ___ mm || ___ mm | ||
| + | |- | ||
| + | |} | ||
| + | |||
| + | '''Notes:''' <!-- Any additional notes which the user needs to be aware of --> | ||
| + | <!-- Example: * Suspension wheels are 20 mm thick, tracks are 30 mm thick, and torsion bars are 60 mm thick. --> | ||
| + | |||
| + | The armour is generally inadequate for BR 4.7, as it uses the [[M4A1]] hull from 3.3. Turret shots will typically knock out both your breech and the two crew there, hull shots will typically send you right back to the hangar. | ||
=== Mobility === | === Mobility === | ||
| − | ''Write about the mobility of the ground vehicle. Estimate the specific power and manoeuvrability as well as the maximum speed | + | <!-- ''Write about the mobility of the ground vehicle. Estimate the specific power and manoeuvrability, as well as the maximum speed forwards and backwards.'' --> |
| + | |||
| + | {{tankMobility|abMinHp=713|rbMinHp=407}} | ||
| + | |||
| + | Fairly decent mobility due to the Sherman chassis with an upgraded engine. Flanking is possible and rewarding. | ||
== Armaments == | == Armaments == | ||
=== Main armament === | === Main armament === | ||
| − | ''Give the reader information about the characteristics of the main gun. Assess its effectiveness in a battle based on the reloading speed, ballistics and the power of shells. Do not forget about the flexibility of the fire, that is how quickly the cannon can be aimed at the target, open fire on it and aim at another enemy. Add a link to the main article on the gun: <code><nowiki>{{main|Name of the weapon}}</nowiki></code>. Describe in general terms the ammunition available for the main gun. Give advice on how to use them and how to fill the ammunition storage.'' | + | <!-- ''Give the reader information about the characteristics of the main gun. Assess its effectiveness in a battle based on the reloading speed, ballistics and the power of shells. Do not forget about the flexibility of the fire, that is how quickly the cannon can be aimed at the target, open fire on it and aim at another enemy. Add a link to the main article on the gun: <code><nowiki>{{main|Name of the weapon}}</nowiki></code>. Describe in general terms the ammunition available for the main gun. Give advice on how to use them and how to fill the ammunition storage.'' --> |
| + | {{main|SA50 L/57 (75 mm)}} | ||
| + | |||
| + | The gun is fantastic, capable of penetrating everything in its BR spread (3.7-5.7) frontally, except for some higher BR German casemate tank destroyers and the Sherman Jumbo. The autoloader enables firing every 5 seconds, even with only a skeleton crew left. | ||
| + | |||
| + | {| class="wikitable" style="text-align:center" width="100%" | ||
| + | |- | ||
| + | ! colspan="5" | [[SA50 L/57 (75 mm)|75 mm SA50 L/57]] || colspan="5" | Turret rotation speed (°/s) || colspan="4" | Reloading rate (seconds) | ||
| + | |- | ||
| + | ! Mode !! Capacity !! Vertical !! Horizontal !! Stabilizer | ||
| + | ! Stock !! Upgraded !! Full !! Expert !! Aced | ||
| + | ! Stock !! Full !! Expert !! Aced | ||
| + | |- | ||
| + | ! ''Arcade'' | ||
| + | | rowspan="2" | 60 || rowspan="2" | -6°/+9° || rowspan="2" | ±180° || rowspan="2" | N/A || 28.56 || 39.53 || 48.00 || 53.08 || 56.47 || rowspan="2" | 5.00 || rowspan="2" | 5.00 || rowspan="2" | 5.00 || rowspan="2" | 5.00 | ||
| + | |- | ||
| + | ! ''Realistic'' | ||
| + | | 17.85 || 21.00 || 25.50 || 28.20 || 30.00 | ||
| + | |- | ||
| + | |} | ||
| + | |||
| + | ==== Ammunition ==== | ||
| + | {| class="wikitable sortable" style="text-align:center" width="100%" | ||
| + | ! colspan="8" | Penetration statistics | ||
| + | |- | ||
| + | ! rowspan="2" data-sort-type="text" | Ammunition | ||
| + | ! rowspan="2" | Type of<br>warhead | ||
| + | ! colspan="6" | '''Penetration @ 0° Angle of Attack (mm)''' | ||
| + | |- | ||
| + | ! 10 m !! 100 m !! 500 m !! 1,000 m !! 1,500 m !! 2,000 m | ||
| + | |- | ||
| + | | POT-51A || APC || 182 || 178 || 162 || 143 || 127 || 113 | ||
| + | |- | ||
| + | | 75 mm HE || HE || 10 || 10 || 10 || 10 || 10 || 10 | ||
| + | |- | ||
| + | |} | ||
| + | {| class="wikitable sortable" style="text-align:center" width="100%" | ||
| + | ! colspan="10" | Shell details | ||
| + | |- | ||
| + | ! rowspan="2" data-sort-type="text" | Ammunition | ||
| + | ! rowspan="2" | Type of<br>warhead | ||
| + | ! rowspan="2" | Velocity<br>(m/s) | ||
| + | ! rowspan="2" | Projectile<br>Mass (kg) | ||
| + | ! rowspan="2" | Fuse delay<br>(m) | ||
| + | ! rowspan="2" | Fuse sensitivity<br>(mm) | ||
| + | ! rowspan="2" | Explosive Mass<br>(TNT equivalent) (g) | ||
| + | ! colspan="3" | Ricochet | ||
| + | |- | ||
| + | ! 0% !! 50% !! 100% | ||
| + | |- | ||
| + | | POT-51A || APC || 1,000 || 6.4 || N/A || N/A || N/A || 48° || 63° || 71° | ||
| + | |- | ||
| + | | 75 mm HE || HE || 753 || 6.2 || 0.4 || 0.1 || 675 || 79° || 80° || 81° | ||
| + | |- | ||
| + | |} | ||
| + | |||
| + | ==== [[Ammo racks]] ==== | ||
| + | [[File:Ammoracks_{{PAGENAME}}.png|right|thumb|x250px|[[Ammo racks]] of the {{PAGENAME}}]] | ||
| + | '''Last updated: 1.101.0.87''' | ||
| + | {| class="wikitable" style="text-align:center" | ||
| + | |- | ||
| + | ! Full<br>ammo | ||
| + | ! 1st<br>rack empty | ||
| + | ! 2nd<br>rack empty | ||
| + | ! 3rd<br>rack empty | ||
| + | ! 4th<br>rack empty | ||
| + | ! 5th<br>rack empty | ||
| + | ! 6th<br>rack empty | ||
| + | ! 7th<br>rack empty | ||
| + | ! 8th<br>rack empty | ||
| + | ! Visual<br>discrepancy | ||
| + | |- | ||
| + | | '''60''' || 56 ''(+4)'' || 52 ''(+8)'' || 42 ''(+18)'' || 32 ''(+28)'' || 23 ''(+37)'' || 13 ''(+47)'' || 7 ''(+53)'' || 1 ''(+59)'' || No | ||
| + | |- | ||
| + | |} | ||
| + | Notes: | ||
| − | + | * Shells in racks 1, 2, 7* and 8* are modeled individually and disappear after having been shot or loaded. | |
| − | + | * Shells in racks 3, 4, 5, and 6 are modeled by sets of 2 and disappear from the rack only after both shells in the set have been shot or loaded. | |
| + | * Racks 7* and 8* (autoloader magazines) are first stage ammo racks. They total 12 shells. | ||
| + | * These racks get filled first when loading up the tank and are also emptied first. | ||
| + | * The depletion order at full capacity is: 7 - 8 - 1 - 2 up to 6. | ||
| + | * As it is equipped with an autoloader, manual reloading of the gun is not possible. | ||
| + | * Once autoloader magazines have been depleted, you can't shoot until the loader has restocked the autoloader. The restocking time is longer than the normal reload time of the gun. Take this into account when playing. | ||
| + | * Simply not firing when the gun is loaded will move ammo from racks 1 to 6 into rack 8* then 7*. Firing will interrupt the restocking of the ready racks. | ||
=== Machine guns === | === Machine guns === | ||
| − | ''Offensive and anti-aircraft machine guns not only allow you to fight some aircraft | + | <!-- ''Offensive and anti-aircraft machine guns not only allow you to fight some aircraft but also are effective against lightly armoured vehicles. Evaluate machine guns and give recommendations on its use.'' --> |
| + | {{main|MAC 31 (7.5 mm)}} | ||
| + | |||
| + | {| class="wikitable" style="text-align:center" width="50%" | ||
| + | |- | ||
| + | ! colspan="5" | [[MAC 31 (7.5 mm)|7.5 mm MAC 31]] | ||
| + | |- | ||
| + | ! Mount !! Capacity (Belt) !! Fire rate !! Vertical !! Horizontal | ||
| + | |- | ||
| + | | Coaxial || 4,950 (150) || 1,350 || N/A || N/A | ||
| + | |- | ||
| + | |} | ||
== Usage in battles == | == Usage in battles == | ||
| − | Depending on the layout of the map, match battle rating and player's own playstyle the FL10 can be used as a sniper, a flanker or a close-quarter brawler. | + | <!-- ''Describe the tactics of playing in the vehicle, the features of using vehicles in the team and advice on tactics. Refrain from creating a "guide" - do not impose a single point of view but instead give the reader food for thought. Describe the most dangerous enemies and give recommendations on fighting them. If necessary, note the specifics of the game in different modes (AB, RB, SB).'' --> |
| + | Depending on the layout of the map, match battle rating and player's own playstyle the FL10 can be used as a sniper, a flanker or a close-quarter brawler. Details about playstyles are as follows: | ||
| − | Sniper | + | ;Sniper |
| − | Using FL10 as a sniper is a conservative, but commonly rewarding | + | *Using FL10 as a sniper is a conservative, but commonly rewarding playstyle. The FL10 boasts a highly potent 75 mm cannon, with an equally impressive round, capable of penetrating 180+ mm of steel equivalent. Given the fast reload of the cannon due to the use of the autoloader, it is possible to perform quick follow-up shots on target at range. This tactic is recommended in matches where it is possible to position oneself in a good position early in the match (e.g. overlooking a point). Be wary of the gun's average depression, however, as this will require to expose the hull during firing. |
| − | Flanker | + | ;Flanker |
| − | Depending on your knowledge of the map and likely enemy routes, FL10 can be effectively used as a flanker. The FL10 inherits a relatively mobile chassis of an M4 medium tank making some flanking | + | *Depending on your knowledge of the map and likely enemy routes, FL10 can be effectively used as a flanker. The FL10 inherits a relatively mobile chassis of an M4 medium tank making some flanking manoeuvres possible. In this role, FL10 can be used to assume an ambush position on the flanks. It is important to note, that FL10 is not the most agile vehicle at its battle rating, however, provided a good early-game position, fast reload and good penetration it can effectively engage an enemy from the flanks and counter enemy flankers. It is advised to retreat immediately if you're spotted as FL10 is unlikely to withstand being fired upon due to mediocre armour and 4 crew members. |
| − | Brawler | + | ;Brawler |
| − | Using FL10 as a close-quarter brawler is a high risk/high reward tactic that is likely to result in either multiple kills or an early return to the hangar. It is important to fire the first shot on the enemy, as given the poor armour of the tank, you are commonly unable to | + | *Using FL10 as a close-quarter brawler is a high risk/high reward tactic that is likely to result in either multiple kills or an early return to the hangar. It is important to fire the first shot on the enemy, as, given the poor armour of the tank, you are commonly unable to withstand even one hit. Here, it is advised to disable the enemy's gun/turret first to prevent them from returning fire. It is important to note, that FL10 lacks the stabiliser found on the American Sherman counterparts, putting the player at a further disadvantage when fighting in close quarters. |
| + | |||
| + | === Modules === | ||
| + | {| class="wikitable" | ||
| + | ! Tier | ||
| + | ! colspan="2" | Mobility | ||
| + | ! Protection | ||
| + | ! colspan="2" | Firepower | ||
| + | |- | ||
| + | | I | ||
| + | | Tracks | ||
| + | | | ||
| + | | Parts | ||
| + | | Horizontal Drive | ||
| + | | | ||
| + | |- | ||
| + | | II | ||
| + | | Suspension | ||
| + | | Brake System | ||
| + | | FPE | ||
| + | | Adjustment of Fire | ||
| + | | | ||
| + | |- | ||
| + | | III | ||
| + | | Filters | ||
| + | | | ||
| + | | Crew Replenishment | ||
| + | | Elevation Mechanism | ||
| + | | Smoke grenade | ||
| + | |- | ||
| + | | IV | ||
| + | | Transmission | ||
| + | | Engine | ||
| + | | | ||
| + | | Artillery Support | ||
| + | | | ||
| + | |- | ||
| + | ! colspan="6" | This is a premium vehicle: all modifications are unlocked on purchase | ||
| + | |- | ||
| + | |} | ||
=== Pros and cons === | === Pros and cons === | ||
| − | '' | + | <!-- ''Summarise and briefly evaluate the vehicle in terms of its characteristics and combat effectiveness. Mark its pros and cons in a bulleted list. Try not to use more than 6 points for each of the characteristics. Avoid using categorical definitions such as "bad", "good" and the like - use substitutions with softer forms such as "inadequate" and "effective".'' --> |
'''Pros:''' | '''Pros:''' | ||
| − | * | + | * Good penetration and excellent rate of fire |
| + | * Improved engine makes for decent mobility | ||
| + | * Smoke grenades | ||
| + | * The best shell is free (like many later French tanks) | ||
'''Cons:''' | '''Cons:''' | ||
| − | * | + | * Lacklustre reverse speed; disengaging from the fight if damaged or out of ammunition can be difficult |
| + | * Oscillating turret means that from a full stop, the M4A1 (FL10) usually takes longer to level the gun compared to conventional turrets | ||
| + | * Poor turret elevation makes engaging aeroplanes difficult | ||
| + | * Poor armour and only 4 crew | ||
| + | * Vulnerable to .50 cal ground target belts through the turret roof armour | ||
== History == | == History == | ||
| − | ''Describe the history of the creation and combat usage of the | + | ''Describe the history of the creation and combat usage of the vehicle in more detail than in the introduction. If the historical reference turns out to be too long, take it to a separate article, taking a link to the article about the vehicle and adding a block "/History" (example: <nowiki>https://wiki.warthunder.com/(Vehicle-name)/History</nowiki>) and add a link to it here using the <code>main</code> template. Be sure to reference text and sources by using <code><nowiki><ref></ref></nowiki></code>, as well as adding them at the end of the article with <code><nowiki><references /></nowiki></code>. This section may also include the vehicle's dev blog entry (if applicable) and the in-game encyclopedia description (under <code><nowiki>=== In-game description ===</nowiki></code>, also if applicable).'' |
== Media == | == Media == | ||
| − | '' | + | <!-- ''Excellent additions to the article would be video guides, screenshots from the game, and photos.'' --> |
| + | {{Youtube-gallery|ih6xhSZlTgQ|'''The Shooting Range #78''' - ''War Machines'' section at 00:32 discusses the M4A1 (FL10).}} | ||
== See also == | == See also == | ||
''Links to the articles on the War Thunder Wiki that you think will be useful for the reader, for example:'' | ''Links to the articles on the War Thunder Wiki that you think will be useful for the reader, for example:'' | ||
| − | |||
* ''reference to the series of the vehicles;'' | * ''reference to the series of the vehicles;'' | ||
* ''links to approximate analogues of other nations and research trees.'' | * ''links to approximate analogues of other nations and research trees.'' | ||
== External links == | == External links == | ||
| − | <!--''Paste links to sources and external resources, such as:'' | + | <!-- ''Paste links to sources and external resources, such as:'' |
* ''topic on the official game forum;'' | * ''topic on the official game forum;'' | ||
* ''encyclopedia page on the tank;'' | * ''encyclopedia page on the tank;'' | ||
| − | * ''other literature.''--> | + | * ''other literature.'' --> |
| − | * [ | + | * [[wt:en/news/5162-development-m4a1-fl10-the-charming-sherman-en|[Devblog] M4A1 FL10 - The Charming Sherman]] |
{{France medium tanks}} | {{France medium tanks}} | ||
{{France premium ground vehicles}} | {{France premium ground vehicles}} | ||
Revision as of 11:47, 25 September 2020
Contents
| This page is about the French premium tank M4A1 (FL10). For other uses, see M4 (Disambiguation). |
Description
.jpg)
The Sherman M4A1 tourelle FL10 is a premium gift rank III French medium tank
with a battle rating of 4.7 (AB) and 5.0 (RB/SB). It was introduced in Update 1.75 "La Résistance". It combines the turret of the AMX-13 (BR 6.0) with the hull of the M4A1 Sherman (BR 3.3) and therefore epitomizes the glass cannon role at a BR of 4.7.
General info
Survivability and armour
Armour type:
| Armour | Front (Slope angle) | Sides | Rear | Roof |
|---|---|---|---|---|
| Hull | ___ mm | ___ mm Top ___ mm Bottom |
___ mm | ___ - ___ mm |
| Turret | ___ - ___ mm Turret front ___ mm Gun mantlet |
___ - ___ mm | ___ - ___ mm | ___ - ___ mm |
| Cupola | ___ mm | ___ mm | ___ mm | ___ mm |
Notes:
The armour is generally inadequate for BR 4.7, as it uses the M4A1 hull from 3.3. Turret shots will typically knock out both your breech and the two crew there, hull shots will typically send you right back to the hangar.
Mobility
| Game Mode | Max Speed (km/h) | Weight (tons) | Engine power (horsepower) | Power-to-weight ratio (hp/ton) | |||
|---|---|---|---|---|---|---|---|
| Forward | Reverse | Stock | Upgraded | Stock | Upgraded | ||
| Arcade | 43 | 6 | 30.3 | 713 | 763 | 23.53 | 25.18 |
| Realistic | 38 | 5 | 407 | 400 | 13.43 | 13.2 | |
Fairly decent mobility due to the Sherman chassis with an upgraded engine. Flanking is possible and rewarding.
Armaments
Main armament
The gun is fantastic, capable of penetrating everything in its BR spread (3.7-5.7) frontally, except for some higher BR German casemate tank destroyers and the Sherman Jumbo. The autoloader enables firing every 5 seconds, even with only a skeleton crew left.
| 75 mm SA50 L/57 | Turret rotation speed (°/s) | Reloading rate (seconds) | |||||||||||
|---|---|---|---|---|---|---|---|---|---|---|---|---|---|
| Mode | Capacity | Vertical | Horizontal | Stabilizer | Stock | Upgraded | Full | Expert | Aced | Stock | Full | Expert | Aced |
| Arcade | 60 | -6°/+9° | ±180° | N/A | 28.56 | 39.53 | 48.00 | 53.08 | 56.47 | 5.00 | 5.00 | 5.00 | 5.00 |
| Realistic | 17.85 | 21.00 | 25.50 | 28.20 | 30.00 | ||||||||
Ammunition
| Penetration statistics | |||||||
|---|---|---|---|---|---|---|---|
| Ammunition | Type of warhead |
Penetration @ 0° Angle of Attack (mm) | |||||
| 10 m | 100 m | 500 m | 1,000 m | 1,500 m | 2,000 m | ||
| POT-51A | APC | 182 | 178 | 162 | 143 | 127 | 113 |
| 75 mm HE | HE | 10 | 10 | 10 | 10 | 10 | 10 |
| Shell details | |||||||||
|---|---|---|---|---|---|---|---|---|---|
| Ammunition | Type of warhead |
Velocity (m/s) |
Projectile Mass (kg) |
Fuse delay (m) |
Fuse sensitivity (mm) |
Explosive Mass (TNT equivalent) (g) |
Ricochet | ||
| 0% | 50% | 100% | |||||||
| POT-51A | APC | 1,000 | 6.4 | N/A | N/A | N/A | 48° | 63° | 71° |
| 75 mm HE | HE | 753 | 6.2 | 0.4 | 0.1 | 675 | 79° | 80° | 81° |
Ammo racks
.png)
Last updated: 1.101.0.87
| Full ammo |
1st rack empty |
2nd rack empty |
3rd rack empty |
4th rack empty |
5th rack empty |
6th rack empty |
7th rack empty |
8th rack empty |
Visual discrepancy |
|---|---|---|---|---|---|---|---|---|---|
| 60 | 56 (+4) | 52 (+8) | 42 (+18) | 32 (+28) | 23 (+37) | 13 (+47) | 7 (+53) | 1 (+59) | No |
Notes:
- Shells in racks 1, 2, 7* and 8* are modeled individually and disappear after having been shot or loaded.
- Shells in racks 3, 4, 5, and 6 are modeled by sets of 2 and disappear from the rack only after both shells in the set have been shot or loaded.
- Racks 7* and 8* (autoloader magazines) are first stage ammo racks. They total 12 shells.
- These racks get filled first when loading up the tank and are also emptied first.
- The depletion order at full capacity is: 7 - 8 - 1 - 2 up to 6.
- As it is equipped with an autoloader, manual reloading of the gun is not possible.
- Once autoloader magazines have been depleted, you can't shoot until the loader has restocked the autoloader. The restocking time is longer than the normal reload time of the gun. Take this into account when playing.
- Simply not firing when the gun is loaded will move ammo from racks 1 to 6 into rack 8* then 7*. Firing will interrupt the restocking of the ready racks.
Machine guns
| 7.5 mm MAC 31 | ||||
|---|---|---|---|---|
| Mount | Capacity (Belt) | Fire rate | Vertical | Horizontal |
| Coaxial | 4,950 (150) | 1,350 | N/A | N/A |
Usage in battles
Depending on the layout of the map, match battle rating and player's own playstyle the FL10 can be used as a sniper, a flanker or a close-quarter brawler. Details about playstyles are as follows:
- Sniper
- Using FL10 as a sniper is a conservative, but commonly rewarding playstyle. The FL10 boasts a highly potent 75 mm cannon, with an equally impressive round, capable of penetrating 180+ mm of steel equivalent. Given the fast reload of the cannon due to the use of the autoloader, it is possible to perform quick follow-up shots on target at range. This tactic is recommended in matches where it is possible to position oneself in a good position early in the match (e.g. overlooking a point). Be wary of the gun's average depression, however, as this will require to expose the hull during firing.
- Flanker
- Depending on your knowledge of the map and likely enemy routes, FL10 can be effectively used as a flanker. The FL10 inherits a relatively mobile chassis of an M4 medium tank making some flanking manoeuvres possible. In this role, FL10 can be used to assume an ambush position on the flanks. It is important to note, that FL10 is not the most agile vehicle at its battle rating, however, provided a good early-game position, fast reload and good penetration it can effectively engage an enemy from the flanks and counter enemy flankers. It is advised to retreat immediately if you're spotted as FL10 is unlikely to withstand being fired upon due to mediocre armour and 4 crew members.
- Brawler
- Using FL10 as a close-quarter brawler is a high risk/high reward tactic that is likely to result in either multiple kills or an early return to the hangar. It is important to fire the first shot on the enemy, as, given the poor armour of the tank, you are commonly unable to withstand even one hit. Here, it is advised to disable the enemy's gun/turret first to prevent them from returning fire. It is important to note, that FL10 lacks the stabiliser found on the American Sherman counterparts, putting the player at a further disadvantage when fighting in close quarters.
Modules
| Tier | Mobility | Protection | Firepower | ||
|---|---|---|---|---|---|
| I | Tracks | Parts | Horizontal Drive | ||
| II | Suspension | Brake System | FPE | Adjustment of Fire | |
| III | Filters | Crew Replenishment | Elevation Mechanism | Smoke grenade | |
| IV | Transmission | Engine | Artillery Support | ||
| This is a premium vehicle: all modifications are unlocked on purchase | |||||
Pros and cons
Pros:
- Good penetration and excellent rate of fire
- Improved engine makes for decent mobility
- Smoke grenades
- The best shell is free (like many later French tanks)
Cons:
- Lacklustre reverse speed; disengaging from the fight if damaged or out of ammunition can be difficult
- Oscillating turret means that from a full stop, the M4A1 (FL10) usually takes longer to level the gun compared to conventional turrets
- Poor turret elevation makes engaging aeroplanes difficult
- Poor armour and only 4 crew
- Vulnerable to .50 cal ground target belts through the turret roof armour
History
Describe the history of the creation and combat usage of the vehicle in more detail than in the introduction. If the historical reference turns out to be too long, take it to a separate article, taking a link to the article about the vehicle and adding a block "/History" (example: https://wiki.warthunder.com/(Vehicle-name)/History) and add a link to it here using the main template. Be sure to reference text and sources by using <ref></ref>, as well as adding them at the end of the article with <references />. This section may also include the vehicle's dev blog entry (if applicable) and the in-game encyclopedia description (under === In-game description ===, also if applicable).
Media
See also
Links to the articles on the War Thunder Wiki that you think will be useful for the reader, for example:
- reference to the series of the vehicles;
- links to approximate analogues of other nations and research trees.
External links
| France medium tanks | |
|---|---|
| M4 Derivatives | M4A1 (FL10) · M4A4 (SA50) |
| AMX-50 | AMX M4 · AMX-50 (TOA100) · AMX-50 (TO90/930) |
| AMX-30 | AMX-30 · AMX-30 (1972) · AMX-30B2 · AMX-30B2 BRENUS · AMX-30 ACRA · AMX-30 Super |
| AMX-32/40 | AMX-32 · AMX-32 (105) · AMX-40 |
| Leclerc | Leclerc · Leclerc S2 · Leclerc SXXI · Leclerc AZUR |
| Other | D2 · S.35 · Lorraine 40t |
| Germany | Panther "Dauphiné" |
| USA | ▄M4A1 · ▄M4A3 (105) · ▄M4A4 · ▄M26 |
| France premium ground vehicles | |
|---|---|
| Light tanks | AMD.35 (SA35) · H.39 "Cambronne" · LVT-4/40 · AMX-13 (SS.11) · AMX-13-M24 · E.B.R. (1954) · E.B.R. (1963) · VBCI-2 (MCT30) |
| Medium tanks | M4A1 (FL10) · Panther "Dauphiné" · AMX-30 · AMX-30 Super · AMX-50 (TO90/930) |
| Heavy tanks | B1 ter · 2C bis · Somua SM |
| Tank destroyers | Lorraine 155 Mle.50 |
