Difference between pages "M1A1" and "F-84B-26"
(→Mobility) |
(→Offensive armament: Info added.) |
||
| Line 1: | Line 1: | ||
| − | {{Specs-Card|code= | + | {{Specs-Card |
| + | |code=f-84b | ||
| + | |cockpit=380026/1304896 | ||
| + | }} | ||
{{About | {{About | ||
| − | |about = | + | |about=aircraft '''{{PAGENAME}}''' |
| − | |usage = other uses | + | |usage=other uses |
| − | |link = | + | |link=F-84 (Family) |
}} | }} | ||
| + | |||
== Description == | == Description == | ||
| − | <!-- ''In the description, the first part should be about the history of the creation and combat usage of the | + | <!--''In the description, the first part should be about the history of and the creation and combat usage of the aircraft, as well as its key features. In the second part, tell the reader about the aircraft in the game. Insert a screenshot of the vehicle, so that if the novice player does not remember the vehicle by name, he will immediately understand what kind of vehicle the article is talking about.''--> |
| + | |||
[[File:GarageImage_{{PAGENAME}}.jpg|420px|thumb|left]] | [[File:GarageImage_{{PAGENAME}}.jpg|420px|thumb|left]] | ||
{{break}} | {{break}} | ||
| − | The '''{{Specs|name}}''' | + | The '''{{Specs|name}}''' is a Rank {{Specs|rank}} American jet fighter {{Battle-rating}}. It was introduced in [[Update 1.39]]. The F-84B-26 is known for its versatile payload and decent top speed, but lackluster in terms of acceleration. The Thunderjet does well at destroying ground targets, given the quantity and quality of payload. |
| + | |||
| + | The F-84 Thunderjet was Republic’s attempt to convert from piston-engine aircraft to turbojets. F-84B featured here is primarily the same aircraft as the final test version the YP-84A, except that it had faster firing M3 Browning machines guns. Due to unmitigable problems, the F-84B (and F-84C) fleet only had a short four-year operational run before being withdrawn from service. | ||
| + | |||
| + | Though never seeing combat in Korea, the F-84B provided the jumping platform in which the F-84D and later models did successfully serve resulting in destroying over 60% of all ground targets during the Korean war. Early tests with the F-84B revealed that the Allison J35-A-15 was relatively weak when it came to taking off (especially with a full complement of suspended weapons) and was underwhelming when it came to rate of climb, however, when at altitude and during diving runs, the F-84B began to shine. The maximum speed of the F-84B was limited to 0.8 Mach (613 mph or 987 kph), flying faster resulted in catastrophic skin buckling or wing twist and shear due to the wing-tip fuel tanks which is a real concern when flying in realistic and simulator battles. This maximum speed limitation can cause issues, especially when flying against the Soviet [[MiG-15]] which has a higher max speed. | ||
| − | + | Pilots of the Thunderjet nicknamed it “The World’s Fastest Tricycle” (a play on the newer tricycle landing gear configuration) or “The Lead Sled” due to its extremely long takeoff roll, however in-game during attack runs, the F-84B is an incredibly stable platform and can be outfitted with a number of various suspended armaments along with its six 12.7 mm M3 Browning machine guns. Though each gun only has 300 rounds of ammunition, trigger control is necessary or else the pilot will be left with empty guns in short order. Considered a multi-role aircraft, the F-84B can be utilised as a fighter-interceptor, bomber interceptor and ground attack fighter. The F-84B can be laden with a variety of bombs ranging from 100 lbs all the way up to two 1,000 lb bombs. [[HVAR]] and [[Tiny Tim]] rockets are a viable option alone or mixed with bombs to expand the options of targets to be attacked depending on the map the pilot is flying in. | |
| − | |||
| − | |||
| − | |||
| − | |||
| − | |||
| − | + | Like many jet fighters, flying slowly makes for an easy target and this is no exception for the F-84B. Speed is necessary to ensure manoeuvrability both to engage a target and to shake a tail. Though not the fastest fighter at this rank, the F-84B can hold its own and when pressed, the six centre lined M3 Browning machine guns can punch enough holes in an enemy fighter to bring it down and allow it to move onto the next target. Don’t expect this fighter when laden down with two 1,000 lbs bombs or two Tiny Tim and 8 HVAR rockets to excel in a dog-fight as it won’t with all that weight, however, after all that ordnance is released the F-84B can then mix it up, though it is preferable to maintain speed while performing Boom & Zoom manoeuvres allowing the fighter to get on target and then speed away to set up for the next shot. The F-84B will help newer jet pilots get used to the basics of the aircraft before upgrading to the [[F-84G-21-RE|F-84G]]. | |
| − | |||
| − | |||
| − | == | + | == General info == |
| − | === | + | === Flight Performance === |
| − | <!-- | + | <!-- Describe how the aircraft behaves in the air. Speed, manoeuvrability, acceleration and allowable loads - these are the most important characteristics of the vehicle. --> |
| − | |||
{| class="wikitable" style="text-align:center" | {| class="wikitable" style="text-align:center" | ||
|- | |- | ||
| − | ! colspan=" | + | ! colspan="8" | Characteristics |
| − | |||
| − | |||
| − | |||
| − | |||
| − | |||
|- | |- | ||
| − | + | ! colspan="8" | ''Stock'' | |
|- | |- | ||
| − | ! colspan=" | + | ! colspan="2" | Max Speed<br>(km/h at ?,000 m) |
| + | ! rowspan="2" | Max altitude<br>(meters) | ||
| + | ! colspan="2" | Turn time<br>(seconds) | ||
| + | ! colspan="2" | Rate of climb<br>(meters/second) | ||
| + | ! rowspan="2" |Take-off run<br>(meters) | ||
|- | |- | ||
| − | ! | + | ! AB |
| − | ! | + | ! RB |
| − | ! | + | ! AB |
| − | ! | + | ! RB |
| − | ! | + | ! AB |
| − | ! | + | ! RB |
|- | |- | ||
| − | | | + | | 924 || 890 || {{Specs|ceiling}} || 32.2 || 33.8 || 17.5 || 17.5 || 1500 |
|- | |- | ||
| − | | '' | + | ! colspan="8" | ''Upgraded'' |
|- | |- | ||
| − | ! colspan=" | + | ! colspan="2" | Max Speed<br>(km/h at ?,000 m) |
| + | ! rowspan="2" |Max altitude (meters) | ||
| + | ! colspan="2" | Turn time (seconds) | ||
| + | ! colspan="2" | Rate of climb<br>(meters/second) | ||
| + | ! rowspan="2" |Take-off run (meters) | ||
|- | |- | ||
| − | ! | + | ! AB |
| − | ! | + | ! RB |
| − | ! | + | ! AB |
| − | ! | + | ! RB |
| + | ! AB | ||
| + | ! RB | ||
|- | |- | ||
| − | | | + | | 960 || 948 || {{Specs|ceiling}} || 30.2 || 31.0 || 27.3 || 22 || 1500 |
|- | |- | ||
|} | |} | ||
| − | ==== | + | ====Details==== |
| − | {| class="wikitable | + | {| class="wikitable" style="text-align:center" |
| − | |||
|- | |- | ||
| − | + | ! colspan="5" | Features | |
| − | |||
| − | ! colspan=" | ||
|- | |- | ||
| − | ! | + | ! Combat flap |
| − | ! | + | ! Take-off flap |
| − | ! | + | ! Landing flap |
| − | ! | + | ! Air brakes |
| − | ! | + | ! Arrestor gear |
| − | |||
|- | |- | ||
| − | | | + | | ✓ || ✓ || ✓ || ✓ || X <!-- ✓ --> |
| − | |||
| − | |||
|- | |- | ||
|} | |} | ||
| − | {| class="wikitable | + | |
| − | + | {| class="wikitable" style="text-align:center" | |
|- | |- | ||
| − | + | ! colspan="5" | Limits | |
| − | |||
| − | |||
| − | |||
| − | |||
| − | |||
| − | |||
| − | |||
| − | |||
| − | |||
| − | ! colspan=" | ||
|- | |- | ||
| − | ! | + | ! rowspan="2" | Wing-break speed<br>(km/h) |
| − | ! | + | ! rowspan="2" | Gear limit<br>(km/h) |
| − | ! | + | ! rowspan="2" | Combat flap<br> (km/h) |
| + | ! colspan="2" | Max Static G | ||
|- | |- | ||
| − | + | ! + | |
| + | ! - | ||
|- | |- | ||
| − | | | + | | {{Specs|разрушение|конструкции}} || {{Specs|разрушение|шасси}} || 550 || ~11 || ~4.5 |
|- | |- | ||
|} | |} | ||
| − | + | {| class="wikitable" style="text-align:center" | |
| − | {| class="wikitable | ||
|- | |- | ||
| − | ! | + | ! colspan="4" | Optimal velocities |
| − | |||
| − | |||
| − | |||
|- | |- | ||
| − | || | + | ! Ailerons<br>(km/h) |
| + | ! Rudder<br>(km/h) | ||
| + | ! Elevators<br>(km/h) | ||
| + | ! Radiator<br>(km/h) | ||
| + | |- | ||
| + | | < 530 || < 600 || < 690 || N/A | ||
|- | |- | ||
|} | |} | ||
| − | |||
| − | |||
| − | |||
| − | |||
| − | |||
{| class="wikitable" style="text-align:center" | {| class="wikitable" style="text-align:center" | ||
|- | |- | ||
| − | ! colspan=" | + | ! colspan="3" | Compressor (RB/SB) |
|- | |- | ||
| − | ! colspan=" | + | ! colspan="3" | Setting 1 |
|- | |- | ||
| − | ! | + | ! Optimal altitude |
| − | ! | + | ! 100% Engine power |
| − | ! | + | ! WEP Engine power |
| − | |||
| − | |||
| − | |||
| − | |||
| − | |||
| − | |||
|- | |- | ||
| − | + | | 0 m || 1620 kgf || No WEP | |
|- | |- | ||
| − | ! colspan=" | + | <!-- |
| + | ! colspan="3" | Setting 2 | ||
|- | |- | ||
| − | ! | + | ! Optimal altitude |
| − | ! | + | ! 100% Engine power |
| − | ! | + | ! WEP Engine power |
| − | |||
|- | |- | ||
| − | | | + | | ?,??? m || ?,??? hp || ?,??? hp |
|- | |- | ||
| − | ! colspan=" | + | ! colspan="3" | Setting 3 |
|- | |- | ||
| − | ! | + | ! Optimal altitude |
| − | ! | + | ! 100% Engine power |
| − | ! | + | ! WEP Engine power |
| − | |||
|- | |- | ||
| − | | | + | | ?,??? m || ?,??? hp || ?,??? hp |
|- | |- | ||
| + | --> | ||
|} | |} | ||
| + | === Survivability and armour === | ||
| + | <!-- Examine the survivability of the aircraft. Note how vulnerable the structure is and how secure the pilot is, whether the fuel tanks are armoured, etc. Describe the armour, if there is any, and also mention the vulnerability of other critical aircraft systems. --> | ||
| + | |||
| + | * 38 mm Bulletproof glass in cockpit front | ||
| + | * 6.35 mm Steel plate in front of the pilot | ||
| + | * 12.7 mm Steel plate in pilot's headrest | ||
| + | * 8 mm Steel plate behind the pilot | ||
| + | |||
| + | Like many early jet fighters, the armour was placed around the pilot while not much thought was given to the other critical components of the aircraft. From behind, the pilot is protected by an 8 mm steel plate behind the seat with a 12.7 mm steel plate as a headrest. In front of the pilot, a 38 mm bulletproof windscreen adds protection from head-on's or from defensive bomber weapons. Another 6.35 mm steel plate is placed in front of the pilot and instrument panel for further protection of bullets entering the open-ended air-intake. | ||
| + | |||
| + | Other critical components such as the jet turbine, fuel tanks and coolers are all exposed, only protected by the outer skin of the aircraft which may deflect incoming bullets if at sufficient distance or angle to do so. | ||
| + | |||
| + | When attacking an F-84B, aim for the centre of the aircraft where you have a good chance of getting a critical hit on the engine or in a fuel tank. Due to this aircraft having wing-tip fuel tanks, shots to the wings or wing-tip tanks have a potential of starting a fire or breaking a wing off. If the attacking aircraft has sufficient calibre ammunition then shots taken at the pilot may have a larger chance of success if made from the sides or behind. This aircraft does not have much protection against rockets or missiles, however, given sufficient notice, rockets can be avoided and it is possible that missiles can be outmanoeuvred, however, when playing in realistic or simulator you run the risk of the pilot blacking-out due to G-force manoeuvers or wings snapping while trying to outfly a missile. | ||
| + | |||
| + | == Armaments == | ||
| + | === Offensive armament === | ||
| + | <!--''Describe the offensive armament of the aircraft, if any. Describe how effective the cannons and machine guns are in a battle, and also what belts or drums are better to use. If there is no offensive weaponry, delete this subsection.''--> | ||
| + | {{main|Browning M3 (12.7 mm)}} | ||
| + | |||
| + | The '''''{{PAGENAME}}''''' is armed with: | ||
| + | |||
| + | * 4 x 12.7 mm M3 Browning machine gun, nose-mounted (300 rpg = 1,200 total) | ||
| + | * 2 x 12.7 mm M3 Browning machine gun, wing-mounted (300 rpg = 600 total) | ||
| + | |||
| + | Early fighters had many different configurations of machine guns and cannons mounted in the fuselage and in the wings, sometimes needing to be synced with the propeller to prevent its destruction. With the jet age developing, many factors of the past needed to be reconsidered with gun placement. With jet fighters flying faster and chasing faster targets, trying to find the sweet spot with gun convergence was extremely difficult, jet fighter pilots needed a little extra help with this. Besides implementing newer gun sites and early radar, jet fighter guns tended to be fuselage-mounted, thus eliminating the need to set the convergence and at any point between 0 m and 800 m the ammunition rounds would fly true without a convergence point. | ||
| + | |||
| + | For the F-84B, four of the 12.7 mm M3 Browning machine guns were mounted in the fuselage with the other two mounted in the wing roots. While they were not all centre mounted, the two in the wing roots were close enough that convergence did not need to be messed with. Two ammunition options provide the most bang-for-the-buck, firstly, the omni-purpose rounds are good all-around ammunition rounds which provide tracers and explosive/incendiary rounds which are effective against aircraft and up to light armoured vehicles. Hardened vehicles and bunkers should be left to bombs and rockets for their destruction. If as a pilot you are looking for the sneak attack, stealth rounds will allow you to get on target fire off rounds and not give away your position, giving you a few seconds to make a second attack if needed before the target realizes where you are coming from. | ||
| + | |||
| + | === Suspended armament === | ||
| + | <!--''Describe the aircraft's suspended armament: additional cannons under the wings, bombs, rockets and torpedoes. This section is especially important for bombers and attackers. If there is no suspended weaponry remove this subsection.''--> | ||
| + | {{main|:Category:Suspended armaments|l1=Suspended armaments}} | ||
| + | |||
| + | The '''''{{PAGENAME}}''''' can be outfitted with the following ordinance" | ||
| + | |||
| + | * 4 × 127 mm HVAR rockets | ||
| + | * 8 × 127 mm HVAR rockets | ||
| + | * 8 × 127 mm HVAR rockets + 2 x 1,000 lb AN-M65A1 bombs | ||
| + | * 8 × 127 mm HVAR rockets + 2 x 500 lb AN-M64A1 bombs | ||
| + | * 8 × 127 mm HVAR rockets + 2 x 250 lb AN-M57 bombs | ||
| + | * 8 × 127 mm HVAR rockets + 2 x 100 lb AN-M30A1 bombs | ||
| + | * 2 × 298 mm Tiny Tim rockets + 8 x 127 mm HVAR rockets | ||
| + | * 2 × 298 mm Tiny Tim rockets | ||
| + | * 2 × 1,000 lb AN-M65A1 bombs | ||
| + | * 2 x 500 lb AN-M64A1 bombs | ||
| + | * 2 x 250 lb AN-M57 bombs | ||
| + | * 2 x 100 lb AN-M30A1 bombs | ||
| + | |||
| + | <!--=== Defensive armament === | ||
| + | ''Defensive armament with turret machine guns or cannons, crewed by gunners. Examine the number of gunners and what belts or drums are better to use. If defensive weaponry is not available, remove this subsection.'' | ||
| + | --> | ||
== Usage in battles == | == Usage in battles == | ||
| − | ''Describe the tactics of playing in | + | <!--''Describe the tactics of playing in an aircraft, the features of using vehicles in a team and advice on tactics. Refrain from creating a "guide" - do not impose a single point of view, but instead, give the reader food for thought. Examine the most dangerous enemies and give recommendations on fighting them. If necessary, note the specifics of the game in different modes (AB, RB, SB).''--> |
| − | + | The F-84B-26 can be used in two different ways to maximize efficiency: | |
| − | + | ||
| + | # Boom and Run: Due to the F-84's good top speed, a good way to fight an enemy is to get up to a higher altitude and dive towards the enemy aircraft, then shoot and extend to stay out of weapons range. Once you extend, re-position yourself and repeat. | ||
| + | |||
| + | # Slice and Dice: Stick low and gain speed (preferably above 800 km/h), once the bowl forms (bowl is when a cluster of enemy planes form into one area) cut through the bowl selecting one target plane and take a shot followed by extending and repositioning. | ||
| − | + | Enemy worth noting- every single plane which is faster than you. A slow F-84 is a dead 84, stay fast. | |
| − | + | As fighter-bomber it can be used as a normal jet fighter too, utilizing the top speed, but hindered by acceleration and climb rate. Due to terrible acceleration, the main tactic to attack enemy fighters, as well as bombers, is to use Boom and Run and Boom and Zoom. Given the inherent issues, keeping energy while flying F-84 is crucial and hard. Indeed a difficult fighter to master, albeit a strict teacher for advanced jet tactics as necessary in the F-86A. | |
| − | |||
| − | |||
| − | |||
| − | |||
| − | |||
| − | + | M3s Brownings are very good at shooting down all types of enemy fighters, bombers and attackers. | |
| − | + | Due to very high RoF and low ammo count, trigger discipline is advised. Best ammo belts are Stealth and Omni-Purpose. | |
| − | |||
| − | |||
| − | |||
| − | |||
| − | == | + | ===Modules=== |
| − | + | Due to better belts, it's recommended to first of all research ''Offensive 12mm''. After it, the pilot needs to focus on ''Compressor'' and ''Engine'' upgrade, due to the very bad acceleration of this jet. Afterwards, ''New boosters'' and ''Wings repair'' is the best choice. ''Airframe'' and ''Cover'' will help plane in all respects. Then all the bombs and rockets to make the plane better at ground strike. However, if used as an assisting vehicle in combined battles going straight for all payload updates isn't a bad decision either. Under this consideration take ''New boosters'' and ''Engine'' as only sidesteps until all armament modules are researched. ''G-Suit'' isn't useful because turning in this plane bleeds speed for enemies to take advantage of. At last, ''Fuselage repair'' is additional. | |
| − | + | {| class="wikitable" | |
| + | ! colspan="1" | Tier | ||
| + | ! colspan="2" | Flight performance | ||
| + | ! colspan="1" | Survivability | ||
| + | ! colspan="3" | Weaponry | ||
| + | |- | ||
| + | | I | ||
| + | | Fuselage Repair | ||
| + | | | ||
| + | | | ||
| + | | Offensive 12 mm | ||
| + | | FRC Mk.7 | ||
| + | | FSBC Mk.1 | ||
| + | |- | ||
| + | | II | ||
| + | | New Boosters | ||
| + | | Compressor | ||
| + | | Airframe | ||
| + | | | ||
| + | | | ||
| + | |FSBC Mk.5 | ||
| + | |- | ||
| + | | III | ||
| + | | Wings Repair | ||
| + | | Engine | ||
| + | | | ||
| + | | New 12 mm MGs | ||
| + | | FRC Mk.7a | ||
| + | | FMBC Mk.1 | ||
| + | |- | ||
| + | | IV | ||
| + | | G-Suit | ||
| + | | | ||
| + | | Cover | ||
| + | | | ||
| + | | LFRC Mk.12 | ||
| + | | FLBC Mk.1 | ||
| + | |- | ||
| + | |} | ||
| − | + | === Pros and cons === | |
| + | '''Pros:''' | ||
| − | + | * Sufficient amount of ammo | |
| + | * Excellent top speed in a straight line | ||
| + | * Above average acceleration levelled | ||
| + | * Above average roll rate | ||
| + | * Deadly rapid-firing M3 Browning machine guns | ||
| + | * Nose mounted guns, no need to worry about convergence | ||
| + | * Overall great durability | ||
| + | * Great at Boom & Run and Boom & Zoom | ||
| + | * Gigantic payload | ||
| + | * Air spawn in realistic battle (most maps) | ||
| − | + | '''Cons:''' | |
| − | + | * Need a solid burst to down an enemy | |
| + | * Engine suffers greatly at high altitudes | ||
| + | * Terrible vertical energy retention | ||
| + | * Loses all speed in turns | ||
| + | * Average climb rate | ||
| + | * Worst manoeuvrability of any early tier jets | ||
| + | * Can carry a large and varied payload, though all of them substantially increase drag and weight, severely hampering the performance | ||
| − | '' | + | == History == |
| + | ''Describe the history of the creation and combat usage of the aircraft in more detail than in the introduction. If the historical reference turns out to be too big, take it to a separate article, taking a link to the article about the vehicle and adding a block "/ History" (example: <nowiki>https://wiki.warthunder.com/(Vehicle-name)/History</nowiki>) and add a link to it here using the <code>main</code> template. Be sure to reference text and sources by using <code><nowiki><ref></nowiki></code>, as well as adding them at the end of the article. This section may also include the vehicle's dev blog entry (if applicable) and the in-game encyclopedia description (under <code><nowiki>=== Encyclopedia Info ===</nowiki></code>, also if applicable).'' | ||
== Media == | == Media == | ||
| − | ''Excellent additions to the article would be video guides, screenshots from the game, and photos.'' | + | <!--''Excellent additions to the article would be video guides, screenshots from the game, and photos.''--> |
| + | |||
| + | {{Youtube-gallery|q5UG8S8sUvM|'''F-84B-26 Thunderjet [Fast and Furious]''' - Jengar|jESI9AlWzj0|'''F84B: Much better than I remember!''' - Van Sinn|S6nbw0Yn56Q|'''F-84B-26 Thunderjet - The Art Of Rushing''' - Napalmratte|fogd5FZmJZU|'''F-84 ThunderJet - Realistic Battle''' - | ||
| + | MagzTV}} | ||
== See also == | == See also == | ||
| − | ''Links to the articles on the War Thunder Wiki that you think will be useful for the reader, for example:'' | + | <!--''Links to the articles on the War Thunder Wiki that you think will be useful for the reader, for example:'' |
| − | * ''reference to the series of the | + | * ''reference to the series of the aircraft;'' |
| − | * ''links to approximate analogues of other nations and research trees.'' | + | * ''links to approximate analogues of other nations and research trees.''--> |
| + | |||
| + | ;Other versions | ||
| + | *[[F-84G-21-RE]] | ||
| + | *[[F-84G-21-RE_(Italy)|F-84F-21-RE]] (Italy) | ||
| + | *[[F-84G-26-RE_(France)|F-84G-26-RE]] (France) | ||
| + | |||
| + | ;Aircraft of comparable configuration, role and era | ||
| + | *[[M.D.450B Ouragan]] | ||
| + | *[[Venom FB.4]] | ||
| + | *[[Meteor_(Family)|Gloster Meteor]] | ||
| + | *[[F9F_(Family)|F9F Panther]] | ||
| + | *[[F9F-8|F9F Cougar]] | ||
== External links == | == External links == | ||
| − | + | ''Paste links to sources and external resources, such as:'' | |
| + | |||
* ''topic on the official game forum;'' | * ''topic on the official game forum;'' | ||
| − | * ''encyclopedia page on the | + | * ''encyclopedia page on the aircraft;'' |
| − | * ''other literature.'' | + | * ''other literature.'' |
| − | |||
| − | |||
| − | {{USA | + | {{USA jet aircraft}} |
Revision as of 15:04, 16 September 2019
Contents
| This page is about the aircraft F-84B-26. For other uses, see F-84 (Family). |
Description

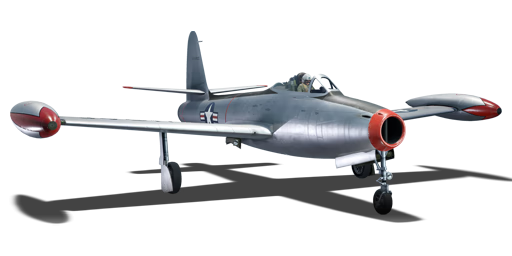
The F-84B-26 Thunderjet is a Rank V American jet fighter
with a battle rating of 6.7 (AB), 7.0 (RB), and 7.7 (SB). It was introduced in Update 1.39. The F-84B-26 is known for its versatile payload and decent top speed, but lackluster in terms of acceleration. The Thunderjet does well at destroying ground targets, given the quantity and quality of payload.
The F-84 Thunderjet was Republic’s attempt to convert from piston-engine aircraft to turbojets. F-84B featured here is primarily the same aircraft as the final test version the YP-84A, except that it had faster firing M3 Browning machines guns. Due to unmitigable problems, the F-84B (and F-84C) fleet only had a short four-year operational run before being withdrawn from service.
Though never seeing combat in Korea, the F-84B provided the jumping platform in which the F-84D and later models did successfully serve resulting in destroying over 60% of all ground targets during the Korean war. Early tests with the F-84B revealed that the Allison J35-A-15 was relatively weak when it came to taking off (especially with a full complement of suspended weapons) and was underwhelming when it came to rate of climb, however, when at altitude and during diving runs, the F-84B began to shine. The maximum speed of the F-84B was limited to 0.8 Mach (613 mph or 987 kph), flying faster resulted in catastrophic skin buckling or wing twist and shear due to the wing-tip fuel tanks which is a real concern when flying in realistic and simulator battles. This maximum speed limitation can cause issues, especially when flying against the Soviet MiG-15 which has a higher max speed.
Pilots of the Thunderjet nicknamed it “The World’s Fastest Tricycle” (a play on the newer tricycle landing gear configuration) or “The Lead Sled” due to its extremely long takeoff roll, however in-game during attack runs, the F-84B is an incredibly stable platform and can be outfitted with a number of various suspended armaments along with its six 12.7 mm M3 Browning machine guns. Though each gun only has 300 rounds of ammunition, trigger control is necessary or else the pilot will be left with empty guns in short order. Considered a multi-role aircraft, the F-84B can be utilised as a fighter-interceptor, bomber interceptor and ground attack fighter. The F-84B can be laden with a variety of bombs ranging from 100 lbs all the way up to two 1,000 lb bombs. HVAR and Tiny Tim rockets are a viable option alone or mixed with bombs to expand the options of targets to be attacked depending on the map the pilot is flying in.
Like many jet fighters, flying slowly makes for an easy target and this is no exception for the F-84B. Speed is necessary to ensure manoeuvrability both to engage a target and to shake a tail. Though not the fastest fighter at this rank, the F-84B can hold its own and when pressed, the six centre lined M3 Browning machine guns can punch enough holes in an enemy fighter to bring it down and allow it to move onto the next target. Don’t expect this fighter when laden down with two 1,000 lbs bombs or two Tiny Tim and 8 HVAR rockets to excel in a dog-fight as it won’t with all that weight, however, after all that ordnance is released the F-84B can then mix it up, though it is preferable to maintain speed while performing Boom & Zoom manoeuvres allowing the fighter to get on target and then speed away to set up for the next shot. The F-84B will help newer jet pilots get used to the basics of the aircraft before upgrading to the F-84G.
General info
Flight Performance
| Characteristics | |||||||
|---|---|---|---|---|---|---|---|
| Stock | |||||||
| Max Speed (km/h at ?,000 m) |
Max altitude (meters) |
Turn time (seconds) |
Rate of climb (meters/second) |
Take-off run (meters) | |||
| AB | RB | AB | RB | AB | RB | ||
| 924 | 890 | 12500 | 32.2 | 33.8 | 17.5 | 17.5 | 1500 |
| Upgraded | |||||||
| Max Speed (km/h at ?,000 m) |
Max altitude (meters) | Turn time (seconds) | Rate of climb (meters/second) |
Take-off run (meters) | |||
| AB | RB | AB | RB | AB | RB | ||
| 960 | 948 | 12500 | 30.2 | 31.0 | 27.3 | 22 | 1500 |
Details
| Features | ||||
|---|---|---|---|---|
| Combat flap | Take-off flap | Landing flap | Air brakes | Arrestor gear |
| ✓ | ✓ | ✓ | ✓ | X |
| Limits | ||||
|---|---|---|---|---|
| Wing-break speed (km/h) |
Gear limit (km/h) |
Combat flap (km/h) |
Max Static G | |
| + | - | |||
| 1044.75 | 320 | 550 | ~11 | ~4.5 |
| Optimal velocities | |||
|---|---|---|---|
| Ailerons (km/h) |
Rudder (km/h) |
Elevators (km/h) |
Radiator (km/h) |
| < 530 | < 600 | < 690 | N/A |
| Compressor (RB/SB) | ||
|---|---|---|
| Setting 1 | ||
| Optimal altitude | 100% Engine power | WEP Engine power |
| 0 m | 1620 kgf | No WEP |
Survivability and armour
- 38 mm Bulletproof glass in cockpit front
- 6.35 mm Steel plate in front of the pilot
- 12.7 mm Steel plate in pilot's headrest
- 8 mm Steel plate behind the pilot
Like many early jet fighters, the armour was placed around the pilot while not much thought was given to the other critical components of the aircraft. From behind, the pilot is protected by an 8 mm steel plate behind the seat with a 12.7 mm steel plate as a headrest. In front of the pilot, a 38 mm bulletproof windscreen adds protection from head-on's or from defensive bomber weapons. Another 6.35 mm steel plate is placed in front of the pilot and instrument panel for further protection of bullets entering the open-ended air-intake.
Other critical components such as the jet turbine, fuel tanks and coolers are all exposed, only protected by the outer skin of the aircraft which may deflect incoming bullets if at sufficient distance or angle to do so.
When attacking an F-84B, aim for the centre of the aircraft where you have a good chance of getting a critical hit on the engine or in a fuel tank. Due to this aircraft having wing-tip fuel tanks, shots to the wings or wing-tip tanks have a potential of starting a fire or breaking a wing off. If the attacking aircraft has sufficient calibre ammunition then shots taken at the pilot may have a larger chance of success if made from the sides or behind. This aircraft does not have much protection against rockets or missiles, however, given sufficient notice, rockets can be avoided and it is possible that missiles can be outmanoeuvred, however, when playing in realistic or simulator you run the risk of the pilot blacking-out due to G-force manoeuvers or wings snapping while trying to outfly a missile.
Armaments
Offensive armament
The F-84B-26 is armed with:
- 4 x 12.7 mm M3 Browning machine gun, nose-mounted (300 rpg = 1,200 total)
- 2 x 12.7 mm M3 Browning machine gun, wing-mounted (300 rpg = 600 total)
Early fighters had many different configurations of machine guns and cannons mounted in the fuselage and in the wings, sometimes needing to be synced with the propeller to prevent its destruction. With the jet age developing, many factors of the past needed to be reconsidered with gun placement. With jet fighters flying faster and chasing faster targets, trying to find the sweet spot with gun convergence was extremely difficult, jet fighter pilots needed a little extra help with this. Besides implementing newer gun sites and early radar, jet fighter guns tended to be fuselage-mounted, thus eliminating the need to set the convergence and at any point between 0 m and 800 m the ammunition rounds would fly true without a convergence point.
For the F-84B, four of the 12.7 mm M3 Browning machine guns were mounted in the fuselage with the other two mounted in the wing roots. While they were not all centre mounted, the two in the wing roots were close enough that convergence did not need to be messed with. Two ammunition options provide the most bang-for-the-buck, firstly, the omni-purpose rounds are good all-around ammunition rounds which provide tracers and explosive/incendiary rounds which are effective against aircraft and up to light armoured vehicles. Hardened vehicles and bunkers should be left to bombs and rockets for their destruction. If as a pilot you are looking for the sneak attack, stealth rounds will allow you to get on target fire off rounds and not give away your position, giving you a few seconds to make a second attack if needed before the target realizes where you are coming from.
Suspended armament
The F-84B-26 can be outfitted with the following ordinance"
- 4 × 127 mm HVAR rockets
- 8 × 127 mm HVAR rockets
- 8 × 127 mm HVAR rockets + 2 x 1,000 lb AN-M65A1 bombs
- 8 × 127 mm HVAR rockets + 2 x 500 lb AN-M64A1 bombs
- 8 × 127 mm HVAR rockets + 2 x 250 lb AN-M57 bombs
- 8 × 127 mm HVAR rockets + 2 x 100 lb AN-M30A1 bombs
- 2 × 298 mm Tiny Tim rockets + 8 x 127 mm HVAR rockets
- 2 × 298 mm Tiny Tim rockets
- 2 × 1,000 lb AN-M65A1 bombs
- 2 x 500 lb AN-M64A1 bombs
- 2 x 250 lb AN-M57 bombs
- 2 x 100 lb AN-M30A1 bombs
Usage in battles
The F-84B-26 can be used in two different ways to maximize efficiency:
- Boom and Run: Due to the F-84's good top speed, a good way to fight an enemy is to get up to a higher altitude and dive towards the enemy aircraft, then shoot and extend to stay out of weapons range. Once you extend, re-position yourself and repeat.
- Slice and Dice: Stick low and gain speed (preferably above 800 km/h), once the bowl forms (bowl is when a cluster of enemy planes form into one area) cut through the bowl selecting one target plane and take a shot followed by extending and repositioning.
Enemy worth noting- every single plane which is faster than you. A slow F-84 is a dead 84, stay fast.
As fighter-bomber it can be used as a normal jet fighter too, utilizing the top speed, but hindered by acceleration and climb rate. Due to terrible acceleration, the main tactic to attack enemy fighters, as well as bombers, is to use Boom and Run and Boom and Zoom. Given the inherent issues, keeping energy while flying F-84 is crucial and hard. Indeed a difficult fighter to master, albeit a strict teacher for advanced jet tactics as necessary in the F-86A.
M3s Brownings are very good at shooting down all types of enemy fighters, bombers and attackers.
Due to very high RoF and low ammo count, trigger discipline is advised. Best ammo belts are Stealth and Omni-Purpose.
Modules
Due to better belts, it's recommended to first of all research Offensive 12mm. After it, the pilot needs to focus on Compressor and Engine upgrade, due to the very bad acceleration of this jet. Afterwards, New boosters and Wings repair is the best choice. Airframe and Cover will help plane in all respects. Then all the bombs and rockets to make the plane better at ground strike. However, if used as an assisting vehicle in combined battles going straight for all payload updates isn't a bad decision either. Under this consideration take New boosters and Engine as only sidesteps until all armament modules are researched. G-Suit isn't useful because turning in this plane bleeds speed for enemies to take advantage of. At last, Fuselage repair is additional.
| Tier | Flight performance | Survivability | Weaponry | |||
|---|---|---|---|---|---|---|
| I | Fuselage Repair | Offensive 12 mm | FRC Mk.7 | FSBC Mk.1 | ||
| II | New Boosters | Compressor | Airframe | FSBC Mk.5 | ||
| III | Wings Repair | Engine | New 12 mm MGs | FRC Mk.7a | FMBC Mk.1 | |
| IV | G-Suit | Cover | LFRC Mk.12 | FLBC Mk.1 | ||
Pros and cons
Pros:
- Sufficient amount of ammo
- Excellent top speed in a straight line
- Above average acceleration levelled
- Above average roll rate
- Deadly rapid-firing M3 Browning machine guns
- Nose mounted guns, no need to worry about convergence
- Overall great durability
- Great at Boom & Run and Boom & Zoom
- Gigantic payload
- Air spawn in realistic battle (most maps)
Cons:
- Need a solid burst to down an enemy
- Engine suffers greatly at high altitudes
- Terrible vertical energy retention
- Loses all speed in turns
- Average climb rate
- Worst manoeuvrability of any early tier jets
- Can carry a large and varied payload, though all of them substantially increase drag and weight, severely hampering the performance
History
Describe the history of the creation and combat usage of the aircraft in more detail than in the introduction. If the historical reference turns out to be too big, take it to a separate article, taking a link to the article about the vehicle and adding a block "/ History" (example: https://wiki.warthunder.com/(Vehicle-name)/History) and add a link to it here using the main template. Be sure to reference text and sources by using <ref>, as well as adding them at the end of the article. This section may also include the vehicle's dev blog entry (if applicable) and the in-game encyclopedia description (under === Encyclopedia Info ===, also if applicable).
Media
See also
- Other versions
- F-84G-21-RE
- F-84F-21-RE (Italy)
- F-84G-26-RE (France)
- Aircraft of comparable configuration, role and era
External links
Paste links to sources and external resources, such as:
- topic on the official game forum;
- encyclopedia page on the aircraft;
- other literature.
| USA jet aircraft | |
|---|---|
| Fighters | |
| F-4 | F-4C Phantom II · F-4E Phantom II · F-4J Phantom II · F-4S Phantom II |
| F-5 | F-5A · F-5C · F-5E · F-20A |
| F-8 | F8U-2 · F-8E |
| F-80 | F-80A-5 · F-80C-10 |
| F-84 | F-84B-26 · F-84F · F-84G-21-RE |
| F-86 | F-86A-5 · F-86F-25 · F-86F-2 · F-86F-35 |
| F-89 | F-89B · F-89D |
| F-100 | F-100D |
| F-104 | F-104A · F-104C |
| F-14 | F-14A Early · F-14B |
| F-15 | F-15A |
| F-16 | F-16A · F-16A ADF · F-16C |
| F9F | F9F-2 · F9F-5 · F9F-8 |
| Other | P-59A · F2H-2 · F3D-1 · F3H-2 · F4D-1 · F11F-1 |
| Strike Aircraft | |
| FJ-4 | FJ-4B · FJ-4B VMF-232 |
| A-4 | A-4B · A-4E Early |
| A-6 | A-6E TRAM |
| A-7 | A-7D · A-7E · A-7K |
| AV-8 | AV-8A · AV-8C |
| A-10 | A-10A · A-10A Late |
| B-57 | B-57A · B-57B |
| F-105 | F-105D |
| F-111 | F-111A |
