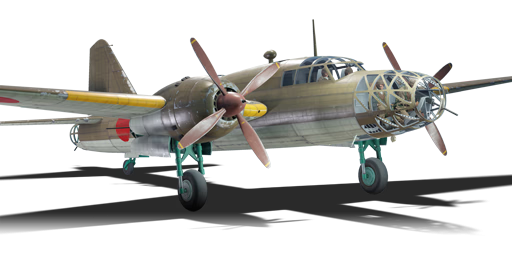
Ki-67-I Ko
| This page is about the Japanese bomber Ki-67-I Ko. For the other version, see Ki-67-I otsu. |

Contents
Description
The Ki-67-I Ko is a rank III Japanese bomber with a battle rating of 4.3 (AB/RB) and 4.7 (SB). It was introduced in Update 1.67 "Assault".
The Ki-67 ko excels in many roles in which other Japanese bombers fail to live up to. This is one of the most formidable medium bombers out there, as it is fast, has great defensive capabilities, can mount a wide array of bombs and torpedoes, and has really good survivability. The Ki-67 ko has a wide variety of roles, but its main role is actually a frontline bomber, as it can destroy pillboxes and other high value ground units. Its payload isn't designed to target bases, so it is advisable to target individual ground targets. The Ki-67 ko differs from the previous model, the Ki-67 otsu, in rear of the aircraft. The Ki-67 ko has a single tail gun configuration, giving it slightly weaker defensive capabilities than the Ki-67 otsu.
General info
Flight performance
The flight performance of this plane is extremely smooth. The Ki-67 can turn really well for a bomber. It has a high rip speed of around 650 km/h. It has excellent acceleration and speed as well, so it can outrun some pursuing fighters. The Ki-67 otsu performs identically to the Ki-67 Ko. It is also important to note that this aircraft is equipped with radial engines, which won't overheat under the WEP setting.
| Characteristics | Max Speed (km/h at 5,150 m) |
Max altitude (metres) |
Turn time (seconds) |
Rate of climb (metres/second) |
Take-off run (metres) | |||
|---|---|---|---|---|---|---|---|---|
| AB | RB | AB | RB | AB | RB | |||
| Stock | 483 | 466 | 9300 | 31.0 | 31.8 | 10.0 | 10.0 | 650 |
| Upgraded | 528 | 502 | 29.0 | 30.0 | 16.0 | 12.5 | 650 | |
Details
| Features | ||||
|---|---|---|---|---|
| Combat flaps | Take-off flaps | Landing flaps | Air brakes | Arrestor gear |
| ✓ | ✓ | ✓ | X | X |
| Limits | ||||||
|---|---|---|---|---|---|---|
| Wings (km/h) | Gear (km/h) | Flaps (km/h) | Max Static G | |||
| Combat | Take-off | Landing | + | - | ||
| 650 | 300 | 450 | 450 | 250 | ~4 | ~1 |
| Optimal velocities (km/h) | |||
|---|---|---|---|
| Ailerons | Rudder | Elevators | Radiator |
| < 360 | < 360 | < 360 | > 313 |
| Compressor (RB/SB) | ||
|---|---|---|
| Setting 1 | ||
| Optimal altitude | 100% Engine power | WEP Engine power |
| 2,200 m | 1,810 hp | 1,973 hp |
| Setting 2 | ||
| Optimal altitude | 100% Engine power | WEP Engine power |
| 5,800 m | 1,610 hp | 1,755 hp |
Survivability and armour
- 70 mm Bulletproof glass - Armoured windscreen
- 12.7 mm steel plate in the nose - protecting pilots
- 15.8 mm steel plate pilot seat
- 15.8 mm steel plate in mid fuselage - protecting dorsal gunner
- 7.9 mm steel plate in tail (belly only)
- Self sealing fuel tanks (in wings and mid fuselage)
The Ki-67 is one of the most sturdy Japanese aircraft in War Thunder. It has self sealing fuel tanks. It can take lots of punishment from .50 calibre rounds. However, when facing aircraft with cannons, it will quickly fall prey to HE rounds unless you take immediate evasive action.
Modifications and economy
| Flight performance | Survivability | Weaponry | ||||||||||||||||||||||||
|---|---|---|---|---|---|---|---|---|---|---|---|---|---|---|---|---|---|---|---|---|---|---|---|---|---|---|
|
|
|
Armaments
Suspended armament
The Ki-67-I Ko can be outfitted with the following ordnance:
- 15 x 50 kg Army Type 94 GPHE bombs (750 kg total)
- 8 x 100 kg Army Type 94 GPHE bombs (800 kg total)
- 3 x 250 kg Army Type 92 GPHE bombs (750 kg total)
- 1 x 850 kg Type 91 Model 3 torpedo
- 1 x 500 kg Army Type 92 GPHE bomb (500 kg total)
Defensive armament
The Ki-67-I Ko is defended by:
- 1 x 20 mm Ho-5 cannon, dorsal turret (500 rpg)
- 1 x 12.7 mm Ho-104 machine gun, nose turret (550 rpg)
- 1 x 12.7 mm Ho-104 machine gun, 2 x beam turret (500 rpg)
- 1 x 12.7 mm Ho-104 machine gun, tail turret (700 rpg)
Usage in battles
Arcade Battles
The Ki-67 can be used in Air Arcade battles to an excellent extent. It can use its bombs to effectively destroy multiple ground units, playing an important role in ticket count. To start, take the eight 100 kg bombs and dive to the deck, stay away from the main group of fighters, as it is advisable to stay on the outside of the map to avoid fighter confrontation. Next, bomb any ground targets you see; tanks and pillboxes are killable only with direct hits, so use the manoeuvrability of this bomber to drop your bombs with precision. It isn't advised to drop bombs on bases, as your payload is not as big enough as that of Heavy bombers and will do very little damage.
Realistic Battles
The Ki-67-I does well in the ground attack role, but due to limited bombs, you'll need to make frequent trips back to the base. The strategy here is to target pillboxes and medium tanks with the 250 kilogram bombs. Remember to set a three to two second fuse on those bombs! To start, you'll need to head in for an attack run as fast as possible. Dive towards the ground targets and line up with the pillboxes. After dropping your four bombs, immediately return to the base, as enemy fighters will be closing in on you. Staying low is critical, as other fighters that dive in on you can be dragged lower to allow for allied interception. However, on certain Pacific maps, you'll need to take torpedoes. To effectively destroy the ships, you'll need to chose a target. At the start of the battle, note if your allies have equipped torpedoes. If no allies are present, head for the destroyers. They take one torpedo to kill. If multiple allies with torpedoes are present, communicate with your team to target the carriers. They are the most rewarding target to kill.
- Enemies worth noting
- P-47 - The P-47 is one of the heavier single-engine fighters that can keep up with the Hiryu and most of your armament will do negligible damage to it. It will unleash eight .50 cals on your aircraft and make short work of you. To deal with this plane, turn. You can out-turn the P-47 and it will most likely disengage. If it keeps up with you, just make sure to manoeuvre out of its sprays and try to hit it with your 20 mm in the tail.
Manual Engine Control
| MEC elements | ||||||
|---|---|---|---|---|---|---|
| Mixer | Pitch | Radiator | Supercharger | Turbocharger | ||
| Oil | Water | Type | ||||
| Controllable | Controllable Not auto controlled |
Not controllable Not auto controlled |
Controllable Not auto controlled |
Combined | Controllable 2 gears |
Not controllable |
The Ki-67 is equipped with two powerful radial engines. They also come with a two-stage supercharger. The propeller pitch should be used at 90%-100% when on WEP. Lower the propeller pitch to 90% when at high speeds. The radiators can be kept at 10-20%, and the supercharger can be activated at 3.5 km (11k ft), and the mixture can be set to the following at each specific altitude:
- Sea Level: 100%-110% Mixture
- 3000 feet: 92% Mixture
- 6000 feet: 84% Mixture
- 1000 feet: 70% Mixture
- 15000 feet: 60% Mixture
Pros and cons
Pros:
- Regular Japanese torpedo as option
- Torpedo has the highest drop speed in the game at 350 mph (580 km/h) and is one of the most feared torpedoes in Naval Battles
- Good armour protection for pilot
- Decent rate of turn time for bombers (29 s | 30 s)
- Decent rate of climb for bombers (16 m/s | 12.5 m/s)
Cons:
- Regular Japanese army bomber ordnance
- Max weight of 800 kg (8 x 100 kg)
- Heaviest bomb choice is a singular 500 kg
- Big target for naval battles
- Japanese Aerial torpedoes have the shortest range of all aerial torpedoes
- Poor armour protection for back gunners
History
Describe the history of the creation and combat usage of the aircraft in more detail than in the introduction. If the historical reference turns out to be too long, take it to a separate article, taking a link to the article about the vehicle and adding a block "/History" (example: https://wiki.warthunder.com/(Vehicle-name)/History) and add a link to it here using the main template. Be sure to reference text and sources by using <ref></ref>, as well as adding them at the end of the article with <references />. This section may also include the vehicle's dev blog entry (if applicable) and the in-game encyclopedia description (under === In-game description ===, also if applicable).
Media
- Videos
See also
- Related Development
- Ki-67-I otsu - (Improved tail armament)
- Ki-109 - (Day Fighter prototype)
External links
| Mitsubishi Company (三菱商会) | |
|---|---|
| Fighters | A5M4 · Hagiri's A5M4 |
| A6M2 mod. 11 · A6M2 · A6M3 · A6M3 mod. 22 · A6M3 mod. 22Ko · A6M5 · A6M5 Ko · A6M5 otsu · A6M5 Hei · A6M6c | |
| A7M1 (NK9H) · A7M2 | |
| J2M2 · J2M3 · J2M4 Kai · J2M5 · J2M5 (30 mm) | |
| Hydroplanes | F1M2 |
| Interceptors | Ki-83 · Ki-109 |
| Bombers | G4M1 |
| Ki-21-Ia · Ki-21-I hei · Ki-67-I Ko · Ki-67-I otsu | |
| Jet Fighters | Ki-200 |
| Captured | ▃A6M2 · ␗A6M2 |
| See also | Mitsubishi Heavy Industries, Ltd. (Post-War) |
| Japan bombers | |
|---|---|
| Navy | |
| Carrier-based attack bomber | |
| B5N | B5N2 |
| B6N | B6N1 · B6N2 · B6N2a |
| B7A | B7A2 · B7A2 (Homare 23) |
| Carrier-based dive bomber | |
| D3A | D3A1 |
| D4Y | D4Y1 · D4Y2 · D4Y3 Ko |
| Shipboard Observation seaplane | |
| F1M | F1M2 |
| Land-based Attack bomber | |
| G4M | G4M1 |
| G5N | G5N1 |
| G8N | G8N1 |
| Flying boat | |
| H6K | H6K4 |
| H8K | H8K2 · H8K3 |
| Land-based Bomber | |
| P1Y | P1Y1 |
| Army | |
| Light | Ki-32 |
| Ki-48-II otsu | |
| Heavy | Ki-21-Ia · Ki-21-I hei |
| Ki-49-I · Ki-49-IIa · Ki-49-IIb · Ki-49-IIb/L | |
| Ki-67-I Ko · Ki-67-I otsu | |
| Other countries | ▅B-17E |
