Difference between revisions of "J6B"
m (→Modules) |
(Edits) |
||
| Line 2: | Line 2: | ||
== Description == | == Description == | ||
| − | <!--''In the description, the first part should be about the history of and the creation and combat usage of the aircraft, as well as its key features. In the second part, tell the reader about the aircraft in the game. Insert a screenshot of the vehicle, so that if the novice player does not remember the vehicle by name, he will immediately understand what kind of vehicle the article is talking about.''--> | + | <!-- ''In the description, the first part should be about the history of and the creation and combat usage of the aircraft, as well as its key features. In the second part, tell the reader about the aircraft in the game. Insert a screenshot of the vehicle, so that if the novice player does not remember the vehicle by name, he will immediately understand what kind of vehicle the article is talking about.'' --> |
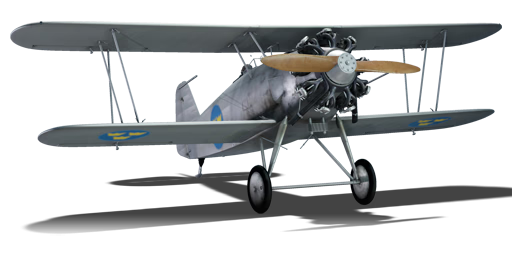
[[File:GarageImage_{{PAGENAME}}.jpg|420px|thumb|left]] | [[File:GarageImage_{{PAGENAME}}.jpg|420px|thumb|left]] | ||
| − | {{ | + | {{Break}} |
The '''{{Specs|name}}''' is a rank {{Specs|rank}} Swedish fighter {{Battle-rating}}. It was introduced in [[Update 1.95 "Northern Wind"]]. | The '''{{Specs|name}}''' is a rank {{Specs|rank}} Swedish fighter {{Battle-rating}}. It was introduced in [[Update 1.95 "Northern Wind"]]. | ||
The {{PAGENAME}} is a follow on development to the Svenska Aero AB (SAAB)’s venture into developing biplane fighters for the Swedish military. Having relied on foreign examples already in production, Svenska Aero attempted to combine the best of what they found into a single aircraft. The first iteration developed was the J5 Jaktfalken and for a first try was a really good fighter, though besought with a few critical problems. | The {{PAGENAME}} is a follow on development to the Svenska Aero AB (SAAB)’s venture into developing biplane fighters for the Swedish military. Having relied on foreign examples already in production, Svenska Aero attempted to combine the best of what they found into a single aircraft. The first iteration developed was the J5 Jaktfalken and for a first try was a really good fighter, though besought with a few critical problems. | ||
| − | + | ||
Modifications to fix the problem were aimed at reworking the fixed landing gear and widened the front part of the fuselage to incorporate the new Bristol Jupiter engine which was replacing the current Armstrong Siddeley Jaguar 14 cylinder radial engine which was originally specified. Most problems were fixed after Svenska Aero merged with Armstrong Siddeley Jaguar which included a modified stabilizer and a windscreen for the pilot and this model became known as the {{PAGENAME}}. | Modifications to fix the problem were aimed at reworking the fixed landing gear and widened the front part of the fuselage to incorporate the new Bristol Jupiter engine which was replacing the current Armstrong Siddeley Jaguar 14 cylinder radial engine which was originally specified. Most problems were fixed after Svenska Aero merged with Armstrong Siddeley Jaguar which included a modified stabilizer and a windscreen for the pilot and this model became known as the {{PAGENAME}}. | ||
| − | + | ||
With the major problems behind the upgraded {{PAGENAME}}, several were deployed with the Swedish Air Force and a few saw action while on loan to the Finnish Air Force. Though not a top speed aircraft compared to other reserve aircraft in the game, this fighter does utilize two 8 mm machine guns in which to eliminate its foes. Ammunition choices allow the pilot to select what is needed by what type of mission is available on the map. While its slower speed will not see it winning any speed competitions, it will, however, handle well in turning manoeuvres and if enough altitude is gained, Boom & Zoom tactics are an option against other turn fighters which are flying circles around the battle zone chasing each other. When firing against other aircraft, the 8 mm machine guns will do quite a bit of damage if fired within the 100 m to 300 m range as any farther out and you risk weaker shots making contact and not doing as much damage. | With the major problems behind the upgraded {{PAGENAME}}, several were deployed with the Swedish Air Force and a few saw action while on loan to the Finnish Air Force. Though not a top speed aircraft compared to other reserve aircraft in the game, this fighter does utilize two 8 mm machine guns in which to eliminate its foes. Ammunition choices allow the pilot to select what is needed by what type of mission is available on the map. While its slower speed will not see it winning any speed competitions, it will, however, handle well in turning manoeuvres and if enough altitude is gained, Boom & Zoom tactics are an option against other turn fighters which are flying circles around the battle zone chasing each other. When firing against other aircraft, the 8 mm machine guns will do quite a bit of damage if fired within the 100 m to 300 m range as any farther out and you risk weaker shots making contact and not doing as much damage. | ||
| Line 19: | Line 19: | ||
''Describe how the aircraft behaves in the air. Speed, manoeuvrability, acceleration and allowable loads - these are the most important characteristics of the vehicle.'' | ''Describe how the aircraft behaves in the air. Speed, manoeuvrability, acceleration and allowable loads - these are the most important characteristics of the vehicle.'' | ||
| − | {| class="wikitable" style="text-align:center" | + | {| class="wikitable" style="text-align:center" width="70%" |
| − | + | ! rowspan="2" | Characteristics | |
| − | |||
| − | |||
| − | ! | ||
| − | |||
! colspan="2" | Max Speed<br>(km/h at 3,000 m) | ! colspan="2" | Max Speed<br>(km/h at 3,000 m) | ||
| − | ! rowspan="2" | Max altitude<br>( | + | ! rowspan="2" | Max altitude<br>(metres) |
! colspan="2" | Turn time<br>(seconds) | ! colspan="2" | Turn time<br>(seconds) | ||
| − | ! colspan="2" | Rate of climb<br>( | + | ! colspan="2" | Rate of climb<br>(metres/second) |
| − | ! rowspan="2" | Take-off run<br>( | + | ! rowspan="2" | Take-off run<br>(metres) |
|- | |- | ||
| − | ! AB | + | ! AB !! RB !! AB !! RB !! AB !! RB |
| − | ! RB | ||
| − | ! AB | ||
| − | ! RB | ||
| − | ! AB | ||
| − | ! RB | ||
|- | |- | ||
| − | | | + | ! Stock |
| + | | 311 || 298 || rowspan="2" | {{Specs|ceiling}} || 14.4 || 15.0 || 13.8 || 13.8 || rowspan="2" | 294 | ||
|- | |- | ||
| − | ! | + | ! Upgraded |
| − | + | | 343 || 325 || 13.0 || 13.7 || 20.3 || 16.6 | |
| − | |||
| − | |||
| − | |||
| − | |||
| − | |||
| − | |||
| − | |||
| − | |||
| − | |||
| − | |||
| − | |||
| − | |||
| − | |||
| − | |343||325 | ||
|- | |- | ||
|} | |} | ||
==== Details ==== | ==== Details ==== | ||
| − | {| class="wikitable" style="text-align:center" | + | {| class="wikitable" style="text-align:center" width="50%" |
|- | |- | ||
! colspan="5" | Features | ! colspan="5" | Features | ||
|- | |- | ||
| − | ! Combat flaps | + | ! Combat flaps !! Take-off flaps !! Landing flaps !! Air brakes !! Arrestor gear |
| − | ! Take-off flaps | ||
| − | ! Landing flaps | ||
| − | ! Air brakes | ||
| − | ! Arrestor gear | ||
|- | |- | ||
| X || X || X || X || X <!-- ✓ --> | | X || X || X || X || X <!-- ✓ --> | ||
| Line 74: | Line 48: | ||
|} | |} | ||
| − | {| class="wikitable" style="text-align:center" | + | {| class="wikitable" style="text-align:center" width="50%" |
|- | |- | ||
| − | ! colspan=" | + | ! colspan="7" | Limits |
|- | |- | ||
| − | ! rowspan="2" | | + | ! rowspan="2" | Wings (km/h) |
| − | ! rowspan="2" | Gear | + | ! rowspan="2" | Gear (km/h) |
| − | ! | + | ! colspan="3" | Flaps (km/h) |
! colspan="2" | Max Static G | ! colspan="2" | Max Static G | ||
|- | |- | ||
| − | ! + | + | ! Combat !! Take-off !! Landing !! + !! - |
| − | ! - | ||
| − | |||
| − | |||
| − | |||
| − | |||
| − | |||
| − | |||
|- | |- | ||
| − | + | | {{Specs|destruction|body}} || {{Specs|destruction|gear}} || N/A || N/A || N/A || ~12 || ~6 | |
| − | | | ||
| − | |||
| − | |||
| − | |||
| − | |||
| − | | | ||
| − | | | ||
|- | |- | ||
|} | |} | ||
| Line 105: | Line 65: | ||
{| class="wikitable" style="text-align:center" | {| class="wikitable" style="text-align:center" | ||
|- | |- | ||
| − | ! colspan=" | + | ! colspan="4" | Optimal velocities (km/h) |
|- | |- | ||
| − | ! | + | ! Ailerons !! Rudder !! Elevators !! Radiator |
|- | |- | ||
| − | + | | < 250 || < 200 || < 320 || > 170 | |
| − | |||
| − | |||
| − | | | ||
| − | | | ||
|- | |- | ||
|} | |} | ||
=== Survivability and armour === | === Survivability and armour === | ||
| − | <!--''Examine the survivability of the aircraft. Note how vulnerable the structure is and how secure the pilot is, whether the fuel tanks are armoured, etc. Describe the armour, if there is any, and also mention the vulnerability of other critical aircraft systems.''--> | + | <!-- ''Examine the survivability of the aircraft. Note how vulnerable the structure is and how secure the pilot is, whether the fuel tanks are armoured, etc. Describe the armour, if there is any, and also mention the vulnerability of other critical aircraft systems.'' --> |
* No armour plating | * No armour plating | ||
| Line 130: | Line 86: | ||
== Armaments == | == Armaments == | ||
=== Offensive armament === | === Offensive armament === | ||
| − | <!--''Describe the offensive armament of the aircraft, if any. Describe how effective the cannons and machine guns are in a battle, and also what belts or drums are better to use. If there is no offensive weaponry, delete this subsection.''--> | + | <!-- ''Describe the offensive armament of the aircraft, if any. Describe how effective the cannons and machine guns are in a battle, and also what belts or drums are better to use. If there is no offensive weaponry, delete this subsection.'' --> |
| − | {{main|Ksp m/22 | + | {{main|Ksp m/22 Fh (8 mm)|Ksp m/22 Fv (8 mm)}} |
The '''''{{PAGENAME}}''''' is armed with: | The '''''{{PAGENAME}}''''' is armed with: | ||
| − | + | * 1 x 8 mm Ksp m/22 Fh machine gun, nose-mounted (500 rpg) | |
| − | * 1 x 8 mm Ksp m/22 | + | * 1 x 8 mm Ksp m/22 Fv machine gun, nose-mounted (500 rpg) |
| − | * 1 x 8 mm Ksp m/22 | ||
The Swedish Air Force chose to outfit the {{PAGENAME}} with license-built copies of the Browning M1919 machine gun, however originally was calibrated for 6.5 mm however this round was found to be less effective against fabric-covered aircraft and so the gun was recalibrated up to 8 mm. The Swedish variant is listed as the Ksp m/22 machine gun of which two were mounted on this fighter. One of the benefits of the armament setup on the {{PAGENAME}} is that both machine guns are mounted in the fuselage, synchronized to fire through the propeller arc. Effectively, this aircraft is a point-and-shoot where the pilot will not have to deal with wing-mounted convergence calculations, however, bullet drop over distance is still a consideration. Typically in biplanes, the most effective range for disabling or destroying another aircraft, 100 to 250 m is best for close-in fighting, typically as one gets farther out from there, bullets lose some of their punch. | The Swedish Air Force chose to outfit the {{PAGENAME}} with license-built copies of the Browning M1919 machine gun, however originally was calibrated for 6.5 mm however this round was found to be less effective against fabric-covered aircraft and so the gun was recalibrated up to 8 mm. The Swedish variant is listed as the Ksp m/22 machine gun of which two were mounted on this fighter. One of the benefits of the armament setup on the {{PAGENAME}} is that both machine guns are mounted in the fuselage, synchronized to fire through the propeller arc. Effectively, this aircraft is a point-and-shoot where the pilot will not have to deal with wing-mounted convergence calculations, however, bullet drop over distance is still a consideration. Typically in biplanes, the most effective range for disabling or destroying another aircraft, 100 to 250 m is best for close-in fighting, typically as one gets farther out from there, bullets lose some of their punch. | ||
| − | Many ace pilots from all sides of the war stated that when the enemy filled the windscreen, there was no way you could not hit, thereby guaranteeing a hit and conserving ammunition. The {{PAGENAME}} does not have the machine-gun speed of those found on some Russian biplanes as it is necessary to synchronize the firing of the guns in the fuselage to fire through the propeller arc. With | + | Many ace pilots from all sides of the war stated that when the enemy filled the windscreen, there was no way you could not hit, thereby guaranteeing a hit and conserving ammunition. The {{PAGENAME}} does not have the machine-gun speed of those found on some Russian biplanes as it is necessary to synchronize the firing of the guns in the fuselage to fire through the propeller arc. With 1,000 rounds of ammunition distributed between both machine guns, it is recommended to fire in short bursts, mainly to prevent overheating and jamming of the machine guns. Typically you can continuously fire about 225 rounds of ammunition before the guns jam up and require a cool down before they can be used again. |
When possible, change out the default ammunition belts for either tracer belts which are very effective against other biplanes, especially those which have fabric coverings and non-self sealing fuel tanks as tracer rounds have a good chance of setting planes on fire which can rarely put the flames out. Air belts are another good choice due to the explosive filler in the round which helps to damage or disable aircraft faster than regular bullets. For those pilots who like to sneak into a fight and catch enemy aircraft unaware, stealth belts are the way to go as there are no tracer rounds to give away your position. The enemy pilots tend to realize where the stealth bullets are coming from only too late as their aircraft is coming apart and falling to the ground. | When possible, change out the default ammunition belts for either tracer belts which are very effective against other biplanes, especially those which have fabric coverings and non-self sealing fuel tanks as tracer rounds have a good chance of setting planes on fire which can rarely put the flames out. Air belts are another good choice due to the explosive filler in the round which helps to damage or disable aircraft faster than regular bullets. For those pilots who like to sneak into a fight and catch enemy aircraft unaware, stealth belts are the way to go as there are no tracer rounds to give away your position. The enemy pilots tend to realize where the stealth bullets are coming from only too late as their aircraft is coming apart and falling to the ground. | ||
| − | + | ||
| − | |||
| − | |||
| − | |||
== Usage in battles == | == Usage in battles == | ||
| − | ''Describe the tactics of playing in | + | ''Describe the tactics of playing in the aircraft, the features of using aircraft in a team and advice on tactics. Refrain from creating a "guide" - do not impose a single point of view, but instead, give the reader food for thought. Examine the most dangerous enemies and give recommendations on fighting them. If necessary, note the specifics of the game in different modes (AB, RB, SB).'' |
=== Manual Engine Control === | === Manual Engine Control === | ||
| Line 161: | Line 113: | ||
! rowspan="2" | Turbocharger | ! rowspan="2" | Turbocharger | ||
|- | |- | ||
| − | ! Oil | + | ! Oil !! Water !! Type |
| − | ! Water | ||
| − | ! Type | ||
|- | |- | ||
| − | | | + | | Controllable || Not controllable<br>Not auto controlled || Not controllable<br>Not auto controlled || Not controllable<br>Not auto controlled || Separate || Not controllable<br>1 gear || Not controllable |
|- | |- | ||
|} | |} | ||
| Line 171: | Line 121: | ||
=== Modules === | === Modules === | ||
{| class="wikitable" | {| class="wikitable" | ||
| − | ! | + | ! Tier |
! colspan="2" | Flight performance | ! colspan="2" | Flight performance | ||
| − | ! | + | ! Survivability |
| − | ! | + | ! Weaponry |
|- | |- | ||
| I | | I | ||
| Line 203: | Line 153: | ||
=== Pros and cons === | === Pros and cons === | ||
| − | <!--''Summarise and briefly evaluate the vehicle in terms of its characteristics and combat effectiveness. Mark its pros and cons in the bulleted list. Try not to use more than 6 points for each of the characteristics. Avoid using categorical definitions such as "bad", "good" and the like - use substitutions with softer forms such as "inadequate" and "effective".''--> | + | <!-- ''Summarise and briefly evaluate the vehicle in terms of its characteristics and combat effectiveness. Mark its pros and cons in the bulleted list. Try not to use more than 6 points for each of the characteristics. Avoid using categorical definitions such as "bad", "good" and the like - use substitutions with softer forms such as "inadequate" and "effective".'' --> |
'''Pros:''' | '''Pros:''' | ||
| Line 216: | Line 166: | ||
== History == | == History == | ||
| − | <!--''Describe the history of the creation and combat usage of the aircraft in more detail than in the introduction. If the historical reference turns out to be too long, take it to a separate article, taking a link to the article about the vehicle and adding a block "/ History" (example: <nowiki>https://wiki.warthunder.com/(Vehicle-name)/History</nowiki>) and add a link to it here using the <code>main</code> template. Be sure to reference text and sources by using <code><nowiki><ref></nowiki></code>, as well as adding them at the end of the article. This section may also include the vehicle's dev blog entry (if applicable) and the in-game encyclopedia description (under <code><nowiki>=== In-game description ===</nowiki></code>, also if applicable).''--> | + | <!-- ''Describe the history of the creation and combat usage of the aircraft in more detail than in the introduction. If the historical reference turns out to be too long, take it to a separate article, taking a link to the article about the vehicle and adding a block "/History" (example: <nowiki>https://wiki.warthunder.com/(Vehicle-name)/History</nowiki>) and add a link to it here using the <code>main</code> template. Be sure to reference text and sources by using <code><nowiki><ref></ref></nowiki></code>, as well as adding them at the end of the article with <code><nowiki><references /></nowiki></code>. This section may also include the vehicle's dev blog entry (if applicable) and the in-game encyclopedia description (under <code><nowiki>=== In-game description ===</nowiki></code>, also if applicable).'' --> |
Svenska Aero AB (SAAB) worked on a private venture to develop a biplane fighter, and to build a fighter which the Swedish Air Force could use, however guidance and direction were not forthcoming by the military, so Svenska Aero turned to foreign-built aircraft to gain inspiration from what was working. The resulting fighter was the Jaktfalken, a relatively standard biplane format fighter which utilised fixed landing gear and like many other early fighters a tail skid instead of a wheel. While the fuselage was constructed of welded beams which were covered in fabric, several portions of the fore and aft section were covered with aluminium sheeting. A 14-cylinder Armstrong Siddeley Jaguar radial engine was outfitted with a fuel tank just aft with the cockpit following right behind. | Svenska Aero AB (SAAB) worked on a private venture to develop a biplane fighter, and to build a fighter which the Swedish Air Force could use, however guidance and direction were not forthcoming by the military, so Svenska Aero turned to foreign-built aircraft to gain inspiration from what was working. The resulting fighter was the Jaktfalken, a relatively standard biplane format fighter which utilised fixed landing gear and like many other early fighters a tail skid instead of a wheel. While the fuselage was constructed of welded beams which were covered in fabric, several portions of the fore and aft section were covered with aluminium sheeting. A 14-cylinder Armstrong Siddeley Jaguar radial engine was outfitted with a fuel tank just aft with the cockpit following right behind. | ||
| − | + | ||
Initial tests of this aircraft resulted in positive reviews by test pilots of the Swedish Air Force, leading to the military to order three Jaktfalken to be built which would then side-by-side be tested against the British Bristol fighter the Bulldog II. The Jaktfalken prototype became known as the J5 by the Swedish Air Force, however, at the last minute in February 1930, the Air Administration reconsidered the ASJA 14-cylinder engine and ordered it to be replaced by a Bristol Jupiter engine which would become the standard engine to be used in the Swedish Air Force. To accept the new Jupiter VII engines, the fuselage needed to be modified along with the engine attachment points. Unfortunately, during test flights severe vibrations were encountered and further attempted modifications failed to correct this. Even with the vibrations issues unresolved, three of these fighters were delivered to the Swedish Air Force and redesignated as J6A fighters. | Initial tests of this aircraft resulted in positive reviews by test pilots of the Swedish Air Force, leading to the military to order three Jaktfalken to be built which would then side-by-side be tested against the British Bristol fighter the Bulldog II. The Jaktfalken prototype became known as the J5 by the Swedish Air Force, however, at the last minute in February 1930, the Air Administration reconsidered the ASJA 14-cylinder engine and ordered it to be replaced by a Bristol Jupiter engine which would become the standard engine to be used in the Swedish Air Force. To accept the new Jupiter VII engines, the fuselage needed to be modified along with the engine attachment points. Unfortunately, during test flights severe vibrations were encountered and further attempted modifications failed to correct this. Even with the vibrations issues unresolved, three of these fighters were delivered to the Swedish Air Force and redesignated as J6A fighters. | ||
| − | + | ||
Later as Svenska Aero and Armstrong Siddeley Jaguar merged, they worked on the issues plaguing the Jaktfalken fighter and installed a modified stabilizer and a windscreen for the pilot (previous versions did not have one) and these versions were delivered to the Swedish Air Force as J6B Jaktfalken II fighters. These fighters served the Swedish military for several years with three of them given to Finland to augment their air force during the 1939-1940 Winter War with the Soviet Union. By the end of 1941, all remaining operational J6B Jaktfalken II fighters in the Swedish inventory were scrapped and replaced by newer and more reliable fighters. | Later as Svenska Aero and Armstrong Siddeley Jaguar merged, they worked on the issues plaguing the Jaktfalken fighter and installed a modified stabilizer and a windscreen for the pilot (previous versions did not have one) and these versions were delivered to the Swedish Air Force as J6B Jaktfalken II fighters. These fighters served the Swedish military for several years with three of them given to Finland to augment their air force during the 1939-1940 Winter War with the Soviet Union. By the end of 1941, all remaining operational J6B Jaktfalken II fighters in the Swedish inventory were scrapped and replaced by newer and more reliable fighters. | ||
== Media == | == Media == | ||
| − | <!--''Excellent additions to the article would be video guides, screenshots from the game, and photos.''--> | + | <!-- ''Excellent additions to the article would be video guides, screenshots from the game, and photos.'' --> |
;Images | ;Images | ||
| − | < | + | <gallery mode="packed"> |
| − | + | File:J6B_WTWallpaper_001.jpg | |
| − | + | File:J6B_WTWallpaper_002.jpg | |
| − | + | File:J6B_WTWallpaper_003.jpg | |
| − | + | File:J6B_WTWallpaper_004.jpg | |
| − | + | File:J6B_WTWallpaper_005.jpg | |
| − | + | File:J6B_WTWallpaper_006.jpg | |
| − | </ | + | </gallery> |
| − | + | ||
| − | |||
== See also == | == See also == | ||
| − | <!--''Links to the articles on the War Thunder Wiki that you think will be useful for the reader, for example:'' | + | <!-- ''Links to the articles on the War Thunder Wiki that you think will be useful for the reader, for example:'' |
* ''reference to the series of the aircraft;'' | * ''reference to the series of the aircraft;'' | ||
| − | * ''links to approximate analogues of other nations and research trees.'' | + | * ''links to approximate analogues of other nations and research trees.'' --> |
| − | |||
| − | |||
;Aircraft of comparable role, configuration and era | ;Aircraft of comparable role, configuration and era | ||
| Line 253: | Line 200: | ||
== External links == | == External links == | ||
| − | <!--''Paste links to sources and external resources, such as:'' | + | <!-- ''Paste links to sources and external resources, such as:'' |
* ''topic on the official game forum;'' | * ''topic on the official game forum;'' | ||
* ''encyclopedia page on the aircraft;'' | * ''encyclopedia page on the aircraft;'' | ||
| − | * ''other literature.''--> | + | * ''other literature.'' --> |
| − | |||
| − | |||
| − | + | * [[wt:en/news/6486-development-j6b-jaktfalken-ii-falcon-from-the-north-en|[Development] J6B Jaktfalken II - Falcon from the North]] | |
| − | |||
| − | + | {{AirManufacturer Saab}} | |
| + | {{Sweden fighters}} | ||
Revision as of 10:40, 23 April 2020
Contents
Description

The J6B is a rank I Swedish fighter
with a battle rating of 1.0 (AB/RB/SB). It was introduced in Update 1.95 "Northern Wind".
The J6B is a follow on development to the Svenska Aero AB (SAAB)’s venture into developing biplane fighters for the Swedish military. Having relied on foreign examples already in production, Svenska Aero attempted to combine the best of what they found into a single aircraft. The first iteration developed was the J5 Jaktfalken and for a first try was a really good fighter, though besought with a few critical problems.
Modifications to fix the problem were aimed at reworking the fixed landing gear and widened the front part of the fuselage to incorporate the new Bristol Jupiter engine which was replacing the current Armstrong Siddeley Jaguar 14 cylinder radial engine which was originally specified. Most problems were fixed after Svenska Aero merged with Armstrong Siddeley Jaguar which included a modified stabilizer and a windscreen for the pilot and this model became known as the J6B.
With the major problems behind the upgraded J6B, several were deployed with the Swedish Air Force and a few saw action while on loan to the Finnish Air Force. Though not a top speed aircraft compared to other reserve aircraft in the game, this fighter does utilize two 8 mm machine guns in which to eliminate its foes. Ammunition choices allow the pilot to select what is needed by what type of mission is available on the map. While its slower speed will not see it winning any speed competitions, it will, however, handle well in turning manoeuvres and if enough altitude is gained, Boom & Zoom tactics are an option against other turn fighters which are flying circles around the battle zone chasing each other. When firing against other aircraft, the 8 mm machine guns will do quite a bit of damage if fired within the 100 m to 300 m range as any farther out and you risk weaker shots making contact and not doing as much damage.
Assumptions can be made about this aircraft, however, pilots who fly it can prove that this biplane fighter is no slouch.
General info
Flight performance
Describe how the aircraft behaves in the air. Speed, manoeuvrability, acceleration and allowable loads - these are the most important characteristics of the vehicle.
| Characteristics | Max Speed (km/h at 3,000 m) |
Max altitude (metres) |
Turn time (seconds) |
Rate of climb (metres/second) |
Take-off run (metres) | |||
|---|---|---|---|---|---|---|---|---|
| AB | RB | AB | RB | AB | RB | |||
| Stock | 311 | 298 | 7700 | 14.4 | 15.0 | 13.8 | 13.8 | 294 |
| Upgraded | 343 | 325 | 13.0 | 13.7 | 20.3 | 16.6 | ||
Details
| Features | ||||
|---|---|---|---|---|
| Combat flaps | Take-off flaps | Landing flaps | Air brakes | Arrestor gear |
| X | X | X | X | X |
| Limits | ||||||
|---|---|---|---|---|---|---|
| Wings (km/h) | Gear (km/h) | Flaps (km/h) | Max Static G | |||
| Combat | Take-off | Landing | + | - | ||
| 560 | 560 | N/A | N/A | N/A | ~12 | ~6 |
| Optimal velocities (km/h) | |||
|---|---|---|---|
| Ailerons | Rudder | Elevators | Radiator |
| < 250 | < 200 | < 320 | > 170 |
Survivability and armour
- No armour plating
- No armour glazing
- Critical components located in front of aircraft (fuel, pilot, engine, controls)
Like many aircraft just prior to the break out of World War II, the J6B was not outfitted with any armour plating. The J6B relied on its engine to get the aircraft where it needed to go and helped the aircraft get into a position where the guns should shoot down an enemy, any attempts to install armour plating would have only slowed down the already relatively slow biplane which would not have been worth the trade-off.
To maintain the centre of balance for this fighter, the pilot, fuel tank and engine take up the fuselage from the middle to the front, any attacks on this aircraft in this zone risk hitting a critical component, ending the J6B's fight in the battle earlier than expected. With an open cockpit, fabric coverings and a mediocre engine, the survivability of this aircraft, for the most part, rests in the pilot's hands and their ability to out-think the enemy pilots.
Armaments
Offensive armament
The J6B is armed with:
- 1 x 8 mm Ksp m/22 Fh machine gun, nose-mounted (500 rpg)
- 1 x 8 mm Ksp m/22 Fv machine gun, nose-mounted (500 rpg)
The Swedish Air Force chose to outfit the J6B with license-built copies of the Browning M1919 machine gun, however originally was calibrated for 6.5 mm however this round was found to be less effective against fabric-covered aircraft and so the gun was recalibrated up to 8 mm. The Swedish variant is listed as the Ksp m/22 machine gun of which two were mounted on this fighter. One of the benefits of the armament setup on the J6B is that both machine guns are mounted in the fuselage, synchronized to fire through the propeller arc. Effectively, this aircraft is a point-and-shoot where the pilot will not have to deal with wing-mounted convergence calculations, however, bullet drop over distance is still a consideration. Typically in biplanes, the most effective range for disabling or destroying another aircraft, 100 to 250 m is best for close-in fighting, typically as one gets farther out from there, bullets lose some of their punch.
Many ace pilots from all sides of the war stated that when the enemy filled the windscreen, there was no way you could not hit, thereby guaranteeing a hit and conserving ammunition. The J6B does not have the machine-gun speed of those found on some Russian biplanes as it is necessary to synchronize the firing of the guns in the fuselage to fire through the propeller arc. With 1,000 rounds of ammunition distributed between both machine guns, it is recommended to fire in short bursts, mainly to prevent overheating and jamming of the machine guns. Typically you can continuously fire about 225 rounds of ammunition before the guns jam up and require a cool down before they can be used again.
When possible, change out the default ammunition belts for either tracer belts which are very effective against other biplanes, especially those which have fabric coverings and non-self sealing fuel tanks as tracer rounds have a good chance of setting planes on fire which can rarely put the flames out. Air belts are another good choice due to the explosive filler in the round which helps to damage or disable aircraft faster than regular bullets. For those pilots who like to sneak into a fight and catch enemy aircraft unaware, stealth belts are the way to go as there are no tracer rounds to give away your position. The enemy pilots tend to realize where the stealth bullets are coming from only too late as their aircraft is coming apart and falling to the ground.
Usage in battles
Describe the tactics of playing in the aircraft, the features of using aircraft in a team and advice on tactics. Refrain from creating a "guide" - do not impose a single point of view, but instead, give the reader food for thought. Examine the most dangerous enemies and give recommendations on fighting them. If necessary, note the specifics of the game in different modes (AB, RB, SB).
Manual Engine Control
| MEC elements | ||||||
|---|---|---|---|---|---|---|
| Mixer | Pitch | Radiator | Supercharger | Turbocharger | ||
| Oil | Water | Type | ||||
| Controllable | Not controllable Not auto controlled |
Not controllable Not auto controlled |
Not controllable Not auto controlled |
Separate | Not controllable 1 gear |
Not controllable |
Modules
| Tier | Flight performance | Survivability | Weaponry | |
|---|---|---|---|---|
| I | Fuselage repair | Radiator | Offensive 8 mm | |
| II | Compressor | Airframe | ||
| III | Wings repair | Engine | New 8 mm MGs | |
| IV | Engine injection | Cover | ||
Pros and cons
Pros:
- Great handling characteristics
- Large choice of machine gun ammo belts
Cons:
- Average speed near the ground, slow level flight
- Weak armament
History
Svenska Aero AB (SAAB) worked on a private venture to develop a biplane fighter, and to build a fighter which the Swedish Air Force could use, however guidance and direction were not forthcoming by the military, so Svenska Aero turned to foreign-built aircraft to gain inspiration from what was working. The resulting fighter was the Jaktfalken, a relatively standard biplane format fighter which utilised fixed landing gear and like many other early fighters a tail skid instead of a wheel. While the fuselage was constructed of welded beams which were covered in fabric, several portions of the fore and aft section were covered with aluminium sheeting. A 14-cylinder Armstrong Siddeley Jaguar radial engine was outfitted with a fuel tank just aft with the cockpit following right behind.
Initial tests of this aircraft resulted in positive reviews by test pilots of the Swedish Air Force, leading to the military to order three Jaktfalken to be built which would then side-by-side be tested against the British Bristol fighter the Bulldog II. The Jaktfalken prototype became known as the J5 by the Swedish Air Force, however, at the last minute in February 1930, the Air Administration reconsidered the ASJA 14-cylinder engine and ordered it to be replaced by a Bristol Jupiter engine which would become the standard engine to be used in the Swedish Air Force. To accept the new Jupiter VII engines, the fuselage needed to be modified along with the engine attachment points. Unfortunately, during test flights severe vibrations were encountered and further attempted modifications failed to correct this. Even with the vibrations issues unresolved, three of these fighters were delivered to the Swedish Air Force and redesignated as J6A fighters.
Later as Svenska Aero and Armstrong Siddeley Jaguar merged, they worked on the issues plaguing the Jaktfalken fighter and installed a modified stabilizer and a windscreen for the pilot (previous versions did not have one) and these versions were delivered to the Swedish Air Force as J6B Jaktfalken II fighters. These fighters served the Swedish military for several years with three of them given to Finland to augment their air force during the 1939-1940 Winter War with the Soviet Union. By the end of 1941, all remaining operational J6B Jaktfalken II fighters in the Swedish inventory were scrapped and replaced by newer and more reliable fighters.
Media
- Images


See also
- Aircraft of comparable role, configuration and era
External links
| Swedish Aeroplane Company Ltd. (SAAB) | |
|---|---|
| Pre-SAAB: ASJA | J6B |
| Fighters | J21A-1 · J21A-2 · A21A-3 |
| Jet fighters | A21RB · J21RA · J29A · A29B · J29D · J29F · J32B · J35A · J35D · JA37C · JA37D · JAS39A |
| Jet attackers | A32A · A32A Röd Adam · AJ37 · AJS37 · SAAB-105G · SK60B |
| Bombers | B17A · B17B · S17BS |
| Dive-bombers | B3C · B18A · B18B · T18B · T18B (57) |
| Export | SAAB-105OE · Saab J35XS · JAS39C · ◔JAS39EBS HU C |
| Sweden fighters | |
|---|---|
| ASJA | J6B |
| Saab | J21A-1 · J21A-2 · A21A-3 |
| FFVS | J22-A · J22-B |
| Foreign Import | J8A · Iacobi's J8A · J9 Early · J11 · J20 · J26 David · J26 |
| Finland | |
| VL | Mörkö-Morane · VL Myrsky II · VL Pyörremyrsky |
| (NL) Fokker | ▄Fokker D.XXI-3 · ▄Fokker D.XXI |
| (DE) Messerschmitt | ▄Bf 109 G-2 · ▄Bf 109 G-6 Erla · ▄Bf 109 G-6 |
| Other | ▄B-239 · ▄Hurricane Mk I/L |
