Difference between revisions of "J35D"
m (Added the worst con about this plane) (Tag: Visual edit) |
(Fully finished product with usage in battles, suspended armaments, media, and modules table added. No further plans on the article. Will get additional assistance on the image placement.) (Tag: Visual edit) |
||
| Line 13: | Line 13: | ||
<!--''Describe how the aircraft behaves in the air. Speed, manoeuvrability, acceleration and allowable loads - these are the most important characteristics of the vehicle.''--> | <!--''Describe how the aircraft behaves in the air. Speed, manoeuvrability, acceleration and allowable loads - these are the most important characteristics of the vehicle.''--> | ||
| − | The {{PAGENAME}} Draken is a highly agile interceptor of the Swedish aviation family. This interceptor uses a double delta wing-configuration and a powerful Avon engine to achieve both excellent high and low-speed performance at various altitudes. This aircraft is outfitted with two wing-mounted Akan m/55 auto-cannons and up to four [[Rb24]] missiles. Along with options for both anti-air and anti-ground rockets, the {{PAGENAME}} becomes a versatile platform with a high potential thanks to unmatched maneuverability. Having almost twice the wing surface of a [[MiG-21MF (Germany)|MiG-21MF]], the | + | The {{PAGENAME}} Draken is a highly agile interceptor of the Swedish aviation family. This interceptor uses a double delta wing-configuration and a powerful Avon engine to achieve both excellent high and low-speed performance at various altitudes. This aircraft is outfitted with two wing-mounted Akan m/55 auto-cannons and up to four [[Rb24]] missiles. Along with options for both anti-air and anti-ground rockets, the {{PAGENAME}} becomes a versatile platform with a high potential thanks to unmatched maneuverability. Having almost twice the wing surface of a [[MiG-21MF (Germany)|MiG-21MF]], the {{PAGENAME}} comfortably dogfights any opponent who dares to challenge it. |
The cost of this maneuverability is the large reduction in speed when turning. The {{PAGENAME}} usually drops below 500 km/h airspeed when performing aggressive maneuvers. This lack of speed usually leaves the {{PAGENAME}} vulnerable to enemy attacks, since avoiding missiles or gunfire becomes a lot more difficult. This makes the {{PAGENAME}} a unique flying experience where the player needs to be constantly aware of the current airspeed, while still avoiding to dump all speed at once. In order to maximize the stored speed, a {{PAGENAME}} should be flown carefully. Aerial maneuvers should be avoided and turning has to be done slowly. The efficiency of the {{PAGENAME}} significantly increases when played with higher speeds. Although the plane becomes more sluggish at speeds close to 1,100 km/h, the {{PAGENAME}} still manages to outmaneuver incoming missiles. Avoiding incoming homing devices usually leads to deceleration, but with careful planning, this speed can always be regained thanks to the strong acceleration the engine provides. | The cost of this maneuverability is the large reduction in speed when turning. The {{PAGENAME}} usually drops below 500 km/h airspeed when performing aggressive maneuvers. This lack of speed usually leaves the {{PAGENAME}} vulnerable to enemy attacks, since avoiding missiles or gunfire becomes a lot more difficult. This makes the {{PAGENAME}} a unique flying experience where the player needs to be constantly aware of the current airspeed, while still avoiding to dump all speed at once. In order to maximize the stored speed, a {{PAGENAME}} should be flown carefully. Aerial maneuvers should be avoided and turning has to be done slowly. The efficiency of the {{PAGENAME}} significantly increases when played with higher speeds. Although the plane becomes more sluggish at speeds close to 1,100 km/h, the {{PAGENAME}} still manages to outmaneuver incoming missiles. Avoiding incoming homing devices usually leads to deceleration, but with careful planning, this speed can always be regained thanks to the strong acceleration the engine provides. | ||
| Line 83: | Line 83: | ||
The {{PAGENAME}} is outfitted with two 30mm Akan m/55 cannons, which are Swedish manufactured variants of the British ADEN cannons. These two cannons offer a high burst mass and velocity at medium ranges. Although these guns are dangerous, they are quite limited by their ammunition count. Just like the J32B, these cannons have 90 rounds each, giving the player a total of 180 shells. The cannons should be fired with caution in order to maximize the amount of damage they provide. Since the missiles are outdated Rb24 missiles, a {{PAGENAME}} pilot needs to be prepared to engage most enemies with these cannons rather than suspended armaments. | The {{PAGENAME}} is outfitted with two 30mm Akan m/55 cannons, which are Swedish manufactured variants of the British ADEN cannons. These two cannons offer a high burst mass and velocity at medium ranges. Although these guns are dangerous, they are quite limited by their ammunition count. Just like the J32B, these cannons have 90 rounds each, giving the player a total of 180 shells. The cannons should be fired with caution in order to maximize the amount of damage they provide. Since the missiles are outdated Rb24 missiles, a {{PAGENAME}} pilot needs to be prepared to engage most enemies with these cannons rather than suspended armaments. | ||
| − | Another issue with the {{PAGENAME}} is the cannon placement. The two Akans are wing-mounted rather than centre-mounted. This is a downgrade compared to the centre-mounted position found on the J32B since set convergence now plays a role. This makes the | + | Another issue with the {{PAGENAME}} is the cannon placement. The two Akans are wing-mounted rather than centre-mounted. This is a downgrade compared to the centre-mounted position found on the J32B since set convergence now plays a role. This makes the {{PAGENAME}} lose effectiveness at certain ranges since the target has the chance to fly between the shells, and when hitting a target, the shells are unlikely to concentrate to a singular point, lowering the amount of damage created. This placement creates difficulty in complex manoeuvres, since putting the plane sideways creates a vertical spread. A wise {{PAGENAME}} pilot will commence target practice with the guns prior to battle as they are important for the plane’s overall survivability and combat effectiveness. |
=== Suspended armament === | === Suspended armament === | ||
| − | + | <!-- Describe the aircraft's suspended armament: additional cannons under the wings, bombs, rockets and torpedoes. This section is especially important for bombers and attackers. If there is no suspended weaponry remove this subsection. -->{{Main|m/57D=}} | |
| + | |||
| + | The {{PAGENAME}} is able to carry 12 suspended m/57D unguided rockets for ground-strike purposes. These rockets have a TNT filler with the same penetration as the earlier m/49A found on the earlier ground-strike planes. The rockets fire individually starting from the left, and are placed in a vertical angle, These rockets are devastating against lighter vehicles at high tiers. Thanks to a single-fire system and good velocity, the effectiveness can be quite high if practiced. But due to the {{PAGENAME}} being only available for use at top-tier, these rockets have a very low chance of reliably working, since the targets are usually heavily armoured. The {{PAGENAME}} lacks a ballistic missile computer and is easily countered by missile SPAA, making the {{PAGENAME}} a bad pick for close air support in general. If the player feels the need for a challenge, the {{PAGENAME}} is at the very least highly maneuverable, giving players the option to do several dangerous passes in a short period of time. | ||
| + | |||
| + | {{Main}} | ||
| + | |||
| + | The {{PAGENAME}} offers a pair of unguided m/57B rocket pods. These rockets are designed for bomber interception, and are very devastating against aerial targets. These rockets fire in pairs, in contrast to the single-fire m/57D rockets for ground-attack purposes. Being placed parallel with the plane, these rockets are comfortable to aim due to the traditional angle, as well as the center fuselage mounting they offer. These pods weigh less than the full Rb24 loadout, but still require a {{PAGENAME}} pilot to engage targets the same way as with the internal Akan m/55 cannons, making them quite redundant. These pods are for pilots looking for a challenge, while still staying effective in aerial combat. | ||
| + | |||
| + | {{Main}} | ||
| + | |||
| + | A final modification found on the {{PAGENAME}} is the option to carry four Rb24 missiles, the same being found on the previous J32B Lansen. These missiles are mounted separately from each other, with two under the center fuselage, and two under the outer delta. Having four of these missiles significantly lowers the performance of the {{PAGENAME}}, meaning that more aggressive players should consider if they will find a practical use for this suspended armament. Defensive and more cautious players will, however, enjoy these missiles since they offer a more distanced approach to engaging targets. A pilot should still be aware that these missiles tend to miss most opponents at high-tier due to missile countermeasures, as well as higher speeds and maneuverability. | ||
== Usage in battles == | == Usage in battles == | ||
| − | + | <!-- Describe the tactics of playing in the aircraft, the features of using aircraft in a team and advice on tactics. Refrain from creating a "guide" - do not impose a single point of view, but instead, give the reader food for thought. Examine the most dangerous enemies and give recommendations on fighting them. If necessary, note the specifics of the game in different modes (AB, RB, SB). --> | |
| + | The {{PAGENAME}} can be a bit “over the top” when it comes to in-game performance. The {{PAGENAME}} doesn’t underperform in any area, even when stock. Yet the {{PAGENAME}} quickly suffers when facing several opponents at once. This is due to the incredible maneuverability the {{PAGENAME}} possesses, which becomes its worst enemy in battles. The {{PAGENAME}} comfortably dodges incoming enemies when at higher speeds, but quickly loses this advantage after the first few passes due to the reduction of speed. Avoiding can still be done easily, but high-load missiles require a speed above 800kph to be reliably dodged. To avoid the likelihood of a low-speed experience, the {{PAGENAME}} should maneuver with caution, with the same style as a pilot preventing wings from ripping. The recommended way to use this trick is to control the elevators with the use of the “pitch axis” button. By tapping this button rapidly, a {{PAGENAME}} pilot can prevent high-G maneuvers while still keeping their backs cleared by looking behind them in a defensive-like approach. The amount of pulling can be varied depending on what is approaching the Draken. It's important to remember that aileron rolling can still be done without much consequence, and will come in handy when avoiding enemies in a defensive situation. | ||
| + | |||
| + | '''Attacking while using the Akan m/55''' | ||
| + | |||
| + | When the {{PAGENAME}} isn’t on the receiving end of an attack, the dominating maneuverability and acceleration start to show. The Draken has the ability to stick with almost any enemy. A rude, but effective approach is to engage already slow enemies since the Draken will never overshoot a target. This should also be done with caution since this is still a sacrifice of valuable energy required to avoid incoming attacks. Learning when to strike is key for the {{PAGENAME}}, since staying alive is always a number one priority. | ||
| + | |||
| + | When it comes to firing on a target, the {{PAGENAME}} immediately shows it’s unorthodox gun placement. Shooting opponents running away, or firing on bypassing enemies might often result in the {{PAGENAME}} missing the target entirely. To avoid this, a pilot can both train their aim and learn useful aerial maneuvers to increase the likelihood of hitting opponents. A general tip when firing upon passing opponents is to make the enemy pass the {{PAGENAME}} along its horizontal axis. This ensures that the target passes through both guns, and the time on target automatically increases. Although this tactic won't focus as much lead on a singular point as a regular approach, it will still assure some shells connect with the target, which is usually enough to finish off any opponent. | ||
| + | |||
| + | '''Superstalling''' | ||
| + | |||
| + | The {{PAGENAME}} features one of the largest wing-areas of any fighter. Although this gives the {{PAGENAME}} a high advantage in terms of maneuverability and speed, the Plane suffers from a unique, but dangerous downside. This downside becomes apparent when damaged, stalling, or deploying negative elevator for a extended period of time. This feature is known as a "superstall", and can result in complete destruction of the aircraft. A superstall can be noticed by the parachute-like falling the plane experiences. The plane spins, and can't exit the maneuver for a extended period of time. In order to exit a superstall, the {{PAGENAME}} is outfitted with four tiny air-brakes positioned at the rear of the aircraft. Deploying these air-brakes will pull the tail-section upwards, allowing a {{PAGENAME}} pilot to regain airflow under their wings. It's important to avoid superstalling since the {{PAGENAME}} stays incredible vulnerable during this period. | ||
| + | ===Modules=== | ||
| + | {| class="wikitable" | ||
| + | !Tier | ||
| + | ! colspan="2" |Flight performance | ||
| + | !Survivability | ||
| + | ! colspan="2" |Weaponry | ||
| + | ! | ||
| + | |- | ||
| + | |I | ||
| + | |Fuselage repair | ||
| + | | | ||
| + | | | ||
| + | |Offensive 30 mm | ||
| + | | | ||
| + | | | ||
| + | |- | ||
| + | |II | ||
| + | | | ||
| + | |Compressor | ||
| + | |Airframe | ||
| + | | | ||
| + | |m/57D | ||
| + | |m/57 | ||
| + | |- | ||
| + | |III | ||
| + | |Wings repair | ||
| + | |Engine | ||
| + | | | ||
| + | |New 30 mm cannons | ||
| + | | | ||
| + | | | ||
| + | |- | ||
| + | |IV | ||
| + | |G-suit | ||
| + | | | ||
| + | |Cover | ||
| + | | | ||
| + | | | ||
| + | |Rb24 | ||
| + | |} | ||
=== Pros and cons === | === Pros and cons === | ||
<!--''Summarise and briefly evaluate the vehicle in terms of its characteristics and combat effectiveness. Mark its pros and cons in the bulleted list. Try not to use more than 6 points for each of the characteristics. Avoid using categorical definitions such as "bad", "good" and the like - use substitutions with softer forms such as "inadequate" and "effective".''--> | <!--''Summarise and briefly evaluate the vehicle in terms of its characteristics and combat effectiveness. Mark its pros and cons in the bulleted list. Try not to use more than 6 points for each of the characteristics. Avoid using categorical definitions such as "bad", "good" and the like - use substitutions with softer forms such as "inadequate" and "effective".''--> | ||
| Line 96: | Line 157: | ||
'''Pros:''' | '''Pros:''' | ||
| − | * Superior | + | * Superior maneuverability - Able to out-turn anything it wishes |
* High top speed - Can catch most top tier aircraft at low altitudes | * High top speed - Can catch most top tier aircraft at low altitudes | ||
* Strong acceleration | * Strong acceleration | ||
| Line 104: | Line 165: | ||
'''Cons:''' | '''Cons:''' | ||
| − | * Poor sustained turning - sustained speed degenerates quickly when | + | * Poor sustained turning - sustained speed degenerates quickly when maneuvering at speeds below 1,000 kph |
* Outdated missiles - unable to reliably eliminate observant opponents | * Outdated missiles - unable to reliably eliminate observant opponents | ||
* Unorthodox gun placement - less accurate and more tricky to get used to | * Unorthodox gun placement - less accurate and more tricky to get used to | ||
| Line 126: | Line 187: | ||
The Saab 210 would see many changes to its design in order to finalize the look of the upcoming J35 Draken. The nose was changed to better suit radar use, its air intakes moved back for a better view, and the tail reconstructed to fit a drag-chute. All of which would be found on the J35 Draken later on. | The Saab 210 would see many changes to its design in order to finalize the look of the upcoming J35 Draken. The nose was changed to better suit radar use, its air intakes moved back for a better view, and the tail reconstructed to fit a drag-chute. All of which would be found on the J35 Draken later on. | ||
| − | ;Saab 35 Draken | + | ;[[File:Saab 35 Draken prototypes.jpg|thumb|Two prototype Saab 35 Draken flying in formation.]]Saab 35 Draken |
With the tests finished, the Draken would finally see full-scale prototypes. The first prototype took to the skies in October 1955, and deliveries of the first variant, the J35A, would commence in 1959. By 1960 the first Drakens would officially be in service. These would be stationed at F13 Bråvalla and F16 Gotland. Later variants would be placed all over Sweden, with various purposes. Being used for bomber interception, reconnaissance and trainers, the Saab 35 Draken would see the longest service life of any fighter in the Swedish air force. The Draken would serve for almost 40 years, having 615 planes produced during its lifespan. | With the tests finished, the Draken would finally see full-scale prototypes. The first prototype took to the skies in October 1955, and deliveries of the first variant, the J35A, would commence in 1959. By 1960 the first Drakens would officially be in service. These would be stationed at F13 Bråvalla and F16 Gotland. Later variants would be placed all over Sweden, with various purposes. Being used for bomber interception, reconnaissance and trainers, the Saab 35 Draken would see the longest service life of any fighter in the Swedish air force. The Draken would serve for almost 40 years, having 615 planes produced during its lifespan. | ||
| Line 146: | Line 207: | ||
== Media == | == Media == | ||
| − | + | <!-- Excellent additions to the article would be video guides, screenshots from the game, and photos. --> | |
| + | '''Images''' | ||
| + | [[File:Saab j35 1920x1080 logo com 0448abf6133b8279971d168aea69010e.jpg|none|thumb|300x300px]] | ||
| + | [[File:Saab j35 06 1280h720 94fc20bd86a695ea49f10597d2c927cd.jpg|none|thumb]] | ||
| + | [[File:Saab j35 05 1280h720 89e7d5ac1b4e398c348f8614cdc013a5.jpg|none|thumb]] | ||
| + | [[File:Saab j35 04 1280h720 f4a95f68fa789f580e1e1ede436dbf7f.jpg|none|thumb]] | ||
| + | '''Videos''' | ||
| + | |||
| + | {{Youtube-gallery|yTXhTOHjvaM|Some Problems Can Be Solved With a Little Bit Of Cobra - War Thunder 1.97|Ewi0jo_rvo0|Erect Superstall, Abrupt Entry}} | ||
== See also == | == See also == | ||
Revision as of 19:55, 10 April 2020
Contents
Description

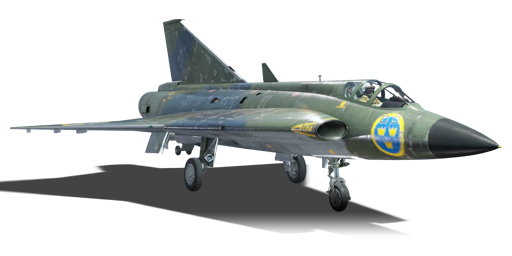
The J35D Draken is a rank VII Swedish jet fighter
with a battle rating of 10.0 (AB), 10.3 (RB), and 10.7 (SB). It was introduced in Update 1.97 "Viking Fury".
The J35D is the first Swedish jet capable at Mach 2. The jet is highly agile and is the first plane in War Thunder capable of performing the famous "Cobra maneuver".
General info
Flight performance
The J35D Draken is a highly agile interceptor of the Swedish aviation family. This interceptor uses a double delta wing-configuration and a powerful Avon engine to achieve both excellent high and low-speed performance at various altitudes. This aircraft is outfitted with two wing-mounted Akan m/55 auto-cannons and up to four Rb24 missiles. Along with options for both anti-air and anti-ground rockets, the J35D becomes a versatile platform with a high potential thanks to unmatched maneuverability. Having almost twice the wing surface of a MiG-21MF, the J35D comfortably dogfights any opponent who dares to challenge it.
The cost of this maneuverability is the large reduction in speed when turning. The J35D usually drops below 500 km/h airspeed when performing aggressive maneuvers. This lack of speed usually leaves the J35D vulnerable to enemy attacks, since avoiding missiles or gunfire becomes a lot more difficult. This makes the J35D a unique flying experience where the player needs to be constantly aware of the current airspeed, while still avoiding to dump all speed at once. In order to maximize the stored speed, a J35D should be flown carefully. Aerial maneuvers should be avoided and turning has to be done slowly. The efficiency of the J35D significantly increases when played with higher speeds. Although the plane becomes more sluggish at speeds close to 1,100 km/h, the J35D still manages to outmaneuver incoming missiles. Avoiding incoming homing devices usually leads to deceleration, but with careful planning, this speed can always be regained thanks to the strong acceleration the engine provides.
| Characteristics | Max Speed (km/h at 0 m - sea level) |
Max altitude (metres) |
Turn time (seconds) |
Rate of climb (metres/second) |
Take-off run (metres) | |||
|---|---|---|---|---|---|---|---|---|
| AB | RB | AB | RB | AB | RB | |||
| Stock | 2059 | 2009 | 12500 | 26.6 | 27.1 | 151.6 | 140.1 | 900 |
| Upgraded | 2257 | 2150 | 23.5 | 25 | 211.6 | 180 | ||
Details
| Features | |||||
|---|---|---|---|---|---|
| Combat flaps | Take-off flaps | Landing flaps | Air brakes | Arrestor gear | Drogue chute |
| X | X | X | ✓ | X | ✓ |
| Limits | ||||||
|---|---|---|---|---|---|---|
| Wings (km/h) | Gear (km/h) | Flaps (km/h) | Max Static G | |||
| Combat | Take-off | Landing | + | - | ||
| 0 | 500 | N/A | N/A | N/A | ~10 | ~5 |
| Optimal velocities (km/h) | |||
|---|---|---|---|
| Ailerons | Rudder | Elevators | Radiator |
| < 850 | < 700 | < 700 | N/A |

Survivability and armour
The J35D is one of the few high-rank planes entirely without protection, much like the F-4 Phantom series of fighters. Although the later variants of the Draken featured bird strike-proof cockpits, no Draken variant was fitted with armour plating or bulletproof glass. In-game, this downside can be quite hard to notice since higher rank vehicles tend to boast incredible amounts of firepower, making every hit incredibly devastating. A J35D pilot should, like every other pilot, avoid damages at all costs as any damage deteriorates the aircraft's performance and ability to stay in the fight.
Armaments
Offensive armament
The J35D is outfitted with two 30mm Akan m/55 cannons, which are Swedish manufactured variants of the British ADEN cannons. These two cannons offer a high burst mass and velocity at medium ranges. Although these guns are dangerous, they are quite limited by their ammunition count. Just like the J32B, these cannons have 90 rounds each, giving the player a total of 180 shells. The cannons should be fired with caution in order to maximize the amount of damage they provide. Since the missiles are outdated Rb24 missiles, a J35D pilot needs to be prepared to engage most enemies with these cannons rather than suspended armaments.
Another issue with the J35D is the cannon placement. The two Akans are wing-mounted rather than centre-mounted. This is a downgrade compared to the centre-mounted position found on the J32B since set convergence now plays a role. This makes the J35D lose effectiveness at certain ranges since the target has the chance to fly between the shells, and when hitting a target, the shells are unlikely to concentrate to a singular point, lowering the amount of damage created. This placement creates difficulty in complex manoeuvres, since putting the plane sideways creates a vertical spread. A wise J35D pilot will commence target practice with the guns prior to battle as they are important for the plane’s overall survivability and combat effectiveness.
Suspended armament
The J35D is able to carry 12 suspended m/57D unguided rockets for ground-strike purposes. These rockets have a TNT filler with the same penetration as the earlier m/49A found on the earlier ground-strike planes. The rockets fire individually starting from the left, and are placed in a vertical angle, These rockets are devastating against lighter vehicles at high tiers. Thanks to a single-fire system and good velocity, the effectiveness can be quite high if practiced. But due to the J35D being only available for use at top-tier, these rockets have a very low chance of reliably working, since the targets are usually heavily armoured. The J35D lacks a ballistic missile computer and is easily countered by missile SPAA, making the J35D a bad pick for close air support in general. If the player feels the need for a challenge, the J35D is at the very least highly maneuverable, giving players the option to do several dangerous passes in a short period of time.
The J35D offers a pair of unguided m/57B rocket pods. These rockets are designed for bomber interception, and are very devastating against aerial targets. These rockets fire in pairs, in contrast to the single-fire m/57D rockets for ground-attack purposes. Being placed parallel with the plane, these rockets are comfortable to aim due to the traditional angle, as well as the center fuselage mounting they offer. These pods weigh less than the full Rb24 loadout, but still require a J35D pilot to engage targets the same way as with the internal Akan m/55 cannons, making them quite redundant. These pods are for pilots looking for a challenge, while still staying effective in aerial combat.
A final modification found on the J35D is the option to carry four Rb24 missiles, the same being found on the previous J32B Lansen. These missiles are mounted separately from each other, with two under the center fuselage, and two under the outer delta. Having four of these missiles significantly lowers the performance of the J35D, meaning that more aggressive players should consider if they will find a practical use for this suspended armament. Defensive and more cautious players will, however, enjoy these missiles since they offer a more distanced approach to engaging targets. A pilot should still be aware that these missiles tend to miss most opponents at high-tier due to missile countermeasures, as well as higher speeds and maneuverability.
Usage in battles
The J35D can be a bit “over the top” when it comes to in-game performance. The J35D doesn’t underperform in any area, even when stock. Yet the J35D quickly suffers when facing several opponents at once. This is due to the incredible maneuverability the J35D possesses, which becomes its worst enemy in battles. The J35D comfortably dodges incoming enemies when at higher speeds, but quickly loses this advantage after the first few passes due to the reduction of speed. Avoiding can still be done easily, but high-load missiles require a speed above 800kph to be reliably dodged. To avoid the likelihood of a low-speed experience, the J35D should maneuver with caution, with the same style as a pilot preventing wings from ripping. The recommended way to use this trick is to control the elevators with the use of the “pitch axis” button. By tapping this button rapidly, a J35D pilot can prevent high-G maneuvers while still keeping their backs cleared by looking behind them in a defensive-like approach. The amount of pulling can be varied depending on what is approaching the Draken. It's important to remember that aileron rolling can still be done without much consequence, and will come in handy when avoiding enemies in a defensive situation.
Attacking while using the Akan m/55
When the J35D isn’t on the receiving end of an attack, the dominating maneuverability and acceleration start to show. The Draken has the ability to stick with almost any enemy. A rude, but effective approach is to engage already slow enemies since the Draken will never overshoot a target. This should also be done with caution since this is still a sacrifice of valuable energy required to avoid incoming attacks. Learning when to strike is key for the J35D, since staying alive is always a number one priority.
When it comes to firing on a target, the J35D immediately shows it’s unorthodox gun placement. Shooting opponents running away, or firing on bypassing enemies might often result in the J35D missing the target entirely. To avoid this, a pilot can both train their aim and learn useful aerial maneuvers to increase the likelihood of hitting opponents. A general tip when firing upon passing opponents is to make the enemy pass the J35D along its horizontal axis. This ensures that the target passes through both guns, and the time on target automatically increases. Although this tactic won't focus as much lead on a singular point as a regular approach, it will still assure some shells connect with the target, which is usually enough to finish off any opponent.
Superstalling
The J35D features one of the largest wing-areas of any fighter. Although this gives the J35D a high advantage in terms of maneuverability and speed, the Plane suffers from a unique, but dangerous downside. This downside becomes apparent when damaged, stalling, or deploying negative elevator for a extended period of time. This feature is known as a "superstall", and can result in complete destruction of the aircraft. A superstall can be noticed by the parachute-like falling the plane experiences. The plane spins, and can't exit the maneuver for a extended period of time. In order to exit a superstall, the J35D is outfitted with four tiny air-brakes positioned at the rear of the aircraft. Deploying these air-brakes will pull the tail-section upwards, allowing a J35D pilot to regain airflow under their wings. It's important to avoid superstalling since the J35D stays incredible vulnerable during this period.
Modules
| Tier | Flight performance | Survivability | Weaponry | |||
|---|---|---|---|---|---|---|
| I | Fuselage repair | Offensive 30 mm | ||||
| II | Compressor | Airframe | m/57D | m/57 | ||
| III | Wings repair | Engine | New 30 mm cannons | |||
| IV | G-suit | Cover | Rb24 | |||
Pros and cons
Pros:
- Superior maneuverability - Able to out-turn anything it wishes
- High top speed - Can catch most top tier aircraft at low altitudes
- Strong acceleration
- Easy and short takeoff/landing
- Slow stall speed - Air-brakes prevent "superstalling"
Cons:
- Poor sustained turning - sustained speed degenerates quickly when maneuvering at speeds below 1,000 kph
- Outdated missiles - unable to reliably eliminate observant opponents
- Unorthodox gun placement - less accurate and more tricky to get used to
- Lack of countermeasures - No flares or RWR
- Very high repair cost (over 20k) compared to Phantoms and MiGs
| Fun Fact: Pilots of the J35D created a term called superstalling, unlike typical aircraft which would stall, nose over, and recover, the Draken's control surfaces remain ineffective for some time as the aircraft falls, potentially causing it to crash. |
History
- Background
The discussion about a new fighter project, capable of intercepting small groups of bombers at an altitude of 10 kilometres, was brought up in the autumn of 1949, just a few months from the introduction of the J29 Tunnan. The threat was deemed to be transonic bombers, which needed to be intercepted before reaching Swedish airspace. This meant the next big project, Saab would focus on a high-speed interceptor capable of exceeding the Mach number, while still being able to function as an all-weather, daytime fighter.
- Saab 210 Lilldraken
This new project for a supersonic fighter-interceptor was given the name "project 1200". This project would be lead by the Saab engineer Erik Bratt. His team tinkered with various ideas on how to create a supersonic fighter with low-speed handling, to ease landing on shorter runways. The team came up with a double delta design that made use of two wing angles, giving the plane less drag at higher speeds, while staying manoeuvrable at lower speeds. In order to test this design, the team constructed a miniature version of the new fighter, named Saab 210, which also received the nickname "Lilldraken" (translates to small kite). This plane was just 70% the size of the regular Draken and was used for extensive testing of handling as well as ergonomics of a double delta configuration. This prototype was first flown on January 21st, 1952.
The Saab 210 would see many changes to its design in order to finalize the look of the upcoming J35 Draken. The nose was changed to better suit radar use, its air intakes moved back for a better view, and the tail reconstructed to fit a drag-chute. All of which would be found on the J35 Draken later on.
- Saab 35 Draken

With the tests finished, the Draken would finally see full-scale prototypes. The first prototype took to the skies in October 1955, and deliveries of the first variant, the J35A, would commence in 1959. By 1960 the first Drakens would officially be in service. These would be stationed at F13 Bråvalla and F16 Gotland. Later variants would be placed all over Sweden, with various purposes. Being used for bomber interception, reconnaissance and trainers, the Saab 35 Draken would see the longest service life of any fighter in the Swedish air force. The Draken would serve for almost 40 years, having 615 planes produced during its lifespan.
- J35D Draken
The J35D was the 4th Draken variant that was planned and built due to the new requirements the Swedish KFF (Kungliga FlygFörvaltningen or Royal air ministry) issued to Saab. The new requirements specified that the next fighter had to intercept high altitude bombers flying at Mach 1.5, while still carrying the same weaponry and ordinance the earlier J35B offered. This required Saab to upgrade the RM6B engine found on the J35B, which meant the design had to be slightly altered. The air intakes were elongated, and the fuselage got altered to support the use of drop-tanks in the centre. The first J35D took to the skies on the 28th of August 1962, but the first planes delivered would be without radar equipment. These would be known as the J35D1, of which 24 of which were made. The other planes got the name J35D2 and would later be known as the J35D when the original D1s got their radar equipment installed.
A total of 120 J35D Drakens would be built between 1963-1964. Being outfitted with the Rm 6C (Avon 300-series), this version was the fastest Draken to take to the skies. This Draken would also be exported to the Austrian air-force. In order to export these planes to Austria, Saab ended up buying back 24 of the Swedish serving J35Ds and converting them to the Austrian requirements, which meant fitting the planes with the bird-proof cockpit from the J35F, as well as repainting them for Austrian service. These Austrian Drakens, designated J35Ö (sometimes designated J35OE), saw extensive use all the way towards the 21st century, being taken out of service in 2005.
Devblog
In the late 1940s, the Swedish Ministry of Defence released a set of requirements for a new, cutting edge jet interceptor. Among other requirements, the new aircraft was to be capable of reaching speeds of Mach 2 and able to hunt down transonic bombers, while being easily maintained and capable of taking off from special public roads.
Saab began developing an aircraft around these specifications in the early 1950s and quickly came to the conclusion that a double delta wing design was needed in order to achieve all the requirements. However, this design was yet untried and untested, which led to the creation of the Saab 210 - a testbed aircraft which pioneered the double delta wing design.
Having gained the necessary insight on the performance of the double delta wing, Saab engineers transferred the newly acquired experience into the development of the actual aircraft to address the Ministry’s requirements - the J35 Draken was born.
The J35 Draken undertook its maiden flight in October 1955 and entered service with the Swedish Air Force in March 1960. Over 650 Drakens of various modifications would be built until the end of production, serving with Sweden until the late 1990s before being decommissioned. Apart from Swedish service, the J35 Draken also saw use with Denmark, Finland and Austria. The Austrian Air Force was the last operator to decommission the Draken in 2005, while some units are still in civilian use.
Media
Images
Videos
See also
- Comparable aircraft
External links
- [Devblog] Saab J35D Draken - The Supersonic Kite
- [aef.se] J35D Draken - Notis 2
- [aef.se] FPL35 Draken - SAAB35 Systemflygplanet
- [svfplhist.home.blog] - Fpl 35 - Historik
- [Wikipedia] - Saab 35 Draken
| Swedish Aeroplane Company Ltd. (SAAB) | |
|---|---|
| Pre-SAAB: ASJA | J6B |
| Fighters | J21A-1 · J21A-2 · A21A-3 |
| Jet fighters | A21RB · J21RA · J29A · A29B · J29D · J29F · J32B · J35A · J35D · JA37C · JA37D · JAS39A |
| Jet attackers | A32A · A32A Röd Adam · AJ37 · AJS37 · SAAB-105G · SK60B |
| Bombers | B17A · B17B · S17BS |
| Dive-bombers | B3C · B18A · B18B · T18B · T18B (57) |
| Export | SAAB-105OE · Saab J35XS · JAS39C · ◔JAS39EBS HU C |
| Sweden jet aircraft | |
|---|---|
| Fighters | J21RA |
| J29A · A29B · J29D · J29F | |
| J32B | |
| J34 | |
| J35A · J35D | |
| JA37C · JA37D | |
| JAS39A | |
| Strike aircraft | A21RB |
| A32A · A32A Röd Adam | |
| A28B | |
| AJ37 · AJS37 | |
| SK60B · SAAB-105G | |
| Export | SAAB-105OE |
| Finland | ▄Vampire FB 52A · ▄MiG-21bis · Saab J35XS |
