Difference between revisions of "IL-2 (1942)"
m (Removed random "italic text") |
Colok76286 (talk | contribs) (Edits) |
||
| (24 intermediate revisions by 12 users not shown) | |||
| Line 1: | Line 1: | ||
| − | {{ | + | {{About |
| − | + | | about = Soviet strike aircraft '''{{PAGENAME}}''' | |
| + | | other | ||
| + | | usage-1 = the captured German version | ||
| + | | link-1 = IL-2 (1942) (Germany) | ||
| + | | usage-2 = other uses | ||
| + | | link-2 = IL-2 (Family) | ||
| + | }} | ||
| + | {{Specs-Card | ||
| + | |code=il-2i | ||
| + | |images={{Specs-Card-Image|GarageImage_{{PAGENAME}}.jpg}} | ||
| + | }} | ||
| + | |||
== Description == | == Description == | ||
| − | <!--''In the description, the first part | + | <!-- ''In the description, the first part should be about the history of and the creation and combat usage of the aircraft, as well as its key features. In the second part, tell the reader about the aircraft in the game. Insert a screenshot of the vehicle, so that if the novice player does not remember the vehicle by name, he will immediately understand what kind of vehicle the article is talking about.'' --> |
| + | The '''{{Specs|name}}''' is a rank {{Specs|rank}} Soviet strike aircraft {{Battle-rating}}. It has been in the game since the start of the Open Beta Test prior to Update 1.27. | ||
| − | |||
| − | |||
| − | |||
== General info == | == General info == | ||
| − | === Flight | + | === Flight performance === |
| − | <!--''Describe how the aircraft behaves in the air. | + | {{Specs-Avia-Flight}} |
| − | {| class="wikitable" style="text-align:center" | + | <!-- ''Describe how the aircraft behaves in the air. Speed, manoeuvrability, acceleration and allowable loads - these are the most important characteristics of the vehicle.'' --> |
| − | + | ||
| − | + | {| class="wikitable" style="text-align:center" width="70%" | |
| − | + | ! rowspan="2" | Characteristics | |
| − | ! | + | ! colspan="2" | Max Speed<br>(km/h at 2,500 m) |
| − | + | ! rowspan="2" | Max altitude<br>(metres) | |
| − | ! colspan="2" | Max Speed<br>(km/h at | ||
| − | ! rowspan="2" | Max altitude<br>( | ||
! colspan="2" | Turn time<br>(seconds) | ! colspan="2" | Turn time<br>(seconds) | ||
| − | ! colspan="2" | Rate of climb<br>( | + | ! colspan="2" | Rate of climb<br>(metres/second) |
| − | ! rowspan="2" |Take-off run<br>( | + | ! rowspan="2" | Take-off run<br>(metres) |
| − | |||
| − | |||
| − | |||
| − | |||
| − | |||
| − | |||
| − | |||
| − | |||
| − | |||
| − | |||
| − | |||
|- | |- | ||
| − | ! | + | ! AB !! RB !! AB !! RB !! AB !! RB |
| − | ! | ||
| − | ! | ||
| − | ! | ||
| − | ! | ||
|- | |- | ||
| − | ! | + | ! Stock |
| − | + | | 406 || 391 || rowspan="2" | {{Specs|ceiling}} || 25.9 || 26.7 || 6.2 || 6.2 || rowspan="2" | 450 | |
| − | |||
| − | |||
| − | |||
| − | |||
|- | |- | ||
| − | | | + | ! Upgraded |
| + | | 447 || 426 || 24.1 || 24.9 || 11.1 || 8.6 | ||
|- | |- | ||
|} | |} | ||
| − | ====Details==== | + | ==== Details ==== |
| − | {| class="wikitable" style="text-align:center" | + | {| class="wikitable" style="text-align:center" width="50%" |
|- | |- | ||
! colspan="5" | Features | ! colspan="5" | Features | ||
|- | |- | ||
| − | ! Combat | + | ! Combat flaps !! Take-off flaps !! Landing flaps !! Air brakes !! Arrestor gear |
| − | ! Take-off | ||
| − | ! Landing | ||
| − | ! Air brakes | ||
| − | ! Arrestor gear | ||
|- | |- | ||
| − | | X || X || | + | | X || X || ✓ || X || X <!-- ✓ --> |
|- | |- | ||
|} | |} | ||
| − | {| class="wikitable" style="text-align:center" | + | {| class="wikitable" style="text-align:center" width="50%" |
|- | |- | ||
| − | ! colspan=" | + | ! colspan="7" | Limits |
|- | |- | ||
| − | ! rowspan="2" | | + | ! rowspan="2" | Wings (km/h) |
| − | ! rowspan="2" | Gear | + | ! rowspan="2" | Gear (km/h) |
| − | ! | + | ! colspan="3" | Flaps (km/h) |
! colspan="2" | Max Static G | ! colspan="2" | Max Static G | ||
|- | |- | ||
| − | ! + | + | ! Combat !! Take-off !! Landing !! + !! - |
| − | ! - | ||
|- | |- | ||
| − | | {{Specs| | + | | {{Specs|destruction|body}} || {{Specs|destruction|gear}} || N/A || N/A || 270 || ~15 || ~15 |
|- | |- | ||
|} | |} | ||
| Line 83: | Line 67: | ||
{| class="wikitable" style="text-align:center" | {| class="wikitable" style="text-align:center" | ||
|- | |- | ||
| − | ! colspan="4" | Optimal velocities | + | ! colspan="4" | Optimal velocities (km/h) |
|- | |- | ||
| − | ! Ailerons | + | ! Ailerons !! Rudder !! Elevators !! Radiator |
| − | ! Rudder | ||
| − | ! Elevators | ||
| − | ! Radiator | ||
|- | |- | ||
| − | | < | + | | < 320 || < 320 || < 370 || > 360 |
|- | |- | ||
|} | |} | ||
| Line 104: | Line 85: | ||
! WEP Engine power | ! WEP Engine power | ||
|- | |- | ||
| − | | | + | | 1,750 m || 1,500 hp || 1,593 hp |
|- | |- | ||
| − | |||
| − | |||
| − | |||
| − | |||
| − | |||
| − | |||
| − | |||
| − | |||
| − | |||
| − | |||
| − | |||
| − | |||
| − | |||
| − | |||
| − | |||
| − | |||
|} | |} | ||
=== Survivability and armour === | === Survivability and armour === | ||
| − | <!--''Examine the survivability of the aircraft. Note how vulnerable the structure is and how secure the pilot is, whether the fuel tanks are armoured. Describe the armour, if there is any, also mention the vulnerability of other critical aircraft systems.''--> | + | {{Specs-Avia-Armour}} |
| − | * | + | <!-- ''Examine the survivability of the aircraft. Note how vulnerable the structure is and how secure the pilot is, whether the fuel tanks are armoured, etc. Describe the armour, if there is any, and also mention the vulnerability of other critical aircraft systems.'' --> |
| − | * | + | |
| − | * | + | * 4 mm steel surrounding engine and frontal cooling systems and frontal fuel tank |
| − | + | * 6 mm steel behind propeller hub | |
| + | * 6 mm steel underneath bottom oil cooling system | ||
| + | * 6 mm steel surrounding pilot | ||
| + | * 6 mm steel behind and above pilot's head | ||
| + | * 12 mm steel behind rear fuel tank | ||
| + | * 64 mm bulletproof glass in front of pilot | ||
| + | * Self sealing fuel tanks with neutral gas pressurization system (1 underneath pilot, 1 in front of pilot, 1 behind pilot) | ||
| + | |||
| + | === Modifications and economy === | ||
| + | {{Specs-Economy}} | ||
== Armaments == | == Armaments == | ||
| + | {{Specs-Avia-Armaments}} | ||
=== Offensive armament === | === Offensive armament === | ||
| − | <!--''Describe the offensive armament of the aircraft, if any. Describe how effective the cannons and machine guns are in a battle, and also what belts or drums are better to use. If there is no offensive weaponry, delete this subsection.'' | + | {{Specs-Avia-Offensive}} |
| − | {{main| | + | <!-- ''Describe the offensive armament of the aircraft, if any. Describe how effective the cannons and machine guns are in a battle, and also what belts or drums are better to use. If there is no offensive weaponry, delete this subsection.'' --> |
| + | {{main|VYa-23 (23 mm)|ShKAS (7.62 mm)}} | ||
The '''''{{PAGENAME}}''''' is armed with: | The '''''{{PAGENAME}}''''' is armed with: | ||
| − | * | + | * 2 x 23 mm VYa-23 cannons, wing-mounted (150 rpg = 300 total) |
| − | + | * 2 x 7.62 mm ShKAS machine guns, wing-mounted (750 rpg = 1,500 total) | |
| − | + | ||
| − | ''Describe the aircraft's suspended armament: additional cannons under the wings, bombs, rockets and torpedoes. This section is especially important for bombers and attackers. If there is no suspended weaponry remove this subsection.''--> | + | === Suspended armament === |
| − | + | {{Specs-Avia-Suspended}} | |
| − | + | <!-- ''Describe the aircraft's suspended armament: additional cannons under the wings, bombs, rockets and torpedoes. This section is especially important for bombers and attackers. If there is no suspended weaponry remove this subsection.'' --> | |
| − | + | {{main|AO-25M-1 (25 kg)|FAB-50sv (50 kg)|FAB-100sv (100 kg)|FAB-250sv (250 kg)}} | |
| − | + | {{main|RS-82|RBS-82|RS-132|RBS-132}} | |
| − | -- | + | |
| − | == Usage in | + | The '''''{{PAGENAME}}''''' can be outfitted with the following ordnance: |
| − | <!--''Describe the tactics of playing in | + | |
| + | * Without load | ||
| + | * 12 x 25 kg AO-25M-1 bombs (300 kg total) | ||
| + | * 4 x 50 kg FAB-50sv bombs (200 kg total) | ||
| + | * 4 x 100 kg FAB-100sv bombs (400 kg total) | ||
| + | * 2 x 250 kg FAB-250sv bombs (500 kg total) | ||
| + | * 8 x RS-82 rockets | ||
| + | * 8 x RBS-82 rockets | ||
| + | * 12 x 25 kg AO-25M-1 bombs + 8 x RS-82 rockets (300 kg total) | ||
| + | * 12 x 25 kg AO-25M-1 bombs + 8 x RBS-82 rockets (300 kg total) | ||
| + | * 4 x 50 kg FAB-50sv bombs + 8 x RS-82 rockets (200 kg total) | ||
| + | * 4 x 50 kg FAB-50sv bombs + 8 x RBS-82 rockets (200 kg total) | ||
| + | * 8 x RS-132 rockets | ||
| + | * 8 x RBS-132 rockets | ||
| + | * 4 x 100 kg FAB-100sv bombs + 8 x RS-82 rockets (400 kg total) | ||
| + | * 4 x 100 kg FAB-100sv bombs + 8 x RBS-82 rockets (400 kg total) | ||
| + | * 12 x 25 kg AO-25M-1 bombs + 4 x RS-132 rockets (300 kg total) | ||
| + | * 12 x 25 kg AO-25M-1 bombs + 4 x RBS-132 rockets (300 kg total) | ||
| + | * 4 x 50 kg FAB-50sv bombs + 4 x RS-132 rockets (200 kg total) | ||
| + | * 4 x 50 kg FAB-50sv bombs + 4 x RBS-132 rockets (200 kg total) | ||
| + | * 4 x 100 kg FAB-100sv bombs + 4 x RBS-132 rockets (400 kg total) | ||
| + | * 4 x 100 kg FAB-100sv bombs + 4 x RS-132 rockets (400 kg total) | ||
| + | * 4 x 100 kg FAB-100sv bombs + 8 x RS-132 rockets (400 kg total) | ||
| + | * 4 x 100 kg FAB-100sv bombs + 8 x RBS-132 rockets (400 kg total) | ||
| + | |||
| + | == Usage in battles == | ||
| + | <!-- ''Describe the tactics of playing in the aircraft, the features of using aircraft in a team and advice on tactics. Refrain from creating a "guide" - do not impose a single point of view, but instead, give the reader food for thought. Examine the most dangerous enemies and give recommendations on fighting them. If necessary, note the specifics of the game in different modes (AB, RB, SB).'' --> | ||
| + | |||
| + | The IL-2 is an attacker which excels at low altitude. You'll be flying close to the ground in order to hit your targets with your cannons and machine guns, so watch for obstacles and use the IL-2's phenomenal low-speed performance and tight turning circle to get out of harm's way, though beware of the mediocre roll rate and the weak acceleration. Give yourself time to build up a good amount of speed before going for another attack, otherwise, you'll struggle to climb away. Make note of what targets you can eliminate: light pillboxes can be destroyed by your cannons, and even extended MG fire from your 7.62 mm guns, but other pillboxes will be impossible to destroy with your guns, and bombs will need a direct hit. Likewise, light tanks and armoured cars can be destroyed with your guns, but medium tanks will need to be hit from the top or rear to penetrate the thicker armour, and heavy tanks are invulnerable unless you land a direct bomb or rocket hit. | ||
| + | |||
| + | Your bombs and rockets are best used for tougher targets, like pillboxes and medium/heavy tanks. You lack any sort of bombing reticule in Realistic Battles, so aim carefully and get used to how your rockets fall and their velocity. Overall, your load is still very strong. Direct bomb hits will destroy any sized tank, and your rockets can be devastating against ground convoys, especially with your 8 x RBS-132 rockets. | ||
| + | |||
| + | Another way to play is to select the loadout with the 2 x 250 kg bombs which are a lot more powerful and easier to use than the 100 kg bombs. After dropping your bombs gain some altitude and attack with your guns from a high angle to increase your chances of penetrating the target. This loadout has much less damage potential but takes much less skill. | ||
| + | |||
| + | The armoured cockpit keeps your pilot safe from harm, and while your engine does have a tendency to take damage, you should still be safe from anti-aircraft artillery unless you're exposed to it for too long. The biggest threat posed to the IL-2 is enemy fighters since you're slower and less manoeuvrable than any fighter at this rank. Unlike the later Shturmovik models, you lack any form of defensive armament, so once an interceptor is on you, typically your outlook is grim. Keep an eye on the movement of enemy fighters and use terrain to hide your movements to and from targets if you can. Once intercepted, make use of the IL-2's slow speed to force overshoots, and use the adequate turning capabilities to dodge fire and get around the fighters. If you have a shot, take it: the 23 mm cannons will shred even large heavy fighters with ease. | ||
| + | |||
| + | The IL-2 lacks bombsight, however from this model on these planes have white lines on the engine cover in front of the cockpit. In cockpit camera mode, the pilot can use them to aid themselves in predicting where the bombs will fall. Each line has an indicated altitude at which it can be used written near it. Although this helps a lot with smaller bombs, when using heavier ones the lines won't be very helpful, so diving is better than level bombing when using 250 kg bombs. | ||
| − | ===Manual Engine Control=== | + | === Manual Engine Control === |
{| class="wikitable" style="text-align:center" | {| class="wikitable" style="text-align:center" | ||
|- | |- | ||
! colspan="7" | MEC elements | ! colspan="7" | MEC elements | ||
|- | |- | ||
| − | ! rowspan="2" |Mixer | + | ! rowspan="2" | Mixer |
| − | ! rowspan="2" |Pitch | + | ! rowspan="2" | Pitch |
| − | ! colspan="3" |Radiator | + | ! colspan="3" | Radiator |
| − | ! rowspan="2" |Supercharger | + | ! rowspan="2" | Supercharger |
| − | ! rowspan="2" |Turbocharger | + | ! rowspan="2" | Turbocharger |
|- | |- | ||
| − | ! Oil | + | ! Oil !! Water !! Type |
| − | ! Water | ||
| − | ! Type | ||
|- | |- | ||
| − | | Controllable || | + | | Controllable || Controllable<br>Not auto controlled || Controllable<br>Auto control available || Controllable<br>Auto control available || Separate || Not controllable<br>1 gear || Not controllable |
| − | |||
| − | |||
| − | |||
| − | |||
| − | |||
| − | |||
| − | |||
| − | |||
| − | |||
| − | |||
| − | |||
| − | |||
| − | |||
| − | |||
| − | |||
| − | |||
| − | |||
| − | |||
| − | |||
| − | |||
| − | |||
| − | |||
| − | |||
| − | |||
| − | |||
| − | |||
| − | |||
| − | |||
| − | |||
| − | |||
| − | |||
| − | |||
| − | |||
|- | |- | ||
|} | |} | ||
=== Pros and cons === | === Pros and cons === | ||
| − | <!--''Summarise and briefly evaluate the vehicle | + | <!-- ''Summarise and briefly evaluate the vehicle in terms of its characteristics and combat effectiveness. Mark its pros and cons in the bulleted list. Try not to use more than 6 points for each of the characteristics. Avoid using categorical definitions such as "bad", "good" and the like - use substitutions with softer forms such as "inadequate" and "effective".'' --> |
'''Pros:''' | '''Pros:''' | ||
| − | * | + | |
| + | * Numerous payload arrangements (23) including bombs and rockets of varying size, flexible ground attack options | ||
| + | * Powerful pair 23 mm VYa canons, increased firepower over its [[IL-2 (1941)|predecessor]], ample ammo capacity | ||
| + | * Strong protection surrounds the pilot and engine | ||
| + | * Can be used as a makeshift fighter at higher speeds | ||
| + | * Great turn rate at higher speeds, can out turn Bf 109 series and even C.205s | ||
'''Cons:''' | '''Cons:''' | ||
| − | * | + | |
| + | * Lacks defensive armament | ||
| + | * Heavy plane | ||
| + | * Can't carry bombs larger than 250 kg, difficult to destroy more than one target | ||
| + | * Restricted visibility from the cockpit in Simulator Battles due to protective armour | ||
| + | * Higher battle rating | ||
| + | * Slow acceleration | ||
| + | * Bad energy retention | ||
| + | * Sluggish at low speeds | ||
== History == | == History == | ||
| − | ''Describe the history of the creation and combat usage of the aircraft in more detail than in the introduction. If the historical reference turns out to be too | + | <!-- ''Describe the history of the creation and combat usage of the aircraft in more detail than in the introduction. If the historical reference turns out to be too long, take it to a separate article, taking a link to the article about the vehicle and adding a block "/History" (example: <nowiki>https://wiki.warthunder.com/(Vehicle-name)/History</nowiki>) and add a link to it here using the <code>main</code> template. Be sure to reference text and sources by using <code><nowiki><ref></ref></nowiki></code>, as well as adding them at the end of the article with <code><nowiki><references /></nowiki></code>. This section may also include the vehicle's dev blog entry (if applicable) and the in-game encyclopedia description (under <code><nowiki>=== In-game description ===</nowiki></code>, also if applicable).'' --> |
| + | |||
| + | === In-game description === | ||
| + | The famous IL-2 Sturmovik was a Soviet WWII-era attack aircraft created by the Ilyushin Design Bureau and nicknamed "Hunchback" by Red Army troops due to the distinct fuselage shape. The designers nicknamed their aircraft the "Flying Tank". Luftwaffe pilots, due to the IL-2's incredible ability to withstand battle damage, called it the "Betonflugzeug" or "Concrete Plane". German ground troops, conversely, despised and feared the IL-2, giving it a slew of unpleasant nicknames, such as "Schlachter" (Butcher); "Fleischwolf" (Meatgrinder); "Eiserner Gustav" (Iron Gustav) and "Schwarzer Tod" (the Black Death). Some historians believe that the 'Black Death' was actually a successful invention of the Soviet propaganda machine that caught on with the Germans. | ||
| + | |||
| + | The IL-2 was the most mass-produced military aircraft in history. However, early in the war German air superiority coupled with the absence of rear gunners on early variants and poorly organized Soviet fighter escorts led to high rates of losses for the type. A favorite attack tactic for IL-2 pilots was a low-level attack run, first letting loose with rockets at 600-700 meters, then firing on-board armament from a distance of 400 to 600 meters. Bombs would be dropped in subsequent passes from an altitude of 100-200 meters, using an impact fuse. The recommended tactic for attacking concentrations of soft targets was a strafing run in a shallow dive from 100-200 meters and a subsequent dropping of bombs at low level when exiting the dive. | ||
== Media == | == Media == | ||
| − | '' | + | ''Excellent additions to the article would be video guides, screenshots from the game, and photos.'' |
| + | |||
| + | == See also == | ||
| + | ''Links to the articles on the War Thunder Wiki that you think will be useful for the reader, for example:'' | ||
| − | |||
| − | |||
* ''reference to the series of the aircraft;'' | * ''reference to the series of the aircraft;'' | ||
* ''links to approximate analogues of other nations and research trees.'' | * ''links to approximate analogues of other nations and research trees.'' | ||
| − | |||
| − | == | + | == External links == |
| − | ''Paste links to sources and external resources, such as:'' | + | <!-- ''Paste links to sources and external resources, such as:'' |
* ''topic on the official game forum;'' | * ''topic on the official game forum;'' | ||
| − | * ''page on aircraft | + | * ''encyclopedia page on the aircraft;'' |
| − | * ''other literature.'' | + | * ''other literature.'' --> |
| + | |||
| + | * [https://forum.warthunder.com/index.php?/topic/195737-ilyushin-il-2-1942/ Official data sheet - more details about the performance] | ||
| − | {{USSR | + | {{AirManufacturer Ilyushin}} |
| + | {{USSR strike aircraft}} | ||
Revision as of 20:45, 26 March 2021
| This page is about the Soviet strike aircraft IL-2 (1942). For the captured German version, see IL-2 (1942) (Germany). For other uses, see IL-2 (Family). |
.jpg)
Contents
Description
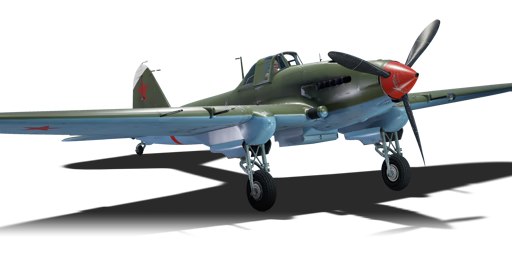
The IL-2 (1942) is a rank II Soviet strike aircraft with a battle rating of 3.0 (AB/RB) and 2.7 (SB). It has been in the game since the start of the Open Beta Test prior to Update 1.27.
General info
Flight performance
| Characteristics | Max Speed (km/h at 2,500 m) |
Max altitude (metres) |
Turn time (seconds) |
Rate of climb (metres/second) |
Take-off run (metres) | |||
|---|---|---|---|---|---|---|---|---|
| AB | RB | AB | RB | AB | RB | |||
| Stock | 406 | 391 | 9500 | 25.9 | 26.7 | 6.2 | 6.2 | 450 |
| Upgraded | 447 | 426 | 24.1 | 24.9 | 11.1 | 8.6 | ||
Details
| Features | ||||
|---|---|---|---|---|
| Combat flaps | Take-off flaps | Landing flaps | Air brakes | Arrestor gear |
| X | X | ✓ | X | X |
| Limits | ||||||
|---|---|---|---|---|---|---|
| Wings (km/h) | Gear (km/h) | Flaps (km/h) | Max Static G | |||
| Combat | Take-off | Landing | + | - | ||
| 620 | 320 | N/A | N/A | 270 | ~15 | ~15 |
| Optimal velocities (km/h) | |||
|---|---|---|---|
| Ailerons | Rudder | Elevators | Radiator |
| < 320 | < 320 | < 370 | > 360 |
| Compressor (RB/SB) | ||
|---|---|---|
| Setting 1 | ||
| Optimal altitude | 100% Engine power | WEP Engine power |
| 1,750 m | 1,500 hp | 1,593 hp |
Survivability and armour
- 4 mm steel surrounding engine and frontal cooling systems and frontal fuel tank
- 6 mm steel behind propeller hub
- 6 mm steel underneath bottom oil cooling system
- 6 mm steel surrounding pilot
- 6 mm steel behind and above pilot's head
- 12 mm steel behind rear fuel tank
- 64 mm bulletproof glass in front of pilot
- Self sealing fuel tanks with neutral gas pressurization system (1 underneath pilot, 1 in front of pilot, 1 behind pilot)
Modifications and economy
| Flight performance | Survivability | Weaponry | ||||||||||||||||||||||||
|---|---|---|---|---|---|---|---|---|---|---|---|---|---|---|---|---|---|---|---|---|---|---|---|---|---|---|
|
|
|
Armaments
Offensive armament
The IL-2 (1942) is armed with:
- 2 x 23 mm VYa-23 cannons, wing-mounted (150 rpg = 300 total)
- 2 x 7.62 mm ShKAS machine guns, wing-mounted (750 rpg = 1,500 total)
Suspended armament
The IL-2 (1942) can be outfitted with the following ordnance:
- Without load
- 12 x 25 kg AO-25M-1 bombs (300 kg total)
- 4 x 50 kg FAB-50sv bombs (200 kg total)
- 4 x 100 kg FAB-100sv bombs (400 kg total)
- 2 x 250 kg FAB-250sv bombs (500 kg total)
- 8 x RS-82 rockets
- 8 x RBS-82 rockets
- 12 x 25 kg AO-25M-1 bombs + 8 x RS-82 rockets (300 kg total)
- 12 x 25 kg AO-25M-1 bombs + 8 x RBS-82 rockets (300 kg total)
- 4 x 50 kg FAB-50sv bombs + 8 x RS-82 rockets (200 kg total)
- 4 x 50 kg FAB-50sv bombs + 8 x RBS-82 rockets (200 kg total)
- 8 x RS-132 rockets
- 8 x RBS-132 rockets
- 4 x 100 kg FAB-100sv bombs + 8 x RS-82 rockets (400 kg total)
- 4 x 100 kg FAB-100sv bombs + 8 x RBS-82 rockets (400 kg total)
- 12 x 25 kg AO-25M-1 bombs + 4 x RS-132 rockets (300 kg total)
- 12 x 25 kg AO-25M-1 bombs + 4 x RBS-132 rockets (300 kg total)
- 4 x 50 kg FAB-50sv bombs + 4 x RS-132 rockets (200 kg total)
- 4 x 50 kg FAB-50sv bombs + 4 x RBS-132 rockets (200 kg total)
- 4 x 100 kg FAB-100sv bombs + 4 x RBS-132 rockets (400 kg total)
- 4 x 100 kg FAB-100sv bombs + 4 x RS-132 rockets (400 kg total)
- 4 x 100 kg FAB-100sv bombs + 8 x RS-132 rockets (400 kg total)
- 4 x 100 kg FAB-100sv bombs + 8 x RBS-132 rockets (400 kg total)
Usage in battles
The IL-2 is an attacker which excels at low altitude. You'll be flying close to the ground in order to hit your targets with your cannons and machine guns, so watch for obstacles and use the IL-2's phenomenal low-speed performance and tight turning circle to get out of harm's way, though beware of the mediocre roll rate and the weak acceleration. Give yourself time to build up a good amount of speed before going for another attack, otherwise, you'll struggle to climb away. Make note of what targets you can eliminate: light pillboxes can be destroyed by your cannons, and even extended MG fire from your 7.62 mm guns, but other pillboxes will be impossible to destroy with your guns, and bombs will need a direct hit. Likewise, light tanks and armoured cars can be destroyed with your guns, but medium tanks will need to be hit from the top or rear to penetrate the thicker armour, and heavy tanks are invulnerable unless you land a direct bomb or rocket hit.
Your bombs and rockets are best used for tougher targets, like pillboxes and medium/heavy tanks. You lack any sort of bombing reticule in Realistic Battles, so aim carefully and get used to how your rockets fall and their velocity. Overall, your load is still very strong. Direct bomb hits will destroy any sized tank, and your rockets can be devastating against ground convoys, especially with your 8 x RBS-132 rockets.
Another way to play is to select the loadout with the 2 x 250 kg bombs which are a lot more powerful and easier to use than the 100 kg bombs. After dropping your bombs gain some altitude and attack with your guns from a high angle to increase your chances of penetrating the target. This loadout has much less damage potential but takes much less skill.
The armoured cockpit keeps your pilot safe from harm, and while your engine does have a tendency to take damage, you should still be safe from anti-aircraft artillery unless you're exposed to it for too long. The biggest threat posed to the IL-2 is enemy fighters since you're slower and less manoeuvrable than any fighter at this rank. Unlike the later Shturmovik models, you lack any form of defensive armament, so once an interceptor is on you, typically your outlook is grim. Keep an eye on the movement of enemy fighters and use terrain to hide your movements to and from targets if you can. Once intercepted, make use of the IL-2's slow speed to force overshoots, and use the adequate turning capabilities to dodge fire and get around the fighters. If you have a shot, take it: the 23 mm cannons will shred even large heavy fighters with ease.
The IL-2 lacks bombsight, however from this model on these planes have white lines on the engine cover in front of the cockpit. In cockpit camera mode, the pilot can use them to aid themselves in predicting where the bombs will fall. Each line has an indicated altitude at which it can be used written near it. Although this helps a lot with smaller bombs, when using heavier ones the lines won't be very helpful, so diving is better than level bombing when using 250 kg bombs.
Manual Engine Control
| MEC elements | ||||||
|---|---|---|---|---|---|---|
| Mixer | Pitch | Radiator | Supercharger | Turbocharger | ||
| Oil | Water | Type | ||||
| Controllable | Controllable Not auto controlled |
Controllable Auto control available |
Controllable Auto control available |
Separate | Not controllable 1 gear |
Not controllable |
Pros and cons
Pros:
- Numerous payload arrangements (23) including bombs and rockets of varying size, flexible ground attack options
- Powerful pair 23 mm VYa canons, increased firepower over its predecessor, ample ammo capacity
- Strong protection surrounds the pilot and engine
- Can be used as a makeshift fighter at higher speeds
- Great turn rate at higher speeds, can out turn Bf 109 series and even C.205s
Cons:
- Lacks defensive armament
- Heavy plane
- Can't carry bombs larger than 250 kg, difficult to destroy more than one target
- Restricted visibility from the cockpit in Simulator Battles due to protective armour
- Higher battle rating
- Slow acceleration
- Bad energy retention
- Sluggish at low speeds
History
In-game description
The famous IL-2 Sturmovik was a Soviet WWII-era attack aircraft created by the Ilyushin Design Bureau and nicknamed "Hunchback" by Red Army troops due to the distinct fuselage shape. The designers nicknamed their aircraft the "Flying Tank". Luftwaffe pilots, due to the IL-2's incredible ability to withstand battle damage, called it the "Betonflugzeug" or "Concrete Plane". German ground troops, conversely, despised and feared the IL-2, giving it a slew of unpleasant nicknames, such as "Schlachter" (Butcher); "Fleischwolf" (Meatgrinder); "Eiserner Gustav" (Iron Gustav) and "Schwarzer Tod" (the Black Death). Some historians believe that the 'Black Death' was actually a successful invention of the Soviet propaganda machine that caught on with the Germans.
The IL-2 was the most mass-produced military aircraft in history. However, early in the war German air superiority coupled with the absence of rear gunners on early variants and poorly organized Soviet fighter escorts led to high rates of losses for the type. A favorite attack tactic for IL-2 pilots was a low-level attack run, first letting loose with rockets at 600-700 meters, then firing on-board armament from a distance of 400 to 600 meters. Bombs would be dropped in subsequent passes from an altitude of 100-200 meters, using an impact fuse. The recommended tactic for attacking concentrations of soft targets was a strafing run in a shallow dive from 100-200 meters and a subsequent dropping of bombs at low level when exiting the dive.
Media
Excellent additions to the article would be video guides, screenshots from the game, and photos.
See also
Links to the articles on the War Thunder Wiki that you think will be useful for the reader, for example:
- reference to the series of the aircraft;
- links to approximate analogues of other nations and research trees.
External links
| Ilyushin Design Bureau (Илью́шинa Опытное конструкторское бюро) | |
|---|---|
| Bombers | DB-3B · IL-4 |
| Jet Bombers | IL-28* · IL-28Sh |
| Strike Aircraft | IL-8 (1944) |
| Il-2 | IL-2 (1941) · IL-2 (1942) · IL-2M type 3 · IL-2M "Avenger" · IL-2M (1943) · IL-2-37 · IL-2 M-82 |
| Il-10 | IL-10 · IL-10 (1946) |
| Export/Captured | |
| Bombers | ␗DB-3A · ◊IL-28 · ◔IL-28 |
| Strike Aircraft | ▀IL-2 (1942) · ␗IL-10 (1946) · ◔IL-10 |
| * The Chinese Harbin Aircraft Manufacturing Corporation built unlicensed copies of the Il-28 known as the H-5. | |
| USSR strike aircraft | |
|---|---|
| IL-2 | IL-2 (1941) · IL-2 (1942) · IL-2M (1943) · IL-2M type 3 · IL-2M "Avenger" · IL-2-37 · IL-2 M-82 |
| IL-8 | IL-8 (1944) |
| IL-10 | IL-10 · IL-10 (1946) |
| Pe-3 | Pe-3 (e) · Pe-3 · Pe-3bis |
| Su-2 | BB-1 · Su-2 MV-5 · Su-2 TSS-1 · Su-2 (M-82) |
| Su-6 | Su-6 · Su-6 (AM-42) · Su-6 (M-71F) |
| Su-8 | Su-8 |
| Tandem MAI | Tandem MAI |
| TIS MA | TIS MA |
| Tu-1 | Tu-1 |
| Yak-2 | Yak-2 KABB |
