Difference between revisions of "IJN Yuudachi"
m (Gameplay) |
Jareel_Skaj (talk | contribs) |
||
| (18 intermediate revisions by 7 users not shown) | |||
| Line 1: | Line 1: | ||
{{Specs-Card | {{Specs-Card | ||
|code=jp_destroyer_yuudachi | |code=jp_destroyer_yuudachi | ||
| − | |||
|market=IJN Yuudachi (Japan) | |market=IJN Yuudachi (Japan) | ||
}} | }} | ||
== Description == | == Description == | ||
| − | <!-- | + | <!--In the first part of the description, cover the history of the ship's creation and military application. In the second part, tell the reader about using this ship in the game. Add a screenshot. If a beginner player has a hard time remembering vehicles by name, a picture will help them identify the ship in question.--> |
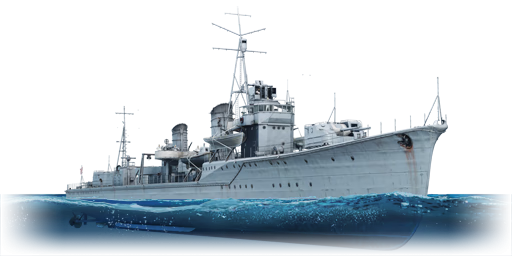
| − | The '''{{Specs|name}}''' | + | [[File:GarageImage_{{PAGENAME}}.jpg|420px|thumb|left]] |
| − | + | {{break}} | |
| − | + | The '''{{Specs|name}}''' is a gift rank {{Specs|rank}} Japanese destroyer {{Battle-rating}}. It was introduced during [[Update 1.89 "Imperial Navy"]] as a reward for the [[wt:en/news/6293/current|Operation H.E.A.T event]]. | |
== General info == | == General info == | ||
=== Survivability and armour === | === Survivability and armour === | ||
| − | + | ''Talk about the vehicle's armour. Note the most well-defended and most vulnerable zones, e.g. the ammo magazine. Evaluate the composition of components and assemblies responsible for movement and manoeuvrability. Evaluate the survivability of the primary and secondary armament separately. Don't forget to mention the size of the crew, which plays an important role in fleet mechanics. Save tips for preserving survivability in the "Use in battle" section.'' | |
| − | ''Talk about the vehicle's armour. Note the most well-defended and most vulnerable zones, e.g. the ammo magazine. Evaluate the composition of components and assemblies responsible for movement and manoeuvrability. Evaluate the survivability of the primary and secondary | + | |
| + | ''If necessary, use a graphics template to show the most well-protected or most vulnerable points in the armour.'' | ||
=== Mobility === | === Mobility === | ||
| − | + | ''Write about the ship's mobility. Evaluate its power and manoeuvrability, rudder rerouting speed, stopping speed at full tilt, with its maximum forward speed and reverse speed.'' | |
| − | ''Write about the ship's mobility. Evaluate its power and manoeuvrability, rudder rerouting speed, stopping speed at full tilt, with its maximum forward and reverse speed.'' | ||
| − | |||
| − | |||
| − | |||
| − | |||
| − | |||
| − | |||
| − | |||
| − | |||
| − | |||
| − | |||
== Armament == | == Armament == | ||
| − | |||
=== Primary armament === | === Primary armament === | ||
| − | {{ | + | {{main|Type 3 (127 mm)}} |
| − | + | ''Provide information about the characteristics of the primary armament. Evaluate their efficacy in battle based on their reload speed, ballistics and the capacity of their shells.'' | |
| − | |||
| − | + | ''Broadly describe the ammunition available for the primary armament, and provide recommendations on how to use it and which ammunition to choose.'' | |
| − | |||
| − | |||
| − | |||
| − | |||
=== Secondary armament === | === Secondary armament === | ||
| − | |||
| − | |||
{{main|40 mm/62 Vickers (40 mm)}} | {{main|40 mm/62 Vickers (40 mm)}} | ||
| + | ''Some ships are fitted with weapons of various calibres. The secondary armament is defined as the weapon chosen with the control <code>Select secondary weapon</code>. Evaluate the secondary armament and give advice on how to use them. Describe the ammunition available for the secondary armament. Provide recommendations on how to use them and which ammunition to choose. Remember that anti-air armament, even heavy calibre weapons, belong in the next section.'' | ||
| − | + | === Torpedo armament === | |
| − | + | {{main|Type 93 Model 1, Mod 2}} | |
| − | + | ''Torpedoes launchers are standard equipment on many ships and boats. Torpedoes are a significant means of defeating an opponent. Evaluate the position of the torpedo launchers, discuss the ammunition available, firing specifics such as dead zones, features of the torpedoes themselves, etc.'' | |
| − | === | + | === Special armament === |
| − | + | {{main|Type 95 depth charge}} | |
| − | + | ''Depth charges, mines, rocket launchers and missiles are also effective in skilled hands and can take an off-guard opponent by surprise. Evaluate the ammunition of this type of armament and rate its performance in combat.'' | |
| − | {{main | ||
| − | |||
| − | |||
| − | |||
| − | |||
| − | |||
| − | |||
== Usage in battles == | == Usage in battles == | ||
| − | + | ''Describe the technique of using this ship, the characteristics of her use in a team and tips on strategy. Abstain from writing an entire guide – don't try to provide a single point of view, but give the reader food for thought. Talk about the most dangerous opponents for this vehicle and provide recommendations on fighting them. If necessary, note the specifics of playing with this vehicle in various modes (AB, RB, SB).'' | |
| − | |||
| − | |||
| − | |||
| − | |||
| − | + | ===Modules=== | |
| + | {| class="wikitable" | ||
| + | ! Tier | ||
| + | ! Seakeeping | ||
| + | ! colspan="2" | Unsinkability | ||
| + | ! colspan="3" | Firepower | ||
| + | |- | ||
| + | | I | ||
| + | | Dry-Docking | ||
| + | | Tool Set|| | ||
| + | | ||40 mm HE clips|| | ||
| + | |- | ||
| + | | II | ||
| + | | Rudder Replacement | ||
| + | | Fire Protection System||Smokescreen | ||
| + | | 127 mm Type 1 HE||40 mm SAP clips||Auxiliary Armament Targeting | ||
| + | |- | ||
| + | | III | ||
| + | | Propeller Replacement | ||
| + | | Shrapnel Protection||Ventilation | ||
| + | | Improved Rangefinder||40 mm HE-DF clips||Primary Armament Targeting | ||
| + | |- | ||
| + | | IV | ||
| + | | Engine Maintenance | ||
| + | | New Pumps||Ammo Wetting | ||
| + | | Bomb mortar|||| | ||
| + | |- | ||
| + | |} | ||
=== Pros and cons === | === Pros and cons === | ||
| − | + | ''Summarise and briefly evaluate the vehicle in terms of its characteristics and combat effectiveness. Mark its pros and cons in the bulleted list. Try not to use more than 6 points for each of the characteristics. Avoid using categorical definitions such as "bad", "good" and the like - use substitutions with softer forms such as "inadequate" and "effective".'' | |
'''Pros:''' | '''Pros:''' | ||
| − | + | * | |
| − | * | ||
| − | |||
| − | |||
| − | |||
| − | |||
| − | |||
'''Cons:''' | '''Cons:''' | ||
| − | + | * | |
| − | * | ||
| − | |||
| − | |||
| − | |||
== History == | == History == | ||
| − | <!-- | + | <!--Describe the history of the creation and combat usage of the ship in more detail than in the introduction. If the historical reference turns out to be too long, take it to a separate article, taking a link to the article about the ship and adding a block "/ History" (example: <nowiki>https://wiki.warthunder.com/(Ship-name)/History</nowiki>) and add a link to it here using the <code>main</code> template. Be sure to reference text and sources by using <code><nowiki><ref></ref></nowiki></code>, as well as adding them at the end of the article with <code><nowiki><references /></nowiki></code>. This section may also include the ship's dev blog entry (if applicable) and the in-game encyclopedia description (under <code><nowiki>=== In-game description ===</nowiki></code>, also if applicable).--> |
| − | The Yūdachi is one of the Shiratsuyu-class destroyers designed with consideration in the restrictions of the London Naval Treaty in place during the period of 1933-1937. All ten destroyers of this class had histories replete with adventure and combat. They were active in | + | The Yūdachi is one of the Shiratsuyu-class destroyers designed with consideration in the restrictions of the London Naval Treaty in place during the period of 1933-1937. All ten destroyers of this class had histories replete with adventure and combat. They were active in Japan’s naval war in the Pacific ocean, the conquests in the Philippines and Indonesia, and the battles of Midway and Guadalcanal. |
| − | Especially noteworthy is the | + | Especially noteworthy is the Yūdachi’s final battle in November of 1942, when, after a nocturnal assault, the small ship found herself at the head of a large squadron that had literally collided head first with American ships defending the Solomon Islands. The American formation was thrown into chaos by this unexpected encounter between fleets. Ships from the opposing sides began to manoeuvre, changed course, and eventually became inextricably intermingled. This led to a horrific 40-minute close combat, in which the Yūdachi found herself behind the enemy front line. Seeing that the squadron’s flagship, the battleship Hiei, was taking heavy fire, the commander of the Yūdachi steered his ship into the thickest part of the battle. The destroyer wound up between two ships, both of which attacked her at once: the USS Juneau, a light cruiser, and the USS Aaron Ward, a destroyer. Taking hit after hit, the Yūdachi tried to torpedo the Juneau. The next torpedo volley hit the USS Portland, the hull of which was massively breached as a result. Parts of the damaged aft section caused a “bump steer,” and the ship could only move in circles until the end of the battle. Unceasingly firing her artillery at the enemy ships, the Yūdachi mistook the destroyer USS Sterett for a friendly vessel, where she paid for her mistake – the Sterett disabled the Japanese ship’s powertrain with a torpedo volley, immobilising the Yūdachi where surviving crew members were evacuated. It wasn’t until the following morning that the heavy cruiser the USS Portland, which had been hit by the little destroyer, sank the brave ship with six volleys. |
''- From [[wt:en/news/6299/current|Devblog]]'' | ''- From [[wt:en/news/6299/current|Devblog]]'' | ||
== Media == | == Media == | ||
| − | + | ''Excellent additions to the article would be video guides, screenshots from the game, and photos.'' | |
| − | |||
| − | |||
| − | |||
== See also == | == See also == | ||
| − | ''Links to articles on the War Thunder Wiki that you think will be useful for the reader, for example:'' | + | ''Links to the articles on the War Thunder Wiki that you think will be useful for the reader, for example:'' |
* ''reference to the series of the ship;'' | * ''reference to the series of the ship;'' | ||
* ''links to approximate analogues of other nations and research trees.'' | * ''links to approximate analogues of other nations and research trees.'' | ||
== External links == | == External links == | ||
| − | <!-- | + | <!--Paste links to sources and external resources, such as: |
* ''topic on the official game forum;'' | * ''topic on the official game forum;'' | ||
| − | * ''other literature.'' --> | + | * ''encyclopedia page on the ship;'' |
| − | + | * ''other literature.''--> | |
| − | * [[wt:en/news/6299/current|[Development] Yūdachi: The nightmare of the Solomon Islands]] | + | * [[wt:en/news/6299/current|[Development<nowiki>]</nowiki> Yūdachi: The nightmare of the Solomon Islands]] |
| − | |||
{{Japan destroyers}} | {{Japan destroyers}} | ||
{{Japan premium ships}} | {{Japan premium ships}} | ||
Revision as of 16:31, 10 May 2020
Contents
Description

The Shiratsuyu-class, IJN Yuudachi, 1942 is a gift rank III Japanese destroyer
with a battle rating of 4.7 (AB/RB/SB). It was introduced during Update 1.89 "Imperial Navy" as a reward for the Operation H.E.A.T event.
General info
Survivability and armour
Talk about the vehicle's armour. Note the most well-defended and most vulnerable zones, e.g. the ammo magazine. Evaluate the composition of components and assemblies responsible for movement and manoeuvrability. Evaluate the survivability of the primary and secondary armament separately. Don't forget to mention the size of the crew, which plays an important role in fleet mechanics. Save tips for preserving survivability in the "Use in battle" section.
If necessary, use a graphics template to show the most well-protected or most vulnerable points in the armour.
Mobility
Write about the ship's mobility. Evaluate its power and manoeuvrability, rudder rerouting speed, stopping speed at full tilt, with its maximum forward speed and reverse speed.
Armament
Primary armament
Provide information about the characteristics of the primary armament. Evaluate their efficacy in battle based on their reload speed, ballistics and the capacity of their shells.
Broadly describe the ammunition available for the primary armament, and provide recommendations on how to use it and which ammunition to choose.
Secondary armament
Some ships are fitted with weapons of various calibres. The secondary armament is defined as the weapon chosen with the control Select secondary weapon. Evaluate the secondary armament and give advice on how to use them. Describe the ammunition available for the secondary armament. Provide recommendations on how to use them and which ammunition to choose. Remember that anti-air armament, even heavy calibre weapons, belong in the next section.
Torpedo armament
Torpedoes launchers are standard equipment on many ships and boats. Torpedoes are a significant means of defeating an opponent. Evaluate the position of the torpedo launchers, discuss the ammunition available, firing specifics such as dead zones, features of the torpedoes themselves, etc.
Special armament
Depth charges, mines, rocket launchers and missiles are also effective in skilled hands and can take an off-guard opponent by surprise. Evaluate the ammunition of this type of armament and rate its performance in combat.
Usage in battles
Describe the technique of using this ship, the characteristics of her use in a team and tips on strategy. Abstain from writing an entire guide – don't try to provide a single point of view, but give the reader food for thought. Talk about the most dangerous opponents for this vehicle and provide recommendations on fighting them. If necessary, note the specifics of playing with this vehicle in various modes (AB, RB, SB).
Modules
| Tier | Seakeeping | Unsinkability | Firepower | |||
|---|---|---|---|---|---|---|
| I | Dry-Docking | Tool Set | 40 mm HE clips | |||
| II | Rudder Replacement | Fire Protection System | Smokescreen | 127 mm Type 1 HE | 40 mm SAP clips | Auxiliary Armament Targeting |
| III | Propeller Replacement | Shrapnel Protection | Ventilation | Improved Rangefinder | 40 mm HE-DF clips | Primary Armament Targeting |
| IV | Engine Maintenance | New Pumps | Ammo Wetting | Bomb mortar | ||
Pros and cons
Summarise and briefly evaluate the vehicle in terms of its characteristics and combat effectiveness. Mark its pros and cons in the bulleted list. Try not to use more than 6 points for each of the characteristics. Avoid using categorical definitions such as "bad", "good" and the like - use substitutions with softer forms such as "inadequate" and "effective".
Pros:
Cons:
History
The Yūdachi is one of the Shiratsuyu-class destroyers designed with consideration in the restrictions of the London Naval Treaty in place during the period of 1933-1937. All ten destroyers of this class had histories replete with adventure and combat. They were active in Japan’s naval war in the Pacific ocean, the conquests in the Philippines and Indonesia, and the battles of Midway and Guadalcanal.
Especially noteworthy is the Yūdachi’s final battle in November of 1942, when, after a nocturnal assault, the small ship found herself at the head of a large squadron that had literally collided head first with American ships defending the Solomon Islands. The American formation was thrown into chaos by this unexpected encounter between fleets. Ships from the opposing sides began to manoeuvre, changed course, and eventually became inextricably intermingled. This led to a horrific 40-minute close combat, in which the Yūdachi found herself behind the enemy front line. Seeing that the squadron’s flagship, the battleship Hiei, was taking heavy fire, the commander of the Yūdachi steered his ship into the thickest part of the battle. The destroyer wound up between two ships, both of which attacked her at once: the USS Juneau, a light cruiser, and the USS Aaron Ward, a destroyer. Taking hit after hit, the Yūdachi tried to torpedo the Juneau. The next torpedo volley hit the USS Portland, the hull of which was massively breached as a result. Parts of the damaged aft section caused a “bump steer,” and the ship could only move in circles until the end of the battle. Unceasingly firing her artillery at the enemy ships, the Yūdachi mistook the destroyer USS Sterett for a friendly vessel, where she paid for her mistake – the Sterett disabled the Japanese ship’s powertrain with a torpedo volley, immobilising the Yūdachi where surviving crew members were evacuated. It wasn’t until the following morning that the heavy cruiser the USS Portland, which had been hit by the little destroyer, sank the brave ship with six volleys.
- From Devblog
Media
Excellent additions to the article would be video guides, screenshots from the game, and photos.
See also
Links to the articles on the War Thunder Wiki that you think will be useful for the reader, for example:
- reference to the series of the ship;
- links to approximate analogues of other nations and research trees.
External links
| Japan destroyers | |
|---|---|
| IJN | |
| Momi-class | IJN Momi |
| Mutsuki-class | IJN Mutsuki · IJN Satsuki |
| Fubuki-class | IJN Ayanami |
| Hatsuharu-class | IJN Hatsuharu · IJN Nenohi |
| Shiratsuyu-class | IJN Yuudachi |
| Yugumo-class | IJN Yugumo · IJN Hayanami · IJN Kiyoshimo |
| Shimakaze-class | IJN Shimakaze |
| Akizuki-class | IJN Akizuki · IJN Hatsuzuki |
| JMSDF | |
| Ariake-class* | JDS Yūgure (DD-184) |
| Harukaze-class | JDS Harukaze (DD-101) |
| * Modified Fletcher-class destroyers | |
| Japan premium ships | |
|---|---|
| Motor torpedo boats | Type T-14 (mod. 1) · Type T-51a |
| Motor gun boats | Type 4 (Mod 4) · PG 02 |
| Sub-chasers | Type K-8 No.13 |
| Frigates | Akebono |
| Destroyers | IJN Satsuki · IJN Nenohi · IJN Hayanami · IJN Kiyoshimo · IJN Yuudachi · JDS Yūgure (DD-184) |
| Light cruisers | IJN Yubari · IJN Mikuma |
| Heavy cruisers | IJN Myoko |
| Battleships | IJN Yamashiro |
