Difference between revisions of "IJN Yugumo"
(→Pros and cons) |
Jareel_Skaj (talk | contribs) |
||
| (19 intermediate revisions by 7 users not shown) | |||
| Line 1: | Line 1: | ||
{{Specs-Card|code=jp_destroyer_yugumo}} | {{Specs-Card|code=jp_destroyer_yugumo}} | ||
| − | + | {{About | |
| + | | about = Japanese destroyer '''{{PAGENAME}}''' | ||
| + | | usage = other uses | ||
| + | | link = Yugumo (Family) | ||
| + | }} | ||
== Description == | == Description == | ||
<!--In the first part of the description, cover the history of the ship’s creation and military application. In the second part, tell the reader about using this ship in the game. Add a screenshot. If a beginner player has a hard time remembering vehicles by name, a picture will help them identify the ship in question.--> | <!--In the first part of the description, cover the history of the ship’s creation and military application. In the second part, tell the reader about using this ship in the game. Add a screenshot. If a beginner player has a hard time remembering vehicles by name, a picture will help them identify the ship in question.--> | ||
| Line 9: | Line 13: | ||
== General info == | == General info == | ||
=== Survivability and armour === | === Survivability and armour === | ||
| − | ''Talk about the vehicle's armour. Note the most well-defended and most vulnerable zones, e.g. the ammo magazine. Evaluate the composition of components and assemblies responsible for movement and manoeuvrability. Evaluate the survivability of the primary and secondary armament separately. Don't forget to mention the size of the crew, which plays an important role in fleet mechanics. Save tips for preserving survivability in the "Use in battle" section.'' | + | <!-- ''Talk about the vehicle's armour. Note the most well-defended and most vulnerable zones, e.g. the ammo magazine. Evaluate the composition of components and assemblies responsible for movement and manoeuvrability. Evaluate the survivability of the primary and secondary armament separately. Don't forget to mention the size of the crew, which plays an important role in fleet mechanics. Save tips for preserving survivability in the "Use in battle" section.'' |
| − | ''If necessary, use a graphics template to show the most well-protected or most vulnerable points in the armour.'' | + | ''If necessary, use a graphics template to show the most well-protected or most vulnerable points in the armour.'' --> |
| + | [[File:Yugumo tight turn.png|thumb|left|Fully-spaded {{PAGENAME}} is both: fast and manoeuvrable, allowing it to quickly face the enemy for an optimal torpedo deployment]] | ||
| + | {{PAGENAME}} upgrades over [[IJN Ayanami]] in survivability, primarily due to its lower profile, but also higher crew count. Notably Yugumo has a much lower freeboard, lower forecastle and much smaller smoke funnels. This in effect gives it a better chance of avoiding enemy fire, especially at the long range, even though overall it is a longer ship. Additionally its survivability further is aided by having ammunition stored deep underneath the water line, what ensures survival if faced with AP shells, and having torpedo turrets protected against fragmentation damage, though they are still one of the easiest components to damage on the ship. | ||
| + | |||
| + | That said though, comparing to the equivalents in its BR, the ship has a relatively low crew count, sailing just a 2/3 of the [[Leningrad (leader)|Leningrad]] men, in a short-range fights Yugumo has to rely on its overwhelming firepower to take down the enemy before suffering overwhelming causalities itself. | ||
=== Mobility === | === Mobility === | ||
| − | ''Write about the ship’s mobility. Evaluate its power and manoeuvrability, rudder rerouting speed, stopping speed at full tilt, with its maximum forward speed and reverse speed.'' | + | <!--''Write about the ship’s mobility. Evaluate its power and manoeuvrability, rudder rerouting speed, stopping speed at full tilt, with its maximum forward speed and reverse speed.''--> |
| + | Stock Yugumo has a maximum speed of 58 km/h, which upgrades to 79 km/s with all the seakeeping modifications. Overall its relatively comparable with equivalents in other nations, if not slightly slower, though the differences are within 5% range between most of the destroyers in the same BR. Maximum reverse speed is -23 km/s stock and -31 km/h spaded. | ||
| + | |||
| + | {| class="wikitable" | ||
| + | ! rowspan="2" | Modules | ||
| + | ! rowspan="2" | Crew skill | ||
| + | ! colspan="5" style="text-align: center;" | Time till (seconds) | ||
| + | ! colspan="2" style="text-align: center;" | Speed (km/h) | ||
| + | |- | ||
| + | ! 10 km/h | ||
| + | ! Flank ahead | ||
| + | ! -10 km/h | ||
| + | ! Full back | ||
| + | ! 180° turn | ||
| + | ! Flank ahead | ||
| + | ! Full back | ||
| + | |- | ||
| + | | Stock | ||
| + | | 0 | ||
| + | | 5.57 | ||
| + | | 30.17 | ||
| + | | 5.50 | ||
| + | | 14.17 | ||
| + | | 50.50 | ||
| + | | 58 | ||
| + | | 23 | ||
| + | |- | ||
| + | | Spaded | ||
| + | | 0 | ||
| + | | 4.03 | ||
| + | | 29.70 | ||
| + | | 3.90 | ||
| + | | 14.17 | ||
| + | | 28.17 | ||
| + | | 80 | ||
| + | | 31 | ||
| + | |} | ||
| + | |||
| + | {{clear}} | ||
== Armament == | == Armament == | ||
| + | [[File:Yugumo Main guns.jpg|thumb|right|[[Type 3 (127 mm)|Primary guns]] firing with other weapon systems clearly visible on the hull]] | ||
=== Primary armament === | === Primary armament === | ||
| − | ''Provide information about the characteristics of the primary armament. Evaluate their efficacy in battle based on their reload speed, ballistics and the capacity of their shells. Add a link to the main article about the weapon: <code><nowiki>{{main|Weapon name (calibre)}}</nowiki></code>. | + | {{main|Type 3 (127 mm)}} |
| − | + | <!-- ''Provide information about the characteristics of the primary armament. Evaluate their efficacy in battle based on their reload speed, ballistics and the capacity of their shells. Add a link to the main article about the weapon: <code><nowiki>{{main|Weapon name (calibre)}}</nowiki></code>. Broadly describe the ammunition available for the primary armament, and provide recommendations on how to use it and which ammunition to choose.'' --> | |
| − | + | Yugumo's primary guns are shared with [[IJN Ayanami#Primary armament|Ayanami]], offering the same capabilities and the same shell choice. Despite of being in a higher BR the ship stands a fair chance against its counterparts, though with increasingly challenging opponents and added care has to be put in an accurate gunnery and torpedoes play an even more important role in disposing opponents. | |
=== Secondary armament === | === Secondary armament === | ||
| − | + | <!--Some ships are fitted with weapons of various calibres. Secondary armaments are defined as weapons chosen with the control <code>Select secondary weapon</code>. Evaluate the secondary armaments and give advice on how to use them. Describe the ammunition available for the secondary armament. Provide recommendations on how to use them and which ammunition to choose. Remember that any anti-air armament, even heavy calibre weapons, belong in the next section. If there is no secondary armament, remove this section.--> | |
| + | {{main|25 mm/60 Type 96 (25 mm)}} | ||
| − | + | The Yugumo is equipped with two twin mountings of the 25 mm Type 96 autocannon. Its setup clearly plays a primary role as an anti-aircraft weaponry, having turrets located to provide optimal AA coverage, however they are classified as an auxiliary armament and will use those crew skills instead of anti-aircraft. The high-explosive type rounds this gun fires will have no trouble knocking out any airplane it hits. AP type rounds are also available and can be used against small torpedo boats that want to sneak. Each twin mounting is placed on side of the ship which mean they can't shoot at the same target unless its aircraft. | |
| − | + | * Universal belts: good balance between firepower and tracer contents, useful for newcomers to the Japanese 25 mm autocannon. | |
| − | + | * APT belts: Full of AP shells, good against boats but you might not meet lots of them in destroyer. | |
| + | * HEI belts: Trades tracer rounds for extra firepower, harder to aim but very good at knocking out aircraft. | ||
| − | ''If there is no | + | === Torpedo armament === |
| + | [[File:Yugumo torpedoes.jpg|thumb|right|Front torpedo turret releasing Type 93s, with both 25 mm/60 Type 96 visible]] | ||
| + | {{main|Type 93 Model 1, Mod 2 (610 mm)}} | ||
| + | <!-- | ||
| + | ''Torpedoes launchers are standard equipment on many ships and boats. Torpedoes are a significant means of defeating an opponent. Evaluate the position of the torpedo launchers, discuss the ammunition available, firing specifics such as dead zones, features of the torpedoes themselves, etc. If there is no torpedo armament, remove this section.'' --> | ||
| − | + | Unlike its predecessors, Yugumo uses a new, Type 93 Model 1, Mod 2 torpedoes. Those are much more powerful, having over 30% more explosive power, which enables it to sink nearly any destroyer with a single hit. To compare with equivalents of other nations, Yugumo's torpedoes have an equivalent of 627.2 kg TNT, while German [[G7a (533 mm)|G7a]] has 358.4 kg, British [[Mk.IX (533 mm)|Mk.IX]] has 340kg or US [[Mk.15 (533 mm)|Mk.15]] has 224 kg, all also having much lower range and slower speed. It's one of the best torpedoes available, bested only by [[Type 93 Model 3 (610 mm)|Type 93 Model 3]] or more modern anti-ship torpedoes, such as [[Mk.16 (533 mm)|Mk.16]]. | |
| − | |||
| − | + | {| class="wikitable sortable" | |
| + | ! class="unsortable" | | ||
| + | ! class="unsortable" | | ||
| + | ! Number<br>per turret | ||
| + | ! Mass (kg) | ||
| + | ! Maximum speed in water (km/h) | ||
| + | ! Travel Distance (km) | ||
| + | ! Explosive TNT equivalent (kg) | ||
| + | |- | ||
| + | | Type 90 | ||
| + | | [[IJN Ayanami]] [[IJN Mutsuki]] | ||
| + | | 3 | ||
| + | | 2540 | ||
| + | | 85 | ||
| + | | 7 | ||
| + | | 480 | ||
| + | |- | ||
| + | | Type 90 + Torpedo Mode | ||
| + | | [[IJN Ayanami]] [[IJN Mutsuki]] | ||
| + | | 3 | ||
| + | | 2540 | ||
| + | | 65 | ||
| + | | 15 | ||
| + | | 480 | ||
| + | |- | ||
| + | | Type 93 Model 1, Mod 2 | ||
| + | | [[IJN Yugumo]] | ||
| + | | 4 | ||
| + | | 2700 | ||
| + | | 91 | ||
| + | | 20 | ||
| + | | 627.2 | ||
| + | |- | ||
| + | | Type 93 Model 3 | ||
| + | | [[IJN Akizuki]] | ||
| + | | 4 | ||
| + | | 2800 | ||
| + | | 91 | ||
| + | | 15 | ||
| + | | 998.4 | ||
| + | |} | ||
=== Special armament === | === Special armament === | ||
| − | ''Depth charges, mines, rocket launchers and missiles are also effective in skilled hands and can take an off-guard opponent by surprise. Evaluate the ammunition of this type of armament and rate its performance in combat.'' | + | [[File:Yugumo Depth Charges Distance.jpg|thumb|right|Explosion size and distance of the depth charges released from Yugumo with a minimal fuze time]] |
| + | {{main|Type 95 depth charge}} | ||
| + | <!-- ''Depth charges, mines, rocket launchers and missiles are also effective in skilled hands and can take an off-guard opponent by surprise. Evaluate the ammunition of this type of armament and rate its performance in combat.'' --> | ||
| + | Yugumo has a tire IV modification available that unlocks the Bomb Mortar, allowing it to equip 8 Type 95 depth charges. All are stored above deck and ejected pneumatically to either port or starbord, up to four on each side. | ||
| + | |||
| + | Depth charges currently have an extremely limited use, having no submarines in the game and being limited to a combination of a static position where they were dropped at, and a specific time at which enemy has to arrive in order to risk any damage from the charge. Realistically it should be the last modification researched on the ship, as it provides no palatable benefit during the gameplay. | ||
== Usage in battles == | == Usage in battles == | ||
| − | ''Describe the technique of using this ship, the characteristics of her use in a team and tips on strategy. Abstain from writing an entire guide – don’t try to provide a single point of view, but give the reader food for thought. Talk about the most dangerous opponents for this vehicle and provide recommendations on fighting them. If necessary, note the specifics of playing with this vehicle in various modes (AB, RB, SB).'' | + | <!-- ''Describe the technique of using this ship, the characteristics of her use in a team and tips on strategy. Abstain from writing an entire guide – don’t try to provide a single point of view, but give the reader food for thought. Talk about the most dangerous opponents for this vehicle and provide recommendations on fighting them. If necessary, note the specifics of playing with this vehicle in various modes (AB, RB, SB).'' --> |
| + | {{PAGENAME}} is one of the most formidable destroyers, owning it largely to its outstanding torpedo armament, but also otherwise well-rounded mix of survivability, mobility and the firepower. Due to lack of AP rounds and a relatively low crew compliment Cruisers are its absolute bane, being able to one-shot it with a single lucky salvo, while themselves not having to worry much about anything but torpedoes. Like all torpedo-centric destroyers Yugumo excels in Arcade Battles with an ability to re-spawn torpedoes mid-battle, while having much tougher time in Realistic Battles. | ||
| + | |||
| + | ===Modules=== | ||
| + | {| class="wikitable" | ||
| + | ! Tier | ||
| + | ! Seakeeping | ||
| + | ! colspan="2" | Unsinkability | ||
| + | ! colspan="3" | Firepower | ||
| + | |- | ||
| + | | I | ||
| + | | Dry-Docking | ||
| + | | Tool Set|| | ||
| + | | 25 mm APT belt|||| | ||
| + | |- | ||
| + | | II | ||
| + | | Rudder Replacement | ||
| + | | Fire Protection System||Smokescreen | ||
| + | | 25 mm HEIT belts||Auxiliary Armament Targeting||127 mm Type 1 HE | ||
| + | |- | ||
| + | | III | ||
| + | | Propeller Replacement | ||
| + | | Shrapnel Protection||Ventilation | ||
| + | | Improved Rangefinder||Primary Armament Targeting|| | ||
| + | |- | ||
| + | | IV | ||
| + | | Engine Maintenance | ||
| + | | New Pumps||Ammo Wetting | ||
| + | | Bomb mortar|||| | ||
| + | |- | ||
| + | |} | ||
| + | As always, the highest priority in modification research should be put on Tool Set and FPE. Beyond that primary focus should be on Unsinkability part of the tree, possibly with an addition of Rudder Replacement. Note that Targeting upgrades are not mandatory, as guns can keep up with a turning rate of even a fully upgraded Seakeeping. Finally, as with all of the destroyers, Bomb mortar is the least important upgrade of the bunch. | ||
=== Pros and cons === | === Pros and cons === | ||
| − | + | <!--Summarize and briefly evaluate the vehicle in terms of its characteristics and combat effectiveness. Mark its pros and cons in the bulleted list. Try not to use more than 6 points for each of the characteristics. Avoid using categorical definitions such as "bad", "good" and the like - use substitutions with softer forms such as "inadequate" and "effective".--> | |
'''Pros:''' | '''Pros:''' | ||
| − | |||
* Can release 8 torpedoes at once | * Can release 8 torpedoes at once | ||
| + | * One of the best torpedoes (Long Lance) | ||
| + | * Good mobility | ||
| + | * Small profile | ||
'''Cons:''' | '''Cons:''' | ||
| − | + | * No access to armour-piercing shells | |
| − | * | + | * Weak anti-aircraft armament, especially against higher altitude bombers |
| + | * Torpedo tubes are damaged easily | ||
| + | * Low crew count | ||
== History == | == History == | ||
<!--Describe the history of the creation and combat usage of the ship in more detail than in the introduction. If the historical reference turns out to be too long, take it to a separate article, taking a link to the article about the vehicle and adding a block "/ History" (example: <nowiki>https://wiki.warthunder.com/(Vehicle-name)/History</nowiki>) and add a link to it here using the <code>main</code> template. Be sure to reference text and sources by using <code><nowiki><ref></nowiki></code>, as well as adding them at the end of the article.--> | <!--Describe the history of the creation and combat usage of the ship in more detail than in the introduction. If the historical reference turns out to be too long, take it to a separate article, taking a link to the article about the vehicle and adding a block "/ History" (example: <nowiki>https://wiki.warthunder.com/(Vehicle-name)/History</nowiki>) and add a link to it here using the <code>main</code> template. Be sure to reference text and sources by using <code><nowiki><ref></nowiki></code>, as well as adding them at the end of the article.--> | ||
| + | {{Main|IJN_Yugumo/History|l1=History of the IJN Yugumo}} | ||
| − | + | IJN Yugumo (夕雲) was the lead ship of her class, launched in March 1941. This magnificent destroyer took part in some of the most important battles of the Pacific War. She started with a vain attempt of chasing down the carrier group that launched Doolittle Raid and later was present and took part in a Battle of Midway. A large portion of her career was spent engaging in the Guadalcanal Campaign, where she served primarily as a part of the Tokyo Express. She then proceeded to the North part of the Pacific, where she evacuated Japanese troops from the Aleutian Islands (Alaska), and finally returned back to the Solomon Islands where she sunk a Fletcher-class destroyer in a mutual kill by torpedoes at night on 6<sup>th</sup>/7<sup>th</sup> October 1943. All ships of her class were sunk in the course of the Pacific battles of WW II. | |
== Media == | == Media == | ||
| − | + | <!--Excellent additions to the article would be video guides, screenshots from the game, and photos.--> | |
| + | ;Images | ||
| + | <div><ul> | ||
| + | <li style="display: inline-block;"> [[File:Yugumo Front Day Operation FROST.jpg|thumb|none|250px|Front profile in the Operation FROST garage.]] </li> | ||
| + | <li style="display: inline-block;"> [[File:Yugumo Rear Day Operation FROST.jpg|thumb|none|250px|Rear profile in the Operation FROST garage.]] </li> | ||
| + | </ul></div> | ||
| + | ;Videos | ||
| + | {{Youtube-gallery|OO1p-dpJOa8|'''The Shooting Range #54''' - ''Metal Beasts'' section at 04:03 discusses the IJN Yugumo.}} | ||
== See also == | == See also == | ||
| − | ''Links to the articles on the War Thunder Wiki that you think will be useful for the reader, for example:'' | + | <!-- ''Links to the articles on the War Thunder Wiki that you think will be useful for the reader, for example:'' |
* ''reference to the series of the ship;'' | * ''reference to the series of the ship;'' | ||
| − | * ''links to approximate analogues of other nations and research trees.'' | + | * ''links to approximate analogues of other nations and research trees.'' --> |
| + | Ships of comparable role, configuration and era | ||
| + | |||
| + | * [[IJN Ayanami]] (predecessor) | ||
| + | * [[Fletcher (DD-445)]] | ||
| + | * [[Type 1934A (1940)]] | ||
| + | * [[Moskva (leader)]] | ||
| + | * [[Tribal (F75)]] | ||
== External links == | == External links == | ||
| − | ''Paste links to sources and external resources, such as:'' | + | <!-- ''Paste links to sources and external resources, such as:'' |
* ''topic on the official game forum;'' | * ''topic on the official game forum;'' | ||
* ''encyclopedia page on the ship;'' | * ''encyclopedia page on the ship;'' | ||
| − | * ''other literature.'' | + | * ''other literature.''--> |
| + | * [[Wikipedia:Y%C5%ABgumo-class_destroyer|[Wikipedia] ''Yūgumo''-class destroyer]] | ||
| + | * [[Wikipedia:Japanese_destroyer_Y%C5%ABgumo_(1941)|[Wikipedia] Japanese destroyer ''Yūgumo'' (1941)]] | ||
{{Japan destroyers}} | {{Japan destroyers}} | ||
Revision as of 15:21, 10 May 2020
Contents
| This page is about the Japanese destroyer IJN Yugumo. For other uses, see Yugumo (Family). |
Description

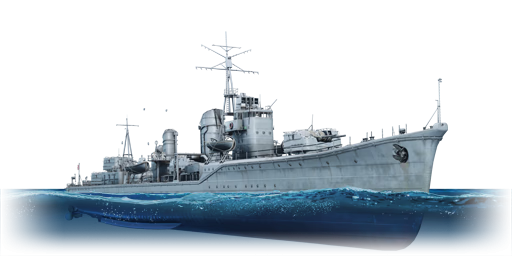
The Yugumo-class, IJN Yugumo, 1942 is a rank II Japanese destroyer
with a battle rating of 4.3 (AB/RB/SB). It was introduced in Update 1.89 "Imperial Navy". This is a last torpedo focused boat, before player gets introduced into the gunboat-style of the Akizuki destroyer.
General info
Survivability and armour

IJN Yugumo upgrades over IJN Ayanami in survivability, primarily due to its lower profile, but also higher crew count. Notably Yugumo has a much lower freeboard, lower forecastle and much smaller smoke funnels. This in effect gives it a better chance of avoiding enemy fire, especially at the long range, even though overall it is a longer ship. Additionally its survivability further is aided by having ammunition stored deep underneath the water line, what ensures survival if faced with AP shells, and having torpedo turrets protected against fragmentation damage, though they are still one of the easiest components to damage on the ship.
That said though, comparing to the equivalents in its BR, the ship has a relatively low crew count, sailing just a 2/3 of the Leningrad men, in a short-range fights Yugumo has to rely on its overwhelming firepower to take down the enemy before suffering overwhelming causalities itself.
Mobility
Stock Yugumo has a maximum speed of 58 km/h, which upgrades to 79 km/s with all the seakeeping modifications. Overall its relatively comparable with equivalents in other nations, if not slightly slower, though the differences are within 5% range between most of the destroyers in the same BR. Maximum reverse speed is -23 km/s stock and -31 km/h spaded.
| Modules | Crew skill | Time till (seconds) | Speed (km/h) | |||||
|---|---|---|---|---|---|---|---|---|
| 10 km/h | Flank ahead | -10 km/h | Full back | 180° turn | Flank ahead | Full back | ||
| Stock | 0 | 5.57 | 30.17 | 5.50 | 14.17 | 50.50 | 58 | 23 |
| Spaded | 0 | 4.03 | 29.70 | 3.90 | 14.17 | 28.17 | 80 | 31 |
Armament

Primary armament
Yugumo's primary guns are shared with Ayanami, offering the same capabilities and the same shell choice. Despite of being in a higher BR the ship stands a fair chance against its counterparts, though with increasingly challenging opponents and added care has to be put in an accurate gunnery and torpedoes play an even more important role in disposing opponents.
Secondary armament
The Yugumo is equipped with two twin mountings of the 25 mm Type 96 autocannon. Its setup clearly plays a primary role as an anti-aircraft weaponry, having turrets located to provide optimal AA coverage, however they are classified as an auxiliary armament and will use those crew skills instead of anti-aircraft. The high-explosive type rounds this gun fires will have no trouble knocking out any airplane it hits. AP type rounds are also available and can be used against small torpedo boats that want to sneak. Each twin mounting is placed on side of the ship which mean they can't shoot at the same target unless its aircraft.
- Universal belts: good balance between firepower and tracer contents, useful for newcomers to the Japanese 25 mm autocannon.
- APT belts: Full of AP shells, good against boats but you might not meet lots of them in destroyer.
- HEI belts: Trades tracer rounds for extra firepower, harder to aim but very good at knocking out aircraft.
Torpedo armament

Unlike its predecessors, Yugumo uses a new, Type 93 Model 1, Mod 2 torpedoes. Those are much more powerful, having over 30% more explosive power, which enables it to sink nearly any destroyer with a single hit. To compare with equivalents of other nations, Yugumo's torpedoes have an equivalent of 627.2 kg TNT, while German G7a has 358.4 kg, British Mk.IX has 340kg or US Mk.15 has 224 kg, all also having much lower range and slower speed. It's one of the best torpedoes available, bested only by Type 93 Model 3 or more modern anti-ship torpedoes, such as Mk.16.
| Number per turret |
Mass (kg) | Maximum speed in water (km/h) | Travel Distance (km) | Explosive TNT equivalent (kg) | ||
|---|---|---|---|---|---|---|
| Type 90 | IJN Ayanami IJN Mutsuki | 3 | 2540 | 85 | 7 | 480 |
| Type 90 + Torpedo Mode | IJN Ayanami IJN Mutsuki | 3 | 2540 | 65 | 15 | 480 |
| Type 93 Model 1, Mod 2 | IJN Yugumo | 4 | 2700 | 91 | 20 | 627.2 |
| Type 93 Model 3 | IJN Akizuki | 4 | 2800 | 91 | 15 | 998.4 |
Special armament

Yugumo has a tire IV modification available that unlocks the Bomb Mortar, allowing it to equip 8 Type 95 depth charges. All are stored above deck and ejected pneumatically to either port or starbord, up to four on each side.
Depth charges currently have an extremely limited use, having no submarines in the game and being limited to a combination of a static position where they were dropped at, and a specific time at which enemy has to arrive in order to risk any damage from the charge. Realistically it should be the last modification researched on the ship, as it provides no palatable benefit during the gameplay.
Usage in battles
IJN Yugumo is one of the most formidable destroyers, owning it largely to its outstanding torpedo armament, but also otherwise well-rounded mix of survivability, mobility and the firepower. Due to lack of AP rounds and a relatively low crew compliment Cruisers are its absolute bane, being able to one-shot it with a single lucky salvo, while themselves not having to worry much about anything but torpedoes. Like all torpedo-centric destroyers Yugumo excels in Arcade Battles with an ability to re-spawn torpedoes mid-battle, while having much tougher time in Realistic Battles.
Modules
| Tier | Seakeeping | Unsinkability | Firepower | |||
|---|---|---|---|---|---|---|
| I | Dry-Docking | Tool Set | 25 mm APT belt | |||
| II | Rudder Replacement | Fire Protection System | Smokescreen | 25 mm HEIT belts | Auxiliary Armament Targeting | 127 mm Type 1 HE |
| III | Propeller Replacement | Shrapnel Protection | Ventilation | Improved Rangefinder | Primary Armament Targeting | |
| IV | Engine Maintenance | New Pumps | Ammo Wetting | Bomb mortar | ||
As always, the highest priority in modification research should be put on Tool Set and FPE. Beyond that primary focus should be on Unsinkability part of the tree, possibly with an addition of Rudder Replacement. Note that Targeting upgrades are not mandatory, as guns can keep up with a turning rate of even a fully upgraded Seakeeping. Finally, as with all of the destroyers, Bomb mortar is the least important upgrade of the bunch.
Pros and cons
Pros:
- Can release 8 torpedoes at once
- One of the best torpedoes (Long Lance)
- Good mobility
- Small profile
Cons:
- No access to armour-piercing shells
- Weak anti-aircraft armament, especially against higher altitude bombers
- Torpedo tubes are damaged easily
- Low crew count
History
IJN Yugumo (夕雲) was the lead ship of her class, launched in March 1941. This magnificent destroyer took part in some of the most important battles of the Pacific War. She started with a vain attempt of chasing down the carrier group that launched Doolittle Raid and later was present and took part in a Battle of Midway. A large portion of her career was spent engaging in the Guadalcanal Campaign, where she served primarily as a part of the Tokyo Express. She then proceeded to the North part of the Pacific, where she evacuated Japanese troops from the Aleutian Islands (Alaska), and finally returned back to the Solomon Islands where she sunk a Fletcher-class destroyer in a mutual kill by torpedoes at night on 6th/7th October 1943. All ships of her class were sunk in the course of the Pacific battles of WW II.
Media
- Images


- Videos
See also
Ships of comparable role, configuration and era
- IJN Ayanami (predecessor)
- Fletcher (DD-445)
- Type 1934A (1940)
- Moskva (leader)
- Tribal (F75)
External links
| Japan destroyers | |
|---|---|
| IJN | |
| Momi-class | IJN Momi |
| Mutsuki-class | IJN Mutsuki · IJN Satsuki |
| Fubuki-class | IJN Ayanami |
| Hatsuharu-class | IJN Hatsuharu · IJN Nenohi |
| Shiratsuyu-class | IJN Yuudachi |
| Yugumo-class | IJN Yugumo · IJN Hayanami · IJN Kiyoshimo |
| Shimakaze-class | IJN Shimakaze |
| Akizuki-class | IJN Akizuki · IJN Hatsuzuki |
| JMSDF | |
| Ariake-class* | JDS Yūgure (DD-184) |
| Harukaze-class | JDS Harukaze (DD-101) |
| * Modified Fletcher-class destroyers | |
