How to add Ammo Rack information to vehicle pages
Contents
- 1 Purpose:
- 2 Responsibilities:
- 3 Definitions:
- 4 Prerequisites:
- 5 Guide:
- 5.1 Familiarization Around Counting of Ammunition Racks
- 5.2 Counting and Recording Ammo Rack Data
- 5.3 Creating the Ammo Rack visual identification image
- 5.3.1 Rules for consistency
- 5.3.2 The seven simple steps
- 5.3.3 The seven detailed steps
- 6 Examples of Ammo Rack images
Purpose:
This guide's purpose is to assist users editing on the War Thunder Wiki on the creation of content regarding ammo racks for War Thunder's ground vehicles. Methodology on creation of media pieces regarding ammo racks as well as the collection of data on ammo racks will be under the scope of this guide.
Responsibilities:
Users are responsible for ensuring that the data and visual imagery presented are accurate and of a sufficient quality that the content is understood by a casual user on the War Thunder Wiki. A user must be able to obtain all necessary information of a ground vehicle's ammo rack data from the ground vehicle's wiki page without having to open another page.
Definitions:
Ammunition rack (shortened to "ammo rack") - Stowage bins within a tank's design that can be visible via the X-ray function in the Garage menu or in battle. These are depleted over use in battle and can be detonated in battle if one filled with ammunition is hit by a penetrating enemy shell.
Ready Rack - An ammunition rack affected by the "First-order" game mechanic. These are configured to be continually replenished in-game in order to facilitate faster gun loading or for a vehicle's auto-loading system.
Prerequisites:
- Understanding of a selected ground vehicle's ammo rack locations
- Access to photo-editing programs such as Paint or Illustrator
- Time
Guide:
Familiarization Around Counting of Ammunition Racks
The numerical format for the individual ammunition pieces that can be brought into a tank's ammo rack can be found in the loadout screen prior to spawning into a battle. The numerical format will be laid out as:
- (Number of shells being brought)\(Total shells carried in vehicle) (+ [Spare shells that can be brought]).
An example of this loading screen can be seen below of the M18 Hellcat. As can be seen, the vehicle can carry a total of 45 rounds into combat, with a chosen load of 28 M62, 7 M93, and 2 M42A1 shells; which leaves a reserve of 8 more shells a user can bring into battle. These 8 shells, if not brought in, and treated as expended ammunition and the ammunition rack will be configured in the game as a tank that has fired 8 shells.

This format can also be found during the "Test Drive" screen when setting the vehicle's conditions prior to starting a test drive.

A variation of this format is replicated on the War Thunder Wiki. As can be seen from this example of a M18 GMC ammo rack, it has an indication of the maximum capacity of individual ammunition pieces it can carry (45 shells), with each column indicating an emptied ammo rack explaining the total shells the vehicle would have at that emptied rack stage, plus the number of shells expended/left behind in a manner similar to the in-game loadout screen (so in this case, the 1st ammo rack that will be emptied will be done if the M18 GMC does not bring 8 rounds).

Counting and Recording Ammo Rack Data
Recording data for ammo racks can be done through the "Test Drive" function in two different methods via the test drive load out screen:
- Full load: Bringing in a full ammunition loadout for the vehicle and use up the ammunition one-by-one to record any ammo rack depletion by the individual rounds. However, this work is quite tedious especially if the vehicle in question has a long reload time.
- Customized load: Being able to choose how much ammo to bring into the test drive can help in finding very specific ammo rack numbers. However, a mistake would require a lengthy process of ending the test drive and restarting it with a different starting ammunition amount.
| The customized load method can also be done in normal/custom battles as well, which has the benefit of having capture points to reload the vehicle if anything goes wrong with the recording of the ammo rack numbers. However, this is a more lengthy and uncontrolled process due to having to set up these matches (and the potential of the enemy destroying the tested vehicle), and if players intentionally bring less than full ammo, the capture point reloads will only fill up to custom amount instead of the vehicle's full capacity. |
Whichever method is used, when preparing to record ammunition rack data, prepare a set of data collecting tools such as personal note-taking equipment, as well as a key-bind on the X-ray function in battle (Controls -> Common -> X-ray (show vehicle modules)) so that a visual can be gained on the depleting ammo racks.
Once spawned in, ensure the vehicle is in a safe setting when preparing to expend ordnance for recording ammo-rack data. Steadily use up the ammunition while examining the ammo racks for any depletions. Record which ammo rack gets fully emptied and mark them in order.
- Identify ammo racks as a bulk rather than the individual depleting shell. If there is a bundle of ten shells close together (which may or may not have a visual band wrapping around them) and the bundle depletes per shell fired, count the shell data instead when the entire ammo bundle empties rather than by the individual shell.
- Vehicles with two-piece ammunition will also need to have the second piece of the ammunition counted in the data. This will be counted in its own row so make sure this data is also recorded.
- This process is to be repeated until all ammo racks and their emptied shell amounts can be found.


Ready racks
Special considerations must be taken with vehicles with ready racks in the ammo rack table on the wiki. These should be placed as the last racks to be emptied, despite being emptied first in combat. This is because the purpose of the ammo rack tables is to inform users how to reduce the number of filled ammo racks in the vehicles when they bring it into battle. Since these ready racks will be filled first no matter the number of shells brought in, the table of emptied racks should emphasize what racks will be emptied with a pre-loaded ammunition batch rather than battle expenditure.

Creating the Ammo Rack visual identification image
To create the visual identification, you do not need some fancy photo editing program. All you need is to load paint or something which comes with your PC for free to do this.
Rules for consistency
Images must be uploaded under the filename Ammoracks_{vehicle-name}.png in the png image format. When the image is uploaded, the brackets "{" must be removed.
- An example: Ammoracks_T90A.png (this is also shown in Image U1)
- In cases of vehicle names with special characters that are not compatible with file names (ex. L6/40 in which the "/" can not be used), it is acceptable to replace these special characters with a space or an underscore (ex. L6/40 → L6 40 or L6_40)
- If multiple angles of the vehicle is needed to capture every ammo rack, it is preferred to first merge these angles into a single image file so long as the content is discernable. If this cannot be done and the ammo rack images needs to be uploaded as separate files, every file must have an additional extension after the {vehicle-name} portion of the file name to distinguish them. (ex. Ammoracks_T90A_Main.png)
All images must be categorised, it's important that: "[[Category:Ammo racks]]" is added to any ammo rack image.
Main Armaments Rules
The appropriate color-coding must be used:
- Projectile (Shell) labels must be in the color yellow.
- Propellant label must be in the color orange.
- Ensure a color legend is placed in an unobstructed manner to inform users on the meaning of the colored text.
- An example of the above can be seen in Image A1.
Ready racks for the armament should be indicated as such with an asterisk symbol next to the ammo rack number. As stated in an earlier passage, ready racks should be considered the last to be depleted.
Secondary Armament Rules
The appropriate color-coding must be used:
- Secondary armament ammo racks must be in the color red.
- Ensure a color legend is placed in an unobstructed manner to inform users on the meaning of the colored text.
- An example of the above can be seen in Image A2.
The seven simple steps
- Load X-ray view in the game hangar.
- Take the screenshot(s) of the vehicle's X-ray (Either using Ansel or by pressing F12).
- Load the screenshot(s) into a photo editing program.
- Label each ammo rack with its appropriate numbering in an order of reduction, with a overlaying box if needed to isolate the ammo rack from nearby ones. Make sure the colouring used in the numbers and box follow the Rules for Consistency as detailed above.
- Once all ammo racks in the image are appropriately labelled, save the image in a .png format with the naming format: Ammoracks_{vehicle-name}.png
- Upload this image on the War Thunder Wiki: Make sure to add "[[Category:Ammo racks]]" to the upload summary to correctly categorise the image on the Wiki.
- Insert the image onto the page.
The seven detailed steps
To Load X-ray:
Starting from the in-game hangar menu, the default view should look something like this image:

Currently, the vehicle will not show the interior view, which means ammo racks will not be viewable.
To enter X-ray view, use the control panel on the left side of the screen. On the control panel screen that provides vehicle details, the "X-Ray" button should be visible on the lower right side. Once the X-ray button has been pressed, the vehicle will now look like this:

However, the X-ray image still looks extremely cluttered with internal tank armour and parts showing up. This will be a common view in Rank VI and later vehicles due to the composite armour constructions showing up in the X-ray view. To remove some of these obstacles, the checkmark below the "X-Ray" button labelled "Show armor parts" need to be checked OFF. The resulting image should be like this:

You can now see the difference, with and without that setting ticked - The vehicle is now cleaner and the ammo racks are now easier to see.
Taking the screenshot(s):
The image should look, something like this at the end. It's important to make sure the ammo racks can clearly be seen for the viewer of the image.

Taking the screenshot with in-game controls Ensure the screenshot button being used is one that will not take an image of all the user interfaces in the hangar. To check which button this is, it is in Controls → Common → Interface → Screenshot without interface. Once a screenshot it taken, ensure that the screenshot location can be found as well.
Taking the screenshot with Nvidia Ansel
The default keys to activate Nvidia Ansel in the hangar is Alt + F2. This mode will allow more customization in the angle and view of the vehicle for a screenshot. Once the right shot and options are selected, press the green "Snap" button on the Nvidia Ansel control panel to produce a screenshot.
Editing the screenshot(s) in a photo editing application:
All that needs to be done, is simply load the screenshot in a photo editing program, Photoshop, Paint - whatever program you have. To highlight the ammo racks.
Adding a box over the ammo rack: (Image A1)

Adding a number over the ammo rack: (Image A2)

Saving the images as a .png
This step is dependent on the image-editing software used for the previous step. Use whichever function is needed to export the file into a .png format for use on the Wiki.
- Paint:
In Paint, to export the edited file as a .png, go to the File button on the top-left corner of the software's window and press it for a drop-down menu. Go over to the Save As function and hover the mouse over it to open a menu to the right. Click the PNG picture in the menu and the program will allow the image to be saved in the .png format.
How to upload the image on the wiki: (Image U1)

As shown here, the required text has been inputted into the upload summary: [[Category:Ammo racks]]
Name has been added to the: Ammoracks_vehiclename (Make sure the image is in a PNG format!) To upload an image on the War Thunder: Wiki - Make sure you are logged in, go to the left hand side bar and click "Tools" - It will expand and show a button called upload. Once this button has been clicked, it will load the above for you to upload the image.
How to Insert the image onto the page:
The page should have this line of text which automatically inserts the image onto the correct page - that is why you have to follow our naming convention. If the page is a barebone page, copy this text word for word and insert this line of text under the Ammo rack header:
[[File:Ammoracks_{{PAGENAME}}.png|right|thumb|x250px|[[Ammo racks]] of the {{PAGENAME}}]]
To do this: click "Edit source" on the top right of the Wiki page. Scroll down the towards the ===Ammo racks=== section and drop the code under it. Press the blue "Save changes" on the bottom of the source edit page and then the edit will be saved. However, the edit will require a Wiki Moderator's approval before it is publicised, so do not be alarmed it the image does not appear immediately afterwards.
If the page is a very new page and it is missing all tables and everything relating to ammo racks go to HERE, press edit source and copy everything listed under this header and paste it in.
Examples of Ammo Rack images
Listed below are examples of ammo rack images that follow the guidelines.
This ammo rack image of the Marder III's uses great photo editing to highlight all the ammo racks on the Marder III and illustrate to the player the order the ammo racks are reduced at and which group of shells they consist of.
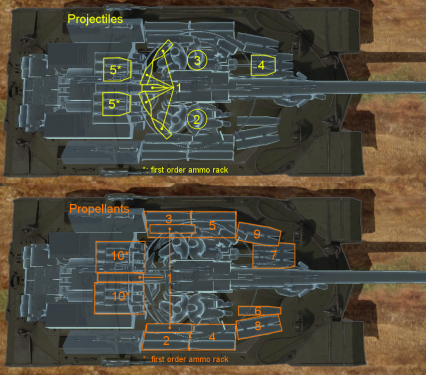
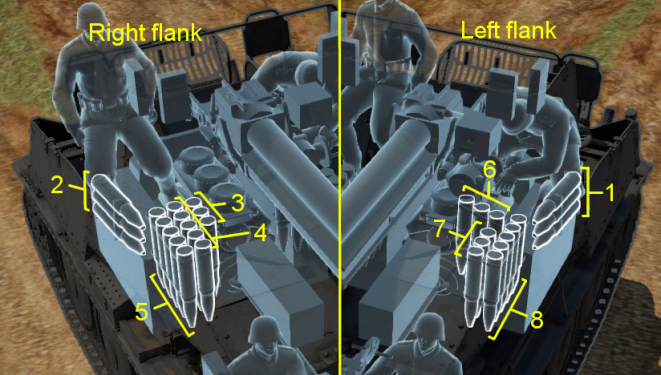
This ammo rack image of the IS-7 has to consider the cramped interior with ammo stowed all-around, and the two-piece ammunition construction that separates the projectile and propellent. However, the numbering design of the specific ammunition component gives players a good perspective on which ammo rack will be consumed first. Proper color-coding with yellow and orange, labeling, as well as photo-editing are utilized to help distinguish which ammo racks for the two-piece ammunition are for the projectile or are for the propellent. Finally, the ready racks are also properly marked with asterisk to distinguish it and are shown properly as the last in the ammo rack reduction.
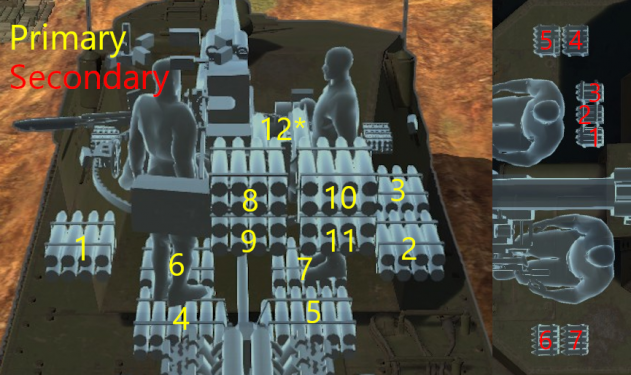
The ammo racks for this Chi-Ri II are unique as the Chi-Ri II has a primary and secondary armament with ammo stowed within the tank. The general numbering of the ammo racks give the player a good perspective on which bundle of ammo racks are depleted first. However, the usage of yellow and red color-coding and appropriate legend allow players to distinguish which ammo rack are for the primary or secondary armament. An asterisk mark on the ready racks also help mark them for players to view.


