Difference between revisions of "Ho-Ri Production"
m (Wikipedia link added / Link to Skins in WT Live) |
Inceptor57 (talk | contribs) (Updated template w/ new design) |
||
| Line 1: | Line 1: | ||
{{Specs-Card|code=jp_type_5_ho_ri_production}} | {{Specs-Card|code=jp_type_5_ho_ri_production}} | ||
| − | {{ | + | {{About |
| + | |about=tank destroyer '''{{PAGENAME}}''' | ||
| + | |usage=the bundle version | ||
| + | |link=Ho-Ri Prototype | ||
| + | }} | ||
== Description == | == Description == | ||
| − | <!--''In the description, the first part | + | <!--''In the description, the first part should be about the history of the creation and combat usage of the vehicle, as well as its key features. In the second part, tell the reader about the ground vehicle in the game. Insert a screenshot of the vehicle, so that if the novice player does not remember the vehicle by name, he will immediately understand what kind of vehicle the article is talking about.''--> |
[[File:GarageImage_Ho-RiProduction.jpg|420px|thumb|left]] | [[File:GarageImage_Ho-RiProduction.jpg|420px|thumb|left]] | ||
{{break}} | {{break}} | ||
| Line 12: | Line 16: | ||
== General info == | == General info == | ||
=== Survivability and armour === | === Survivability and armour === | ||
| − | <!--''Describe armour protection. Note the most well protected and key weak areas. Appreciate the layout of modules as well as the number and location of crew members. Is the level of armour protection sufficient, is the placement of modules | + | <!--''Describe armour protection. Note the most well protected and key weak areas. Appreciate the layout of modules as well as the number and location of crew members. Is the level of armour protection sufficient, is the placement of modules helpful for survival in combat?'' |
''If necessary use a visual template to indicate the most secure and weak zones of the armour.''--> | ''If necessary use a visual template to indicate the most secure and weak zones of the armour.''--> | ||
| + | If you spot a Ho-Ri, '''never''' shoot it in the sloped UFP. It can bounce shells from even a Object 120 and the only good thing that can come from it is if you get lucky and it bounces into the barrel. Instead, aim for the 120mm lower plate to destroy its mobility, or the right side of the mantlet to knock out the gunner. Note that the outer edges of the mantlet is slightly weaker, so if using APHE aim for that if possible. | ||
| + | |||
'''Armour type:''' | '''Armour type:''' | ||
* Rolled homogeneous armour | * Rolled homogeneous armour | ||
| Line 33: | Line 39: | ||
* Hull underside right above tracks is 20 mm thick. | * Hull underside right above tracks is 20 mm thick. | ||
* 20 mm RHA plates separate the engine compartment from the front and rear. | * 20 mm RHA plates separate the engine compartment from the front and rear. | ||
| − | |||
| − | |||
=== Mobility === | === Mobility === | ||
| − | <!--''Write about the mobility of the ground vehicle. Estimate the specific power and | + | <!--''Write about the mobility of the ground vehicle. Estimate the specific power and manoeuvrability, as well as the maximum speed forwards and backwards.''--> |
{| class="wikitable" style="text-align:center" | {| class="wikitable" style="text-align:center" | ||
|- | |- | ||
| Line 82: | Line 86: | ||
== Armaments == | == Armaments == | ||
=== Main armament === | === Main armament === | ||
| − | <!--''Give the reader information about the characteristics of the main gun. Assess its effectiveness in a battle based on the reloading speed, ballistics and the power of shells. Do not forget about the | + | <!--''Give the reader information about the characteristics of the main gun. Assess its effectiveness in a battle based on the reloading speed, ballistics and the power of shells. Do not forget about the flexibility of the fire, that is how quickly the cannon can be aimed at the target, open fire on it and aim at another enemy. Add a link to the main article on the gun: <code><nowiki>{{main|Name of the weapon}}</nowiki></code>. Describe in general terms the ammunition available for the main gun. Give advice on how to use them and how to fill the ammunition storage.''--> |
{{main|Type 5 (105 mm)}} | {{main|Type 5 (105 mm)}} | ||
| Line 126: | Line 130: | ||
! rowspan="2" data-sort-type="text" | Ammunition | ! rowspan="2" data-sort-type="text" | Ammunition | ||
! rowspan="2" class="unsortable" | Type of <br /> warhead | ! rowspan="2" class="unsortable" | Type of <br /> warhead | ||
| − | ! colspan="6" | '''Penetration''' '''''in mm''''' '''@ | + | ! colspan="6" | '''Penetration''' '''''in mm''''' '''@ 0° Angle of Attack''' |
|- | |- | ||
! 10m | ! 10m | ||
| Line 183: | Line 187: | ||
Casemate sides empty: 40''(+11)'' | Casemate sides empty: 40''(+11)'' | ||
| − | == Usage in | + | == Usage in battles == |
| − | <!--''Describe the tactics of playing in the vehicle, the features of using vehicles in the team and advice on tactics. Refrain from creating a "guide" - do not impose a single point of view but give the reader food for thought. Describe the most dangerous enemies and give recommendations on fighting them. If necessary, note the specifics of the game in different modes (AB, RB, SB).''--> | + | <!--''Describe the tactics of playing in the vehicle, the features of using vehicles in the team and advice on tactics. Refrain from creating a "guide" - do not impose a single point of view but instead give the reader food for thought. Describe the most dangerous enemies and give recommendations on fighting them. If necessary, note the specifics of the game in different modes (AB, RB, SB).''--> |
The Ho-Ri should be primarily played as a medium to long range sniper. Your potent cannon can dispatch most enemies and the thick frontal armour will stop most shots, especially the UFP which is basically an auto-bounce zone. Be careful in close quarters - the Ho-Ri turns quite slowly when not up to speed and an easy shot to the LFP will instantly eliminate your mobility allowing for an easy flank. Your surprisingly fast speed will also assist when getting to nice sniping spots, and the comically speedy reverse allows you to retreat when getting overrun. Note that your reverse is bugged and thus you cannot go past the first gear without either using a manual transmission OR using your reverse cruise control. | The Ho-Ri should be primarily played as a medium to long range sniper. Your potent cannon can dispatch most enemies and the thick frontal armour will stop most shots, especially the UFP which is basically an auto-bounce zone. Be careful in close quarters - the Ho-Ri turns quite slowly when not up to speed and an easy shot to the LFP will instantly eliminate your mobility allowing for an easy flank. Your surprisingly fast speed will also assist when getting to nice sniping spots, and the comically speedy reverse allows you to retreat when getting overrun. Note that your reverse is bugged and thus you cannot go past the first gear without either using a manual transmission OR using your reverse cruise control. | ||
| Line 195: | Line 199: | ||
=== Pros and cons === | === Pros and cons === | ||
| − | <!--''Summarize and briefly evaluate the vehicle in terms of its characteristics and combat effectiveness. Mark its pros and cons in a bulleted list. | + | <!--''Summarize and briefly evaluate the vehicle in terms of its characteristics and combat effectiveness. Mark its pros and cons in a bulleted list. Try not to use more than 6 points for each of the characteristics. Avoid using categorical definitions such as "bad", "good" and the like - use substitutions with softer forms such as "inadequate" and "effective".''--> |
'''Pros:''' | '''Pros:''' | ||
* Heavy amount of frontal sloped armour | * Heavy amount of frontal sloped armour | ||
* Can bounce '''anything''' when angled right | * Can bounce '''anything''' when angled right | ||
| − | |||
* Very fast with high acceleration thanks to its massive engine | * Very fast with high acceleration thanks to its massive engine | ||
* High velocity cannon with decent penetration and high post-penetration damage | * High velocity cannon with decent penetration and high post-penetration damage | ||
| Line 213: | Line 216: | ||
== History == | == History == | ||
| − | + | ''Describe the history of the creation and combat usage of the ground vehicle in more detail than in the introduction. If the historical reference turns out to be too big, take it to a separate article, taking a link to the article about the vehicle and adding a block "/ History" (example: <nowiki>https://wiki.warthunder.com/(Vehicle-name)/History</nowiki>) and add a link to it here using the <code>main</code> template. Be sure to reference text and sources by using <code><nowiki><ref></nowiki></code>, as well as adding them at the end of the article. This section may also include the vehicle's dev blog entry (if applicable) and the in-game encyclopedia description (under <code><nowiki>=== Encyclopedia Info ===</nowiki></code>, also if applicable).'' | |
== Media == | == Media == | ||
| + | <!--''Excellent additions to the article would be video guides, screenshots from the game, and photos.''--> | ||
Skin and Camouflages for the [https://live.warthunder.com/feed/camouflages/?vehicleCountry=japan&vehicleType=tank&vehicleClass=tank_destroyer&vehicle=jp_type_5_ho_ri_production Ho-Ri Production] in Warthunder Live. | Skin and Camouflages for the [https://live.warthunder.com/feed/camouflages/?vehicleCountry=japan&vehicleType=tank&vehicleClass=tank_destroyer&vehicle=jp_type_5_ho_ri_production Ho-Ri Production] in Warthunder Live. | ||
| − | == | + | == See also == |
| − | ''Links to the articles on the War Thunder Wiki that you think will be useful for the reader, for example | + | ''Links to the articles on the War Thunder Wiki that you think will be useful for the reader, for example:'' |
* ''reference to the series of the vehicles;'' | * ''reference to the series of the vehicles;'' | ||
* ''links to approximate analogues of other nations and research trees.'' | * ''links to approximate analogues of other nations and research trees.'' | ||
| − | |||
| − | == | + | == External links == |
<!--''Paste links to sources and external resources, such as:'' | <!--''Paste links to sources and external resources, such as:'' | ||
* ''topic on the official game forum;'' | * ''topic on the official game forum;'' | ||
| + | * ''encyclopedia page on the tank;'' | ||
* ''other literature.''--> | * ''other literature.''--> | ||
| − | * [ | + | * [[Wikipedia:Type_5_Chi-Ri_medium_tank#Variant|[Wikipedia<nowiki>]</nowiki> Type 5 Chi-Ri medium tank]] |
{{Japan tank destroyers}} | {{Japan tank destroyers}} | ||
Revision as of 16:01, 5 April 2019
Contents
| This page is about the tank destroyer Ho-Ri Production. For the bundle version, see Ho-Ri Prototype. |
Description

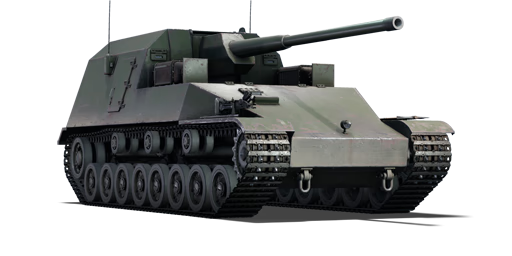
The Type 5 Ho-Ri Production is a Rank V Japanese tank destroyer
with a battle rating of 7.3 (AB/RB/SB). It was introduced in Update 1.73 "Vive la France".
The Ho-Ri has a distinctive sloped UFP, small gun mantlet, and long casemate hull. Note the large lower plate - it is quite vulnerable and can get your transmission destroyed.
General info
Survivability and armour
If you spot a Ho-Ri, never shoot it in the sloped UFP. It can bounce shells from even a Object 120 and the only good thing that can come from it is if you get lucky and it bounces into the barrel. Instead, aim for the 120mm lower plate to destroy its mobility, or the right side of the mantlet to knock out the gunner. Note that the outer edges of the mantlet is slightly weaker, so if using APHE aim for that if possible.
Armour type:
- Rolled homogeneous armour
- Cast homogeneous armour (Gun mantlet)
| Armour | Front (Slope angle) | Sides | Rear | Roof |
|---|---|---|---|---|
| Hull | 120 mm (70°) Front glacis 120 mm (8°), 60 mm (67°) Lower glacis 100 mm (16°) Hull cheeks |
75 mm (17°) Top 75 mm Bottom |
35 mm (10-40°) | 20 mm |
| Superstructure | 200-225 mm (5-20°) Superstructure front 175-225 mm Gun mantlet 175 mm (5°) Vision slits 50-200 mm (45°) Barrel shroud |
75 mm (17-48°) | 35 mm (5°) | 20-35 mm |
Notes:
- Suspension wheels and bogies are 15 mm thick while tracks are 20 mm thick.
- Bogie guards in the side suspension provide rows of 10 mm RHA at their locations.
- Belly armour is 20 mm thick.
- Hull underside right above tracks is 20 mm thick.
- 20 mm RHA plates separate the engine compartment from the front and rear.
Mobility
| Mobility characteristic | ||
|---|---|---|
| Weight (tons) | Add-on Armor weight (tons) |
Max speed (km/h) |
| 65.0 | N/A | 44 (AB) |
| 40 (RB/SB) | ||
| Engine power (horsepower) | ||
| Mode | Stock | Upgraded |
| Arcade | 1,562 | 1,924 |
| Realistic/Simulator | 973 | 1,100 |
| Power-to-weight ratio (hp/ton) | ||
| Mode | Stock | Upgraded |
| Arcade | 24.03 | 29.60 |
| Realistic/Simulator | 14.97 | 16.92 |
Armaments
Main armament
| 105 mm Type 5 | |||||
|---|---|---|---|---|---|
| Capacity | Vertical guidance |
Horizontal guidance |
Stabilizer | ||
| 51 | -10°/+20° | ±10° | N/A | ||
| Turret rotation speed (°/s) | |||||
| Mode | Stock | Upgraded | Prior + Full crew | Prior + Expert qualif. | Prior + Ace qualif. |
| Arcade | 3.60 | __.__ | __.__ | __.__ | __.__ |
| Realistic | 3.60 | __.__ | __.__ | __.__ | __.__ |
| Reloading rate (seconds) | |||||
| Stock | Prior + Full crew | Prior + Expert qualif. | Prior + Ace qualif. | ||
| 11.10 | __.__ | __.__ | __.__ | ||
Ammunition
| Penetration statistics | |||||||
|---|---|---|---|---|---|---|---|
| Ammunition | Type of warhead |
Penetration in mm @ 0° Angle of Attack | |||||
| 10m | 100m | 500m | 1000m | 1500m | 2000m | ||
| Type 2 APHE | APHE | 234 | 230 | 209 | 184 | 163 | 141 |
| Experimental HE | HE | 30 | 30 | 30 | 30 | 30 | 30 |
| Shell details | ||||||||||
|---|---|---|---|---|---|---|---|---|---|---|
| Ammunition | Type of warhead |
Velocity in m/s |
Projectile Mass in kg |
Fuse delay
in m: |
Fuse sensitivity
in mm: |
Explosive Mass in g (TNT equivalent): |
Normalization At 30° from horizontal: |
Ricochet: | ||
| 0% | 50% | 100% | ||||||||
| Type 2 APHE | APHE | 1000 | 16 | 1.3 | 15 | 200 | ° | 47° | 60° | 65° |
| Experimental HE | HE | 920 | 16 | 0.1 | 0.1 | 2,520 | +0° | 79° | 80° | 81° |
Ammo racks

| Full ammo |
1st rack empty |
2nd rack empty |
3rd rack empty |
4th rack empty |
5th rack empty |
Visual discrepancy |
|---|---|---|---|---|---|---|
| 51 | 46 (+5) | 40 (+11) | 30 (+21) | 12 (+39) | 1 (+50) | no |
Casemate sides empty: 40(+11)
Usage in battles
The Ho-Ri should be primarily played as a medium to long range sniper. Your potent cannon can dispatch most enemies and the thick frontal armour will stop most shots, especially the UFP which is basically an auto-bounce zone. Be careful in close quarters - the Ho-Ri turns quite slowly when not up to speed and an easy shot to the LFP will instantly eliminate your mobility allowing for an easy flank. Your surprisingly fast speed will also assist when getting to nice sniping spots, and the comically speedy reverse allows you to retreat when getting overrun. Note that your reverse is bugged and thus you cannot go past the first gear without either using a manual transmission OR using your reverse cruise control.
The Ho-Ri can be used in multiple roles. Its most effective at medium range, where it's harder for the enemy to aim for the lower plate and shells have a harder time penetrating the mantlet, making it easy for you to destroy them. The Ho-Ri is also quite potent at long range, particularly in downtiers, where your gun remains effective (though less so) and your armour becomes even better. Be careful using it as a brawler, however. Your transmission is easier to hit, the mantlet is easier to penetrate, and faster foes can surround you easier and get a shot at your weak side armour.
Some concerning enemies are:
- T-54 1947: This tank can be quite the pain to destroy, and if they are using the more advanced APHE shells found in the 100mm gun they can wipe out most of your crew in the mantlet. Your biggest chance at destroying them is through a trap shot or the mantlet at very close range.
- AMX-50 Foch: Wielding a powerful cannon and heavy sloped armour, the Foch is a rare yet dangerous enemy. Aim for the gun.
- T32: Though rare, this tank is completely immune from your gun in the front while it can still go through your lower plate easily. Shoot the barrel and either flank him or retreat.
Pros and cons
Pros:
- Heavy amount of frontal sloped armour
- Can bounce anything when angled right
- Very fast with high acceleration thanks to its massive engine
- High velocity cannon with decent penetration and high post-penetration damage
- Very fast reverse speed
- Good gun depression
Cons:
- No neutral-steering.
- Can get outflanked easily.
- Often uptiered.
- Can't use its amazing reverse speed without manual transmission or cruise control.
- Mantlet is easily penetrated in close quarters, especially against sabot rounds.
- Large weakspot in the LFP, resulting in a quick death to the mobility.
History
Describe the history of the creation and combat usage of the ground vehicle in more detail than in the introduction. If the historical reference turns out to be too big, take it to a separate article, taking a link to the article about the vehicle and adding a block "/ History" (example: https://wiki.warthunder.com/(Vehicle-name)/History) and add a link to it here using the main template. Be sure to reference text and sources by using <ref>, as well as adding them at the end of the article. This section may also include the vehicle's dev blog entry (if applicable) and the in-game encyclopedia description (under === Encyclopedia Info ===, also if applicable).
Media
Skin and Camouflages for the Ho-Ri Production in Warthunder Live.
See also
Links to the articles on the War Thunder Wiki that you think will be useful for the reader, for example:
- reference to the series of the vehicles;
- links to approximate analogues of other nations and research trees.
External links
| Japan tank destroyers | |
|---|---|
| Ro-Go Derivatives | Ro-Go Exp. |
| Chi-Ha Derivatives | Ho-Ni I · Ho-Ni III · Ho-Ro · Chi-Ha LG |
| Ho-Ri | Ho-Ri Prototype · Ho-Ri Production |
| Other | Na-To |
| JGSDF | |
| SPRG | Type 60 (C) |
| SPH | Type 75 · Type 99 |
| ATGM | Type 60 ATM |
| Rocket | Type 75 MLRS |
| USA | ▅M36 |
