Difference between revisions of "HMS London"
(additional history content, this part is still WIP) (Tag: Visual edit) |
(→The Strain in the North, The Disaster of PQ17, and the rest of 1942) (Tag: Visual edit) |
||
| Line 189: | Line 189: | ||
Within seconds of the food arriving on the cruiser's bridge the first signal arrived. Marked ‘MOST IMMEDIATE’ it said: | Within seconds of the food arriving on the cruiser's bridge the first signal arrived. Marked ‘MOST IMMEDIATE’ it said: | ||
| − | {{Quote| | + | {{Quote|The time was 9.11 p.m. and twelve minutes later another equally alarming signal hit the HMS London: IMMEDIATE… OWING TO THREAT FROM SURFACE SHIPS, CONVOY IS TO DISPERSE AND PROCEED TO RUSSIAN PORTS. |
| − | + | This was followed, at 9.36 p.m., by the signal that has gone down as one of the most notorious in naval history: | |
| − | + | MOST IMMEDIATE. CONVOY IS TO SCATTER. }} | |
| − | |||
| − | MOST IMMEDIATE. CONVOY IS TO SCATTER. | ||
| − | |||
| − | |||
=== [[wt:en/news/6626-development-hms-london-anticipated-calibre-en|Devblog]] === | === [[wt:en/news/6626-development-hms-london-anticipated-calibre-en|Devblog]] === | ||
Revision as of 22:57, 19 May 2021

Contents
Description
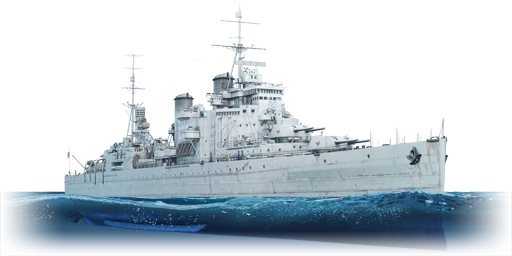
The County-class, HMS London (69), 1945 is a rank IV British heavy cruiser with a battle rating of 5.7 (AB/RB/SB). It was introduced in Update 1.97 "Viking Fury".
General info
Survivability and armour
Talk about the vehicle's armour. Note the most well-defended and most vulnerable zones, e.g. the ammo magazine. Evaluate the composition of components and assemblies responsible for movement and manoeuvrability. Evaluate the survivability of the primary and secondary armaments separately. Don't forget to mention the size of the crew, which plays an important role in fleet mechanics. Save tips on preserving survivability for the "Usage in battles" section. If necessary, use a graphical template to show the most well-protected or most vulnerable points in the armour.
Mobility
Write about the ship's mobility. Evaluate its power and manoeuvrability, rudder rerouting speed, stopping speed at full tilt, with its maximum forward and reverse speed.
| Mobility Characteristics | |||
|---|---|---|---|
| Game Mode | Upgrade Status | Maximum Speed (km/h) | |
| Forward | Reverse | ||
| AB | |||
| Upgraded | 70 | 29 | |
| RB/SB | |||
| Upgraded | 60 | 25 | |
Modifications and economy
| Seakeeping | Unsinkability | Firepower | ||||||||||||||||||||||||
|---|---|---|---|---|---|---|---|---|---|---|---|---|---|---|---|---|---|---|---|---|---|---|---|---|---|---|
|
|
|
Armament
Primary armament
Provide information about the characteristics of the primary armament. Evaluate their efficacy in battle based on their reload speed, ballistics and the capacity of their shells. Add a link to the main article about the weapon: {{main|Weapon name (calibre)}}. Broadly describe the ammunition available for the primary armament, and provide recommendations on how to use it and which ammunition to choose.
Secondary armament
Some ships are fitted with weapons of various calibres. Secondary armaments are defined as weapons chosen with the control Select secondary weapon. Evaluate the secondary armaments and give advice on how to use them. Describe the ammunition available for the secondary armament. Provide recommendations on how to use them and which ammunition to choose. Remember that any anti-air armament, even heavy calibre weapons, belong in the next section. If there is no secondary armament, remove this section.
Anti-aircraft armament
An important part of the ship's armament responsible for air defence. Anti-aircraft armament is defined by the weapon chosen with the control Select anti-aircraft weapons. Talk about the ship's anti-air cannons and machine guns, the number of guns and their positions, their effective range, and about their overall effectiveness – including against surface targets. If there are no anti-aircraft armaments, remove this section.
Additional armament
Describe the available additional armaments of the ship: depth charges, mines, torpedoes. Talk about their positions, available ammunition and launch features such as dead zones of torpedoes. If there is no additional armament, remove this section.
Usage in battles
Describe the technique of using this ship, the characteristics of her use in a team and tips on strategy. Abstain from writing an entire guide – don't try to provide a single point of view, but give the reader food for thought. Talk about the most dangerous opponents for this vehicle and provide recommendations on fighting them. If necessary, note the specifics of playing with this vehicle in various modes (AB, RB, SB).
Pros and cons
Pros:
- Very effective anti-air defences
- 8 inch guns are useful for sinking cruisers and destroyers
- Ammunition is stored under the water line and is well protected
- Carries torpedoes which are useful in close range encounters
- Decent speed for a heavy cruiser
Cons:
- Guns lack AP shells to deal with battlecruisers and battleships
- No bridge protection, losing control is very common in this ship
- Lacks deck armour against plunging shells
- Armour is weak against battleship-calibre guns
- Outgunned by battleships, battlecruisers, and some American heavy cruisers
History
The Treaty Cruiser
The 1921 Washington Treaty conference aimed to prevent war between the major naval powers by restricting warship construction. It decided that cruiser displacement should be limited to a maximum of 10,000 tons per ship. Britain had set the pace by constructing the Hawkins class – the most modern and capable cruisers of their time – which displaced close to 10,000 tons. It was known that the USA and Japan would soon match, and probably exceed, them, building 10,000-ton cruisers with 8-inch guns (the Hawkins-class ships carried 7.5-inch main guns). The British answer was heavy cruisers of the County class, constructed in three batches that were to be armed with 8-inch guns and would be fast with long range. At the end of 1923, the British administration gave the building of eight County-class cruisers known as Kent class (Kent, Suffolk, Cumberland, Berwick, and Cornwall), with two extras (Australia and Canberra) for the Royal Australian Navy. They were laid down between July 1924 and September 1925 and completed between July 1927 and July 1928. Next came the London class (London, Devonshire, Shropshire, and Sussex), laid down between March 1926 and February 1927 and completed between January and September 1929.
The most obvious difference between the London and Kent classes was the removal of a protective bulge on the waterline, which forced a modified hull design that increased length by 2 feet 8 inches and incorporated internal bulges. Their high freeboard meant they were, in most weather, dry ships and could keep up a good rate of knots even in heavy seas. The beam of the Kent was 2 feet 5 inches wider than the London. HMS London's displacement was 9,850 tons (standard) and 13,315 tons (full load). She was 632 feet 8 inches in length, with a 66-foot beam and a draught of 20 feet 9 inches. Propulsion was provided by Parsons geared turbines and eight Admiralty three-drum boilers. HMS London could carry 3,190 tons of oil and achieve more than thirty-two knots. In addition to eight 8-inch main guns and four 4-inch high-angles, London also had four 2-pounder guns and eight 21-inch torpedo tubes. The bridge and the foremast of the London-class cruisers were set further aft to allow B turret to fire abaft the beam without blasting the bridge.
HMS London in the 1930s
For her first overseas deployment, HMS London was sent to the Mediterranean, where she became the flagship of the First Cruiser Squadron and activated in the following years. Trouble was brewing on the island of Cyprus in the early 1930s and soon boiled over into insurrection. It had been granted Crown Colony status in 1925, after being taken from the Turks and occupied by British forces in the First World War. Its position in the eastern Mediterranean made it an ideal base from which to provide additional security for British interests in the Middle East, such as the Suez Canal and Palestine. A strategically vital oil pipeline terminated at Haifa, and the island was also an important staging post for travelers heading to Britain's empire in Asia. Having cast off the hated Turks, Greek Cypriots were angry and frustrated at being prevented by British rule from uniting with their ethnic homeland of Greece. A decision by the Crown Colony administrators to raise taxes stoked the fires of resentment. On 21 October 1931, a mob gathered and marched on the Governor's residence. They burned it to the ground and then went on the rampage when the police belatedly intervened.
The Royal Navy was asked to aid the civil powers, with HMS London and her sister ship HMS Shropshire sent to suppress the uprising in company with the destroyers HMS Acasta and Achates. At Larnaca, HMS London landed armed shore parties of Royal Marines and sailors to protect government offices. They found the local population still defiant and capable of violence. The protestors hurled verbal abuse at London's marines and sailors, waving the Greek flag in their faces. Stones rained down on the helmets of the British, but they held firm. The rioters were trying to make the marines and sailors lose their cool and open fire in the hope that Greece might protest and even intervene militarily. In the early hours of 25 October, the revolt leaders were arrested by troops and police. They were taken by boat to London and Shropshire, where they were held in the cruisers' wardrooms' convivial surroundings. The detainees were given every hospitality, including good food and drink. A few stiff whiskies helped steady the nerves of those still a little shocked at being hauled from their beds in the wee small hours. The seizing of the leaders took the steam out of the revolt, and the British warships were soon able to depart the island's harbours, leaving a job well done behind them.
On 18 July 1936, the Fascist General Franco led an uprising by twelve military garrisons on mainland Spain and five in Spanish Morocco. Most of southern Spain fell to the Fascists, and outside forces intervened to stoke the fires of conflict – the Germans and Italians on the Fascist side and Russia on the Republican government side. Thousands of British passport holders were at the mercy of various warring factions, and the UK government responded by sending warships, including HMS London, to evacuate them from danger, using Barcelona and Valencia as points of embarkation. The ship stopped at Malta for supplies and then went on to Barcelona in company with the Devonshire. On 22 July, the cruiser was secured by her stern to the Mole in Barcelona harbor and the ship received reports from ashore saying the city was now quiet after savage fighting.
|
…one regiment of Fascists was annihilated in a square, being mown down by concealed rifle fire. |
As London waited for the evacuees to start arriving, the situation grew more volatile. On 23 July, a bomb from an aircraft landed near a British warship patrolling the Straits of Gibraltar. HMS London was informed that Barcelona's British Colony of 1,000 people, including many nuns, was to be evacuated. By midnight on 23 July, only 200 people had turned up, with forty of them being immediately sent to Marseilles aboard the destroyer HMS Douglas, which had come alongside London to take them off.
At the beginning of August, the Italian and Swiss governments ordered all their nationals out of Spain. London was flooded with desperate people, and Commander Wright gave up his cabin to a refugee family, ending up sleeping on the upper deck by X-turret. London was told on 7 August that she would stay another fifteen days in Barcelona. After returning to Gibraltar, she was to head back to Portsmouth for a refit that was due to commence in November, during which she was to receive four more high-angle 4-inch guns. By mid-August, it was apparent to Captain Wright that an increasing number of the 'British' refugees were bogus:
|
13 August…. The 'British' folk leaving Spain nowadays are not good speakers of English! |
On 22 August, HMS London was pleased to note that HMS Shropshire had arrived in Barcelona to relieve herself. Between 23 July and 29 July, 839 refugees were evacuated via HMS London, and a further 1,000 were sent to safety between 30 July and 21 August.
At the end of 1936, HMS London was tasked with hunting down gunrunners in Western Mediterranean. Her aircrafts located a suspicious-looking vessel that could well have been a gunrunner, but the cruiser caught up after five hours of hard steaming, only to discover that it was not the suitable quarry at all. In 1937 HMS London was called back to Britain for celebrating the coronation of King George VI and another major refit.
The Reconstruction
With war clouds gathering fast in the late 1930s and naval construction restrictions being discarded equally rapidly, the decision was taken to reconstruct the County-class cruisers to make them more capable ships. HMS London was the first, paying off into refit at Chatham in March 1939. Her ambitious rebuild proved complex and lasted until February 1941. Among the significant modifications were a new waterline armour belt and bridge superstructure, additional 4-inch guns, new hangars and aircraft catapult (the original had been fitted in 1932), and new engines. Her top speed was to remain more than thirty-two knots, and she would be able to do twenty-four knots using just half her boilers. Having started her life with a displacement of 9,850 tons (standard) and 13,315 tons (deep load), by the end of the refit, HMS London's tonnage was 11,015 tons (standard) and 14,578 tons (deep load). The severe changes in London's silhouette included removing one of her funnels, with the new catapult occupying space between the remaining two. Grouped around the aft funnel were the new 4-inch guns, in twin mountings, with pom-pom anti-aircraft weapons (sixteen 2-pounders) on the hangar roofs and machine guns fitted on top of X and B turrets. Post refit, HMS London carried eight 21-inch torpedoes in quadruple mountings on the upper deck and had depth charges. The onset of hostilities between Britain and Germany in September 1939 meant the remaining County-class cruisers were too busy to be rebuilt along the same lines as London. And, as we will see later, it was just as well, for London's rebuild would not stand up to the strain of war service.
During the reconstruction, German bombers targeted Chatham frequently and air raids often interrupted the work, delaying London's progress. The cruiser was finally commissioned for service with the Home Fleet on 7 February 1941.
On 5 March HMS London left Chatham. Waiting for her in the familiar waters of the Channel were magnetic mines sown by the Germans and E-boats keen to pounce on her. The cruiser indulged in some simple deception to ensure she got away from Chatham safely, heading for Tilbury instead of going straight out to sea to avoid German spies and scout planes. Leaving the Thames on 6 March, on her way north, HMS London passed a couple of sinking ships which had been unlucky, falling victim to mines or E-boats.
After arriving at Scapa Flow, London embarked on an energetic program of work up exercises. These included sub-calibre and full calibre shoots with her main guns at targets and also throw off shoots. The latter entailed her guns having their controls set to throw off shells by a cable's length (200 yards) astern, even though the weapons were aimed right at the target ship. London was soon on the receiving end of this all too realistic gunnery exercise technique, when she acted as a target for the battleship Rodney's 16-inch guns. Among other battlewagons the London provided a target for, were King George V, Hood and Prince of Wales.
On 2 April, the London left Scapa to rendezvous with the carrier HMS Argus, which was being used to ferry fighter planes to the Mediterranean. The cruiser escorted Argus to a point 300 miles west of Lisbon where she was turned over to the care of HMS Sheffield.
HMS London spent some time with the battleship King George V keeping watch on Brest to ensure the German battlecruisers Scharnhorst and Gneisenau remained bottled up. The two German heavy ships had taken refuge at the French naval port in February 1941 and would be there for another year. Relieved of this duty, London's next mission was escorting slow convoys out of Sierra Leone. This was difficult for the ship to deal with, as the merchant vessels could do little more than six knots and she tended to wallow at such a slow speed. To relieve the tedium, and provide a means of boosting the confidence of the merchant ships, HMS London ran up and down the convoy lines at twenty-two knots, then took a circuitous route, before going back to the center.
On 12 May, at a UK port, London embarked soldiers who were being taken south to Gibraltar. The generous internal proportions of the County-class cruisers made them ideal troop carriers. After offloading her 600 Army passengers at Gibraltar, London stayed in port for a few days, as she was due to return to Britain carrying soldiers going home on leave. Together with the cruiser HMS Edinburgh, she was also to provide escort for a UK-bound convoy that included the liner SS Arundel Castle, carrying evacuees from Gibraltar. Shortly before the cruiser left, Italian aircraft tried to bomb the Rock, but hit a nearby Spanish town by mistake, killing a number of people. London's AA guns went to action stations but the planes were too far away to shoot down. Sailing north from Gibraltar, on 23 May, London encountered a Vichy French ship that she stopped and searched.
Hunt for Bismarck, and all the troubles
Shortly before 5 P.M., on 24 May, London received a order to take over shadowing duties, searching for the German battleship Bismarck, which was cornered and destroyed on 27 May, leaving HMS London re-ordered to search for German supply ships in the central and southern Atlantic.
On 31 May, HMS London called in at Bathurst, Gambia, to land some of the troops embarked at Gibraltar. They were grateful to escape the confines of the cruiser, but not exactly pleased at being further away from Britain than when they had started. Their chances of spending their leave with their families looked rather slim. HMS London sailed again that afternoon, heading for a rendezvous on 3 June with the destroyer HMS Brilliant, which would be her hunting partner. The following day at 07° 35' N – 31° 29' W, the two British warships found their first German supply ship, the 17,000 tons Esso Hamburg, which had, in fact, refueled the Prinz Eugen on the morning of 28 May. The oil transfer had been curtailed when the German cruiser's lookouts spotted smoke on the horizon.
The British ships soon set the German supply ship on fire and picked up surviving German sailors. But the Esso Hamburg was being very stubborn, so HMS Brilliant fired a torpedo into the supply ship, which failed to go off. Next, she poured fire from her 4.7-inch guns into the German vessel, which caught fire and sank. Unfortunately, the huge pillar of smoke from burning oil curling up into the sky was a perfect warning sign for any other German vessels lurking in that stretch of ocean.
On 5 June HMS London found the supply ship, Egerland, which was flying the Panamanian flag. In an effort to prevent her from scuttling herself London opened fire on her at a very long range and the shot went through her bridge and set her on fire. The German vessel's crew set scuttling charges and abandoned ship, with several more boatloads of Germans taken aboard the already crowded London. Many of the new POWs were U-boat crews who had been waiting for submarines to turn up.
Blessed with enough able-bodied sailors to keep her underway, HMS London headed to Freetown in Sierra Leone to offload her passengers and for part of the way she helped escort a convoy heading in the same direction. London left the convoy on 7 June and went ahead.
During a brief stay in port, the London offloaded the remainder of her British troops onto HMS Norfolk, which was heading back to the UK, while the Germans were sent to prison camps. Back at sea, HMS London resumed her search for German supply vessels. On 12 June the Friedrich Breme had been sunk by the cruiser HMS Sheffield while, on 15 June, the Lothringen had been located and destroyed by planes from the carrier Eagle assisted by the cruiser Dunedin. Six days later, close to the equator, HMS London found the Babitonga, another German supply ship. As it appeared the small German merchant ship posed no threat, London's off watch sailors were allowed to come up onto the upper deck to watch her being sunk.
No more German supply ships were located and so London returned to Freetown to offload her prisoners. By this time some of London's sailors had gone down with malaria and venereal disease, the latter contracted from consorting with prostitutes in Sierra Leone.
On 6 July, HMS London left Freetown and four days later came across another Vichy French merchant ship that was boarded and searched. Two weeks later, during a visit to Gibraltar, London was suddenly called back to home waters. Steaming at top speed for several days, the cruiser was needed to help contain another German surface raider believed to be readying herself for a breakout into the Atlantic.
The high seas raider alert proved to be a false alarm and, after loitering off Iceland for a short while, London came down to Scapa Flow, arriving on 23 July. The cruiser only spent a week in the Orkneys before sailing for Greenock, in the mouth of the Clyde on Scotland's west coast, where her crew were awarded some much-needed shore leave. Following this, London was assigned as escort to a convoy that contained a number of large troop ships bound for North Africa via the Cape. On 10 August, just south of the Azores, London was relieved of escort duty by another cruiser and headed back to the UK, arriving at Scapa Flow eight days later. After another visit to Greenock, London was ordered north again to Iceland, arriving at the Hvalfjord on 2 August.
In late September 1941, HMS London, now back at Scapa, went on a journey that would add a new dimension to war in the North Atlantic. She received orders to embark on an Anglo-US diplomatic mission that was to be taken to Archangel in the far north of Russia. The final destination of this important group was the Kremlin in Moscow, to draw up an agreement with Soviet leader Joseph Stalin for cooperation against Germany.
The Anglo-American mission to Moscow left Scapa Flow aboard HMS London on 22 September. The cruiser carried Lord Beaverbrook, the Canadian newspaper tycoon who Churchill had made his supply minister, as Britain's chief negotiator, with two British Army generals, Air Ministry officials and secretaries making up the rest of the UK party. The Americans were led by business tycoon and diplomat Averell Harriman, who had been sent to Britain by President Roosevelt to oversee administration of the Lend-Lease agreement. The weather during the voyage turned out to be calm and the Germans failed to find the London, which had sailed without escorts. She deposited her precious cargo at Archangel on 27 September, having sailed through the White Sea and thirty miles up the broad River Dvina. From Archangel airport the delegation flew directly to Moscow.
On 28 September, London left Archangel, which was not a good place to hang around as it was being bombed regularly. To kill time, until the diplomats were ready to be picked up for the journey home, the cruiser accompanied a UK-bound convoy of half a dozen ships. A month earlier they had made the first Arctic convoy journey of the war – codenamed Operation Dervish. Now they were carrying timber back to the UK. German aircraft flying from airfields in Finland could be heard hunting for the convoy throughout the time London was with it. Handing over convoy escort duties to HMS Shropshire on 2 October, the London turned around and headed back to Archangel for picking up VIPs.
The Strain in the North, The Disaster of PQ17, and the rest of 1942
HMS London returned to Palmers on the Tyne, where she received a refit from November 1941 until January 1942. It was the major reconstruction that made London brittle and prone to cracking. The armor belt and other additions had added so much weight and were so inflexible that reports were received of leaking rivets and cracks in the upper deck, particularly around the boiler room uptakes.
On leaving refit the London duly headed back to Scapa. After working up in early February, she sailed for Iceland and straight out on a dreaded Patrol White, which stands for a series of patrols for preventing German raiders in northern area.
For London it would mean many months in the Arctic, with the cruiser pushed to the limits of her construction and her sailors to the edge of human endurance. The Denmark Strait, between Iceland and Greenland, was a key patrol area where cruisers based in Iceland, including HMS London, would loiter, waiting for attempts by German capital ships to break out into the Atlantic. As happened with the Bismarck and Prinz Eugen, the cruisers would be expected to tail the enemy, fixing their position for air strikes by carrier planes and subsequent destruction by Royal Navy battleships. In terms of weather, Patrol White was possibly the worst duty of the entire war for British cruisers
The next few months were a living hell of Patrol White with the occasional respite of convoy escort work. The fury of the Arctic winter in those turbulent waters between Iceland and Greenland almost defies the imagination. Even with her high freeboard, the big cruiser was still powerless in the face of the savage forces of nature. It was more than a full gale at sea, it was nearer to a great roaring battlefield, with ships blowing across it like scraps of newspaper.
In mid-February, HMS London became flagship of the First Cruiser Squadron. The big worry, above all others, was the Tirpitz and in early March 1942, when the depleted Home Fleet – sapped of strength by the need to replace ships lost in the Mediterranean and maintaining a presence in the Indian Ocean to counter the Japanese – was only able to field the battleship King George V, battlecruiser Renown, aircraft carrier HMS Victorious, several cruisers (including London) and a mixed bag of destroyers against the German Battleship.
On 1 March, convoy PQ12, consisting of sixteen merchant ships, had set sail from Iceland, with QP8, made up of fifteen supply vessels, coming in the opposite direction from the Kola Inlet. They were given the initials PQ (for Russian bound) and QP (for UK bound) in honor of a naval officer who helped organize them in the Admiralty, Commander P.Q. Roberts. A Luftwaffe scout plane sighted PQ12 on 5 March, when it was less than 100 miles south of Jan Mayen Island and the Germans decided to mount a foray by the Tirpitz. Hitler, who was keeping his heavy ships on a tight leash following the loss of Graf Spee and Bismarck and the damage to the Prinz Eugen, reluctantly gave permission. So, Tirpitz, with a trio of destroyers as her screen, left Trondheim and headed north. HMS London had returned to Hvalfjord from a Patrol White on 7 March and was taking on fuel, and immediately put to sea under urgent orders of the Admiralty, travelling all night at high speed.
Shortly after 10 a.m. the following day, The British submarine that spotted Tirpitz was the Seawolf, loitering off Trondheim and her sighting report allowed Admiral John Tovey, the Home Fleet Commander-in-Chief, to steam hard for an interception somewhere south of PQ12's position. Most important of all were the Albacore torpedo-bombers of Victorious. But progress was slow, as the weather was dreadful. It was so bad that British scout planes could not find the Tirpitz to fix her for a strike and the Germans failed to find PQ12. Giving up, Tovey sailed his force south to a position parallel with Trondheim, hoping Victorious would be able to launch a strike as the Tirpitz returned to her lair. At dawn on 9 March, the carrier launched two of her aircraft on an air search, with the scouting aircraft discovering the German battleship sixty miles off the Norwegian coast, heading for the Vestfjord. At around 9 a.m. a British strike force of more than a dozen Albacores arrived and scored two hits on Tirpitz, for the loss of two aircraft. Unfortunately, the torpedoes were defective and, with the Home Fleet's battleships still too far away to intervene, the Tirpitz was able to seek refuge in the Vestfjord unharmed. While the Home Fleet failed in its attack on the Tirpitz, at least both PQ12 and QP8 got through with light casualties and Hitler was so alarmed by such a close call that he barred any further sorties by Tirpitz, unless the British carrier had been located and destroyed. HMS London, together with her upset crews, had to continue their daily patrol again.
HMS London was again beginning to buckle under the strain. As a result of all the modifications she leaked like a sieve; water was always coming through into the oil tanks, contaminating the oil tanks.
The German Kriegsmarine had its own problems with oil. On top of Hitler's restrictions on battleship and heavy cruiser movements, there was a shortage of fuel. The Germans therefore restricted themselves to launching eight U-boats, three destroyers and Ju88 bombers against PQ13 in late March.
On 28 April HMS London left Scapa in company with King George V, the USS Washington, USS Wichita, USS Tuscaloosa and HMS Nigeria together with HMS Victorious and a brace of destroyers. This Home Fleet task force patrolled between Norway and Iceland to cover PQ15 and QP11. The latter left the Kola Inlet on 28 April, with a close escort led by the cruiser HMS Edinburgh.
On 29 April the pocket battleship Admiral Scheer was reported to be at sea but she turned around without attacking the convoy or giving the Home Fleet enough time to find and sink her. The heavy escort force linked up with PQ15 on 30 April and the following day the Germans made a determined attack on the cruiser squadron. Because the cruisers’ job was to hover just over the horizon, waiting for a surface warship threat rather than providing close anti-aircraft cover, the Luftwaffe's bombers ignored them, choosing to concentrate on the merchant ships. But on 1 May, the cruisers, and London in particular, came in for some special attention. Action stations were called at 10 a.m. and the London's sailors dutifully went to their allocated positions throughout the ship for air defense, in which the escort team claim shooting down six Ju88s.

At the same time, it was a chaos for the Royal Navy, the King George V rammed one of her escorting destroyers, and was damaged by the smaller warship's depth charges going off as she was crushed. Meanwhile, Edinburgh had been torpedoed on 30 April but survived and turned back for Murmansk, but on 2 May her luck ran out when three German destroyers attacked, one of them putting another torpedo into her. British destroyers came to the cruiser's aid but she was so badly damaged by now that she had to be abandoned and scuttled. The German destroyer Hermann Schoemann was also scuttled, having suffered fatal damage during the fight with Edinburgh. In the meantime, QP11 linked up with London and the other Home Fleet ships, managing to get through to Iceland with the loss of only one of thirteen merchant ships. Three of PQ15's merchant ships were lost, with the other twenty-two reaching Murmansk.
HMS London was back at Scapa Flow by 5 May and nothing much happened for nine days until May 14, when London left with Duke of York, Victorious and flotilla of destroyers in an attempt to HMS Trinidad, which was badly damaged in the battle before, limping home from Russia.
However, their mission was already in vain. After temporary repairs in Murmansk, Trinidad set out for the UK on 13 May, with a close escort provided by four destroyers, and four other cruisers providing more distant support. But German aircraft caught Trinidad late in the evening of 14 May. Following at least two bomb hits which caused an uncontrollable fire, Trinidad was abandoned, with one of the escorting destroyers sending her to the bottom with a torpedo in the early hours of 15 May.
The loss of Edinburgh and Trinidad, together with the growing numbers of torpedo bombers and undiminished German surface threat, persuaded the Admiralty that convoys should be suspended during the perpetual daylight of the Arctic summer. But Russia was still under the most serious pressure from the Wehrmacht, which was preparing to mount a big thrust into the Caucasus towards Stalingrad. Also, more and more American merchant ships packed with essential war supplies were queuing up to come across to Iceland on the way to Russia, with President Roosevelt telling Winston Churchill there could be no delays.
On 27 June, HMS London, as the flagship of First Cruiser Squadron, alongside HMS Norfolk, USS Tuscaloosa, and USS Wichita, participated the escort of PQ17 convoy from Iceland. By 1 July the convoy was past Jan Mayen Island, with the first U-boats sighted on the same day and attacked by escorting destroyers. The cruiser force was keeping just over the horizon where it was enthusiastically engaged in depth-charging submarine contacts. The cruisers’ aircraft, including London's Walrus seaplanes, were sent up on Anti-Submarine Warfare patrols to provide more air cover. The weather was calm, with fine blue skies, but there were the usual patches of fog, caused by the warm Gulf Stream hitting the cold polar water and random ice.
German spies had been able to pass on considerable detail about PQ17's composition and a pack of eleven U-boats had been assembled to attack it. In fact, the Germans were planning something special – a concerted offensive involving U-boats and bombers backed up by a heavy ship sortie. Codenamed Rosselsprung, or Knight's Move, it had been outlined for Hitler on 1 June, when he was told it would involve Tirpitz, Lützow, Hipper and Scheer attacking PQ17 once it reached the Barents Sea around 5 July.
The German Naval Staff was confident of evading the Home Fleet and anticipated great success, but Hitler reminded his admirals that HMS Victorious had to be found and destroyed before the battle group could leave harbour. But if the big ships remained where they were the plan would be totally unfeasible – they would never catch up with the convoy. So, the Kriegsmarine persuaded the Führer to allow Tirpitz and Hipper to move up to the Vestfjord, and Scheer and Lützow to the Altenfjord, in the far north of Norway, prior to the green light being given. The admirals also persuaded Hitler the operation could proceed in safety if the Victorious and Allied battleships had been confirmed as too far away to intervene before the convoy was destroyed. However, during the move north on 3 July the Lützow ran aground, as did three destroyers escorting Tirpitz. Robbed of a pocket battleship and left with a reduced escort force, the Germans decided to concentrate their battle group in the Altenfjord.
Meanwhile PQ17 was passing just to the north of Bear Island, U-boat contacts were coming in thick and fast and air attacks were growing in intensity. At 3 p.m. a wave of two dozen German bombers came over but, because of a layer of low cloud, the attackers were forced to drop theirdeadly payloads through it and all the bombs missed. A U-boat fired three torpedoes at the Tuscaloosa, but they all went wide.
In the early hours of 4 July, a single plane shot out of a fog bank…and dropped its fish hitting a cargo vessel and damaging her so badly she had to be scuttled. At 5.15 p.m. a gaggle of torpedo-bombers came winging over smooth seas and sank another merchant ship. Just under an hour later more than thirty German aircraft were greeted with a storm of fire from the escorting warships and merchantmen. Several were shot down but two more ships were mortally wounded. London contributed to the air defence with her 8-inch guns, helping to disrupt an attack by Heinkel torpedo bombers, but on the whole the cruisers had to content themselves with being spectators.
By the evening of 4 July, the Admiralty was confident that Tirpitz was in the Altenfjord and it also knew about the imminent foray, thanks to intelligence sources in Sweden. The increasing volume of German signals traffic seemed to indicate that something was about to happen and in the early hours of 4 July the Admiralty had advised Rear Admiral Hamilton, aboard London, that he should stay with the convoy until it was level with North Cape (25° East).
However, the Admiralty's final orders for PQ17 had ultimately incorporated both the scatter option and the possibility of it being turned back to lead the German surface ships within striking distance of the Home Fleet. On the afternoon of 4 July, Admiral Tovey, now with the Home Fleet somewhere between Iceland and Bear Island, advised the First Cruiser Squadron that it could leave PQ17 before reaching 25° East, indicating that the threat from major German surface units was receding. Hamilton replied that he would leave the convoy late on the evening of 4 July after refueling his destroyers. Shortly before 7 p.m., London received a signal from the Admiralty instructing the First Cruiser Squadron to stay with the convoy.
Rear Admiral Hamilton was not impressed by the contradictory attitudes of his two masters, but he knew that, even though Tovey was the man on the spot with excellent operational instinct, the Admiralty was tapping in to a steady flow of intelligence. He felt that the best course of action would be for his squadron to stay with the convoy until the exact disposition of the German surface ships was known. Despite instructions not to attack major German surface ships, Hamilton had decided that he would have a go if a heavy cruiser or pocket battleship came over the horizon. If his squadron encountered either Scheer, Hipper or even Lützow on their own, he would split his force and attack from four directions – a tactic similar to that employed by the cruisers Exeter, Achilles and Ajax against the Graf Spee in 1939. If there were two German heavy ships then London and Norfolk would attack one, while the Americans would attack the other. If Tirpitz appeared then London and the other cruisers would, as instructed, hang back and try and lead her towards the Home Fleet. As Hamilton pondered these options in his cabin aboard London, the convoy was coming under sustained attack from German aircraft. That evening a British and an American merchant ship were sunk and a Russian tanker damaged, with three German aircraft shot down.
The cruisers were five miles in front, zig-zagging to reduce the risk of being hit by torpedoes, but as the enemy aircraft were concentrating as usual on the merchant ships, the London relaxed her state of alert.
At the Admiralty in London the latest deciphered German signals revealed the enemy had mistaken HMS London for a King George V Class battleship, sailing in company with three escorting destroyers. Because of her one-off rebuild, the London's silhouette was like no other cruiser's and, unless scout plane crews were warned of her presence with the convoy, it was an easy mistake to make. The First Sea Lord was briefed by a member of his staff about the likely implications of this mistaken sighting and other factors that might create caution in the Kriegsmarine's high command. It was pointed out that the PQ12 experience would have made the Germans very wary of risking Tirpitz at sea without knowing for certain where Victorious was. In fact, unknown to the British, floatplanes from the American cruisers had been mistaken for Albacores from the British carrier. However, the person who briefed the First Sea Lord did know that Royal Navy and Russian submarines staking out the Altenfjord had not seen the Tirpitz emerge. But when Admiral Pound asked for a cast iron assurance that the Tirpitz was still in the Altenfjord it could not be provided.
On the bridge of HMS London, Rear Admiral Hamilton was suggesting that the break in enemy attacks provided an opportunity for a quick bite to eat.
Within seconds of the food arriving on the cruiser's bridge the first signal arrived. Marked ‘MOST IMMEDIATE’ it said:
|
The time was 9.11 p.m. and twelve minutes later another equally alarming signal hit the HMS London: IMMEDIATE… OWING TO THREAT FROM SURFACE SHIPS, CONVOY IS TO DISPERSE AND PROCEED TO RUSSIAN PORTS. This was followed, at 9.36 p.m., by the signal that has gone down as one of the most notorious in naval history: MOST IMMEDIATE. CONVOY IS TO SCATTER. |
Devblog
The County-class cruisers, also known as the A-Type cruisers, were the first British cruiser vessels to be developed in the interwar period of the 1920s. Their design being heavily influenced by the restrictions imposed by the Washington Naval Treaty, meant that British shipbuilders had to find compromises during development in order to comply with the treaty as well as to meet the requirements of the Royal Navy for a ship capable of trade route protection.
This resulted in the creation of a ship design with good cruising range and adequate firepower, but very light armour protection in order to stay within treaty restrictions. The orders for the first ships were placed in the mid 1920's and construction began in 1924.
HMS London (C69) was laid down in February 1926 and commissioned into service in January 1929 as the lead ship of the second batch of County-class cruisers to be built, known as the London subclass. During the 1930's, HMS London took part in a goodwill visit to Venice and assisted in the evacuation of civilians from Barcelona during the Spanish Civil War, before being sent to drydock for refit in 1939.
In 1941, HMS London took part in the hunt for the battleship Bismarck, after which the ship was once again dry-docked for repairs. The following year, HMS London assisted in escorting several convoys in the Atlantic, after which she was assigned to South African waters in 1943, before joining the Eastern Fleet. HMS London continued serving in the postwar years, during which the ship got involved in an incident in Chinese waters in 1949 which left it heavily damaged. Being deemed uneconomical for repairs, HMS London was sold for scrap in January 1950.
Media


See also
Links to articles on the War Thunder Wiki that you think will be useful for the reader, for example:
- reference to the series of the ship;
- links to approximate analogues of other nations and research trees.
External links
References
Works Cited
- Chen, C. (2007, May). Heavy Cruiser London. Retrieved November 17, 2020, from https://ww2db.com/ship_spec.php?ship_id=326
- Helgason, G. (1995). HMS London (69). Retrieved November 17, 2020, from https://uboat.net/allies/warships/ship/1178.html
| Britain heavy cruisers | |
|---|---|
| Hawkins-class | HMS Hawkins |
| York-class | HMS York |
| County-class | HMS Kent · HMS London · HMS Norfolk |
