Difference between revisions of "HMS Armada"
(Updated format) |
|||
| Line 5: | Line 5: | ||
== Description == | == Description == | ||
| − | <!--''In the first part of the description, cover the history of the | + | <!-- ''In the first part of the description, cover the history of the ship's creation and military application. In the second part, tell the reader about using this ship in the game. Add a screenshot: if a beginner player has a hard time remembering vehicles by name, a picture will help them identify the ship in question.'' --> |
| − | + | The '''{{Specs|name}}''' is a rank {{Specs|rank}} British destroyer {{Battle-rating}}. It was introduced in [[Update 1.83 "Masters of the Sea"]] as part of the British fleet closed beta test. | |
| − | |||
| − | The '''{{ | ||
== General info == | == General info == | ||
=== Survivability and armour === | === Survivability and armour === | ||
{{Specs-Fleet-Armour}} | {{Specs-Fleet-Armour}} | ||
| − | ''Talk about the vehicle's armour. Note the most well-defended and most vulnerable zones, e.g. the ammo magazine. Evaluate the composition of components and assemblies responsible for movement and manoeuvrability. Evaluate the survivability of the primary and secondary | + | ''Talk about the vehicle's armour. Note the most well-defended and most vulnerable zones, e.g. the ammo magazine. Evaluate the composition of components and assemblies responsible for movement and manoeuvrability. Evaluate the survivability of the primary and secondary armaments separately. Don't forget to mention the size of the crew, which plays an important role in fleet mechanics. Save tips on preserving survivability for the "Usage in battles" section. If necessary, use a graphical template to show the most well-protected or most vulnerable points in the armour.'' |
| − | |||
| − | |||
=== Mobility === | === Mobility === | ||
{{Specs-Fleet-Mobility}} | {{Specs-Fleet-Mobility}} | ||
| − | ''Write about the | + | ''Write about the ship's mobility. Evaluate its power and manoeuvrability, rudder rerouting speed, stopping speed at full tilt, with its maximum forward and reverse speed.'' |
| + | |||
| + | {{NavalMobility}} | ||
=== Modifications and economy === | === Modifications and economy === | ||
| Line 28: | Line 26: | ||
=== Primary armament === | === Primary armament === | ||
{{Specs-Fleet-Primary}} | {{Specs-Fleet-Primary}} | ||
| − | {{main|4 | + | {{main|4.5 inch/45 QF Mark IV (114 mm)}} |
| − | |||
| − | ''Broadly describe the ammunition available for the primary armament, and provide recommendations on how to use it and which ammunition to choose.'' | + | ''Provide information about the characteristics of the primary armament. Evaluate their efficacy in battle based on their reload speed, ballistics and the capacity of their shells. Add a link to the main article about the weapon: <code><nowiki>{{main|Weapon name (calibre)}}</nowiki></code>. Broadly describe the ammunition available for the primary armament, and provide recommendations on how to use it and which ammunition to choose.'' |
=== Secondary armament === | === Secondary armament === | ||
{{Specs-Fleet-Secondary}} | {{Specs-Fleet-Secondary}} | ||
| − | {{main|QF Mark | + | {{main|QF Mark V (40 mm)|QF Mark VII (40 mm)|QF STAAG Mark II (40 mm)}} |
| − | |||
| − | + | ''Some ships are fitted with weapons of various calibres. Secondary armaments are defined as weapons chosen with the control <code>Select secondary weapon</code>. Evaluate the secondary armaments and give advice on how to use them. Describe the ammunition available for the secondary armament. Provide recommendations on how to use them and which ammunition to choose. Remember that any anti-air armament, even heavy calibre weapons, belong in the next section. If there is no secondary armament, remove this section.'' | |
| − | |||
| − | '' | ||
=== Additional armament === | === Additional armament === | ||
{{Specs-Fleet-Additional}} | {{Specs-Fleet-Additional}} | ||
| − | + | {{main|Mk.IX (533 mm)}} | |
| − | ''If there is no additional armament, remove this section.'' | + | ''Describe the available additional armaments of the ship: depth charges, mines, torpedoes. Talk about their positions, available ammunition and launch features such as dead zones of torpedoes. If there is no additional armament, remove this section.'' |
== Usage in battles == | == Usage in battles == | ||
| − | ''Describe the technique of using this ship, the characteristics of her use in a team and tips on strategy. Abstain from writing an entire guide – | + | ''Describe the technique of using this ship, the characteristics of her use in a team and tips on strategy. Abstain from writing an entire guide – don't try to provide a single point of view, but give the reader food for thought. Talk about the most dangerous opponents for this vehicle and provide recommendations on fighting them. If necessary, note the specifics of playing with this vehicle in various modes (AB, RB, SB).'' |
| − | |||
| − | |||
| − | |||
| − | |||
| − | |||
| − | |||
| − | |||
| − | |||
| − | |||
| − | |||
| − | |||
| − | |||
| − | |||
| − | |||
| − | |||
| − | |||
| − | |||
| − | |||
| − | |||
| − | |||
| − | |||
| − | |||
| − | |||
| − | |||
| − | |||
| − | |||
| − | |||
| − | |||
| − | |||
| − | |||
| − | |||
| − | |||
| − | |||
| − | |||
| − | |||
| − | |||
| − | |||
| − | |||
| − | |||
| − | |||
=== Pros and cons === | === Pros and cons === | ||
| − | '' | + | ''Summarise and briefly evaluate the vehicle in terms of its characteristics and combat effectiveness. Mark its pros and cons in the bulleted list. Try not to use more than 6 points for each of the characteristics. Avoid using categorical definitions such as "bad", "good" and the like - use substitutions with softer forms such as "inadequate" and "effective".'' |
'''Pros:''' | '''Pros:''' | ||
| Line 106: | Line 60: | ||
== History == | == History == | ||
| − | <!--''Describe the history of the creation and combat usage of the ship in more detail than in the introduction. If the historical reference turns out to be too | + | <!-- ''Describe the history of the creation and combat usage of the ship in more detail than in the introduction. If the historical reference turns out to be too long, take it to a separate article, taking a link to the article about the ship and adding a block "/History" (example: <nowiki>https://wiki.warthunder.com/(Ship-name)/History</nowiki>) and add a link to it here using the <code>main</code> template. Be sure to reference text and sources by using <code><nowiki><ref></ref></nowiki></code>, as well as adding them at the end of the article with <code><nowiki><references /></nowiki></code>. This section may also include the ship's dev blog entry (if applicable) and the in-game encyclopedia description (under <code><nowiki>=== In-game description ===</nowiki></code>, also if applicable).'' --> |
Realizing the heavy losses to air attacks and the inability of the then current destroyer designs to deal with aerial threats, the Royal Navy decided to act. In 1941, the first plans for what would become the replacement for the Tribal-class were drawn up. | Realizing the heavy losses to air attacks and the inability of the then current destroyer designs to deal with aerial threats, the Royal Navy decided to act. In 1941, the first plans for what would become the replacement for the Tribal-class were drawn up. | ||
| − | Contrary to previous classes, the new destroyers would focus on powerful AA armament, featuring large calibre, high-angle dual purpose guns assisted by a number of smaller calibre AA cannons. The proposed design was accepted in autumn of 1941 under the name | + | Contrary to previous classes, the new destroyers would focus on powerful AA armament, featuring large calibre, high-angle dual purpose guns assisted by a number of smaller calibre AA cannons. The proposed design was accepted in autumn of 1941 under the name "Battle-class" with initial plans to build a total of 16 ships, forming two flotillas. The first order for 10 ships was issued in April 1942, with the second order for the remaining six ships following in August. |
| − | Despite the orders already being placed, further debate among high-ranking officials about the final design of the ship continued. As the initial ships were already under construction, changes to the existing design | + | Despite the orders already being placed, further debate among high-ranking officials about the final design of the ship continued. As the initial ships were already under construction, changes to the existing design couldn't be applied anymore. This led to several more subclasses being developed, but that's a story for another time. |
Although the first ships were launched by November 1943, delays in their completion were caused by late deliveries of critical fire control systems. In the end, only a handful of ships were completed by the end of WW2 and none of them saw any combat action. However, most of the ships of the Battle-class continued to serve well into the Cold War. | Although the first ships were launched by November 1943, delays in their completion were caused by late deliveries of critical fire control systems. In the end, only a handful of ships were completed by the end of WW2 and none of them saw any combat action. However, most of the ships of the Battle-class continued to serve well into the Cold War. | ||
| Line 119: | Line 73: | ||
During the mid 1950s, HMS Armada was involved in the Suez Crisis, but rejoined the Home Fleet shortly after. In 1960, HMS Armada was decommissioned and five years later, in 1965, taken apart for scrap. | During the mid 1950s, HMS Armada was involved in the Suez Crisis, but rejoined the Home Fleet shortly after. In 1960, HMS Armada was decommissioned and five years later, in 1965, taken apart for scrap. | ||
| − | ''- From [ | + | ''- From [[wt:en/news/5835-fleet-development-hms-armada-d14-keeping-the-birds-at-bay-en|Devblog]]'' |
== Media == | == Media == | ||
| − | '' | + | ''Excellent additions to the article would be video guides, screenshots from the game, and photos.'' |
== See also == | == See also == | ||
| − | ''Links to | + | ''Links to articles on the War Thunder Wiki that you think will be useful for the reader, for example:'' |
| − | |||
* ''reference to the series of the ship;'' | * ''reference to the series of the ship;'' | ||
* ''links to approximate analogues of other nations and research trees.'' | * ''links to approximate analogues of other nations and research trees.'' | ||
== External links == | == External links == | ||
| − | <!--''Paste links to sources and external resources, such as:'' | + | <!-- ''Paste links to sources and external resources, such as:'' |
* ''topic on the official game forum;'' | * ''topic on the official game forum;'' | ||
| − | * ''encyclopedia page on ship;'' | + | * ''encyclopedia page on the ship;'' |
| − | * ''other literature.''--> | + | * ''other literature.'' --> |
| − | * [ | + | * [[wt:en/news/5835-fleet-development-hms-armada-d14-keeping-the-birds-at-bay-en|[Devblog] HMS Armada (D14): Keeping The Birds at Bay]] |
{{Britain destroyers}} | {{Britain destroyers}} | ||
Revision as of 11:45, 11 January 2021

Contents
Description
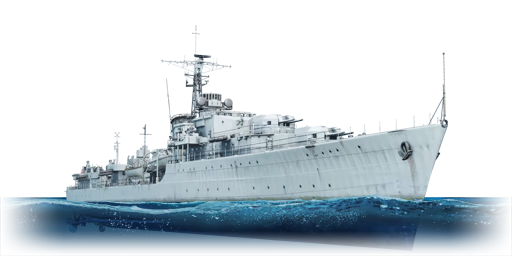
The Battle-class, HMS Armada (D14), 1943 is a rank III British destroyer with a battle rating of 4.7 (AB/RB/SB). It was introduced in Update 1.83 "Masters of the Sea" as part of the British fleet closed beta test.
General info
Survivability and armour
Talk about the vehicle's armour. Note the most well-defended and most vulnerable zones, e.g. the ammo magazine. Evaluate the composition of components and assemblies responsible for movement and manoeuvrability. Evaluate the survivability of the primary and secondary armaments separately. Don't forget to mention the size of the crew, which plays an important role in fleet mechanics. Save tips on preserving survivability for the "Usage in battles" section. If necessary, use a graphical template to show the most well-protected or most vulnerable points in the armour.
Mobility
Write about the ship's mobility. Evaluate its power and manoeuvrability, rudder rerouting speed, stopping speed at full tilt, with its maximum forward and reverse speed.
| Mobility Characteristics | |||
|---|---|---|---|
| Game Mode | Upgrade Status | Maximum Speed (km/h) | |
| Forward | Reverse | ||
| AB | |||
| Upgraded | 86 | 31 | |
| RB/SB | |||
| Upgraded | 70 | 25 | |
Modifications and economy
| Seakeeping | Unsinkability | Firepower | ||||||||||||||||||||||||||||
|---|---|---|---|---|---|---|---|---|---|---|---|---|---|---|---|---|---|---|---|---|---|---|---|---|---|---|---|---|---|---|
|
|
|
Armament
Primary armament
Provide information about the characteristics of the primary armament. Evaluate their efficacy in battle based on their reload speed, ballistics and the capacity of their shells. Add a link to the main article about the weapon: {{main|Weapon name (calibre)}}. Broadly describe the ammunition available for the primary armament, and provide recommendations on how to use it and which ammunition to choose.
Secondary armament
Some ships are fitted with weapons of various calibres. Secondary armaments are defined as weapons chosen with the control Select secondary weapon. Evaluate the secondary armaments and give advice on how to use them. Describe the ammunition available for the secondary armament. Provide recommendations on how to use them and which ammunition to choose. Remember that any anti-air armament, even heavy calibre weapons, belong in the next section. If there is no secondary armament, remove this section.
Additional armament
Describe the available additional armaments of the ship: depth charges, mines, torpedoes. Talk about their positions, available ammunition and launch features such as dead zones of torpedoes. If there is no additional armament, remove this section.
Usage in battles
Describe the technique of using this ship, the characteristics of her use in a team and tips on strategy. Abstain from writing an entire guide – don't try to provide a single point of view, but give the reader food for thought. Talk about the most dangerous opponents for this vehicle and provide recommendations on fighting them. If necessary, note the specifics of playing with this vehicle in various modes (AB, RB, SB).
Pros and cons
Summarise and briefly evaluate the vehicle in terms of its characteristics and combat effectiveness. Mark its pros and cons in the bulleted list. Try not to use more than 6 points for each of the characteristics. Avoid using categorical definitions such as "bad", "good" and the like - use substitutions with softer forms such as "inadequate" and "effective".
Pros:
- High rate of fire
- Decent survivability
- All main caliber guns are located on the bow of the ship, meaning you don't necessarily have to expose the entire profile of the ship in order to maximize firepower
Cons:
- Ineffective against Cruisers
- The low number of main guns means that loss of even one turret significantly effects ability to fight other large ships
History
Realizing the heavy losses to air attacks and the inability of the then current destroyer designs to deal with aerial threats, the Royal Navy decided to act. In 1941, the first plans for what would become the replacement for the Tribal-class were drawn up.
Contrary to previous classes, the new destroyers would focus on powerful AA armament, featuring large calibre, high-angle dual purpose guns assisted by a number of smaller calibre AA cannons. The proposed design was accepted in autumn of 1941 under the name "Battle-class" with initial plans to build a total of 16 ships, forming two flotillas. The first order for 10 ships was issued in April 1942, with the second order for the remaining six ships following in August.
Despite the orders already being placed, further debate among high-ranking officials about the final design of the ship continued. As the initial ships were already under construction, changes to the existing design couldn't be applied anymore. This led to several more subclasses being developed, but that's a story for another time.
Although the first ships were launched by November 1943, delays in their completion were caused by late deliveries of critical fire control systems. In the end, only a handful of ships were completed by the end of WW2 and none of them saw any combat action. However, most of the ships of the Battle-class continued to serve well into the Cold War.
HMS Armada was one of these early ships of the class to be completed, but due to similar reasons, was only commissioned into service in July 1945. After several port visits throughout the UK, she was placed in reserve in 1947 only to rejoin active service in 1949 as part of the 3rd Destroyer Flotilla, operating in the Mediterranean.
During the mid 1950s, HMS Armada was involved in the Suez Crisis, but rejoined the Home Fleet shortly after. In 1960, HMS Armada was decommissioned and five years later, in 1965, taken apart for scrap.
- From Devblog
Media
Excellent additions to the article would be video guides, screenshots from the game, and photos.
See also
Links to articles on the War Thunder Wiki that you think will be useful for the reader, for example:
- reference to the series of the ship;
- links to approximate analogues of other nations and research trees.
External links
| Britain destroyers | |
|---|---|
| Town-class | HMS Churchill · HMS Montgomery |
| V-class | HMS Valhalla · HMS Vega · HMS Verdun |
| G-class | HMS Grafton · ORP Garland |
| Hunt-class | HMS Calpe · HMS Brissenden |
| Tribal-class | HMCS Haida · HMS Eskimo · HMS Mohawk |
| J-class | HMS Jervis |
| K-class | HMS Kelvin |
| N-class | HMAS Nepal |
| Battle-class | HMS Armada · HMS Cadiz · HMAS Tobruk |
| Daring-class | HMS Daring · HMS Diamond · HMS Diana |
