Difference between revisions of "G4M1"
Jareel_Skaj (talk | contribs) (→Survivability and armour: Created) |
Jareel_Skaj (talk | contribs) (→Usage in battles: Created) |
||
| Line 127: | Line 127: | ||
== Usage in battles == | == Usage in battles == | ||
| − | ''Describe the tactics of playing in the aircraft, the features of using aircraft in a team and advice on tactics. Refrain from creating a "guide" - do not impose a single point of view, but instead, give the reader food for thought. Examine the most dangerous enemies and give recommendations on fighting them. If necessary, note the specifics of the game in different modes (AB, RB, SB).'' | + | <!-- ''Describe the tactics of playing in the aircraft, the features of using aircraft in a team and advice on tactics. Refrain from creating a "guide" - do not impose a single point of view, but instead, give the reader food for thought. Examine the most dangerous enemies and give recommendations on fighting them. If necessary, note the specifics of the game in different modes (AB, RB, SB).'' --> |
| + | Comparing to its contemporaries, G4M1 has a somewhat above average climb rate and top speed. Where it has an advantage is in the defensive armament, which, however, cannot be completely relied upon, due to the unreliability of the AI gunners and the relative fragility of the medium bombers. | ||
| + | |||
| + | As a result, the best use of the G4M1 is in dropping general-purpose bombs on enemy bases and emplacements from a high altitude, in particular for the arcade battles. Here an extra care should be taken when selecting bomb load, in order to choose payloads with maximum TNT equivalent for its destructive potential, as opposite to armor-piercing bombs. Also, worth noting, that the [[Navy Type Number 80 Model 1 (800 kg)|800 kg Number 80 Model 1]] bomb does more damage to the enemy base than the four [[Navy Type Number 25 Model 2 (250 kg)|250 kg Number 25 Model 2]] bombs, despite them having a higher total TNT equivalent. 250 kg bombs, however, are perfect for engaging enemy pillboxes and vehicles, owning it to their 116 m destruction radius of a soft targets, and 5 m of the armored targets. | ||
| + | |||
| + | For the anti-naval duty, the [[B6N1 Model 11|B6N family]] or [[D4Y (Family)|D4Y family]] typically do a better job, in particular as a torpedo carrier, due to its smaller size and vastly superior maneuverability. | ||
| + | |||
| + | Low-altitude attacks against vehicles would be best left to the [[D4Y3 Ko]], within the same BR it carried triple 250 kg bombs (1 less), but it's far more maneuverable and to a limited degree can double as a fighter with its twin 7.7 mm machine guns. | ||
=== Manual Engine Control === | === Manual Engine Control === | ||
| Line 183: | Line 190: | ||
|} | |} | ||
| − | + | This plane needs to be fast to avoid trouble and good at defending itself- stock, it can do both things, but not very well. It is suggested that you research Engine and flight performance modifications as quickly as possible so you can skirt around the edge of the map, away from fighters. Alternatively, if you believe you can handle fighters, research the defensive armament lines first. Bomb load-outs are the next most important thing- fortunately, since research at this rank costs very little time, you can research defensive armament and bomb load-outs alternately; this will make the G4M1 an effective weapon. Protection is non-existent for the G4M1, so you should research survivability upgrades last, as it will not help you survive fighter attacks. | |
=== Pros and cons === | === Pros and cons === | ||
| Line 190: | Line 197: | ||
'''Pros:''' | '''Pros:''' | ||
| − | * | + | * Excellent mix of bombs and torpedoes, suitable against all kinds of targets |
| − | + | * Good maneuverability and top speed for a medium bomber | |
| − | * Good | + | * Good defensive capability with the tail 20 mm cannon |
| − | * Good defensive capability with | + | * Self-sealing fuel tanks (although still quite unreliable) |
'''Cons:''' | '''Cons:''' | ||
| Line 199: | Line 206: | ||
* No armour means it can't take very many hits without adverse effects | * No armour means it can't take very many hits without adverse effects | ||
* Large wings means larger targets for the enemy | * Large wings means larger targets for the enemy | ||
| − | |||
== History == | == History == | ||
Revision as of 15:02, 16 August 2020
Contents
Description

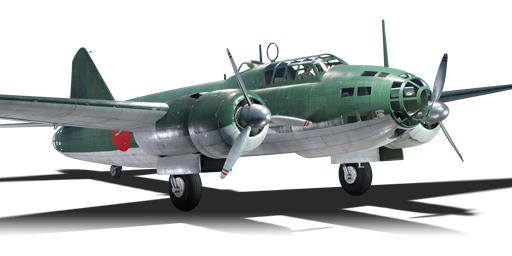
The G4M1 is a rank II Japanese bomber
with a battle rating of 3.0 (AB/SB) and 2.7 (RB). It has been in the game since the start of the Open Beta Test prior to Update 1.27. The Americans nicknamed it "Betty", whilst the Japanese called it "Hamaki" ("cigar" or "leaf roll").
This vehicle is more dangerous the longer it stays in the battle- this is because, whilst its armament of 4 x 250 kg bombs is a small one for its BR and rank, it can destroy most targets that it will encounter with these bombs, so more bombing runs make it more devastating to the enemy ticket counter. This plane can be used as a base bomber, but this normally results in death, as the enemy climbs to meet you and it only takes a few shots to destroy you. The G4M1's most effective play is destroying ground targets like Light Pillboxes, tanks and gun emplacements; the 250 kg bombs work on ships well too. It is not suggested to climb in the G4M1, as you need the protection of air superiority to be secure higher up, but the Allied aircraft you face will engage your fighters before they reach you.
Accuracy is everything with the G4M1. You need to be on target with your rear gunner, otherwise an enemy sitting behind you will make quick work of you. The 20 mm cannon is devastating if you hit- this can be hard for novice bomber pilots, but expert bomber pilots will know where to aim. The other guns on the G4M1 have little effect, but try to use them if the enemy is closing in in that direction.
General info
Flight performance
| Characteristics | Max Speed (km/h at 6,000 m) |
Max altitude (metres) |
Turn time (seconds) |
Rate of climb (metres/second) |
Take-off run (metres) | |||
|---|---|---|---|---|---|---|---|---|
| AB | RB | AB | RB | AB | RB | |||
| Stock | 431 | 422 | 8000 | 33.2 | 33.6 | 5.1 | 5.1 | 314 |
| Upgraded | 471 | 452 | 31.2 | 32.0 | 10.2 | 7.2 | ||
Details
| Features | ||||
|---|---|---|---|---|
| Combat flaps | Take-off flaps | Landing flaps | Air brakes | Arrestor gear |
| ✓ | ✓ | ✓ | X | X |
| Limits | ||||||
|---|---|---|---|---|---|---|
| Wings (km/h) | Gear (km/h) | Flaps (km/h) | Max Static G | |||
| Combat | Take-off | Landing | + | - | ||
| 540 | 300 | 450 | 450 | 250 | ~4 | ~3 |
| Optimal velocities (km/h) | |||
|---|---|---|---|
| Ailerons | Rudder | Elevators | Radiator |
| < 360 | < 360 | < 310 | > 324 |
| Compressor (RB/SB) | ||
|---|---|---|
| Setting 1 | ||
| Optimal altitude | 100% Engine power | WEP Engine power |
| 2,600 m | 2,800 hp | 3,125 hp |
| Setting 2 | ||
| Optimal altitude | 100% Engine power | WEP Engine power |
| 5,600 m | 2,560 hp | 2,857 hp |
Survivability and armour
The bomber has no dedicated armor protection, however, it still features relatively good survivability for a Japanese bomber. All of its fuel tanks are self-sealing, making it likely to survive burning wings, and significantly increasing survival chances under low to medium-caliber gunfire. Furthermore, 20mm rear gunner provides an opportunity to quickly dispatch tailing fighters. This, in a combination with a narrow silhouette, makes rear aspect engagement the preferable way of dealing with incoming enemy fighters.
What should be avoided are enemies incoming from top and bottom, especially those equipped with 20mm cannons, as the large and fragile wing area makes for an easy target.
Armaments
Suspended armament
The G4M1 can be outfitted with the following ordnance:
- 12 x 60 kg Navy Type 97 Number 6 bombs (720 kg total)
- 4 x 250 kg Navy Type Number 25 Model 2 bombs (1,000 kg total)
- 4 x 250 kg Navy Type 98 Number 25 bombs (1,000 kg total)
- 1 x 500 kg Navy Type Number 50 Model 2 bomb (500 kg total)
- 1 x 835 kg Type 91 Model 2 torpedo
- 1 x 850 kg Type 91 Model 3 torpedo
- 1 x 800 kg Navy Type 99 Number 80 AP bomb (800 kg total)
- 1 x 800 kg Navy Type Number 80 Model 1 bomb (800 kg total)
Defensive armament
The G4M1 is defended by:
- 1 x 20 mm Type 99 Model 1 cannon, tail turret (1,000 rpg)
- 1 x 7.7 mm Type 92 machine gun, nose turret (1,000 rpg)
- 1 x 7.7 mm Type 92 machine gun, dorsal turret (1,000 rpg)
- 1 x 7.7 mm Type 92 machine gun, 2 x beam turrets (1,000 rpg)
Usage in battles
Comparing to its contemporaries, G4M1 has a somewhat above average climb rate and top speed. Where it has an advantage is in the defensive armament, which, however, cannot be completely relied upon, due to the unreliability of the AI gunners and the relative fragility of the medium bombers.
As a result, the best use of the G4M1 is in dropping general-purpose bombs on enemy bases and emplacements from a high altitude, in particular for the arcade battles. Here an extra care should be taken when selecting bomb load, in order to choose payloads with maximum TNT equivalent for its destructive potential, as opposite to armor-piercing bombs. Also, worth noting, that the 800 kg Number 80 Model 1 bomb does more damage to the enemy base than the four 250 kg Number 25 Model 2 bombs, despite them having a higher total TNT equivalent. 250 kg bombs, however, are perfect for engaging enemy pillboxes and vehicles, owning it to their 116 m destruction radius of a soft targets, and 5 m of the armored targets.
For the anti-naval duty, the B6N family or D4Y family typically do a better job, in particular as a torpedo carrier, due to its smaller size and vastly superior maneuverability.
Low-altitude attacks against vehicles would be best left to the D4Y3 Ko, within the same BR it carried triple 250 kg bombs (1 less), but it's far more maneuverable and to a limited degree can double as a fighter with its twin 7.7 mm machine guns.
Manual Engine Control
| MEC elements | ||||||
|---|---|---|---|---|---|---|
| Mixer | Pitch | Radiator | Supercharger | Turbocharger | ||
| Oil | Water | Type | ||||
| Controllable | Controllable Not auto controlled |
Controllable Auto control available |
Controllable Auto control available |
Separate | Controllable 2 gears |
Not controllable |
Modules
| Tier | Flight performance | Survivability | Weaponry | ||
|---|---|---|---|---|---|
| I | Fuselage repair | Radiator | Turret 7 mm | 12 in (mod30) | |
| II | Compressor | Airframe | New 7 mm MGs (turret) | 17 3/4 in (mod45) | |
| III | Wings repair | Engine | Turret 20 mm | Improved torpedo | |
| IV | Engine injection | Cover | New 20 mm cannons (turret) | 14 in (mod35) | |
This plane needs to be fast to avoid trouble and good at defending itself- stock, it can do both things, but not very well. It is suggested that you research Engine and flight performance modifications as quickly as possible so you can skirt around the edge of the map, away from fighters. Alternatively, if you believe you can handle fighters, research the defensive armament lines first. Bomb load-outs are the next most important thing- fortunately, since research at this rank costs very little time, you can research defensive armament and bomb load-outs alternately; this will make the G4M1 an effective weapon. Protection is non-existent for the G4M1, so you should research survivability upgrades last, as it will not help you survive fighter attacks.
Pros and cons
Pros:
- Excellent mix of bombs and torpedoes, suitable against all kinds of targets
- Good maneuverability and top speed for a medium bomber
- Good defensive capability with the tail 20 mm cannon
- Self-sealing fuel tanks (although still quite unreliable)
Cons:
- No armour means it can't take very many hits without adverse effects
- Large wings means larger targets for the enemy
History
Designed as a lightweight medium bomber, the G4M1 sacrificed protection in order to achieve high-speed and an operational range of 2,850 km. Unfortunately, this made the plane extremely vulnerable to Allied fighters and anti-aircraft fire who found the engines and fuel tanks particularly flammable. The plane's finest hour was the sinking of the HMS Repulse and HMS Prince Of Wales, the first two capital ships sunk in open waters by aircraft during wartime.
The plane also played a role in the final hours of Admiral Isoroku Yamamoto. Two G4M1 bombers of the Kōkūtai 705, escorted by 6 A6M2 fighters Kōkūtai 204, were to carry him from Rabaul to Balalae Airfield near Bougainville Island. Admiral Yamamoto's purpose in traveling to Balalae Airfield was to inspect Japanese aircraft participating in Operation I-Go, and to boost morale following the intense battles at Guadalcanal. However, U.S. naval intelligence decrypted orders sent to Japanese commanders regarding the itinerary, escorting forces, and which units were be toured. In Operation Vengeance, 18 P-38G Lightnings were sent to intercept Yamamoto, which ended in both G4M1 bombers shot down. The bomber with Yamamoto crashed in the jungle, killing him, and the other, holding his staff, crashed at the sea.
In-game description
The long-range twin-engine Mitsubishi G4M torpedo bomber had a relatively small bomb load of 1000 kg but a long flight range of about 6000 km.
Because of the Washington Naval Agreement, Japan was far behind in fleet construction. Therefore, to guard against potential enemy warships, the 10-Shi specification was created, calling for a long-range, twin-engine torpedo bomber.
The power plant consisted of two engines with 1530 horsepower. The plane was the first Japanese plane in history to use retractable landing gear.
Needing to make weight cutbacks to construct a high-speed and long-range bomber, the designers abandoned fuel tank protection, assuming that the G4M1 would be able to flee from enemy fighters. The designers' hopes did not materialize: the wings (where the fuel tanks were located) easily caught fire, and at the war's start, fighters which could catch up to the bombers without much difficulty were already in the air.
All in all, 1170 G4M1s were constructed.
Media
See also
Links to the articles on the War Thunder Wiki that you think will be useful for the reader, for example:
- reference to the series of the aircraft;
- links to approximate analogues of other nations and research trees.
External links
Paste links to sources and external resources, such as:
- topic on the official game forum;
- encyclopedia page on the aircraft;
- other literature.
| Mitsubishi Company (三菱商会) | |
|---|---|
| Fighters | A5M4 · Hagiri's A5M4 |
| A6M2 mod. 11 · A6M2 · A6M3 · A6M3 mod. 22 · A6M3 mod. 22Ko · A6M5 · A6M5 Ko · A6M5 otsu · A6M5 Hei · A6M6c | |
| A7M1 (NK9H) · A7M2 | |
| J2M2 · J2M3 · J2M4 Kai · J2M5 · J2M5 (30 mm) | |
| Hydroplanes | F1M2 |
| Interceptors | Ki-83 · Ki-109 |
| Bombers | G4M1 |
| Ki-21-Ia · Ki-21-I hei · Ki-67-I Ko · Ki-67-I otsu | |
| Jet Fighters | Ki-200 |
| Captured | ▃A6M2 · ␗A6M2 |
| See also | Mitsubishi Heavy Industries, Ltd. (Post-War) |
| Japan bombers | |
|---|---|
| Navy | |
| Carrier-based attack bomber | |
| B5N | B5N2 |
| B6N | B6N1 · B6N2 · B6N2a |
| B7A | B7A2 · B7A2 (Homare 23) |
| Carrier-based dive bomber | |
| D3A | D3A1 |
| D4Y | D4Y1 · D4Y2 · D4Y3 Ko |
| Shipboard Observation seaplane | |
| F1M | F1M2 |
| Land-based Attack bomber | |
| G4M | G4M1 |
| G5N | G5N1 |
| G8N | G8N1 |
| Flying boat | |
| H6K | H6K4 |
| H8K | H8K2 · H8K3 |
| Land-based Bomber | |
| P1Y | P1Y1 |
| Army | |
| Light | Ki-32 |
| Ki-48-II otsu | |
| Heavy | Ki-21-Ia · Ki-21-I hei |
| Ki-49-I · Ki-49-IIa · Ki-49-IIb · Ki-49-IIb/L | |
| Ki-67-I Ko · Ki-67-I otsu | |
| Other countries | ▅B-17E |
