Difference between revisions of "Fw 190 A-4"
(Updated information.) |
(Updated page template) |
||
| (12 intermediate revisions by 8 users not shown) | |||
| Line 1: | Line 1: | ||
{{Specs-Card|code=fw-190a-4}} | {{Specs-Card|code=fw-190a-4}} | ||
| + | {{About | ||
| + | | about = German fighter '''{{PAGENAME}}''' | ||
| + | | usage = other versions | ||
| + | | link = Fw 190 (Family) | ||
| + | }} | ||
== Description == | == Description == | ||
| − | <!--''In the description, the first part | + | <!-- ''In the description, the first part should be about the history of and the creation and combat usage of the aircraft, as well as its key features. In the second part, tell the reader about the aircraft in the game. Insert a screenshot of the vehicle, so that if the novice player does not remember the vehicle by name, he will immediately understand what kind of vehicle the article is talking about.'' --> |
| − | |||
[[File:GarageImage_Fw190A4.jpg|420px|thumb|left]] | [[File:GarageImage_Fw190A4.jpg|420px|thumb|left]] | ||
| − | {{ | + | {{Break}} |
| − | The ''' | + | The '''{{Specs|name}}''' is a rank {{Specs|rank}} German fighter {{Battle-rating}}. It was introduced in [[Update 1.43]]. |
''"Würger"'' is the German nickname of this beast of a plane, or in English, Shrike. It can also be translated as ''slayer'', ''choker'', or ''strangler''. In that regard fits the English designation well too: ''"Butcher-bird"'' | ''"Würger"'' is the German nickname of this beast of a plane, or in English, Shrike. It can also be translated as ''slayer'', ''choker'', or ''strangler''. In that regard fits the English designation well too: ''"Butcher-bird"'' | ||
| − | Fw 190s are fighters, while this one can load additional payload, it will reduce the planes combat ability. Using it as a | + | Fw 190s are fighters, while this one can load additional payload, it will reduce the planes combat ability. Using it as a fighter-bomber is generally not advised, this would be the duty of the [[Fw 190 F-8|Fw 190 F-8]]. |
| + | |||
| + | The best ammo to use for both cannons is the Air Target belts. They will destroy fighters and bombers faster than tracers. They are different for both cannons, however. For the MG 151's they have a high explosive incendiary shell, armour-piercing shell, and incendiary tracer shell costing 110 silver lions per "per reload". The Mg FF/M's have high explosive incendiary shell, Fragmentation incendiary tracer shell (self-destroying) and armour piercing high explosive shell which cost 40 Sliver Lions "per reload." | ||
| − | The best | + | The best ammunition available for use with machine guns is Universal. Universal utilizes armour-piercing tracer rounds, armour-piercing rounds, adjustment incendiary rounds, and armour-piercing incendiary rounds. Reloading only costs 9 silver lions "per reload". |
| − | |||
== General info == | == General info == | ||
| − | === Flight | + | === Flight performance === |
| − | + | ''Describe how the aircraft behaves in the air. Speed, manoeuvrability, acceleration and allowable loads - these are the most important characteristics of the vehicle.'' | |
| − | {| class="wikitable" style="text-align:center" | + | |
| − | + | {| class="wikitable" style="text-align:center" width="70%" | |
| − | + | ! rowspan="2" | Characteristics | |
| − | |||
| − | ! | ||
| − | |||
! colspan="2" | Max Speed<br>(km/h at 5,800 m) | ! colspan="2" | Max Speed<br>(km/h at 5,800 m) | ||
| − | ! rowspan="2" | Max altitude<br>( | + | ! rowspan="2" | Max altitude<br>(metres) |
! colspan="2" | Turn time<br>(seconds) | ! colspan="2" | Turn time<br>(seconds) | ||
| − | ! colspan="2" | Rate of climb<br>( | + | ! colspan="2" | Rate of climb<br>(metres/second) |
| − | ! rowspan="2" |Take-off run<br>( | + | ! rowspan="2" | Take-off run<br>(metres) |
|- | |- | ||
| − | ! AB | + | ! AB !! RB !! AB !! RB !! AB !! RB |
| − | ! RB | ||
| − | ! AB | ||
| − | ! RB | ||
| − | ! AB | ||
| − | ! RB | ||
|- | |- | ||
| − | | 619 || | + | ! Stock |
| + | | 619 || 603 || rowspan="2" | {{Specs|ceiling}} || 23.4 || 24.0 || 10.6 || 10.6 || rowspan="2" | 420 | ||
|- | |- | ||
| − | ! | + | ! Upgraded |
| − | + | | 675 || 648 || 20.9 || 22.0 || 18.4 || 14.1 | |
| − | |||
| − | |||
| − | |||
| − | |||
| − | |||
| − | | | ||
| − | |||
| − | |||
| − | |||
| − | |||
| − | |||
| − | |||
| − | |||
| − | |||
|- | |- | ||
|} | |} | ||
| − | ====Details==== | + | ==== Details ==== |
| − | {| class="wikitable" style="text-align:center" | + | {| class="wikitable" style="text-align:center" width="50%" |
|- | |- | ||
! colspan="5" | Features | ! colspan="5" | Features | ||
|- | |- | ||
| − | ! Combat | + | ! Combat flaps !! Take-off flaps !! Landing flaps !! Air brakes !! Arrestor gear |
| − | ! Take-off | ||
| − | ! Landing | ||
| − | ! Air brakes | ||
| − | ! Arrestor gear | ||
|- | |- | ||
| − | | | + | | X || ✓ || ✓ || X || X <!-- ✓ --> |
|- | |- | ||
|} | |} | ||
| − | {| class="wikitable" style="text-align:center" | + | {| class="wikitable" style="text-align:center" width="50%" |
|- | |- | ||
| − | ! colspan=" | + | ! colspan="7" | Limits |
|- | |- | ||
| − | ! rowspan="2" | | + | ! rowspan="2" | Wings (km/h) |
| − | ! rowspan="2" | Gear | + | ! rowspan="2" | Gear (km/h) |
| − | ! | + | ! colspan="3" | Flaps (km/h) |
! colspan="2" | Max Static G | ! colspan="2" | Max Static G | ||
|- | |- | ||
| − | ! + | + | ! Combat !! Take-off !! Landing !! + !! - |
| − | ! - | ||
|- | |- | ||
| − | | | + | | {{Specs|destruction|body}} || {{Specs|destruction|gear}} || N/A || 700 || 310 || ~13 || ~6 |
|- | |- | ||
|} | |} | ||
| Line 91: | Line 70: | ||
{| class="wikitable" style="text-align:center" | {| class="wikitable" style="text-align:center" | ||
|- | |- | ||
| − | ! colspan="4" | Optimal velocities | + | ! colspan="4" | Optimal velocities (km/h) |
|- | |- | ||
| − | ! Ailerons | + | ! Ailerons !! Rudder !! Elevators !! Radiator |
| − | ! Rudder | ||
| − | ! Elevators | ||
| − | ! Radiator | ||
|- | |- | ||
| − | | < 420 || < | + | | < 420 || < 240 || < 550 || > 280 |
|- | |- | ||
|} | |} | ||
| Line 112: | Line 88: | ||
! WEP Engine power | ! WEP Engine power | ||
|- | |- | ||
| − | | 1,500 m || 1,520 hp || 1,727 hp | + | | 1,500 m || 1,520 hp || 1,727 hp |
|- | |- | ||
! colspan="3" | Setting 2 | ! colspan="3" | Setting 2 | ||
| Line 120: | Line 96: | ||
! WEP Engine power | ! WEP Engine power | ||
|- | |- | ||
| − | | 5,300 m || 1,420 hp || 1,613 hp | + | | 5,300 m || 1,420 hp || 1,613 hp |
| − | |||
| − | |||
|- | |- | ||
| − | |||
| − | |||
| − | |||
| − | |||
| − | |||
| − | |||
|} | |} | ||
=== Survivability and armour === | === Survivability and armour === | ||
| − | <!--''Examine the survivability of the aircraft. Note how vulnerable the structure is and how secure the pilot is, whether the fuel tanks are armoured. Describe the armour, if there is any, also mention the vulnerability of other critical aircraft systems.''--> | + | <!-- ''Examine the survivability of the aircraft. Note how vulnerable the structure is and how secure the pilot is, whether the fuel tanks are armoured, etc. Describe the armour, if there is any, and also mention the vulnerability of other critical aircraft systems.'' --> |
| + | |||
* 3 mm Steel - Fore engine cowling | * 3 mm Steel - Fore engine cowling | ||
* 5 mm Steel - Secondary engine cowling | * 5 mm Steel - Secondary engine cowling | ||
| Line 146: | Line 115: | ||
== Armaments == | == Armaments == | ||
=== Offensive armament === | === Offensive armament === | ||
| − | <!--''Describe the offensive armament of the aircraft, if any. Describe how effective the cannons and machine guns are in a battle, and also what belts or drums are better to use. If there is no offensive weaponry, delete this subsection.''--> | + | <!-- ''Describe the offensive armament of the aircraft, if any. Describe how effective the cannons and machine guns are in a battle, and also what belts or drums are better to use. If there is no offensive weaponry, delete this subsection.'' --> |
| − | {{main|MG 151 | + | {{main|MG 151 (20 mm)|MG FF/M (20 mm)|MG 17 (7.92 mm)}} |
| − | The | + | The '''''{{PAGENAME}}''''' is armed with: |
| − | * 2 x 20 mm MG 151 | + | * 2 x 20 mm MG 151 cannons, wing-mounted (250 rpg = 500 total) |
| − | * 2 x 20 mm MG FF/M | + | * 2 x 20 mm MG FF/M cannons, wing-mounted (90 rpg = 180 total) |
| − | * 2 x 7.92 mm MG 17 machine | + | * 2 x 7.92 mm MG 17 machine guns, nose-mounted (900 rpg = 1,800 total) |
| − | |||
Pilots who are really experienced with the aiming and hitting of the MG151/20 might want to use stealth belts on the MGs and cannons, to avoid being spotted by tracers. Using stealth belts on the machine guns only is also useful for aiming the cannon more easily without the distraction provided by the light machine gun tracers.<br /> | Pilots who are really experienced with the aiming and hitting of the MG151/20 might want to use stealth belts on the MGs and cannons, to avoid being spotted by tracers. Using stealth belts on the machine guns only is also useful for aiming the cannon more easily without the distraction provided by the light machine gun tracers.<br /> | ||
| + | |||
:'''7.92mm MG 17''' | :'''7.92mm MG 17''' | ||
| + | |||
*Air Targets: Universal (AP-T/AP/AI/AP-I) | *Air Targets: Universal (AP-T/AP/AI/AP-I) | ||
*Ground Targets: Tracer (AP-T) | *Ground Targets: Tracer (AP-T) | ||
| − | |||
| − | |||
| − | |||
| − | |||
| − | |||
| − | |||
| − | |||
| − | + | :'''20mm MG 151''' | |
| − | '' | + | |
| − | + | *Air Targets: Air targets (AP-I/HEI/HEI/HEI/HEI/IT) // Consisting of 2/3 Minengeschoße, this belt is very effective against any aircraft. | |
| − | + | *Ground Targets: Armored targets (APHE/APHE/APHE/IT) | |
| − | + | ||
| − | + | :'''20 mm MG FF/M''' | |
| − | + | *Air targets | |
| − | + | == Usage in battles == | |
| + | <!-- ''Describe the tactics of playing in the aircraft, the features of using aircraft in a team and advice on tactics. Refrain from creating a "guide" - do not impose a single point of view, but instead, give the reader food for thought. Examine the most dangerous enemies and give recommendations on fighting them. If necessary, note the specifics of the game in different modes (AB, RB, SB).'' --> | ||
| + | The A-4 is a punishing Boom & Zoom fighter. The armament is fantastic, climb rate top par (rivalled by the [[Bf 109 F-4|Bf 109 F-4]]), and dive speed/top-speed is very good. Use this to your advantage. As should be familiar now with the previous Focke-Wulf (and future models), the turning capabilities of this plane are very poor. Dogfighting is not recommended with the Fw 190. | ||
| − | + | This should not discourage you from seizing opportunities, however. A Fw 190 A-4 in a balanced furball can be devastating when acting as a wingman, keeping other fighters from attacking your teammates. These opponents are less focused on evading you, as they are busy trying to attack your allies, giving you the time to line up the shot. As soon as the fight begins to tip in the enemies' favour, it's time for you to make a quick disappearance, as enemies actively trying to get on your tail will almost always succeed. | |
| − | + | The 190-A4's weapon set is fantastic, too. Four 20 mm cannons are more than enough to rip any plane to shreds and the backup MGs, while not particularly damaging against other fighters at this tier, are great for strafing light ground targets like AA guns. Your firepower is only rivalled by the Aircobras and the twin-engine heavy fighters. | |
| − | + | The Fw 190 A-4, as all the planes in this line, are some of the best Boom & Zoomers in the game and should be flown exclusively in this style. But like the [[Fw 190 A-1|Fw 190 A-1]], it is one of the more manoeuvrable Focke-Wulfs. The performance at high speeds is excellent, as is it's dive and climb characteristics. '''Do not ever engage this aircraft in a turn fight''' as this will usually end badly. Instead, fight primarily in the vertical. Always try to have an altitude or speed advantage over your opponents (climb off to the side at the start of the battle and then enter the highest battle you come across). | |
| − | |||
| − | |||
| − | |||
| − | + | In the defensive, as in the previous plane, you can often just dive away from most planes at high speed. In a dive, the 190 can, due to its short wings, pull quite some stunts to lose your attacker or even cause him to lose his wings! Again, be sure to regain your energy and altitude after a fight. | |
| − | + | The best tactic for this plane is Boom and Zoom tactics, although careful energy-fighting works well too at higher speeds. There are generally two types of Boom & Zoom strategies: '''Tailing Boom & Zoom''' or '''Burst Boom & Zoom''': | |
| − | + | A '''Tailing Boom & Zoom''' is when the pilot sweeps in behind a target and follows (or "tails") him for a few seconds before breaking away. The benefit of doing this is that the attacker has a longer time to aim and take down the target. This comes at the cost of having less energy to climb back up afterwards, and you are a fairly easy target for other nearby enemies. | |
| − | + | If you remain behind your target for too long, you will lose too much energy and won't be able to climb back up to safety. Any turning involved makes your situation worse, though remember that smart foes in more agile planes will often try to counter this tactic by baiting you into a turn. Keeping their plane just out of your sights entices you to keep following them for just another second more until they've drained your speed and then you will be a slow, easy target. | |
| − | |||
| − | |||
| − | |||
| − | |||
| − | |||
| − | |||
| − | |||
| − | ''' | + | '''Burst Boom & Zoom''' is when a pilot dives down directly onto an enemy, fires a 1-2 second burst at close range, and immediately zooms back up to a safe altitude. The benefits of this tactic, as opposed to the former, is you have far more speed to climb back up and you will be safer from return fire, as you will have spent less time in the enemy's "zone". The problem with this is that you have far less time to shoot, and may not even damage the enemy if your aim is off even by a little. |
| − | |||
| − | |||
| − | |||
| − | |||
| − | |||
====Specific enemies worth noting==== | ====Specific enemies worth noting==== | ||
<!--Some concerning vehicles to worry about if playing this plane. (i.e. Japanese fighters will out turn you)--> | <!--Some concerning vehicles to worry about if playing this plane. (i.e. Japanese fighters will out turn you)--> | ||
| − | Some planes, you might see which are very deadly opponents are the: [[ | + | Some planes, you might see which are very deadly opponents are the: [[Spitfire_F_Mk_IX|Spitfires]], [[Typhoon_Mk_Ib/L|Typhoons]], [[Beaufighter_Mk_21|Beaufighters]], [[P-51D-5|Mustangs]], [[Yak-9U|Yakovlevs]], [[B-17E/L|B-17s]] and the [[Wellington_Mk_Ic/L|Wellingtons]] These planes should not be underestimated, they can all fight this aircraft extremely well. |
| − | ===Manual Engine Control=== | + | |
| + | === Manual Engine Control === | ||
{| class="wikitable" style="text-align:center" | {| class="wikitable" style="text-align:center" | ||
|- | |- | ||
! colspan="7" | MEC elements | ! colspan="7" | MEC elements | ||
|- | |- | ||
| − | ! rowspan="2" |Mixer | + | ! rowspan="2" | Mixer |
| − | ! rowspan="2" |Pitch | + | ! rowspan="2" | Pitch |
| − | ! colspan="3" |Radiator | + | ! colspan="3" | Radiator |
| − | ! rowspan="2" |Supercharger | + | ! rowspan="2" | Supercharger |
| − | ! rowspan="2" |Turbocharger | + | ! rowspan="2" | Turbocharger |
|- | |- | ||
| − | ! Oil | + | ! Oil !! Water !! Type |
| − | ! Water | ||
| − | ! Type | ||
|- | |- | ||
| − | + | | Not controllable || Controllable<br>Not auto controlled || Not controllable<br>Not auto controlled || Controllable<br>Not auto controlled || Combined || Not controllable<br>2 gears || Not controllable | |
|- | |- | ||
|} | |} | ||
| − | ===Modules=== | + | === Modules === |
{| class="wikitable" | {| class="wikitable" | ||
! Tier | ! Tier | ||
| − | ! Flight performance | + | ! colspan="2" | Flight performance |
! Survivability | ! Survivability | ||
| − | ! Weaponry | + | ! colspan="2" | Weaponry |
|- | |- | ||
| I | | I | ||
| − | | Fuselage | + | | Fuselage repair |
| − | | | + | | Radiator |
| + | | | ||
| Offensive 7 mm | | Offensive 7 mm | ||
| + | | | ||
|- | |- | ||
| II | | II | ||
| + | | | ||
| Compressor | | Compressor | ||
| Airframe | | Airframe | ||
| New 7 mm MGs | | New 7 mm MGs | ||
| + | | | ||
|- | |- | ||
| III | | III | ||
| − | | | + | | Wings repair |
| − | | | + | | Engine |
| − | | Offensive 20 mm | + | | |
| + | | Offensive 20 mm | ||
| + | | Offensive 20 mm | ||
|- | |- | ||
| IV | | IV | ||
| − | | Engine | + | | |
| + | | Engine injection | ||
| Cover | | Cover | ||
| − | | New 20 mm | + | | New 20 mm cannons |
| + | | New 20 mm cannons | ||
|- | |- | ||
|} | |} | ||
=== Pros and cons === | === Pros and cons === | ||
| − | <!--'' | + | <!-- ''Summarise and briefly evaluate the vehicle in terms of its characteristics and combat effectiveness. Mark its pros and cons in the bulleted list. Try not to use more than 6 points for each of the characteristics. Avoid using categorical definitions such as "bad", "good" and the like - use substitutions with softer forms such as "inadequate" and "effective".'' --> |
'''Pros:''' | '''Pros:''' | ||
| + | |||
* Excellent firepower | * Excellent firepower | ||
* Excellent roll rate | * Excellent roll rate | ||
| Line 277: | Line 235: | ||
'''Cons:''' | '''Cons:''' | ||
| − | * | + | |
| + | * Loses power above 5,000 m (16,400 ft) steadily | ||
* Stalls quickly in simulator battle | * Stalls quickly in simulator battle | ||
| − | * Very bad turn rate, as a trade off for the high dive speed | + | * Very bad turn rate, as a trade-off for the high dive speed |
== History == | == History == | ||
| − | ''Describe the history of the creation and combat usage of the aircraft in more detail than in the introduction. If the historical reference turns out to be too | + | ''Describe the history of the creation and combat usage of the aircraft in more detail than in the introduction. If the historical reference turns out to be too long, take it to a separate article, taking a link to the article about the vehicle and adding a block "/History" (example: <nowiki>https://wiki.warthunder.com/(Vehicle-name)/History</nowiki>) and add a link to it here using the <code>main</code> template. Be sure to reference text and sources by using <code><nowiki><ref></ref></nowiki></code>, as well as adding them at the end of the article with <code><nowiki><references /></nowiki></code>. This section may also include the vehicle's dev blog entry (if applicable) and the in-game encyclopedia description (under <code><nowiki>=== In-game description ===</nowiki></code>, also if applicable).'' |
== Media == | == Media == | ||
| − | '' | + | <!-- ''Excellent additions to the article would be video guides, screenshots from the game, and photos.'' --> |
| + | {{Youtube-gallery|vtCKzvbLfNg|'''The Shooting Range #18''' - ''Pages of History'' section at 03:03 discusses the Fw 190A.}} | ||
| − | == | + | == See also == |
| − | ''Links to the articles on the War Thunder Wiki that you think will be useful for the reader, for example | + | ''Links to the articles on the War Thunder Wiki that you think will be useful for the reader, for example:'' |
* ''reference to the series of the aircraft;'' | * ''reference to the series of the aircraft;'' | ||
* ''links to approximate analogues of other nations and research trees.'' | * ''links to approximate analogues of other nations and research trees.'' | ||
| − | |||
| − | == | + | == External links == |
''Paste links to sources and external resources, such as:'' | ''Paste links to sources and external resources, such as:'' | ||
* ''topic on the official game forum;'' | * ''topic on the official game forum;'' | ||
| − | * ''page on aircraft | + | * ''encyclopedia page on the aircraft;'' |
* ''other literature.'' | * ''other literature.'' | ||
| + | {{AirManufacturer Focke-Wulf}} | ||
{{Germany fighters}} | {{Germany fighters}} | ||
Revision as of 14:46, 19 July 2020
Contents
| This page is about the German fighter Fw 190 A-4. For other versions, see Fw 190 (Family). |
Description

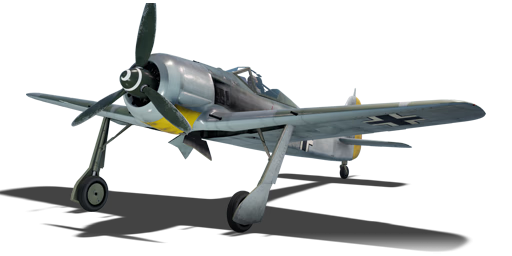
The Fw 190 A-4 is a rank III German fighter
with a battle rating of 4.3 (AB) and 4.0 (RB/SB). It was introduced in Update 1.43.
"Würger" is the German nickname of this beast of a plane, or in English, Shrike. It can also be translated as slayer, choker, or strangler. In that regard fits the English designation well too: "Butcher-bird"
Fw 190s are fighters, while this one can load additional payload, it will reduce the planes combat ability. Using it as a fighter-bomber is generally not advised, this would be the duty of the Fw 190 F-8.
The best ammo to use for both cannons is the Air Target belts. They will destroy fighters and bombers faster than tracers. They are different for both cannons, however. For the MG 151's they have a high explosive incendiary shell, armour-piercing shell, and incendiary tracer shell costing 110 silver lions per "per reload". The Mg FF/M's have high explosive incendiary shell, Fragmentation incendiary tracer shell (self-destroying) and armour piercing high explosive shell which cost 40 Sliver Lions "per reload."
The best ammunition available for use with machine guns is Universal. Universal utilizes armour-piercing tracer rounds, armour-piercing rounds, adjustment incendiary rounds, and armour-piercing incendiary rounds. Reloading only costs 9 silver lions "per reload".
General info
Flight performance
Describe how the aircraft behaves in the air. Speed, manoeuvrability, acceleration and allowable loads - these are the most important characteristics of the vehicle.
| Characteristics | Max Speed (km/h at 5,800 m) |
Max altitude (metres) |
Turn time (seconds) |
Rate of climb (metres/second) |
Take-off run (metres) | |||
|---|---|---|---|---|---|---|---|---|
| AB | RB | AB | RB | AB | RB | |||
| Stock | 619 | 603 | 12000 | 23.4 | 24.0 | 10.6 | 10.6 | 420 |
| Upgraded | 675 | 648 | 20.9 | 22.0 | 18.4 | 14.1 | ||
Details
| Features | ||||
|---|---|---|---|---|
| Combat flaps | Take-off flaps | Landing flaps | Air brakes | Arrestor gear |
| X | ✓ | ✓ | X | X |
| Limits | ||||||
|---|---|---|---|---|---|---|
| Wings (km/h) | Gear (km/h) | Flaps (km/h) | Max Static G | |||
| Combat | Take-off | Landing | + | - | ||
| 912 | 310 | N/A | 700 | 310 | ~13 | ~6 |
| Optimal velocities (km/h) | |||
|---|---|---|---|
| Ailerons | Rudder | Elevators | Radiator |
| < 420 | < 240 | < 550 | > 280 |
| Compressor (RB/SB) | ||
|---|---|---|
| Setting 1 | ||
| Optimal altitude | 100% Engine power | WEP Engine power |
| 1,500 m | 1,520 hp | 1,727 hp |
| Setting 2 | ||
| Optimal altitude | 100% Engine power | WEP Engine power |
| 5,300 m | 1,420 hp | 1,613 hp |
Survivability and armour
- 3 mm Steel - Fore engine cowling
- 5 mm Steel - Secondary engine cowling
- 6 mm Steel - Lower engine plate
- 8 mm Steel - Lower cockpit/fuel tank plate
- 5 mm Steel - Rear fuel tank plate
- 6 mm Steel - Pilot seat back (first plate)
- 8 mm Steel - Pilot seat back (second plate)
- 12 mm Steel - Headrest
- 57 mm Bulletproof glass
Armaments
Offensive armament
The Fw 190 A-4 is armed with:
- 2 x 20 mm MG 151 cannons, wing-mounted (250 rpg = 500 total)
- 2 x 20 mm MG FF/M cannons, wing-mounted (90 rpg = 180 total)
- 2 x 7.92 mm MG 17 machine guns, nose-mounted (900 rpg = 1,800 total)
Pilots who are really experienced with the aiming and hitting of the MG151/20 might want to use stealth belts on the MGs and cannons, to avoid being spotted by tracers. Using stealth belts on the machine guns only is also useful for aiming the cannon more easily without the distraction provided by the light machine gun tracers.
- 7.92mm MG 17
- Air Targets: Universal (AP-T/AP/AI/AP-I)
- Ground Targets: Tracer (AP-T)
- 20mm MG 151
- Air Targets: Air targets (AP-I/HEI/HEI/HEI/HEI/IT) // Consisting of 2/3 Minengeschoße, this belt is very effective against any aircraft.
- Ground Targets: Armored targets (APHE/APHE/APHE/IT)
- 20 mm MG FF/M
- Air targets
Usage in battles
The A-4 is a punishing Boom & Zoom fighter. The armament is fantastic, climb rate top par (rivalled by the Bf 109 F-4), and dive speed/top-speed is very good. Use this to your advantage. As should be familiar now with the previous Focke-Wulf (and future models), the turning capabilities of this plane are very poor. Dogfighting is not recommended with the Fw 190.
This should not discourage you from seizing opportunities, however. A Fw 190 A-4 in a balanced furball can be devastating when acting as a wingman, keeping other fighters from attacking your teammates. These opponents are less focused on evading you, as they are busy trying to attack your allies, giving you the time to line up the shot. As soon as the fight begins to tip in the enemies' favour, it's time for you to make a quick disappearance, as enemies actively trying to get on your tail will almost always succeed.
The 190-A4's weapon set is fantastic, too. Four 20 mm cannons are more than enough to rip any plane to shreds and the backup MGs, while not particularly damaging against other fighters at this tier, are great for strafing light ground targets like AA guns. Your firepower is only rivalled by the Aircobras and the twin-engine heavy fighters.
The Fw 190 A-4, as all the planes in this line, are some of the best Boom & Zoomers in the game and should be flown exclusively in this style. But like the Fw 190 A-1, it is one of the more manoeuvrable Focke-Wulfs. The performance at high speeds is excellent, as is it's dive and climb characteristics. Do not ever engage this aircraft in a turn fight as this will usually end badly. Instead, fight primarily in the vertical. Always try to have an altitude or speed advantage over your opponents (climb off to the side at the start of the battle and then enter the highest battle you come across).
In the defensive, as in the previous plane, you can often just dive away from most planes at high speed. In a dive, the 190 can, due to its short wings, pull quite some stunts to lose your attacker or even cause him to lose his wings! Again, be sure to regain your energy and altitude after a fight.
The best tactic for this plane is Boom and Zoom tactics, although careful energy-fighting works well too at higher speeds. There are generally two types of Boom & Zoom strategies: Tailing Boom & Zoom or Burst Boom & Zoom:
A Tailing Boom & Zoom is when the pilot sweeps in behind a target and follows (or "tails") him for a few seconds before breaking away. The benefit of doing this is that the attacker has a longer time to aim and take down the target. This comes at the cost of having less energy to climb back up afterwards, and you are a fairly easy target for other nearby enemies.
If you remain behind your target for too long, you will lose too much energy and won't be able to climb back up to safety. Any turning involved makes your situation worse, though remember that smart foes in more agile planes will often try to counter this tactic by baiting you into a turn. Keeping their plane just out of your sights entices you to keep following them for just another second more until they've drained your speed and then you will be a slow, easy target.
Burst Boom & Zoom is when a pilot dives down directly onto an enemy, fires a 1-2 second burst at close range, and immediately zooms back up to a safe altitude. The benefits of this tactic, as opposed to the former, is you have far more speed to climb back up and you will be safer from return fire, as you will have spent less time in the enemy's "zone". The problem with this is that you have far less time to shoot, and may not even damage the enemy if your aim is off even by a little.
Specific enemies worth noting
Some planes, you might see which are very deadly opponents are the: Spitfires, Typhoons, Beaufighters, Mustangs, Yakovlevs, B-17s and the Wellingtons These planes should not be underestimated, they can all fight this aircraft extremely well.
Manual Engine Control
| MEC elements | ||||||
|---|---|---|---|---|---|---|
| Mixer | Pitch | Radiator | Supercharger | Turbocharger | ||
| Oil | Water | Type | ||||
| Not controllable | Controllable Not auto controlled |
Not controllable Not auto controlled |
Controllable Not auto controlled |
Combined | Not controllable 2 gears |
Not controllable |
Modules
| Tier | Flight performance | Survivability | Weaponry | ||
|---|---|---|---|---|---|
| I | Fuselage repair | Radiator | Offensive 7 mm | ||
| II | Compressor | Airframe | New 7 mm MGs | ||
| III | Wings repair | Engine | Offensive 20 mm | Offensive 20 mm | |
| IV | Engine injection | Cover | New 20 mm cannons | New 20 mm cannons | |
Pros and cons
Pros:
- Excellent firepower
- Excellent roll rate
- Great energy retention
- Great dive performance
- Good climb rate
- Good top speed
- Good supply of cannon ammo
- Good bomber hunter
- Engine almost never overheats even on WEP
- Simulator battle: Good instantaneous turn
Cons:
- Loses power above 5,000 m (16,400 ft) steadily
- Stalls quickly in simulator battle
- Very bad turn rate, as a trade-off for the high dive speed
History
Describe the history of the creation and combat usage of the aircraft in more detail than in the introduction. If the historical reference turns out to be too long, take it to a separate article, taking a link to the article about the vehicle and adding a block "/History" (example: https://wiki.warthunder.com/(Vehicle-name)/History) and add a link to it here using the main template. Be sure to reference text and sources by using <ref></ref>, as well as adding them at the end of the article with <references />. This section may also include the vehicle's dev blog entry (if applicable) and the in-game encyclopedia description (under === In-game description ===, also if applicable).
Media
See also
Links to the articles on the War Thunder Wiki that you think will be useful for the reader, for example:
- reference to the series of the aircraft;
- links to approximate analogues of other nations and research trees.
External links
Paste links to sources and external resources, such as:
- topic on the official game forum;
- encyclopedia page on the aircraft;
- other literature.
| Focke-Wulf Aircraft Corporation (Focke-Wulf Flugzeugbau Aktiengesellschaft) | |
|---|---|
| Fighters | Fw 190 A-1 · Fw 190 A-4 · Fw 190 A-5 · Fw 190 A-5/U2 · Fw 190 A-5/U12 · Fw 190 A-5/U14 · Fw 190 A-8 |
| Fw 190 C | |
| Fw 190 D-9 · Fw 190 D-12 · Fw 190 D-13 | |
| Fw 190 F-8 | |
| Ta 152 C-3* · Ta 152 H-1* · Ta 154 A-1* | |
| Bombers | Fw 189 A-1 · Fw 200 C-1 |
| Export | ▅Fw 190 A-5 |
| Captured | ▃Fw 190 A-8 · ▂Fw 190 D-9 |
| * In 1944, the Germany Air Ministry changed new fighter aircraft designation to that of the chief designer. Kurt Tank was the chief designer at Focke-Wulf and later aircraft he designed were given the prefix of Ta. | |
| Germany fighters | |
|---|---|
| Heinkel | |
| He 51 | He 51 A-1 · He 51 B-1 · He 51 B-2/H · He 51 C-1 · He 51 C-1/L |
| He 100 | He 100 D-1 |
| He 112 | He 112 A-0 · He 112 B-0 · He 112 B-1/U2 · He 112 B-2/U2 · He 112 V-5 |
| Messerschmitt | |
| Bf 109 (Jumo) | Flegel's Bf 109 A · Bf 109 B-1 · Bf 109 C-1 |
| Bf 109 (DB-601) | Bf 109 E-1 · Bf 109 E-3 · Bf 109 E-4 · Bf 109 E-7/U2 · Bf 109 F-1 · Bf 109 F-2 · Bf 109 F-4 · Bf 109 F-4/trop |
| Bf 109 (DB-605) | Bf 109 G-2/trop · Bf 109 G-2 · Bf 109 G-6 · Bf 109 G-10 · Bf 109 G-14 · Bf 109 K-4 |
| Focke-Wulf | |
| Fw 190 (early) | Fw 190 A-1 · Fw 190 A-4 · Fw 190 A-5 · Fw 190 A-5 · Fw 190 A-5/U2 · Fw 190 A-5/U14 · Fw 190 A-8 · Fw 190 C |
| Fw 190 (late) | Fw 190 D-9 · Fw 190 D-12 · Fw 190 D-13 |
| Ta 152 | Ta 152 C-3 · Ta 152 H-1 |
| Blohm & Voss | |
| BV 155 | BV 155 B-1 |
| Foreign: | |
| USA | ▀P-47D-16-RE · ▀P-47D |
| USSR | ▀La-5FN · ▀Yak-1B |
| Britain | ▀Tempest Mk V |
| Italy | ▀CR.42 · ▀Marcolin's C.R.42 CN · ▀G.50 serie 2 · ▀G.50 AS serie 7 · ▀C. 200 serie 3 · ▀C. 200 serie 7 · ▀C. 202 |
| Finland | ▀Hawk H-75A-2 |
