Difference between pages "IS-7" and "Lorraine 155 Mle.50"
(Edits.) |
Colok76286 (talk | contribs) (→Media: Added video) |
||
| Line 1: | Line 1: | ||
| − | {{Specs-Card | + | {{Specs-Card|code=fr_lorraine_155}} |
| − | |code= | ||
| − | |||
| − | }} | ||
== Description == | == Description == | ||
| Line 8: | Line 5: | ||
[[File:GarageImage_{{PAGENAME}}.jpg|420px|thumb|left]] | [[File:GarageImage_{{PAGENAME}}.jpg|420px|thumb|left]] | ||
{{break}} | {{break}} | ||
| − | The '''{{Specs|name}}''' is a gift | + | The '''{{Specs|name}}''' (shortened as '''{{Specs|pseudonym}}''') is a gift rank {{Specs|rank}} French tank destroyer {{Battle-rating|1}}. It was introduced in [[Update 1.77 "Advancing Storm"]] during the [[wt:en/news/5453-special-chronicles-of-world-war-ii-in-war-thunder-en|2018 WW2 Chronicles]]. |
| − | |||
| − | |||
| − | |||
| − | |||
| − | |||
| − | |||
| − | |||
| − | |||
| − | |||
| − | |||
== General info == | == General info == | ||
=== Survivability and armour === | === Survivability and armour === | ||
| − | <!--''Describe armour protection. Note the most well protected and key weak areas. Appreciate the layout of modules as well as the number and location of crew members. Is the level of armour protection sufficient, is the placement of modules helpful for survival in combat? | + | <!--''Describe armour protection. Note the most well protected and key weak areas. Appreciate the layout of modules as well as the number and location of crew members. Is the level of armour protection sufficient, is the placement of modules helpful for survival in combat?''--> |
| − | + | The Lorraine 155 Mle.50 has very little armour (although some are sloped enough to deflect certain low-rank rounds), and can generally be penetrated by most guns of its rank. Even worse, however, the 'casemate' (if it can even be called that) has very little armour, and in some places can be shot through with machine guns. The machine-gunner (operating the 151) is completely open to the elements. Generally, you want to rely on good map placement and mobility, rather than armour. | |
| − | |||
| − | |||
| − | The | ||
| − | |||
| − | |||
| − | |||
| − | |||
| − | |||
| − | |||
'''Armour type:''' | '''Armour type:''' | ||
| − | * | + | * Rolled homogeneous armour |
| − | * | + | * Structural steel |
{| class="wikitable" | {| class="wikitable" | ||
| Line 43: | Line 21: | ||
! Armour !! Front (Slope angle) !! Sides !! Rear !! Roof | ! Armour !! Front (Slope angle) !! Sides !! Rear !! Roof | ||
|- | |- | ||
| − | | Hull || | + | | Hull || 16 mm (70°) ''Front glacis'' <br> 16 mm (2-73°) ''Transmission housing'' || 16 mm || 10 mm (0-42°) || 10 mm |
|- | |- | ||
| − | | | + | | Superstructure || 16 mm (21°) ''Front'' <br> 10 mm ''Gun shield'' || 16 mm (30°) ''Right side'' <br> 16 mm (21-48°) ''Left side'' || 10 mm || 10 mm |
|- | |- | ||
| − | + | ! Armour !! Sides !! Roof | |
|- | |- | ||
| + | | Cupola || 10 mm || N/A | ||
|} | |} | ||
'''Notes:''' | '''Notes:''' | ||
| − | * Suspension wheels are | + | * Suspension wheels are 10 mm thick while tracks, sprocket wheels, torsion bars, and return rollers are 20 mm thick. |
| + | * Belly armour is 10 mm thick. | ||
| + | * Gun breech is 300mm thick, while the barrel itself is 25mm. | ||
| + | * Gun carriage around the gun is 20mm thick, while the gun mount/traverse device is 40mm thick. | ||
=== Mobility === | === Mobility === | ||
| − | <!--''Write about the mobility of the ground vehicle. Estimate the specific power and | + | <!-- ''Write about the mobility of the ground vehicle. Estimate the specific power and manoeuvrability, as well as the maximum speed forwards and backwards.'' --> |
| − | + | ||
| − | + | {{tankMobility|abMinHp= 639|rbMinHp= 398}} | |
| − | |||
| − | |||
| − | |||
| − | |||
| − | |||
| − | |||
| − | |||
| − | |||
| − | |||
| − | |||
| − | |||
| − | |||
| − | |||
| − | |||
| − | |||
| − | |||
| − | |||
| − | |||
== Armaments == | == Armaments == | ||
=== Main armament === | === Main armament === | ||
<!--''Give the reader information about the characteristics of the main gun. Assess its effectiveness in a battle based on the reloading speed, ballistics and the power of shells. Do not forget about the flexibility of the fire, that is how quickly the cannon can be aimed at the target, open fire on it and aim at another enemy. Add a link to the main article on the gun: <code><nowiki>{{main|Name of the weapon}}</nowiki></code>. Describe in general terms the ammunition available for the main gun. Give advice on how to use them and how to fill the ammunition storage.''--> | <!--''Give the reader information about the characteristics of the main gun. Assess its effectiveness in a battle based on the reloading speed, ballistics and the power of shells. Do not forget about the flexibility of the fire, that is how quickly the cannon can be aimed at the target, open fire on it and aim at another enemy. Add a link to the main article on the gun: <code><nowiki>{{main|Name of the weapon}}</nowiki></code>. Describe in general terms the ammunition available for the main gun. Give advice on how to use them and how to fill the ammunition storage.''--> | ||
| − | {{main| | + | {{main|L'Obusier de 155 Modèle 1950 howitzer (155 mm)|l1=L'Obusier de 155 Modèle 1950 (155 mm)}} |
| − | {| class="wikitable" style="text-align:center" width=" | + | |
| + | {| class="wikitable" style="text-align:center" | ||
| + | |- | ||
| + | ! colspan="6" | [[L'Obusier de 155 Modèle 1950 howitzer (155 mm)|155 mm L'Obusier de 155 Modèle 1950]] | ||
| + | |- | ||
| + | ! colspan="3" rowspan="1" style="width:5em" |Capacity | ||
| + | ! rowspan="1" | Vertical <br> guidance | ||
| + | ! rowspan="1" | Horizontal <br> guidance | ||
| + | ! rowspan="1" | Stabilizer | ||
| + | |- | ||
| + | | colspan="3" | 30 || -5°/+67° || ±20° || N/A | ||
| + | |- | ||
| + | ! colspan="6" | Turret rotation speed (°/s) | ||
| + | |- | ||
| + | ! style="width:4em" |Mode | ||
| + | ! style="width:4em" |Stock | ||
| + | ! style="width:4em" |Upgraded | ||
| + | ! style="width:4em" |Prior + Full crew | ||
| + | ! style="width:4em" |Prior + Expert qualif. | ||
| + | ! style="width:4em" |Prior + Ace qualif. | ||
| + | |- | ||
| + | | ''Arcade'' || 5.27 || 7.31 || 8.88 || 9.82 || 10.45 | ||
|- | |- | ||
| − | + | | ''Realistic'' || 3.57 || 4.2 || 5.1 || 5.64 || 6.0 | |
|- | |- | ||
| − | ! | + | ! colspan="4" | Reloading rate (seconds) |
| − | |||
| − | |||
| − | |||
| − | |||
| − | |||
| − | |||
| − | |||
| − | |||
| − | |||
| − | |||
| − | |||
| − | |||
| − | |||
|- | |- | ||
| − | ! | + | ! colspan="1" style="width:4em" |Stock |
| − | + | ! colspan="1" style="width:4em" |Prior + Full crew | |
| + | ! colspan="1" style="width:4em" |Prior + Expert qualif. | ||
| + | ! colspan="1" style="width:4em" |Prior + Ace qualif. | ||
|- | |- | ||
| − | + | | 26.0 || 23.0 || 21.2 || 20.0 | |
| − | | | ||
|- | |- | ||
|} | |} | ||
| Line 123: | Line 96: | ||
! 2000m | ! 2000m | ||
|- | |- | ||
| − | | | + | | M107 || HE || 54 || 54 || 54 || 54 || 54 || 54 |
|- | |- | ||
| − | |||
| − | |||
|} | |} | ||
{| class="wikitable sortable" style="text-align:center" width="100%" | {| class="wikitable sortable" style="text-align:center" width="100%" | ||
| Line 147: | Line 118: | ||
! 100% | ! 100% | ||
|- | |- | ||
| − | | | + | | M107 || HE || 563 || 43.1 || 0.1 || 0.1 || 6,860 || +0° || 79° || 80° || 81° |
| + | |- | ||
| + | |} | ||
| + | {| class="wikitable sortable" style="text-align:center" | ||
| + | ! colspan="7" | Smoke characteristic | ||
| + | |- | ||
| + | ! Ammunition | ||
| + | ! Velocity <br /> in m/s | ||
| + | ! Projectile<br />Mass in kg | ||
| + | ! ''Screen radius <br /> in m'' | ||
| + | ! ''Screen time <br /> in s'' | ||
| + | ! ''Screen hold time <br /> in s:'' | ||
| + | ! ''Explosive Mass in g<br /> (TNT equivalent):'' | ||
| + | |- | ||
| + | | M110 || 563 || 40.8 || 25 || 5 || 30 || 50 | ||
|- | |- | ||
| − | |||
| − | |||
|} | |} | ||
===== [[Ammo racks|Ammo racks]] ===== | ===== [[Ammo racks|Ammo racks]] ===== | ||
| − | {| class="wikitable | + | [[File:Ammoracks_{{PAGENAME}}.jpg|right|thumbnail|x250px|Ammo racks of the {{PAGENAME}}.]] |
| + | {| class="wikitable" style="text-align:center" | ||
|- | |- | ||
| − | ! | + | ! Full<br /> ammo |
| − | ! | + | ! 1st<br /> rack empty |
| − | ! | + | ! 2nd<br /> rack empty |
| − | ! | + | ! 3rd<br /> rack empty |
| − | ! | + | ! 4th<br /> rack empty |
| − | ! | + | ! 5th<br /> rack empty |
| − | ! | + | ! 6th<br /> rack empty |
| − | ! | + | ! 7th <br /> rack empty |
| + | ! 8th <br /> rack empty | ||
| + | ! Visual discrepancy | ||
|- | |- | ||
| − | || '''30''' || | + | || '''30''' || 29 ''(+1)'' || 27 ''(+3)'' || 23 ''(+7)'' || 18 ''(+12)'' || 15 ''(+15)'' || 9 ''(+21)'' ||6 ''(+24)''||1 ''(+29)''|| style="text-align:left" | No |
|- | |- | ||
|} | |} | ||
| + | |||
| + | '''Notes:''' | ||
| + | |||
| + | * Recommended ammo load: '''10'''. ''Keeps most ammunition in the floor and out of sponsons.'' | ||
=== Machine guns === | === Machine guns === | ||
| − | <!--''Offensive and anti-aircraft machine guns not only allow you to fight some aircraft | + | <!--''Offensive and anti-aircraft machine guns not only allow you to fight some aircraft but also are effective against lightly armoured vehicles. Evaluate machine guns and give recommendations on its use.''--> |
| − | {{main| | + | {{main|MG 151/20 (20 mm)}} |
| − | {| class="wikitable" style="text-align:center | + | {| class="wikitable" style="text-align:center" |
|- | |- | ||
| − | ! colspan=" | + | ! colspan="7" | [[MG 151/20 (20 mm)|20 mm MG151/20]] |
|- | |- | ||
| − | ! | + | ! colspan="7" | ''Commander's mount'' |
| − | |||
| − | |||
| − | |||
| − | |||
| − | |||
|- | |- | ||
| − | | | + | ! colspan="4" rowspan="1" style="width:5em" |Capacity (Belt capacity) |
| + | ! rowspan="1" | Fire rate <br> (shots/minute) | ||
| + | ! rowspan="1" | Vertical <br> guidance | ||
| + | ! rowspan="1" | Horizontal <br> guidance | ||
|- | |- | ||
| − | | | + | | colspan="4" | 400 (250) || 700 || -8°/+45° || ±180° |
|- | |- | ||
|} | |} | ||
| − | {| class="wikitable" | + | == Usage in battles == |
| + | <!--''Describe the tactics of playing in the vehicle, the features of using vehicles in the team and advice on tactics. Refrain from creating a "guide" - do not impose a single point of view but give the reader food for thought. Describe the most dangerous enemies and give recommendations on fighting them. If necessary, note the specifics of the game in different modes (AB, RB, SB).''--> | ||
| + | The best method of using the large-calibre weapon on the Loraine is to exploit the high-explosive power against thin-armour on the enemy. Like other large calibre HE tanks, shooting below an enemy vehicle will penetrate its belly armor. This is an effective, albeit difficult way to engage tanks whose armor is greater than what your HE shell can penetrate. | ||
| + | |||
| + | Some targets to keep in mind of, and their weak points: | ||
| + | |||
| + | * Tiger I - While seemingly a hard enemy to face, the Tiger is easily dispatched with a side shot. A hit to the roadwheels will penetrate the tank, with the shell fragments going through the thin armor on the underside of the tank's sponson. This is also possible to do to Tiger IIs, but usually results in much less damage done. | ||
| + | * Tiger II P, Panthers D and A - a hit to the bottom of the curved turret face of these tanks will cause the HE shell to pen the roof of the vehicle. This can also be done on tanks with flat turret fronts ( Tiger I, Tiger II H, Panthers G and F) by aiming for the lower half of the turret, but is not as reliable. | ||
| + | |||
| + | === Modules === | ||
| + | {| class="wikitable" | ||
| + | ! Tier | ||
| + | ! colspan="2" | Mobility | ||
| + | ! Protection | ||
| + | ! colspan="2" | Firepower | ||
|- | |- | ||
| − | + | | I | |
| + | | Tracks | ||
| + | | | ||
| + | | Parts | ||
| + | | Horizontal Drive | ||
| + | | M110 | ||
|- | |- | ||
| − | + | | II | |
| − | + | | Suspension | |
| − | + | | Brake System | |
| − | + | | FPE | |
| − | + | | Adjustment of Fire | |
| − | + | | | |
|- | |- | ||
| − | | | + | | III |
| + | | Filters | ||
| + | | | ||
| + | | Crew Replenishment | ||
| + | | Elevation Mechanism | ||
| + | | | ||
|- | |- | ||
| − | | | + | | IV |
| + | | Transmission | ||
| + | | Engine | ||
| + | | | ||
| + | | | ||
| + | | | ||
|- | |- | ||
| − | + | ! colspan="6" |This is a premium vehicle: all modifications are unlocked on purchase | |
|- | |- | ||
|} | |} | ||
| − | |||
| − | |||
| − | |||
| − | |||
| − | |||
| − | |||
| − | |||
| − | |||
| − | |||
| − | |||
| − | |||
| − | |||
| − | |||
| − | |||
| − | |||
| − | |||
| − | |||
| − | |||
| − | |||
| − | |||
| − | |||
| − | |||
| − | |||
| − | |||
=== Pros and cons === | === Pros and cons === | ||
| Line 237: | Line 230: | ||
'''Pros:''' | '''Pros:''' | ||
| − | * | + | * Powerful 155mm gun with a HE shell on-par with the KV-2's gun |
| − | + | * Pintle-mounted 20mm cannon that is deadly to lightly-armoured vehicles and aircraft | |
| − | + | * Decent mobility | |
| − | + | * Good reverse speed | |
| − | |||
| − | * | ||
| − | |||
| − | * | ||
| − | * Good reverse speed | ||
| − | |||
| − | |||
'''Cons:''' | '''Cons:''' | ||
| − | * | + | * Thin armor with an open casemate, allows even rifle-calibre rounds to affect the crew |
| − | + | * Despite thin armor, it's thick enough to trigger most fuses in APHE shells | |
| − | + | * Large profile | |
| − | * | + | * Long reload time; increases if the loader is taken out |
| − | + | * If the machine-gunner is knocked out, so is the ability to use the 20mm cannon | |
| − | * | + | * No AP shells, only HE shells |
| − | * | + | * Bad gun depression of 5° |
| − | * | ||
| − | * | ||
| − | * | ||
== History == | == History == | ||
<!--''Describe the history of the creation and combat usage of the ground vehicle in more detail than in the introduction. If the historical reference turns out to be too big, take it to a separate article, taking a link to an article about the vehicle and adding a block "/ History" (example: <nowiki>https://wiki.warthunder.com/(Vehicle-name)/History</nowiki>) and add a link to it here using the <code>main</code> template. Be sure to reference text and sources by using <code><nowiki><ref></nowiki></code>, as well as adding them at the end of the article.''--> | <!--''Describe the history of the creation and combat usage of the ground vehicle in more detail than in the introduction. If the historical reference turns out to be too big, take it to a separate article, taking a link to an article about the vehicle and adding a block "/ History" (example: <nowiki>https://wiki.warthunder.com/(Vehicle-name)/History</nowiki>) and add a link to it here using the <code>main</code> template. Be sure to reference text and sources by using <code><nowiki><ref></nowiki></code>, as well as adding them at the end of the article.''--> | ||
| − | + | Prototypes of the Lorraine 155 Mle.50 passed trials in 1950, but never reached production. | |
| − | + | == Media == | |
| + | <!-- ''Excellent additions to the article would be video guides, screenshots from the game, and photos.'' --> | ||
| − | + | ;Skins | |
| + | * [https://live.warthunder.com/feed/camouflages/?vehicleCountry=france&vehicleType=tank&vehicleClass=tank_destroyer&vehicle=fr_lorraine_155 Skin and Camouflages for the {{PAGENAME}} from live.warthunder.com.] | ||
| − | + | ;Videos | |
| − | + | {{Youtube-gallery|YZtAEsSpwNM|'''The Shooting Range #96''' - ''Metal Beasts'' section at 00:39 discusses the Lorraine 155 Mle.50.|_xCgMBOiA8U|'''High-explosive power''' discusses the {{PAGENAME}} at 0:50 - ''War Thunder Official Channel''}} | |
| − | |||
| − | |||
| − | |||
| − | |||
| − | | | ||
| − | | | ||
| − | | | ||
| − | |||
| − | |||
| − | |||
== See also == | == See also == | ||
| Line 291: | Line 266: | ||
== External links == | == External links == | ||
<!--''Paste links to sources and external resources, such as:'' | <!--''Paste links to sources and external resources, such as:'' | ||
| + | |||
* ''topic on the official game forum;'' | * ''topic on the official game forum;'' | ||
* ''encyclopedia page on tank;'' | * ''encyclopedia page on tank;'' | ||
* ''other literature.''--> | * ''other literature.''--> | ||
| − | * [ | + | * [[Wikipedia:Obusier_de_155_mm_Mod%C3%A8le_50|[Wikipedia<nowiki>]</nowiki> Obusier de 155mm Modèle 50 (The gun)]] |
| + | * [[Wikipedia:AMX-50#Char_Lorraine|[Wikipedia<nowiki>]</nowiki> AMX-50 - Char Lorraine (The chassis)]] | ||
| − | {{ | + | {{France tank destroyers}} |
| + | {{France premium ground vehicles}} | ||
Revision as of 21:48, 15 August 2020
Contents
Description

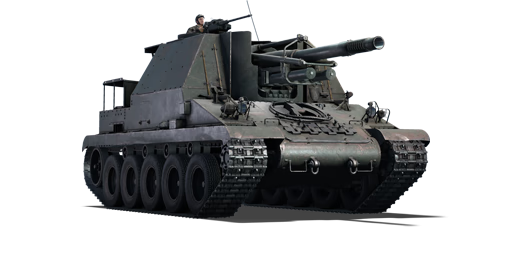
The Lorraine automoteur de 155 mm modèle 1950 (shortened as Lorraine 155 Mle.50) is a gift rank III French tank destroyer
with a battle rating of 4.3 (AB/RB/SB). It was introduced in Update 1.77 "Advancing Storm" during the 2018 WW2 Chronicles.
General info
Survivability and armour
The Lorraine 155 Mle.50 has very little armour (although some are sloped enough to deflect certain low-rank rounds), and can generally be penetrated by most guns of its rank. Even worse, however, the 'casemate' (if it can even be called that) has very little armour, and in some places can be shot through with machine guns. The machine-gunner (operating the 151) is completely open to the elements. Generally, you want to rely on good map placement and mobility, rather than armour.
Armour type:
- Rolled homogeneous armour
- Structural steel
| Armour | Front (Slope angle) | Sides | Rear | Roof |
|---|---|---|---|---|
| Hull | 16 mm (70°) Front glacis 16 mm (2-73°) Transmission housing |
16 mm | 10 mm (0-42°) | 10 mm |
| Superstructure | 16 mm (21°) Front 10 mm Gun shield |
16 mm (30°) Right side 16 mm (21-48°) Left side |
10 mm | 10 mm |
| Armour | Sides | Roof | ||
| Cupola | 10 mm | N/A |
Notes:
- Suspension wheels are 10 mm thick while tracks, sprocket wheels, torsion bars, and return rollers are 20 mm thick.
- Belly armour is 10 mm thick.
- Gun breech is 300mm thick, while the barrel itself is 25mm.
- Gun carriage around the gun is 20mm thick, while the gun mount/traverse device is 40mm thick.
Mobility
| Game Mode | Max Speed (km/h) | Weight (tons) | Engine power (horsepower) | Power-to-weight ratio (hp/ton) | |||
|---|---|---|---|---|---|---|---|
| Forward | Reverse | Stock | Upgraded | Stock | Upgraded | ||
| Arcade | 60 | 16 | 30 | 639 | 1,145 | 21.3 | 38.17 |
| Realistic | 55 | 15 | 398 | 600 | 13.27 | 20 | |
Armaments
Main armament
| 155 mm L'Obusier de 155 Modèle 1950 | |||||
|---|---|---|---|---|---|
| Capacity | Vertical guidance |
Horizontal guidance |
Stabilizer | ||
| 30 | -5°/+67° | ±20° | N/A | ||
| Turret rotation speed (°/s) | |||||
| Mode | Stock | Upgraded | Prior + Full crew | Prior + Expert qualif. | Prior + Ace qualif. |
| Arcade | 5.27 | 7.31 | 8.88 | 9.82 | 10.45 |
| Realistic | 3.57 | 4.2 | 5.1 | 5.64 | 6.0 |
| Reloading rate (seconds) | |||||
| Stock | Prior + Full crew | Prior + Expert qualif. | Prior + Ace qualif. | ||
| 26.0 | 23.0 | 21.2 | 20.0 | ||
Ammunition
| Penetration statistics | |||||||
|---|---|---|---|---|---|---|---|
| Ammunition | Type of warhead |
Penetration in mm @ 0° Angle of Attack | |||||
| 10m | 100m | 500m | 1000m | 1500m | 2000m | ||
| M107 | HE | 54 | 54 | 54 | 54 | 54 | 54 |
| Shell details | ||||||||||
|---|---|---|---|---|---|---|---|---|---|---|
| Ammunition | Type of warhead |
Velocity in m/s |
Projectile Mass in kg |
Fuse delay
in m: |
Fuse sensitivity
in mm: |
Explosive Mass in g (TNT equivalent): |
Normalization At 30° from horizontal: |
Ricochet: | ||
| 0% | 50% | 100% | ||||||||
| M107 | HE | 563 | 43.1 | 0.1 | 0.1 | 6,860 | +0° | 79° | 80° | 81° |
| Smoke characteristic | ||||||
|---|---|---|---|---|---|---|
| Ammunition | Velocity in m/s |
Projectile Mass in kg |
Screen radius in m |
Screen time in s |
Screen hold time in s: |
Explosive Mass in g (TNT equivalent): |
| M110 | 563 | 40.8 | 25 | 5 | 30 | 50 |
Ammo racks

| Full ammo |
1st rack empty |
2nd rack empty |
3rd rack empty |
4th rack empty |
5th rack empty |
6th rack empty |
7th rack empty |
8th rack empty |
Visual discrepancy |
|---|---|---|---|---|---|---|---|---|---|
| 30 | 29 (+1) | 27 (+3) | 23 (+7) | 18 (+12) | 15 (+15) | 9 (+21) | 6 (+24) | 1 (+29) | No |
Notes:
- Recommended ammo load: 10. Keeps most ammunition in the floor and out of sponsons.
Machine guns
| 20 mm MG151/20 | ||||||
|---|---|---|---|---|---|---|
| Commander's mount | ||||||
| Capacity (Belt capacity) | Fire rate (shots/minute) |
Vertical guidance |
Horizontal guidance | |||
| 400 (250) | 700 | -8°/+45° | ±180° | |||
Usage in battles
The best method of using the large-calibre weapon on the Loraine is to exploit the high-explosive power against thin-armour on the enemy. Like other large calibre HE tanks, shooting below an enemy vehicle will penetrate its belly armor. This is an effective, albeit difficult way to engage tanks whose armor is greater than what your HE shell can penetrate.
Some targets to keep in mind of, and their weak points:
- Tiger I - While seemingly a hard enemy to face, the Tiger is easily dispatched with a side shot. A hit to the roadwheels will penetrate the tank, with the shell fragments going through the thin armor on the underside of the tank's sponson. This is also possible to do to Tiger IIs, but usually results in much less damage done.
- Tiger II P, Panthers D and A - a hit to the bottom of the curved turret face of these tanks will cause the HE shell to pen the roof of the vehicle. This can also be done on tanks with flat turret fronts ( Tiger I, Tiger II H, Panthers G and F) by aiming for the lower half of the turret, but is not as reliable.
Modules
| Tier | Mobility | Protection | Firepower | ||
|---|---|---|---|---|---|
| I | Tracks | Parts | Horizontal Drive | M110 | |
| II | Suspension | Brake System | FPE | Adjustment of Fire | |
| III | Filters | Crew Replenishment | Elevation Mechanism | ||
| IV | Transmission | Engine | |||
| This is a premium vehicle: all modifications are unlocked on purchase | |||||
Pros and cons
Pros:
- Powerful 155mm gun with a HE shell on-par with the KV-2's gun
- Pintle-mounted 20mm cannon that is deadly to lightly-armoured vehicles and aircraft
- Decent mobility
- Good reverse speed
Cons:
- Thin armor with an open casemate, allows even rifle-calibre rounds to affect the crew
- Despite thin armor, it's thick enough to trigger most fuses in APHE shells
- Large profile
- Long reload time; increases if the loader is taken out
- If the machine-gunner is knocked out, so is the ability to use the 20mm cannon
- No AP shells, only HE shells
- Bad gun depression of 5°
History
Prototypes of the Lorraine 155 Mle.50 passed trials in 1950, but never reached production.
Media
- Skins
- Videos
See also
Links to the articles on the War Thunder Wiki that you think will be useful for the reader, for example:
- reference to the series of the vehicles;
- links to approximate analogues of other nations and research trees.
External links
| France tank destroyers | |
|---|---|
| Lorraine 40t derivatives | CA Lorraine · Lorraine 155 Mle.50 |
| ATGM | MEPHISTO · AMX-10M |
| Other | AMR.35 ZT3 · Lorraine 37L · SAu 40 · ARL-44 · ELC bis · AMX-50 Foch · AuF1 |
| USA | ▄M10 GMC · ▄M36B2 |
| France premium ground vehicles | |
|---|---|
| Light tanks | AMD.35 (SA35) · H.39 "Cambronne" · LVT-4/40 · AMX-13 (SS.11) · AMX-13-M24 · E.B.R. (1954) · E.B.R. (1963) · VBCI-2 (MCT30) |
| Medium tanks | M4A1 (FL10) · Panther "Dauphiné" · AMX-30 · AMX-30 Super · AMX-50 (TO90/930) |
| Heavy tanks | B1 ter · 2C bis · Somua SM |
| Tank destroyers | Lorraine 155 Mle.50 |
