Difference between pages "War Thunder: Wikipedia Share Program" and "M60A1 RISE (P)"
(→Example of excellent grade: Pro's and con's) |
Inceptor57 (talk | contribs) m (→Armaments) |
||
| Line 1: | Line 1: | ||
| − | == | + | {{Specs-Card|code=us_m60a1_rise_passive_era}} |
| + | {{About | ||
| + | | about = American medium tank '''{{PAGENAME}}''' | ||
| + | | usage = other uses | ||
| + | | link = M60 (Disambiguation) | ||
| + | }} | ||
| − | == | + | == Description == |
| + | <!--''In the description, the first part should be about the history of the creation and combat usage of the vehicle, as well as its key features. In the second part, tell the reader about the ground vehicle in the game. Insert a screenshot of the vehicle, so that if the novice player does not remember the vehicle by name, he will immediately understand what kind of vehicle the article is talking about.''--> | ||
| + | [[File:GarageImage_{{PAGENAME}}.jpg|420px|thumb|left]] | ||
| + | {{break}} | ||
| + | The '''{{Specs|name}}''' (shortened as the '''{{Specs|pseudonym}}''') is a Rank {{Specs|rank}} American medium tank {{Battle-rating}}. It was introduced in [[Update 1.71 "New E.R.A."]]. | ||
| − | === | + | == General info == |
| + | === Survivability and armour === | ||
| + | ''Describe armour protection. Note the most well protected and key weak areas. Appreciate the layout of modules as well as the number and location of crew members. Is the level of armour protection sufficient, is the placement of modules helpful for survival in combat?'' | ||
| − | + | ''If necessary use a visual template to indicate the most secure and weak zones of the armour.'' | |
| − | === | + | === Mobility === |
| + | ''Write about the mobility of the ground vehicle. Estimate the specific power and manoeuvrability, as well as the maximum speed forward and backward.'' | ||
| − | == | + | == Armaments == |
| − | + | <!--''Give the reader information about the characteristics of the main gun. Assess its effectiveness in a battle based on the reloading speed, ballistics and the power of shells. Do not forget about the flexibilty of the fire, that is how quickly the cannon can be aimed at the target, open fire on it and aim at another enemy. Add a link to the main article on the gun: <code><nowiki>{{main|Name of the weapon}}</nowiki></code>. Describe in general terms the ammunition available for the main gun. Give advice on how to use them and how to fill the ammunition storage.''--> | |
| + | ===Main armament=== | ||
| + | {{main|M68 (105 mm)}} | ||
| − | + | {| class="wikitable" style="text-align:center" | |
| − | + | |- | |
| − | + | ! colspan="6" | [[M68 (105 mm)|105 mm M68]] | |
| − | + | |- | |
| + | ! colspan="3" rowspan="1" style="width:5em" |Capacity | ||
| + | ! rowspan="1" | Vertical <br> guidance | ||
| + | ! rowspan="1" | Horizontal <br> guidance | ||
| + | ! rowspan="1" | Stabilizer | ||
| + | |- | ||
| + | | colspan="3" | 63 || -10°/+20° || ±180° || Two-plane | ||
| + | |- | ||
| + | ! colspan="6" | Turret rotation speed (°/s) | ||
| + | |- | ||
| + | ! style="width:4em" |Mode | ||
| + | ! style="width:4em" |Stock | ||
| + | ! style="width:4em" |Upgraded | ||
| + | ! style="width:4em" |Prior + Full crew | ||
| + | ! style="width:4em" |Prior + Expert qualif. | ||
| + | ! style="width:4em" |Prior + Ace qualif. | ||
| + | |- | ||
| + | | ''Arcade'' || 21.40 || __.__ || __.__ || __.__ || __.__ | ||
| + | |- | ||
| + | | ''Realistic'' || 13.40 || __.__ || __.__ || __.__ || __.__ | ||
| + | |- | ||
| + | ! colspan="4" | Reloading rate (seconds) | ||
| + | |- | ||
| + | ! colspan="1" style="width:4em" |Stock | ||
| + | ! colspan="1" style="width:4em" |Prior + Full crew | ||
| + | ! colspan="1" style="width:4em" |Prior + Expert qualif. | ||
| + | ! colspan="1" style="width:4em" |Prior + Ace qualif. | ||
| + | |- | ||
| + | | 8.70 || __.__ || __.__ || __.__ | ||
| + | |- | ||
| + | |} | ||
| − | ==== | + | ===== Ammunition ===== |
| − | ===== | + | {| class="wikitable sortable" style="text-align:center" width="100%" |
| + | ! colspan="8" | Penetration statistics | ||
| + | |- | ||
| + | ! rowspan="2" data-sort-type="text" | Ammunition | ||
| + | ! rowspan="2" class="unsortable" | Type of <br /> warhead | ||
| + | ! colspan="6" | '''Penetration''' '''''in mm''''' '''@ 90°''' | ||
| + | |- | ||
| + | ! 10m | ||
| + | ! 100m | ||
| + | ! 500m | ||
| + | ! 1000m | ||
| + | ! 1500m | ||
| + | ! 2000m | ||
| + | |- | ||
| + | | M728 || APDS || 260 || 256 || 250 || 240 || 231 || 222 | ||
| + | |- | ||
| + | | M393A2 || HESH || 127 || 127 || 127 || 127 || 127 || 127 | ||
| + | |- | ||
| + | | M456 || HEATFS || 400 || 400 || 400 || 400 || 400 || 400 | ||
| + | |- | ||
| + | | M735 || APFSDS || 360 || 355 || 345 || 330 || 321 || 300 | ||
| + | |- | ||
| + | |} | ||
| + | {| class="wikitable sortable" style="text-align:center" width="100%" | ||
| + | ! colspan="11" | Shell details | ||
| + | |- | ||
| + | ! rowspan="2" data-sort-type="text" | Ammunition | ||
| + | ! rowspan="2" class="unsortable" | Type of <br /> warhead | ||
| + | ! rowspan="2" |Velocity <br /> in m/s | ||
| + | ! rowspan="2" |Projectile<br />Mass in kg | ||
| + | ! rowspan="2" | ''Fuse delay'' | ||
| + | ''in m:'' | ||
| + | ! rowspan="2" | ''Fuse sensitivity'' | ||
| + | ''in mm:'' | ||
| + | ! rowspan="2" | ''Explosive Mass in g<br /> (TNT equivalent):'' | ||
| + | ! rowspan="2" | ''Normalization At 30° <br> from horizontal:'' | ||
| + | ! colspan="3" | ''Ricochet:'' | ||
| + | |- | ||
| + | ! 0% | ||
| + | ! 50% | ||
| + | ! 100% | ||
| + | |- | ||
| + | | M392A2 || APDS || 1478 || 5.8 || N/A || N/A || N/A || +1.5° || 75° || 78° || 80° | ||
| + | |- | ||
| + | | M393A2 || HESH || 730 || 15 || 0.4 || 0.1 || 4,310 || +0° || 73° || 77° || 80° | ||
| + | |- | ||
| + | | M456 || HEATFS || 1173 || 11 || 0.0 || 0.1 || 1,270 || +0° || 65° || 72° || 75° | ||
| + | |- | ||
| + | | M735 || APFSDS || 3.7 || 1501 || N/A || N/A || N/A || +1.5° || 76° || 77° || 78° | ||
| + | |- | ||
| + | |} | ||
| + | {| class="wikitable sortable" style="text-align:center" | ||
| + | ! colspan="7" | Smoke characteristic | ||
| + | |- | ||
| + | ! Ammunition | ||
| + | ! Velocity <br /> in m/s | ||
| + | ! Projectile<br />Mass in kg | ||
| + | ! ''Screen radius <br /> in m'' | ||
| + | ! ''Screen time <br /> in s'' | ||
| + | ! ''Screen hold time <br /> in s:'' | ||
| + | ! ''Explosive Mass in g<br /> (TNT equivalent):'' | ||
| + | |- | ||
| + | | M416 || 730 || 11 || 20 || 5 || 25 || 50 | ||
| + | |- | ||
| + | |} | ||
| − | + | '''M728 ''APDS''''' (Armour-Piercing Discarding Sabot) is capable of easily penetrating the majority of the foes it meets, but these rounds do require finesse as to their placing.<br />Because the shell lacks an explosive filler, the best bet is to try and either knock out the majority of the enemy tank's crew or to destroy the enemy by ammo or fuel detonation through hitting their respective storage capacities. This, of course, requires knowledge about the vehicles the M60 may face - so be sure to use the game's X-Ray view in the hangar and analyse the potential foes for their weak spots! Also, keep in mind that with increased armour thickness the amount of shrapnels shrinks. | |
| − | + | '''M456 ''HEAT-FS''''' (High-Explosive Anti Tank Fin Stabilised): The knowledge of enemy vehicle layouts gained from the stock shell (DM13), will be handy to use for the M60's fullest potential - as the M456 is a round that can penetrate most vehicle's armour frontally. Like the APDS shot, increased armour thickness results in a reduced amount of shrapnel after penetration. Unlike APDS it has one downside: Given that it is a chemical energy round, its fuse is highly sensitive in regards to its practical application in battle. As a result, virtually anything, such as trees or even a fence, will set it off prematurely, so the HEAT-FS round cannot fire through obstructions with this kind. | |
| − | + | '''M393A2 ''HESH''''' (High-Exlposive_Squash-Head) works very differently than other shell types. It ignores any angle, except for ricochet and deals damage by metal-flakes which are blown off inside the armour by the exterior explosion. Basically, the fighting compartment is showered in metal rain. Currently, only true armour thickness (opposed to the line of sight thickness) will provide sufficient means of protection, benefitting the USSR turret designs and in general German tanks. Like all high-explosive shells, the fuze is very sensitive and can be set-off by most objects e.g. fences, trees, pillars. | |
| − | + | <!---'''M735 ''APFSDS''''---> | |
| − | + | <!---'''M416 ''Smoke''''---> | |
| − | + | ===== [[Ammo racks|Ammo racks]] ===== | |
| − | + | [[File:Ammoracks_M60.png|right|thumbnail|x250px|Ammo racks of the M60.]] | |
| − | ===== | + | {| class="wikitable sortable" style="text-align:center" |
| − | + | |- | |
| − | + | ! class="wikitable unsortable" |Full<br /> ammo | |
| − | + | ! class="wikitable unsortable" |1st<br /> rack empty | |
| − | + | ! class="wikitable unsortable" |2nd<br /> rack empty | |
| − | + | ! class="wikitable unsortable" |3rd<br /> rack empty | |
| − | + | ! class="wikitable unsortable" |4th<br /> rack empty | |
| − | + | ! class="wikitable unsortable" |5th<br /> rack empty | |
| − | + | ! class="wikitable unsortable" |Visual<br /> discrepancy | |
| − | == | + | |- |
| − | = | + | || '''63''' || 50 ''(+13)'' || 48 ''(+15)'' || 27 ''(+36)'' || 13 ''(+50)'' || 1 ''(+62)'' || style="text-align:left" | no |
| − | |||
| − | |||
| − | |||
| − | |||
| − | |||
| − | |||
| − | |||
| − | |||
| − | |||
| − | |||
| − | ''' | ||
| − | |||
| − | |||
| − | |||
| − | |||
| − | |||
| − | |||
| − | |||
| − | ''' | ||
| − | |||
| − | |||
| − | |||
| − | |||
| − | |||
| − | |||
|- | |- | ||
|} | |} | ||
| − | |||
| − | |||
| − | === | + | === Machine guns === |
| − | + | <!--Offensive and anti-aircraft machine guns not only allow you to fight some aircraft but also are effective against lightly armoured vehicles. Evaluate machine guns and give recommendations on its use.--> | |
| − | + | {{main|M85 (12.7 mm)|M240 (7.62 mm)}} | |
| − | |||
| − | |||
| − | |||
| − | {| | ||
| − | + | {| class="wikitable" style="text-align:center" | |
| − | + | |- | |
| − | + | ! colspan="7" | [[M85 (12.7 mm)|12.7 mm M85]] | |
| − | + | |- | |
| − | + | ! colspan="7" | ''Commander's cupola'' | |
| − | + | |- | |
| − | + | ! colspan="4" rowspan="1" style="width:5em" |Capacity (Belt capacity) | |
| − | + | ! rowspan="1" | Fire rate <br> (shots/minute) | |
| − | + | ! rowspan="1" | Vertical <br> guidance | |
| − | + | ! rowspan="1" | Horizontal <br> guidance | |
| − | + | |- | |
| − | + | | colspan="4" | 900 (200) || 626 || -9°/+60° || ±180° | |
| − | |||
| − | |||
| − | |||
| − | |||
| − | |||
| − | |||
| − | |||
| − | |||
| − | < | ||
| − | |||
| − | |||
| − | |||
| − | |||
| − | |||
| − | |||
| − | |||
| − | |||
| − | |||
| − | |||
| − | |||
| − | |||
| − | |||
| − | |||
| − | |||
| − | |||
| − | |||
| − | |||
|- | |- | ||
|} | |} | ||
| − | + | {| class="wikitable" style="text-align:center" | |
| − | + | |- | |
| − | + | ! colspan="7" | [[M240 (7.62 mm)|7.62 mm M240]] | |
| − | + | |- | |
| − | + | ! colspan="7" | ''Coaxial mount'' | |
| − | + | |- | |
| − | + | ! colspan="4" rowspan="1" style="width:5em" |Capacity (Belt capacity) | |
| − | + | ! rowspan="1" | Fire rate <br> (shots/minute) | |
| − | + | ! rowspan="1" | Vertical <br> guidance | |
| − | + | ! rowspan="1" | Horizontal <br> guidance | |
| − | + | |- | |
| − | + | | colspan="4" | 5,950 (250) || 500 || N/A || N/A | |
| − | |||
| − | |||
| − | |||
| − | ''' | ||
| − | |||
| − | |||
| − | |||
| − | |||
| − | |||
| − | |||
| − | |||
| − | |||
| − | |||
|- | |- | ||
|} | |} | ||
| − | |||
| − | |||
| − | ==== | + | == Usage in battles == |
| − | + | ''Describe the tactics of playing in the vehicle, the features of using vehicles in the team and advice on tactics. Refrain from creating a "guide" - do not impose a single point of view but instead give the reader food for thought. Describe the most dangerous enemies and give recommendations on fighting them. If necessary, note the specifics of the game in different modes (AB, RB, SB).'' | |
| − | |||
| − | |||
| − | |||
| − | + | === Pros and cons === | |
| − | + | ''Summarize and briefly evaluate the vehicle in terms of its characteristics and combat effectiveness. Mark its pros and cons in a bulleted list. Try not to use more than 6 points for each of the characteristics. Avoid using categorical definitions such as "bad", "good" and the like - they can be substituted with softer forms such as "inadequate" and "effective".'' | |
| − | |||
| − | |||
| − | + | '''Pros:''' | |
| − | + | * | |
| − | |||
| − | |||
| − | |||
| − | |||
| − | + | '''Cons:''' | |
| + | * | ||
| − | + | == History == | |
| + | ''Describe the history of the creation and combat usage of the ground vehicle in more detail than in the introduction. If the historical reference turns out to be too big, take it to a separate article, taking a link to the article about the vehicle and adding a block "/ History" (example: <nowiki>https://wiki.warthunder.com/(Vehicle-name)/History</nowiki>) and add a link to it here using the <code>main</code> template. Be sure to reference text and sources by using <code><nowiki><ref></nowiki></code>, as well as adding them at the end of the article. This section may also include the vehicle's devblog entry (if applicable) and the ingame encyclopedia description (under <code><nowiki>=== Encyclopedia Info ===</nowiki></code>, also if applicable).'' | ||
| − | + | == Media == | |
| + | ''Excellent additions to the article would be video guides, screenshots from the game, and photos.'' | ||
| − | + | == See also == | |
| − | + | ''Links to the articles on the War Thunder Wiki that you think will be useful for the reader, for example:'' | |
| − | * | + | * ''reference to the series of the vehicles;'' |
| + | * ''links to approximate analogues of other nations and research trees.'' | ||
| − | + | == External links == | |
| − | + | ''Paste links to sources and external resources, such as:'' | |
| − | + | * ''topic on the official game forum;'' | |
| − | + | * ''encyclopedia page on the tank;'' | |
| − | + | * ''other literature.'' | |
| − | |||
| − | |||
| − | |||
| − | |||
| − | |||
| − | |||
| − | |||
| − | |||
| − | |||
| − | |||
| − | |||
| − | |||
| − | |||
| − | |||
| − | |||
| − | + | {{USA medium tanks}} | |
| − | |||
| − | |||
| − | { | ||
| − | |||
| − | |||
| − | |||
Revision as of 15:03, 6 September 2019
Contents
| This page is about the American medium tank M60A1 RISE (P). For other uses, see M60 (Disambiguation). |
Description
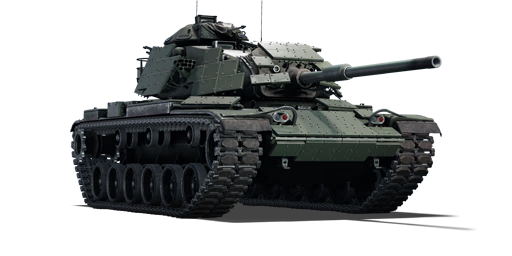
.jpg)
The Tank, Combat, Full-Tracked 105-mm Gun M60A1 RISE (Passive) (shortened as the M60A1 RISE (P)) is a Rank VI American medium tank
with a battle rating of 8.3 (AB) and 8.7 (RB/SB). It was introduced in Update 1.71 "New E.R.A.".
General info
Survivability and armour
Describe armour protection. Note the most well protected and key weak areas. Appreciate the layout of modules as well as the number and location of crew members. Is the level of armour protection sufficient, is the placement of modules helpful for survival in combat?
If necessary use a visual template to indicate the most secure and weak zones of the armour.
Mobility
Write about the mobility of the ground vehicle. Estimate the specific power and manoeuvrability, as well as the maximum speed forward and backward.
Armaments
Main armament
| 105 mm M68 | |||||
|---|---|---|---|---|---|
| Capacity | Vertical guidance |
Horizontal guidance |
Stabilizer | ||
| 63 | -10°/+20° | ±180° | Two-plane | ||
| Turret rotation speed (°/s) | |||||
| Mode | Stock | Upgraded | Prior + Full crew | Prior + Expert qualif. | Prior + Ace qualif. |
| Arcade | 21.40 | __.__ | __.__ | __.__ | __.__ |
| Realistic | 13.40 | __.__ | __.__ | __.__ | __.__ |
| Reloading rate (seconds) | |||||
| Stock | Prior + Full crew | Prior + Expert qualif. | Prior + Ace qualif. | ||
| 8.70 | __.__ | __.__ | __.__ | ||
Ammunition
| Penetration statistics | |||||||
|---|---|---|---|---|---|---|---|
| Ammunition | Type of warhead |
Penetration in mm @ 90° | |||||
| 10m | 100m | 500m | 1000m | 1500m | 2000m | ||
| M728 | APDS | 260 | 256 | 250 | 240 | 231 | 222 |
| M393A2 | HESH | 127 | 127 | 127 | 127 | 127 | 127 |
| M456 | HEATFS | 400 | 400 | 400 | 400 | 400 | 400 |
| M735 | APFSDS | 360 | 355 | 345 | 330 | 321 | 300 |
| Shell details | ||||||||||
|---|---|---|---|---|---|---|---|---|---|---|
| Ammunition | Type of warhead |
Velocity in m/s |
Projectile Mass in kg |
Fuse delay
in m: |
Fuse sensitivity
in mm: |
Explosive Mass in g (TNT equivalent): |
Normalization At 30° from horizontal: |
Ricochet: | ||
| 0% | 50% | 100% | ||||||||
| M392A2 | APDS | 1478 | 5.8 | N/A | N/A | N/A | +1.5° | 75° | 78° | 80° |
| M393A2 | HESH | 730 | 15 | 0.4 | 0.1 | 4,310 | +0° | 73° | 77° | 80° |
| M456 | HEATFS | 1173 | 11 | 0.0 | 0.1 | 1,270 | +0° | 65° | 72° | 75° |
| M735 | APFSDS | 3.7 | 1501 | N/A | N/A | N/A | +1.5° | 76° | 77° | 78° |
| Smoke characteristic | ||||||
|---|---|---|---|---|---|---|
| Ammunition | Velocity in m/s |
Projectile Mass in kg |
Screen radius in m |
Screen time in s |
Screen hold time in s: |
Explosive Mass in g (TNT equivalent): |
| M416 | 730 | 11 | 20 | 5 | 25 | 50 |
M728 APDS (Armour-Piercing Discarding Sabot) is capable of easily penetrating the majority of the foes it meets, but these rounds do require finesse as to their placing.
Because the shell lacks an explosive filler, the best bet is to try and either knock out the majority of the enemy tank's crew or to destroy the enemy by ammo or fuel detonation through hitting their respective storage capacities. This, of course, requires knowledge about the vehicles the M60 may face - so be sure to use the game's X-Ray view in the hangar and analyse the potential foes for their weak spots! Also, keep in mind that with increased armour thickness the amount of shrapnels shrinks.
M456 HEAT-FS (High-Explosive Anti Tank Fin Stabilised): The knowledge of enemy vehicle layouts gained from the stock shell (DM13), will be handy to use for the M60's fullest potential - as the M456 is a round that can penetrate most vehicle's armour frontally. Like the APDS shot, increased armour thickness results in a reduced amount of shrapnel after penetration. Unlike APDS it has one downside: Given that it is a chemical energy round, its fuse is highly sensitive in regards to its practical application in battle. As a result, virtually anything, such as trees or even a fence, will set it off prematurely, so the HEAT-FS round cannot fire through obstructions with this kind.
M393A2 HESH (High-Exlposive_Squash-Head) works very differently than other shell types. It ignores any angle, except for ricochet and deals damage by metal-flakes which are blown off inside the armour by the exterior explosion. Basically, the fighting compartment is showered in metal rain. Currently, only true armour thickness (opposed to the line of sight thickness) will provide sufficient means of protection, benefitting the USSR turret designs and in general German tanks. Like all high-explosive shells, the fuze is very sensitive and can be set-off by most objects e.g. fences, trees, pillars.
Ammo racks

| Full ammo |
1st rack empty |
2nd rack empty |
3rd rack empty |
4th rack empty |
5th rack empty |
Visual discrepancy |
|---|---|---|---|---|---|---|
| 63 | 50 (+13) | 48 (+15) | 27 (+36) | 13 (+50) | 1 (+62) | no |
Machine guns
| 12.7 mm M85 | ||||||
|---|---|---|---|---|---|---|
| Commander's cupola | ||||||
| Capacity (Belt capacity) | Fire rate (shots/minute) |
Vertical guidance |
Horizontal guidance | |||
| 900 (200) | 626 | -9°/+60° | ±180° | |||
| 7.62 mm M240 | ||||||
|---|---|---|---|---|---|---|
| Coaxial mount | ||||||
| Capacity (Belt capacity) | Fire rate (shots/minute) |
Vertical guidance |
Horizontal guidance | |||
| 5,950 (250) | 500 | N/A | N/A | |||
Usage in battles
Describe the tactics of playing in the vehicle, the features of using vehicles in the team and advice on tactics. Refrain from creating a "guide" - do not impose a single point of view but instead give the reader food for thought. Describe the most dangerous enemies and give recommendations on fighting them. If necessary, note the specifics of the game in different modes (AB, RB, SB).
Pros and cons
Summarize and briefly evaluate the vehicle in terms of its characteristics and combat effectiveness. Mark its pros and cons in a bulleted list. Try not to use more than 6 points for each of the characteristics. Avoid using categorical definitions such as "bad", "good" and the like - they can be substituted with softer forms such as "inadequate" and "effective".
Pros:
Cons:
History
Describe the history of the creation and combat usage of the ground vehicle in more detail than in the introduction. If the historical reference turns out to be too big, take it to a separate article, taking a link to the article about the vehicle and adding a block "/ History" (example: https://wiki.warthunder.com/(Vehicle-name)/History) and add a link to it here using the main template. Be sure to reference text and sources by using <ref>, as well as adding them at the end of the article. This section may also include the vehicle's devblog entry (if applicable) and the ingame encyclopedia description (under === Encyclopedia Info ===, also if applicable).
Media
Excellent additions to the article would be video guides, screenshots from the game, and photos.
See also
Links to the articles on the War Thunder Wiki that you think will be useful for the reader, for example:
- reference to the series of the vehicles;
- links to approximate analogues of other nations and research trees.
External links
Paste links to sources and external resources, such as:
- topic on the official game forum;
- encyclopedia page on the tank;
- other literature.
| USA medium tanks | |
|---|---|
| M2 | M2 |
| M3 | M3 Lee · ▃Grant I |
| M4 | M4 · Calliope · M4A1 · M4A1 (76) W · M4A2 · M4A2 (76) W · M4A3 (105) · M4A3 (76) W · M4/T26 |
| M26 Pershing | T20 · T25 · M26 · M26 T99 · M26E1 |
| M46/47/48 Patton | M46 · M46 "Tiger" · M47 · M48A1 · T54E1 · T54E2 |
| M60 | M60 · M60A1 (AOS) · M60A1 RISE (P) · M60A2 · M60A3 TTS · M728 CEV · 120S |
| MBT-70 | MBT-70 · XM803 |
| M1 Abrams | XM1 (Chrysler) · XM1 (GM) |
| M1 Abrams · M1 KVT · IPM1 | |
| M1A1 · M1A1 HC · M1A1 Click-Bait | |
| M1A2 Abrams · M1A2 SEP · M1A2 SEP V2 | |
| Other | T95E1 |
| Australia | M1A1 AIM |
| Canada | M4A5 |
| Israel | ▃Magach 3 (ERA) · ▃Merkava Mk.1 · ▃Merkava Mk.2B · ▃Merkava Mk.3D |
| Turkey | M60 AMBT |
