Difference between revisions of "FlaRakRad"
CobraKingII (talk | contribs) (→Survivability and armour) (Tag: Visual edit) |
|||
| (15 intermediate revisions by 7 users not shown) | |||
| Line 1: | Line 1: | ||
| − | {{Specs-Card|code=germ_flarakrad}} | + | {{Specs-Card |
| + | |code=germ_flarakrad | ||
| + | |images={{Specs-Card-Image|GarageImage_{{PAGENAME}}.jpg}} | ||
| + | }} | ||
== Description == | == Description == | ||
<!-- ''In the description, the first part should be about the history of the creation and combat usage of the vehicle, as well as its key features. In the second part, tell the reader about the ground vehicle in the game. Insert a screenshot of the vehicle, so that if the novice player does not remember the vehicle by name, he will immediately understand what kind of vehicle the article is talking about.'' --> | <!-- ''In the description, the first part should be about the history of the creation and combat usage of the vehicle, as well as its key features. In the second part, tell the reader about the ground vehicle in the game. Insert a screenshot of the vehicle, so that if the novice player does not remember the vehicle by name, he will immediately understand what kind of vehicle the article is talking about.'' --> | ||
| − | |||
| − | |||
The '''{{Specs|name}}''' is a rank {{Specs|rank}} German SPAA {{Battle-rating}}. It was introduced in [[Update "New Power"]]. | The '''{{Specs|name}}''' is a rank {{Specs|rank}} German SPAA {{Battle-rating}}. It was introduced in [[Update "New Power"]]. | ||
== General info == | == General info == | ||
=== Survivability and armour === | === Survivability and armour === | ||
| − | <!-- ''Describe armour protection. Note the most well protected and key weak areas. Appreciate the layout of modules as well as the number and location of crew members. Is the level of armour protection sufficient, is the placement of modules helpful for survival in combat? If necessary use a visual template to indicate the most secure and weak zones of the armour.'' -->[[File:FlaRakRad internal armor.png|thumb|Internal | + | {{Specs-Tank-Armour}} |
| − | + | <!-- ''Describe armour protection. Note the most well protected and key weak areas. Appreciate the layout of modules as well as the number and location of crew members. Is the level of armour protection sufficient, is the placement of modules helpful for survival in combat? If necessary use a visual template to indicate the most secure and weak zones of the armour.'' --> | |
| + | [[File:FlaRakRad internal armor.png|thumb|Internal armour of the FlaRakRad (5 mm)]] | ||
| + | As the FlaRakRad is the largest ground vehicle in game, and an SPAA, it is not hard for one to guess how the protection situation is. As there is no armour to speak of, the best bet for protecting this vehicle is not to be seen. Try hiding behind large hills, buildings near spawn, and other large obstacles. The non retractable search radar makes it hard to find spots tall enough to hide the FlaRakRad's immense size. However, due to the size of this vehicle, it can take ATGMs from helis occasionally, and can sometimes even eat APFSDS. However, any shot is very likely to cripple you, as the transmission is huge and easily hit. | ||
{| class="wikitable" | {| class="wikitable" | ||
| Line 25: | Line 28: | ||
* The chassis is 30 mm thick. | * The chassis is 30 mm thick. | ||
| − | * The windows in the cab have no | + | * The windows in the cab have no armour. |
* The tracking radar is 15 mm thick. | * The tracking radar is 15 mm thick. | ||
| − | * There are 5 mm plates inside the rear compartment (see image). | + | * There are 5 mm plates inside the rear compartment (see image). |
| − | |||
=== Mobility === | === Mobility === | ||
| − | <!-- ''Write about the mobility of the ground vehicle. Estimate the specific power and manoeuvrability, as well as the maximum speed forwards and backwards.'' -->{{tankMobility|abMinHp=511|rbMinHp=318}} | + | {{Specs-Tank-Mobility}} |
| + | <!-- ''Write about the mobility of the ground vehicle. Estimate the specific power and manoeuvrability, as well as the maximum speed forwards and backwards.'' --> | ||
| + | |||
| + | {{tankMobility|abMinHp=511|rbMinHp=318}} | ||
| + | |||
| + | === Modifications and economy === | ||
| + | {{Specs-Economy}} | ||
== Armaments == | == Armaments == | ||
| + | {{Specs-Tank-Armaments}} | ||
=== Main armament === | === Main armament === | ||
| + | {{Specs-Tank-Weapon|1}} | ||
<!-- ''Give the reader information about the characteristics of the main gun. Assess its effectiveness in a battle based on the reloading speed, ballistics and the power of shells. Do not forget about the flexibility of the fire, that is how quickly the cannon can be aimed at the target, open fire on it and aim at another enemy. Add a link to the main article on the gun: <code><nowiki>{{main|Name of the weapon}}</nowiki></code>. Describe in general terms the ammunition available for the main gun. Give advice on how to use them and how to fill the ammunition storage.'' --> | <!-- ''Give the reader information about the characteristics of the main gun. Assess its effectiveness in a battle based on the reloading speed, ballistics and the power of shells. Do not forget about the flexibility of the fire, that is how quickly the cannon can be aimed at the target, open fire on it and aim at another enemy. Add a link to the main article on the gun: <code><nowiki>{{main|Name of the weapon}}</nowiki></code>. Describe in general terms the ammunition available for the main gun. Give advice on how to use them and how to fill the ammunition storage.'' --> | ||
{{main|Roland}} | {{main|Roland}} | ||
| − | |||
{| class="wikitable" style="text-align:center" width="100%" | {| class="wikitable" style="text-align:center" width="100%" | ||
|- | |- | ||
| − | ! colspan=" | + | ! colspan="6" | [[Roland|Roland SAM]] (x2) || colspan="5" | Turret rotation speed (°/s) || colspan="4" | Reloading rate (seconds) |
|- | |- | ||
| − | ! Mode !! Capacity (Belt) !! Vertical !! Horizontal !! Stabilizer | + | ! Mode !! Capacity (Belt) !! Fire rate !! Vertical !! Horizontal !! Stabilizer |
! Stock !! Upgraded !! Full !! Expert !! Aced | ! Stock !! Upgraded !! Full !! Expert !! Aced | ||
! Stock !! Full !! Expert !! Aced | ! Stock !! Full !! Expert !! Aced | ||
|- | |- | ||
! ''Arcade'' | ! ''Arcade'' | ||
| − | | rowspan="2" | 10 (2) || rowspan="2" | -10°/+80° || rowspan="2" | ±180° || rowspan="2" | N/A || __._ || __._ || __._ || __._ || __._ || rowspan="2" | 5.00 || rowspan="2" | 5.00 || rowspan="2" | 5.00 || rowspan="2" | 5.00 | + | | rowspan="2" | 10 (2) || rowspan="2" | 145 || rowspan="2" | -10°/+80° || rowspan="2" | ±180° || rowspan="2" | N/A || __._ || __._ || __._ || __._ || __._ || rowspan="2" | 5.00 || rowspan="2" | 5.00 || rowspan="2" | 5.00 || rowspan="2" | 5.00 |
|- | |- | ||
! ''Realistic'' | ! ''Realistic'' | ||
| Line 65: | Line 74: | ||
! 10 m !! 100 m !! 500 m !! 1,000 m !! 1,500 m !! 2,000 m | ! 10 m !! 100 m !! 500 m !! 1,000 m !! 1,500 m !! 2,000 m | ||
|- | |- | ||
| − | | Roland 3 || SAM ||54||54||54||54||54||54 | + | | Roland 3 || SAM || 54 || 54 || 54 || 54 || 54 || 54 |
|- | |- | ||
| − | | VT1 || SAM ||59||59||59||59||59||59 | + | | VT1 || SAM || 59 || 59 || 59 || 59 || 59 || 59 |
|- | |- | ||
|} | |} | ||
{| class="wikitable sortable" style="text-align:center" width="100%" | {| class="wikitable sortable" style="text-align:center" width="100%" | ||
| − | ! colspan=" | + | ! colspan="11" | Shell details |
| − | |||
| − | |||
| − | |||
| − | |||
| − | |||
| − | |||
| − | |||
| − | |||
|- | |- | ||
| − | + | ! data-sort-type="text" | Ammunition | |
| + | ! Type of<br>warhead | ||
| + | ! Velocity<br>(m/s) | ||
| + | ! Range<br>(m) | ||
| + | ! Projectile<br>Mass (kg) | ||
| + | ! Fuse delay<br>(m) | ||
| + | ! Fuse sensitivity<br>(mm) | ||
| + | ! Explosive Mass<br>(TNT equivalent) (g) | ||
|- | |- | ||
| − | | Roland 3 || SAM ||900||77||0||0.1|| | + | | Roland 3 || SAM || 900 || 8,500 || 77 || 0 || 0.1 || 6,810 |
|- | |- | ||
| − | | VT1 || SAM || | + | | VT1 || SAM || 1,250 || 12,000 || 73 || 0 || N/A || 7,860 |
|- | |- | ||
|} | |} | ||
| Line 91: | Line 99: | ||
==== [[Ammo racks]] ==== | ==== [[Ammo racks]] ==== | ||
<!-- [[File:Ammoracks_{{PAGENAME}}.png|right|thumb|x250px|[[Ammo racks]] of the {{PAGENAME}}]] --> | <!-- [[File:Ammoracks_{{PAGENAME}}.png|right|thumb|x250px|[[Ammo racks]] of the {{PAGENAME}}]] --> | ||
| − | <!-- '''Last updated: | + | <!-- '''Last updated:''' --> |
{| class="wikitable" style="text-align:center" | {| class="wikitable" style="text-align:center" | ||
|- | |- | ||
| Line 109: | Line 117: | ||
== Usage in battles == | == Usage in battles == | ||
<!-- ''Describe the tactics of playing in the vehicle, the features of using vehicles in the team and advice on tactics. Refrain from creating a "guide" - do not impose a single point of view but instead give the reader food for thought. Describe the most dangerous enemies and give recommendations on fighting them. If necessary, note the specifics of the game in different modes (AB, RB, SB).'' --> | <!-- ''Describe the tactics of playing in the vehicle, the features of using vehicles in the team and advice on tactics. Refrain from creating a "guide" - do not impose a single point of view but instead give the reader food for thought. Describe the most dangerous enemies and give recommendations on fighting them. If necessary, note the specifics of the game in different modes (AB, RB, SB).'' --> | ||
| − | '' | + | It is recommended to find a concealed spot near spawn and memorize where the helicopters' airfield is. Helicopters are easy prey for the FlaRakRad; but be careful to take them out quickly or you'll find you have a Vikhr (or Igla) headed right at you. Be careful to not radar lock helicopters, as they usually have RWR and will detect you if you lock them. Try instead to hand guide the missiles. This isn't as hard as it seems, as helicopters mostly hover and without the RWR won't know where the missile is coming from. Once the VT1 missile is unlocked, this allows the FlaRakRad to be able to finally engage aircraft with any hint of reliability. Still, one must exercise discipline when choosing when to engage aircraft, as the VT1 can still be dodged. As for the VT1 against helicopters, it just allows the FlaRakRad to kill enemy helicopters quicker, giving them less time to react. All in all, the FlaRakRad is a competent SPAA once one unlocks the missile and has the flexibility to engage aircraft as well as helis. Take care not to be hit, and you'll have a good time. |
| − | |||
| − | |||
| − | |||
| − | |||
| − | |||
| − | |||
| − | |||
| − | |||
| − | |||
| − | |||
| − | |||
| − | |||
| − | |||
| − | |||
| − | |||
| − | |||
| − | |||
| − | |||
| − | |||
| − | |||
| − | |||
| − | |||
| − | |||
| − | |||
| − | |||
| − | |||
| − | |||
| − | |||
| − | |||
| − | |||
| − | |||
| − | |||
| − | |||
| − | |||
| − | |||
| − | |||
| − | |||
| − | |||
| − | |||
| − | |||
| − | |||
=== Pros and cons === | === Pros and cons === | ||
<!-- ''Summarise and briefly evaluate the vehicle in terms of its characteristics and combat effectiveness. Mark its pros and cons in a bulleted list. Try not to use more than 6 points for each of the characteristics. Avoid using categorical definitions such as "bad", "good" and the like - use substitutions with softer forms such as "inadequate" and "effective".'' --> | <!-- ''Summarise and briefly evaluate the vehicle in terms of its characteristics and combat effectiveness. Mark its pros and cons in a bulleted list. Try not to use more than 6 points for each of the characteristics. Avoid using categorical definitions such as "bad", "good" and the like - use substitutions with softer forms such as "inadequate" and "effective".'' --> | ||
| − | |||
'''Pros:''' | '''Pros:''' | ||
| − | * Good | + | * Good speed and mobility; easy to move around on larger maps |
| + | * High speed missile with long range | ||
| + | * 1st generation gunner thermals allow the FlaRakRad to track targets without the use of radar easier | ||
'''Cons:''' | '''Cons:''' | ||
| − | * No defence against | + | * The single biggest ground vehicle in the game, longer and taller than a Maus - finding proper concealment is nigh impossible |
| − | * | + | * Every single gun in the game, MGs included, poses a threat |
| + | * No defence against any ground vehicles | ||
| + | * Lack of guns means it cannot defend itself from close aircraft | ||
| + | * No survivability from attacks from the ground or air | ||
== History == | == History == | ||
<!-- ''Describe the history of the creation and combat usage of the vehicle in more detail than in the introduction. If the historical reference turns out to be too long, take it to a separate article, taking a link to the article about the vehicle and adding a block "/History" (example: <nowiki>https://wiki.warthunder.com/(Vehicle-name)/History</nowiki>) and add a link to it here using the <code>main</code> template. Be sure to reference text and sources by using <code><nowiki><ref></ref></nowiki></code>, as well as adding them at the end of the article with <code><nowiki><references /></nowiki></code>. This section may also include the vehicle's dev blog entry (if applicable) and the in-game encyclopedia description (under <code><nowiki>=== In-game description ===</nowiki></code>, also if applicable).'' --> | <!-- ''Describe the history of the creation and combat usage of the vehicle in more detail than in the introduction. If the historical reference turns out to be too long, take it to a separate article, taking a link to the article about the vehicle and adding a block "/History" (example: <nowiki>https://wiki.warthunder.com/(Vehicle-name)/History</nowiki>) and add a link to it here using the <code>main</code> template. Be sure to reference text and sources by using <code><nowiki><ref></ref></nowiki></code>, as well as adding them at the end of the article with <code><nowiki><references /></nowiki></code>. This section may also include the vehicle's dev blog entry (if applicable) and the in-game encyclopedia description (under <code><nowiki>=== In-game description ===</nowiki></code>, also if applicable).'' --> | ||
| − | + | === [[wt:en/news/6902-development-flarakrad-protective-sphere-en|Devblog]] === | |
| + | The FlaRakRad self-propelled anti-aircraft missile system with the Roland 3 surface-to-air missile system became the most advanced modification of the Roland, Franco-German anti-aircraft missile. While the army version of the FlaRakPz 1 self-propelled air defense system was equipped with a tracked chassis, the air defense services and the German naval forces settled on wheeled chassis for AA systems for airfield protection. At the end of the 90's, a MAN 6x6 truck was chosen as a chassis for the Roland 2 complex, but soon a unified command vehicle on the chassis of the MAN 15t mil gl KAT I A1 (8×8) truck was adopted, which served as the basis for further development of the Roland family. | ||
| + | |||
| + | One of the latest modernization programs for the complex for the needs of the German army assumed the possibility of launching not only Roland 2 and Roland 3 missiles, but also promising long-range VT1 missiles, but the program was not completed and by 2003 Germany refused to further modernize the Roland complex in favor of more modern systems. | ||
== Media == | == Media == | ||
<!-- ''Excellent additions to the article would be video guides, screenshots from the game, and photos.'' --> | <!-- ''Excellent additions to the article would be video guides, screenshots from the game, and photos.'' --> | ||
| − | + | <gallery mode="packed" caption="FlaRakRad Devblog Images" heights="200"> | |
| + | File:FlaRakRad WTWallpaper 001.jpg| | ||
| + | File:FlaRakRad WTWallpaper 002.jpg| | ||
| + | File:FlaRakRad WTWallpaper 003.jpg| | ||
| + | File:FlaRakRad WTWallpaper 004.jpg| | ||
| + | File:FlaRakRad WTWallpaper 005.jpg| | ||
| + | File:FlaRakRad WTWallpaper 006.jpg| | ||
| + | File:FlaRakRad WTWallpaper 007.jpg| | ||
| + | </gallery> | ||
== See also == | == See also == | ||
Revision as of 07:43, 25 January 2021

Contents
Description
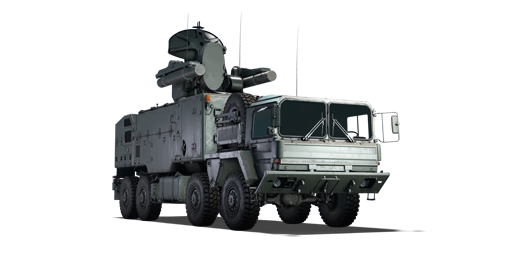
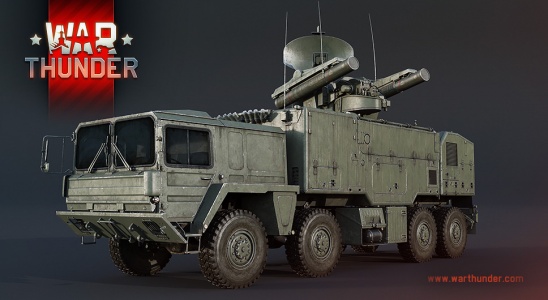
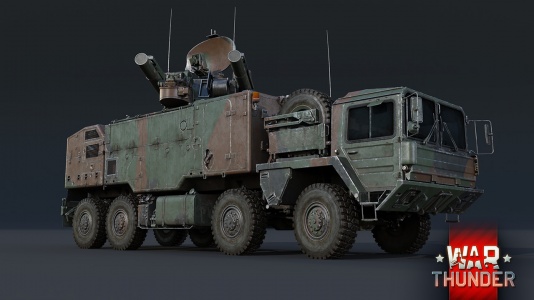
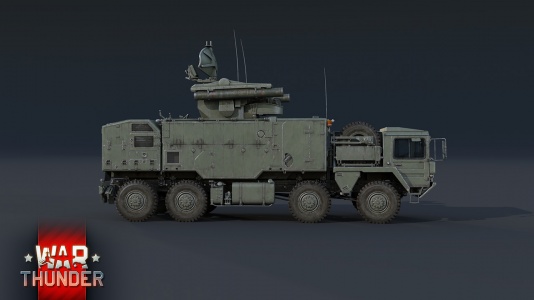
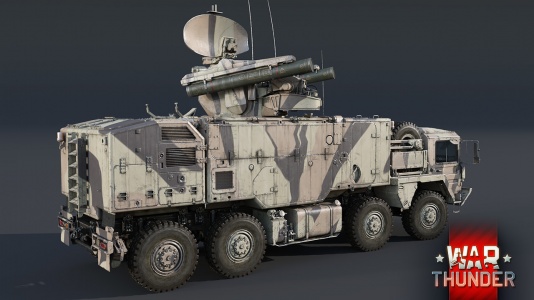
The Flugabwehrraketensystem Roland auf Radkraftfahrzeug is a rank VIII German SPAA with a battle rating of 11.7 (AB/RB/SB). It was introduced in Update "New Power".
General info
Survivability and armour

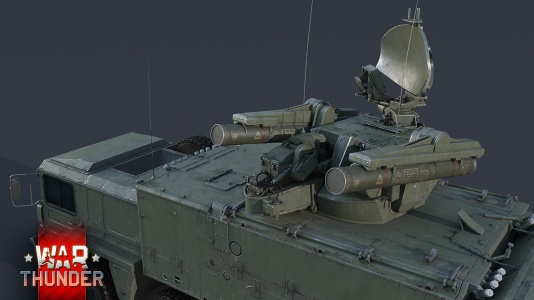
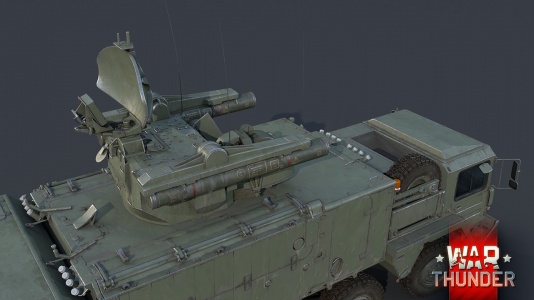
As the FlaRakRad is the largest ground vehicle in game, and an SPAA, it is not hard for one to guess how the protection situation is. As there is no armour to speak of, the best bet for protecting this vehicle is not to be seen. Try hiding behind large hills, buildings near spawn, and other large obstacles. The non retractable search radar makes it hard to find spots tall enough to hide the FlaRakRad's immense size. However, due to the size of this vehicle, it can take ATGMs from helis occasionally, and can sometimes even eat APFSDS. However, any shot is very likely to cripple you, as the transmission is huge and easily hit.
| Armour | Front (Slope angle) | Sides | Rear | Roof |
|---|---|---|---|---|
| Hull | 5 mm | 5 mm | 5 mm | 5 mm |
| Turret | 15 mm | 15 mm | 15 mm | 10 mm |
Notes:
- The chassis is 30 mm thick.
- The windows in the cab have no armour.
- The tracking radar is 15 mm thick.
- There are 5 mm plates inside the rear compartment (see image).
Mobility
| Game Mode | Max Speed (km/h) | Weight (tons) | Engine power (horsepower) | Power-to-weight ratio (hp/ton) | |||
|---|---|---|---|---|---|---|---|
| Forward | Reverse | Stock | Upgraded | Stock | Upgraded | ||
| Arcade | 110 | 39 | 27.5 | 511 | 687 | 18.58 | 24.98 |
| Realistic | 101 | 36 | 318 | 360 | 11.56 | 13.09 | |
Modifications and economy
| Mobility | Protection | Firepower | ||||||||||||||||||||||||
|---|---|---|---|---|---|---|---|---|---|---|---|---|---|---|---|---|---|---|---|---|---|---|---|---|---|---|
|
|
|
Armaments
Main armament
| Roland SAM (x2) | Turret rotation speed (°/s) | Reloading rate (seconds) | ||||||||||||
|---|---|---|---|---|---|---|---|---|---|---|---|---|---|---|
| Mode | Capacity (Belt) | Fire rate | Vertical | Horizontal | Stabilizer | Stock | Upgraded | Full | Expert | Aced | Stock | Full | Expert | Aced |
| Arcade | 10 (2) | 145 | -10°/+80° | ±180° | N/A | __._ | __._ | __._ | __._ | __._ | 5.00 | 5.00 | 5.00 | 5.00 |
| Realistic | __._ | __._ | __._ | __._ | __._ | |||||||||
Ammunition
| Penetration statistics | |||||||
|---|---|---|---|---|---|---|---|
| Ammunition | Type of warhead |
Penetration @ 0° Angle of Attack (mm) | |||||
| 10 m | 100 m | 500 m | 1,000 m | 1,500 m | 2,000 m | ||
| Roland 3 | SAM | 54 | 54 | 54 | 54 | 54 | 54 |
| VT1 | SAM | 59 | 59 | 59 | 59 | 59 | 59 |
| Shell details | ||||||||||
|---|---|---|---|---|---|---|---|---|---|---|
| Ammunition | Type of warhead |
Velocity (m/s) |
Range (m) |
Projectile Mass (kg) |
Fuse delay (m) |
Fuse sensitivity (mm) |
Explosive Mass (TNT equivalent) (g) | |||
| Roland 3 | SAM | 900 | 8,500 | 77 | 0 | 0.1 | 6,810 | |||
| VT1 | SAM | 1,250 | 12,000 | 73 | 0 | N/A | 7,860 | |||
Ammo racks
| Full ammo |
1st rack empty |
2nd rack empty |
3rd rack empty |
4th rack empty |
5th rack empty |
6th rack empty |
Visual discrepancy |
|---|---|---|---|---|---|---|---|
| 5 | __ (+__) | __ (+__) | __ (+__) | __ (+__) | __ (+__) | __ (+__) | __ |
Usage in battles
It is recommended to find a concealed spot near spawn and memorize where the helicopters' airfield is. Helicopters are easy prey for the FlaRakRad; but be careful to take them out quickly or you'll find you have a Vikhr (or Igla) headed right at you. Be careful to not radar lock helicopters, as they usually have RWR and will detect you if you lock them. Try instead to hand guide the missiles. This isn't as hard as it seems, as helicopters mostly hover and without the RWR won't know where the missile is coming from. Once the VT1 missile is unlocked, this allows the FlaRakRad to be able to finally engage aircraft with any hint of reliability. Still, one must exercise discipline when choosing when to engage aircraft, as the VT1 can still be dodged. As for the VT1 against helicopters, it just allows the FlaRakRad to kill enemy helicopters quicker, giving them less time to react. All in all, the FlaRakRad is a competent SPAA once one unlocks the missile and has the flexibility to engage aircraft as well as helis. Take care not to be hit, and you'll have a good time.
Pros and cons
Pros:
- Good speed and mobility; easy to move around on larger maps
- High speed missile with long range
- 1st generation gunner thermals allow the FlaRakRad to track targets without the use of radar easier
Cons:
- The single biggest ground vehicle in the game, longer and taller than a Maus - finding proper concealment is nigh impossible
- Every single gun in the game, MGs included, poses a threat
- No defence against any ground vehicles
- Lack of guns means it cannot defend itself from close aircraft
- No survivability from attacks from the ground or air
History
Devblog
The FlaRakRad self-propelled anti-aircraft missile system with the Roland 3 surface-to-air missile system became the most advanced modification of the Roland, Franco-German anti-aircraft missile. While the army version of the FlaRakPz 1 self-propelled air defense system was equipped with a tracked chassis, the air defense services and the German naval forces settled on wheeled chassis for AA systems for airfield protection. At the end of the 90's, a MAN 6x6 truck was chosen as a chassis for the Roland 2 complex, but soon a unified command vehicle on the chassis of the MAN 15t mil gl KAT I A1 (8×8) truck was adopted, which served as the basis for further development of the Roland family.
One of the latest modernization programs for the complex for the needs of the German army assumed the possibility of launching not only Roland 2 and Roland 3 missiles, but also promising long-range VT1 missiles, but the program was not completed and by 2003 Germany refused to further modernize the Roland complex in favor of more modern systems.
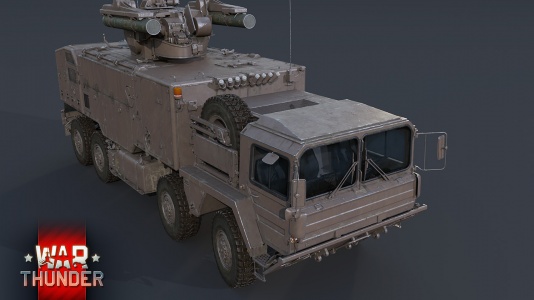
Media
- FlaRakRad Devblog Images


See also
Links to the articles on the War Thunder Wiki that you think will be useful for the reader, for example:
- reference to the series of the vehicles;
- links to approximate analogues of other nations and research trees.
External links
| Germany anti-aircraft vehicles | |
|---|---|
| Wheeled | Sd.Kfz.222 |
| Half-track | Sd.Kfz.251/21 · Sd.Kfz. 6/2 |
| Flakpanzer IV | Wirbelwind · Ostwind · Ostwind II · Kugelblitz · Zerstörer 45 |
| Other Flakpanzers | Flakpanzer I · Flakpanzer 38 · Flakpanzer 341 |
| Wiesel AWC | Wiesel 1A4 · Ozelot |
| Radar SPAAG | Gepard · Gepard 1A2 |
| Missile SPAA | FlaRakPz 1 · FlaRakRad |
