Difference between revisions of "Falcon"
Inceptor57 (talk | contribs) (Restored page) |
|||
| Line 2: | Line 2: | ||
== Description == | == Description == | ||
| − | ''In the description, the first part needs to be about the history of the creation and combat usage of the vehicle, as well as its key features. In the second part, tell the reader about the ground vehicle in the game. Insert the screenshot of the vehicle. If the novice player does not remember the vehicle by name, they will immediately understand what kind of vehicle it is talking about.'' | + | <!--''In the description, the first part needs to be about the history of the creation and combat usage of the vehicle, as well as its key features. In the second part, tell the reader about the ground vehicle in the game. Insert the screenshot of the vehicle. If the novice player does not remember the vehicle by name, they will immediately understand what kind of vehicle it is talking about.''--> |
| + | [[File:GarageImage_{{PAGENAME}}.jpg|420px|thumb|left]] | ||
| + | {{Break}} | ||
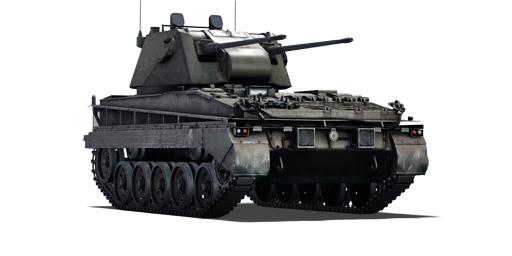
| + | The '''{{Specs|name}}''' is a Rank {{Specs|rank}} British self-propelled anti-aircraft vehicle {{Battle-rating|1}}. This vehicle was introduced in [[Update 1.57 "Battle March"]]. While being an anti-aircraft vehicle, the Falcon has optimal performance against everything, assuming you have enough modifications. There are SPAA with higher fire rate, that can destroy planes instantly or harass them at great range, but have problems with medium tanks or tanks in general. There are SPAA that can destroy tanks, but can't shoot down anything besides bombers. Falcon can potentially do both. | ||
| + | |||
| + | The Falcon looks like light tank chassis with slightly sloped round turret on the back. Turret also has 2 long autocannons on it's front. It's easy to realize it's falcon, there are not many vehicles like it on a field at it's battle rating. | ||
| + | |||
| + | The armour is not very good, it protects from machineguns, but that's about it. Even fighter planes can destroy you, however, this vehicle is mobile and fast, compared to most adversaries it faces. | ||
| + | |||
| + | Autocannons tend to overheat if continuously fired, short bursts work best. Don't fire for longer than 6 seconds unless you try to destroy enemy tank's protection for allies. | ||
| + | Recoil from guns slows you down and pushes you back. If you want to do run-n-gun attack, keep that in mind and try to fire broadside, if possible, as otherwise tank's turret might actually catch up to you. | ||
| + | |||
| + | Ammunition is stored in one belt, which is good for last stand type of fight, but bad in general. Rearming the belt is only possible when you are empty, you can do that in capture point. It takes almost a minute, and then you also have to reload it for about half a minute. You really don't want to run out of ammo, if your team is bad at controlling the map. You can be easily taken out even by fighter planes at that state, because your armour is weak. | ||
== General info == | == General info == | ||
=== Survivability and armour === | === Survivability and armour === | ||
| − | ''Describe armour protection. Note the most well protected and key weak areas. Appreciate the layout of modules as well as the number and location of crew members. Is the level of armour protection sufficient, is the placement of modules helpfull for survival in combat?'' | + | <!--''Describe armour protection. Note the most well protected and key weak areas. Appreciate the layout of modules as well as the number and location of crew members. Is the level of armour protection sufficient, is the placement of modules helpfull for survival in combat?'' |
| − | ''If necessary use a visual template to indicate the most secure and weak zones of the armour.'' | + | ''If necessary use a visual template to indicate the most secure and weak zones of the armour.''--> |
| + | '''Armour type:''' | ||
| + | * Rolled homogeneous armour | ||
| + | {| class="wikitable" | ||
| + | |- | ||
| + | ! Armour !! Front !! Sides !! Rear !! Roof | ||
| + | |- | ||
| + | | Hull || 10 mm (80°), 12.7 mm (2-19°) ''Front glacis'' <br> 12.7 mm (37°) ''Lower glacis'' || 12.7 mm ''Top'' <br> 12.7 mm (13°) ''Bottom'' || 10 mm (2°) || 10 mm | ||
| + | |- | ||
| + | | Turret || 10 mm (4-64°) || 10 mm (14-26°) || 10 mm (2°) || 6 mm | ||
| + | |- | ||
| + | |} | ||
| + | '''Notes:''' | ||
| + | * Suspension wheels are 10 mm thick while tracks are 15 mm thick. | ||
=== Mobility === | === Mobility === | ||
| − | ''Write about the mobility of the ground vehicle. Estimate the specific power and maneuverability as well as the maximum speed forward and backward.'' | + | <!--''Write about the mobility of the ground vehicle. Estimate the specific power and maneuverability as well as the maximum speed forward and backward.''--> |
| + | {| class="wikitable" style="text-align:center" | ||
| + | |- | ||
| + | !colspan="3" | Mobility characteristic | ||
| + | |- | ||
| + | ! Weight (tons) | ||
| + | !colspan="1" | Add-on Armor<br>weight (tons) | ||
| + | !colspan="1" | Max speed (km/h) | ||
| + | |- | ||
| + | |rowspan="2" | 15.9 || colspan="1" rowspan="2" | N/A || colspan="1" | 52 (AB) | ||
| + | |- | ||
| + | |48 (RB/SB) | ||
| + | |- | ||
| + | !colspan="3" | Engine power (horsepower) | ||
| + | |- | ||
| + | !colspan="1" | Mode | ||
| + | !Stock | ||
| + | !Upgraded | ||
| + | |- | ||
| + | |''Arcade'' | ||
| + | |303 | ||
| + | |___ | ||
| + | |- | ||
| + | |''Realistic/Simulator'' | ||
| + | |188 | ||
| + | |___ | ||
| + | |- | ||
| + | !colspan="3" | Power-to-weight ratio (hp/ton) | ||
| + | |- | ||
| + | !colspan="1" | Mode | ||
| + | !Stock | ||
| + | !Upgraded | ||
| + | |- | ||
| + | |''Arcade'' | ||
| + | |19.06 | ||
| + | |__.__ | ||
| + | |- | ||
| + | |''Realistic/Simulator'' | ||
| + | |11.82 | ||
| + | |__.__ | ||
| + | |- | ||
| + | |} | ||
== Armaments == | == Armaments == | ||
=== Main armament === | === Main armament === | ||
| − | ''Give the reader information about the characteristics of the main gun. Assess its effectiveness in a battle based on the reloading speed, ballistics and the power of shells. Do not forget about the flexibilty of the fire, that is how quickly the cannon can be aimed at the target, open fire on it and aim at another enemy. Add a link to the main article on the gun: <code><nowiki>{{main|Name of the weapon}}</nowiki></code>. Describe in general terms the ammunition available for the main gun. Give advice on how to use them and how to fill the ammunition storage.'' | + | <!--''Give the reader information about the characteristics of the main gun. Assess its effectiveness in a battle based on the reloading speed, ballistics and the power of shells. Do not forget about the flexibilty of the fire, that is how quickly the cannon can be aimed at the target, open fire on it and aim at another enemy. Add a link to the main article on the gun: <code><nowiki>{{main|Name of the weapon}}</nowiki></code>. Describe in general terms the ammunition available for the main gun. Give advice on how to use them and how to fill the ammunition storage.''--> |
| + | {{main|HSS-831L (30 mm)}} | ||
| − | === | + | {| class="wikitable" style="text-align:center" |
| − | '' | + | |- |
| + | ! colspan="6" | [[HSS-831L (30 mm)|30 mm HSS-831L]] (x4) | ||
| + | |- | ||
| + | ! colspan="2" rowspan="1" style="width:5em" |Capacity (Belt capacity each) | ||
| + | ! rowspan="1" | Fire rate <br> (shots/minute) | ||
| + | ! rowspan="1" | Vertical <br> guidance | ||
| + | ! rowspan="1" | Horizontal <br> guidance | ||
| + | ! rowspan="1" | Stabilizer | ||
| + | |- | ||
| + | | colspan="2" | 620 (310) || 600 || -10°/+85° || ±180° || Two-plane | ||
| + | |- | ||
| + | ! colspan="6" | Turret rotation speed (°/s) | ||
| + | |- | ||
| + | ! style="width:4em" |Mode | ||
| + | ! style="width:4em" |Stock | ||
| + | ! style="width:4em" |Upgraded | ||
| + | ! style="width:4em" |Prior + Full crew | ||
| + | ! style="width:4em" |Prior + Expert qualif. | ||
| + | ! style="width:4em" |Prior + Ace qualif. | ||
| + | |- | ||
| + | | ''Arcade'' || __.__ || __.__ || __.__ || __.__ || __.__ | ||
| + | |- | ||
| + | | ''Realistic'' || __.__ || __.__ || __.__ || __.__ || __.__ | ||
| + | |- | ||
| + | ! colspan="4" | Reloading rate (seconds) | ||
| + | |- | ||
| + | ! colspan="1" style="width:4em" |Stock | ||
| + | ! colspan="1" style="width:4em" |Prior + Full crew | ||
| + | ! colspan="1" style="width:4em" |Prior + Expert qualif. | ||
| + | ! colspan="1" style="width:4em" |Prior + Ace qualif. | ||
| + | |- | ||
| + | | __.__ || __.__ || __.__ || __.__ | ||
| + | |- | ||
| + | |} | ||
| − | === | + | === Ammunition === |
| − | '' | + | {| class="wikitable sortable" style="text-align:center" width="100%" |
| + | ! colspan="8" | Penetration statistics | ||
| + | |- | ||
| + | ! rowspan="2" data-sort-type="text" | Ammunition | ||
| + | ! rowspan="2" class="unsortable" | Type of <br /> warhead | ||
| + | ! colspan="6" | '''Penetration''' '''''in mm''''' '''@ 90°''' | ||
| + | |- | ||
| + | ! 10m | ||
| + | ! 100m | ||
| + | ! 500m | ||
| + | ! 1000m | ||
| + | ! 1500m | ||
| + | ! 2000m | ||
| + | |- | ||
| + | | APHE-I || AP-I || 60 || 53 || 40 || 33 || 28 || 19 | ||
| + | |- | ||
| + | | APDS-T || HVAP-T || 110 || 101 || 95 || 69 || 52 || 41 | ||
| + | |- | ||
| + | |} | ||
| + | |||
| + | ===Belt types=== | ||
| + | {|class="wikitable" | ||
| + | | '''Belts''' || '''Shell composition''' || '''Combat usage''' | ||
| + | |- | ||
| + | |align="left"|'''''Default ''''' ||align="left"| AP-I, HEI-T* ||align="left"| | ||
| + | |- | ||
| + | |align="left"|'''''30x170 HE-I-T''''' ||align="left"| HEI-T*, HEI*, HEI*, AP-I ||align="left"| | ||
| + | |- | ||
| + | |align="left"|'''''30x170 APHE-I''''' ||align="left"| AP-I, AP-I, AP-I, HEI-T*||align="left"| | ||
| + | |- | ||
| + | |align="left"|'''''30x170 APDS-T''''' ||align="left"| HVAP-T, AP-I*, AP-I*, HEI-T* ||align="left"| | ||
| + | |} | ||
| + | |||
| + | === [[Ammo racks|Ammo racks]] === | ||
| + | [[File:Ammoracks Falcon.png|right|thumbnail|x250px|[[Ammo racks|Ammo racks]] of the Falcon.]] | ||
| + | {| class="wikitable sortable" style="text-align:center" | ||
| + | |- | ||
| + | ! class="wikitable unsortable" |Full<br />ammo | ||
| + | ! class="wikitable unsortable" |1st<br />rack empty | ||
| + | ! class="wikitable unsortable" |2nd<br />rack empty | ||
| + | ! class="wikitable unsortable" |Visual<br /> discrepancy | ||
| + | |- | ||
| + | | '''620''' || 310 ''(+310)''|| 0 ''(+620)''|| style="text-align:center" | N/A | ||
| + | |- | ||
| + | |} | ||
== Usage in the battles == | == Usage in the battles == | ||
| − | ''Describe the tactics of playing in the vehicle, the features of using vehicles in the team and advice on tactics. Refrain from creating a "guide" - do not impose a single point of view but give the reader food for thought. Describe the most dangerous enemies and give recommendations on fighting them. If necessary, note the specifics of the game in different modes (AB, RB, SB).'' | + | <!--''Describe the tactics of playing in the vehicle, the features of using vehicles in the team and advice on tactics. Refrain from creating a "guide" - do not impose a single point of view but give the reader food for thought. Describe the most dangerous enemies and give recommendations on fighting them. If necessary, note the specifics of the game in different modes (AB, RB, SB).''--> |
| + | Generally Falcon drives around the battlefield, trying to hide in hard to notice flank positions or behind houses and shoots at planes. In case if someone drives by - flanks them and destroys them, if has AP belt. | ||
| + | |||
| + | It's generally better to stay out of sight, using terrain elevation or houses. You only can choose one belt, AP belt is adequate for any work. If you want to shoot just planes you can take explosive ammo, but then you are completely useless against armor. APDS belt allows to harass even heavily armoured vehicles from sides. You wont need to reload until you are done. | ||
| + | |||
| + | In case if some tank noticed you and wants to destroy you, you can use the fact, that tanks turrets are usually far from front of tank. Bait enemy towards your cover, stand far enough away from corner to see enemy tracks, but not to see enemy turret, and shoot cannons at track that is '''further away from you'''. That will force moving tank to topple over and mess with enemy aim. Before enemy realized what has just happened shred their side armour and destroy them. If that failed - run, they wont be able to get you anyway. You can do that in duels as well, however just destroying them is better at that point. | ||
| + | |||
| + | In RB, it's possible to hide in forests, waiting for relatively poorly armored German medium tanks, light tanks and alike, however, if they notice your vehicle first you probably won't do enough damage to stop them from firing again. | ||
| + | |||
| + | In AB, it's possible to just drive around and shoot at everyone, since it's even faster there, however, people dislike being shot at by auto cannons, and someone will certainly notice the noise and kill-feed, so don't expect to live long, especially against Soviets, who have lots of frontal armouring and BMPs, which are superior to you in every way. | ||
| + | |||
| + | Some enemies to be concerned about: | ||
| + | * ATGM: These are worse than any tanks, because they wont accidentally hit your loader with AP shell, they will just explode you. Attack only when have upper hand, be that long range, cover, or surprise. | ||
| + | * Maus: It's invulnerable to you and has 2 cannons. Even IS-7 can technically be defeated in point blank duel with APDS from the rear, but not The Maus. In AB this means, that you can't drive anywhere it can look and fire at. | ||
| + | |||
| + | ====Counter-tactics==== | ||
| + | <!--What to expect, if it would be in command of the enemy and how to counter it. (i.e. Just flank)--> | ||
| + | '''Ground:'''<br> | ||
| + | AP and APDS belts are most effective when fired at your side armor or back of the turret. If you are attacked by falcon, just turn both hull and turret to take better angle against them. | ||
| + | |||
| + | It's best to not let them get a jump on you at all, since it may be able to destroy 2 tanks before anyone even realizes what's going on. Just don't stand with your sides open towards flank directions, instead turn your hull's front and back there, if enemy you are currently fighting cannot fire at your hull anyway. | ||
| + | |||
| + | On rare occasions, ramming the Falcon damages it's guns. Ramming at full speed often damages tracks or at least temporarily stops it. | ||
| + | |||
| + | '''Air:'''<br> The Falcon has questionable accuracy at 2 km range, but it still can force you to disengage just by firing in your general direction. It's still better to not mess with falcon and avoid flying too much near to buildings, if you know it's there. | ||
=== Pros and cons === | === Pros and cons === | ||
| − | ''Summarize and briefly evaluate the vehicle in terms of its characteristics and combat effectiveness. Mark its pros and cons in a bulleted list. Do not use more than 6 points for each of the characteristics. Avoid using categorical definitions such as "bad", "good" and the like - they have a substitution in the form of softer "inadequate", "effective".'' | + | <!--''Summarize and briefly evaluate the vehicle in terms of its characteristics and combat effectiveness. Mark its pros and cons in a bulleted list. Do not use more than 6 points for each of the characteristics. Avoid using categorical definitions such as "bad", "good" and the like - they have a substitution in the form of softer "inadequate", "effective".''--> |
| − | |||
'''Pros:''' | '''Pros:''' | ||
| − | * | + | * High penetrating APDS rounds can actually do some major damage at the tier |
| + | * Very high one-second burst mass | ||
| + | * Only has one ammo belt per gun so no need to reload | ||
'''Cons:''' | '''Cons:''' | ||
| − | * | + | * Weak armour |
| + | * Shotgun effect when fired continuously for more than 10 seconds. Will most likely overheat at that point, too | ||
| + | * Approximately 30 seconds worth of ammo before needing to rearm at a capture circle, which takes a long time | ||
| + | * High repair cost in AB of 20k+ | ||
== History == | == History == | ||
| Line 42: | Line 214: | ||
== Read also == | == Read also == | ||
| − | + | * [http://warthunder.com/en/devblog/current/866/ [Devblog<nowiki>]</nowiki> Falcon AA: Britain’s foremost anti-air gun] | |
| − | * | ||
| − | |||
| − | |||
== Sources == | == Sources == | ||
| Line 51: | Line 220: | ||
* ''topic on the official game forum;'' | * ''topic on the official game forum;'' | ||
* ''other literature.'' | * ''other literature.'' | ||
| + | |||
| + | {{Britain anti-aircraft vehicles}} | ||
Revision as of 01:22, 4 February 2019
Contents
Description

The Falcon is a Rank V British self-propelled anti-aircraft vehicle
with a battle rating of 8.0 (AB) and 8.3 (RB/SB). This vehicle was introduced in Update 1.57 "Battle March". While being an anti-aircraft vehicle, the Falcon has optimal performance against everything, assuming you have enough modifications. There are SPAA with higher fire rate, that can destroy planes instantly or harass them at great range, but have problems with medium tanks or tanks in general. There are SPAA that can destroy tanks, but can't shoot down anything besides bombers. Falcon can potentially do both.
The Falcon looks like light tank chassis with slightly sloped round turret on the back. Turret also has 2 long autocannons on it's front. It's easy to realize it's falcon, there are not many vehicles like it on a field at it's battle rating.
The armour is not very good, it protects from machineguns, but that's about it. Even fighter planes can destroy you, however, this vehicle is mobile and fast, compared to most adversaries it faces.
Autocannons tend to overheat if continuously fired, short bursts work best. Don't fire for longer than 6 seconds unless you try to destroy enemy tank's protection for allies. Recoil from guns slows you down and pushes you back. If you want to do run-n-gun attack, keep that in mind and try to fire broadside, if possible, as otherwise tank's turret might actually catch up to you.
Ammunition is stored in one belt, which is good for last stand type of fight, but bad in general. Rearming the belt is only possible when you are empty, you can do that in capture point. It takes almost a minute, and then you also have to reload it for about half a minute. You really don't want to run out of ammo, if your team is bad at controlling the map. You can be easily taken out even by fighter planes at that state, because your armour is weak.
General info
Survivability and armour
Armour type:
- Rolled homogeneous armour
| Armour | Front | Sides | Rear | Roof |
|---|---|---|---|---|
| Hull | 10 mm (80°), 12.7 mm (2-19°) Front glacis 12.7 mm (37°) Lower glacis |
12.7 mm Top 12.7 mm (13°) Bottom |
10 mm (2°) | 10 mm |
| Turret | 10 mm (4-64°) | 10 mm (14-26°) | 10 mm (2°) | 6 mm |
Notes:
- Suspension wheels are 10 mm thick while tracks are 15 mm thick.
Mobility
| Mobility characteristic | ||
|---|---|---|
| Weight (tons) | Add-on Armor weight (tons) |
Max speed (km/h) |
| 15.9 | N/A | 52 (AB) |
| 48 (RB/SB) | ||
| Engine power (horsepower) | ||
| Mode | Stock | Upgraded |
| Arcade | 303 | ___ |
| Realistic/Simulator | 188 | ___ |
| Power-to-weight ratio (hp/ton) | ||
| Mode | Stock | Upgraded |
| Arcade | 19.06 | __.__ |
| Realistic/Simulator | 11.82 | __.__ |
Armaments
Main armament
| 30 mm HSS-831L (x4) | |||||
|---|---|---|---|---|---|
| Capacity (Belt capacity each) | Fire rate (shots/minute) |
Vertical guidance |
Horizontal guidance |
Stabilizer | |
| 620 (310) | 600 | -10°/+85° | ±180° | Two-plane | |
| Turret rotation speed (°/s) | |||||
| Mode | Stock | Upgraded | Prior + Full crew | Prior + Expert qualif. | Prior + Ace qualif. |
| Arcade | __.__ | __.__ | __.__ | __.__ | __.__ |
| Realistic | __.__ | __.__ | __.__ | __.__ | __.__ |
| Reloading rate (seconds) | |||||
| Stock | Prior + Full crew | Prior + Expert qualif. | Prior + Ace qualif. | ||
| __.__ | __.__ | __.__ | __.__ | ||
Ammunition
| Penetration statistics | |||||||
|---|---|---|---|---|---|---|---|
| Ammunition | Type of warhead |
Penetration in mm @ 90° | |||||
| 10m | 100m | 500m | 1000m | 1500m | 2000m | ||
| APHE-I | AP-I | 60 | 53 | 40 | 33 | 28 | 19 |
| APDS-T | HVAP-T | 110 | 101 | 95 | 69 | 52 | 41 |
Belt types
| Belts | Shell composition | Combat usage |
| Default | AP-I, HEI-T* | |
| 30x170 HE-I-T | HEI-T*, HEI*, HEI*, AP-I | |
| 30x170 APHE-I | AP-I, AP-I, AP-I, HEI-T* | |
| 30x170 APDS-T | HVAP-T, AP-I*, AP-I*, HEI-T* |
Ammo racks

| Full ammo |
1st rack empty |
2nd rack empty |
Visual discrepancy |
|---|---|---|---|
| 620 | 310 (+310) | 0 (+620) | N/A |
Usage in the battles
Generally Falcon drives around the battlefield, trying to hide in hard to notice flank positions or behind houses and shoots at planes. In case if someone drives by - flanks them and destroys them, if has AP belt.
It's generally better to stay out of sight, using terrain elevation or houses. You only can choose one belt, AP belt is adequate for any work. If you want to shoot just planes you can take explosive ammo, but then you are completely useless against armor. APDS belt allows to harass even heavily armoured vehicles from sides. You wont need to reload until you are done.
In case if some tank noticed you and wants to destroy you, you can use the fact, that tanks turrets are usually far from front of tank. Bait enemy towards your cover, stand far enough away from corner to see enemy tracks, but not to see enemy turret, and shoot cannons at track that is further away from you. That will force moving tank to topple over and mess with enemy aim. Before enemy realized what has just happened shred their side armour and destroy them. If that failed - run, they wont be able to get you anyway. You can do that in duels as well, however just destroying them is better at that point.
In RB, it's possible to hide in forests, waiting for relatively poorly armored German medium tanks, light tanks and alike, however, if they notice your vehicle first you probably won't do enough damage to stop them from firing again.
In AB, it's possible to just drive around and shoot at everyone, since it's even faster there, however, people dislike being shot at by auto cannons, and someone will certainly notice the noise and kill-feed, so don't expect to live long, especially against Soviets, who have lots of frontal armouring and BMPs, which are superior to you in every way.
Some enemies to be concerned about:
- ATGM: These are worse than any tanks, because they wont accidentally hit your loader with AP shell, they will just explode you. Attack only when have upper hand, be that long range, cover, or surprise.
- Maus: It's invulnerable to you and has 2 cannons. Even IS-7 can technically be defeated in point blank duel with APDS from the rear, but not The Maus. In AB this means, that you can't drive anywhere it can look and fire at.
Counter-tactics
Ground:
AP and APDS belts are most effective when fired at your side armor or back of the turret. If you are attacked by falcon, just turn both hull and turret to take better angle against them.
It's best to not let them get a jump on you at all, since it may be able to destroy 2 tanks before anyone even realizes what's going on. Just don't stand with your sides open towards flank directions, instead turn your hull's front and back there, if enemy you are currently fighting cannot fire at your hull anyway.
On rare occasions, ramming the Falcon damages it's guns. Ramming at full speed often damages tracks or at least temporarily stops it.
Air:
The Falcon has questionable accuracy at 2 km range, but it still can force you to disengage just by firing in your general direction. It's still better to not mess with falcon and avoid flying too much near to buildings, if you know it's there.
Pros and cons
Pros:
- High penetrating APDS rounds can actually do some major damage at the tier
- Very high one-second burst mass
- Only has one ammo belt per gun so no need to reload
Cons:
- Weak armour
- Shotgun effect when fired continuously for more than 10 seconds. Will most likely overheat at that point, too
- Approximately 30 seconds worth of ammo before needing to rearm at a capture circle, which takes a long time
- High repair cost in AB of 20k+
History
Describe the history of the creation and combat usage of the ground vehicle in more detail than in the introduction. If the historical reference turns out to be too big, take it to a separate article, taking a link to an article about the vehicle and adding a block "/historical reference" (example: https://wiki.warthunder.com/Name-vehicles/historical reference) and add a link to it here using the main template. Be sure to include links to sources at the end of the article.
Media
An excellent addition to the article will be video guides, as well as screenshots from the game and photos.
Read also
Sources
Paste links to sources and external resources, such as:
- topic on the official game forum;
- other literature.
| Britain anti-aircraft vehicles | |
|---|---|
| Crusader AA | Crusader AA Mk I · Crusader AA Mk II |
| Wheeled | Staghound AA · AEC AA |
| Radar SPAAG | Chieftain Marksman |
| Missile SPAA | Stormer HVM |
| Other | Light AA Mk I · Falcon |
| Canada | Skink |
| South Africa | Ystervark · Bosvark · ZA-35 |
