Difference between pages "Nashorn" and "Object 685"
Colok76286 (talk | contribs) (→Ammo racks: Added image and notes) |
(→Main armament) (Tag: Visual edit) |
||
| Line 1: | Line 1: | ||
| − | {{Specs-Card|code= | + | {{Specs-Card|code=ussr_object_685}} |
== Description == | == Description == | ||
| − | <!--In the description, the first part should be about the history of the creation and combat usage of the vehicle, as well as its key features. In the second part, tell the reader about the ground vehicle in the game. Insert a screenshot of the vehicle, so that if the novice player does not remember the vehicle by name, he will immediately understand what kind of vehicle the article is talking about.--> | + | <!-- ''In the description, the first part should be about the history of the creation and combat usage of the vehicle, as well as its key features. In the second part, tell the reader about the ground vehicle in the game. Insert a screenshot of the vehicle, so that if the novice player does not remember the vehicle by name, he will immediately understand what kind of vehicle the article is talking about.'' --> |
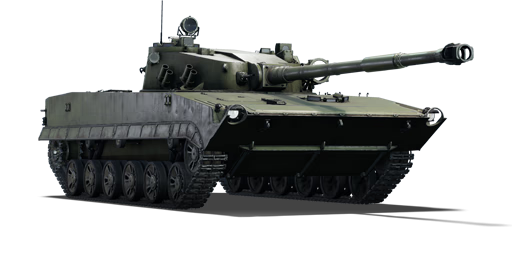
[[File:GarageImage_{{PAGENAME}}.jpg|420px|thumb|left]] | [[File:GarageImage_{{PAGENAME}}.jpg|420px|thumb|left]] | ||
| − | {{ | + | {{Break}} |
| − | The '''{{Specs|name}}''' | + | The '''{{Specs|name}}''' is a rank {{Specs|rank}} Soviet light tank {{Battle-rating}}. It was introduced in [[Update 1.91 "Night Vision"]]. |
== General info == | == General info == | ||
=== Survivability and armour === | === Survivability and armour === | ||
| − | <!-- ''Describe armour protection. Note the most well protected and key weak areas. Appreciate the layout of modules as well as the number and location of crew members. Is the level of armour protection sufficient, is the placement of modules helpful for survival in combat? If necessary use a visual template to indicate the most secure and weak zones of the armour.'' | + | <!-- ''Describe armour protection. Note the most well protected and key weak areas. Appreciate the layout of modules as well as the number and location of crew members. Is the level of armour protection sufficient, is the placement of modules helpful for survival in combat? If necessary use a visual template to indicate the most secure and weak zones of the armour.'' --> |
| + | [[File:Obj685 xray.png|right|thumb|Object 685 X-ray view in hangar]] | ||
| + | |||
| + | * The armour on the Object 685 is Alloy ABT-101. The armour values in the chart are displayed in rolled homogeneous armour equivalence. | ||
| + | |||
{| class="wikitable" | {| class="wikitable" | ||
|- | |- | ||
| − | ! Armour !! Front (Slope angle) !! Sides !! | + | !''Armour''!!''Front (Slope angle)''!!''Sides''!!''Rear''!!''Roof'' |
| − | |||
| − | |||
|- | |- | ||
| − | | | + | |''Hull''||''54 mm''||16 mm||5 mm||6 mm |
| − | |||
| − | |||
|- | |- | ||
| + | |''Turret''||19 mm||16 mm||16 mm||8 mm | ||
|} | |} | ||
| − | + | The Object 685 is a very lightly armoured vehicle. The alloy may at first appear to be somewhat thick, but it is much less effective than rolled homogeneous armour at stopping rounds. The Object 685 can be killed by almost anything, with .50 calibre machine guns able to penetrate even parts of the front armour at close range. Additionally, the Object 685 has hullbreak. The commander and gunner are somewhat far apart, but the Object has only 3 crew, so survivability is not particularly impressive. Generally, Object 685 drivers should not rely on their armour in any situation. | |
| − | |||
| − | |||
| − | |||
| − | |||
| − | The | ||
| − | |||
| − | |||
=== Mobility === | === Mobility === | ||
<!-- ''Write about the mobility of the ground vehicle. Estimate the specific power and manoeuvrability, as well as the maximum speed forwards and backwards.'' --> | <!-- ''Write about the mobility of the ground vehicle. Estimate the specific power and manoeuvrability, as well as the maximum speed forwards and backwards.'' --> | ||
| − | {{tankMobility|abMinHp= | + | {{tankMobility|abMinHp=620|rbMinHp=354}} |
== Armaments == | == Armaments == | ||
=== Main armament === | === Main armament === | ||
<!-- ''Give the reader information about the characteristics of the main gun. Assess its effectiveness in a battle based on the reloading speed, ballistics and the power of shells. Do not forget about the flexibility of the fire, that is how quickly the cannon can be aimed at the target, open fire on it and aim at another enemy. Add a link to the main article on the gun: <code><nowiki>{{main|Name of the weapon}}</nowiki></code>. Describe in general terms the ammunition available for the main gun. Give advice on how to use them and how to fill the ammunition storage.'' --> | <!-- ''Give the reader information about the characteristics of the main gun. Assess its effectiveness in a battle based on the reloading speed, ballistics and the power of shells. Do not forget about the flexibility of the fire, that is how quickly the cannon can be aimed at the target, open fire on it and aim at another enemy. Add a link to the main article on the gun: <code><nowiki>{{main|Name of the weapon}}</nowiki></code>. Describe in general terms the ammunition available for the main gun. Give advice on how to use them and how to fill the ammunition storage.'' --> | ||
| − | {{main| | + | {{main|2A48 (100 mm)}} |
| + | |||
{| class="wikitable" style="text-align:center" width="100%" | {| class="wikitable" style="text-align:center" width="100%" | ||
|- | |- | ||
| − | ! colspan="5" | [[ | + | ! colspan="5" | [[2A48 (100 mm)|100 mm 2A48]] || colspan="5" | Turret rotation speed (°/s) || colspan="4" | Reloading rate (seconds) |
|- | |- | ||
! Mode !! Capacity !! Vertical !! Horizontal !! Stabilizer | ! Mode !! Capacity !! Vertical !! Horizontal !! Stabilizer | ||
| Line 49: | Line 44: | ||
|- | |- | ||
! ''Arcade'' | ! ''Arcade'' | ||
| − | | rowspan="2" | 40 || rowspan="2" | - | + | | rowspan="2" | 40 || rowspan="2" | -4°/+17° || rowspan="2" | ±180° || rowspan="2" | Two-plane || 19.0 || 26.2 ||32.0||35.4||37.6|| rowspan="2" | 6.0 || rowspan="2" |6.0|| rowspan="2" |6.0|| rowspan="2" |6.0 |
|- | |- | ||
! ''Realistic'' | ! ''Realistic'' | ||
| − | | | + | | 11.9 || 14.0 ||17.0||18.5||20.0 |
|- | |- | ||
|} | |} | ||
| − | |||
==== Ammunition ==== | ==== Ammunition ==== | ||
{| class="wikitable sortable" style="text-align:center" width="100%" | {| class="wikitable sortable" style="text-align:center" width="100%" | ||
| Line 67: | Line 61: | ||
! 10 m !! 100 m !! 500 m !! 1,000 m !! 1,500 m !! 2,000 m | ! 10 m !! 100 m !! 500 m !! 1,000 m !! 1,500 m !! 2,000 m | ||
|- | |- | ||
| − | | | + | | 3BK17M || HEATFS || 390 || 390 || 390 || 390 || 390 || 390 |
|- | |- | ||
| − | | | + | | BR-412D || APCBC || 239 || 236 || 223 || 207 || 192 || 178 |
|- | |- | ||
| − | | | + | | 3BM25 || APFSDS || 335 || 330 || 307 || 290 || 275 || 260 |
|- | |- | ||
| − | | | + | | OF-412 || HE || 19 || 19 || 19 || 19 || 19 || 19 |
|- | |- | ||
|} | |} | ||
| − | |||
{| class="wikitable sortable" style="text-align:center" width="100%" | {| class="wikitable sortable" style="text-align:center" width="100%" | ||
! colspan="10" | Shell details | ! colspan="10" | Shell details | ||
| Line 91: | Line 84: | ||
! 0% !! 50% !! 100% | ! 0% !! 50% !! 100% | ||
|- | |- | ||
| − | | | + | | 3BK17M || HEATFS || 1,085 || 9.96 || N/A || 0.1 || 1,440 || 65° || 72° || 77° |
| + | |- | ||
| + | | BR-412D || APCBC || 887 || 15.90 || 1.2 || 19.0 || 93.94 || 48° || 63° || 71° | ||
|- | |- | ||
| − | | | + | | 3BM25 || APFSDS || 1,430 || 3.40 || N/A || N/A || N/A || 76° || 77° || 80° |
| + | |- | ||
| + | | OF-412 || HE || 900 || 15.20 || 0.1 || 0.5 || 1,460 || 79° || 80° || 81° | ||
| + | |- | ||
| + | |} | ||
| + | {| class="wikitable" style="text-align:center" | ||
| + | ! colspan="7" | Smoke shell characteristics | ||
|- | |- | ||
| − | + | ! Ammunition | |
| + | ! Velocity<br>(m/s) | ||
| + | ! Projectile<br>Mass (kg) | ||
| + | ! Screen radius<br>(m) | ||
| + | ! Screen deploy time<br>(s) | ||
| + | ! Screen hold time<br>(s) | ||
| + | ! Explosive Mass<br>(TNT equivalent) (g) | ||
|- | |- | ||
| − | | | + | | 3D3 || 880 || 15.6 || 20 || 5 || 25 || 272 |
|- | |- | ||
|} | |} | ||
==== [[Ammo racks]] ==== | ==== [[Ammo racks]] ==== | ||
| − | [[File:Ammoracks_{{PAGENAME}}.png|right|thumb|x250px|[[Ammo racks]] of the {{PAGENAME}}]] | + | <!-- [[File:Ammoracks_{{PAGENAME}}.png|right|thumb|x250px|[[Ammo racks]] of the {{PAGENAME}}]] --> |
{| class="wikitable" style="text-align:center" | {| class="wikitable" style="text-align:center" | ||
|- | |- | ||
| Line 110: | Line 117: | ||
! 3rd<br>rack empty | ! 3rd<br>rack empty | ||
! 4th<br>rack empty | ! 4th<br>rack empty | ||
| + | ! 5th<br>rack empty | ||
| + | ! 6th<br>rack empty | ||
! Visual<br>discrepancy | ! Visual<br>discrepancy | ||
|- | |- | ||
| − | | '''40''' || | + | | '''40''' || __ ''(+__)'' || __ ''(+__)'' || __ ''(+__)'' || __ ''(+__)'' || __ ''(+__)'' || __ ''(+__)'' || __ |
|- | |- | ||
|} | |} | ||
| − | |||
| − | |||
| − | |||
=== Machine guns === | === Machine guns === | ||
| − | <!-- ''Offensive and anti-aircraft machine guns not only allow you to fight some aircraft but also are effective against lightly armoured vehicles. Evaluate machine guns and give recommendations on its use.'' | + | <!-- ''Offensive and anti-aircraft machine guns not only allow you to fight some aircraft but also are effective against lightly armoured vehicles. Evaluate machine guns and give recommendations on its use.'' --> |
| − | {{main| | + | {{main|SGMT (7.62 mm)}} |
{| class="wikitable" style="text-align:center" width="50%" | {| class="wikitable" style="text-align:center" width="50%" | ||
|- | |- | ||
| − | ! colspan="5" | [[ | + | ! colspan="5" | [[SGMT (7.62 mm)|7.62 mm SGMT]] |
| − | |||
| − | |||
| − | |||
| − | |||
| − | |||
| − | |||
|- | |- | ||
| − | + | ! Mount !! Capacity (Belt) !! Fire rate !! Vertical !! Horizontal | |
|- | |- | ||
| − | | | + | | Coaxial || 2,000 (250) || 600 || N/A || N/A |
|- | |- | ||
|} | |} | ||
| − | |||
| − | |||
== Usage in battles == | == Usage in battles == | ||
<!-- ''Describe the tactics of playing in the vehicle, the features of using vehicles in the team and advice on tactics. Refrain from creating a "guide" - do not impose a single point of view but instead give the reader food for thought. Describe the most dangerous enemies and give recommendations on fighting them. If necessary, note the specifics of the game in different modes (AB, RB, SB).'' --> | <!-- ''Describe the tactics of playing in the vehicle, the features of using vehicles in the team and advice on tactics. Refrain from creating a "guide" - do not impose a single point of view but instead give the reader food for thought. Describe the most dangerous enemies and give recommendations on fighting them. If necessary, note the specifics of the game in different modes (AB, RB, SB).'' --> | ||
| + | '''Gameplay Stock:''' | ||
| + | |||
| + | The Object 685 is much less powerful when stock. It is equipped with the 3BK17M HEAT-FS shell, which is generally inferior to the 3BM25 shell. Another issue while stock is the mobility, which is not as impressive when stock. Another issue is the lack of the Airstrike modification, which makes spawning in air vehicles easier in ground RB after scouting. | ||
| + | |||
| + | '''Gameplay Spaded:''' | ||
| + | |||
| + | The Object 685 is a highly mobile Soviet light tank which has an excellent cannon. Its disadvantages are thin armour and a lack of thermal sights. Object 685 players should avoid areas with heavy foliage, as the lack of thermals will prove detrimental in these areas. The best strategy with the Object 685 is flanking the enemy team using the Object 685's mobility. The amphibious capability can help create new avenues of attack when flanking. The scouting ability also helps the team while on the flanks. One tactic to avoid in the Object 685 is using the ESS system, as enemy thermal sights can see through the smoke, while the Object 685 will effectively blind itself. | ||
| + | |||
| + | '''Close Range Engagements:''' | ||
| + | |||
| + | The Object 685 can fare well at close range due to the excellent gun handling and reload rate. Additionally, the mobility of the vehicle allows it to easily outmanoeuvre enemies at close range. However, the thin armour and hullbreak means that getting shot is usually a death sentence. | ||
| − | + | '''Long Range Engagements:''' | |
| − | + | The Object 685 may have difficulty in prolonged long range engagements. The main armament is excellent, but the Object is held back by its lack of thermal sights and low survivability. The lack of thermals means that seeing your target may be difficult at long range. Additionally, the low survivability means that the Object 685 will not survive most hits, even at long range. | |
=== Modules === | === Modules === | ||
| Line 153: | Line 162: | ||
! colspan="2" | Mobility | ! colspan="2" | Mobility | ||
! Protection | ! Protection | ||
| − | ! colspan=" | + | ! colspan="3" | Firepower |
|- | |- | ||
| I | | I | ||
| Tracks | | Tracks | ||
| − | | | + | | |
| Parts | | Parts | ||
| + | | BR-412D | ||
| Horizontal Drive | | Horizontal Drive | ||
| − | | | + | | NVD |
|- | |- | ||
| II | | II | ||
| Line 166: | Line 176: | ||
| Brake System | | Brake System | ||
| FPE | | FPE | ||
| + | | 3BM25 | ||
| Adjustment of Fire | | Adjustment of Fire | ||
| − | | | + | | Airstrike |
|- | |- | ||
| III | | III | ||
| Line 174: | Line 185: | ||
| Crew Replenishment | | Crew Replenishment | ||
| Elevation Mechanism | | Elevation Mechanism | ||
| − | | | + | | Smoke grenade |
| + | | Laser rangefinder | ||
|- | |- | ||
| IV | | IV | ||
| Transmission | | Transmission | ||
| Engine | | Engine | ||
| − | | | + | | ESS |
| − | | | + | | Artillery Support |
| − | | | + | | Improved optics |
| + | | 3D3 | ||
|- | |- | ||
|} | |} | ||
| Line 190: | Line 203: | ||
'''Pros:''' | '''Pros:''' | ||
| − | * | + | * Powerful rounds with a fast reload |
| − | * | + | * Good mobility |
| − | * | + | * Scouting ability |
| − | * | + | * Thin armour avoids excessive spalling |
| − | * | + | * Amphibious |
'''Cons:''' | '''Cons:''' | ||
| − | * | + | * Thin armour |
| − | * | + | * Hullbreak |
| − | * | + | * Lack of thermal sights |
| − | * | + | * Small crew |
| − | |||
| − | |||
== History == | == History == | ||
<!-- ''Describe the history of the creation and combat usage of the vehicle in more detail than in the introduction. If the historical reference turns out to be too long, take it to a separate article, taking a link to the article about the vehicle and adding a block "/History" (example: <nowiki>https://wiki.warthunder.com/(Vehicle-name)/History</nowiki>) and add a link to it here using the <code>main</code> template. Be sure to reference text and sources by using <code><nowiki><ref></ref></nowiki></code>, as well as adding them at the end of the article with <code><nowiki><references /></nowiki></code>. This section may also include the vehicle's dev blog entry (if applicable) and the in-game encyclopedia description (under <code><nowiki>=== In-game description ===</nowiki></code>, also if applicable).'' --> | <!-- ''Describe the history of the creation and combat usage of the vehicle in more detail than in the introduction. If the historical reference turns out to be too long, take it to a separate article, taking a link to the article about the vehicle and adding a block "/History" (example: <nowiki>https://wiki.warthunder.com/(Vehicle-name)/History</nowiki>) and add a link to it here using the <code>main</code> template. Be sure to reference text and sources by using <code><nowiki><ref></ref></nowiki></code>, as well as adding them at the end of the article with <code><nowiki><references /></nowiki></code>. This section may also include the vehicle's dev blog entry (if applicable) and the in-game encyclopedia description (under <code><nowiki>=== In-game description ===</nowiki></code>, also if applicable).'' --> | ||
| + | After production of the PT-76 was discontinued, Soviet engineers began work on developing a suitable replacement around a set of requirements provided by the military. The requirements were sent to three different design bureaus, with each bureau developing its own vehicle around the given specifications. | ||
| − | + | One of the proposed designs, the Object 788, was disqualified early from the competition due to being incomplete and missing several key features mandated by the requirements. The other two designs, the Object 685 and Object 934 were both deemed as sufficient, and work on them continued. By the mid 1970s, both vehicles were built and tested, but neither managed to garner enough interest to warrant a production order being issued. Despite not making it past the prototype stage, design solutions from both vehicles were later applied to other Soviet fighting vehicles. | |
| + | |||
| + | ''- From [[wt:en/news/6332-development-object-685-return-of-the-river-mosquito-en|Devblog]]'' | ||
== Media == | == Media == | ||
| − | + | ''Excellent additions to the article would be video guides, screenshots from the game, and photos.'' | |
| − | |||
| − | |||
| − | |||
| − | |||
== See also == | == See also == | ||
| − | + | ''Links to the articles on the War Thunder Wiki that you think will be useful for the reader, for example:'' | |
| + | |||
* ''reference to the series of the vehicles;'' | * ''reference to the series of the vehicles;'' | ||
| − | * ''links to approximate analogues of other nations and research trees.'' | + | * ''links to approximate analogues of other nations and research trees.'' |
| − | |||
| − | |||
| − | |||
| − | |||
| − | |||
| − | |||
== External links == | == External links == | ||
| Line 234: | Line 239: | ||
* ''other literature.'' --> | * ''other literature.'' --> | ||
| − | * [[wt:en/ | + | * [[wt:en/news/6332-development-object-685-return-of-the-river-mosquito-en|[Development] Object 685: Return of the River Mosquito]] |
| − | |||
| − | |||
| − | {{ | + | {{USSR light tanks}} |
Revision as of 16:15, 31 July 2020
Contents
Description

The Object 685 is a rank VI Soviet light tank
with a battle rating of 8.3 (AB) and 8.7 (RB/SB). It was introduced in Update 1.91 "Night Vision".
General info
Survivability and armour

- The armour on the Object 685 is Alloy ABT-101. The armour values in the chart are displayed in rolled homogeneous armour equivalence.
| Armour | Front (Slope angle) | Sides | Rear | Roof |
|---|---|---|---|---|
| Hull | 54 mm | 16 mm | 5 mm | 6 mm |
| Turret | 19 mm | 16 mm | 16 mm | 8 mm |
The Object 685 is a very lightly armoured vehicle. The alloy may at first appear to be somewhat thick, but it is much less effective than rolled homogeneous armour at stopping rounds. The Object 685 can be killed by almost anything, with .50 calibre machine guns able to penetrate even parts of the front armour at close range. Additionally, the Object 685 has hullbreak. The commander and gunner are somewhat far apart, but the Object has only 3 crew, so survivability is not particularly impressive. Generally, Object 685 drivers should not rely on their armour in any situation.
Mobility
| Game Mode | Max Speed (km/h) | Weight (tons) | Engine power (horsepower) | Power-to-weight ratio (hp/ton) | |||
|---|---|---|---|---|---|---|---|
| Forward | Reverse | Stock | Upgraded | Stock | Upgraded | ||
| Arcade | 79 | 23 | 16.5 | 620 | 868 | 37.58 | 52.61 |
| Realistic | 71 | 21 | 354 | 455 | 21.45 | 27.58 | |
Armaments
Main armament
| 100 mm 2A48 | Turret rotation speed (°/s) | Reloading rate (seconds) | |||||||||||
|---|---|---|---|---|---|---|---|---|---|---|---|---|---|
| Mode | Capacity | Vertical | Horizontal | Stabilizer | Stock | Upgraded | Full | Expert | Aced | Stock | Full | Expert | Aced |
| Arcade | 40 | -4°/+17° | ±180° | Two-plane | 19.0 | 26.2 | 32.0 | 35.4 | 37.6 | 6.0 | 6.0 | 6.0 | 6.0 |
| Realistic | 11.9 | 14.0 | 17.0 | 18.5 | 20.0 | ||||||||
Ammunition
| Penetration statistics | |||||||
|---|---|---|---|---|---|---|---|
| Ammunition | Type of warhead |
Penetration @ 0° Angle of Attack (mm) | |||||
| 10 m | 100 m | 500 m | 1,000 m | 1,500 m | 2,000 m | ||
| 3BK17M | HEATFS | 390 | 390 | 390 | 390 | 390 | 390 |
| BR-412D | APCBC | 239 | 236 | 223 | 207 | 192 | 178 |
| 3BM25 | APFSDS | 335 | 330 | 307 | 290 | 275 | 260 |
| OF-412 | HE | 19 | 19 | 19 | 19 | 19 | 19 |
| Shell details | |||||||||
|---|---|---|---|---|---|---|---|---|---|
| Ammunition | Type of warhead |
Velocity (m/s) |
Projectile Mass (kg) |
Fuse delay (m) |
Fuse sensitivity (mm) |
Explosive Mass (TNT equivalent) (g) |
Ricochet | ||
| 0% | 50% | 100% | |||||||
| 3BK17M | HEATFS | 1,085 | 9.96 | N/A | 0.1 | 1,440 | 65° | 72° | 77° |
| BR-412D | APCBC | 887 | 15.90 | 1.2 | 19.0 | 93.94 | 48° | 63° | 71° |
| 3BM25 | APFSDS | 1,430 | 3.40 | N/A | N/A | N/A | 76° | 77° | 80° |
| OF-412 | HE | 900 | 15.20 | 0.1 | 0.5 | 1,460 | 79° | 80° | 81° |
| Smoke shell characteristics | ||||||
|---|---|---|---|---|---|---|
| Ammunition | Velocity (m/s) |
Projectile Mass (kg) |
Screen radius (m) |
Screen deploy time (s) |
Screen hold time (s) |
Explosive Mass (TNT equivalent) (g) |
| 3D3 | 880 | 15.6 | 20 | 5 | 25 | 272 |
Ammo racks
| Full ammo |
1st rack empty |
2nd rack empty |
3rd rack empty |
4th rack empty |
5th rack empty |
6th rack empty |
Visual discrepancy |
|---|---|---|---|---|---|---|---|
| 40 | __ (+__) | __ (+__) | __ (+__) | __ (+__) | __ (+__) | __ (+__) | __ |
Machine guns
| 7.62 mm SGMT | ||||
|---|---|---|---|---|
| Mount | Capacity (Belt) | Fire rate | Vertical | Horizontal |
| Coaxial | 2,000 (250) | 600 | N/A | N/A |
Usage in battles
Gameplay Stock:
The Object 685 is much less powerful when stock. It is equipped with the 3BK17M HEAT-FS shell, which is generally inferior to the 3BM25 shell. Another issue while stock is the mobility, which is not as impressive when stock. Another issue is the lack of the Airstrike modification, which makes spawning in air vehicles easier in ground RB after scouting.
Gameplay Spaded:
The Object 685 is a highly mobile Soviet light tank which has an excellent cannon. Its disadvantages are thin armour and a lack of thermal sights. Object 685 players should avoid areas with heavy foliage, as the lack of thermals will prove detrimental in these areas. The best strategy with the Object 685 is flanking the enemy team using the Object 685's mobility. The amphibious capability can help create new avenues of attack when flanking. The scouting ability also helps the team while on the flanks. One tactic to avoid in the Object 685 is using the ESS system, as enemy thermal sights can see through the smoke, while the Object 685 will effectively blind itself.
Close Range Engagements:
The Object 685 can fare well at close range due to the excellent gun handling and reload rate. Additionally, the mobility of the vehicle allows it to easily outmanoeuvre enemies at close range. However, the thin armour and hullbreak means that getting shot is usually a death sentence.
Long Range Engagements:
The Object 685 may have difficulty in prolonged long range engagements. The main armament is excellent, but the Object is held back by its lack of thermal sights and low survivability. The lack of thermals means that seeing your target may be difficult at long range. Additionally, the low survivability means that the Object 685 will not survive most hits, even at long range.
Modules
| Tier | Mobility | Protection | Firepower | |||
|---|---|---|---|---|---|---|
| I | Tracks | Parts | BR-412D | Horizontal Drive | NVD | |
| II | Suspension | Brake System | FPE | 3BM25 | Adjustment of Fire | Airstrike |
| III | Filters | Crew Replenishment | Elevation Mechanism | Smoke grenade | Laser rangefinder | |
| IV | Transmission | Engine | ESS | Artillery Support | Improved optics | 3D3 |
Pros and cons
Pros:
- Powerful rounds with a fast reload
- Good mobility
- Scouting ability
- Thin armour avoids excessive spalling
- Amphibious
Cons:
- Thin armour
- Hullbreak
- Lack of thermal sights
- Small crew
History
After production of the PT-76 was discontinued, Soviet engineers began work on developing a suitable replacement around a set of requirements provided by the military. The requirements were sent to three different design bureaus, with each bureau developing its own vehicle around the given specifications.
One of the proposed designs, the Object 788, was disqualified early from the competition due to being incomplete and missing several key features mandated by the requirements. The other two designs, the Object 685 and Object 934 were both deemed as sufficient, and work on them continued. By the mid 1970s, both vehicles were built and tested, but neither managed to garner enough interest to warrant a production order being issued. Despite not making it past the prototype stage, design solutions from both vehicles were later applied to other Soviet fighting vehicles.
- From Devblog
Media
Excellent additions to the article would be video guides, screenshots from the game, and photos.
See also
Links to the articles on the War Thunder Wiki that you think will be useful for the reader, for example:
- reference to the series of the vehicles;
- links to approximate analogues of other nations and research trees.
External links
| USSR light tanks | |
|---|---|
| T-26 | T-26 · T-26 (1st Gv.T.Br.) · T-26-4 · T-26E |
| BT | BT-5 · RBT-5 · BT-7 · BT-7 TD · BT-7M · BT-7A (F-32) |
| T-50 | T-126 · T-50 |
| T-70 | T-70 · T-80 |
| PT-76 | PT-76B · PT-76-57 · Object 906 |
| BMP | BMP-1 · BMP-2 · BMP-2M · BMP-3 |
| BMD | BMD-4 |
| 2S25 | 2S25 · 2S25M |
| Wheeled | BA-11 · BTR-80A |
| Other | T-60 · Object 685 · 2S38 |
| China | ▂Type 62 |
