Difference between revisions of "Dark Aggressor TD"
(→Torpedo armament) (Tag: Visual edit) |
(Copied from Dark class (FPB 1102)) |
||
| Line 10: | Line 10: | ||
=== Survivability and armour === | === Survivability and armour === | ||
<!-- ''Talk about the vehicle's armour. Note the most well-defended and most vulnerable zones, e.g. the ammo magazine. Evaluate the composition of components and assemblies responsible for movement and manoeuvrability. Evaluate the survivability of the primary and secondary armaments separately. Don't forget to mention the size of the crew, which plays an important role in fleet mechanics. Save tips on preserving survivability for the "Usage in battles" section. If necessary, use a graphical template to show the most well-protected or most vulnerable points in the armour.'' --> | <!-- ''Talk about the vehicle's armour. Note the most well-defended and most vulnerable zones, e.g. the ammo magazine. Evaluate the composition of components and assemblies responsible for movement and manoeuvrability. Evaluate the survivability of the primary and secondary armaments separately. Don't forget to mention the size of the crew, which plays an important role in fleet mechanics. Save tips on preserving survivability for the "Usage in battles" section. If necessary, use a graphical template to show the most well-protected or most vulnerable points in the armour.'' --> | ||
| − | Dark | + | |
| + | Dark Aggressor has the following armour layout: | ||
* Hull: 40 mm, wood | * Hull: 40 mm, wood | ||
* Superstructure: 15 mm, wood | * Superstructure: 15 mm, wood | ||
| − | Dark | + | Dark Aggressor has no armour at all, lacking even a gunshield for the main cannon. Right beneath the gun are also two large ammunition racks. These cannot be removed unless all ammo for the main gun is emptied. Altogether, with a crew complement of only 15, Dark Aggressor's survivability is low. |
| − | On top of this, being a small boat, she can be hull-broken by any gun with a diameter above 4 inches (102 mm). At Dark Aggressor's battle rating, there are three guns capable of hull-break: the [[8cwt QF Mk I (114 mm)]] | + | On top of this, being a small boat, she can be hull-broken by any gun with a diameter above 4 inches (102 mm). At Dark Aggressor's battle rating, there are three guns capable of hull-break: the [[8cwt QF Mk I (114 mm)]] (found on {{Specs-Link|uk_dark_class}}), the [[10.5 cm SK C/32 (105 mm)|10.5 cm SK C/32]] (found on {{Specs-Link|germ_artilleriefahrprahm_typ_d3}}), and the [[120 mm/45 Type 3 (120 mm)|120 mm/45 Type 3]] (found on {{Specs-Link|jp_escort_hiburi_class_syonan}}). Luckily for Dark Aggressor though, the first two are quite rare to see and are mounted on vehicles that are easily knocked out themselves, and the third is a rather bad cannon that most players don't even use. This makes hull-breaks fairly rare. |
All things considered, aside from the ammunition racks in the bow, Dark Aggressor's survivability is more or less average. Low survivability and the ability to be hull-broken are the norms for most boats at this battle rating and really shouldn't be looked at as a disadvantage on the part of Dark Aggressor. | All things considered, aside from the ammunition racks in the bow, Dark Aggressor's survivability is more or less average. Low survivability and the ability to be hull-broken are the norms for most boats at this battle rating and really shouldn't be looked at as a disadvantage on the part of Dark Aggressor. | ||
| + | |||
=== Mobility === | === Mobility === | ||
| − | <!-- ''Write about the ship's mobility. Evaluate its power and manoeuvrability, rudder rerouting speed, stopping speed at full tilt, with its maximum forward and reverse speed.'' --> | + | <!-- ''Write about the ship's mobility. Evaluate its power and manoeuvrability, rudder rerouting speed, stopping speed at full tilt, with its maximum forward and reverse speed.'' --> |
| − | {{ | + | {| class="wikitable" style="text-align:center" |
| + | ! colspan="6" | '''Mobility Characteristics''' | ||
| + | |- | ||
| + | ! rowspan="2" | Game Mode | ||
| + | ! rowspan="2" | Upgrade Status | ||
| + | ! colspan="2" | Maximum Speed (km/h) | ||
| + | ! rowspan="2" | {{Annotation|Turn Time (s)|Time needed to complete a 360° turn at maximum speed}} | ||
| + | ! rowspan="2" | {{Annotation|Turn Radius (m)|At maximum speed}} | ||
| + | |- | ||
| + | ! rowspan="1" | Forward | ||
| + | ! rowspan="1" | Reverse | ||
| + | |- | ||
| + | | rowspan="2" | {{Annotation|AB|Arcade Battles}} | ||
| + | | {{Annotation|Stock|All modifications removed}} || 73 || 27 || ~26.18 || ~43.98 | ||
| + | |- | ||
| + | | {{Annotation|Upgraded|All modifications installed}} || 100 || 37 || ~17.38 || ~27.66 | ||
| + | |- | ||
| + | | rowspan="2" | {{Annotation|RB|Realistic Battles}}/{{Annotation|SB|Simulator Battles}} | ||
| + | | {{Annotation|Stock|All modifications removed}} || 64 || 24 || ~29.02 || ~50.04 | ||
| + | |- | ||
| + | | {{Annotation|Upgraded|All modifications installed}} || 74 || 27 || ~23.83 || ~40.03 | ||
| + | |- | ||
| + | |} | ||
| + | |||
| + | Dark Aggressor's maximum speeds, mobility, acceleration, and stopping are all average, not too much better or worse than any of the other fast motor torpedo boats or motor gun boats around her battle rating. | ||
== Armament == | == Armament == | ||
| Line 30: | Line 56: | ||
{{main|QF Mark VII (40 mm)}} | {{main|QF Mark VII (40 mm)}} | ||
| − | In her primary armament group, Dark | + | In her primary armament group, Dark Aggressor has a single 40 mm QF Mark VII in a single mount just in front of the bridge. It has 1500 rounds of ammunition available for it. It can traverse horizontally at a rate of 40°/s and vertically at a rate of 34°/s. The gun has a magazine capacity of 4 rounds and has a rate of fire of 160 rounds/min. With a stock crew, the gun can be reloaded in 0.49 seconds; with an aced crew, it can be reloaded in 0.38 seconds. Firing the gun for too long will cause it to jam. Its maximum range against surface targets is roughly 3.25 km. |
{| class="wikitable" style="text-align:center" | {| class="wikitable" style="text-align:center" | ||
| − | ! colspan="2" |'''Guidance for the Secondary Gun Turret''' | + | ! colspan="2" | '''Guidance for the Secondary Gun Turret''' |
|- | |- | ||
| − | !Horizontal!!Vertical | + | ! Horizontal !! Vertical |
| + | |- | ||
| + | | ±180° || -10°/+89° | ||
|- | |- | ||
| − | |||
|} | |} | ||
| + | |||
There are three ammunition options available: | There are three ammunition options available: | ||
| − | *Universal: {{Annotation|AP-T|Armour-Piercing Tracer}}/{{Annotation|HEFI-T|High-Explosive Fragmentary Incendiary Tracer}} | + | * Universal: {{Annotation|AP-T|Armour-Piercing Tracer}}/{{Annotation|HEFI-T|High-Explosive Fragmentary Incendiary Tracer}} |
| − | *40 mm HE clips: {{Annotation|HEFI-T|High-Explosive Fragmentary Incendiary Tracer}}/{{Annotation|HEFI-T|High-Explosive Fragmentary Incendiary Tracer}}/{{Annotation|HEFI-T|High-Explosive Fragmentary Incendiary Tracer}}/{{Annotation|AP-T|Armour-Piercing Tracer}} | + | * 40 mm HE clips: {{Annotation|HEFI-T|High-Explosive Fragmentary Incendiary Tracer}}/{{Annotation|HEFI-T|High-Explosive Fragmentary Incendiary Tracer}}/{{Annotation|HEFI-T|High-Explosive Fragmentary Incendiary Tracer}}/{{Annotation|AP-T|Armour-Piercing Tracer}} |
| − | *40 mm AP clips: {{Annotation|AP-T|Armour-Piercing Tracer}}/{{Annotation|AP-T|Armour-Piercing Tracer}}/{{Annotation|AP-T|Armour-Piercing Tracer}}/{{Annotation|HEFI-T|High-Explosive Fragmentary Incendiary Tracer}} | + | * 40 mm AP clips: {{Annotation|AP-T|Armour-Piercing Tracer}}/{{Annotation|AP-T|Armour-Piercing Tracer}}/{{Annotation|AP-T|Armour-Piercing Tracer}}/{{Annotation|HEFI-T|High-Explosive Fragmentary Incendiary Tracer}} |
{| class="wikitable sortable" style="text-align:center" width="100%" | {| class="wikitable sortable" style="text-align:center" width="100%" | ||
| − | ! colspan="7" |'''Penetration Statistics''' | + | ! colspan="7" | '''Penetration Statistics''' |
|- | |- | ||
| − | ! rowspan="2" data-sort-type="text" |Ammunition | + | ! rowspan="2" data-sort-type="text" | Ammunition |
| − | ! colspan="6" |'''Penetration @ 0° Angle of Attack (mm)''' | + | ! colspan="6" | '''Penetration @ 0° Angle of Attack (mm)''' |
|- | |- | ||
| − | !10 m!!100 m!!500 m!!1,000 m!!1,500 m!!2,000 m | + | ! 10 m !! 100 m !! 500 m !! 1,000 m !! 1,500 m !! 2,000 m |
|- | |- | ||
| − | |Universal||80||77||66||57||50||45 | + | | Universal || 80 || 77 || 66 || 57 || 50 || 45 |
|- | |- | ||
| − | |40 mm HE clips||80||77||66||57||50||45 | + | | 40 mm HE clips || 80 || 77 || 66 || 57 || 50 || 45 |
| + | |- | ||
| + | | 40 mm AP clips || 80 || 77 || 66 || 57 || 50 || 45 | ||
|- | |- | ||
| − | |||
|} | |} | ||
=== Torpedo armament === | === Torpedo armament === | ||
| Line 66: | Line 95: | ||
{| class="wikitable" style="text-align:center" width="100%" | {| class="wikitable" style="text-align:center" width="100%" | ||
| − | ! colspan="9" |'''Torpedo Characteristics''' | + | ! colspan="9" | '''Torpedo Characteristics''' |
| + | |- | ||
| + | ! Torpedo Mode !! Mass (kg) !! Maximum speed in water (km/h) !! Travel distance (km) !! Depth stroke (m) !! Arming distance (m) !! Explosive type !! Explosive mass (kg) !! TNT equivalent (kg) | ||
| + | |- | ||
| + | | {{Annotation|No|'Torpedo Mode' modification uninstalled}} || 1566 || 84 || 4.57 || 1 || 50 || TNT || 327 || 327 | ||
| + | |- | ||
| + | | {{Annotation|Yes|'Torpedo Mode' modification installed}} || 1566 || 76 || 6.40 || 1 || 50 || TNT || 327 || 327 | ||
| + | |} | ||
| + | |||
| + | The Torpedo Mode modification is available as a tier IV modification. Installing it has the following changes: | ||
| + | |||
| + | {| class="wikitable" style="text-align:center" | ||
| + | ! colspan="2" | '''Torpedo Mode Specification Changes''' | ||
| + | |- | ||
| + | ! Max Distance (m) | ||
| + | ! Max Speed (m/s) | ||
| + | |- | ||
| + | | +1830 || -1 | ||
|- | |- | ||
| − | |||
|} | |} | ||
| + | |||
=== Special armament === | === Special armament === | ||
<!-- ''Depth charges, mines, rocket launchers and missiles are also effective in skilled hands and can take an off-guard opponent by surprise. Evaluate the ammunition of this type of armament and rate its performance in combat. If there are no special armaments, remove this section.'' --> | <!-- ''Depth charges, mines, rocket launchers and missiles are also effective in skilled hands and can take an off-guard opponent by surprise. Evaluate the ammunition of this type of armament and rate its performance in combat. If there are no special armaments, remove this section.'' --> | ||
{{main|Mk.VII depth charge}} | {{main|Mk.VII depth charge}} | ||
| − | + | Dark Aggressor can carry two Mk.VII depth charges mounted on the aft, one on each side facing outwards. The depth charges drop one-at-a-time in the following order (see the image): | |
| + | |||
| + | # Starboard side | ||
| + | # Portside | ||
| + | |||
| + | Before spawning, the detonation time delay can be set anywhere between 3 seconds and 10 seconds. | ||
| + | |||
| + | {| class="wikitable" style="text-align:center" | ||
| + | |- | ||
| + | ! Mass (kg) | ||
| + | ! Explosive Type | ||
| + | ! Explosive Mass (kg) | ||
| + | ! TNT Equivalent (kg) | ||
| + | |- | ||
| + | | 196 || TNT || 130 || 130 | ||
| + | |} | ||
== Usage in battles == | == Usage in battles == | ||
<!-- ''Describe the technique of using this ship, the characteristics of her use in a team and tips on strategy. Abstain from writing an entire guide – don't try to provide a single point of view, but give the reader food for thought. Talk about the most dangerous opponents for this vehicle and provide recommendations on fighting them. If necessary, note the specifics of playing with this vehicle in various modes (AB, RB, SB).'' --> | <!-- ''Describe the technique of using this ship, the characteristics of her use in a team and tips on strategy. Abstain from writing an entire guide – don't try to provide a single point of view, but give the reader food for thought. Talk about the most dangerous opponents for this vehicle and provide recommendations on fighting them. If necessary, note the specifics of playing with this vehicle in various modes (AB, RB, SB).'' --> | ||
| − | + | ||
| + | ;Ammunition Choices | ||
| + | |||
| + | The best ammunition choice is 40 mm HE clips because it has the highest ratio of HE rounds to AP rounds, which means it has the highest effectiveness against both aircraft and surface targets. The 40 mm HE clips should be the primary ammunition type used, but several 40 mm AP clips should also be taken into battle for use against certain armoured targets and against enemies sailing directly bow-in. In the latter case, HE rounds will detonate on a possibly already-destroyed bow compartment, leaving the rest of the vessel unharmed. AP rounds will pass through the bow compartment and deal damage to the rear of the vessel. | ||
| + | |||
| + | From arcade battle experience, AP rounds are more versatile in battle and are the better choice in most situations especially when engaging surface targets of similar size within tier 2 and always try to resolve direct fights as quickly as possible (either by winning or disengaging as quickly as possible). This boat is best used when outranging, flanking or ambushing the opposition given the facts it possess poor armour but the gun can sustain long periods continued fire therefore, strafing targets is encouraged. | ||
| + | |||
| + | ;Torpedoes | ||
| + | |||
| + | The 18-inch Mk.XII is fairly average in terms of maximum speed and range, but it has a very low TNT equivalence compared to other torpedoes at this tier. Still, a hit with the Mk.XII torpedo on any boat at this tier is more than enough to destroy it. Otherwise, this is torpedo is unnoteworthy. | ||
| + | |||
| + | The Torpedo Mode modification should always be installed. The higher maximum speed is much more valuable against the fast-moving boats of tier I and II, and the maps are small enough that the reduction to the maximum range doesn't really matter. | ||
| + | |||
| + | ;Depth Charges | ||
| + | |||
| + | Being anti-submarine weapons and with the present lack of submarines in the game, there is practically no reason to use them. While they can be used against surface targets, this is extremely situational. Sailing up right next to a slower target and dropping a depth charge can lead to some success, though again, this is very situational. If attempting this, remember the order in which the depth charges drop and that there is no reason to use any depth charge activation time setting above the minimum 3 seconds, since higher delay times means the depth charge will sink further, and thus away, from the target. Again, it should be reiterated that this is very situational. | ||
| + | |||
| + | There is no practical reason to take them into battle, since, if they're not dropped, they essentially become unarmoured ammo racks. | ||
=== Modules === | === Modules === | ||
| Line 123: | Line 201: | ||
=== Pros and cons === | === Pros and cons === | ||
<!-- ''Summarise and briefly evaluate the vehicle in terms of its characteristics and combat effectiveness. Mark its pros and cons in the bulleted list. Try not to use more than 6 points for each of the characteristics. Avoid using categorical definitions such as "bad", "good" and the like - use substitutions with softer forms such as "inadequate" and "effective".'' --> | <!-- ''Summarise and briefly evaluate the vehicle in terms of its characteristics and combat effectiveness. Mark its pros and cons in the bulleted list. Try not to use more than 6 points for each of the characteristics. Avoid using categorical definitions such as "bad", "good" and the like - use substitutions with softer forms such as "inadequate" and "effective".'' --> | ||
| − | |||
'''Pros:''' | '''Pros:''' | ||
| − | * | + | * 40 mm QF Mark VII: powerful HE rounds, very high-penetration AP rounds (80 mm) |
| + | * Very quick reload, practically continuous fire | ||
| + | * Can outrange most enemies | ||
'''Cons:''' | '''Cons:''' | ||
| − | * | + | * 40 mm QF Mark VII cannot fire directly backwards and takes a long time to cool |
| + | * Main armament easily knocked out | ||
| + | * No secondary or AA guns | ||
| + | * Two large ammo racks below the forward gun, cannot be removed | ||
== History == | == History == | ||
| Line 145: | Line 227: | ||
* ''reference to the series of the ship;'' | * ''reference to the series of the ship;'' | ||
* ''links to approximate analogues of other nations and research trees.'' --> | * ''links to approximate analogues of other nations and research trees.'' --> | ||
| − | |||
| − | * | + | * {{Specs-Link|uk_dark_class}} |
| − | * | + | * {{Specs-Link|uk_brave_borderer}} |
== External links == | == External links == | ||
Revision as of 17:05, 12 December 2020
Contents
Description
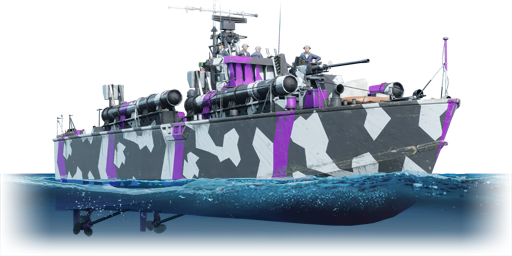
The Dark-сlass, Dark Aggressor (FPB 1102) TD is a gift rank III British motor torpedo boat with a battle rating of 2.3 (AB/RB/SB). It was introduced during Update "New Power" as a reward for watching War Thunder streams on Twitch.tv along with a unique skin for the vehicle.
General info
Survivability and armour
Dark Aggressor has the following armour layout:
- Hull: 40 mm, wood
- Superstructure: 15 mm, wood
Dark Aggressor has no armour at all, lacking even a gunshield for the main cannon. Right beneath the gun are also two large ammunition racks. These cannot be removed unless all ammo for the main gun is emptied. Altogether, with a crew complement of only 15, Dark Aggressor's survivability is low.
On top of this, being a small boat, she can be hull-broken by any gun with a diameter above 4 inches (102 mm). At Dark Aggressor's battle rating, there are three guns capable of hull-break: the 8cwt QF Mk I (114 mm) (found on Dark Adventurer), the 10.5 cm SK C/32 (found on AF D3), and the 120 mm/45 Type 3 (found on Syonan). Luckily for Dark Aggressor though, the first two are quite rare to see and are mounted on vehicles that are easily knocked out themselves, and the third is a rather bad cannon that most players don't even use. This makes hull-breaks fairly rare.
All things considered, aside from the ammunition racks in the bow, Dark Aggressor's survivability is more or less average. Low survivability and the ability to be hull-broken are the norms for most boats at this battle rating and really shouldn't be looked at as a disadvantage on the part of Dark Aggressor.
Mobility
| Mobility Characteristics | |||||
|---|---|---|---|---|---|
| Game Mode | Upgrade Status | Maximum Speed (km/h) | Turn Time (s) | Turn Radius (m) | |
| Forward | Reverse | ||||
| AB | Stock | 73 | 27 | ~26.18 | ~43.98 |
| Upgraded | 100 | 37 | ~17.38 | ~27.66 | |
| RB/SB | Stock | 64 | 24 | ~29.02 | ~50.04 |
| Upgraded | 74 | 27 | ~23.83 | ~40.03 | |
Dark Aggressor's maximum speeds, mobility, acceleration, and stopping are all average, not too much better or worse than any of the other fast motor torpedo boats or motor gun boats around her battle rating.
Armament
Primary armament
In her primary armament group, Dark Aggressor has a single 40 mm QF Mark VII in a single mount just in front of the bridge. It has 1500 rounds of ammunition available for it. It can traverse horizontally at a rate of 40°/s and vertically at a rate of 34°/s. The gun has a magazine capacity of 4 rounds and has a rate of fire of 160 rounds/min. With a stock crew, the gun can be reloaded in 0.49 seconds; with an aced crew, it can be reloaded in 0.38 seconds. Firing the gun for too long will cause it to jam. Its maximum range against surface targets is roughly 3.25 km.
| Guidance for the Secondary Gun Turret | |
|---|---|
| Horizontal | Vertical |
| ±180° | -10°/+89° |
There are three ammunition options available:
- Universal: AP-T/HEFI-T
- 40 mm HE clips: HEFI-T/HEFI-T/HEFI-T/AP-T
- 40 mm AP clips: AP-T/AP-T/AP-T/HEFI-T
| Penetration Statistics | ||||||
|---|---|---|---|---|---|---|
| Ammunition | Penetration @ 0° Angle of Attack (mm) | |||||
| 10 m | 100 m | 500 m | 1,000 m | 1,500 m | 2,000 m | |
| Universal | 80 | 77 | 66 | 57 | 50 | 45 |
| 40 mm HE clips | 80 | 77 | 66 | 57 | 50 | 45 |
| 40 mm AP clips | 80 | 77 | 66 | 57 | 50 | 45 |
Torpedo armament
Dark Aggressor has four torpedo tubes, two on each side, and can carry a total of four 533 mm Mk.VIII torpedoes. The torpedo tubes are pointed forwards but are angled outwards on each side. They are fixed, requiring the boat to be turned in order to aim them.
| Torpedo Characteristics | ||||||||
|---|---|---|---|---|---|---|---|---|
| Torpedo Mode | Mass (kg) | Maximum speed in water (km/h) | Travel distance (km) | Depth stroke (m) | Arming distance (m) | Explosive type | Explosive mass (kg) | TNT equivalent (kg) |
| No | 1566 | 84 | 4.57 | 1 | 50 | TNT | 327 | 327 |
| Yes | 1566 | 76 | 6.40 | 1 | 50 | TNT | 327 | 327 |
The Torpedo Mode modification is available as a tier IV modification. Installing it has the following changes:
| Torpedo Mode Specification Changes | |
|---|---|
| Max Distance (m) | Max Speed (m/s) |
| +1830 | -1 |
Special armament
Dark Aggressor can carry two Mk.VII depth charges mounted on the aft, one on each side facing outwards. The depth charges drop one-at-a-time in the following order (see the image):
- Starboard side
- Portside
Before spawning, the detonation time delay can be set anywhere between 3 seconds and 10 seconds.
| Mass (kg) | Explosive Type | Explosive Mass (kg) | TNT Equivalent (kg) |
|---|---|---|---|
| 196 | TNT | 130 | 130 |
Usage in battles
- Ammunition Choices
The best ammunition choice is 40 mm HE clips because it has the highest ratio of HE rounds to AP rounds, which means it has the highest effectiveness against both aircraft and surface targets. The 40 mm HE clips should be the primary ammunition type used, but several 40 mm AP clips should also be taken into battle for use against certain armoured targets and against enemies sailing directly bow-in. In the latter case, HE rounds will detonate on a possibly already-destroyed bow compartment, leaving the rest of the vessel unharmed. AP rounds will pass through the bow compartment and deal damage to the rear of the vessel.
From arcade battle experience, AP rounds are more versatile in battle and are the better choice in most situations especially when engaging surface targets of similar size within tier 2 and always try to resolve direct fights as quickly as possible (either by winning or disengaging as quickly as possible). This boat is best used when outranging, flanking or ambushing the opposition given the facts it possess poor armour but the gun can sustain long periods continued fire therefore, strafing targets is encouraged.
- Torpedoes
The 18-inch Mk.XII is fairly average in terms of maximum speed and range, but it has a very low TNT equivalence compared to other torpedoes at this tier. Still, a hit with the Mk.XII torpedo on any boat at this tier is more than enough to destroy it. Otherwise, this is torpedo is unnoteworthy.
The Torpedo Mode modification should always be installed. The higher maximum speed is much more valuable against the fast-moving boats of tier I and II, and the maps are small enough that the reduction to the maximum range doesn't really matter.
- Depth Charges
Being anti-submarine weapons and with the present lack of submarines in the game, there is practically no reason to use them. While they can be used against surface targets, this is extremely situational. Sailing up right next to a slower target and dropping a depth charge can lead to some success, though again, this is very situational. If attempting this, remember the order in which the depth charges drop and that there is no reason to use any depth charge activation time setting above the minimum 3 seconds, since higher delay times means the depth charge will sink further, and thus away, from the target. Again, it should be reiterated that this is very situational.
There is no practical reason to take them into battle, since, if they're not dropped, they essentially become unarmoured ammo racks.
Modules
| Tier | Seakeeping | Unsinkability | Firepower | |||
|---|---|---|---|---|---|---|
| I | Dry-Docking | Tool Set | 40 mm HE clips | |||
| II | Rudder Replacement | Fire Protection System | Smokescreen | 40 mm AP clips | ||
| III | Propeller Replacement | Improved Rangefinder | Primary Armament Targeting | Depth Charges | ||
| IV | Engine Maintenance | New Pumps | Artillery Support | Torpedo Mode | ||
Pros and cons
Pros:
- 40 mm QF Mark VII: powerful HE rounds, very high-penetration AP rounds (80 mm)
- Very quick reload, practically continuous fire
- Can outrange most enemies
Cons:
- 40 mm QF Mark VII cannot fire directly backwards and takes a long time to cool
- Main armament easily knocked out
- No secondary or AA guns
- Two large ammo racks below the forward gun, cannot be removed
History
Describe the history of the creation and combat usage of the ship in more detail than in the introduction. If the historical reference turns out to be too long, take it to a separate article, taking a link to the article about the ship and adding a block "/History" (example: https://wiki.warthunder.com/(Ship-name)/History) and add a link to it here using the main template. Be sure to reference text and sources by using <ref></ref>, as well as adding them at the end of the article with <references />. This section may also include the ship's dev blog entry (if applicable) and the in-game encyclopedia description (under === In-game description ===, also if applicable).
Media
Excellent additions to the article would be video guides, screenshots from the game, and photos.
See also
External links
Paste links to sources and external resources, such as:
- topic on the official game forum;
- other literature.
| Britain boats | |
|---|---|
| Motor torpedo boats | Brave Borderer · Dark Aggressor · Dark Aggressor TD · Fairmile D (617) · Fairmile D (697) · Fairmile D (5001) · HMS Gay Archer |
| MTB-1(1) · MTB-1(2) · MTB Vosper · MTB Vosper(2) · MTB-422 | |
| Motor gun boats | Dark Adventurer · Fairmile A (ML100) · Fairmile B (ML345) · Fairmile C (312) · Fairmile C (332) · Fairmile D (601) · Fairmile H LCS(L)(2) |
| HMAS Arrow · MGB-61 · MGB-75 · ML 1383 · SGB Grey Fox · SGB Grey Goose | |
| Gunboats | HMS Spey |
