Difference between revisions of "Daimler Mk II"
(→Usage in the battles) (Tag: Visual edit) |
(Updated page template, edits) |
||
| Line 2: | Line 2: | ||
== Description == | == Description == | ||
| − | <!--''In the description, the first part | + | <!-- ''In the description, the first part should be about the history of the creation and combat usage of the vehicle, as well as its key features. In the second part, tell the reader about the ground vehicle in the game. Insert a screenshot of the vehicle, so that if the novice player does not remember the vehicle by name, he will immediately understand what kind of vehicle the article is talking about.'' --> |
[[File:GarageImage_DaimlerACMkII.jpg|420px|thumb|left]] | [[File:GarageImage_DaimlerACMkII.jpg|420px|thumb|left]] | ||
| − | {{ | + | {{Break}} |
| − | The {{Specs|name}} is a rank {{Specs|rank}} British light tank {{Battle-rating}}. It was introduced in [[Update 1.71 "New E.R.A."]]. Boasting the usual British Rank | + | The '''{{Specs|name}}''' is a rank {{Specs|rank}} British light tank {{Battle-rating}}. It was introduced in [[Update 1.71 "New E.R.A."]]. Boasting the usual British Rank I [[QF 2-pounder (40 mm)|QF 2-pounder]] on a wheeled platform, it is the first vehicle in the AC/AA line of the British tech tree. |
A QF 2-pounder on 4x4 wheels. This vehicle is made to support infantry in a way similar to the cavalry. It is not made to withstand heavy fire. Notably, its wheeled configuration means the car will not get good fire when on the move and it will turn in an arc. Meanwhile, its good reverse speed could possibly save the car as long as the move happens before the enemy shoots. The Daimler is recognisable from other AC by its hexagonal hull centre and its short length. It has 4 mm boxes scattered across the hull and a spare tire on the left side. Besides the main armament, it is equipped with a coaxial BESA MG (same MG as higher rank British vehicles), a decent gun to spread onto an open-topped SPG with lead, ending him rightly. | A QF 2-pounder on 4x4 wheels. This vehicle is made to support infantry in a way similar to the cavalry. It is not made to withstand heavy fire. Notably, its wheeled configuration means the car will not get good fire when on the move and it will turn in an arc. Meanwhile, its good reverse speed could possibly save the car as long as the move happens before the enemy shoots. The Daimler is recognisable from other AC by its hexagonal hull centre and its short length. It has 4 mm boxes scattered across the hull and a spare tire on the left side. Besides the main armament, it is equipped with a coaxial BESA MG (same MG as higher rank British vehicles), a decent gun to spread onto an open-topped SPG with lead, ending him rightly. | ||
| Line 11: | Line 11: | ||
== General info == | == General info == | ||
=== Survivability and armour === | === Survivability and armour === | ||
| − | <!--''Describe armour protection. Note the most well protected and key weak areas. Appreciate the layout of modules as well as the number and location of crew members. Is the level of armour protection sufficient, is the placement of modules helpful for survival in combat? | + | <!-- ''Describe armour protection. Note the most well protected and key weak areas. Appreciate the layout of modules as well as the number and location of crew members. Is the level of armour protection sufficient, is the placement of modules helpful for survival in combat? If necessary use a visual template to indicate the most secure and weak zones of the armour.'' --> |
| − | |||
| − | |||
'''Armour type:''' | '''Armour type:''' | ||
| Line 37: | Line 35: | ||
<!-- ''Write about the mobility of the ground vehicle. Estimate the specific power and manoeuvrability, as well as the maximum speed forwards and backwards.'' --> | <!-- ''Write about the mobility of the ground vehicle. Estimate the specific power and manoeuvrability, as well as the maximum speed forwards and backwards.'' --> | ||
| − | {{tankMobility|abMinHp= 112|rbMinHp= 84}} | + | {{tankMobility|abMinHp=112|rbMinHp=84}} |
== Armaments == | == Armaments == | ||
=== Main armament === | === Main armament === | ||
| − | <!--''Give the reader information about the characteristics of the main gun. Assess its effectiveness in a battle based on the reloading speed, ballistics and the power of shells. Do not forget about the flexibility of the fire, that is how quickly the cannon can be aimed at the target, open fire on it and aim at another enemy. Add a link to the main article on the gun: <code><nowiki>{{main|Name of the weapon}}</nowiki></code>. Describe in general terms the ammunition available for the main gun. Give advice on how to use them and how to fill the ammunition storage.''--> | + | <!-- ''Give the reader information about the characteristics of the main gun. Assess its effectiveness in a battle based on the reloading speed, ballistics and the power of shells. Do not forget about the flexibility of the fire, that is how quickly the cannon can be aimed at the target, open fire on it and aim at another enemy. Add a link to the main article on the gun: <code><nowiki>{{main|Name of the weapon}}</nowiki></code>. Describe in general terms the ammunition available for the main gun. Give advice on how to use them and how to fill the ammunition storage.'' --> |
| − | {{main| | + | {{main|QF 2-pounder (40 mm)}} |
| − | {| class="wikitable" style="text-align:center | + | {| class="wikitable" style="text-align:center" width="100%" |
| − | |||
| − | |||
| − | |||
| − | |||
| − | |||
| − | |||
| − | |||
| − | |||
| − | |||
| − | |||
| − | |||
|- | |- | ||
| − | ! | + | ! colspan="5" | [[QF 2-pounder (40 mm)|40 mm QF 2-pounder]] || colspan="5" | Turret rotation speed (°/s) || colspan="4" | Reloading rate (seconds) |
| − | |||
| − | |||
| − | |||
| − | |||
| − | |||
|- | |- | ||
| − | + | ! Mode !! Capacity !! Vertical !! Horizontal !! Stabilizer | |
| + | ! Stock !! Upgraded !! Full !! Expert !! Aced | ||
| + | ! Stock !! Full !! Expert !! Aced | ||
|- | |- | ||
| − | + | ! ''Arcade'' | |
| + | | rowspan="2" | 52 || rowspan="2" | -12°/+25° || rowspan="2" | ±180° || rowspan="2" | Vertical || __.__ || __.__ || __.__ || __.__ || __.__ || rowspan="2" | 3.60 || rowspan="2" | _.__ || rowspan="2" | _.__ || rowspan="2" | _.__ | ||
|- | |- | ||
| − | ! | + | ! ''Realistic'' |
| − | | | + | | 9.50 || __.__ || __.__ || __.__ || __.__ |
| − | |||
| − | |||
| − | |||
| − | |||
| − | | | ||
| − | |||
|- | |- | ||
|} | |} | ||
| − | + | ==== Ammunition ==== | |
{| class="wikitable sortable" style="text-align:center" width="100%" | {| class="wikitable sortable" style="text-align:center" width="100%" | ||
! colspan="8" | Penetration statistics | ! colspan="8" | Penetration statistics | ||
|- | |- | ||
! rowspan="2" data-sort-type="text" | Ammunition | ! rowspan="2" data-sort-type="text" | Ammunition | ||
| − | ! rowspan="2 | + | ! rowspan="2" | Type of<br>warhead |
| − | ! colspan="6" | '''Penetration | + | ! colspan="6" | '''Penetration @ 0° Angle of Attack (mm)''' |
|- | |- | ||
| − | ! | + | ! 10 m !! 100 m !! 500 m !! 1,000 m !! 1,500 m !! 2,000 m |
| − | ! | ||
| − | ! | ||
| − | ! | ||
| − | ! | ||
| − | ! | ||
|- | |- | ||
| − | | Shot Mk.1 AP/T || AP || | + | | Shot Mk.1 AP/T || AP || 72 || 68 || 52 || 37 || 27 || 19 |
|- | |- | ||
| − | | Shot Mk. | + | | Shot Mk.IXB APCBC/T || APCBC || 88 || 83 || 64 || 46 || 33 || 24 |
|- | |- | ||
| − | | Shot Mk.1 APHV/T || AP || 80 || 78 || 67 || 56 || 47 || 40 | + | | Shot Mk.1 APHV/T || AP || 80 || 78 || 67 || 56 || 47 || 40 |
|- | |- | ||
| − | | Shell Mk.1 AP/T || APHE || | + | | Shell Mk.1 AP/T || APHE || 66 || 62 || 49 || 36 || 26 || 20 |
|- | |- | ||
|} | |} | ||
{| class="wikitable sortable" style="text-align:center" width="100%" | {| class="wikitable sortable" style="text-align:center" width="100%" | ||
| − | ! colspan=" | + | ! colspan="10" | Shell details |
|- | |- | ||
! rowspan="2" data-sort-type="text" | Ammunition | ! rowspan="2" data-sort-type="text" | Ammunition | ||
| − | ! rowspan="2 | + | ! rowspan="2" | Type of<br>warhead |
| − | ! rowspan="2" |Velocity <br | + | ! rowspan="2" | Velocity<br>(m/s) |
| − | ! rowspan="2" |Projectile<br | + | ! rowspan="2" | Projectile<br>Mass (kg) |
| − | ! rowspan="2" | | + | ! rowspan="2" | Fuse delay<br>(m) |
| − | + | ! rowspan="2" | Fuse sensitivity<br>(mm) | |
| − | ! rowspan="2" | | + | ! rowspan="2" | Explosive Mass<br>(TNT equivalent) (g) |
| − | + | ! colspan="3" | Ricochet | |
| − | ! rowspan="2" | | ||
| − | |||
| − | ! colspan="3" | | ||
|- | |- | ||
| − | ! 0% | + | ! 0% !! 50% !! 100% |
| − | ! 50% | ||
| − | ! 100% | ||
|- | |- | ||
| − | | Shot Mk.1 AP/T || AP || 792 || 1.08 || N/A || N/A || N/A | + | | Shot Mk.1 AP/T || AP || 792 || 1.08 || N/A || N/A || N/A || 47° || 60° || 65° |
|- | |- | ||
| − | | Shot Mk. | + | | Shot Mk.IXB APCBC/T || APCBC || 792 || 1.24 || N/A || N/A || N/A || 48° || 63° || 71° |
|- | |- | ||
| − | | Shot Mk.1 APHV/T || AP || 853 || 1.08 || N/A || N/A || N/A | + | | Shot Mk.1 APHV/T || AP || 853 || 1.08 || N/A || N/A || N/A || 47° || 60° || 65° |
|- | |- | ||
| − | | Shell Mk.1 AP/T || APHE || 792 || 1.08 || 1.2 || 9 || 19 | + | | Shell Mk.1 AP/T || APHE || 792 || 1.08 || 1.2 || 9.0 || 19 || 47° || 60° || 65° |
|- | |- | ||
|} | |} | ||
| − | + | ==== [[Ammo racks]] ==== | |
| − | [[File:Ammoracks_DaimlerACMkII.png|right| | + | [[File:Ammoracks_DaimlerACMkII.png|right|thumb|x250px|[[Ammo racks]] of the {{PAGENAME}}]] |
| − | {| class="wikitable | + | {| class="wikitable" style="text-align:center" |
|- | |- | ||
| − | ! | + | ! Full<br>ammo |
| − | ! | + | ! 1st<br>rack empty |
| − | ! | + | ! 2nd<br>rack empty |
| − | ! | + | ! 3rd<br>rack empty |
| − | ! | + | ! 4th<br>rack empty |
| − | ! | + | ! Visual<br>discrepancy |
|- | |- | ||
| − | + | | '''52''' || 40 ''(+12)'' || 27 ''(+25)'' || 14 ''(+38)'' || 1 ''(+51)'' || No | |
|- | |- | ||
|} | |} | ||
| − | + | ==== Optics ==== | |
| − | |||
| − | |||
| − | |||
| − | |||
| − | |||
{| class="wikitable" style="text-align:center" width="50%" | {| class="wikitable" style="text-align:center" width="50%" | ||
| − | ! colspan="3" | {{PAGENAME}} [[Optics]] | + | ! colspan="3" | {{PAGENAME}} [[Optics]] |
|- | |- | ||
! Which ones | ! Which ones | ||
| Line 161: | Line 125: | ||
|- | |- | ||
! Main Gun optics | ! Main Gun optics | ||
| − | | x1.85 || x3.5 | + | | x1.85 || x3.5 |
|- | |- | ||
! Comparable optics | ! Comparable optics | ||
| − | | colspan="2 | + | | colspan="2" | [[AMR.35 ZT3]] |
|- | |- | ||
|} | |} | ||
=== Machine guns === | === Machine guns === | ||
| − | <!--''Offensive and anti-aircraft machine guns not only allow you to fight some aircraft but also are effective against lightly armoured vehicles. Evaluate machine guns and give recommendations on its use.''--> | + | <!-- ''Offensive and anti-aircraft machine guns not only allow you to fight some aircraft but also are effective against lightly armoured vehicles. Evaluate machine guns and give recommendations on its use.'' --> |
{{main|BESA (7.92 mm)}} | {{main|BESA (7.92 mm)}} | ||
| − | {| class="wikitable" style="text-align:center" | + | {| class="wikitable" style="text-align:center" width="50%" |
|- | |- | ||
| − | ! colspan=" | + | ! colspan="5" | [[BESA (7.92 mm)|7.92 mm BESA]] |
|- | |- | ||
| − | ! | + | ! Mount !! Capacity (Belt) !! Fire rate !! Vertical !! Horizontal |
|- | |- | ||
| − | + | | Coaxial || 500 (225) || 600 || N/A || N/A | |
| − | |||
| − | |||
| − | |||
| − | |||
| − | |||
|- | |- | ||
|} | |} | ||
| − | == Usage in | + | == Usage in battles == |
| − | <!--''Describe the tactics of playing in the vehicle, the features of using vehicles in the team and advice on tactics. Refrain from creating a "guide" - do not impose a single point of view but give the reader food for thought. Describe the most dangerous enemies and give recommendations on fighting them. If necessary, note the specifics of the game in different modes (AB, RB, SB).''--> | + | <!-- ''Describe the tactics of playing in the vehicle, the features of using vehicles in the team and advice on tactics. Refrain from creating a "guide" - do not impose a single point of view but instead give the reader food for thought. Describe the most dangerous enemies and give recommendations on fighting them. If necessary, note the specifics of the game in different modes (AB, RB, SB).'' --> |
| − | The Daimler AC is very similar to other British light tanks at the tier, but with one major difference: it has wheels rather than tracks. While the Daimler is not particularly fast off road, it is very speedy | + | The Daimler AC is very similar to other British light tanks at the tier, but with one major difference: it has wheels rather than tracks. While the Daimler is not particularly fast off road, it is very speedy on-road. Because of this, Daimler drivers should consider planning their route based on what roads are available on the map, however once engaged with the enemy, it is best to find cover rather than remain exposed on the road. The Daimler has very weak armour, only able to stop rifle-calibre ammunition reliably. Having both thin armour and a small crew, the Daimler cannot sustain enemy fire. While the armour is weak, drivers can take advantage of the good manoeuvrability and gun to ambush enemies. |
| − | The | + | The 40 mm 2-pounder cannon is one of the best weapons for its tier, and has a good selection of ammunition. The Shell Mk.1 AP/T (APHE) has sufficient penetration for the tier and the post-penetration effects are worth the comparably low penetration. However when facing enemies with more armour, or playing at a higher tier, the Shot Mk.IXB APCBC/T has excellent penetration characteristics. Drivers can also remember that the 40 mm 2-pounder has a very fast fire rate, and you often reload faster than opponents. This means that if you and your enemy both miss the first shot, the Daimler is likely to get in the second shot before the enemy has reloaded. |
| − | The enemy to be most wary of in the Daimler is any vehicle with a rapid firing cannon. German vehicles with | + | The enemy to be most wary of in the Daimler is any vehicle with a rapid firing cannon. German vehicles with 20 mm cannons and most enemy AA vehicles are very dangerous for the Daimler, because their rounds will shred its armour. |
| − | Generally, the best play style for the Daimler is to flank using a road until near the enemy, and then fire from cover. The Daimler is capable at both short and long range fights. At long range make sure to use cover and wait till the enemy looks away before exposing yourself. At close range you can use your speed to | + | Generally, the best play style for the Daimler is to flank using a road until near the enemy, and then fire from cover. The Daimler is capable at both short and long range fights. At long range make sure to use cover and wait till the enemy looks away before exposing yourself. At close range you can use your speed to outmanoeuvre the enemy. The main thing to consider when playing the Daimler is to never expose yourself to enemy fire. |
=== Pros and cons === | === Pros and cons === | ||
| − | <!--'' | + | <!-- ''Summarise and briefly evaluate the vehicle in terms of its characteristics and combat effectiveness. Mark its pros and cons in a bulleted list. Try not to use more than 6 points for each of the characteristics. Avoid using categorical definitions such as "bad", "good" and the like - use substitutions with softer forms such as "inadequate" and "effective".'' --> |
| + | |||
'''Pros:''' | '''Pros:''' | ||
| Line 223: | Line 183: | ||
== History == | == History == | ||
| − | <!--''Describe the history of the creation and combat usage of the | + | <!-- ''Describe the history of the creation and combat usage of the vehicle in more detail than in the introduction. If the historical reference turns out to be too long, take it to a separate article, taking a link to the article about the vehicle and adding a block "/History" (example: <nowiki>https://wiki.warthunder.com/(Vehicle-name)/History</nowiki>) and add a link to it here using the <code>main</code> template. Be sure to reference text and sources by using <code><nowiki><ref></ref></nowiki></code>, as well as adding them at the end of the article with <code><nowiki><references /></nowiki></code>. This section may also include the vehicle's dev blog entry (if applicable) and the in-game encyclopedia description (under <code><nowiki>=== In-game description ===</nowiki></code>, also if applicable).'' --> |
| + | The excellent performance of the turretless Daimler Scout Car led people to suggest that a larger armoured car version with a turret be built as well. The Daimler AC was similar in design but also introduced a rear-facing wheel for the commander to use in an emergency. It carried the same turret as the Tetrarch light tank, putting it on a par with early-war British tanks. German bombing raids over England hampered production, however, and the vehicle did not enter combat until mid-1942. 2,694 would be built. In the Desert Campaign, they were used by the King's Dragoon Guards and the Royal Dragoons, and by the time of the Tunisia campaign, additional armoured car regiments. In the desert, the Daimler was normally the heaviest-armed armoured car, with one in each three-car troop. After the North Africa campaign, armoured car troops were reorganized into 4-car troops with two Daimlers and two lighter armoured scout cars. Daimlers were also used by the 11th Cavalry in the Burma campaign. They remained in British service until 1960. | ||
| − | |||
== Media == | == Media == | ||
| − | + | ''Excellent additions to the article would be video guides, screenshots from the game, and photos.'' | |
| − | |||
| − | |||
| − | |||
| − | |||
| + | == See also == | ||
| + | ''Links to the articles on the War Thunder Wiki that you think will be useful for the reader, for example:'' | ||
* ''reference to the series of the vehicles;'' | * ''reference to the series of the vehicles;'' | ||
* ''links to approximate analogues of other nations and research trees.'' | * ''links to approximate analogues of other nations and research trees.'' | ||
| − | + | == External links == | |
| − | |||
| − | == | ||
''Paste links to sources and external resources, such as:'' | ''Paste links to sources and external resources, such as:'' | ||
| − | |||
* ''topic on the official game forum;'' | * ''topic on the official game forum;'' | ||
| + | * ''encyclopedia page on the tank;'' | ||
* ''other literature.'' | * ''other literature.'' | ||
{{Britain light tanks}} | {{Britain light tanks}} | ||
Revision as of 08:29, 21 May 2020
Contents
Description

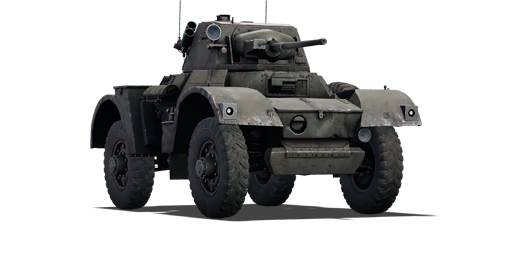
The Armoured Car, Daimler Mk II is a rank I British light tank
with a battle rating of 1.3 (AB/RB/SB). It was introduced in Update 1.71 "New E.R.A.". Boasting the usual British Rank I QF 2-pounder on a wheeled platform, it is the first vehicle in the AC/AA line of the British tech tree.
A QF 2-pounder on 4x4 wheels. This vehicle is made to support infantry in a way similar to the cavalry. It is not made to withstand heavy fire. Notably, its wheeled configuration means the car will not get good fire when on the move and it will turn in an arc. Meanwhile, its good reverse speed could possibly save the car as long as the move happens before the enemy shoots. The Daimler is recognisable from other AC by its hexagonal hull centre and its short length. It has 4 mm boxes scattered across the hull and a spare tire on the left side. Besides the main armament, it is equipped with a coaxial BESA MG (same MG as higher rank British vehicles), a decent gun to spread onto an open-topped SPG with lead, ending him rightly.
General info
Survivability and armour
Armour type:
- Rolled homogeneous armour
- Cast homogeneous armour (Gun mantlet)
| Armour | Front (Slope angle) | Sides | Rear | Roof |
|---|---|---|---|---|
| Hull | 14 mm (1°) Front plate 14 + 4 mm Front glacis 14 mm (34°) Lower glacis 16 mm (1°) Driver's port |
10 mm (19-34°) Top 10 mm Bottom |
14 mm (1°) Top 14 mm (18-24°) Bottom |
8 mm |
| Turret | 16 mm (16°) Turret front 16 mm (0-79°) Gun mantlet |
14 mm (16-17°) | 10 + 4 mm | 4 mm |
Notes:
- Belly armour is 7 mm thick.
- Wheels provide 2 mm thick armour.
- A 14 mm RHA plate separates the engine compartment from the crew.
Mobility
| Game Mode | Max Speed (km/h) | Weight (tons) | Engine power (horsepower) | Power-to-weight ratio (hp/ton) | |||
|---|---|---|---|---|---|---|---|
| Forward | Reverse | Stock | Upgraded | Stock | Upgraded | ||
| Arcade | 89 | 41 | 7.6 | 112 | 181 | 14.74 | 23.82 |
| Realistic | 80 | 37 | 84 | 95 | 11.05 | 12.5 | |
Armaments
Main armament
| 40 mm QF 2-pounder | Turret rotation speed (°/s) | Reloading rate (seconds) | |||||||||||
|---|---|---|---|---|---|---|---|---|---|---|---|---|---|
| Mode | Capacity | Vertical | Horizontal | Stabilizer | Stock | Upgraded | Full | Expert | Aced | Stock | Full | Expert | Aced |
| Arcade | 52 | -12°/+25° | ±180° | Vertical | __.__ | __.__ | __.__ | __.__ | __.__ | 3.60 | _.__ | _.__ | _.__ |
| Realistic | 9.50 | __.__ | __.__ | __.__ | __.__ | ||||||||
Ammunition
| Penetration statistics | |||||||
|---|---|---|---|---|---|---|---|
| Ammunition | Type of warhead |
Penetration @ 0° Angle of Attack (mm) | |||||
| 10 m | 100 m | 500 m | 1,000 m | 1,500 m | 2,000 m | ||
| Shot Mk.1 AP/T | AP | 72 | 68 | 52 | 37 | 27 | 19 |
| Shot Mk.IXB APCBC/T | APCBC | 88 | 83 | 64 | 46 | 33 | 24 |
| Shot Mk.1 APHV/T | AP | 80 | 78 | 67 | 56 | 47 | 40 |
| Shell Mk.1 AP/T | APHE | 66 | 62 | 49 | 36 | 26 | 20 |
| Shell details | |||||||||
|---|---|---|---|---|---|---|---|---|---|
| Ammunition | Type of warhead |
Velocity (m/s) |
Projectile Mass (kg) |
Fuse delay (m) |
Fuse sensitivity (mm) |
Explosive Mass (TNT equivalent) (g) |
Ricochet | ||
| 0% | 50% | 100% | |||||||
| Shot Mk.1 AP/T | AP | 792 | 1.08 | N/A | N/A | N/A | 47° | 60° | 65° |
| Shot Mk.IXB APCBC/T | APCBC | 792 | 1.24 | N/A | N/A | N/A | 48° | 63° | 71° |
| Shot Mk.1 APHV/T | AP | 853 | 1.08 | N/A | N/A | N/A | 47° | 60° | 65° |
| Shell Mk.1 AP/T | APHE | 792 | 1.08 | 1.2 | 9.0 | 19 | 47° | 60° | 65° |
Ammo racks
| Full ammo |
1st rack empty |
2nd rack empty |
3rd rack empty |
4th rack empty |
Visual discrepancy |
|---|---|---|---|---|---|
| 52 | 40 (+12) | 27 (+25) | 14 (+38) | 1 (+51) | No |
Optics
| Daimler Mk II Optics | ||
|---|---|---|
| Which ones | Default magnification | Maximum magnification |
| Main Gun optics | x1.85 | x3.5 |
| Comparable optics | AMR.35 ZT3 | |
Machine guns
| 7.92 mm BESA | ||||
|---|---|---|---|---|
| Mount | Capacity (Belt) | Fire rate | Vertical | Horizontal |
| Coaxial | 500 (225) | 600 | N/A | N/A |
Usage in battles
The Daimler AC is very similar to other British light tanks at the tier, but with one major difference: it has wheels rather than tracks. While the Daimler is not particularly fast off road, it is very speedy on-road. Because of this, Daimler drivers should consider planning their route based on what roads are available on the map, however once engaged with the enemy, it is best to find cover rather than remain exposed on the road. The Daimler has very weak armour, only able to stop rifle-calibre ammunition reliably. Having both thin armour and a small crew, the Daimler cannot sustain enemy fire. While the armour is weak, drivers can take advantage of the good manoeuvrability and gun to ambush enemies.
The 40 mm 2-pounder cannon is one of the best weapons for its tier, and has a good selection of ammunition. The Shell Mk.1 AP/T (APHE) has sufficient penetration for the tier and the post-penetration effects are worth the comparably low penetration. However when facing enemies with more armour, or playing at a higher tier, the Shot Mk.IXB APCBC/T has excellent penetration characteristics. Drivers can also remember that the 40 mm 2-pounder has a very fast fire rate, and you often reload faster than opponents. This means that if you and your enemy both miss the first shot, the Daimler is likely to get in the second shot before the enemy has reloaded.
The enemy to be most wary of in the Daimler is any vehicle with a rapid firing cannon. German vehicles with 20 mm cannons and most enemy AA vehicles are very dangerous for the Daimler, because their rounds will shred its armour.
Generally, the best play style for the Daimler is to flank using a road until near the enemy, and then fire from cover. The Daimler is capable at both short and long range fights. At long range make sure to use cover and wait till the enemy looks away before exposing yourself. At close range you can use your speed to outmanoeuvre the enemy. The main thing to consider when playing the Daimler is to never expose yourself to enemy fire.
Pros and cons
Pros:
- Good reverse speed and acceleration.
- Does not lose speed when turning, smooth driving
- Decent turret traverse
- Armour is thin enough to avoid detonating APHE shells
- Has smoke grenade launchers
- Many 4 mm boxes scattered on the hull, offering bonus protection against shrapnel and machine guns
- -12° of gun depression
- Compact ammo racks
Cons:
- Armour is lacking overall
- Bad off-road mobility
- As it has no tracks, does not turn on point
- Has difficulty reaching max speed
- Vulnerable to HMG, especially the tires
- Has a tendency to tip over in sharp turns if not careful
- Poor stock performance
- Only three crewmen means poor survivability
- Generally high profile
History
The excellent performance of the turretless Daimler Scout Car led people to suggest that a larger armoured car version with a turret be built as well. The Daimler AC was similar in design but also introduced a rear-facing wheel for the commander to use in an emergency. It carried the same turret as the Tetrarch light tank, putting it on a par with early-war British tanks. German bombing raids over England hampered production, however, and the vehicle did not enter combat until mid-1942. 2,694 would be built. In the Desert Campaign, they were used by the King's Dragoon Guards and the Royal Dragoons, and by the time of the Tunisia campaign, additional armoured car regiments. In the desert, the Daimler was normally the heaviest-armed armoured car, with one in each three-car troop. After the North Africa campaign, armoured car troops were reorganized into 4-car troops with two Daimlers and two lighter armoured scout cars. Daimlers were also used by the 11th Cavalry in the Burma campaign. They remained in British service until 1960.
Media
Excellent additions to the article would be video guides, screenshots from the game, and photos.
See also
Links to the articles on the War Thunder Wiki that you think will be useful for the reader, for example:
- reference to the series of the vehicles;
- links to approximate analogues of other nations and research trees.
External links
Paste links to sources and external resources, such as:
- topic on the official game forum;
- encyclopedia page on the tank;
- other literature.
| Britain light tanks | |
|---|---|
| A13 | A13 Mk I · A13 Mk I (3rd R.T.R.) · A13 Mk II · A13 Mk II 1939 |
| A15 | Crusader II · Crusader "The Saint" · Crusader III |
| A17 | Tetrarch I |
| IFV | Warrior |
| Wheeled | Daimler Mk II · AEC Mk II · Fox · Vickers Mk.11 |
| Other | VFM5 |
| South Africa | |
| SARC | SARC MkIVa · SARC MkVI (2pdr) · SARC MkVI (6pdr) |
| Ratel | Ratel 90 · Ratel 20 |
| Rooikat | Rooikat Mk.1D · Rooikat 105 · Rooikat MTTD |
| Other | Concept 3 · Eland 90 Mk.7 |
| USA | Stuart I · Stuart III |
