Difference between revisions of "DB-3B"
(Edits) |
|||
| (15 intermediate revisions by 8 users not shown) | |||
| Line 1: | Line 1: | ||
{{Specs-Card|code=db_3b}} | {{Specs-Card|code=db_3b}} | ||
| + | {{About | ||
| + | | about = Russian bomber '''{{PAGENAME}}''' | ||
| + | | usage = other version | ||
| + | | link = DB-3A (China) | ||
| + | }} | ||
== Description == | == Description == | ||
| − | ''In the description, the first part | + | <!-- ''In the description, the first part should be about the history of and the creation and combat usage of the aircraft, as well as its key features. In the second part, tell the reader about the aircraft in the game. Insert a screenshot of the vehicle, so that if the novice player does not remember the vehicle by name, he will immediately understand what kind of vehicle the article is talking about.'' --> |
| + | [[File:GarageImage_{{PAGENAME}}.jpg|420px|thumb|left]] | ||
| + | {{Break}} | ||
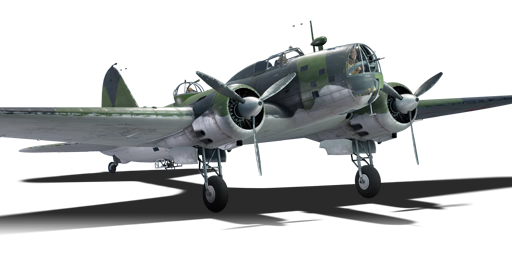
| + | The '''{{Specs|name}}''' is a rank {{Specs|rank}} Soviet bomber {{Battle-rating}}. It was introduced in [[Update 1.67 "Assault"]]. | ||
== General info == | == General info == | ||
| − | === Flight | + | === Flight performance === |
| − | ''Describe how the aircraft behaves in the air. | + | ''Describe how the aircraft behaves in the air. Speed, manoeuvrability, acceleration and allowable loads - these are the most important characteristics of the vehicle.'' |
| + | |||
| + | {| class="wikitable" style="text-align:center" width="70%" | ||
| + | ! rowspan="2" | Characteristics | ||
| + | ! colspan="2" | Max Speed<br>(km/h at 6,250 m) | ||
| + | ! rowspan="2" | Max altitude<br>(metres) | ||
| + | ! colspan="2" | Turn time<br>(seconds) | ||
| + | ! colspan="2" | Rate of climb<br>(metres/second) | ||
| + | ! rowspan="2" | Take-off run<br>(metres) | ||
| + | |- | ||
| + | ! AB !! RB !! AB !! RB !! AB !! RB | ||
| + | |- | ||
| + | ! Stock | ||
| + | | 388 || 374 || rowspan="2" | {{Specs|ceiling}} || 35.0 || 35.8 || 7.1 || 7.1 || rowspan="2" | 326 | ||
| + | |- | ||
| + | ! Upgraded | ||
| + | | ___ || ___ || __._ || __._ || __._ || __._ | ||
| + | |- | ||
| + | |} | ||
| + | |||
| + | ==== Details ==== | ||
| + | {| class="wikitable" style="text-align:center" width="50%" | ||
| + | |- | ||
| + | ! colspan="5" | Features | ||
| + | |- | ||
| + | ! Combat flaps !! Take-off flaps !! Landing flaps !! Air brakes !! Arrestor gear | ||
| + | |- | ||
| + | | X || X || ✓ || X || X <!-- ✓ --> | ||
| + | |- | ||
| + | |} | ||
| + | |||
| + | {| class="wikitable" style="text-align:center" width="50%" | ||
| + | |- | ||
| + | ! colspan="7" | Limits | ||
| + | |- | ||
| + | ! rowspan="2" | Wings (km/h) | ||
| + | ! rowspan="2" | Gear (km/h) | ||
| + | ! colspan="3" | Flaps (km/h) | ||
| + | ! colspan="2" | Max Static G | ||
| + | |- | ||
| + | ! Combat !! Take-off !! Landing !! + !! - | ||
| + | |- | ||
| + | | {{Specs|destruction|body}} || {{Specs|destruction|gear}} || N/A || N/A || 280 || ~5 || ~2 | ||
| + | |- | ||
| + | |} | ||
| + | |||
| + | {| class="wikitable" style="text-align:center" | ||
| + | |- | ||
| + | ! colspan="4" | Optimal velocities (km/h) | ||
| + | |- | ||
| + | ! Ailerons !! Rudder !! Elevators !! Radiator | ||
| + | |- | ||
| + | | < 280 || < 240 || < 300 || > 270 | ||
| + | |- | ||
| + | |} | ||
| + | |||
| + | {| class="wikitable" style="text-align:center" | ||
| + | |- | ||
| + | ! colspan="3" | Compressor (RB/SB) | ||
| + | |- | ||
| + | ! colspan="3" | Setting 1 | ||
| + | |- | ||
| + | ! Optimal altitude | ||
| + | ! 100% Engine power | ||
| + | ! WEP Engine power | ||
| + | |- | ||
| + | | 4,700 m || 950 hp || 1,100 hp | ||
| + | |- | ||
| + | |} | ||
=== Survivability and armour === | === Survivability and armour === | ||
| − | ''Examine the survivability of the aircraft. Note how vulnerable the structure is and how secure the pilot is, whether the fuel tanks are armoured. Describe the armour, if there is any, also mention the vulnerability of other critical aircraft systems.'' | + | <!-- ''Examine the survivability of the aircraft. Note how vulnerable the structure is and how secure the pilot is, whether the fuel tanks are armoured, etc. Describe the armour, if there is any, and also mention the vulnerability of other critical aircraft systems.'' --> |
| + | |||
| + | * 6 mm steel behind pilot | ||
| + | * Self-sealing fuel tanks (2 in each wing) | ||
== Armaments == | == Armaments == | ||
| − | === | + | === Suspended armament === |
| − | ''Describe the | + | <!-- ''Describe the aircraft's suspended armament: additional cannons under the wings, bombs, rockets and torpedoes. This section is especially important for bombers and attackers. If there is no suspended weaponry remove this subsection.'' --> |
| + | {{main|FAB-50 (50 kg)|FAB-100 (100 kg)|FAB-250M43 (250 kg)|FAB-500 (500 kg)|FAB-1000 (1,000 kg)}} | ||
| − | + | The '''''{{PAGENAME}}''''' can be outfitted with the following ordnance: | |
| − | '' | + | |
| + | * 10 x 50 kg FAB-50 bombs (500 kg total) | ||
| + | * 10 x 100 kg FAB-100 bombs (1,000 kg total) | ||
| + | * 2 x 250 kg FAB-250M43 bombs (500 kg total) | ||
| + | * 2 x 250 kg FAB-250M43 bombs + 10 x 100 kg FAB-100 bombs (1,500 kg total) | ||
| + | * 2 x 500 kg FAB-500 bombs (1,000 kg total) | ||
| + | * 1 x 1,000 kg FAB-1000 bomb (1,000 kg total) | ||
| + | * 1 x 1,000 kg FAB-1000 bomb + 2 x 500 kg FAB-500 bombs (2,000 kg total) | ||
=== Defensive armament === | === Defensive armament === | ||
| − | ''Defensive armament with turret machine guns or cannons, crewed by gunners. Examine the number of gunners and what belts or drums are better to use. If defensive weaponry is not available remove this subsection.'' | + | <!-- ''Defensive armament with turret machine guns or cannons, crewed by gunners. Examine the number of gunners and what belts or drums are better to use. If defensive weaponry is not available, remove this subsection.'' --> |
| + | {{main|ShKAS (7.62 mm)}} | ||
| − | == Usage in | + | The '''''{{PAGENAME}}''''' is defended by: |
| − | ''Describe the tactics of playing in | + | |
| + | * 1 x 7.62 mm ShKAS machine gun, nose turret (1,000 rpg) | ||
| + | * 1 x 7.62 mm ShKAS machine gun, dorsal turret (1,000 rpg) | ||
| + | * 1 x 7.62 mm ShKAS machine gun, ventral turret (500 rpg) | ||
| + | |||
| + | == Usage in battles == | ||
| + | <!-- ''Describe the tactics of playing in the aircraft, the features of using aircraft in a team and advice on tactics. Refrain from creating a "guide" - do not impose a single point of view, but instead, give the reader food for thought. Examine the most dangerous enemies and give recommendations on fighting them. If necessary, note the specifics of the game in different modes (AB, RB, SB).'' --> | ||
| + | |||
| + | In Simulator, the DB-3 has distinct pros and cons. It is a brilliant base / airfield-bombing plane with a maximum bombload of 1x 1000 kg + 2x 500 kg bombs, allowing it to easily finish a base or cripple airfield modules in one run. The bombs drop one by one, allowing flexible targeting. It has greatly improved handling and stability comparing with the previous SB2M, making flying a lot easier. However the DB-3 is quite slow, making it an easy target to pick on. It also has next to no defensive firepower: only 3x 7.62mm MGs in total; the one in the nose has great coverage, however most opponents are not likely to take head-ons. The top turret cannot even aim horizontally nor directly at the tail, meaning that the seemingly suicidal tactic of tailing a bomber can actually destroy a DB-3. The belly gun has good negative angle but its horizontal guidance is too limited. Therefore you can only target opponents at your front, upper half and lower rear. | ||
| + | |||
| + | When taking off, the DB-3 will shift to the right, so it is best to set separate keybind for left and right brakes to counter the torque. Given your weak guns, you can only survive if the room is rather empty or if the opponent also has weak firepower. If you are bombing a base, fly at treetop level to force any attacker to engage you from above so you can fight back. Bombing airfield is more dangerous, as you are not only exposed to AAA fire, but also attackers hiding in your gunner's deadzones. Climb to at least 2000m before approaching the airfield, then target the modules of fuel sector (surrounded by 4 towers), residential area (a bunch of tents) and hangar (6 giant houses). Bombing the airstrip is the easiest but it seems to give less rewards. If you see an attacker trying to shoot at you, you will have to nudge the plane so that the target is within your gunner's guidance which is very awful. The bullets will not do lots of damage as the target might constantly get into your deadzones. Most of the times against maneuvering or heavily armed / armored attackers, you will not survive long. | ||
| + | |||
| + | Landing is easy and similar to the style of the SB2M. Line up with the airstrip when it occupies around 1/3 of your windscreen and descent to treetop level. Cut throttle to around 0-40% to drop speed to 200 kph, and deploy landing flaps and gears. Control the throttle so that the touchdown speed is around 140kph. Like the SB2M, if you don't slow down enough the DB-3 will bounce off again and again which might lead to a crash. Once you have landed, you can keep braking as the nose will not dip down and cause a propeller strike. | ||
| + | |||
| + | === Manual Engine Control === | ||
| + | {| class="wikitable" style="text-align:center" | ||
| + | |- | ||
| + | ! colspan="7" | MEC elements | ||
| + | |- | ||
| + | ! rowspan="2" | Mixer | ||
| + | ! rowspan="2" | Pitch | ||
| + | ! colspan="3" | Radiator | ||
| + | ! rowspan="2" | Supercharger | ||
| + | ! rowspan="2" | Turbocharger | ||
| + | |- | ||
| + | ! Oil !! Water !! Type | ||
| + | |- | ||
| + | | Controllable || Controllable<br>Not auto controlled || Controllable<br>Not auto controlled || Not controllable<br>Not auto controlled || Separate || Not controllable<br>1 gear || Not controllable | ||
| + | |- | ||
| + | |} | ||
| + | |||
| + | === Modules === | ||
| + | {| class="wikitable" | ||
| + | ! Tier | ||
| + | ! colspan="2" | Flight performance | ||
| + | ! Survivability | ||
| + | ! colspan="2" | Weaponry | ||
| + | |- | ||
| + | | I | ||
| + | | Fuselage repair | ||
| + | | Radiator | ||
| + | | | ||
| + | | Turret 7 mm | ||
| + | | | ||
| + | |- | ||
| + | | II | ||
| + | | | ||
| + | | Compressor | ||
| + | | Airframe | ||
| + | | | ||
| + | | Der-19 | ||
| + | |- | ||
| + | | III | ||
| + | | Wings repair | ||
| + | | Engine | ||
| + | | | ||
| + | | New 7 mm MGs (turret) | ||
| + | | | ||
| + | |- | ||
| + | | IV | ||
| + | | 95 octane fuel usage | ||
| + | | Engine injection | ||
| + | | Cover | ||
| + | | | ||
| + | | Der-20 | ||
| + | |- | ||
| + | |} | ||
=== Pros and cons === | === Pros and cons === | ||
| − | '' | + | <!-- ''Summarise and briefly evaluate the vehicle in terms of its characteristics and combat effectiveness. Mark its pros and cons in the bulleted list. Try not to use more than 6 points for each of the characteristics. Avoid using categorical definitions such as "bad", "good" and the like - use substitutions with softer forms such as "inadequate" and "effective".'' --> |
'''Pros:''' | '''Pros:''' | ||
| − | * | + | |
| + | * Great maximum bombload of 2 x 500 kg + 1 x 1000 kg bombs allows you to finish a base in one go, or even have spare bombs for other targets | ||
| + | * Has a wide range of bomb combinations, meaning that you can choose between large and small targets | ||
| + | * Can break continuously until full stop, its nose will never strike the ground | ||
| + | * Nose turret has wide coverage | ||
'''Cons:''' | '''Cons:''' | ||
| − | |||
| − | == | + | * Extremely weak defensive firepower: terrible gun coverage at the rear/bottom, you cannot aim at planes on your side, tail, or underside, gunners are unprotected, and the 7.62 mm MGs lack damage |
| − | ''Describe the history of the creation and combat usage of the aircraft in more detail than in the introduction. If the historical reference turns out to be too | + | * Quite slow and large, making it an easy target |
| + | * Below average climb rate | ||
| + | * Only has landing flaps | ||
| + | * Negative deflection of elevator will not pitch the plane down at >390 kph | ||
| + | |||
| + | == History == | ||
| + | ''Describe the history of the creation and combat usage of the aircraft in more detail than in the introduction. If the historical reference turns out to be too long, take it to a separate article, taking a link to the article about the vehicle and adding a block "/History" (example: <nowiki>https://wiki.warthunder.com/(Vehicle-name)/History</nowiki>) and add a link to it here using the <code>main</code> template. Be sure to reference text and sources by using <code><nowiki><ref></ref></nowiki></code>, as well as adding them at the end of the article with <code><nowiki><references /></nowiki></code>. This section may also include the vehicle's dev blog entry (if applicable) and the in-game encyclopedia description (under <code><nowiki>=== In-game description ===</nowiki></code>, also if applicable).'' | ||
== Media == | == Media == | ||
| − | '' | + | ''Excellent additions to the article would be video guides, screenshots from the game, and photos.'' |
| + | |||
| + | == See also == | ||
| + | ''Links to the articles on the War Thunder Wiki that you think will be useful for the reader, for example:'' | ||
| − | |||
| − | |||
* ''reference to the series of the aircraft;'' | * ''reference to the series of the aircraft;'' | ||
* ''links to approximate analogues of other nations and research trees.'' | * ''links to approximate analogues of other nations and research trees.'' | ||
| − | |||
| − | == | + | == External links == |
''Paste links to sources and external resources, such as:'' | ''Paste links to sources and external resources, such as:'' | ||
| + | |||
* ''topic on the official game forum;'' | * ''topic on the official game forum;'' | ||
| − | * ''page on aircraft | + | * ''encyclopedia page on the aircraft;'' |
* ''other literature.'' | * ''other literature.'' | ||
| + | |||
| + | {{AirManufacturer Ilyushin}} | ||
| + | {{USSR bombers}} | ||
Revision as of 06:45, 6 October 2020
Contents
| This page is about the Russian bomber DB-3B. For other version, see DB-3A (China). |
Description

The DB-3B is a rank II Soviet bomber
with a battle rating of 2.7 (AB/RB/SB). It was introduced in Update 1.67 "Assault".
General info
Flight performance
Describe how the aircraft behaves in the air. Speed, manoeuvrability, acceleration and allowable loads - these are the most important characteristics of the vehicle.
| Characteristics | Max Speed (km/h at 6,250 m) |
Max altitude (metres) |
Turn time (seconds) |
Rate of climb (metres/second) |
Take-off run (metres) | |||
|---|---|---|---|---|---|---|---|---|
| AB | RB | AB | RB | AB | RB | |||
| Stock | 388 | 374 | 9400 | 35.0 | 35.8 | 7.1 | 7.1 | 326 |
| Upgraded | ___ | ___ | __._ | __._ | __._ | __._ | ||
Details
| Features | ||||
|---|---|---|---|---|
| Combat flaps | Take-off flaps | Landing flaps | Air brakes | Arrestor gear |
| X | X | ✓ | X | X |
| Limits | ||||||
|---|---|---|---|---|---|---|
| Wings (km/h) | Gear (km/h) | Flaps (km/h) | Max Static G | |||
| Combat | Take-off | Landing | + | - | ||
| 600 | 320 | N/A | N/A | 280 | ~5 | ~2 |
| Optimal velocities (km/h) | |||
|---|---|---|---|
| Ailerons | Rudder | Elevators | Radiator |
| < 280 | < 240 | < 300 | > 270 |
| Compressor (RB/SB) | ||
|---|---|---|
| Setting 1 | ||
| Optimal altitude | 100% Engine power | WEP Engine power |
| 4,700 m | 950 hp | 1,100 hp |
Survivability and armour
- 6 mm steel behind pilot
- Self-sealing fuel tanks (2 in each wing)
Armaments
Suspended armament
The DB-3B can be outfitted with the following ordnance:
- 10 x 50 kg FAB-50 bombs (500 kg total)
- 10 x 100 kg FAB-100 bombs (1,000 kg total)
- 2 x 250 kg FAB-250M43 bombs (500 kg total)
- 2 x 250 kg FAB-250M43 bombs + 10 x 100 kg FAB-100 bombs (1,500 kg total)
- 2 x 500 kg FAB-500 bombs (1,000 kg total)
- 1 x 1,000 kg FAB-1000 bomb (1,000 kg total)
- 1 x 1,000 kg FAB-1000 bomb + 2 x 500 kg FAB-500 bombs (2,000 kg total)
Defensive armament
The DB-3B is defended by:
- 1 x 7.62 mm ShKAS machine gun, nose turret (1,000 rpg)
- 1 x 7.62 mm ShKAS machine gun, dorsal turret (1,000 rpg)
- 1 x 7.62 mm ShKAS machine gun, ventral turret (500 rpg)
Usage in battles
In Simulator, the DB-3 has distinct pros and cons. It is a brilliant base / airfield-bombing plane with a maximum bombload of 1x 1000 kg + 2x 500 kg bombs, allowing it to easily finish a base or cripple airfield modules in one run. The bombs drop one by one, allowing flexible targeting. It has greatly improved handling and stability comparing with the previous SB2M, making flying a lot easier. However the DB-3 is quite slow, making it an easy target to pick on. It also has next to no defensive firepower: only 3x 7.62mm MGs in total; the one in the nose has great coverage, however most opponents are not likely to take head-ons. The top turret cannot even aim horizontally nor directly at the tail, meaning that the seemingly suicidal tactic of tailing a bomber can actually destroy a DB-3. The belly gun has good negative angle but its horizontal guidance is too limited. Therefore you can only target opponents at your front, upper half and lower rear.
When taking off, the DB-3 will shift to the right, so it is best to set separate keybind for left and right brakes to counter the torque. Given your weak guns, you can only survive if the room is rather empty or if the opponent also has weak firepower. If you are bombing a base, fly at treetop level to force any attacker to engage you from above so you can fight back. Bombing airfield is more dangerous, as you are not only exposed to AAA fire, but also attackers hiding in your gunner's deadzones. Climb to at least 2000m before approaching the airfield, then target the modules of fuel sector (surrounded by 4 towers), residential area (a bunch of tents) and hangar (6 giant houses). Bombing the airstrip is the easiest but it seems to give less rewards. If you see an attacker trying to shoot at you, you will have to nudge the plane so that the target is within your gunner's guidance which is very awful. The bullets will not do lots of damage as the target might constantly get into your deadzones. Most of the times against maneuvering or heavily armed / armored attackers, you will not survive long.
Landing is easy and similar to the style of the SB2M. Line up with the airstrip when it occupies around 1/3 of your windscreen and descent to treetop level. Cut throttle to around 0-40% to drop speed to 200 kph, and deploy landing flaps and gears. Control the throttle so that the touchdown speed is around 140kph. Like the SB2M, if you don't slow down enough the DB-3 will bounce off again and again which might lead to a crash. Once you have landed, you can keep braking as the nose will not dip down and cause a propeller strike.
Manual Engine Control
| MEC elements | ||||||
|---|---|---|---|---|---|---|
| Mixer | Pitch | Radiator | Supercharger | Turbocharger | ||
| Oil | Water | Type | ||||
| Controllable | Controllable Not auto controlled |
Controllable Not auto controlled |
Not controllable Not auto controlled |
Separate | Not controllable 1 gear |
Not controllable |
Modules
| Tier | Flight performance | Survivability | Weaponry | ||
|---|---|---|---|---|---|
| I | Fuselage repair | Radiator | Turret 7 mm | ||
| II | Compressor | Airframe | Der-19 | ||
| III | Wings repair | Engine | New 7 mm MGs (turret) | ||
| IV | 95 octane fuel usage | Engine injection | Cover | Der-20 | |
Pros and cons
Pros:
- Great maximum bombload of 2 x 500 kg + 1 x 1000 kg bombs allows you to finish a base in one go, or even have spare bombs for other targets
- Has a wide range of bomb combinations, meaning that you can choose between large and small targets
- Can break continuously until full stop, its nose will never strike the ground
- Nose turret has wide coverage
Cons:
- Extremely weak defensive firepower: terrible gun coverage at the rear/bottom, you cannot aim at planes on your side, tail, or underside, gunners are unprotected, and the 7.62 mm MGs lack damage
- Quite slow and large, making it an easy target
- Below average climb rate
- Only has landing flaps
- Negative deflection of elevator will not pitch the plane down at >390 kph
History
Describe the history of the creation and combat usage of the aircraft in more detail than in the introduction. If the historical reference turns out to be too long, take it to a separate article, taking a link to the article about the vehicle and adding a block "/History" (example: https://wiki.warthunder.com/(Vehicle-name)/History) and add a link to it here using the main template. Be sure to reference text and sources by using <ref></ref>, as well as adding them at the end of the article with <references />. This section may also include the vehicle's dev blog entry (if applicable) and the in-game encyclopedia description (under === In-game description ===, also if applicable).
Media
Excellent additions to the article would be video guides, screenshots from the game, and photos.
See also
Links to the articles on the War Thunder Wiki that you think will be useful for the reader, for example:
- reference to the series of the aircraft;
- links to approximate analogues of other nations and research trees.
External links
Paste links to sources and external resources, such as:
- topic on the official game forum;
- encyclopedia page on the aircraft;
- other literature.
| Ilyushin Design Bureau (Илью́шинa Опытное конструкторское бюро) | |
|---|---|
| Bombers | DB-3B · IL-4 |
| Jet Bombers | IL-28* · IL-28Sh |
| Strike Aircraft | IL-8 (1944) |
| Il-2 | IL-2 (1941) · IL-2 (1942) · IL-2M type 3 · IL-2M "Avenger" · IL-2M (1943) · IL-2-37 · IL-2 M-82 |
| Il-10 | IL-10 · IL-10 (1946) |
| Export/Captured | |
| Bombers | ␗DB-3A · ◊IL-28 · ◔IL-28 |
| Strike Aircraft | ▀IL-2 (1942) · ␗IL-10 (1946) · ◔IL-10 |
| * The Chinese Harbin Aircraft Manufacturing Corporation built unlicensed copies of the Il-28 known as the H-5. | |
| USSR bombers | |
|---|---|
| SB and Ar | SB 2M-100 · SB 2M-103 · SB 2M-103 MV-3 · SB 2M-103U · SB 2M-103U MV-3 · SB 2M-105 · Ar-2 |
| Yer-2 (petrol) | Yer-2 (M-105) · Yer-2 (M-105) TAT · Yer-2 (M-105R) TAT · Yer-2 (M-105R) LU |
| Yer-2 (diesel) | Yer-2 (ACh-30B) (e) · Yer-2 (ACh-30B) (l) |
| Tu | Tu-2 · Tu-2S · Tu-2S-44 · Tu-2S-59 · Tu-4 |
| Pe | Pe-2-1 · Pe-2-31 · Pe-2-83 · Pe-2-110 · Pe-2-205 · Pe-2-359 · Pe-8 |
| IL | DB-3B · IL-4 |
| Po-2 · Po-2M · MBR-2-M-34 · TB-3M-17-32 · Yak-4 · Be-6 | |
| Lend-Lease | ▂PBY-5A Catalina · ▂Hampden TB Mk I · ▂A-20G-30 · ▂B-25J-30 |
