Difference between revisions of "D4Y2"
(→Usage in battles) (Tag: Visual edit) |
(→See also) |
||
| Line 204: | Line 204: | ||
* Airbrakes, can dive if needed | * Airbrakes, can dive if needed | ||
* Fused rocket payload | * Fused rocket payload | ||
| − | * Excellent | + | * Excellent manoeuvrability, can outmanoeuvre Spitfires |
| − | * Fast, can outrun almost anything, save P-38s | + | * Fast, can outrun almost anything, save P-38s |
* Nose mounted armament | * Nose mounted armament | ||
* Its speed forces the enemy to tail behind your gunner, giving you a chance to shoot at the approaching fighter with your turret | * Its speed forces the enemy to tail behind your gunner, giving you a chance to shoot at the approaching fighter with your turret | ||
| Line 211: | Line 211: | ||
'''Cons:''' | '''Cons:''' | ||
| − | * Rockets can only be launched two at a time, giving you only two chances to down a bomber | + | * Rockets can only be launched two at a time, giving you only two chances to down a bomber |
* Poor defensive armament | * Poor defensive armament | ||
* Overheats easily on WEP | * Overheats easily on WEP | ||
| Line 248: | Line 248: | ||
;Aircraft of comparable role and era | ;Aircraft of comparable role and era | ||
| − | * [[SBD-3 | + | * [[SBD-3]] - Early war American dive bomber |
| − | * [[SB2C-4]] - Late | + | * [[SB2C-4]] - Late war American dive bomber |
| − | * [[A-35B (France)|A-35B]] - French | + | * [[A-35B (France)|A-35B]] - French dive bomber with 6 x machine guns |
| − | * [[B17A]]/[[B17B|B]] - Swedish | + | * [[B17A]]/[[B17B|B]] - Swedish light/dive bomber |
| − | * [[Ju 87 (Family)|Ju | + | * [[Ju 87 (Family)|Ju 87 D]] - German ground attack dive bomber |
== External links == | == External links == | ||
Revision as of 17:24, 15 October 2020
Contents
| This page is about the Japanese dive bomber D4Y2. For other versions, see D4Y1 and D4Y3 Ko. |
Description

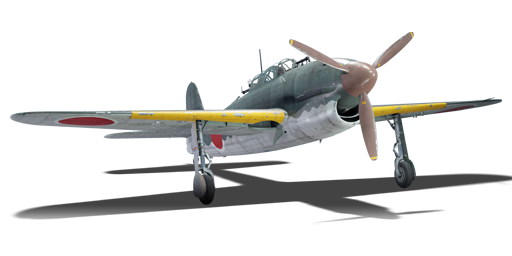
The D4Y2 is a rank II Japanese dive bomber
with a battle rating of 2.0 (AB), 2.3 (RB), and 2.7 (SB). It was introduced in Update 1.71 "New E.R.A.".
The D4Y2 is a very strong ground attack aircraft, and thanks to its high speed and agility, it can make a great fighter. This is your typical Japanese dive bomber, which has excellent ground-pounding capabilities, as well as fighter-hunting abilities. Since the D4Y2 gets a bomber airspawn, it can outclimb any fighter you want. You can also outspeed and outmanoeuvre pretty much anything, even Spitfires. However, the D4Y2 carries something special, something that the D4Y1 and D4Y3 Ko cannot carry, fused rockets. What some might realize about Japanese planes is their inability to bomber hunt. Fused rockets fix this issue, by being a great pick to tackle slow, sturdy, and sluggish bombers. Even if you don't get the rockets exactly on point, the explosion near the bomber could be enough to rip a wing off or damage their controls.
Despite all these advantages, the D4Y2 still has many flaws. It is very fragile, and shouldn't be exposed to .50 calibre Brownings, as they will almost always set you on fire. Even though it has high speed and agility, it bleeds energy so quickly that turnfighting for prolonged periods is not recommended. You also don't have the greatest turret, as the Type 92 is completely unreliable to down air targets, so it should be used to scare away fighters rather than destroy them. Always try outmanoeuvring fighters before you dive away from them.
General info

Flight performance
The D4Y2 behaves much like the D4Y1: fast, agile, and powerful. However, since you don't get a radial engine, your Atsuta engine will overheat very easily on WEP, even with both radiators fully open. WEP should be used when on the deck when ground pounding, or in dogfights. Using WEP while climbing should only be done on cooler maps. It gets a bomber airspawn, which allows the D4Y2 to outclimb all the fighters, but be sure to select the right airspawn, because it gets a carrier spawn by default on pacific maps. The only issue with the performance of this aircraft arises at high altitudes, where it is left without a supercharger.
| Characteristics | Max Speed (km/h at 5,250 m) |
Max altitude (metres) |
Turn time (seconds) |
Rate of climb (metres/second) |
Take-off run (metres) | |||
|---|---|---|---|---|---|---|---|---|
| AB | RB | AB | RB | AB | RB | |||
| Stock | 555 | 541 | 9800 | 23.8 | 24.4 | 7.7 | 7.7 | 300 |
| Upgraded | 607 | 580 | 22.2 | 23.0 | 14.6 | 10.9 | ||
Details

| Features | ||||
|---|---|---|---|---|
| Combat flaps | Take-off flaps | Landing flaps | Air brakes | Arrestor gear |
| ✓ | ✓ | ✓ | ✓ | ✓ |
| Limits | ||||||
|---|---|---|---|---|---|---|
| Wings (km/h) | Gear (km/h) | Flaps (km/h) | Max Static G | |||
| Combat | Take-off | Landing | + | - | ||
| 750 | 350 | 480 | 480 | 280 | ~12 | ~9 |
| Optimal velocities (km/h) | |||
|---|---|---|---|
| Ailerons | Rudder | Elevators | Radiator |
| < 350 | < 400 | < 400 | > 200 |
| Compressor (RB/SB) | ||
|---|---|---|
| Setting 1 | ||
| Optimal altitude | 100% Engine power | WEP Engine power |
| 5,000 m | 1,300 hp | 1,430 hp |
Survivability and armour
The D4Y2, like its predecessor the D4Y1, lacks any armour and self-sealing fuel tanks. The fuel tanks are located in the same location (2 in each wing). The gunner is still unprotected.
Armaments

Offensive armament
The D4Y2 is armed with:
- 2 x 7.7 mm Type 97 navy machine guns, nose-mounted (400 rpg = 800 total)
Suspended armament
The D4Y2 can be outfitted with the following ordnance:
- Without load
- 1 x 250 kg Navy Type Number 25 Model 2 bomb (250 kg total)
- 4 x Type 3 No.1 Mod.28 Mk.1 rockets
- 1 x 250 kg Navy Type Number 25 Model 2 bomb + 2 x 60 kg Navy Type 97 Number 6 bombs (370 kg total)
- 1 x 500 kg Number Type 2 50 Model 1 GP(SAP) bomb (500 kg total)

Defensive armament
The D4Y2 is defended by:
- 1 x 7.7 mm Type 92 machine gun, dorsal turret (582 rpg)
Usage in battles

The D4Y2 is a pilot's play, meaning that you can choose whatever role you wish in a D4Y2, since it has bombs, rockets, and a bomber airspawn.
Interceptor: The D4Y2 can carry fused rockets, meaning they'll explode after a certain distance. Usually Japanese planes are horrible interceptors, they are slow, easily set on fire by turrets, and have poor armament. However, the D4Y2 can carry rockets, turning the tables in the D4Y2's favour. Set a fuse on your rockets to whatever you please, as long as it is between 400 and 800 meters. Use impact fuse however, when ground pounding. To intercept a bomber, don't rely on your machine guns. Don't tail the bomber either. Instead, dive on it, or engage in a head-on if they don't have forward guns. Fire your rockets when you are exactly the distance away from the bomber as your fuse distance is. Remember to lead, as the rockets tend to curve and don't travel as fast as the MGs.
Fighter: The D4Y2 is a great fighter, but has two flaws, armament and energy retention. Speed is your armour, as well as altitude, because you cannot retain any energy in a boom and zoom attack. It isn't a good idea to boom and zoom either, unless the enemy aircraft is a bomber, or a damaged fighter, or any other slow target. Your fights will mostly occur near the ground, where the D4Y2 has good acceleration. You can turn with anything you wish. However, there is one danger with fighting near the ground. If you lose all of your energy when turnfighting (it will happen sometimes), you become the perfect target for a boom and zoom attack. Since you can't dive away from boom and zoomers on the ground, the D4Y2 is a sitting duck. The turret won't do anything either, but trying to dodge the incoming threat is still a good option, as long as you keep your speed up.
Attacker: Since the D4Y2 can carry bombs and rockets, we must discuss the attacker role of this aircraft. On new maps like Honolulu, as well as old maps like Iwo Jima, rockets will be a good pick. Rockets easily destroy cargo ships, especially ones on the move. Take the bombs on maps with light pillboxes. Use your armament only for AAA, howitzers, artillery, and lightly armoured trucks. Once all ammunition is spent, or if enemy fighters are sighted, return to the base.
Manual Engine Control
| MEC elements | ||||||
|---|---|---|---|---|---|---|
| Mixer | Pitch | Radiator | Supercharger | Turbocharger | ||
| Oil | Water | Type | ||||
| Controllable | Controllable Not auto controlled |
Controllable Not auto controlled |
Controllable Not auto controlled |
Separate | Not controllable 1 gear |
Not controllable |
Modules
| Tier | Flight performance | Survivability | Weaponry | ||
|---|---|---|---|---|---|
| I | Fuselage repair | Radiator | Offensive 7 mm | Type 3 No.1 Mod.28 Mk.1 rockets | |
| II | Compressor | Airframe | New 7 mm MGs | ||
| III | Wings repair | Engine | Turret 7 mm | 9 in (mod30) | |
| IV | Engine injection | Cover | New 7 mm MGs (turret) | 13 in (mod35) | |
The payload option should be a top priority, so getting to tier three modifications is of utmost importance. Rush the new belts and MGs, or the radiator or compressor if you choose to have better performance. Then get the bomb modification. After that, research all engine modifications and then the survivability modifications. Save the turret upgrades for last.

Pros and cons
Pros:
- Bomber airspawn, outclimbs anything and can intercept
- Airbrakes, can dive if needed
- Fused rocket payload
- Excellent manoeuvrability, can outmanoeuvre Spitfires
- Fast, can outrun almost anything, save P-38s
- Nose mounted armament
- Its speed forces the enemy to tail behind your gunner, giving you a chance to shoot at the approaching fighter with your turret
Cons:
- Rockets can only be launched two at a time, giving you only two chances to down a bomber
- Poor defensive armament
- Overheats easily on WEP
- No supercharger, struggles at high altitudes
- Extremely fragile, play it like a zero
- No torpedoes
- Machine gun armament does not provide enough firepower to down bombers, but it can still work wonders on the many fighters you will face, namely the F2A, I-15/16, and Hurricanes
- Significant delay in bomb drop
History

Nicknamed the the "Judy" by allied pilots, the D4Y2 was feared by both troops on the ground and ships in the sea.
The D4Y2 was a carrier based dive bomber. It sported a 1,400 hp "Aichi AE1P Atsuta 32" engine. The D4Y2 would see 7 variants, and was the most widely used version of the D4Y series.
Some variants had very unique roles such as the D4Y2 KAI Suisei Model 22, designed to be launched from a battleship by the means of a catapult.
With a range of 1,400 miles the D4Y2 was perfect for the defence of the Japanese territories. Combined with its extreme accuracy in a dive, it saw great success. However, with Allied aircraft upgrading from the F4F Wildcat to the F6F Hellcat, it was no longer fast enough to escape and started seeing massive casualties in missions which just months before would have had little to no casualties. The increased death rates of the pilots and crew saw pilots becoming less and less experienced, increasing the death rates even further. Slowly the time of the D4Y's was coming to an end.
No D4Y2's survived the war, but their legacy lives on as a feared a ruthless dive bomber and night fighter. Their achievements include the attack on the USS Enterprise and attack on the USS Bunker Hill which was damaged beyond repair at sea and had to return to port in the United States to repair.
Media
See also
- D4Y1, the first series of the D4Y
- D4Y3, a D4Y1 with a new turret and engine
- D4Y family
- Aircraft of comparable role and era
- SBD-3 - Early war American dive bomber
- SB2C-4 - Late war American dive bomber
- A-35B - French dive bomber with 6 x machine guns
- B17A/B - Swedish light/dive bomber
- Ju 87 D - German ground attack dive bomber
External links
| Yokosuka Naval Air Technical Arsenal (海軍航空技術廠) | |
|---|---|
| Bombers | D4Y1 · D4Y2 · D4Y3 Ko |
| P1Y1 mod. 11 | |
| Jet fighters | R2Y2 Kai V1 · R2Y2 Kai V2 · R2Y2 Kai V3 |
| Captured | ␗P1Y1 mod. 11 |
| While the arsenal was simply known as the Naval Air Technical Arsenal and usually referred to as Kūgi-shō (Kaigun Kōkū Gijutsu-shō). | |
| The name Yokosuka prevailed however, even though it referred to the Arsenal's location. | |
| See also | Yokosuka Naval Arsenal (Shipyard) |
| Japan bombers | |
|---|---|
| Navy | |
| Carrier-based attack bomber | |
| B5N | B5N2 |
| B6N | B6N1 · B6N2 · B6N2a |
| B7A | B7A2 · B7A2 (Homare 23) |
| Carrier-based dive bomber | |
| D3A | D3A1 |
| D4Y | D4Y1 · D4Y2 · D4Y3 Ko |
| Shipboard Observation seaplane | |
| F1M | F1M2 |
| Land-based Attack bomber | |
| G4M | G4M1 |
| G5N | G5N1 |
| G8N | G8N1 |
| Flying boat | |
| H6K | H6K4 |
| H8K | H8K2 · H8K3 |
| Land-based Bomber | |
| P1Y | P1Y1 |
| Army | |
| Light | Ki-32 |
| Ki-48-II otsu | |
| Heavy | Ki-21-Ia · Ki-21-I hei |
| Ki-49-I · Ki-49-IIa · Ki-49-IIb · Ki-49-IIb/L | |
| Ki-67-I Ko · Ki-67-I otsu | |
| Other countries | ▅B-17E |
