Difference between revisions of "D-3"
CobraKingII (talk | contribs) (→History) (Tag: Visual edit) |
Bonisducks (talk | contribs) (→History) (Tag: Visual edit) |
||
| (4 intermediate revisions by 4 users not shown) | |||
| Line 1: | Line 1: | ||
| − | {{Specs-Card|code=ussr_d3}} | + | {{Specs-Card |
| + | |code=ussr_d3 | ||
| + | |images={{Specs-Card-Image|GarageImage_{{PAGENAME}}.jpg}} | ||
| + | }} | ||
== Description == | == Description == | ||
| − | <!--In the first part of the description, cover the history of the ship's creation and military application. In the second part, tell the reader about using this ship in the game. Add a screenshot: if a beginner player has a hard time remembering vehicles by name, a picture will help them identify the ship in question.--> | + | <!-- ''In the first part of the description, cover the history of the ship's creation and military application. In the second part, tell the reader about using this ship in the game. Add a screenshot: if a beginner player has a hard time remembering vehicles by name, a picture will help them identify the ship in question.'' --> |
| − | |||
| − | |||
The '''{{Specs|name}}''' is a rank {{Specs|rank}} Soviet motor torpedo boat {{Battle-rating}}. It was introduced during [[Update 1.79 "Project X"]] when the Soviet fleet was implemented into the game. | The '''{{Specs|name}}''' is a rank {{Specs|rank}} Soviet motor torpedo boat {{Battle-rating}}. It was introduced during [[Update 1.79 "Project X"]] when the Soviet fleet was implemented into the game. | ||
== General info == | == General info == | ||
=== Survivability and armour === | === Survivability and armour === | ||
| − | <!--Talk about the vehicle's armour. Note the most well-defended and most vulnerable zones, e.g. the ammo magazine. Evaluate the composition of components and assemblies responsible for movement and manoeuvrability. Evaluate the survivability of the primary and secondary armaments separately. Don't forget to mention the size of the crew, which plays an important role in fleet mechanics. Save tips on preserving survivability for the "Usage in battles" section. If necessary, use a graphical template to show the most well-protected or most vulnerable points in the armour.--> | + | {{Specs-Fleet-Armour}} |
| + | <!-- ''Talk about the vehicle's armour. Note the most well-defended and most vulnerable zones, e.g. the ammo magazine. Evaluate the composition of components and assemblies responsible for movement and manoeuvrability. Evaluate the survivability of the primary and secondary armaments separately. Don't forget to mention the size of the crew, which plays an important role in fleet mechanics. Save tips on preserving survivability for the "Usage in battles" section. If necessary, use a graphical template to show the most well-protected or most vulnerable points in the armour.'' --> | ||
[[File:X-RayImage StarboardView D-3.png|thumb|Profile shot of the D-3. Vulnerable areas include the engines located at the centre of the vessel.]] | [[File:X-RayImage StarboardView D-3.png|thumb|Profile shot of the D-3. Vulnerable areas include the engines located at the centre of the vessel.]] | ||
| Line 15: | Line 17: | ||
=== Mobility === | === Mobility === | ||
| − | <!--Write about the ship's mobility. Evaluate its power and manoeuvrability, rudder rerouting speed, stopping speed at full tilt, with its maximum forward and reverse speed.--> | + | {{Specs-Fleet-Mobility}} |
| − | The D-3 can reach speeds over | + | <!-- ''Write about the ship's mobility. Evaluate its power and manoeuvrability, rudder rerouting speed, stopping speed at full tilt, with its maximum forward and reverse speed.'' --> |
| + | The D-3 can reach speeds over 80 km/h in AB and 59 km/h in RB and SB. It is swift, and also very mobile - you can make very sharp turns, due to the quick rudder rerouting speed. The reverse speeds are not bad, reaching a maximum of -28km/h. Although, you shouldn't be going backwards, because it usually takes a lot of time just to come to a stop; it's much safer to make a forwards U-turn. | ||
| + | |||
| + | {{NavalMobility}} | ||
| + | |||
| + | === Modifications and economy === | ||
| + | {{Specs-Economy}} | ||
== Armament == | == Armament == | ||
| + | {{Specs-Fleet-Armaments}} | ||
=== Primary armament === | === Primary armament === | ||
| − | <!--Provide information about the characteristics of the primary armament. Evaluate their efficacy in battle based on their reload speed, ballistics and the capacity of their shells. Add a link to the main article about the weapon: <code><nowiki>{{main|Weapon name (calibre)}}</nowiki></code>. Broadly describe the ammunition available for the primary armament, and provide recommendations on how to use it and which ammunition to choose.--> | + | {{Specs-Fleet-Primary}} |
| + | <!-- ''Provide information about the characteristics of the primary armament. Evaluate their efficacy in battle based on their reload speed, ballistics and the capacity of their shells. Add a link to the main article about the weapon: <code><nowiki>{{main|Weapon name (calibre)}}</nowiki></code>. Broadly describe the ammunition available for the primary armament, and provide recommendations on how to use it and which ammunition to choose.'' --> | ||
{{main|DShK (12.7 mm)}} | {{main|DShK (12.7 mm)}} | ||
Primary armament consists of two 12.7 mm DShK machine guns with one located at the bow of the ship and the other one at the centre of the ship allowing for engagement in all 360° directions. However, it should be noted that due to structural designs only one gun can be pointed towards at either the bow or aft of the ship. Reloading the DShK takes about 4.7 seconds and can reliably engage targets up to 1.8 kilometres away. With its 12.7 mm bullets, the D-3 can reliably knock out enemy vessels in the same class and maybe even larger vessels if given enough time. Available ammunition belts include the high explosive incendiary (HEI) and armour piercing incendiary tracer (APIT) rounds. | Primary armament consists of two 12.7 mm DShK machine guns with one located at the bow of the ship and the other one at the centre of the ship allowing for engagement in all 360° directions. However, it should be noted that due to structural designs only one gun can be pointed towards at either the bow or aft of the ship. Reloading the DShK takes about 4.7 seconds and can reliably engage targets up to 1.8 kilometres away. With its 12.7 mm bullets, the D-3 can reliably knock out enemy vessels in the same class and maybe even larger vessels if given enough time. Available ammunition belts include the high explosive incendiary (HEI) and armour piercing incendiary tracer (APIT) rounds. | ||
| − | === | + | === Additional armament === |
| − | <!-- | + | {{Specs-Fleet-Additional}} |
| − | {{main|53-38 (533 mm)}} | + | <!-- ''Describe the available additional armaments of the ship: depth charges, mines, torpedoes. Talk about their positions, available ammunition and launch features such as dead zones of torpedoes. If there is no additional armament, remove this section.'' --> |
| + | {{main|53-38 (533 mm)|BB-1 depth charge}} | ||
| − | The D-3 carries two, front facing, 533 mm 53-38 torpedoes located at the stern of the ship. The torpedoes are rather accurate with a default travel distance of 4km and a good speed of 82 km. | + | The D-3 carries two, front facing, 533 mm 53-38 torpedoes located at the stern of the ship. The torpedoes are rather accurate with a default travel distance of 4km and a good speed of 82 km. |
| − | |||
| − | |||
| − | |||
| − | |||
Once unlocked, the D-3 can carry four BB-1 depth charges located at the stern of the ship which is also where they are dropped when deployed. | Once unlocked, the D-3 can carry four BB-1 depth charges located at the stern of the ship which is also where they are dropped when deployed. | ||
| Line 39: | Line 46: | ||
''Remember'' that you can set the Depth Charge activation time before spawning in if you are carrying depth charges. You can select activation times from 3 to 10 seconds, but it's recommended to set it to something in the middle (5-8s), to keep your options open. | ''Remember'' that you can set the Depth Charge activation time before spawning in if you are carrying depth charges. You can select activation times from 3 to 10 seconds, but it's recommended to set it to something in the middle (5-8s), to keep your options open. | ||
| − | ==Usage in battles== | + | == Usage in battles == |
| − | <!--Describe the technique of using this ship, the characteristics of her use in a team and tips on strategy. Abstain from writing an entire guide – don't try to provide a single point of view, but give the reader food for thought. Talk about the most dangerous opponents for this vehicle and provide recommendations on fighting them. If necessary, note the specifics of playing with this vehicle in various modes (AB, RB, SB).--> | + | <!-- ''Describe the technique of using this ship, the characteristics of her use in a team and tips on strategy. Abstain from writing an entire guide – don't try to provide a single point of view, but give the reader food for thought. Talk about the most dangerous opponents for this vehicle and provide recommendations on fighting them. If necessary, note the specifics of playing with this vehicle in various modes (AB, RB, SB).'' --> |
| − | The | + | The D-3 is a very strong beginner torpedo boat for lower rank battles and can compete quite well with other ships at its BR. However, note that the ship itself has some quirks and flaws which should be remedied to succeed in battle. The ship's main armament consists of two single 12.7 mm DShK machine guns which represent a significant upgrade over the reserve G-5 torpedo boat. As well, the ship can carry two 533 mm torpedoes that can easily shred any ship. The D-3 does have mediocre mobility for a small torpedo boat, but it is certainly enough to get the ship where it needs to go. Finally, the ship's survivability is decidedly terrible (though average for motor torpedo boats at its BR) meaning that you should try to utilize ambush tactics to maximise the ship's survivability. |
| − | + | At the start of each battle, your first priority should be to capture points. However, rushing straight into points isn't the greatest strategy for the D-3. This is because the D-3 has relatively worse agility when compared to faster MTBs such as the G-5, meaning that it cannot reach capture points nearly as quickly. As a result, one good potential strategy is to flank and find island cover, allowing you to use ambush tactics against enemy ships. The D-3 is not survivable and will get ripped to shreds by any gunfire, rifle-calibre and above. Thus, the best strategy is to not get hit, meaning that island cover is critical for preserving your ship's survivability. | |
| − | + | ||
| − | + | Against smaller boats, try to ambush and destroy them as quickly as possible using the DShK machine guns, which can get the job done very quickly. Against larger vessels, the best strategy is to avoid direct engagement, as the D-3 will get ripped apart far quicker than it can destroy larger vessels. Seeking the assistance of teammates is very helpful, as well as a smokescreen which can be used for a fast getaway. The D-3 does carry torpedoes, but these weapons are not efficient against coastal vessels, meaning that it may be more efficient to leave them off the ship ; after all, the torpedoes can be detonated leading to a fiery death. | |
| − | |||
| − | |||
| − | |||
| − | |||
| − | |||
| − | |||
| − | |||
| − | |||
| − | |||
| − | |||
| − | |||
| − | |||
| − | |||
| − | |||
| − | |||
| − | |||
| − | |||
| − | |||
| − | |||
| − | |||
| − | |||
| − | |||
| − | |||
| − | |||
| − | |||
===Pros and cons=== | ===Pros and cons=== | ||
| − | <!--Summarise and briefly evaluate the vehicle in terms of its characteristics and combat effectiveness. Mark its pros and cons in the bulleted list. Try not to use more than 6 points for each of the characteristics. Avoid using categorical definitions such as "bad", "good" and the like - use substitutions with softer forms such as "inadequate" and "effective".--> | + | <!-- ''Summarise and briefly evaluate the vehicle in terms of its characteristics and combat effectiveness. Mark its pros and cons in the bulleted list. Try not to use more than 6 points for each of the characteristics. Avoid using categorical definitions such as "bad", "good" and the like - use substitutions with softer forms such as "inadequate" and "effective".'' --> |
'''Pros:''' | '''Pros:''' | ||
| − | * Turret placement allows the D-3 to engage in targets all around itself | + | * Turret placement allows the D-3 to engage in targets all around itself |
| − | * | + | ** Two DShK machine guns, which are highly effective against smaller targets |
| + | * Small and decently fast, meaning that it is relatively difficult to kill at longer ranges | ||
| + | * Gets access to torpedoes, which can be used against targets that the guns cannot kill | ||
'''Cons:''' | '''Cons:''' | ||
| − | * No armour at all | + | * No armour at all and just 9 crew members, making it very easy to kill |
| − | * Vulnerable to aircraft due to no dedicated anti-air and weak vertical guidance on its guns | + | * Vulnerable to aircraft due to no dedicated anti-air and weak vertical guidance on its guns |
| − | * Only one gun can operate on targets right in-front and behind the craft | + | * Only one gun can operate on targets right in-front and behind the craft |
| + | * While still good, mobility is relatively mediocre compared to its contemporaries | ||
== History == | == History == | ||
<!-- ''Describe the history of the creation and combat usage of the ship in more detail than in the introduction. If the historical reference turns out to be too long, take it to a separate article, taking a link to the article about the ship and adding a block "/History" (example: <nowiki>https://wiki.warthunder.com/(Ship-name)/History</nowiki>) and add a link to it here using the <code>main</code> template. Be sure to reference text and sources by using <code><nowiki><ref></ref></nowiki></code>, as well as adding them at the end of the article with <code><nowiki><references /></nowiki></code>. This section may also include the ship's dev blog entry (if applicable) and the in-game encyclopedia description (under <code><nowiki>=== In-game description ===</nowiki></code>, also if applicable).'' --> | <!-- ''Describe the history of the creation and combat usage of the ship in more detail than in the introduction. If the historical reference turns out to be too long, take it to a separate article, taking a link to the article about the ship and adding a block "/History" (example: <nowiki>https://wiki.warthunder.com/(Ship-name)/History</nowiki>) and add a link to it here using the <code>main</code> template. Be sure to reference text and sources by using <code><nowiki><ref></ref></nowiki></code>, as well as adding them at the end of the article with <code><nowiki><references /></nowiki></code>. This section may also include the ship's dev blog entry (if applicable) and the in-game encyclopedia description (under <code><nowiki>=== In-game description ===</nowiki></code>, also if applicable).'' --> | ||
| − | The Soviet | + | The D-3 was a class of Soviet Motor Torpedo Boats (MTBs) built during the Second World War as a replacement to the prior G-5 class. The ship was designed as an incremental improvement to the G-5, featuring improved endurance and main armament. In total, 73 D-3 class torpedo boats were produced, operating during the Second World War alongside its predecessor and successor classes, the G-5s and Pr. 123bis. |
| + | |||
| + | The Soviet Navy aimed to resolve several of the G-5’s main issues with the D-3 motor torpedo boat. Namely, the G-5 had a small main armament and short range of just 220 miles (354 km). The D-3 was thus much larger than the D-3 and carried reinforced armament. The ships had a significantly longer range of 350 miles (or 550 at a lower speed), and featured a second DShK machine gun compared to the G-5’s single DShK gun. The ships also carried two 533 mm torpedoes in open mounts, instead of the G-5’s rear trough torpedo configuration. Finally, the D-3s were designed to carry eight depth charges for anti-submarine warfare. | ||
| − | D- | + | However, this came at the expense of speed - the initial production D-3s, powered by three gasoline engines producing 2550 hp, were only capable of making 32 knots (59 km/h). Later versions of the D-3 remedied this problem by using lend-lease Packard engines developing a total of 3600 hp, allowing for a top speed of 45 knots. In total, 73 D-3 class torpedo boats were built, of which 26 boats were of the original engine configuration. These ships were built between 1940 and 1941, while the remaining re-engined ships were built between 1943 and 1945. Of the 73 D-3s built, 28 ships were lost in service, the remainder serving with the Soviet navy into the 1950s. |
== Media == | == Media == | ||
| Line 107: | Line 94: | ||
* ''topic on the official game forum;'' | * ''topic on the official game forum;'' | ||
| − | |||
* ''other literature.'' | * ''other literature.'' | ||
{{USSR boats}} | {{USSR boats}} | ||
Revision as of 19:18, 26 March 2021

Contents
Description
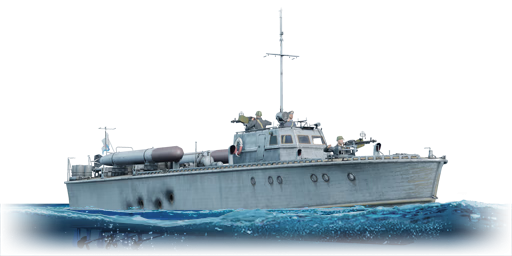
The Pr.P-19-ОК, D-3-class is a rank I Soviet motor torpedo boat with a battle rating of 1.3 (AB/RB/SB). It was introduced during Update 1.79 "Project X" when the Soviet fleet was implemented into the game.
General info
Survivability and armour

Armour is practically non-existent as the D3 is constructed entirely out of wood. All three engines are also located in the centre of the vessel making it quite easy to knock out. Crew consists of 9 men.
Mobility
The D-3 can reach speeds over 80 km/h in AB and 59 km/h in RB and SB. It is swift, and also very mobile - you can make very sharp turns, due to the quick rudder rerouting speed. The reverse speeds are not bad, reaching a maximum of -28km/h. Although, you shouldn't be going backwards, because it usually takes a lot of time just to come to a stop; it's much safer to make a forwards U-turn.
| Mobility Characteristics | |||
|---|---|---|---|
| Game Mode | Upgrade Status | Maximum Speed (km/h) | |
| Forward | Reverse | ||
| AB | |||
| Upgraded | 83 | 28 | |
| RB/SB | |||
| Upgraded | 59 | 20 | |
Modifications and economy
| Seakeeping | Unsinkability | Firepower | ||||||||||||||||||||
|---|---|---|---|---|---|---|---|---|---|---|---|---|---|---|---|---|---|---|---|---|---|---|
|
|
|
Armament
Primary armament
Primary armament consists of two 12.7 mm DShK machine guns with one located at the bow of the ship and the other one at the centre of the ship allowing for engagement in all 360° directions. However, it should be noted that due to structural designs only one gun can be pointed towards at either the bow or aft of the ship. Reloading the DShK takes about 4.7 seconds and can reliably engage targets up to 1.8 kilometres away. With its 12.7 mm bullets, the D-3 can reliably knock out enemy vessels in the same class and maybe even larger vessels if given enough time. Available ammunition belts include the high explosive incendiary (HEI) and armour piercing incendiary tracer (APIT) rounds.
Additional armament
The D-3 carries two, front facing, 533 mm 53-38 torpedoes located at the stern of the ship. The torpedoes are rather accurate with a default travel distance of 4km and a good speed of 82 km.
Once unlocked, the D-3 can carry four BB-1 depth charges located at the stern of the ship which is also where they are dropped when deployed.
Remember that you can set the Depth Charge activation time before spawning in if you are carrying depth charges. You can select activation times from 3 to 10 seconds, but it's recommended to set it to something in the middle (5-8s), to keep your options open.
Usage in battles
The D-3 is a very strong beginner torpedo boat for lower rank battles and can compete quite well with other ships at its BR. However, note that the ship itself has some quirks and flaws which should be remedied to succeed in battle. The ship's main armament consists of two single 12.7 mm DShK machine guns which represent a significant upgrade over the reserve G-5 torpedo boat. As well, the ship can carry two 533 mm torpedoes that can easily shred any ship. The D-3 does have mediocre mobility for a small torpedo boat, but it is certainly enough to get the ship where it needs to go. Finally, the ship's survivability is decidedly terrible (though average for motor torpedo boats at its BR) meaning that you should try to utilize ambush tactics to maximise the ship's survivability.
At the start of each battle, your first priority should be to capture points. However, rushing straight into points isn't the greatest strategy for the D-3. This is because the D-3 has relatively worse agility when compared to faster MTBs such as the G-5, meaning that it cannot reach capture points nearly as quickly. As a result, one good potential strategy is to flank and find island cover, allowing you to use ambush tactics against enemy ships. The D-3 is not survivable and will get ripped to shreds by any gunfire, rifle-calibre and above. Thus, the best strategy is to not get hit, meaning that island cover is critical for preserving your ship's survivability.
Against smaller boats, try to ambush and destroy them as quickly as possible using the DShK machine guns, which can get the job done very quickly. Against larger vessels, the best strategy is to avoid direct engagement, as the D-3 will get ripped apart far quicker than it can destroy larger vessels. Seeking the assistance of teammates is very helpful, as well as a smokescreen which can be used for a fast getaway. The D-3 does carry torpedoes, but these weapons are not efficient against coastal vessels, meaning that it may be more efficient to leave them off the ship ; after all, the torpedoes can be detonated leading to a fiery death.
Pros and cons
Pros:
- Turret placement allows the D-3 to engage in targets all around itself
- Two DShK machine guns, which are highly effective against smaller targets
- Small and decently fast, meaning that it is relatively difficult to kill at longer ranges
- Gets access to torpedoes, which can be used against targets that the guns cannot kill
Cons:
- No armour at all and just 9 crew members, making it very easy to kill
- Vulnerable to aircraft due to no dedicated anti-air and weak vertical guidance on its guns
- Only one gun can operate on targets right in-front and behind the craft
- While still good, mobility is relatively mediocre compared to its contemporaries
History
The D-3 was a class of Soviet Motor Torpedo Boats (MTBs) built during the Second World War as a replacement to the prior G-5 class. The ship was designed as an incremental improvement to the G-5, featuring improved endurance and main armament. In total, 73 D-3 class torpedo boats were produced, operating during the Second World War alongside its predecessor and successor classes, the G-5s and Pr. 123bis.
The Soviet Navy aimed to resolve several of the G-5’s main issues with the D-3 motor torpedo boat. Namely, the G-5 had a small main armament and short range of just 220 miles (354 km). The D-3 was thus much larger than the D-3 and carried reinforced armament. The ships had a significantly longer range of 350 miles (or 550 at a lower speed), and featured a second DShK machine gun compared to the G-5’s single DShK gun. The ships also carried two 533 mm torpedoes in open mounts, instead of the G-5’s rear trough torpedo configuration. Finally, the D-3s were designed to carry eight depth charges for anti-submarine warfare.
However, this came at the expense of speed - the initial production D-3s, powered by three gasoline engines producing 2550 hp, were only capable of making 32 knots (59 km/h). Later versions of the D-3 remedied this problem by using lend-lease Packard engines developing a total of 3600 hp, allowing for a top speed of 45 knots. In total, 73 D-3 class torpedo boats were built, of which 26 boats were of the original engine configuration. These ships were built between 1940 and 1941, while the remaining re-engined ships were built between 1943 and 1945. Of the 73 D-3s built, 28 ships were lost in service, the remainder serving with the Soviet navy into the 1950s.
Media
Excellent additions to the article would be video guides, screenshots from the game, and photos.
See also
Links to articles on the War Thunder Wiki that you think will be useful for the reader, for example:
- reference to the series of the ship;
- links to approximate analogues of other nations and research trees.
External links
Paste links to sources and external resources, such as:
- topic on the official game forum;
- other literature.
| USSR boats | |
|---|---|
| Motor torpedo boats | D-3 · G-5 · G-5 (ShVAK) · Pr.123-bis · Pr.123K (A-11) · Pr.123K · Pr.183 |
| Motor gun boats | TKA-106 · MO-4 · OD-200 · Pr.183 BM-21 · Ya-5M |
| Motor torpedo gun boats | Pr. 206 · Pr.206-M · MPK Pr.12412 · MPK Pr.12412P |
| Gunboats | Groza |
| Armoured gun boats | BMO · MBK-161 early · MBK-161 late · MBK pr.186 · MBK pr.186 (MK 85) · Pr.1124 early · Pr.1124 late · Pr.1124 MLRS |
| Pr.191 · Pr.191M · Pr.1204 · Pr.1204 late | |
