Difference between revisions of "Crusader II"
Inceptor57 (talk | contribs) (Restored page) |
|||
| Line 2: | Line 2: | ||
== Description == | == Description == | ||
| − | ''In the description, the first part needs to be about the history of the creation and combat usage of the vehicle, as well as its key features. In the second part, tell the reader about the ground vehicle in the game. Insert the screenshot of the vehicle. If the novice player does not remember the vehicle by name, they will immediately understand what kind of vehicle it is talking about.'' | + | <!--''In the description, the first part needs to be about the history of the creation and combat usage of the vehicle, as well as its key features. In the second part, tell the reader about the ground vehicle in the game. Insert the screenshot of the vehicle. If the novice player does not remember the vehicle by name, they will immediately understand what kind of vehicle it is talking about.''--> |
| + | [[File:GarageImage_{{PAGENAME}}.jpg|420px|thumb|left]] | ||
| + | {{break}} | ||
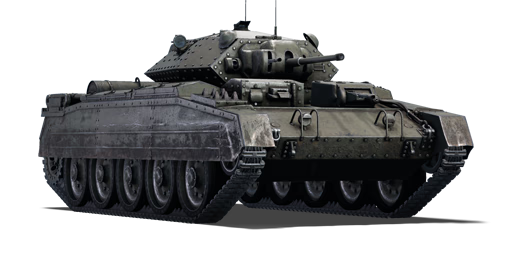
| + | The '''{{Specs|name}}''' is a Rank {{Specs|rank}} British light tank {{Battle-rating|4}}. It was introduced along with the initial British tree line in [[Update 1.55 "Royal Armour"]]. | ||
== General info == | == General info == | ||
=== Survivability and armour === | === Survivability and armour === | ||
| − | ''Describe armour protection. Note the most well protected and key weak areas. Appreciate the layout of modules as well as the number and location of crew members. Is the level of armour protection sufficient, is the placement of modules helpfull for survival in combat?'' | + | <!--''Describe armour protection. Note the most well protected and key weak areas. Appreciate the layout of modules as well as the number and location of crew members. Is the level of armour protection sufficient, is the placement of modules helpfull for survival in combat?'' |
| − | ''If necessary use a visual template to indicate the most secure and weak zones of the armour.'' | + | ''If necessary use a visual template to indicate the most secure and weak zones of the armour.''--> |
| + | '''Armour type:''' | ||
| + | * Rolled homogeneous armour | ||
| + | * Cast homogeneous armour (Gun mantlet, Machine gun mantlet, Driver's port) | ||
| + | * Structural steel (Side skirts) | ||
| + | {| class="wikitable" | ||
| + | |- | ||
| + | ! Armour !! Front !! Sides !! Rear !! Roof | ||
| + | |- | ||
| + | | Hull || 20 mm (33°) ''Front plate'' <br> 9 mm (78-85°), 20 mm (61°) ''Front glacis'' <br> 20 mm (27-64°) ''Lower glacis'' <br> 18 mm (1°) ''Driver's port'' || 14 + 4 mm || 14 mm (44-51°) ''Top'' <br> (14-51°) 14 mm ''Bottom''|| 7 mm | ||
| + | |- | ||
| + | | Main Turret || 30 mm (11°) ''Turret front'' <br> 30 mm (6-58°) ''Gun mantlet'' || 14 mm (40-49°) || 17 + 12.7 mm (36°) ''Top'' <br> 9 mm (66°) ''Bottom'' || 12.7 mm | ||
| + | |- | ||
| + | | Secondary Turret || 30 mm (1-32°) ''Turret front'' <br> 20 mm (3-67°) ''Gun mantlet'' || 30 mm (1-3°) || 30 mm (5-6°) || 9 mm | ||
| + | |} | ||
| + | '''Notes:''' | ||
| + | * Suspension wheels and tracks are 15 mm thick. | ||
=== Mobility === | === Mobility === | ||
| − | ''Write about the mobility of the ground vehicle. Estimate the specific power and maneuverability as well as the maximum speed forward and backward.'' | + | <!--''Write about the mobility of the ground vehicle. Estimate the specific power and maneuverability as well as the maximum speed forward and backward.''--> |
| + | {| class="wikitable" style="text-align:center" | ||
| + | |- | ||
| + | !colspan="3" | Mobility characteristic | ||
| + | |- | ||
| + | ! Weight (tons) | ||
| + | !colspan="1" | Add-on Armour<br>weight (tons) | ||
| + | !colspan="1" | Max speed (km/h) | ||
| + | |- | ||
| + | |rowspan="2" | 16.3 || colspan="1" rowspan="2" | N/A || colspan="1" | 47 (AB) | ||
| + | |- | ||
| + | |42 (RB/SB) | ||
| + | |- | ||
| + | !colspan="3" | Engine power (horsepower) | ||
| + | |- | ||
| + | !colspan="1" | Mode | ||
| + | !Stock | ||
| + | !Upgraded | ||
| + | |- | ||
| + | |''Arcade'' | ||
| + | |527 | ||
| + | |649 | ||
| + | |- | ||
| + | |''Realistic/Simulator'' | ||
| + | |301 | ||
| + | |340 | ||
| + | |- | ||
| + | !colspan="3" | Power-to-weight ratio (hp/ton) | ||
| + | |- | ||
| + | !colspan="1" | Mode | ||
| + | !Stock | ||
| + | !Upgraded | ||
| + | |- | ||
| + | |''Arcade'' | ||
| + | |32.33 | ||
| + | |39.82 | ||
| + | |- | ||
| + | |''Realistic/Simulator'' | ||
| + | |18.47 | ||
| + | |20.86 | ||
| + | |- | ||
| + | |} | ||
== Armaments == | == Armaments == | ||
=== Main armament === | === Main armament === | ||
| − | ''Give the reader information about the characteristics of the main gun. Assess its effectiveness in a battle based on the reloading speed, ballistics and the power of shells. Do not forget about the flexibilty of the fire, that is how quickly the cannon can be aimed at the target, open fire on it and aim at another enemy. Add a link to the main article on the gun: <code><nowiki>{{main|Name of the weapon}}</nowiki></code>. Describe in general terms the ammunition available for the main gun. Give advice on how to use them and how to fill the ammunition storage.'' | + | <!--''Give the reader information about the characteristics of the main gun. Assess its effectiveness in a battle based on the reloading speed, ballistics and the power of shells. Do not forget about the flexibilty of the fire, that is how quickly the cannon can be aimed at the target, open fire on it and aim at another enemy. Add a link to the main article on the gun: <code><nowiki>{{main|Name of the weapon}}</nowiki></code>. Describe in general terms the ammunition available for the main gun. Give advice on how to use them and how to fill the ammunition storage.''--> |
| + | {{main|Ordnance QF 2-pounder (40 mm)}} | ||
| − | === | + | {| class="wikitable" style="text-align:center" |
| − | '' | + | |- |
| + | ! colspan="6" | [[Ordnance QF 2-pounder (40 mm)|40 mm OQF 2-pounder]] | ||
| + | |- | ||
| + | ! colspan="3" rowspan="1" style="width:5em" |Capacity | ||
| + | ! rowspan="1" | Vertical <br> guidance | ||
| + | ! rowspan="1" | Horizontal <br> guidance | ||
| + | ! rowspan="1" | Stabilizer | ||
| + | |- | ||
| + | | colspan="3" | 110 || -15°/+20° || ±180° || Vertical | ||
| + | |- | ||
| + | ! colspan="6" | Turret rotation speed (°/s) | ||
| + | |- | ||
| + | ! style="width:4em" |Mode | ||
| + | ! style="width:4em" |Stock | ||
| + | ! style="width:4em" |Upgraded | ||
| + | ! style="width:4em" |Prior + Full crew | ||
| + | ! style="width:4em" |Prior + Expert qualif. | ||
| + | ! style="width:4em" |Prior + Ace qualif. | ||
| + | |- | ||
| + | | ''Arcade'' || 34.3 || 47.4 || __.__ || __.__ || __.__ | ||
| + | |- | ||
| + | | ''Realistic'' || 21.4 || 25.2 || __.__ || __.__ || __.__ | ||
| + | |- | ||
| + | ! colspan="4" | Reloading rate (seconds) | ||
| + | |- | ||
| + | ! colspan="1" style="width:4em" |Stock | ||
| + | ! colspan="1" style="width:4em" |Prior + Full crew | ||
| + | ! colspan="1" style="width:4em" |Prior + Expert qualif. | ||
| + | ! colspan="1" style="width:4em" |Prior + Ace qualif. | ||
| + | |- | ||
| + | | 3.6 || __.__ || __.__ || __.__ | ||
| + | |- | ||
| + | |} | ||
| + | |||
| + | ===== Ammunition ===== | ||
| + | {| class="wikitable sortable" style="text-align:center" width="100%" | ||
| + | ! colspan="8" | Penetration statistics | ||
| + | |- | ||
| + | ! rowspan="2" data-sort-type="text" | Ammunition | ||
| + | ! rowspan="2" class="unsortable" | Type of <br /> warhead | ||
| + | ! colspan="6" | '''Penetration''' '''''in mm''''' '''@ 90°''' | ||
| + | |- | ||
| + | ! 10m | ||
| + | ! 100m | ||
| + | ! 500m | ||
| + | ! 1000m | ||
| + | ! 1500m | ||
| + | ! 2000m | ||
| + | |- | ||
| + | | Shot Mk.1 AP/T || AP || 80 || 79 || 61 || 46 || 32 || 21 | ||
| + | |- | ||
| + | | Shot Mk.1 APCBC/T || APCBC || 74 || 72 || 64 || 58 || 48 || 43 | ||
| + | |- | ||
| + | |} | ||
| + | {| class="wikitable sortable" style="text-align:center" width="100%" | ||
| + | ! colspan="11" | Shell details | ||
| + | |- | ||
| + | ! rowspan="2" data-sort-type="text" | Ammunition | ||
| + | ! rowspan="2" class="unsortable" | Type of <br /> warhead | ||
| + | ! rowspan="2" |Velocity <br /> in m/s | ||
| + | ! rowspan="2" |Projectile<br />Mass in kg | ||
| + | ! rowspan="2" | ''Fuse delay'' | ||
| + | ''in m:'' | ||
| + | ! rowspan="2" | ''Fuse sensitivity'' | ||
| + | ''in mm:'' | ||
| + | ! rowspan="2" | ''Explosive Mass in g<br /> (TNT equivalent):'' | ||
| + | ! rowspan="2" | ''Normalization At 30° <br> from horizontal:'' | ||
| + | ! colspan="3" | ''Ricochet:'' | ||
| + | |- | ||
| + | ! 0% | ||
| + | ! 50% | ||
| + | ! 100% | ||
| + | |- | ||
| + | | Shot Mk.1 AP/T || AP || 853 || 1.1 || N/A || N/A || N/A || -1° || 47° || 60° || 65° | ||
| + | |- | ||
| + | | Shot Mk.1 APCBC/T || APCBC || 853 || 1.2 || N/A || N/A || N/A || +4° || 48° || 63° || 71° | ||
| + | |- | ||
| + | |} | ||
| + | |||
| + | ===== [[Ammo racks|Ammo racks]] ===== | ||
| + | [[File:Ammoracks_{{PAGENAME}}.png|right|thumbnail|x250px|[[Ammo racks|Ammo racks]] of the Crusader Mk II.]] | ||
| + | {| class="wikitable sortable" style="text-align:center" | ||
| + | |- | ||
| + | ! class="wikitable unsortable" |Full<br /> ammo | ||
| + | ! class="wikitable unsortable" |1st<br /> rack empty | ||
| + | ! class="wikitable unsortable" |2nd<br /> rack empty | ||
| + | ! class="wikitable unsortable" |3rd<br /> rack empty | ||
| + | ! class="wikitable unsortable" |4th<br /> rack empty | ||
| + | ! class="wikitable unsortable" |5th<br /> rack empty | ||
| + | ! class="wikitable unsortable" |Visual<br /> discrepancy | ||
| + | |- | ||
| + | || '''110''' || 89 ''(+21)'' || 67 ''(+43)'' || 45 ''(+65)'' || 23 ''(+87)'' || 1 ''(+109)'' || style="text-align:left" | No | ||
| + | |- | ||
| + | |} | ||
| + | Turret & center empty: 45 ''(+65)'' | ||
=== Machine guns === | === Machine guns === | ||
| − | ''Offensive and anti-aircraft machine guns not only allow you to fight some aircraft, but also are effective against lightly armoured vehicles. Evaluate machine guns and give recommendations on its use.'' | + | <!--''Offensive and anti-aircraft machine guns not only allow you to fight some aircraft, but also are effective against lightly armoured vehicles. Evaluate machine guns and give recommendations on its use.''--> |
| + | {{main|BESA (7.92 mm)}} | ||
| + | |||
| + | {| class="wikitable" style="text-align:center" | ||
| + | |- | ||
| + | ! colspan="7" | [[BESA (7.92 mm)|7.92 mm BESA]] | ||
| + | |- | ||
| + | ! colspan="7" | ''Hull turret'' | ||
| + | |- | ||
| + | ! colspan="4" rowspan="1" style="width:5em" |Capacity (Belt capacity) | ||
| + | ! rowspan="1" | Fire rate <br> (shots/minute) | ||
| + | ! rowspan="1" | Vertical <br> guidance | ||
| + | ! rowspan="1" | Horizontal <br> guidance | ||
| + | |- | ||
| + | | colspan="4" | 4,950 (225) || 600 || ±10° || ±50° | ||
| + | |- | ||
| + | ! colspan="7" | ''Coaxial mount'' | ||
| + | |- | ||
| + | ! colspan="4" rowspan="1" style="width:5em" |Capacity (Belt capacity) | ||
| + | ! rowspan="1" | Fire rate <br> (shots/minute) | ||
| + | ! rowspan="1" | Vertical <br> guidance | ||
| + | ! rowspan="1" | Horizontal <br> guidance | ||
| + | |- | ||
| + | | colspan="4" | 3,375 (225) || 600 || N/A || N/A | ||
| + | |- | ||
| + | |} | ||
== Usage in the battles == | == Usage in the battles == | ||
| − | ''Describe the tactics of playing in the vehicle, the features of using vehicles in the team and advice on tactics. Refrain from creating a "guide" - do not impose a single point of view but give the reader food for thought. Describe the most dangerous enemies and give recommendations on fighting them. If necessary, note the specifics of the game in different modes (AB, RB, SB).'' | + | <!--''Describe the tactics of playing in the vehicle, the features of using vehicles in the team and advice on tactics. Refrain from creating a "guide" - do not impose a single point of view but give the reader food for thought. Describe the most dangerous enemies and give recommendations on fighting them. If necessary, note the specifics of the game in different modes (AB, RB, SB).''--> |
| + | The Crusader Mk II retains Rank I play style for beginners, acceptable speed (holds at around 47-48 kph) and maneuverability, and good survivabilty for its rank with 5 crew members. | ||
| + | |||
| + | Due to the thin armour on the tank, the user should play in the support role, always scooting around the map with a team mate. Possible to also use as a flanker. | ||
=== Pros and cons === | === Pros and cons === | ||
| − | ''Summarize and briefly evaluate the vehicle in terms of its characteristics and combat effectiveness. Mark its pros and cons in a bulleted list. Do not use more than 6 points for each of the characteristics. Avoid using categorical definitions such as "bad", "good" and the like - they have a substitution in the form of softer "inadequate", "effective".'' | + | <!--''Summarize and briefly evaluate the vehicle in terms of its characteristics and combat effectiveness. Mark its pros and cons in a bulleted list. Do not use more than 6 points for each of the characteristics. Avoid using categorical definitions such as "bad", "good" and the like - they have a substitution in the form of softer "inadequate", "effective".''--> |
| − | |||
'''Pros:''' | '''Pros:''' | ||
| − | * | + | *5 man crew |
| − | + | *Frontal armour is bouncy when shot from certain angle | |
| + | *High penetration 2 Pdr | ||
| + | *Low profile | ||
| + | *Fast with good handling. | ||
| + | *Additional 4mm side skirts. | ||
| + | *Reload rate is still fast despite having only 2 crew left. | ||
'''Cons:''' | '''Cons:''' | ||
| − | * | + | *Overall weak armour |
| + | *Gun has no explosive filler and can have trouble killing larger tanks, pinpoint shots are needed | ||
| + | *Crew is packed together, can be one-shotted easily by large caliber shells, notably the early Pz.IV models | ||
| + | *Flat surface on the front turret armour | ||
| + | *Any tank with a respectable gun will be able to penetrate and destroy the Crusader easily | ||
== History == | == History == | ||
| − | ''Describe the history of the creation and combat usage of the ground vehicle in more detail than in the introduction. If the historical reference turns out to be too big, take it to a separate article, taking a link to an article about the vehicle and adding a block "/historical reference" (example: https://wiki.warthunder.com/Name-vehicles/historical reference) and add a link to it here using the <code>main</code> template. Be sure to include links to sources at the end of the article.'' | + | <!--''Describe the history of the creation and combat usage of the ground vehicle in more detail than in the introduction. If the historical reference turns out to be too big, take it to a separate article, taking a link to an article about the vehicle and adding a block "/historical reference" (example: https://wiki.warthunder.com/Name-vehicles/historical reference) and add a link to it here using the <code>main</code> template. Be sure to include links to sources at the end of the article.''--> |
| + | ===Development=== | ||
| + | In 1938, the General Staff of the British Army requested for a cruiser tank that was lighter and more affordable than the heavier A16 cruiser design developed by Nuffield Mechanizations & Aero. One of these designs was the designation ''Tank, Cruiser Mk.V'' based off the [[A13 Mk I|A13 cruiser tanks]], named the "Covenanter", and Nuffield was invited to become part of its development team, but they refused due to interest in developing their own cruiser tank. Their tank was designated the '''Tank, Cruiser Mk.VI Crusader''' and fell under the General Staff specification of ''A15''. The Crusader was a parallel design to the Covenanter, but was ready six weeks earlier than the Covenanter despite starting at a later time. The Crusader was adopted into service with the British Army in 1941 and the 5,300 units were manufactured between 1940 to 1943. | ||
| + | |||
| + | ===Design=== | ||
| + | The Crusader features a new design that differs from its cruiser tank predecessors. The Christie suspension system on the Crusader had five road wheels for it instead of the usual four, which improves weight distribution of the increased 20 ton weight of the Crusader compared to the 14 tons of the A13 cruisers. The engine, steering system, and cooling system on the Crusader was different as well, but the Covenanter and Crusader use the same main turret. The polygonal shape of the turret gives the crew inside more room for the turret ring diameter. | ||
| + | |||
| + | The Crusader Mk.I and '''Mk.II''' were equipped with the 2-pounder, which was aimed by the gunner inside with a padded shaft that allows them to elevate the gun by simply adjusting his own height. Later in the war where an up-gun of the tank armament was necessary and newer tanks such as the [[Cromwell V|Cromwell]] was delayed, the Crusader was upgraded into the ''[[Crusader Mk III]]'' variant with a 6-pounder instead, which restricted turret space, requiring the turret crew to be reduced from three to two. These saw first action the Second Battle of El Alamein in October 1942. | ||
| + | |||
| + | ===Combat Usage=== | ||
| + | The Crusader first saw action at North Africa, right after the British had been pushed back to the Egyptian border by Axis forces. The Crusaders were part of the huge shipment in the Malta Convoys to reequip the British forces there. Enough Crusaders arrive that the entire 6th Royal Tank Regiment was refitted with them, which joined up with the 2nd Royal Tank Regiment to form the 7th Armoured Brigade "Desert Rats". The brigade's first action was in Operation Battleaxe, though it was delayed due to adapting the tanks for the desert environment. The operation, which called for the relieve of the siege of Tobruk in June, was initiated in June to which 11 Crusader tanks were lost to anti-tank guns, plus many more to mechanical faults. While more Crusader tanks came in to reinforce the cruiser tank forces, there were never enough to supply the continuously expanding armoured units as 7th Brigade was combine with the 7th Hussars, the 2nd Armoured Brigade was added to the 7th Armoured Division, and the 8th Hussars was combined with the 4th Armoured Brigade. Overall, the Crusaders proved effective in the North African Campaign, the Crusader was faster than any tanks on the opposing side and the 2-pounder was lethal to the [[Pz.III J|Panzer III]], but the tank suffered from its thin armour, mechanical problems in the desert, and the growing deficiency of the 2-pounder, which didn't have enough range to destroy farther tanks. The Crusader design also caused the ammo racks on the tank to easily ignite due to unprotected racks and shot traps on the turret design. Anti-tank guns continue to be the main reason the Crusader units suffer losses, rather than to enemy tanks. | ||
| + | |||
| + | By the end of 1941, only the 2nd Armoured Brigade retained the Crusaders, the rest of the other tank units were being refitted with better tanks, such as the [[Grant I|M3 Grant medium tank]] from the American Lend-Lease. Crusader units were also refitted with the more powerful Crusader Mk.III with the 6-pounder, which improved the Crusader's ability to destroy the gradually stronger German tanks. After General Bernard Montgomery took command of the British Army in 1942, more British tank units were reequipped with the Grant and [[M4|M4 Sherman]] tanks while the Crusaders were relegated from the front-lines to "light squadrons" meant to flank the enemy and attacked at its exposed sides. When the British 1st Army engaged the Axis at Tunisia, some tank regiments still use Crusaders mixed in with [[Valentine Mk I|Valentine tanks]]. These units in the 26th Armoured Brigade, code named "Blade Force", worked alongside the 78th Infantry Division as an independent armoured column. During Tunisia, the 1st Army was already converting the tank regiments into Shermans, but the 8th Army continued to use the Crusaders for much longer, which would see use at the Battle of Wadi Akarit and Mareth Line. | ||
| + | |||
| + | After the North African Campaign, the Crusaders no longer saw any use in the front-lines and were used in other roles such as gun tractors with 17-pounders or anti-aircraft mounts such as the ''[[Crusader AA Mk I|Crusader AA Mk I]]'' and ''[[Crusader AA Mk II|Mk II]]'' Some Crusader tanks equipped the tank regiments that stayed back at the British Homelands such as the 11th Armoured Division. | ||
| + | |||
| + | ===Survivors=== | ||
| + | About 21 Crusaders still exist intact in various parts of the world. The most notable places with the Crusaders are South Africa with 8 known survivors, a running [[Crusader Mk III]] at Bovington Tank Museum at England, and an anti-aircraft version at Musée des Blindés in France. | ||
== Media == | == Media == | ||
| Line 51: | Line 259: | ||
* ''topic on the official game forum;'' | * ''topic on the official game forum;'' | ||
* ''other literature.'' | * ''other literature.'' | ||
| + | |||
| + | {{Britain light tanks}} | ||
Revision as of 23:47, 5 February 2019
Contents
Description

The Tank, Cruiser, Mk VIA, Crusader II (A15) is a Rank II British light tank
with a battle rating of 2.3 (AB) and 2.7 (RB/SB). It was introduced along with the initial British tree line in Update 1.55 "Royal Armour".
General info
Survivability and armour
Armour type:
- Rolled homogeneous armour
- Cast homogeneous armour (Gun mantlet, Machine gun mantlet, Driver's port)
- Structural steel (Side skirts)
| Armour | Front | Sides | Rear | Roof |
|---|---|---|---|---|
| Hull | 20 mm (33°) Front plate 9 mm (78-85°), 20 mm (61°) Front glacis 20 mm (27-64°) Lower glacis 18 mm (1°) Driver's port |
14 + 4 mm | 14 mm (44-51°) Top (14-51°) 14 mm Bottom |
7 mm |
| Main Turret | 30 mm (11°) Turret front 30 mm (6-58°) Gun mantlet |
14 mm (40-49°) | 17 + 12.7 mm (36°) Top 9 mm (66°) Bottom |
12.7 mm |
| Secondary Turret | 30 mm (1-32°) Turret front 20 mm (3-67°) Gun mantlet |
30 mm (1-3°) | 30 mm (5-6°) | 9 mm |
Notes:
- Suspension wheels and tracks are 15 mm thick.
Mobility
| Mobility characteristic | ||
|---|---|---|
| Weight (tons) | Add-on Armour weight (tons) |
Max speed (km/h) |
| 16.3 | N/A | 47 (AB) |
| 42 (RB/SB) | ||
| Engine power (horsepower) | ||
| Mode | Stock | Upgraded |
| Arcade | 527 | 649 |
| Realistic/Simulator | 301 | 340 |
| Power-to-weight ratio (hp/ton) | ||
| Mode | Stock | Upgraded |
| Arcade | 32.33 | 39.82 |
| Realistic/Simulator | 18.47 | 20.86 |
Armaments
Main armament
| 40 mm OQF 2-pounder | |||||
|---|---|---|---|---|---|
| Capacity | Vertical guidance |
Horizontal guidance |
Stabilizer | ||
| 110 | -15°/+20° | ±180° | Vertical | ||
| Turret rotation speed (°/s) | |||||
| Mode | Stock | Upgraded | Prior + Full crew | Prior + Expert qualif. | Prior + Ace qualif. |
| Arcade | 34.3 | 47.4 | __.__ | __.__ | __.__ |
| Realistic | 21.4 | 25.2 | __.__ | __.__ | __.__ |
| Reloading rate (seconds) | |||||
| Stock | Prior + Full crew | Prior + Expert qualif. | Prior + Ace qualif. | ||
| 3.6 | __.__ | __.__ | __.__ | ||
Ammunition
| Penetration statistics | |||||||
|---|---|---|---|---|---|---|---|
| Ammunition | Type of warhead |
Penetration in mm @ 90° | |||||
| 10m | 100m | 500m | 1000m | 1500m | 2000m | ||
| Shot Mk.1 AP/T | AP | 80 | 79 | 61 | 46 | 32 | 21 |
| Shot Mk.1 APCBC/T | APCBC | 74 | 72 | 64 | 58 | 48 | 43 |
| Shell details | ||||||||||
|---|---|---|---|---|---|---|---|---|---|---|
| Ammunition | Type of warhead |
Velocity in m/s |
Projectile Mass in kg |
Fuse delay
in m: |
Fuse sensitivity
in mm: |
Explosive Mass in g (TNT equivalent): |
Normalization At 30° from horizontal: |
Ricochet: | ||
| 0% | 50% | 100% | ||||||||
| Shot Mk.1 AP/T | AP | 853 | 1.1 | N/A | N/A | N/A | -1° | 47° | 60° | 65° |
| Shot Mk.1 APCBC/T | APCBC | 853 | 1.2 | N/A | N/A | N/A | +4° | 48° | 63° | 71° |
Ammo racks

| Full ammo |
1st rack empty |
2nd rack empty |
3rd rack empty |
4th rack empty |
5th rack empty |
Visual discrepancy |
|---|---|---|---|---|---|---|
| 110 | 89 (+21) | 67 (+43) | 45 (+65) | 23 (+87) | 1 (+109) | No |
Turret & center empty: 45 (+65)
Machine guns
| 7.92 mm BESA | ||||||
|---|---|---|---|---|---|---|
| Hull turret | ||||||
| Capacity (Belt capacity) | Fire rate (shots/minute) |
Vertical guidance |
Horizontal guidance | |||
| 4,950 (225) | 600 | ±10° | ±50° | |||
| Coaxial mount | ||||||
| Capacity (Belt capacity) | Fire rate (shots/minute) |
Vertical guidance |
Horizontal guidance | |||
| 3,375 (225) | 600 | N/A | N/A | |||
Usage in the battles
The Crusader Mk II retains Rank I play style for beginners, acceptable speed (holds at around 47-48 kph) and maneuverability, and good survivabilty for its rank with 5 crew members.
Due to the thin armour on the tank, the user should play in the support role, always scooting around the map with a team mate. Possible to also use as a flanker.
Pros and cons
Pros:
- 5 man crew
- Frontal armour is bouncy when shot from certain angle
- High penetration 2 Pdr
- Low profile
- Fast with good handling.
- Additional 4mm side skirts.
- Reload rate is still fast despite having only 2 crew left.
Cons:
- Overall weak armour
- Gun has no explosive filler and can have trouble killing larger tanks, pinpoint shots are needed
- Crew is packed together, can be one-shotted easily by large caliber shells, notably the early Pz.IV models
- Flat surface on the front turret armour
- Any tank with a respectable gun will be able to penetrate and destroy the Crusader easily
History
Development
In 1938, the General Staff of the British Army requested for a cruiser tank that was lighter and more affordable than the heavier A16 cruiser design developed by Nuffield Mechanizations & Aero. One of these designs was the designation Tank, Cruiser Mk.V based off the A13 cruiser tanks, named the "Covenanter", and Nuffield was invited to become part of its development team, but they refused due to interest in developing their own cruiser tank. Their tank was designated the Tank, Cruiser Mk.VI Crusader and fell under the General Staff specification of A15. The Crusader was a parallel design to the Covenanter, but was ready six weeks earlier than the Covenanter despite starting at a later time. The Crusader was adopted into service with the British Army in 1941 and the 5,300 units were manufactured between 1940 to 1943.
Design
The Crusader features a new design that differs from its cruiser tank predecessors. The Christie suspension system on the Crusader had five road wheels for it instead of the usual four, which improves weight distribution of the increased 20 ton weight of the Crusader compared to the 14 tons of the A13 cruisers. The engine, steering system, and cooling system on the Crusader was different as well, but the Covenanter and Crusader use the same main turret. The polygonal shape of the turret gives the crew inside more room for the turret ring diameter.
The Crusader Mk.I and Mk.II were equipped with the 2-pounder, which was aimed by the gunner inside with a padded shaft that allows them to elevate the gun by simply adjusting his own height. Later in the war where an up-gun of the tank armament was necessary and newer tanks such as the Cromwell was delayed, the Crusader was upgraded into the Crusader Mk III variant with a 6-pounder instead, which restricted turret space, requiring the turret crew to be reduced from three to two. These saw first action the Second Battle of El Alamein in October 1942.
Combat Usage
The Crusader first saw action at North Africa, right after the British had been pushed back to the Egyptian border by Axis forces. The Crusaders were part of the huge shipment in the Malta Convoys to reequip the British forces there. Enough Crusaders arrive that the entire 6th Royal Tank Regiment was refitted with them, which joined up with the 2nd Royal Tank Regiment to form the 7th Armoured Brigade "Desert Rats". The brigade's first action was in Operation Battleaxe, though it was delayed due to adapting the tanks for the desert environment. The operation, which called for the relieve of the siege of Tobruk in June, was initiated in June to which 11 Crusader tanks were lost to anti-tank guns, plus many more to mechanical faults. While more Crusader tanks came in to reinforce the cruiser tank forces, there were never enough to supply the continuously expanding armoured units as 7th Brigade was combine with the 7th Hussars, the 2nd Armoured Brigade was added to the 7th Armoured Division, and the 8th Hussars was combined with the 4th Armoured Brigade. Overall, the Crusaders proved effective in the North African Campaign, the Crusader was faster than any tanks on the opposing side and the 2-pounder was lethal to the Panzer III, but the tank suffered from its thin armour, mechanical problems in the desert, and the growing deficiency of the 2-pounder, which didn't have enough range to destroy farther tanks. The Crusader design also caused the ammo racks on the tank to easily ignite due to unprotected racks and shot traps on the turret design. Anti-tank guns continue to be the main reason the Crusader units suffer losses, rather than to enemy tanks.
By the end of 1941, only the 2nd Armoured Brigade retained the Crusaders, the rest of the other tank units were being refitted with better tanks, such as the M3 Grant medium tank from the American Lend-Lease. Crusader units were also refitted with the more powerful Crusader Mk.III with the 6-pounder, which improved the Crusader's ability to destroy the gradually stronger German tanks. After General Bernard Montgomery took command of the British Army in 1942, more British tank units were reequipped with the Grant and M4 Sherman tanks while the Crusaders were relegated from the front-lines to "light squadrons" meant to flank the enemy and attacked at its exposed sides. When the British 1st Army engaged the Axis at Tunisia, some tank regiments still use Crusaders mixed in with Valentine tanks. These units in the 26th Armoured Brigade, code named "Blade Force", worked alongside the 78th Infantry Division as an independent armoured column. During Tunisia, the 1st Army was already converting the tank regiments into Shermans, but the 8th Army continued to use the Crusaders for much longer, which would see use at the Battle of Wadi Akarit and Mareth Line.
After the North African Campaign, the Crusaders no longer saw any use in the front-lines and were used in other roles such as gun tractors with 17-pounders or anti-aircraft mounts such as the Crusader AA Mk I and Mk II Some Crusader tanks equipped the tank regiments that stayed back at the British Homelands such as the 11th Armoured Division.
Survivors
About 21 Crusaders still exist intact in various parts of the world. The most notable places with the Crusaders are South Africa with 8 known survivors, a running Crusader Mk III at Bovington Tank Museum at England, and an anti-aircraft version at Musée des Blindés in France.
Media
An excellent addition to the article will be video guides, as well as screenshots from the game and photos.
Read also
Links to the articles on the War Thunder Wiki that you think will be useful for the reader, for example,
- reference to the series of the vehicles;
- links to approximate analogues of other nations and research trees.
ETC.
Sources
Paste links to sources and external resources, such as:
- topic on the official game forum;
- other literature.
| Britain light tanks | |
|---|---|
| A13 | A13 Mk I · A13 Mk I (3rd R.T.R.) · A13 Mk II · A13 Mk II 1939 |
| A15 | Crusader II · Crusader "The Saint" · Crusader III |
| A17 | Tetrarch I |
| IFV | Warrior |
| Wheeled | Daimler Mk II · AEC Mk II · Fox · Vickers Mk.11 |
| Other | VFM5 |
| South Africa | |
| SARC | SARC MkIVa · SARC MkVI (2pdr) · SARC MkVI (6pdr) |
| Ratel | Ratel 90 · Ratel 20 |
| Rooikat | Rooikat Mk.1D · Rooikat 105 · Rooikat MTTD |
| Other | Concept 3 · Eland 90 Mk.7 |
| USA | Stuart I · Stuart III |
