Difference between revisions of "Conway"
Inceptor57 (talk | contribs) (Restored page) |
Colok76286 (talk | contribs) (Edits) |
||
| (46 intermediate revisions by 13 users not shown) | |||
| Line 1: | Line 1: | ||
| − | {{Specs-Card|code=uk_fv4004_conway}} | + | {{Specs-Card |
| + | |code=uk_fv4004_conway | ||
| + | |images={{Specs-Card-Image|GarageImage_{{PAGENAME}}.jpg|ArtImage_{{PAGENAME}}.png}} | ||
| + | }} | ||
== Description == | == Description == | ||
| − | <!--''In the description, the first part | + | <!-- ''In the description, the first part should be about the history of the creation and combat usage of the vehicle, as well as its key features. In the second part, tell the reader about the ground vehicle in the game. Insert a screenshot of the vehicle, so that if the novice player does not remember the vehicle by name, he will immediately understand what kind of vehicle the article is talking about.'' --> |
| − | + | The '''{{Specs|name}}''' is a rank {{Specs|rank}} British tank destroyer {{Battle-rating}}. It was introduced in [[Update 1.57 "Battle March"]]. It is armed with a cannon developed to take on the heavy Soviet [[IS-3]] tank. It excels in fighting the top-rank heavies. | |
| − | |||
| − | The '''{{Specs|name}}''' is a | ||
| − | + | The Conway plays similarly to the [[FV4005]]. It has sub-par armour on all sides and has a very large-calibre gun, able to penetrate everything it faces, severely damaging most. However the incredibly high-velocity APDS, fast turret traverse and short reload time differ distinctly from the FV4005. It can be played as an usual tank destroyer, excelling at it with its high velocity APDS rounds, sniping from a distance. | |
== General info == | == General info == | ||
=== Survivability and armour === | === Survivability and armour === | ||
| − | <!--''Describe armour protection. Note the most well protected and key weak areas. Appreciate the layout of modules as well as the number and location of crew members. Is the level of armour protection sufficient, is the placement of modules | + | {{Specs-Tank-Armour}} |
| + | <!-- ''Describe armour protection. Note the most well protected and key weak areas. Appreciate the layout of modules as well as the number and location of crew members. Is the level of armour protection sufficient, is the placement of modules helpful for survival in combat? If necessary use a visual template to indicate the most secure and weak zones of the armour.'' --> | ||
| + | The turret front can shrug off smaller calibre rounds at long range and is resistant to autocannon and HMGs, unlike the FV4005. | ||
| − | |||
'''Armour type:''' | '''Armour type:''' | ||
| + | |||
* Rolled homogeneous armour | * Rolled homogeneous armour | ||
* Cast homogeneous armour (Gun mantlet) | * Cast homogeneous armour (Gun mantlet) | ||
| + | |||
{| class="wikitable" | {| class="wikitable" | ||
|- | |- | ||
! Armour !! Front !! Sides !! Rear !! Roof | ! Armour !! Front !! Sides !! Rear !! Roof | ||
|- | |- | ||
| − | | Hull || 76.2 mm (58°) ''Front glacis'' <br> 76.2 mm (47-48°) ''Lower glacis'' || 50.8 (12°) + 6 mm | + | | Hull || 76.2 mm (58°) ''Front glacis'' <br> 76.2 mm (47-48°) ''Lower glacis'' || 50.8 (12°) + 6 mm || 38 mm (8-12°) || 29 mm <br> 8-14 mm ''Engine deck'' |
| − | |||
| − | |||
|- | |- | ||
| − | + | | Turret || 132 mm (19°) ''Turret front'' <br> 140 mm (7-61°) ''Gun Mantlet''|| 95 mm (0-6°) ''Front''<br> 47 mm (2°) ''Middle'' <br> 30 mm ''Rear'' || 30 mm ''Border'' <br> 20 mm ''Hatch'' || 17 mm | |
|- | |- | ||
| − | | Cupola || 47 mm || 47 mm ''Right | + | | Cupola || 47 mm || 47 mm ''Right'' <br> 30 mm ''Left'' || 30 mm || 47 mm |
|- | |- | ||
|} | |} | ||
'''Notes:''' | '''Notes:''' | ||
| + | |||
* Suspension wheels are 20 mm thick while tracks are 30 mm thick. | * Suspension wheels are 20 mm thick while tracks are 30 mm thick. | ||
| + | * Turret sides are angled, causing inaccurate shots to bounce. | ||
=== Mobility === | === Mobility === | ||
| − | <!--''Write about the mobility of the ground vehicle. Estimate the specific power and | + | {{Specs-Tank-Mobility}} |
| − | + | <!-- ''Write about the mobility of the ground vehicle. Estimate the specific power and manoeuvrability, as well as the maximum speed forwards and backwards.'' --> | |
| − | + | The Conway possesses average mobility. The chassis is identical to that of the Centurion Mk 3 tank, but with a heavier turret, causing slightly worse mobility than the MBT. When stock, the Conway can be very sluggish, especially when driving uphill. With tracks, brakes and engine modules researched, it becomes mobile to an acceptable degree, but still not enough to be an ambusher. | |
| − | + | ||
| − | + | The Conway has a fair top speed, but shines significantly with its -12 km/h reverse speed, allowing the Conway to peak, fire and swiftly retreat into cover. | |
| − | + | ||
| − | + | {{tankMobility|abMinHp=902|rbMinHp=562}} | |
| − | + | ||
| − | + | === Modifications and economy === | |
| − | | | + | {{Specs-Economy}} |
| − | + | ||
| − | + | The first upgrades to research are "Parts" and "FPE" for increased survivability. Once you got these two, go for "Adjustment of Fire" and "Elevation Mechanism", since these modules increase the accuracy of the gun. | |
| − | |||
| − | |||
| − | |||
| − | |||
| − | |||
| − | |||
| − | |||
| − | |||
| − | |||
| − | |||
| − | |||
| − | |||
| − | |||
| − | |||
| − | |||
| − | |||
| − | |||
| − | |||
| − | |||
| − | |||
| − | |||
| − | |||
| − | |||
| − | |||
| − | |||
| − | |||
| − | |||
| − | |||
| − | |||
| − | |||
== Armaments == | == Armaments == | ||
| + | {{Specs-Tank-Armaments}} | ||
=== Main armament === | === Main armament === | ||
| − | <!--''Give the reader information about the characteristics of the main gun. Assess its effectiveness in a battle based on the reloading speed, ballistics and the power of shells. Do not forget about the | + | {{Specs-Tank-Weapon|1}} |
| − | {{main|L1A2 (120 mm)}} | + | <!-- ''Give the reader information about the characteristics of the main gun. Assess its effectiveness in a battle based on the reloading speed, ballistics and the power of shells. Do not forget about the flexibility of the fire, that is how quickly the cannon can be aimed at the target, open fire on it and aim at another enemy. Add a link to the main article on the gun: <code><nowiki>{{main|Name of the weapon}}</nowiki></code>. Describe in general terms the ammunition available for the main gun. Give advice on how to use them and how to fill the ammunition storage.'' --> |
| + | {{main|Ordnance QF Tk. L1A2 (120 mm)}} | ||
| + | The most notable attribute of the Conway is the 120 mm OQF Tk. L1A2 cannon. The gun is capable of firing devastating APDS rounds with over 300 mm of penetration, even beyond 2km, as well as slower HESH rounds useful for overpressurizing or indirect fire against entrenched targets. | ||
| − | + | Both ammunition types for the 120 mm cannon are available stock, and you will most of the time make use of the APDS round, as it is significantly superior in offensive capability compared to the more specialized HESH round (Which functions like HE on similar tanks). | |
| − | + | ||
| − | + | The Conway suffers from bad gun depression angles as well as a long reload time. If you do not take out your enemy in one shot, they have plenty of time to retreat before you've reloaded. | |
| − | + | ||
| − | + | {| class="wikitable" style="text-align:center" width="100%" | |
| − | |||
| − | |||
| − | |||
| − | |||
| − | |||
| − | |||
| − | |||
| − | |||
| − | |||
| − | |||
| − | |||
| − | |||
| − | |||
| − | |||
| − | |||
| − | |||
|- | |- | ||
| − | | | + | ! colspan="5" | [[Ordnance QF Tk. L1A2 (120 mm)|120 mm Ordnance QF Tk. L1A2]] || colspan="5" | Turret rotation speed (°/s) || colspan="4" | Reloading rate (seconds) |
|- | |- | ||
| − | ! | + | ! Mode !! Capacity !! Vertical !! Horizontal !! Stabilizer |
| + | ! Stock !! Upgraded !! Full !! Expert !! Aced | ||
| + | ! Stock !! Full !! Expert !! Aced | ||
|- | |- | ||
| − | ! | + | ! ''Arcade'' |
| − | + | | rowspan="2" | 20 || rowspan="2" | -5°/+10° || rowspan="2" | ±180° || rowspan="2" | N/A || 15.8 || 21.9 || 26.6 || 29.5 || 31.3 || rowspan="2" | 19.37 || rowspan="2" | 17.14 || rowspan="2" | 15.79 || rowspan="2" | 14.90 | |
| − | |||
| − | |||
|- | |- | ||
| − | | | + | ! ''Realistic'' |
| + | | 10.7 || 12.6 || 15.3 || 16.9 || 18.0 | ||
|- | |- | ||
|} | |} | ||
| − | + | ==== Ammunition ==== | |
| − | + | [[File:T26E5 Post-Pen Damage Conway Shot 1G.png|right|thumb|x200px|none|Shot 1G's post-pen damage after piercing T32E1's frontal plate.]] | |
| − | + | The Shot L1G is the primary round in the Conway's arsenal, which is capable of frontally piercing tanks like Tigers, [[IS-3]]s, [[T26E5]]s or even the [[Maus]] with ease. The round combines incredible shell velocity (around 1,500 m/s) and penetration against both flat and angled armor plates. The problem however comes with its post-penetration damage. As long as Conway faces well-armoured opponents from the front or rear the damage is usually enough to one-shot an enemy or at the very least incapacitate him from retaliating. | |
| − | | | + | |
| − | + | Things get tricky when faced against enemies who either don't have much armour or are sideways towards Conway. The amount of spalling caused by Shot L1G usually won't be enough to one-shot an enemy. | |
| − | + | [[File:Shell L1 2.png|left|thumb|x200px|none|Shell L1TK's performance against 5mm armored screens on Panzer IV H.]] | |
| − | + | ||
| − | + | Conway also has access to Shell L1TK, a HESH round, loaded with almost 4 kgs of HE. It has an average velocity and quite bad ballistic performance. The round's penetration may seem unsatisfactory at first, but because of the way in which HESH shells work, it is capable of going through many well-angled and even extremely-angled plates. However, due to the inconsistent performance of this shell, using it requires a lot of practice. While shooting at very lightly-armored target should usually result in its instant death, larger targets will cause problems. If the round lands in the center of the target the damage will be minuscule so it is advised to aim at unusual places, like the roofs or sides of the turrets. It is also important to take into account that HESH rounds are very ineffective against any kinds of armored screens or spaced armor. | |
| − | + | ||
| − | + | ||
| − | + | {{:Ordnance QF Tk. L1A2 (120 mm)/Ammunition|Shot L1G, Shell L1TK}} | |
| − | |||
| − | |||
| − | |||
| − | |||
| − | |||
| − | |||
| − | |||
| − | |||
| − | |||
| − | |||
| − | |||
| − | |||
| − | |||
| − | |||
| − | |||
| − | |||
| − | |||
| − | |||
| − | |||
| − | |||
| − | |||
| − | |||
| − | |||
| − | |||
| − | |||
| − | |||
| − | |||
| − | |||
| − | | Shot L1G | ||
| − | |||
| − | |||
| − | |||
| − | |||
| − | + | ==== [[Ammo racks]] ==== | |
| − | [[File: | + | [[File:Ammoracks_{{PAGENAME}}.png|right|thumb|x250px|[[Ammo racks]] of the {{PAGENAME}}]] |
| − | {| class="wikitable | + | <!-- '''Last updated: 2.5.1.138''' --> |
| + | {| class="wikitable" style="text-align:center" | ||
|- | |- | ||
| − | ! | + | ! Full<br>ammo |
| − | ! | + | ! Ammo<br>part |
| − | ! | + | ! 1st<br>rack empty |
| − | ! | + | ! 2nd<br>rack empty |
| − | ! | + | ! 3rd<br>rack empty |
| − | ! | + | ! 4th<br>rack empty |
| − | ! | + | ! Visual<br>discrepancy |
|- | |- | ||
| − | | '''20''' | | + | | '''20''' || ''Projectiles'' <br> ''Propellants'' || 18 ''(+2)'' <br> 20 ''(+0)'' || 17 ''(+3)'' <br> 14 ''(+6)'' || 5 ''(+15)'' <br> 5 ''(+15)''|| 1 ''(+19)'' <br> 1 ''(+19)'' || No |
|- | |- | ||
|} | |} | ||
| + | '''Notes''': | ||
| − | + | * The {{PAGENAME}} uses two-piece ammunition, composed of projectiles (yellow) and propellant bags (orange). Both have separate racks. | |
| + | * Projectile and propellant racks 4 are first-stage ammo racks. | ||
=== Machine guns === | === Machine guns === | ||
| − | <!--''Offensive and anti-aircraft machine guns not only allow you to fight some aircraft | + | {{Specs-Tank-Weapon|2}} |
| + | <!-- ''Offensive and anti-aircraft machine guns not only allow you to fight some aircraft but also are effective against lightly armoured vehicles. Evaluate machine guns and give recommendations on its use.'' --> | ||
{{main|L3A1 (7.62 mm)}} | {{main|L3A1 (7.62 mm)}} | ||
| − | {| class="wikitable" style="text-align:center" | + | {| class="wikitable" style="text-align:center" width="50%" |
| − | |||
| − | |||
|- | |- | ||
| − | ! colspan="7 | + | ! colspan="5" | [[L3A1 (7.62 mm)|7.62 mm L3A1]] |
|- | |- | ||
| − | ! | + | ! Mount !! Capacity (Belt) !! Fire rate !! Vertical !! Horizontal |
| − | ! | ||
| − | ! | ||
| − | ! | ||
|- | |- | ||
| − | | | + | | Coaxial || 3,750 (250) || 500 || N/A || N/A |
|- | |- | ||
|} | |} | ||
| − | == Usage in | + | == Usage in battles == |
| − | ''Describe the tactics of playing in the vehicle, the features of using vehicles in the team and advice on tactics. Refrain from creating a "guide" - do not impose a single point of view but give the reader food for thought. Describe the most dangerous enemies and give recommendations on fighting them. If necessary, note the specifics of the game in different modes (AB, RB, SB).'' | + | <!-- ''Describe the tactics of playing in the vehicle, the features of using vehicles in the team and advice on tactics. Refrain from creating a "guide" - do not impose a single point of view but instead give the reader food for thought. Describe the most dangerous enemies and give recommendations on fighting them. If necessary, note the specifics of the game in different modes (AB, RB, SB).'' --> |
| + | Conway's play style is not very different from that of the [[Object 120|Object 120 Taran]]. Both vehicles are quite large, making them large and easy to spot targets, with very powerful guns. The Conway's characteristics promotes the sniper play style, with the the incredible penetration and ballistic performance of the Shot L1G allowing the Conway to engage from extreme distances with relative ease. In order to maximise the post-penetration damage of the APDS round, it is usually advised to aim for the center of the target, otherwise the chance of destroying an enemy, with just one shot, drops dramatically. However, unlike the Taran, Conway's mobility is mediocre (except for the reverse speed) which, combined with the tank's size, make moving into sniping positions quite difficult, so it's important to watch your surroundings for any enemies trying to take you out. This also makes flanking very risky. | ||
| + | |||
| + | An often overlooked advantage that Conway has is its turret. The armour at around the gun breech is surprisingly sturdy, even being capable of stopping Russian BM-471D at point-blank range. This armor makes the Conway very good in hull-down positions in a downtier, provided you can hide the rest of the tank. However, most opponents at 7.3 BR will have access to HEAT ammunition, making your armour ineffective. | ||
| + | [[File:Conway Armour against BR-471D.png|right|thumb|none|x250px|BR-471D not capable of penetrating Conway's turret around the gun.]] | ||
| − | + | The height of the Conway is perhaps its biggest drawback, however it does make the use of the HESH round much easier. Because the Shell L1TK works well even against the most extremely angled plates, a viable, but quite difficult to pull off strategy would be to shoot the roofs of the enemy vehicles. This usually results in making the enemy unable to retaliate, or being overpressured and subsequently destroyed. The smaller the target, the higher the chance of overpressure happening. However, there are two limiting factor to this strategy. First is the rather long reload time, which even with aced crew takes around 15 seconds. Second factor is the ballistic performance of the HESH, which forces the player to engage people at close range to make aiming for weak surfaces easier. | |
| − | The | ||
=== Pros and cons === | === Pros and cons === | ||
| − | <!--'' | + | <!-- ''Summarise and briefly evaluate the vehicle in terms of its characteristics and combat effectiveness. Mark its pros and cons in a bulleted list. Try not to use more than 6 points for each of the characteristics. Avoid using categorical definitions such as "bad", "good" and the like - use substitutions with softer forms such as "inadequate" and "effective".'' --> |
| + | |||
'''Pros:''' | '''Pros:''' | ||
| − | * Very powerful 120 mm gun | + | |
| − | * | + | * Very powerful 120 mm gun |
| + | * Excellent long range support thanks to the high muzzle velocity of the APDS shells | ||
| + | * Large calibre APDS still often leads to one-shots | ||
| + | * High-penetration APDS rounds | ||
| + | |||
'''Cons:''' | '''Cons:''' | ||
| − | * | + | |
| + | * Unreliable armour profile | ||
| + | * Low mobility | ||
| + | * Tall profile | ||
| + | * Only carries a maximum of 20 shells | ||
* Long reload time | * Long reload time | ||
| − | * | + | * Insufficient gun depression |
| − | |||
== History == | == History == | ||
| − | <!--''Describe the history of the creation and combat usage of the | + | <!-- ''Describe the history of the creation and combat usage of the vehicle in more detail than in the introduction. If the historical reference turns out to be too long, take it to a separate article, taking a link to the article about the vehicle and adding a block "/History" (example: <nowiki>https://wiki.warthunder.com/(Vehicle-name)/History</nowiki>) and add a link to it here using the <code>main</code> template. Be sure to reference text and sources by using <code><nowiki><ref></ref></nowiki></code>, as well as adding them at the end of the article with <code><nowiki><references /></nowiki></code>. This section may also include the vehicle's dev blog entry (if applicable) and the in-game encyclopedia description (under <code><nowiki>=== In-game description ===</nowiki></code>, also if applicable).'' --> |
| − | When the [[Centurion | + | When the [[Centurion (Family)|Centurion]] tanks entered service in British service in 1945, the British didn't take into account the sudden appearance of the Soviet [[IS-3]]. The IS-3 tank showed the Western Allies needed to reconsider their tank inventories, which at the time the IS-3 was introduced only composed of mostly [[M4A3 (76) W|M4 Sherman]], [[M26]] Pershing, and Centurions. The British, recognizing the need for a bigger gun to fight the IS-3, started producing the [[Conqueror]]. However, development takes time and the Conqueror would not be ready until 1955. As an interim project until it is done, the British took a [[Centurion Mk 3]] tank and upgraded with a new turret made from rolled plate that can mount the 120 mm L1 gun, the same gun meant for the Conqueror. This vehicle, designated the FV4004 Conway was to have the heavy armament, yet the same manoeuvrability as the base Centurion. One of such vehicle was made in this matter before the whole thing was cancelled in 1951. The sole piece made is now stored at the Bovington Tank Museum. |
| − | Another attempt at this kind of mounting with the Centurion was the | + | Another attempt at this kind of mounting with the Centurion was the [[FV4005]], which was meant to be a tank destroyer with a larger 183 mm gun. The project started in 1951 and developed in July 1955. The gun was mounted in a similar fashion as the Conway on a lightly armoured turret. This was a limited production and by August 1957, the whole project was disassembled. The FV4005 also has survived in the Bovington Tank Museum. |
== Media == | == Media == | ||
| − | '' | + | <!-- ''Excellent additions to the article would be video guides, screenshots from the game, and photos.'' --> |
| − | + | ;Skins | |
| − | |||
| − | |||
| − | == | + | * [https://live.warthunder.com/feed/camouflages/?vehicle=uk_fv4004_conway Skins and camouflages for the {{PAGENAME}} from live.warthunder.com.] |
| − | ''Paste links to sources and external resources, such as:'' | + | |
| + | == See also == | ||
| + | ''Links to the articles on the War Thunder Wiki that you think will be useful for the reader, for example:'' | ||
| + | |||
| + | * ''reference to the series of the vehicles;'' | ||
| + | * ''links to approximate analogues of other nations and research trees.'' | ||
| + | |||
| + | == External links == | ||
| + | <!-- ''Paste links to sources and external resources, such as:'' | ||
* ''topic on the official game forum;'' | * ''topic on the official game forum;'' | ||
| − | * ''other literature.'' | + | * ''other literature.'' --> |
| + | |||
| + | * [[wt:en/devblog/current/872/|[Devblog] FV4004 Conway: IS Hunter]] | ||
| + | * [[Wikipedia:Centurion_(tank)#Fighting_Vehicle_numbers|[Wikipedia] Centurion (tank) - Fighting Vehicle numbers]] | ||
| + | {{TankManufacturer Department of Tank Design}} | ||
{{Britain tank destroyers}} | {{Britain tank destroyers}} | ||
Latest revision as of 16:30, 30 March 2024


Contents
Description
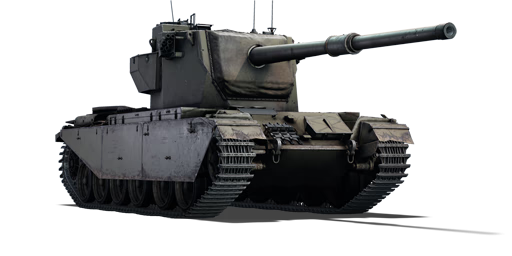
The FV4004 Conway is a rank IV British tank destroyer with a battle rating of 6.7 (AB) and 7.0 (RB/SB). It was introduced in Update 1.57 "Battle March". It is armed with a cannon developed to take on the heavy Soviet IS-3 tank. It excels in fighting the top-rank heavies.
The Conway plays similarly to the FV4005. It has sub-par armour on all sides and has a very large-calibre gun, able to penetrate everything it faces, severely damaging most. However the incredibly high-velocity APDS, fast turret traverse and short reload time differ distinctly from the FV4005. It can be played as an usual tank destroyer, excelling at it with its high velocity APDS rounds, sniping from a distance.
General info
Survivability and armour
The turret front can shrug off smaller calibre rounds at long range and is resistant to autocannon and HMGs, unlike the FV4005.
Armour type:
- Rolled homogeneous armour
- Cast homogeneous armour (Gun mantlet)
| Armour | Front | Sides | Rear | Roof |
|---|---|---|---|---|
| Hull | 76.2 mm (58°) Front glacis 76.2 mm (47-48°) Lower glacis |
50.8 (12°) + 6 mm | 38 mm (8-12°) | 29 mm 8-14 mm Engine deck |
| Turret | 132 mm (19°) Turret front 140 mm (7-61°) Gun Mantlet |
95 mm (0-6°) Front 47 mm (2°) Middle 30 mm Rear |
30 mm Border 20 mm Hatch |
17 mm |
| Cupola | 47 mm | 47 mm Right 30 mm Left |
30 mm | 47 mm |
Notes:
- Suspension wheels are 20 mm thick while tracks are 30 mm thick.
- Turret sides are angled, causing inaccurate shots to bounce.
Mobility
The Conway possesses average mobility. The chassis is identical to that of the Centurion Mk 3 tank, but with a heavier turret, causing slightly worse mobility than the MBT. When stock, the Conway can be very sluggish, especially when driving uphill. With tracks, brakes and engine modules researched, it becomes mobile to an acceptable degree, but still not enough to be an ambusher.
The Conway has a fair top speed, but shines significantly with its -12 km/h reverse speed, allowing the Conway to peak, fire and swiftly retreat into cover.
| Game Mode | Max Speed (km/h) | Weight (tons) | Engine power (horsepower) | Power-to-weight ratio (hp/ton) | |||
|---|---|---|---|---|---|---|---|
| Forward | Reverse | Stock | Upgraded | Stock | Upgraded | ||
| Arcade | 41 | 14 | 49.8 | 902 | 1,212 | 18.11 | 24.34 |
| Realistic | 38 | 13 | 562 | 635 | 11.29 | 12.75 | |
Modifications and economy
| Mobility | Protection | Firepower | ||||||||||||||||
|---|---|---|---|---|---|---|---|---|---|---|---|---|---|---|---|---|---|---|
|
|
|
The first upgrades to research are "Parts" and "FPE" for increased survivability. Once you got these two, go for "Adjustment of Fire" and "Elevation Mechanism", since these modules increase the accuracy of the gun.
Armaments
Main armament
The most notable attribute of the Conway is the 120 mm OQF Tk. L1A2 cannon. The gun is capable of firing devastating APDS rounds with over 300 mm of penetration, even beyond 2km, as well as slower HESH rounds useful for overpressurizing or indirect fire against entrenched targets.
Both ammunition types for the 120 mm cannon are available stock, and you will most of the time make use of the APDS round, as it is significantly superior in offensive capability compared to the more specialized HESH round (Which functions like HE on similar tanks).
The Conway suffers from bad gun depression angles as well as a long reload time. If you do not take out your enemy in one shot, they have plenty of time to retreat before you've reloaded.
| 120 mm Ordnance QF Tk. L1A2 | Turret rotation speed (°/s) | Reloading rate (seconds) | |||||||||||
|---|---|---|---|---|---|---|---|---|---|---|---|---|---|
| Mode | Capacity | Vertical | Horizontal | Stabilizer | Stock | Upgraded | Full | Expert | Aced | Stock | Full | Expert | Aced |
| Arcade | 20 | -5°/+10° | ±180° | N/A | 15.8 | 21.9 | 26.6 | 29.5 | 31.3 | 19.37 | 17.14 | 15.79 | 14.90 |
| Realistic | 10.7 | 12.6 | 15.3 | 16.9 | 18.0 | ||||||||
Ammunition

The Shot L1G is the primary round in the Conway's arsenal, which is capable of frontally piercing tanks like Tigers, IS-3s, T26E5s or even the Maus with ease. The round combines incredible shell velocity (around 1,500 m/s) and penetration against both flat and angled armor plates. The problem however comes with its post-penetration damage. As long as Conway faces well-armoured opponents from the front or rear the damage is usually enough to one-shot an enemy or at the very least incapacitate him from retaliating.
Things get tricky when faced against enemies who either don't have much armour or are sideways towards Conway. The amount of spalling caused by Shot L1G usually won't be enough to one-shot an enemy.

Conway also has access to Shell L1TK, a HESH round, loaded with almost 4 kgs of HE. It has an average velocity and quite bad ballistic performance. The round's penetration may seem unsatisfactory at first, but because of the way in which HESH shells work, it is capable of going through many well-angled and even extremely-angled plates. However, due to the inconsistent performance of this shell, using it requires a lot of practice. While shooting at very lightly-armored target should usually result in its instant death, larger targets will cause problems. If the round lands in the center of the target the damage will be minuscule so it is advised to aim at unusual places, like the roofs or sides of the turrets. It is also important to take into account that HESH rounds are very ineffective against any kinds of armored screens or spaced armor.
| Penetration statistics | |||||||
|---|---|---|---|---|---|---|---|
| Ammunition | Type of warhead |
Penetration @ 0° Angle of Attack (mm) | |||||
| 10 m | 100 m | 500 m | 1,000 m | 1,500 m | 2,000 m | ||
| Shot L1G | APDS | 487 | 482 | 460 | 434 | 410 | 386 |
| Shell L1TK | HESH | 152 | 152 | 152 | 152 | 152 | 152 |
| Shell details | ||||||||||||
|---|---|---|---|---|---|---|---|---|---|---|---|---|
| Ammunition | Type of warhead |
Velocity (m/s) |
Projectile mass (kg) |
Fuse delay (m) |
Fuse sensitivity (mm) |
Explosive mass (TNT equivalent) (kg) |
Ricochet | |||||
| 0% | 50% | 100% | ||||||||||
| Shot L1G | APDS | 1,463 | 6.37 | - | - | - | 75° | 78° | 80° | |||
| Shell L1TK | HESH | 792 | 15.87 | 0.1 | 4 | 3.97 | 73° | 77° | 80° | |||
Ammo racks

| Full ammo |
Ammo part |
1st rack empty |
2nd rack empty |
3rd rack empty |
4th rack empty |
Visual discrepancy |
|---|---|---|---|---|---|---|
| 20 | Projectiles Propellants |
18 (+2) 20 (+0) |
17 (+3) 14 (+6) |
5 (+15) 5 (+15) |
1 (+19) 1 (+19) |
No |
Notes:
- The Conway uses two-piece ammunition, composed of projectiles (yellow) and propellant bags (orange). Both have separate racks.
- Projectile and propellant racks 4 are first-stage ammo racks.
Machine guns
| 7.62 mm L3A1 | ||||
|---|---|---|---|---|
| Mount | Capacity (Belt) | Fire rate | Vertical | Horizontal |
| Coaxial | 3,750 (250) | 500 | N/A | N/A |
Usage in battles
Conway's play style is not very different from that of the Object 120 Taran. Both vehicles are quite large, making them large and easy to spot targets, with very powerful guns. The Conway's characteristics promotes the sniper play style, with the the incredible penetration and ballistic performance of the Shot L1G allowing the Conway to engage from extreme distances with relative ease. In order to maximise the post-penetration damage of the APDS round, it is usually advised to aim for the center of the target, otherwise the chance of destroying an enemy, with just one shot, drops dramatically. However, unlike the Taran, Conway's mobility is mediocre (except for the reverse speed) which, combined with the tank's size, make moving into sniping positions quite difficult, so it's important to watch your surroundings for any enemies trying to take you out. This also makes flanking very risky.
An often overlooked advantage that Conway has is its turret. The armour at around the gun breech is surprisingly sturdy, even being capable of stopping Russian BM-471D at point-blank range. This armor makes the Conway very good in hull-down positions in a downtier, provided you can hide the rest of the tank. However, most opponents at 7.3 BR will have access to HEAT ammunition, making your armour ineffective.

The height of the Conway is perhaps its biggest drawback, however it does make the use of the HESH round much easier. Because the Shell L1TK works well even against the most extremely angled plates, a viable, but quite difficult to pull off strategy would be to shoot the roofs of the enemy vehicles. This usually results in making the enemy unable to retaliate, or being overpressured and subsequently destroyed. The smaller the target, the higher the chance of overpressure happening. However, there are two limiting factor to this strategy. First is the rather long reload time, which even with aced crew takes around 15 seconds. Second factor is the ballistic performance of the HESH, which forces the player to engage people at close range to make aiming for weak surfaces easier.
Pros and cons
Pros:
- Very powerful 120 mm gun
- Excellent long range support thanks to the high muzzle velocity of the APDS shells
- Large calibre APDS still often leads to one-shots
- High-penetration APDS rounds
Cons:
- Unreliable armour profile
- Low mobility
- Tall profile
- Only carries a maximum of 20 shells
- Long reload time
- Insufficient gun depression
History
When the Centurion tanks entered service in British service in 1945, the British didn't take into account the sudden appearance of the Soviet IS-3. The IS-3 tank showed the Western Allies needed to reconsider their tank inventories, which at the time the IS-3 was introduced only composed of mostly M4 Sherman, M26 Pershing, and Centurions. The British, recognizing the need for a bigger gun to fight the IS-3, started producing the Conqueror. However, development takes time and the Conqueror would not be ready until 1955. As an interim project until it is done, the British took a Centurion Mk 3 tank and upgraded with a new turret made from rolled plate that can mount the 120 mm L1 gun, the same gun meant for the Conqueror. This vehicle, designated the FV4004 Conway was to have the heavy armament, yet the same manoeuvrability as the base Centurion. One of such vehicle was made in this matter before the whole thing was cancelled in 1951. The sole piece made is now stored at the Bovington Tank Museum.
Another attempt at this kind of mounting with the Centurion was the FV4005, which was meant to be a tank destroyer with a larger 183 mm gun. The project started in 1951 and developed in July 1955. The gun was mounted in a similar fashion as the Conway on a lightly armoured turret. This was a limited production and by August 1957, the whole project was disassembled. The FV4005 also has survived in the Bovington Tank Museum.
Media
- Skins
See also
Links to the articles on the War Thunder Wiki that you think will be useful for the reader, for example:
- reference to the series of the vehicles;
- links to approximate analogues of other nations and research trees.
External links
| Department of Tank Design | |
|---|---|
| Medium Tanks | |
| Sherman Firefly | Sherman Firefly · Sherman IC "Trzyniec" |
| MBTs | |
| Centurion | Centurion Mk 1 · Centurion Mk.2 · Centurion Mk 3 · Centurion Action X · Centurion Mk.5 AVRE · Centurion Mk 10 |
| Challenger* | Challenger Mk.2 · Challenger Mk.3 · Challenger DS |
| Tank Destroyers | |
| Achilles | Achilles · Achilles (65 Rg.) |
| Centurion-based | Conway · FV4005 |
| Export | |
| Sherman Firefly | Sherman Ic · ▄Sherman Vc |
| Centurion | Centurion Mk.5/1 · Strv 81 · Strv 81 (RB 52) · ▄Strv 81 (RB 52) · Strv 101 · Strv 104** · Strv 105** · Sho't |
| See also | US Ordnance Department · Israeli Ordnance Corps · Vickers-Armstrongs Limited |
| *By successor, the Military Vehicles and Engineering Establishment | |
| **Swedish modernizations incorporating innovations from the Israeli Sho't Kals. | |
| Britain tank destroyers | |
|---|---|
| Infantry tank derivatives | Archer · Gun Carrier (3-in) |
| Light tank derivatives | Alecto I |
| M10 Achilles | Achilles · Achilles (65 Rg.) |
| Centurion derivatives | FV4005 · Conway |
| ATGM | Swingfire · Striker |
| Other | Tortoise · ▄M109A1 |
| Canada | QF 3.7 Ram · ADATS (M113) |
| South Africa | G6 · ZT3A2 |
