Difference between pages "Churchill I" and "S.81"
Inceptor57 (talk | contribs) m (→Ammunition) |
(Added tables and basic info.) |
||
| Line 1: | Line 1: | ||
| − | {{Specs-Card|code= | + | {{Specs-Card|code=s_81_ar125}} |
== Description == | == Description == | ||
| − | <!--''In the description, the first part needs to be about the history of the creation and combat usage of the | + | <!--''In the description, the first part needs to be about the history of and the creation and combat usage of the aircraft, as well as its key features. In the second part, tell the reader about the aircraft in the game. Insert screenshot of the vehicle. If the novice player does not remember the vehicle by name, he will immediately understand what kind of vehicle it is talking about.''--> |
| − | [[File: | + | |
| + | [[File:GarageImage_{{PAGENAME}}.jpg|420px|thumb|left]] | ||
{{break}} | {{break}} | ||
| − | The ''' | + | The '''{{Specs|name}}''' is a Rank {{Specs|rank}} Italian bomber {{Battle-rating|1}}. It was introduced in [[Update 1.71 "New E.R.A"]]. |
| − | The | + | The S.81 is distinctive with its three engines, two on the wings and one in the nose. This provides a level of redundancy with the nose engine unlikely to be disabled except from a head-on or a diving attack. Although, each engine is less powerful than contemporaries on other aircraft so each engine loss will heavily impact the aircraft's speed, causing it to lose altitude. Losing one engine on the wing would also cause the aircraft to start rolling over to the weakened end. |
| − | The | + | The plane in its default state is covered in a light green paint with black splotches around to break up the solid figure. A huge white band stretch out at the mid-section of the fuselage, right around the beam turrets, which could serve as reference points for enemies to knockout the beam and ventral turret gunners. On the tail's vertical stabilizer, a large white cross is also present with the logo of the ''Regia Aeronautica'' in the upper center point of the paint. On the wings, the ''Regia Aeronautica'' roundels were also present to make the vehicle certainly belonging to the Italian tech tree. |
| + | |||
| + | Three types of turrets are available on the S.81, a dorsal turret on top, a ventral turret on the bottom, and two beam turrets for both sides of the fuselage. All the turrets provide excellent arc of fires on their sectors, with mutual machine gun fire from more than one turret able to be met in most areas. Unfortunately, all the turrets used a 7.7 mm machine gun and while sustained fire could cause sufficient damage, they lack the quick stopping power needed to prevent fighters from strafing the bomber, and taking down enemy fighters quickly is crucial as the S.81 lacks any sort of armour for itself and the crew except self-sealing fuel tanks. Enemy machine gun fire will quickly go through, damaging modules and crew members. | ||
== General info == | == General info == | ||
| − | === | + | === Flight Performance === |
| − | <!--''Describe | + | <!--''Describe how the aircraft behaves in the air. Maximum speed, maneuverability, speed and allowable loads - these are the most important characteristics of the vehicle.''--> |
| − | |||
| − | |||
| − | |||
| − | |||
| − | |||
| − | |||
| − | |||
| − | |||
| − | |||
| − | |||
| − | |||
| − | |||
| − | |||
| − | |||
| − | |||
| − | |||
| − | |||
| − | |||
| − | |||
| − | |||
{| class="wikitable" style="text-align:center" | {| class="wikitable" style="text-align:center" | ||
|- | |- | ||
| − | !colspan=" | + | ! colspan="8" | Characteristics |
| − | |||
| − | |||
| − | |||
| − | |||
|- | |- | ||
| − | + | ! colspan="8" | ''Stock'' | |
|- | |- | ||
| − | | | + | ! colspan="2" | Max Speed<br>(km/h at 4,000 m) |
| + | ! rowspan="2" | Max altitude<br>(meters) | ||
| + | ! colspan="2" | Turn time<br>(seconds) | ||
| + | ! colspan="2" | Rate of climb<br>(meters/second) | ||
| + | ! rowspan="2" |Take-off run<br>(meters) | ||
|- | |- | ||
| − | ! | + | ! AB |
| + | ! RB | ||
| + | ! AB | ||
| + | ! RB | ||
| + | ! AB | ||
| + | ! RB | ||
|- | |- | ||
| − | + | | 314 || 310 || 6,800 || 30.5 || 31.3 || 2.9 || 3.9 || 450 | |
| − | |||
| − | |||
|- | |- | ||
| − | |'' | + | ! colspan="8" | ''Upgraded'' |
| − | |||
| − | |||
|- | |- | ||
| − | | | + | ! colspan="2" | Max Speed<br>(km/h at 4,000 m) |
| − | | | + | ! rowspan="2" |Max altitude (meters) |
| − | | | + | ! colspan="2" | Turn time (seconds) |
| + | ! colspan="2" | Rate of climb<br>(meters/second) | ||
| + | ! rowspan="2" |Take-off run (meters) | ||
|- | |- | ||
| − | ! | + | ! AB |
| + | ! RB | ||
| + | ! AB | ||
| + | ! RB | ||
| + | ! AB | ||
| + | ! RB | ||
|- | |- | ||
| − | + | | 356 || 335 || 6,800 || 27.6 || 29.0 || 11.2 || 6.3 || 450 | |
| − | |||
| − | |||
| − | | | ||
| − | | | ||
| − | | | ||
| − | | | ||
| − | | | ||
| − | | | ||
| − | | | ||
| − | | | ||
|- | |- | ||
|} | |} | ||
| − | == | + | ====Details==== |
| − | === | ||
| − | |||
| − | |||
| − | |||
{| class="wikitable" style="text-align:center" | {| class="wikitable" style="text-align:center" | ||
|- | |- | ||
| − | ! colspan=" | + | ! colspan="5" | Features |
| − | |||
| − | |||
| − | |||
| − | |||
| − | |||
| − | |||
| − | |||
| − | |||
| − | |||
| − | |||
| − | |||
| − | |||
| − | |||
| − | |||
| − | |||
| − | |||
| − | |||
| − | |||
| − | |||
| − | |||
|- | |- | ||
| − | ! | + | ! Combat flap |
| + | ! Take-off flap | ||
| + | ! Landing flap | ||
| + | ! Air brakes | ||
| + | ! Arrestor gear | ||
|- | |- | ||
| − | + | | X || X || X || X || X <!-- ✓ --> | |
| − | |||
| − | |||
| − | |||
| − | | | ||
| − | | | ||
|- | |- | ||
|} | |} | ||
| − | + | {| class="wikitable" style="text-align:center" | |
| − | {| class="wikitable | ||
| − | |||
|- | |- | ||
| − | + | ! colspan="5" | Limits | |
| − | |||
| − | ! colspan=" | ||
|- | |- | ||
| − | ! | + | ! rowspan="2" | Wing-break speed<br>(km/h) |
| − | ! | + | ! rowspan="2" | Gear limit<br>(km/h) |
| − | ! | + | ! rowspan="2" | Combat flap<br> (km/h) |
| − | ! | + | ! colspan="2" | Max Static G |
| − | |||
| − | |||
|- | |- | ||
| − | + | ! + | |
| + | ! - | ||
|- | |- | ||
| − | | | + | | ??? || ??? || ??? || ~?? || ~? |
|- | |- | ||
|} | |} | ||
| − | {| class="wikitable | + | |
| − | + | {| class="wikitable" style="text-align:center" | |
| − | |||
| − | |||
| − | |||
| − | |||
| − | |||
| − | |||
| − | |||
| − | |||
| − | |||
| − | |||
| − | |||
| − | |||
|- | |- | ||
| − | ! | + | ! colspan="4" | Optimal velocities |
| − | |||
| − | |||
| − | |||
| − | |||
| − | |||
| − | |||
| − | |||
| − | |||
| − | |||
| − | |||
| − | |||
|- | |- | ||
| − | ! | + | ! Ailerons<br>(km/h) |
| − | + | ! Rudder<br>(km/h) | |
| − | ! | + | ! Elevators<br>(km/h) |
| − | + | ! Radiator<br>(km/h) | |
| − | |||
| − | ! | ||
| − | |||
| − | ! | ||
| − | |||
|- | |- | ||
| − | || | + | | < ??? || < ??? || < ??? || > ??? |
|- | |- | ||
|} | |} | ||
| − | |||
| − | |||
| − | |||
| − | |||
| − | |||
| − | |||
{| class="wikitable" style="text-align:center" | {| class="wikitable" style="text-align:center" | ||
|- | |- | ||
| − | ! colspan=" | + | ! colspan="3" | Compressor (RB/SB) |
|- | |- | ||
| − | ! colspan="3 | + | ! colspan="3" | Setting 1 |
| − | |||
| − | |||
| − | |||
|- | |- | ||
| − | + | ! Optimal altitude | |
| + | ! 100% Engine power | ||
| + | ! WEP Engine power | ||
|- | |- | ||
| − | + | | ?,??? m || ??? hp || ?,??? hp | |
|- | |- | ||
| − | ! | + | <!--! colspan="3" | Setting 2 |
| − | |||
| − | |||
| − | |||
| − | |||
| − | ! | ||
|- | |- | ||
| − | + | ! Optimal altitude | |
| + | ! 100% Engine power | ||
| + | ! WEP Engine power | ||
|- | |- | ||
| − | | | + | | ?,??? m || ?,??? hp || ?,??? hp |
|- | |- | ||
| − | ! colspan=" | + | ! colspan="3" | Setting 3 |
|- | |- | ||
| − | ! | + | ! Optimal altitude |
| − | ! | + | ! 100% Engine power |
| − | ! | + | ! WEP Engine power |
| − | |||
| − | |||
| − | |||
|- | |- | ||
| + | | ?,??? m || ?,??? hp || ?,??? hp | ||
| + | |- --> | ||
|} | |} | ||
| − | ===== | + | === Survivability and armour === |
| − | + | <!--''Examine the survivability of the aircraft. Note how vulnerable the structure is and how secure the pilot is, whether the fuel tanks are armoured. Describe the armour, if there is any, also mention the vulnerability of other critical aircraft systems.''--> | |
| − | + | * No armour plating | |
| − | |- | + | * No armour glazing |
| − | + | * Critical components located at front of aircraft (fuel, pilot, engine, controls) | |
| − | + | * More fuel tanks located in wings near fuselage | |
| − | ! | + | |
| − | + | == Armaments == | |
| − | + | <!--=== Offensive armament === | |
| − | + | ''Describe the offensive armament of the aircraft, if any. Describe how effective the cannons and machine guns are in a battle, and also what belts or drums are better to use. If there is no offensive weaponry, delete this subsection.'' | |
| − | + | {{main|MAC 1934 (7.5 mm)}} | |
| − | + | ||
| − | + | The '''''{{PAGENAME}}''''' is armed with: | |
| − | ! | + | |
| − | + | * 4 x 7.5 mm [[MAC 1934 (7.5 mm)|MAC 1934]] machine guns (300 rpg = 1,200 total) | |
| − | + | ||
| − | |- | + | The four machine guns are arranged in bundles of two mounted on the underside of the upper wing. Each are armed with the same amount of ammunition, which means that all guns will fire with each other until empty.--> |
| − | |} | + | === Suspended armament === |
| − | { | + | <!--''Describe the aircraft's suspended armament: additional cannons under the wings, bombs, rockets and torpedoes. This section is especially important for bombers and attackers. If there is no suspended weaponry remove this subsection.''--> |
| − | + | ''Main article: '''[[:Category:Suspended armaments|Bombs]]''''' | |
| − | + | ||
| − | + | The '''''{{PAGENAME}}''''' can be outfitted with the following ordinance: | |
| − | + | ||
| − | + | * 28 x 50 kg GP 50 bombs (1,400 kg total) | |
| − | + | * 16 x 100 kg GP 100 bombs (1,600 kg total) | |
| − | ! | + | * 4 x 250 kg GP 250 bombs (1,000 kg total) |
| − | ''in | + | * 4 x 500 kg GP 500 bombs (2,000 kg total) |
| − | + | ||
| − | + | === Defensive armament === | |
| − | + | <!--''Defensive armament with turret machine guns or cannons, crewed by gunners. Examine the number of gunners and what belts or drums are better to use. If defensive weaponry is not available remove this subsection.''--> | |
| − | + | {{main|Breda-SAFAT da 7.7 mm (7.7 mm)|Lewis (7.7 mm)}} | |
| − | + | ||
| + | The '''''{{PAGENAME}}''''' is defended by: | ||
| + | |||
| + | * 2 x 7.7 mm Breda-SAFAT machine gun, dorsal turret (500 rpg = 1,000 total) | ||
| + | * 2 x 7.7 mm Breda-SAFAT machine gun, ventral turret (500 rpg = 1,000 total) | ||
| + | * 1 x 7.7 mm Lewis machine gun, left beam turret (500 rpg) | ||
| + | * 1 x 7.7 mm Lewis machine gun, right beam turret (500 rpg) | ||
| + | |||
| + | == Usage in the battles == | ||
| + | <!--''Describe the tactics of playing in an aircraft, the features of using vehicles in a team and advice on tactics. Refrain from creating a "guide" - do not impose a single point of view but give the reader food for thought. Examine the most dangerous enemies and give recommendations on fighting them. If necessary, note the specifics of the game in different modes (AB, RB, SB).''--> | ||
| + | When flying the S.81 there are 2 payloads that are recommended 16 x 100 kg for ground strike against enemy vehicles or 4 x 500 kg for bombing bases. Always try to avoid enemy fighter aircraft as rifle caliber machine guns will shred this plane very easily. | ||
| + | |||
| + | The primary enemy of the S.81 is any fighter as it can be easily destroyed by rifle caliber machine gun fire, with sustained fire able to ignite the fuel or engine and cause a fire that could potentially burn down the aircraft. | ||
| + | |||
| + | ===Manual Engine Control=== | ||
| + | {| class="wikitable" style="text-align:center" | ||
|- | |- | ||
| − | ! | + | ! colspan="7" | MEC elements |
| − | |||
| − | |||
|- | |- | ||
| − | | | + | ! rowspan="2" |Mixer |
| + | ! rowspan="2" |Pitch | ||
| + | ! colspan="3" |Radiator | ||
| + | ! rowspan="2" |Supercharger | ||
| + | ! rowspan="2" |Turbocharger | ||
|- | |- | ||
| − | + | ! Oil | |
| − | + | ! Water | |
| − | ! | + | ! Type |
|- | |- | ||
| − | + | | Controllable || rowspan="2" | Not controllable || rowspan="2" | Not controllable || rowspan="2" | Not controllable || rowspan="2" | Separate || rowspan="2" | Not ontrollable || rowspan="2" | Not controllable | |
| − | |||
| − | |||
| − | |||
| − | |||
| − | |||
| − | |||
| − | | | ||
| − | | | ||
|- | |- | ||
|} | |} | ||
| − | === | + | ===Modules=== |
| − | + | {| class="wikitable" | |
| − | {| class="wikitable | + | !colspan = "1"| Tier |
| − | + | !colspan = "2"| Flight performance | |
| − | ! | + | !colspan = "1"| Survivability |
| − | ! | + | !colspan = "2"| Weaponry |
| − | ! | ||
| − | ! | ||
| − | |||
| − | |||
| − | |||
| − | |||
| − | |||
| − | |||
| − | |||
| − | |||
| − | |||
| − | |||
| − | |||
| − | |||
| − | |||
| − | |||
| − | |||
|- | |- | ||
| − | + | | I | |
| + | | Fuselage Repair | ||
| + | | Radiator | ||
| + | | | ||
| + | | | ||
|- | |- | ||
| − | + | | II | |
| + | | | ||
| + | | Compressor | ||
| + | | Airframe | ||
| + | | | ||
|- | |- | ||
| − | + | | III | |
| − | + | | Wings Repair | |
| − | + | | Engine | |
| − | + | | | |
| + | | | ||
|- | |- | ||
| − | | | + | | IV |
| + | | | ||
| + | | Engine Injection | ||
| + | | Cover | ||
| + | | | ||
|- | |- | ||
|} | |} | ||
| + | * When grinding this plane for improvements and modules, focus on the payload first, then the plane performance. Ignore the defensive firepower upgrades as the defensive firepower upgraded is still extremely weak until its the last upgrades you have to get. | ||
| + | === Pros and cons === | ||
| + | <!--''Summarize and briefly evaluate the vehicle in terms of its characteristics and combat effectiveness. Mark its pros and cons in the bulleted list. Do not use more than 6 points for each of the characteristics. Avoid using categorical definitions such as "bad", "good" and the like - they have a substitution in the form of softer "inadequate", "effective".''--> | ||
| − | + | '''Pros:''' | |
| − | + | * Decent payload, can hold large numbers of 50 kg bombs | |
| − | + | * Machine gun turrets can reach all sides of the bomber | |
| − | |||
| − | |||
| − | |||
| − | |||
| − | |||
| − | |||
| − | |||
| − | |||
| − | |||
| − | |||
| − | |||
| − | |||
| − | |||
| − | |||
| − | |||
| − | |||
| − | |||
| − | |||
| − | |||
| − | |||
'''Cons:''' | '''Cons:''' | ||
| − | * | + | * Slow and sluggish |
| − | * | + | * No armour or bulletproof glass for protection |
| − | * | + | * Abysmal defensive firepower |
| − | * | + | * Loss of a single engine will hamper the plane's ability to stay in the air |
| − | + | * Low maximum altitude | |
| − | |||
| − | |||
| − | |||
| − | |||
| − | |||
| − | * | ||
| − | |||
| − | |||
== History == | == History == | ||
| − | <!--''Describe the history of the creation and combat usage of the | + | <!--''Describe the history of the creation and combat usage of the aircraft in more detail than in the introduction. If the historical reference turns out to be too big, take it to a separate article, taking a link to an article about the vehicle and adding a block "/ historical reference" (example: https://wiki.warthunder.com/Name-vehicles/historical reference) and add a link to it here using the <code>main</code> template. Be sure to include links to sources at the end of the article.''--> |
| − | + | Under the need to have an aircraft capable reaching the far reaches of the Italian colonies in Africa, a project was made to develop an aircraft able to suit the Regia Aeronautica. Approaching manufacturer Savoia-Marchetti, chief designer Alessandro Marchetti developed the aircraft based on the Savoia's SM.73 airliner and militarized the vehicle for its intended use.<ref name="MFS.81">Military Factory 2017</ref> The first prototype was built and flown in early 1935, approximately six months after the SM.73 debuted.<ref name="CenturyS.81">Century of Flight 2007</ref> This aircraft was then known as the '''SM.81 "Pipistrello"''' ('''"Bat"'''). The aircraft was accepted for service in the same year with mass-production slated, with different engines used throughout the production life. 534 SM.81 would be produced in the time span between 1935 to 1944.<ref name="MurphyS.81">Murphy 2009</ref> | |
| − | |||
| − | + | ===Combat usage=== | |
| + | At its inception, the SM.81 was considered one of the better medium bombers of the era with its top speed of 211 miles, long range of 1,336 miles, well armed with six machine gun positions and able to carry a payload of up to 2,205 lbs.<ref name="MurphyS.81"/> The SM.81 found a versatile use on the battlefield, being used in a transport, bombing, ground attack, and a reconnaissance role, ensuring its relevancy even later in the war. One was procured by Benito Mussolini to be used as his private aircraft, the aircraft being nicknamed "Taratuga" ("Turtle") for its sluggish speed. | ||
| − | The | + | The SM.81 were first used in the Second Italo-Ethiopian War (also known as the Second Italo-Abyssinian War), lasting from 03 October 1935 to May 1936, quickly putting the SM.81 into action. Their versatile performed well in their support of the Italian troops, culminating with the annexation of Ethiopia into Italy's East African colonies. The SM.81 saw use again in the Spanish Civil War to aid the Spanish Nationalists in the Aviazione Legionaria, where they were used to the same degree as in Ethiopia. Though 12 were sent on a 705 mile flight on 29 July 1936 to Spanish-controlled Morocco, complexity in the flight had only nine arrive. These nine bombers provided a great asset in the Strait of Gibraltar as more aircraft arrived, keeping the Spanish Republican's Navy at bay. As the Nationalists push closer to Madrid, the SM.81, working alongside the German Condor Legion, bombed the Spanish capital almost daily. Though the SM.81 sometimes flew with escorting [[C.R.32]] biplanes, flying unescorted with tight formations was also possible due to the mutual machine gun protection with each other.<ref name="SmithS.81">Smith 2011</ref> However, when Soviet [[I-15_M-22|I-15]] and [[I-16type5|I-16]] appeared, flights started to be conducted at night to avoid losing precious bombers. When Italy left Spain at the conclusion of the war, around 64 SM.81 was left behind for the Spanish Air Force. |
| − | = | + | By the outbreak of World War II, the SM.81 was showing its age, though 300 units still remained in the Regia Aeronautica's inventory.<ref name="MFS.81"/> With the faster and more powerful [[SM.79Sparviero_(1936)_IT|SM.79]] beginning to see service in 1936, the SM.81's roles was supplemented. The SM.81 still saw service in secondary roles and so deliveries still continued. It was used in the African theater as the main bomber against British forces in East Africa, but British [[Gladiator_Mk_II|Gladiators]] and [[Hurricane_Mk_IIB|Hurricanes]] posed a major threat. Due to this the SM.81 was relegated as a night bomber in North Africa, with the darkness as cover against the enemy fighters. 80 SM.81 were also produced into a dedicated transport aircraft, known as ''SM.81T'', which proved vital in transporting troops and material to Rommel's Afrika Korps.<ref name="MurphyS.81"/> |
| − | |||
| − | + | Even after Italy's surrender to Allied forces in September 1943, the SM.81 still saw service in North Italy's Aeronautica Nazionale Repubblicana and South Italy's Aviazione Cobelligerante Italiana. Though South Italy soon removed them from service, North Italy used them until the end of the war.<ref name="MFS.81"/> In the conclusion of World War II, several SM.81 were still in service with the post-war Aeronautica Militare Italiana, sticking around until 1950 when they were all officially retired. | |
| − | |||
| − | + | ===Other developments=== | |
| + | Two main variants of the SM.81 existed, the SM.81 as a bomber/transport variant and the SM.81T as a dedicated transport aircraft, both using various engines as propulsion. A project was done known as the ''SM.81B'', which used a two-engine configuration. This provided inadequate performance compared to the three-engine configurations and so the project was discontinued. | ||
| − | + | Though the SM.81 saw use in the various Italian air forces and in Spain, three were also sent to the Chinese Nationalist forces, arriving at an unknown date. However, all three samples were destroyed in training exercises in early 1938.<ref name="MFS.81"/> | |
| − | |||
| − | |||
| − | |||
| − | |||
== Media == | == Media == | ||
| Line 377: | Line 264: | ||
== Read also == | == Read also == | ||
| − | * | + | ''Links to the articles on the War Thunder Wiki that you think will be useful for the reader, for example,'' |
| + | * ''reference to the series of the aircraft;'' | ||
| + | * ''links to approximate analogues of other nations and research trees.'' | ||
| + | <!--''ETC.''--> | ||
== Sources == | == Sources == | ||
| − | ''Paste links to sources and external resources, such as:'' | + | <!--''Paste links to sources and external resources, such as:'' |
* ''topic on the official game forum;'' | * ''topic on the official game forum;'' | ||
| − | * ''other literature.'' | + | * ''page on aircraft encyclopedia;'' |
| + | * ''other literature.''--> | ||
| + | * Century of Flight. "Savoia Marchetti S.M.81 Pipistrello." Italian Aircraft of World War Two, 11 Nov 2007, [http://www.century-of-flight.net/Aviation%20history/photo_albums/timeline/ww2/Savoia%20Marchetti.htm#r Website]. | ||
| + | * Military Factory. "Savoia-Marchetti SM.81 Pipistrello (Bat) Medium Bomber / Transport Aircraft." Military Factory, 31 May 2017, [http://www.militaryfactory.com/aircraft/detail.asp?aircraft_id=811 Website]. | ||
| + | * Murphy, Justin D., and Matthew A. McNiece. Military Aircraft, 1919-1945: an Illustrated History of Their Impact. ABC-CLIO, 2009. | ||
| + | * Smith, Richard K., and R. Cargill. Hall. Five down, No Glory: Frank G. Tinker, Mercenary Ace in the Spanish Civil War. Naval Institute Press, 2011. | ||
| + | |||
| − | {{ | + | {{Italian bombers}} |
Revision as of 12:06, 13 December 2018
Contents
Description

The S.81 is a Rank I Italian bomber
with a battle rating of 1.3 (AB/RB/SB). It was introduced in Update 1.71 "New E.R.A".
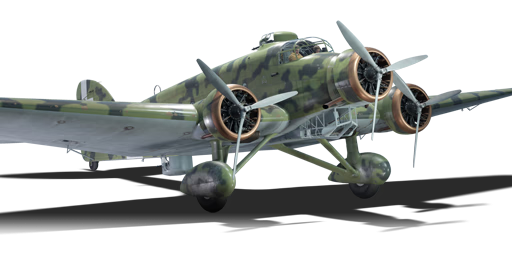
The S.81 is distinctive with its three engines, two on the wings and one in the nose. This provides a level of redundancy with the nose engine unlikely to be disabled except from a head-on or a diving attack. Although, each engine is less powerful than contemporaries on other aircraft so each engine loss will heavily impact the aircraft's speed, causing it to lose altitude. Losing one engine on the wing would also cause the aircraft to start rolling over to the weakened end.
The plane in its default state is covered in a light green paint with black splotches around to break up the solid figure. A huge white band stretch out at the mid-section of the fuselage, right around the beam turrets, which could serve as reference points for enemies to knockout the beam and ventral turret gunners. On the tail's vertical stabilizer, a large white cross is also present with the logo of the Regia Aeronautica in the upper center point of the paint. On the wings, the Regia Aeronautica roundels were also present to make the vehicle certainly belonging to the Italian tech tree.
Three types of turrets are available on the S.81, a dorsal turret on top, a ventral turret on the bottom, and two beam turrets for both sides of the fuselage. All the turrets provide excellent arc of fires on their sectors, with mutual machine gun fire from more than one turret able to be met in most areas. Unfortunately, all the turrets used a 7.7 mm machine gun and while sustained fire could cause sufficient damage, they lack the quick stopping power needed to prevent fighters from strafing the bomber, and taking down enemy fighters quickly is crucial as the S.81 lacks any sort of armour for itself and the crew except self-sealing fuel tanks. Enemy machine gun fire will quickly go through, damaging modules and crew members.
General info
Flight Performance
| Characteristics | |||||||
|---|---|---|---|---|---|---|---|
| Stock | |||||||
| Max Speed (km/h at 4,000 m) |
Max altitude (meters) |
Turn time (seconds) |
Rate of climb (meters/second) |
Take-off run (meters) | |||
| AB | RB | AB | RB | AB | RB | ||
| 314 | 310 | 6,800 | 30.5 | 31.3 | 2.9 | 3.9 | 450 |
| Upgraded | |||||||
| Max Speed (km/h at 4,000 m) |
Max altitude (meters) | Turn time (seconds) | Rate of climb (meters/second) |
Take-off run (meters) | |||
| AB | RB | AB | RB | AB | RB | ||
| 356 | 335 | 6,800 | 27.6 | 29.0 | 11.2 | 6.3 | 450 |
Details
| Features | ||||
|---|---|---|---|---|
| Combat flap | Take-off flap | Landing flap | Air brakes | Arrestor gear |
| X | X | X | X | X |
| Limits | ||||
|---|---|---|---|---|
| Wing-break speed (km/h) |
Gear limit (km/h) |
Combat flap (km/h) |
Max Static G | |
| + | - | |||
| ??? | ??? | ??? | ~?? | ~? |
| Optimal velocities | |||
|---|---|---|---|
| Ailerons (km/h) |
Rudder (km/h) |
Elevators (km/h) |
Radiator (km/h) |
| < ??? | < ??? | < ??? | > ??? |
| Compressor (RB/SB) | ||
|---|---|---|
| Setting 1 | ||
| Optimal altitude | 100% Engine power | WEP Engine power |
| ?,??? m | ??? hp | ?,??? hp |
Survivability and armour
- No armour plating
- No armour glazing
- Critical components located at front of aircraft (fuel, pilot, engine, controls)
- More fuel tanks located in wings near fuselage
Armaments
Suspended armament
Main article: Bombs
The S.81 can be outfitted with the following ordinance:
- 28 x 50 kg GP 50 bombs (1,400 kg total)
- 16 x 100 kg GP 100 bombs (1,600 kg total)
- 4 x 250 kg GP 250 bombs (1,000 kg total)
- 4 x 500 kg GP 500 bombs (2,000 kg total)
Defensive armament
The S.81 is defended by:
- 2 x 7.7 mm Breda-SAFAT machine gun, dorsal turret (500 rpg = 1,000 total)
- 2 x 7.7 mm Breda-SAFAT machine gun, ventral turret (500 rpg = 1,000 total)
- 1 x 7.7 mm Lewis machine gun, left beam turret (500 rpg)
- 1 x 7.7 mm Lewis machine gun, right beam turret (500 rpg)
Usage in the battles
When flying the S.81 there are 2 payloads that are recommended 16 x 100 kg for ground strike against enemy vehicles or 4 x 500 kg for bombing bases. Always try to avoid enemy fighter aircraft as rifle caliber machine guns will shred this plane very easily.
The primary enemy of the S.81 is any fighter as it can be easily destroyed by rifle caliber machine gun fire, with sustained fire able to ignite the fuel or engine and cause a fire that could potentially burn down the aircraft.
Manual Engine Control
| MEC elements | ||||||
|---|---|---|---|---|---|---|
| Mixer | Pitch | Radiator | Supercharger | Turbocharger | ||
| Oil | Water | Type | ||||
| Controllable | Not controllable | Not controllable | Not controllable | Separate | Not ontrollable | Not controllable |
Modules
| Tier | Flight performance | Survivability | Weaponry | ||
|---|---|---|---|---|---|
| I | Fuselage Repair | Radiator | |||
| II | Compressor | Airframe | |||
| III | Wings Repair | Engine | |||
| IV | Engine Injection | Cover | |||
- When grinding this plane for improvements and modules, focus on the payload first, then the plane performance. Ignore the defensive firepower upgrades as the defensive firepower upgraded is still extremely weak until its the last upgrades you have to get.
Pros and cons
Pros:
- Decent payload, can hold large numbers of 50 kg bombs
- Machine gun turrets can reach all sides of the bomber
Cons:
- Slow and sluggish
- No armour or bulletproof glass for protection
- Abysmal defensive firepower
- Loss of a single engine will hamper the plane's ability to stay in the air
- Low maximum altitude
History
Under the need to have an aircraft capable reaching the far reaches of the Italian colonies in Africa, a project was made to develop an aircraft able to suit the Regia Aeronautica. Approaching manufacturer Savoia-Marchetti, chief designer Alessandro Marchetti developed the aircraft based on the Savoia's SM.73 airliner and militarized the vehicle for its intended use.[1] The first prototype was built and flown in early 1935, approximately six months after the SM.73 debuted.[2] This aircraft was then known as the SM.81 "Pipistrello" ("Bat"). The aircraft was accepted for service in the same year with mass-production slated, with different engines used throughout the production life. 534 SM.81 would be produced in the time span between 1935 to 1944.[3]
Combat usage
At its inception, the SM.81 was considered one of the better medium bombers of the era with its top speed of 211 miles, long range of 1,336 miles, well armed with six machine gun positions and able to carry a payload of up to 2,205 lbs.[3] The SM.81 found a versatile use on the battlefield, being used in a transport, bombing, ground attack, and a reconnaissance role, ensuring its relevancy even later in the war. One was procured by Benito Mussolini to be used as his private aircraft, the aircraft being nicknamed "Taratuga" ("Turtle") for its sluggish speed.
The SM.81 were first used in the Second Italo-Ethiopian War (also known as the Second Italo-Abyssinian War), lasting from 03 October 1935 to May 1936, quickly putting the SM.81 into action. Their versatile performed well in their support of the Italian troops, culminating with the annexation of Ethiopia into Italy's East African colonies. The SM.81 saw use again in the Spanish Civil War to aid the Spanish Nationalists in the Aviazione Legionaria, where they were used to the same degree as in Ethiopia. Though 12 were sent on a 705 mile flight on 29 July 1936 to Spanish-controlled Morocco, complexity in the flight had only nine arrive. These nine bombers provided a great asset in the Strait of Gibraltar as more aircraft arrived, keeping the Spanish Republican's Navy at bay. As the Nationalists push closer to Madrid, the SM.81, working alongside the German Condor Legion, bombed the Spanish capital almost daily. Though the SM.81 sometimes flew with escorting C.R.32 biplanes, flying unescorted with tight formations was also possible due to the mutual machine gun protection with each other.[4] However, when Soviet I-15 and I-16 appeared, flights started to be conducted at night to avoid losing precious bombers. When Italy left Spain at the conclusion of the war, around 64 SM.81 was left behind for the Spanish Air Force.
By the outbreak of World War II, the SM.81 was showing its age, though 300 units still remained in the Regia Aeronautica's inventory.[1] With the faster and more powerful SM.79 beginning to see service in 1936, the SM.81's roles was supplemented. The SM.81 still saw service in secondary roles and so deliveries still continued. It was used in the African theater as the main bomber against British forces in East Africa, but British Gladiators and Hurricanes posed a major threat. Due to this the SM.81 was relegated as a night bomber in North Africa, with the darkness as cover against the enemy fighters. 80 SM.81 were also produced into a dedicated transport aircraft, known as SM.81T, which proved vital in transporting troops and material to Rommel's Afrika Korps.[3]
Even after Italy's surrender to Allied forces in September 1943, the SM.81 still saw service in North Italy's Aeronautica Nazionale Repubblicana and South Italy's Aviazione Cobelligerante Italiana. Though South Italy soon removed them from service, North Italy used them until the end of the war.[1] In the conclusion of World War II, several SM.81 were still in service with the post-war Aeronautica Militare Italiana, sticking around until 1950 when they were all officially retired.
Other developments
Two main variants of the SM.81 existed, the SM.81 as a bomber/transport variant and the SM.81T as a dedicated transport aircraft, both using various engines as propulsion. A project was done known as the SM.81B, which used a two-engine configuration. This provided inadequate performance compared to the three-engine configurations and so the project was discontinued.
Though the SM.81 saw use in the various Italian air forces and in Spain, three were also sent to the Chinese Nationalist forces, arriving at an unknown date. However, all three samples were destroyed in training exercises in early 1938.[1]
Media
An excellent addition to the article will be video guides, as well as screenshots from the game and photos.
Read also
Links to the articles on the War Thunder Wiki that you think will be useful for the reader, for example,
- reference to the series of the aircraft;
- links to approximate analogues of other nations and research trees.
Sources
- Century of Flight. "Savoia Marchetti S.M.81 Pipistrello." Italian Aircraft of World War Two, 11 Nov 2007, Website.
- Military Factory. "Savoia-Marchetti SM.81 Pipistrello (Bat) Medium Bomber / Transport Aircraft." Military Factory, 31 May 2017, Website.
- Murphy, Justin D., and Matthew A. McNiece. Military Aircraft, 1919-1945: an Illustrated History of Their Impact. ABC-CLIO, 2009.
- Smith, Richard K., and R. Cargill. Hall. Five down, No Glory: Frank G. Tinker, Mercenary Ace in the Spanish Civil War. Naval Institute Press, 2011.
| Italy bombers | |
|---|---|
| Fiat | B.R.20DR · B.R.20M M1 |
| Savoia-Marchetti | S.81 · S.M.79 serie 1 · S.M.79 B · S.M.79 serie 8 · S.M.79 AS · S.M.79 bis/T.M |
| CANT | Z.1007 bis serie 3 · Z.1007 bis serie 5 |
| Piaggio | P.108B serie 1 · P.108B serie 2 |
| Foreign: | |
| Germany | ▄Ju 87 R-2 · ▄Ju 87 D-3 |
| Hungary | ◔Tu-2S-59 |
