Difference between revisions of "Churchill I"
m (U38088265 moved page Churchill Mk I to Churchill I: Renamed in-game) |
(Updated page template) |
||
| Line 2: | Line 2: | ||
{{About | {{About | ||
| about = British heavy tank '''{{PAGENAME}}''' | | about = British heavy tank '''{{PAGENAME}}''' | ||
| − | | usage = other | + | | usage = other variants |
| link = Churchill (Family) | | link = Churchill (Family) | ||
}} | }} | ||
| − | |||
== Description == | == Description == | ||
| − | <!--''In the description, the first part | + | <!-- ''In the description, the first part should be about the history of the creation and combat usage of the vehicle, as well as its key features. In the second part, tell the reader about the ground vehicle in the game. Insert a screenshot of the vehicle, so that if the novice player does not remember the vehicle by name, he will immediately understand what kind of vehicle the article is talking about.'' --> |
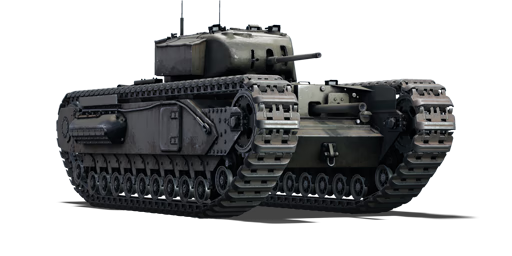
[[File:GarageImage_{{PAGENAME}}.jpg|420px|thumb|left]] | [[File:GarageImage_{{PAGENAME}}.jpg|420px|thumb|left]] | ||
| − | {{ | + | {{Break}} |
The '''{{Specs|name}}''' (or just '''{{Specs|pseudonym}}''') is a rank {{Specs|rank}} British heavy tank {{Battle-rating}}. It was introduced in [[Update 1.69 "Regia Aeronautica"]] along with the [[Vickers MBT]] and [[Chieftain Mk 5]] as an expansion to the British tech tree. Like the original model of the Churchill infantry tank, it has the substantial frontal armour able to withstand enemy shells. | The '''{{Specs|name}}''' (or just '''{{Specs|pseudonym}}''') is a rank {{Specs|rank}} British heavy tank {{Battle-rating}}. It was introduced in [[Update 1.69 "Regia Aeronautica"]] along with the [[Vickers MBT]] and [[Chieftain Mk 5]] as an expansion to the British tech tree. Like the original model of the Churchill infantry tank, it has the substantial frontal armour able to withstand enemy shells. | ||
| − | The Churchill Mk I is one of the more capable heavy tanks at rank II. The tank has excellent frontal armour that can absorb and bounce shots. Tanks such as the [[Pz.III J1|Panzer III]], [[T-34 (1941)|T-34]], [[M4|M4 Sherman]], and even the dreaded [[Pz.IV F2|Panzer IV F2]] can be blocked if angled. Very few tanks can deal with the Churchill Mk I effectively from the front, such as the [[M10 GMC|M10]] or [[Achilles]]. Its 2-pounder gun, however, is very underpowered for its battle rating. It is of small calibre and low penetration and damage. Its secondary howitzer is also nearly useless as it only has HE shells. | + | The Churchill Mk I is one of the more capable heavy tanks at rank II. The tank has excellent frontal armour that can absorb and bounce shots. Tanks such as the [[Pz.III J1|Panzer III]], [[T-34 (1941)|T-34]], [[M4|M4 Sherman]], and even the dreaded [[Pz.IV F2|Panzer IV F2]] can be blocked if angled. Very few tanks can deal with the Churchill Mk I effectively from the front, such as the [[M10 GMC|M10]] or [[Achilles]]. Its 2-pounder gun, however, is very underpowered for its battle rating. It is of small calibre and low penetration and damage. Its secondary howitzer is also nearly useless as it only has HE shells. |
The Churchill Mk I is slow and hard to turn, which can be taken advantage of when flanking. Its engine is also easily damaged. The thick armour is also completely unangled. | The Churchill Mk I is slow and hard to turn, which can be taken advantage of when flanking. Its engine is also easily damaged. The thick armour is also completely unangled. | ||
| Line 19: | Line 18: | ||
== General info == | == General info == | ||
=== Survivability and armour === | === Survivability and armour === | ||
| − | <!--''Describe armour protection. Note the most well protected and key weak areas. Appreciate the layout of modules as well as the number and location of crew members. Is the level of armour protection sufficient, is the placement of modules | + | <!-- ''Describe armour protection. Note the most well protected and key weak areas. Appreciate the layout of modules as well as the number and location of crew members. Is the level of armour protection sufficient, is the placement of modules helpful for survival in combat? If necessary use a visual template to indicate the most secure and weak zones of the armour.'' --> |
| − | |||
| − | |||
'''Armour type:''' | '''Armour type:''' | ||
* Rolled homogeneous armour (Hull, Turret) | * Rolled homogeneous armour (Hull, Turret) | ||
| − | * Cast homogeneous armour (Driver viewport, Machine gun area, Gun mantlet) | + | * Cast homogeneous armour (Driver viewport, Machine gun area, Gun mantlet) |
{| class="wikitable" | {| class="wikitable" | ||
| Line 44: | Line 41: | ||
<!-- ''Write about the mobility of the ground vehicle. Estimate the specific power and manoeuvrability, as well as the maximum speed forwards and backwards.'' --> | <!-- ''Write about the mobility of the ground vehicle. Estimate the specific power and manoeuvrability, as well as the maximum speed forwards and backwards.'' --> | ||
| − | {{tankMobility|abMinHp= 452|rbMinHp= 310}} | + | {{tankMobility|abMinHp=452|rbMinHp=310}} |
== Armaments == | == Armaments == | ||
=== Main armament === | === Main armament === | ||
| − | <!--''Give the reader information about the characteristics of the main gun. Assess its effectiveness in a battle based on the reloading speed, ballistics and the power of shells. Do not forget about the flexibility of the fire, that is how quickly the cannon can be aimed at the target, open fire on it and aim at another enemy. Add a link to the main article on the gun: <code><nowiki>{{main|Name of the weapon}}</nowiki></code>. Describe in general terms the ammunition available for the main gun. Give advice on how to use them and how to fill the ammunition storage.''--> | + | <!-- ''Give the reader information about the characteristics of the main gun. Assess its effectiveness in a battle based on the reloading speed, ballistics and the power of shells. Do not forget about the flexibility of the fire, that is how quickly the cannon can be aimed at the target, open fire on it and aim at another enemy. Add a link to the main article on the gun: <code><nowiki>{{main|Name of the weapon}}</nowiki></code>. Describe in general terms the ammunition available for the main gun. Give advice on how to use them and how to fill the ammunition storage.'' --> |
| − | {{main| | + | {{main|QF 2-pounder (40 mm)}} |
| − | {| class="wikitable" style="text-align:center" | + | {| class="wikitable" style="text-align:center" width="100%" |
|- | |- | ||
| − | ! colspan=" | + | ! colspan="5" | [[QF 2-pounder (40 mm)|40 mm QF 2-pounder]] || colspan="5" | Turret rotation speed (°/s) || colspan="4" | Reloading rate (seconds) |
|- | |- | ||
| − | ! | + | ! Mode !! Capacity !! Vertical !! Horizontal !! Stabilizer |
| − | ! | + | ! Stock !! Upgraded !! Full !! Expert !! Aced |
| − | ! | + | ! Stock !! Full !! Expert !! Aced |
| − | ! | ||
|- | |- | ||
| − | | | + | ! ''Arcade'' |
| + | | rowspan="2" | 150 || rowspan="2" | -15°/+20° || rowspan="2" | ±180° || rowspan="2" | Vertical || 19.42 || 26.88 || 32.64 || 36.10 || 38.40 || rowspan="2" | 3.64 || rowspan="2" | 3.22 || rowspan="2" | 2.97 || rowspan="2" | 2.80 | ||
|- | |- | ||
| − | ! | + | ! ''Realistic'' |
| − | + | | 14.28 || 16.80 || 20.40 || 22.56 || 24.00 | |
| − | |||
| − | |||
| − | |||
| − | |||
| − | |||
| − | |||
| − | |||
| − | |||
| − | |||
| − | |||
| − | |||
| − | |||
| − | |||
| − | |||
| − | |||
| − | |||
| − | |||
| − | |||
| − | |||
|- | |- | ||
|} | |} | ||
| − | + | ==== Ammunition ==== | |
{| class="wikitable sortable" style="text-align:center" width="100%" | {| class="wikitable sortable" style="text-align:center" width="100%" | ||
! colspan="8" | Penetration statistics | ! colspan="8" | Penetration statistics | ||
|- | |- | ||
! rowspan="2" data-sort-type="text" | Ammunition | ! rowspan="2" data-sort-type="text" | Ammunition | ||
| − | ! rowspan="2 | + | ! rowspan="2" | Type of<br>warhead |
| − | ! colspan="6" | '''Penetration | + | ! colspan="6" | '''Penetration @ 0° Angle of Attack (mm)''' |
|- | |- | ||
| − | ! | + | ! 10 m !! 100 m !! 500 m !! 1,000 m !! 1,500 m !! 2,000 m |
| − | ! | ||
| − | ! | ||
| − | ! | ||
| − | ! | ||
| − | ! | ||
|- | |- | ||
| − | | Shot Mk.1 AP/T || AP || | + | | Shot Mk.1 AP/T || AP || 72 || 68 || 52 || 37 || 27 || 19 |
|- | |- | ||
| − | | Shot Mk. | + | | Shot Mk.IXB APCBC/T || APCBC || 88 || 83 || 64 || 46 || 33 || 24 |
|- | |- | ||
| − | | Shot Mk.1 APHV/T || AP || 80 || 78 || 67 || 56 || 47 || 40 | + | | Shot Mk.1 APHV/T || AP || 80 || 78 || 67 || 56 || 47 || 40 |
|- | |- | ||
| − | | Shell Mk.1 AP/T || APHE || | + | | Shell Mk.1 AP/T || APHE || 66 || 62 || 49 || 36 || 26 || 20 |
|- | |- | ||
|} | |} | ||
{| class="wikitable sortable" style="text-align:center" width="100%" | {| class="wikitable sortable" style="text-align:center" width="100%" | ||
| − | ! colspan=" | + | ! colspan="10" | Shell details |
|- | |- | ||
! rowspan="2" data-sort-type="text" | Ammunition | ! rowspan="2" data-sort-type="text" | Ammunition | ||
| − | ! rowspan="2 | + | ! rowspan="2" | Type of<br>warhead |
| − | ! rowspan="2" |Velocity <br | + | ! rowspan="2" | Velocity<br>(m/s) |
| − | ! rowspan="2" |Projectile<br | + | ! rowspan="2" | Projectile<br>Mass (kg) |
| − | ! rowspan="2" | | + | ! rowspan="2" | Fuse delay<br>(m) |
| − | + | ! rowspan="2" | Fuse sensitivity<br>(mm) | |
| − | ! rowspan="2" | | + | ! rowspan="2" | Explosive Mass<br>(TNT equivalent) (g) |
| − | + | ! colspan="3" | Ricochet | |
| − | ! rowspan="2" | | ||
| − | |||
| − | ! colspan="3" | | ||
|- | |- | ||
| − | ! 0% | + | ! 0% !! 50% !! 100% |
| − | ! 50% | ||
| − | ! 100% | ||
|- | |- | ||
| − | | Shot Mk.1 AP/T || AP || 792 || 1.08 || N/A || N/A || N/A | + | | Shot Mk.1 AP/T || AP || 792 || 1.08 || N/A || N/A || N/A || 47° || 60° || 65° |
|- | |- | ||
| − | | Shot Mk. | + | | Shot Mk.IXB APCBC/T || APCBC || 792 || 1.24 || N/A || N/A || N/A || 48° || 63° || 71° |
|- | |- | ||
| − | | Shot Mk.1 APHV/T || AP || 853 || 1.08 || N/A || N/A || N/A | + | | Shot Mk.1 APHV/T || AP || 853 || 1.08 || N/A || N/A || N/A || 47° || 60° || 65° |
|- | |- | ||
| − | | Shell Mk.1 AP/T || APHE || 792 || 1.08 || 1.2 || 9 || | + | | Shell Mk.1 AP/T || APHE || 792 || 1.08 || 1.2 || 9.0 || 20.9 || 47° || 60° || 65° |
|- | |- | ||
|} | |} | ||
| − | + | ==== [[Ammo racks]] ==== | |
| − | {| class="wikitable | + | [[File:Ammoracks_Churchill_Mk_I.png|right|thumb|x250px|[[Ammo racks]] of the {{PAGENAME}}]] |
| + | {| class="wikitable" style="text-align:center" | ||
|- | |- | ||
| − | ! | + | ! Full<br>ammo |
| − | ! | + | ! 1st<br>rack empty |
| − | ! | + | ! 2nd<br>rack empty |
| − | ! | + | ! 3rd<br>rack empty |
| − | ! | + | ! 4th<br>rack empty |
| − | ! | + | ! 5th<br>rack empty |
| − | ! | + | ! 6th<br>rack empty |
| − | ! | + | ! 7th<br>rack empty |
| − | ! | + | ! Visual<br>discrepancy |
|- | |- | ||
| − | + | | '''150''' || 110 ''(+40)'' || 80 ''(+70)'' || 58 ''(+92)'' || 36 ''(+114)'' || 26 ''(+124)'' || 16 ''(+134)'' || 1 ''(+149)'' || No | |
|- | |- | ||
|} | |} | ||
| Line 159: | Line 128: | ||
===== Optics ===== | ===== Optics ===== | ||
| − | |||
{| class="wikitable" style="text-align:center" width="50%" | {| class="wikitable" style="text-align:center" width="50%" | ||
| − | ! colspan="3" | {{PAGENAME}} [[Optics]] | + | ! colspan="3" | {{PAGENAME}} [[Optics]] |
|- | |- | ||
! Which ones | ! Which ones | ||
| Line 168: | Line 136: | ||
|- | |- | ||
! Main Gun optics | ! Main Gun optics | ||
| − | | x1.85 || x3.5 | + | | x1.85 || x3.5 |
|- | |- | ||
! Comparable optics | ! Comparable optics | ||
| − | | colspan="2 | + | | colspan="2" | [[T-34 (1940)]] |
|- | |- | ||
|} | |} | ||
=== Additional armament === | === Additional armament === | ||
| − | <!--''Some tanks are armed with several guns in one or more turrets. Evaluate the additional weaponry and give advice on its use. Describe the ammunition available for additional weaponry. Give advice on how to use them and how to fill the ammunition storage. If there is no additional weaponry remove this subsection.''--> | + | <!-- ''Some tanks are armed with several guns in one or more turrets. Evaluate the additional weaponry and give advice on its use. Describe the ammunition available for additional weaponry. Give advice on about how to use them and how to fill the ammunition storage. If there is no additional weaponry remove this subsection.'' --> |
| − | {{main| | + | {{main|OQF 3-inch Howitzer Mk I (76 mm)}} |
| − | {| class="wikitable" style="text-align:center | + | {| class="wikitable" style="text-align:center" width="100%" |
| − | |||
| − | |||
| − | |||
| − | |||
| − | |||
| − | |||
| − | |||
| − | |||
| − | |||
| − | |||
| − | |||
|- | |- | ||
| − | ! | + | ! colspan="5" | [[OQF 3-inch Howitzer Mk I (76 mm)|76 mm OQF 3-inch Howitzer Mk I]] || colspan="5" | Turret rotation speed (°/s) || colspan="4" | Reloading rate (seconds) |
| − | |||
| − | |||
| − | |||
| − | |||
| − | |||
|- | |- | ||
| − | + | ! Mode !! Capacity !! Vertical !! Horizontal !! Stabilizer | |
| + | ! Stock !! Upgraded !! Full !! Expert !! Aced | ||
| + | ! Stock !! Full !! Expert !! Aced | ||
|- | |- | ||
| − | + | ! ''Arcade'' | |
| + | | rowspan="2" | 58 || rowspan="2" | -5°/+9° || rowspan="2" | ±15° || rowspan="2" | N/A || 12 || 17 || 20 || __.__ || __.__ || rowspan="2" | 8.2 || rowspan="2" | 7.2 || rowspan="2" | _.__ || rowspan="2" | _.__ | ||
|- | |- | ||
| − | ! | + | ! ''Realistic'' |
| − | + | | 8.9 || 10 || 13 || __.__ || __.__ | |
| − | |||
| − | |||
| − | |||
| − | |||
| − | | | ||
| − | | | ||
|- | |- | ||
|} | |} | ||
| − | + | ==== Ammunition ==== | |
| − | {| class="wikitable | + | {| class="wikitable" style="text-align:center" width="100%" |
! colspan="8" | Penetration statistics | ! colspan="8" | Penetration statistics | ||
|- | |- | ||
! rowspan="2" data-sort-type="text" | Ammunition | ! rowspan="2" data-sort-type="text" | Ammunition | ||
| − | ! rowspan="2 | + | ! rowspan="2" | Type of<br>warhead |
| − | ! colspan="6" | '''Penetration | + | ! colspan="6" | '''Penetration @ 0° Angle of Attack (mm)''' |
|- | |- | ||
| − | ! | + | ! 10 m !! 100 m !! 500 m !! 1,000 m !! 1,500 m !! 2,000 m |
| − | ! | ||
| − | ! | ||
| − | ! | ||
| − | ! | ||
| − | ! | ||
|- | |- | ||
| − | | 3-inch | + | | 3-inch Mark II || HE || 10 || 10 || 10 || 10 || 10 || 10 |
|- | |- | ||
|} | |} | ||
| − | {| class="wikitable | + | {| class="wikitable" style="text-align:center" width="100%" |
| − | ! colspan=" | + | ! colspan="10" | Shell details |
|- | |- | ||
! rowspan="2" data-sort-type="text" | Ammunition | ! rowspan="2" data-sort-type="text" | Ammunition | ||
| − | ! rowspan="2 | + | ! rowspan="2" | Type of<br>warhead |
| − | ! rowspan="2" |Velocity <br | + | ! rowspan="2" | Velocity<br>(m/s) |
| − | ! rowspan="2" |Projectile<br | + | ! rowspan="2" | Projectile<br>Mass (kg) |
| − | ! rowspan="2" | | + | ! rowspan="2" | Fuse delay<br>(m) |
| − | + | ! rowspan="2" | Fuse sensitivity<br>(mm) | |
| − | ! rowspan="2" | | + | ! rowspan="2" | Explosive Mass<br>(TNT equivalent) (g) |
| − | + | ! colspan="3" | Ricochet | |
| − | ! rowspan="2" | | ||
| − | |||
| − | ! colspan="3" | | ||
|- | |- | ||
| − | ! 0% | + | ! 0% !! 50% !! 100% |
| − | ! 50% | ||
| − | ! 100% | ||
|- | |- | ||
| − | | 3-inch | + | | 3-inch Mark II || HE || 210 || 6.02 || 0.4 || 0.5 || 606 || 79° || 80° || 81° |
|- | |- | ||
|} | |} | ||
| − | {| class="wikitable | + | {| class="wikitable" style="text-align:center" |
| − | ! colspan="7" | Smoke | + | ! colspan="7" | Smoke shell characteristics |
|- | |- | ||
! Ammunition | ! Ammunition | ||
| − | ! Velocity <br | + | ! Velocity<br>(m/s) |
| − | ! Projectile<br | + | ! Projectile<br>Mass (kg) |
| − | ! | + | ! Screen radius<br>(m) |
| − | ! | + | ! Screen deploy time<br>(s) |
| − | ! | + | ! Screen hold time<br>(s) |
| − | ! | + | ! Explosive Mass<br>(TNT equivalent) (g) |
|- | |- | ||
| − | | 3-inch Smoke || 210 || | + | | 3-inch Smoke || 210 || 3.18 || 13 || 5 || 20 || 8 |
|- | |- | ||
|} | |} | ||
| − | + | ==== [[Ammo racks]] ==== | |
| − | [[File: | + | [[File:Ammoracks_Churchill_Mk_I.png|right|thumb|x250px|[[Ammo racks]] of the {{PAGENAME}}]] |
| − | {| class="wikitable | + | {| class="wikitable" style="text-align:center" |
|- | |- | ||
| − | ! | + | ! Full<br>ammo |
| − | ! | + | ! 1st<br>rack empty |
| − | ! | + | ! 2nd<br>rack empty |
| − | ! | + | ! 3rd<br>rack empty |
| − | ! | + | ! 4th<br>rack empty |
| − | ! | + | ! Visual<br>discrepancy |
| − | |||
|- | |- | ||
| − | + | | '''58''' || 45 ''(+13)'' || 31 ''(+27)'' || 16 ''(+42)'' || 1 ''(+57)'' || No | |
|- | |- | ||
|} | |} | ||
| Line 288: | Line 226: | ||
=== Machine guns === | === Machine guns === | ||
| − | <!--''Offensive and anti-aircraft machine guns not only allow you to fight some aircraft but also are effective against lightly armoured vehicles. Evaluate machine guns and give recommendations on its use.''--> | + | <!-- ''Offensive and anti-aircraft machine guns not only allow you to fight some aircraft but also are effective against lightly armoured vehicles. Evaluate machine guns and give recommendations on its use.'' --> |
{{main|BESA (7.92 mm)}} | {{main|BESA (7.92 mm)}} | ||
| − | {| class="wikitable" style="text-align:center" | + | {| class="wikitable" style="text-align:center" width="50%" |
| − | |||
| − | |||
|- | |- | ||
| − | ! colspan="7 | + | ! colspan="5" | [[BESA (7.92 mm)|7.92 mm BESA]] |
|- | |- | ||
| − | ! | + | ! Mount !! Capacity (Belt) !! Fire rate !! Vertical !! Horizontal |
| − | ! | ||
| − | ! | ||
| − | ! | ||
|- | |- | ||
| − | | | + | | Coaxial || 4,950 (225) || 600 || N/A || N/A |
|- | |- | ||
|} | |} | ||
| − | == Usage in | + | == Usage in battles == |
| − | <!--''Describe the tactics of playing in the vehicle, the features of using vehicles in the team and advice on tactics. Refrain from creating a "guide" - do not impose a single point of view but give the reader food for thought. Describe the most dangerous enemies and give recommendations on fighting them. If necessary, note the specifics of the game in different modes (AB, RB, SB).''--> | + | <!-- ''Describe the tactics of playing in the vehicle, the features of using vehicles in the team and advice on tactics. Refrain from creating a "guide" - do not impose a single point of view but instead give the reader food for thought. Describe the most dangerous enemies and give recommendations on fighting them. If necessary, note the specifics of the game in different modes (AB, RB, SB).'' --> |
This tank can use a play style similar to the Matilda or a weaker Churchill III. It's best played up close, to make use of the armour and also gun. Since the tank is rather boxy, it's very good at angling. Unlike the Churchill III, it's gun isn't capable of taking on most other tanks of its rank. Its main role in the battlefield is to soak up and take shots, with its thick armour, that can withstand most tanks of its rank. Main enemies for this tank would be the M10, the Achilles, the 88 mm SFL, and most Panzer IVs and StuGs. | This tank can use a play style similar to the Matilda or a weaker Churchill III. It's best played up close, to make use of the armour and also gun. Since the tank is rather boxy, it's very good at angling. Unlike the Churchill III, it's gun isn't capable of taking on most other tanks of its rank. Its main role in the battlefield is to soak up and take shots, with its thick armour, that can withstand most tanks of its rank. Main enemies for this tank would be the M10, the Achilles, the 88 mm SFL, and most Panzer IVs and StuGs. | ||
| − | The Churchill has heavy armour, especially when it is angled, but this certainly does not mean that it is invincible. In fact, there are a lot of guns around BR 3.0 that can destroy the Churchill, even at long range. The most immediate threat comes from the Germans, as in every RB/SB battle the British will be facing them. By far the most lethal tanks are the Panzer IVs with the long barrel 75mm. They can penetrate the Churchill Mk I frontally at long range. Later versions of the Panzer IV also have armour which the 2-pdr will really struggle to penetrate at long range, putting the Churchill at a big disadvantage. The same applies to any vehicle armed with the long barrel 75mm gun, including the | + | The Churchill has heavy armour, especially when it is angled, but this certainly does not mean that it is invincible. In fact, there are a lot of guns around BR 3.0 that can destroy the Churchill, even at long range. The most immediate threat comes from the Germans, as in every RB/SB battle the British will be facing them. By far the most lethal tanks are the Panzer IVs with the long barrel 75mm. They can penetrate the Churchill Mk I frontally at long range. Later versions of the Panzer IV also have armour which the 2-pdr will really struggle to penetrate at long range, putting the Churchill at a big disadvantage. The same applies to any vehicle armed with the long barrel 75mm gun, including the StuG III F/G, Marder III H (Particularly the Marder III H which has almost 200mm penetration with APCR). The Churchill Mk I can also come across tanks like the 88mm Flak Truck which is a massive threat. The 2-pdr's 40mm is almost useless against the Flak Truck as it will have to take each crew member out individually. Luckily, the Churchill Mk I has access to the 75mm howitzer, which provides well needed explosive firepower. It can quite easily hull break the Flak Truck. Luckily, the Flak Truck is a whole BR higher than the Churchill, so it will be a rare opponent. Also, watch out for tanks armed with HEAT (such as Panzer III/IVs with the short-barreled 75 mm), as it has up to 100mm penetration. The Sturmgeschütz III Ausf. G is also dangerous, with a powerful HE round and a high penetration HEAT round. Luckily both of the aforementioned tanks will have to close into shorter ranges to effectively attack the Churchill Mk I, as their guns have poor ballistics. This means that Churchill's 40 mm gun will be more effective. Also, watch out for the Sd.Kfz.234/2 or Sd.Kfz.234/4. These are vehicles based on the Puma armoured car. The /2 has a 50mm and the /4 has a 75mm gun. Both are excellent flanking vehicles, extremely fast and potent. They will easily outflank the slow Churchill. |
| − | Sometimes in RB matches, the Churchill will also face the Russians. At long range, the ZiS-30 proves to be a real threat. it has a high penetration gun and is great at ambushing. Luckily, it has light armour and can be destroyed easily. Russian armour is a bigger threat. Tanks like the T-34 are highly resistant to the 2-pdr gun due to their steep sloping armour. The L-11 gun on the T-34 (1940) will struggle to penetrate the Churchill, but the F-34 gun found on Post 1940 versions is much more effective. Below 500 m, the F-34 guns can destroy the Churchill with its potent BR-350B APHEBC rounds or APCR rounds (though they do less damage). An even bigger threat is the KV-1 type tanks. A Churchill vs a KV-1 L1-1 can end in a stalemate situation, as both tanks will struggle to penetrate the other frontally. However, later KV-1 models have the ZiS 5 gun, which is pretty much identical to the F-34 gun found on the T-34. There is also the German premium KV-1B which has upgraded armour but a weaker gun, which is a dangerous opponent and quite common despite being a premium vehicle. | + | Sometimes in RB matches, the Churchill will also face the Russians. At long range, the ZiS-30 proves to be a real threat. it has a high penetration gun and is great at ambushing. Luckily, it has light armour and can be destroyed easily. Russian armour is a bigger threat. Tanks like the T-34 are highly resistant to the 2-pdr gun due to their steep sloping armour. The L-11 gun on the T-34 (1940) will struggle to penetrate the Churchill, but the F-34 gun found on Post 1940 versions is much more effective. Below 500 m, the F-34 guns can destroy the Churchill with its potent BR-350B APHEBC rounds or APCR rounds (though they do less damage). An even bigger threat is the KV-1 type tanks. A Churchill vs a KV-1 L1-1 can end in a stalemate situation, as both tanks will struggle to penetrate the other frontally. However, later KV-1 models have the ZiS 5 gun, which is pretty much identical to the F-34 gun found on the T-34. There is also the German premium KV-1B which has upgraded armour but a weaker gun, which is a dangerous opponent and quite common despite being a premium vehicle. |
From the Japanese, be careful of the Ho Ro with its massive howitzer, or the Chi Nu with its powerful 75mm gun. | From the Japanese, be careful of the Ho Ro with its massive howitzer, or the Chi Nu with its powerful 75mm gun. | ||
| + | |||
=== Modules === | === Modules === | ||
{| class="wikitable" | {| class="wikitable" | ||
| Line 324: | Line 258: | ||
| I | | I | ||
| Tracks | | Tracks | ||
| − | | | + | | |
| Parts | | Parts | ||
| Horizontal Drive | | Horizontal Drive | ||
| Line 334: | Line 268: | ||
| Brake System | | Brake System | ||
| FPE | | FPE | ||
| − | | Adjustment of | + | | Adjustment of Fire |
| Shot Mk.1 APHV/T | | Shot Mk.1 APHV/T | ||
| | | | ||
| Line 340: | Line 274: | ||
| III | | III | ||
| Filters | | Filters | ||
| − | | | + | | |
| Crew Replenishment | | Crew Replenishment | ||
| Elevation Mechanism | | Elevation Mechanism | ||
| Line 349: | Line 283: | ||
| Transmission | | Transmission | ||
| Engine | | Engine | ||
| − | | | + | | |
| Shell Mk.1 AP/T | | Shell Mk.1 AP/T | ||
| 3-inch Smoke | | 3-inch Smoke | ||
| Line 355: | Line 289: | ||
|- | |- | ||
|} | |} | ||
| + | |||
=== Pros and cons === | === Pros and cons === | ||
| − | <!--'' | + | <!-- ''Summarise and briefly evaluate the vehicle in terms of its characteristics and combat effectiveness. Mark its pros and cons in a bulleted list. Try not to use more than 6 points for each of the characteristics. Avoid using categorical definitions such as "bad", "good" and the like - use substitutions with softer forms such as "inadequate" and "effective".'' --> |
| + | |||
'''Pros:''' | '''Pros:''' | ||
| Line 364: | Line 300: | ||
* Good mantlet | * Good mantlet | ||
* Quick firing gun | * Quick firing gun | ||
| − | * | + | * Its size eliminates any recoil from the gun, making it easy to fire a second shot without losing any accuracy |
* Ability to pivot steer | * Ability to pivot steer | ||
* Large suspension sides have side hits more likely to break tracks than penetrate the hull | * Large suspension sides have side hits more likely to break tracks than penetrate the hull | ||
| Line 388: | Line 324: | ||
== History == | == History == | ||
| − | <!--''Describe the history of the creation and combat usage of the | + | <!-- ''Describe the history of the creation and combat usage of the vehicle in more detail than in the introduction. If the historical reference turns out to be too long, take it to a separate article, taking a link to the article about the vehicle and adding a block "/History" (example: <nowiki>https://wiki.warthunder.com/(Vehicle-name)/History</nowiki>) and add a link to it here using the <code>main</code> template. Be sure to reference text and sources by using <code><nowiki><ref></ref></nowiki></code>, as well as adding them at the end of the article with <code><nowiki><references /></nowiki></code>. This section may also include the vehicle's dev blog entry (if applicable) and the in-game encyclopedia description (under <code><nowiki>=== In-game description ===</nowiki></code>, also if applicable).'' --> |
===Development=== | ===Development=== | ||
The General Staff specification ''A20'' was implemented before World War II and was meant to replace the [[Matilda Mk II|Matilda II]] and [[Valentine Mk XI|Valentine]] infantry tanks. The specification was based around the British infantry tank doctrine and with the expectation that the coming war would be based off the World War I trench warfare, thus the tank was needed to travel across unfavorable terrain and able to destroy enemy defenses and infantry obstacles. As speed and heavy firepower was not taken with priority, the vehicle was to have two 2-pounder gun on side sponson mounts with a coaxial machine gun, with another machine gun and smoke dischargers on the front hull, armour was about 60 mm on the turret. Four prototypes were made by June 1940 by Harland and Wolff. The front hull would see an upgrade in armament with a 3-inch howitzer during the prototype stages, the 43 ton tank had a 300 hp Meadows engine from the Covenanter tank and was made the tank underpowered. The A20 project was cancelled with the Battle of France, which saw the emergency evacuation of the British Expeditionary Force from Dunkirk that left a majority of their heavy equipment behind. | The General Staff specification ''A20'' was implemented before World War II and was meant to replace the [[Matilda Mk II|Matilda II]] and [[Valentine Mk XI|Valentine]] infantry tanks. The specification was based around the British infantry tank doctrine and with the expectation that the coming war would be based off the World War I trench warfare, thus the tank was needed to travel across unfavorable terrain and able to destroy enemy defenses and infantry obstacles. As speed and heavy firepower was not taken with priority, the vehicle was to have two 2-pounder gun on side sponson mounts with a coaxial machine gun, with another machine gun and smoke dischargers on the front hull, armour was about 60 mm on the turret. Four prototypes were made by June 1940 by Harland and Wolff. The front hull would see an upgrade in armament with a 3-inch howitzer during the prototype stages, the 43 ton tank had a 300 hp Meadows engine from the Covenanter tank and was made the tank underpowered. The A20 project was cancelled with the Battle of France, which saw the emergency evacuation of the British Expeditionary Force from Dunkirk that left a majority of their heavy equipment behind. | ||
| Line 411: | Line 347: | ||
== Media == | == Media == | ||
| − | '' | + | ''Excellent additions to the article would be video guides, screenshots from the game, and photos.'' |
| − | |||
| − | |||
| − | |||
| − | |||
| − | == | + | == See also == |
| − | '' | + | ''Links to the articles on the War Thunder Wiki that you think will be useful for the reader, for example:'' |
| + | * ''reference to the series of the vehicles;'' | ||
| + | * ''links to approximate analogues of other nations and research trees.'' | ||
| + | == External links == | ||
| + | <!-- ''Paste links to sources and external resources, such as:'' | ||
* ''topic on the official game forum;'' | * ''topic on the official game forum;'' | ||
| − | * ''other literature.'' | + | * ''encyclopedia page on the tank;'' |
| + | * ''other literature.'' --> | ||
| + | * [[wt:en/news/4793-vehicle-profile-a22-churchill-mk-i-first-of-its-breed-en|[Vehicle Profile] A22 Churchill Mk I - "First of Its Breed"]] | ||
{{Britain heavy tanks}} | {{Britain heavy tanks}} | ||
Revision as of 11:05, 27 July 2020
Contents
| This page is about the British heavy tank Churchill I. For other variants, see Churchill (Family). |
Description

The Tank, Infantry, Mk IV, Churchill I (A22) (or just Churchill I) is a rank II British heavy tank
with a battle rating of 3.0 (AB) and 3.3 (RB/SB). It was introduced in Update 1.69 "Regia Aeronautica" along with the Vickers MBT and Chieftain Mk 5 as an expansion to the British tech tree. Like the original model of the Churchill infantry tank, it has the substantial frontal armour able to withstand enemy shells.
The Churchill Mk I is one of the more capable heavy tanks at rank II. The tank has excellent frontal armour that can absorb and bounce shots. Tanks such as the Panzer III, T-34, M4 Sherman, and even the dreaded Panzer IV F2 can be blocked if angled. Very few tanks can deal with the Churchill Mk I effectively from the front, such as the M10 or Achilles. Its 2-pounder gun, however, is very underpowered for its battle rating. It is of small calibre and low penetration and damage. Its secondary howitzer is also nearly useless as it only has HE shells.
The Churchill Mk I is slow and hard to turn, which can be taken advantage of when flanking. Its engine is also easily damaged. The thick armour is also completely unangled.
General info
Survivability and armour
Armour type:
- Rolled homogeneous armour (Hull, Turret)
- Cast homogeneous armour (Driver viewport, Machine gun area, Gun mantlet)
| Armour | Front | Sides | Rear | Roof |
|---|---|---|---|---|
| Hull | 89 mm Front plate 89 + 89 mm Front plate (MG Port) 38 mm (63°) Front glacis 76.2 mm (19°) Lower glacis |
63.5 mm Overall side armour 76.2 mm Side hatch 38.1 mm Side edge |
50.8 mm 25.4 mm (68°) Bottom |
15.87 mm |
| Turret | 89 mm Turret front 89 mm (0-30°) Gun mantlet 18 mm (76°) Roof area |
76.2 mm | 76.2 mm | 18 mm |
Notes:
- Suspension wheels are 20 mm thick while tracks are 30 mm thick.
- Belly armour is 19 mm thick.
- A 8 mm Structural steel plate separates the engine and crew compartment.
Mobility
| Game Mode | Max Speed (km/h) | Weight (tons) | Engine power (horsepower) | Power-to-weight ratio (hp/ton) | |||
|---|---|---|---|---|---|---|---|
| Forward | Reverse | Stock | Upgraded | Stock | Upgraded | ||
| Arcade | 30 | 3 | 37.8 | 452 | 668 | 11.96 | 17.67 |
| Realistic | 28 | 3 | 310 | 350 | 8.2 | 9.26 | |
Armaments
Main armament
| 40 mm QF 2-pounder | Turret rotation speed (°/s) | Reloading rate (seconds) | |||||||||||
|---|---|---|---|---|---|---|---|---|---|---|---|---|---|
| Mode | Capacity | Vertical | Horizontal | Stabilizer | Stock | Upgraded | Full | Expert | Aced | Stock | Full | Expert | Aced |
| Arcade | 150 | -15°/+20° | ±180° | Vertical | 19.42 | 26.88 | 32.64 | 36.10 | 38.40 | 3.64 | 3.22 | 2.97 | 2.80 |
| Realistic | 14.28 | 16.80 | 20.40 | 22.56 | 24.00 | ||||||||
Ammunition
| Penetration statistics | |||||||
|---|---|---|---|---|---|---|---|
| Ammunition | Type of warhead |
Penetration @ 0° Angle of Attack (mm) | |||||
| 10 m | 100 m | 500 m | 1,000 m | 1,500 m | 2,000 m | ||
| Shot Mk.1 AP/T | AP | 72 | 68 | 52 | 37 | 27 | 19 |
| Shot Mk.IXB APCBC/T | APCBC | 88 | 83 | 64 | 46 | 33 | 24 |
| Shot Mk.1 APHV/T | AP | 80 | 78 | 67 | 56 | 47 | 40 |
| Shell Mk.1 AP/T | APHE | 66 | 62 | 49 | 36 | 26 | 20 |
| Shell details | |||||||||
|---|---|---|---|---|---|---|---|---|---|
| Ammunition | Type of warhead |
Velocity (m/s) |
Projectile Mass (kg) |
Fuse delay (m) |
Fuse sensitivity (mm) |
Explosive Mass (TNT equivalent) (g) |
Ricochet | ||
| 0% | 50% | 100% | |||||||
| Shot Mk.1 AP/T | AP | 792 | 1.08 | N/A | N/A | N/A | 47° | 60° | 65° |
| Shot Mk.IXB APCBC/T | APCBC | 792 | 1.24 | N/A | N/A | N/A | 48° | 63° | 71° |
| Shot Mk.1 APHV/T | AP | 853 | 1.08 | N/A | N/A | N/A | 47° | 60° | 65° |
| Shell Mk.1 AP/T | APHE | 792 | 1.08 | 1.2 | 9.0 | 20.9 | 47° | 60° | 65° |
Ammo racks

| Full ammo |
1st rack empty |
2nd rack empty |
3rd rack empty |
4th rack empty |
5th rack empty |
6th rack empty |
7th rack empty |
Visual discrepancy |
|---|---|---|---|---|---|---|---|---|
| 150 | 110 (+40) | 80 (+70) | 58 (+92) | 36 (+114) | 26 (+124) | 16 (+134) | 1 (+149) | No |
Center & turret empty: 58 (+92)
Optics
| Churchill I Optics | ||
|---|---|---|
| Which ones | Default magnification | Maximum magnification |
| Main Gun optics | x1.85 | x3.5 |
| Comparable optics | T-34 (1940) | |
Additional armament
| 76 mm OQF 3-inch Howitzer Mk I | Turret rotation speed (°/s) | Reloading rate (seconds) | |||||||||||
|---|---|---|---|---|---|---|---|---|---|---|---|---|---|
| Mode | Capacity | Vertical | Horizontal | Stabilizer | Stock | Upgraded | Full | Expert | Aced | Stock | Full | Expert | Aced |
| Arcade | 58 | -5°/+9° | ±15° | N/A | 12 | 17 | 20 | __.__ | __.__ | 8.2 | 7.2 | _.__ | _.__ |
| Realistic | 8.9 | 10 | 13 | __.__ | __.__ | ||||||||
Ammunition
| Penetration statistics | |||||||
|---|---|---|---|---|---|---|---|
| Ammunition | Type of warhead |
Penetration @ 0° Angle of Attack (mm) | |||||
| 10 m | 100 m | 500 m | 1,000 m | 1,500 m | 2,000 m | ||
| 3-inch Mark II | HE | 10 | 10 | 10 | 10 | 10 | 10 |
| Shell details | |||||||||
|---|---|---|---|---|---|---|---|---|---|
| Ammunition | Type of warhead |
Velocity (m/s) |
Projectile Mass (kg) |
Fuse delay (m) |
Fuse sensitivity (mm) |
Explosive Mass (TNT equivalent) (g) |
Ricochet | ||
| 0% | 50% | 100% | |||||||
| 3-inch Mark II | HE | 210 | 6.02 | 0.4 | 0.5 | 606 | 79° | 80° | 81° |
| Smoke shell characteristics | ||||||
|---|---|---|---|---|---|---|
| Ammunition | Velocity (m/s) |
Projectile Mass (kg) |
Screen radius (m) |
Screen deploy time (s) |
Screen hold time (s) |
Explosive Mass (TNT equivalent) (g) |
| 3-inch Smoke | 210 | 3.18 | 13 | 5 | 20 | 8 |
Ammo racks
| Full ammo |
1st rack empty |
2nd rack empty |
3rd rack empty |
4th rack empty |
Visual discrepancy |
|---|---|---|---|---|---|
| 58 | 45 (+13) | 31 (+27) | 16 (+42) | 1 (+57) | No |
Minimal load: 16 (+42)
Machine guns
| 7.92 mm BESA | ||||
|---|---|---|---|---|
| Mount | Capacity (Belt) | Fire rate | Vertical | Horizontal |
| Coaxial | 4,950 (225) | 600 | N/A | N/A |
Usage in battles
This tank can use a play style similar to the Matilda or a weaker Churchill III. It's best played up close, to make use of the armour and also gun. Since the tank is rather boxy, it's very good at angling. Unlike the Churchill III, it's gun isn't capable of taking on most other tanks of its rank. Its main role in the battlefield is to soak up and take shots, with its thick armour, that can withstand most tanks of its rank. Main enemies for this tank would be the M10, the Achilles, the 88 mm SFL, and most Panzer IVs and StuGs.
The Churchill has heavy armour, especially when it is angled, but this certainly does not mean that it is invincible. In fact, there are a lot of guns around BR 3.0 that can destroy the Churchill, even at long range. The most immediate threat comes from the Germans, as in every RB/SB battle the British will be facing them. By far the most lethal tanks are the Panzer IVs with the long barrel 75mm. They can penetrate the Churchill Mk I frontally at long range. Later versions of the Panzer IV also have armour which the 2-pdr will really struggle to penetrate at long range, putting the Churchill at a big disadvantage. The same applies to any vehicle armed with the long barrel 75mm gun, including the StuG III F/G, Marder III H (Particularly the Marder III H which has almost 200mm penetration with APCR). The Churchill Mk I can also come across tanks like the 88mm Flak Truck which is a massive threat. The 2-pdr's 40mm is almost useless against the Flak Truck as it will have to take each crew member out individually. Luckily, the Churchill Mk I has access to the 75mm howitzer, which provides well needed explosive firepower. It can quite easily hull break the Flak Truck. Luckily, the Flak Truck is a whole BR higher than the Churchill, so it will be a rare opponent. Also, watch out for tanks armed with HEAT (such as Panzer III/IVs with the short-barreled 75 mm), as it has up to 100mm penetration. The Sturmgeschütz III Ausf. G is also dangerous, with a powerful HE round and a high penetration HEAT round. Luckily both of the aforementioned tanks will have to close into shorter ranges to effectively attack the Churchill Mk I, as their guns have poor ballistics. This means that Churchill's 40 mm gun will be more effective. Also, watch out for the Sd.Kfz.234/2 or Sd.Kfz.234/4. These are vehicles based on the Puma armoured car. The /2 has a 50mm and the /4 has a 75mm gun. Both are excellent flanking vehicles, extremely fast and potent. They will easily outflank the slow Churchill.
Sometimes in RB matches, the Churchill will also face the Russians. At long range, the ZiS-30 proves to be a real threat. it has a high penetration gun and is great at ambushing. Luckily, it has light armour and can be destroyed easily. Russian armour is a bigger threat. Tanks like the T-34 are highly resistant to the 2-pdr gun due to their steep sloping armour. The L-11 gun on the T-34 (1940) will struggle to penetrate the Churchill, but the F-34 gun found on Post 1940 versions is much more effective. Below 500 m, the F-34 guns can destroy the Churchill with its potent BR-350B APHEBC rounds or APCR rounds (though they do less damage). An even bigger threat is the KV-1 type tanks. A Churchill vs a KV-1 L1-1 can end in a stalemate situation, as both tanks will struggle to penetrate the other frontally. However, later KV-1 models have the ZiS 5 gun, which is pretty much identical to the F-34 gun found on the T-34. There is also the German premium KV-1B which has upgraded armour but a weaker gun, which is a dangerous opponent and quite common despite being a premium vehicle.
From the Japanese, be careful of the Ho Ro with its massive howitzer, or the Chi Nu with its powerful 75mm gun.
Modules
| Tier | Mobility | Protection | Firepower | |||
|---|---|---|---|---|---|---|
| I | Tracks | Parts | Horizontal Drive | Shot Mk.IXB APCBC/T | ||
| II | Suspension | Brake System | FPE | Adjustment of Fire | Shot Mk.1 APHV/T | |
| III | Filters | Crew Replenishment | Elevation Mechanism | |||
| IV | Transmission | Engine | Shell Mk.1 AP/T | 3-inch Smoke | Smoke grenade | |
Pros and cons
Pros:
- Excellent frontal armour
- Almost immune to small calibre guns
- Well armoured sides
- Good mantlet
- Quick firing gun
- Its size eliminates any recoil from the gun, making it easy to fire a second shot without losing any accuracy
- Ability to pivot steer
- Large suspension sides have side hits more likely to break tracks than penetrate the hull
- Incredibly hard to dislodge or destroy when properly angled
- Works well as the spearhead of an assault when capturing a point, absorbing damage
- Good acceleration
Cons:
- 40mm gun is ineffective against anything with sloped armour
- Will lose a lot of speed when making a sharp turn in motion
- Has difficulties engaging other heavy tanks
- Up-gunned Panzer IVs are a major threat
- Poor mobility when compared to other heavy tanks from other nations
- Terrible reverse speed
- Boxy armour, although still thick
- Has trouble scaling obstacles
- Very slow, will take a lot of time just to reach the combat zone from spawn points
- Frontal 50 mm weak spot (Machine gun port)
- Roof armour is somehow thin
- Ammo racks just below the turret, a smart player will shoot there and a hit will be lethal most of the time
- Priority target by planes due to size and bad reverse speed
History
Development
The General Staff specification A20 was implemented before World War II and was meant to replace the Matilda II and Valentine infantry tanks. The specification was based around the British infantry tank doctrine and with the expectation that the coming war would be based off the World War I trench warfare, thus the tank was needed to travel across unfavorable terrain and able to destroy enemy defenses and infantry obstacles. As speed and heavy firepower was not taken with priority, the vehicle was to have two 2-pounder gun on side sponson mounts with a coaxial machine gun, with another machine gun and smoke dischargers on the front hull, armour was about 60 mm on the turret. Four prototypes were made by June 1940 by Harland and Wolff. The front hull would see an upgrade in armament with a 3-inch howitzer during the prototype stages, the 43 ton tank had a 300 hp Meadows engine from the Covenanter tank and was made the tank underpowered. The A20 project was cancelled with the Battle of France, which saw the emergency evacuation of the British Expeditionary Force from Dunkirk that left a majority of their heavy equipment behind.
The Battle of France proved that the coming World War II was not going to be a stagnant battlefield like the trench warfare from World War I. The entire concept had to be redesigned and was done so by Henry Merrit, the director of Tank Design at Woolwich Arsenal. His new concept, the A22 or Infantry Tank Mark IV Churchill, was given to Vauxhall Motors in June 1940. War Office requested that the A22 be ready to enter production within the year due to growing pressure of a German invasion of Britain. The designs were ready in July 1940 and the first prototypes were made by December of the same year, production soon followed in June 1941. The rushed development was acknowledged in the company to being the cause of many faults and defects in the tank, but the demand by the government was so great that it must be carried out, with the expectation that the issues will be fixed during production. The Churchill tank suffered from an under-powered engine, weak armament, and mechanical issues. The weak armament from a 2-pounder was fixed with the arming of a 6-pounder on the Churchill, but the other issues caused poor performance of the Churchill in the battlefield. In fact, the Churchill production was almost cancelled in favor of the Cromwell due to its issues, but its usage in the Second Battle of El Alamein proved its value and kept it in service.
The Churchill would carry on the rest of the war as one of the most versatile tank design in British service, serving in many specialist roles other than its tank role. Altogether, a total of 7,568 Churchill units produced from 1941 to 1945, with 5,968 as tanks.
Variants
The Churchill, used in a multitude of roles, is made into many different variants. 12 different kinds of tank variants were produced for combat roles, with 11 more variants in specialized roles ranging from armoured personnel carrier, a bridge-layer, mine clearer, a 3 inch Gun Carrier, flamethrower tank, and an armoured recovery vehicle.
Combat usage
The Churchill tank was first used in the Dieppe Raid in August 1942. While it was really a test on how an opposed landing would work, the 60 Churchill tanks to support the Canadian units suffered from mechanical issues, and those that did work are not able to penetrate past the sea wall due to impassable defenses. None of the Churchill tanks that landed returned from the beaches and with a 70% casualty rate, the raid's attempt to establish a beachhead was a failure.
The next use of the Churchill was in North Africa during the Second Battle of El Alamein. At this point, the Churchills have been upgraded to the Mk.III variants with 6-pounders as their main armament. The detachment, code named "King Force", help supported the 7th Motor Brigade in their attack. The Churchills were fired upon by many German anti-tank weapons, but none were taken out with only one receiving note worthy damage. "King Force", as a test bed for the feasibility of Churchills operating in the desert environment, was disbanded with the establishment of the 25th Army Tank Brigade with the Churchills to see action in February 1943 in Tunisia. In the German offensive Operation Ochsenkpf, two Churchill Mk.III from the 51st Royal Tank Regiment came across an entire German transport column that they ambushed. The end result was a loss of twelve artillery pieces, 25 wheeled vehicles, two Panzer IIIs and 200 casualties on the German side with no losses for the British. The Churchill also played a key role in the Battle of Longstop Hill, where Churchill tanks in the 48th Royal Tank Regiment faced off with Germany's newest heavy tank Tiger I. Though suffering losses, a lucky 6-pounder shot from the Churchill ended up jamming the Tiger's turret and turret ring that injured the crew, forcing them to abandon the tank. The Tiger tank was captured by the British for intelligence purpose on Germany's armoured forces. The Tiger Tank is named Tiger 131.
After the North African campaign, the Churchill began to see widespread usage in the British army as a support unit for the infantry. The Churchill saw much more operation hours than any other British tank in service. It was at this point that the Churchill Mk.III began a conversion into the 75 mm guns that were used on the American M4 Sherman tanks. These conversions, known as NA75, proved to be more efficient than the Shermans and were used more effectively. Some Churchills were also converted into close support vehicles with 95 mm howitzers as their main armaments. In response to the growing German anti-tank firepower in the later years of World War II, the Churchill tanks were also upgraded in armour by a large degree, though their engines were also upgraded to compensate for the additional weight. The Churchill Mk.VII, for example, has armour ranging up to 152 mm thick in the front, in comparison to the Mk.III 89 mm thick front hull. The Churchills also saw service in Europe during Operation Overlord. At the time, it was considered that the Churchill would become severely outdated with the growing tank technology, so an experimental program under specification A43, otherwise known as the Black Prince, to uparmour and upgun the Churchill. While this experimented seem fruitful, the development of more agile tanks with the same level of protection and armament such as the Centurion rendered the project obsolete.
The Churchills were also given out to the Allies to help combat the Axis forces. The Australian Army received a handful of Churchills for testing alongside the M4 Sherman with the Matilda II as the basis, to which proved that the Churchill was superior in jungle warfare. Of the 510 Churchills ordered by the Australians in the war, only 46 arrived in time and were not used in the Pacific War, the rest were cancelled with the end of World War II. The USSR also used the Churchills given by the British as part of the Lend-Lease act. 301 Churchills were sent, but 43 were lost to the sea by German naval forces. Of those that arrived, the Soviets gave the Churchills to the 5th Guards Tank Army in the Battle of Prokhorovka during the Kursk Offensive.
After World War II, the Churchill stuck around in the British Army until the Korean War, where the British sent the Churchill Crocodile Squadron (C squadron of the 7th Royal Tank Regiment) to Korea to fight with the Allied coalition. They fought as gun tanks in battle such as the Third Battle of Seoul. The Churchills were instrumental in some victories and were widely praised by both British and American forces and historians. After the Korean war, the Churchills remains in combat service until 1952, with the specialized bridge-layer variant stayin until the 1970s. The Irish Army also received three Churchill tanks in 1948 and another in 1949 as rentals until 1954, where they were purchased after trials with the vehicles. Despite running out of spare parts for the Churchill, the Irish Army took them in and experimented with using different engines to keep them functional, though this ended with a failure and by 1967, only one was still functional. All were retired in 1969 and one was preserved at the Curragh Camp.
Media
Excellent additions to the article would be video guides, screenshots from the game, and photos.
See also
Links to the articles on the War Thunder Wiki that you think will be useful for the reader, for example:
- reference to the series of the vehicles;
- links to approximate analogues of other nations and research trees.
External links
| Britain heavy tanks | |
|---|---|
| Matilda | Matilda III · Matilda Hedgehog |
| Churchill | Churchill I · Churchill III · Churchill VII · Churchill Crocodile · Churchill NA75 · Black Prince |
| Post-war | Caernarvon · Conqueror |
| Other | Independent · Excelsior · TOG II |
