Difference between revisions of "Chieftain Marksman"
Inceptor57 (talk | contribs) (Restored page) |
|||
| Line 1: | Line 1: | ||
{{Specs-Card|code=uk_chieftain_marksman}} | {{Specs-Card|code=uk_chieftain_marksman}} | ||
| + | {{Notice|''This page is about the self-propelled anti-aircraft vehicle '''{{PAGENAME}}'''. For other uses, see [[Chieftain_(Disambiguation)|Chieftain (Disambiguation)]]''}} | ||
== Description == | == Description == | ||
| − | ''In the description, the first part needs to be about the history of the creation and combat usage of the vehicle, as well as its key features. In the second part, tell the reader about the ground vehicle in the game. Insert the screenshot of the vehicle. If the novice player does not remember the vehicle by name, they will immediately understand what kind of vehicle it is talking about.'' | + | <!--''In the description, the first part needs to be about the history of the creation and combat usage of the vehicle, as well as its key features. In the second part, tell the reader about the ground vehicle in the game. Insert the screenshot of the vehicle. If the novice player does not remember the vehicle by name, they will immediately understand what kind of vehicle it is talking about.''--> |
| + | [[File:GarageImage_{{PAGENAME}}.jpg|420px|thumb|left]] | ||
| + | {{Break}} | ||
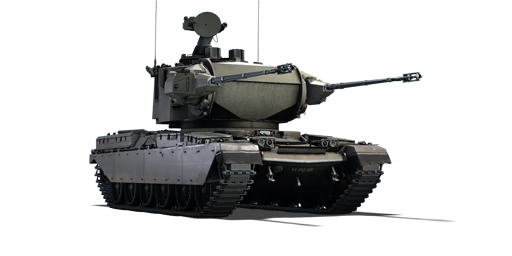
| + | The '''{{Specs|name}}''' (shortened to '''{{Specs|pseudonym}}''') is a Rank {{Specs|rank}} British self-propelled anti-aircraft vehicle {{Battle-rating|1}}. It was introduced in [[Update 1.79 "Project X"]]. | ||
| + | |||
| + | The Marksman looks like Chieftain tank hull with giant boxy turret in middle of it. The turret has a radar on the back of it and clearly visible handles with cannons on its front. The front has distinctive double slope. There is no other such turret in game and so it is very easy to identify. | ||
| + | |||
| + | The Chieftain chassis make this SPAA invulnerable to hull breaks and protects it fairly well against frontal attacks by light vehicles. The turret protection is not great, but it will stop most heavy machine gun fire. It's almost like the FV4005 with slightly more armour on turret. Do not show the lower front plate to the enemy's tanks, as it's considerably weaker. | ||
| + | |||
| + | Despite having better armour for hull, Marksman is extremely slow, so keep the enemy away from this vehicle. | ||
| + | |||
| + | Guns converge at about 1.2 km range without "Adjustments of Fire" modification and about 1.8 km with it. This makes firing at close range enemy vehicles very impractical, due to low ammunition count. However, it's very convenient for firing at moving targets, including light tanks and jets, as if two autocannons increase the probability of a hit. Also the guns can disable both tracks of enemy vehicle at 300 m distance, if facing enemy's front. Since the guns are 35 mm, they also deal more damage, use the explosive ammo to destroy planes in fewer hits, lightly armoured vehicles get destroyed in about 30 shots at worst. | ||
| + | |||
| + | Ammunition belts are split into 2: main one and secondary one. The Marksman can take 460 shells for main belt and 40 for secondary, which is barely enough for 1 engagement. This may be insulting, but it's necessary for survival. Unlike Falcon, when ammo for the main belt runs out, this could be reloaded at capture point while the secondary belt of pure anti-air or anti-armor rounds that could be used as self-defense. Also, there won't be a need to reload a new belt once the ammo restock is complete, so the Marksman is ready to fight quicker. The other thing with ammunition belts is that APDS belt is now purely APDS. This makes decision about secondary belt being fully anti-tank or fully anti-air ever more annoying. | ||
| + | |||
| + | Guns still overheat in 10 seconds and can put the Marksman out of fighting capability for half a minute. Luckily, it's hardly necessary to go trigger happy with marksman's accuracy. | ||
| + | |||
| + | Radar allows to have aiming reticle against closing in planes in RB. Reticle works the same way as in AB, however it doesn't say how far is the plane. | ||
| + | |||
| + | Like Falcon, Marksman's role is hiding around the battlefield, shooting at planes and punishing unsuspecting ground opponents, however it's much slower so it's doing its job from about kilometer away, or further, if possible. | ||
== General info == | == General info == | ||
=== Survivability and armour === | === Survivability and armour === | ||
| − | ''Describe armour protection. Note the most well protected and key weak areas. Appreciate the layout of modules as well as the number and location of crew members. Is the level of armour protection sufficient, is the placement of modules helpfull for survival in combat?'' | + | <!--''Describe armour protection. Note the most well protected and key weak areas. Appreciate the layout of modules as well as the number and location of crew members. Is the level of armour protection sufficient, is the placement of modules helpfull for survival in combat?'' |
| − | ''If necessary use a visual template to indicate the most secure and weak zones of the armour.'' | + | ''If necessary use a visual template to indicate the most secure and weak zones of the armour.''--> |
| + | Aim at bottom-left (their right) of turret to take out the gunner, shooting at the opposite end of this will take out commander, then aim in middle of lower frontal plate to disable the driver, or simply flank the vehicle and do the same. It has an extremely fast turning turret, so the gunner should be taken out as fast as possible. | ||
| + | |||
| + | The play style is much less aggressive than Falcon; however, the APDS belt is no joke, as '''every''' shell in it can penetrate about 100 mm of armour up to 500 meters. As such, weaker side armour on medium tanks could be threatened by the Marksman, and it only brings much more pain to light vehicles from afar. | ||
=== Mobility === | === Mobility === | ||
| Line 15: | Line 38: | ||
== Armaments == | == Armaments == | ||
=== Main armament === | === Main armament === | ||
| − | ''Give the reader information about the characteristics of the main gun. Assess its effectiveness in a battle based on the reloading speed, ballistics and the power of shells. Do not forget about the flexibilty of the fire, that is how quickly the cannon can be aimed at the target, open fire on it and aim at another enemy. Add a link to the main article on the gun: <code><nowiki>{{main|Name of the weapon}}</nowiki></code>. Describe in general terms the ammunition available for the main gun. Give advice on how to use them and how to fill the ammunition storage.'' | + | <!--''Give the reader information about the characteristics of the main gun. Assess its effectiveness in a battle based on the reloading speed, ballistics and the power of shells. Do not forget about the flexibilty of the fire, that is how quickly the cannon can be aimed at the target, open fire on it and aim at another enemy. Add a link to the main article on the gun: <code><nowiki>{{main|Name of the weapon}}</nowiki></code>. Describe in general terms the ammunition available for the main gun. Give advice on how to use them and how to fill the ammunition storage.''--><!--Details on the main armament of the tank, which should default be the one fired with a left click and also that the stat card follows--> |
| + | {{main|Oerlikon KDA (35 mm)}} | ||
| − | === | + | {| class="wikitable" style="text-align:center" |
| − | '' | + | |- |
| + | ! colspan="6" | [[Oerlikon KDA (35 mm)|35 mm Oerlikon KDA]] (x2) | ||
| + | |- | ||
| + | ! colspan="2" rowspan="1" style="width:5em" |Capacity (Belt capacity each) | ||
| + | ! rowspan="1" | Fire rate <br> (shots/minute) | ||
| + | ! rowspan="1" | Vertical <br> guidance | ||
| + | ! rowspan="1" | Horizontal <br> guidance | ||
| + | ! rowspan="1" | Stabilizer | ||
| + | |- | ||
| + | | colspan="2" | 500 (230) || 550 || -10°/+80° || ±180° || Two-plane | ||
| + | |- | ||
| + | ! colspan="6" | Turret rotation speed (°/s) | ||
| + | |- | ||
| + | ! style="width:4em" |Mode | ||
| + | ! style="width:4em" |Stock | ||
| + | ! style="width:4em" |Upgraded | ||
| + | ! style="width:4em" |Prior + Full crew | ||
| + | ! style="width:4em" |Prior + Expert qualif. | ||
| + | ! style="width:4em" |Prior + Ace qualif. | ||
| + | |- | ||
| + | | ''Arcade'' || 79.3 || __.__ || __.__ || __.__ || __.__ | ||
| + | |- | ||
| + | | ''Realistic'' || 53.5 || __.__ || __.__ || __.__ || __.__ | ||
| + | |- | ||
| + | ! colspan="4" | Reloading rate (seconds) | ||
| + | |- | ||
| + | ! colspan="1" style="width:4em" |Stock | ||
| + | ! colspan="1" style="width:4em" |Prior + Full crew | ||
| + | ! colspan="1" style="width:4em" |Prior + Expert qualif. | ||
| + | ! colspan="1" style="width:4em" |Prior + Ace qualif. | ||
| + | |- | ||
| + | | 1.3 || __.__ || __.__ || __.__ | ||
| + | |- | ||
| + | |} | ||
| − | === | + | ===== [[Ammo racks|Ammo racks]] ===== |
| − | '' | + | [[File:Ammoracks_{{PAGENAME}}.png|right|thumbnail|[[Ammo racks|Ammo racks]] of the Chieftain Marksman]] |
| + | {| class="wikitable sortable" style="text-align:center" | ||
| + | |- | ||
| + | ! class="wikitable unsortable" |Full<br /> ammo | ||
| + | ! class="wikitable unsortable" |1st<br /> rack empty | ||
| + | ! class="wikitable unsortable" |2nd<br /> rack empty | ||
| + | ! class="wikitable unsortable" |3rd<br /> rack empty | ||
| + | ! class="wikitable unsortable" |4th<br /> rack empty | ||
| + | ! class="wikitable unsortable" |5th<br /> rack empty | ||
| + | ! class="wikitable unsortable" |6th<br /> rack empty | ||
| + | ! class="wikitable unsortable" |Visual<br /> discrepancy | ||
| + | |- | ||
| + | || '''XX''' || XX ''(X+)'' || ''(+)'' || ''(+)'' || ''(+)'' || ''(+)'' || ''(+)'' || style="text-align:left" | no | ||
| + | |- | ||
| + | |} | ||
== Usage in the battles == | == Usage in the battles == | ||
| − | ''Describe the tactics of playing in the vehicle, the features of using vehicles in the team and advice on tactics. Refrain from creating a "guide" - do not impose a single point of view but give the reader food for thought. Describe the most dangerous enemies and give recommendations on fighting them. If necessary, note the specifics of the game in different modes (AB, RB, SB).'' | + | <!--''Describe the tactics of playing in the vehicle, the features of using vehicles in the team and advice on tactics. Refrain from creating a "guide" - do not impose a single point of view but give the reader food for thought. Describe the most dangerous enemies and give recommendations on fighting them. If necessary, note the specifics of the game in different modes (AB, RB, SB).''--> |
| + | Follow the team's push and take some nice fortified position near to the capture point, destroying any scout vehicle that attempt to get close while looking for planes. Conducting both actions at once is crucial to not only deny the enemy a recon point, but also for self-preservation to keep the Marksman protected. Fighting at a distance will be best to minimize convergence distance to avoid wasting ammunition on the lead. Vertical traverse of cannons is almost instant, so that should not be a concern when shifting from a ground to air target. | ||
| + | |||
| + | As ammo runs out, move closer to capture point for rearm. Only use secondary belt for self defence on capture point, or if it's really necessary for teammate's survival. | ||
| + | |||
| + | Some enemies to be concerned about: | ||
| + | * Soviet tanks: Avoid them as much as possible. With the gun convergence and reduced movement speed, it will not be easy to defeat them in a duel. Detrack them and communicate to the teammates to finish them off. | ||
| + | * Maus: It's invulnerable. Best to not show up in parts of map it controls. | ||
=== Pros and cons === | === Pros and cons === | ||
| − | ''Summarize and briefly evaluate the vehicle in terms of its characteristics and combat effectiveness. Mark its pros and cons in a bulleted list. Do not use more than 6 points for each of the characteristics. Avoid using categorical definitions such as "bad", "good" and the like - they have a substitution in the form of softer "inadequate", "effective".'' | + | <!--''Summarize and briefly evaluate the vehicle in terms of its characteristics and combat effectiveness. Mark its pros and cons in a bulleted list. Do not use more than 6 points for each of the characteristics. Avoid using categorical definitions such as "bad", "good" and the like - they have a substitution in the form of softer "inadequate", "effective".''--> |
| − | |||
'''Pros:''' | '''Pros:''' | ||
| − | * | + | * Guns produce great effect upon shell contact on target, requiring only one or two hits to down a plane |
| − | + | * Can fire effectively at longer ranges than Falcon and has radar guidance (for RB) | |
| + | * Chieftain hull offers good protection | ||
| + | * Secondary belts allow for safer rearms | ||
'''Cons:''' | '''Cons:''' | ||
| − | * | + | * Low mobility |
| + | * APDS ammo is now put into separate belt, which may be inconvenient to use with low ammunition capacity | ||
| + | * Slower rate of fire than other SPAA | ||
| + | * LFP is a weak spot | ||
| + | * Turret is lightly armoured and a big target | ||
| + | * Cannons convergence makes the Marksman weaker in close combat | ||
== History == | == History == | ||
Revision as of 01:06, 4 February 2019
Contents
| This page is about the self-propelled anti-aircraft vehicle Chieftain Marksman. For other uses, see Chieftain (Disambiguation) |
Description

The Marconi Electronic Systems Chieftain Mk.10 Marksman (shortened to Chieftain Marksman) is a Rank VI British self-propelled anti-aircraft vehicle
with a battle rating of 8.3 (AB/RB/SB). It was introduced in Update 1.79 "Project X".
The Marksman looks like Chieftain tank hull with giant boxy turret in middle of it. The turret has a radar on the back of it and clearly visible handles with cannons on its front. The front has distinctive double slope. There is no other such turret in game and so it is very easy to identify.
The Chieftain chassis make this SPAA invulnerable to hull breaks and protects it fairly well against frontal attacks by light vehicles. The turret protection is not great, but it will stop most heavy machine gun fire. It's almost like the FV4005 with slightly more armour on turret. Do not show the lower front plate to the enemy's tanks, as it's considerably weaker.
Despite having better armour for hull, Marksman is extremely slow, so keep the enemy away from this vehicle.
Guns converge at about 1.2 km range without "Adjustments of Fire" modification and about 1.8 km with it. This makes firing at close range enemy vehicles very impractical, due to low ammunition count. However, it's very convenient for firing at moving targets, including light tanks and jets, as if two autocannons increase the probability of a hit. Also the guns can disable both tracks of enemy vehicle at 300 m distance, if facing enemy's front. Since the guns are 35 mm, they also deal more damage, use the explosive ammo to destroy planes in fewer hits, lightly armoured vehicles get destroyed in about 30 shots at worst.
Ammunition belts are split into 2: main one and secondary one. The Marksman can take 460 shells for main belt and 40 for secondary, which is barely enough for 1 engagement. This may be insulting, but it's necessary for survival. Unlike Falcon, when ammo for the main belt runs out, this could be reloaded at capture point while the secondary belt of pure anti-air or anti-armor rounds that could be used as self-defense. Also, there won't be a need to reload a new belt once the ammo restock is complete, so the Marksman is ready to fight quicker. The other thing with ammunition belts is that APDS belt is now purely APDS. This makes decision about secondary belt being fully anti-tank or fully anti-air ever more annoying.
Guns still overheat in 10 seconds and can put the Marksman out of fighting capability for half a minute. Luckily, it's hardly necessary to go trigger happy with marksman's accuracy.
Radar allows to have aiming reticle against closing in planes in RB. Reticle works the same way as in AB, however it doesn't say how far is the plane.
Like Falcon, Marksman's role is hiding around the battlefield, shooting at planes and punishing unsuspecting ground opponents, however it's much slower so it's doing its job from about kilometer away, or further, if possible.
General info
Survivability and armour
Aim at bottom-left (their right) of turret to take out the gunner, shooting at the opposite end of this will take out commander, then aim in middle of lower frontal plate to disable the driver, or simply flank the vehicle and do the same. It has an extremely fast turning turret, so the gunner should be taken out as fast as possible.
The play style is much less aggressive than Falcon; however, the APDS belt is no joke, as every shell in it can penetrate about 100 mm of armour up to 500 meters. As such, weaker side armour on medium tanks could be threatened by the Marksman, and it only brings much more pain to light vehicles from afar.
Mobility
Write about the mobility of the ground vehicle. Estimate the specific power and maneuverability as well as the maximum speed forward and backward.
Armaments
Main armament
| 35 mm Oerlikon KDA (x2) | |||||
|---|---|---|---|---|---|
| Capacity (Belt capacity each) | Fire rate (shots/minute) |
Vertical guidance |
Horizontal guidance |
Stabilizer | |
| 500 (230) | 550 | -10°/+80° | ±180° | Two-plane | |
| Turret rotation speed (°/s) | |||||
| Mode | Stock | Upgraded | Prior + Full crew | Prior + Expert qualif. | Prior + Ace qualif. |
| Arcade | 79.3 | __.__ | __.__ | __.__ | __.__ |
| Realistic | 53.5 | __.__ | __.__ | __.__ | __.__ |
| Reloading rate (seconds) | |||||
| Stock | Prior + Full crew | Prior + Expert qualif. | Prior + Ace qualif. | ||
| 1.3 | __.__ | __.__ | __.__ | ||
Ammo racks

| Full ammo |
1st rack empty |
2nd rack empty |
3rd rack empty |
4th rack empty |
5th rack empty |
6th rack empty |
Visual discrepancy |
|---|---|---|---|---|---|---|---|
| XX | XX (X+) | (+) | (+) | (+) | (+) | (+) | no |
Usage in the battles
Follow the team's push and take some nice fortified position near to the capture point, destroying any scout vehicle that attempt to get close while looking for planes. Conducting both actions at once is crucial to not only deny the enemy a recon point, but also for self-preservation to keep the Marksman protected. Fighting at a distance will be best to minimize convergence distance to avoid wasting ammunition on the lead. Vertical traverse of cannons is almost instant, so that should not be a concern when shifting from a ground to air target.
As ammo runs out, move closer to capture point for rearm. Only use secondary belt for self defence on capture point, or if it's really necessary for teammate's survival.
Some enemies to be concerned about:
- Soviet tanks: Avoid them as much as possible. With the gun convergence and reduced movement speed, it will not be easy to defeat them in a duel. Detrack them and communicate to the teammates to finish them off.
- Maus: It's invulnerable. Best to not show up in parts of map it controls.
Pros and cons
Pros:
- Guns produce great effect upon shell contact on target, requiring only one or two hits to down a plane
- Can fire effectively at longer ranges than Falcon and has radar guidance (for RB)
- Chieftain hull offers good protection
- Secondary belts allow for safer rearms
Cons:
- Low mobility
- APDS ammo is now put into separate belt, which may be inconvenient to use with low ammunition capacity
- Slower rate of fire than other SPAA
- LFP is a weak spot
- Turret is lightly armoured and a big target
- Cannons convergence makes the Marksman weaker in close combat
History
Describe the history of the creation and combat usage of the ground vehicle in more detail than in the introduction. If the historical reference turns out to be too big, take it to a separate article, taking a link to an article about the vehicle and adding a block "/historical reference" (example: https://wiki.warthunder.com/Name-vehicles/historical reference) and add a link to it here using the main template. Be sure to include links to sources at the end of the article.
Media
An excellent addition to the article will be video guides, as well as screenshots from the game and photos.
Read also
Links to the articles on the War Thunder Wiki that you think will be useful for the reader, for example,
- reference to the series of the vehicles;
- links to approximate analogues of other nations and research trees.
ETC.
Sources
Paste links to sources and external resources, such as:
- topic on the official game forum;
- other literature.
